
Lumen
®
Hosted VoIP End User Portal Guide
February 28, 2022

page 2 of 66
Services not available everywhere. Business customers only. Lumen may change, cancel or substitute products and services,
or vary them by service area at its sole discretion without notice. ©2022 Lumen Technologies. All Rights Reserved.
Table of Contents
Portal navigation and tips .................................................................................................................................................. 5
Home page ........................................................................................................................................................................ 5
Call logs ............................................................................................................................................................................. 6
View and sort call logs ................................................................................................................................................... 6
Initiate a call from call logs ............................................................................................................................................ 6
Add a contact a call from call logs ................................................................................................................................. 7
Exporting call logs ......................................................................................................................................................... 7
Call features....................................................................................................................................................................... 8
Call recording................................................................................................................................................................. 8
Call settings ................................................................................................................................................................. 10
Call waiting .............................................................................................................................................................. 10
Auto callback ........................................................................................................................................................... 11
Push to talk .............................................................................................................................................................. 11
Automatic hold/retrieve ............................................................................................................................................ 12
Barge-in exempt ...................................................................................................................................................... 12
Directed call pickup with barge-in ............................................................................................................................ 12
Music on hold ........................................................................................................................................................... 12
Contact center standard .......................................................................................................................................... 12
Call treatment schedules ............................................................................................................................................. 13
Find me ........................................................................................................................................................................ 18
Send all calls to voicemail ....................................................................................................................................... 19
Send busy calls to voicemail ................................................................................................................................... 19
Send unanswered calls to voicemail ....................................................................................................................... 19
Call forwarding not reachable .................................................................................................................................. 19
Call forwarding always ............................................................................................................................................. 19
Call forwarding busy ................................................................................................................................................ 19
Call forwarding no answer ....................................................................................................................................... 19
Call forwarding selective .......................................................................................................................................... 19
Call notify ................................................................................................................................................................. 21
Do not disturb .......................................................................................................................................................... 22
Simultaneous ring .................................................................................................................................................... 22
Sequential ring ......................................................................................................................................................... 24
Hoteling ........................................................................................................................................................................ 27
Managing PC receptionist users.................................................................................................................................. 28

page 3 of 66
Services not available everywhere. Business customers only. Lumen may change, cancel or substitute products and services,
or vary them by service area at its sole discretion without notice. ©2022 Lumen Technologies. All Rights Reserved.
Privacy ......................................................................................................................................................................... 29
Anonymous call rejection ......................................................................................................................................... 30
Selective call rejection ............................................................................................................................................. 30
Selective call acceptance ........................................................................................................................................ 31
Calling line ID blocking ............................................................................................................................................ 33
Virtual desk ...................................................................................................................................................................... 33
Anywhere ..................................................................................................................................................................... 33
Adding selective criteria ........................................................................................................................................... 35
Locate your Anywhere pilot number ........................................................................................................................ 37
Move an active call from your IP handset to your Anywhere device ....................................................................... 37
Make a call from your Anywhere device .................................................................................................................. 37
Move an active call from your Anywhere device to your IP handset ....................................................................... 38
Custom ringback .......................................................................................................................................................... 38
Distinctive ring ............................................................................................................................................................. 40
Line status ................................................................................................................................................................... 41
Busy lamp field ........................................................................................................................................................ 42
Shared call appearances ......................................................................................................................................... 42
Shared call appearance configuration ..................................................................................................................... 42
Multiple call arrangement configuration ....................................................................................................................... 42
Mobility (Webex) .......................................................................................................................................................... 43
Remote office............................................................................................................................................................... 44
Voice mail ........................................................................................................................................................................ 45
Inbox ............................................................................................................................................................................ 45
Settings ........................................................................................................................................................................ 47
Names and greetings .................................................................................................................................................. 48
Notifications ................................................................................................................................................................. 49
Message waiting indication ...................................................................................................................................... 49
Outcall notification ................................................................................................................................................... 50
Text (email) notification ........................................................................................................................................... 51
Work schedule ............................................................................................................................................................. 52
Contacts ........................................................................................................................................................................... 53
Contacts – create and manage ................................................................................................................................... 53
Add one contact ....................................................................................................................................................... 53
Add multiple contacts .............................................................................................................................................. 53
Managing your personal contacts list ...................................................................................................................... 54
Speed dial 8 ................................................................................................................................................................. 55
Speed dial 100 ............................................................................................................................................................. 56

page 4 of 66
Services not available everywhere. Business customers only. Lumen may change, cancel or substitute products and services,
or vary them by service area at its sole discretion without notice. ©2022 Lumen Technologies. All Rights Reserved.
Managing your speed dial 100 list ........................................................................................................................... 57
Call recordings ................................................................................................................................................................. 57
Profile & settings .............................................................................................................................................................. 58
Profile ........................................................................................................................................................................... 58
Settings ........................................................................................................................................................................ 59
911 location ................................................................................................................................................................. 59
Add a new 911 location ........................................................................................................................................... 60
Change your current 911 location ........................................................................................................................... 62
Scheduling a 911 location change........................................................................................................................... 63
Help ................................................................................................................................................................................. 66

page 5 of 66
Services not available everywhere. Business customers only. Lumen may change, cancel or substitute products and services,
or vary them by service area at its sole discretion without notice. ©2022 Lumen Technologies. All Rights Reserved.
Portal navigation and tips
The Lumen Hosted VoIP end user portal follows a standard layout throughout. Regardless of where you navigate within
this portal, the main menu will always be available to you. When you hover your cursor over an option in the main
menu, you with see a dropdown box where you can select a sub menu option.
Throughout the portal, you will see a question mark icon (“?”) next to features. Hover your mouse over the question
mark and you will see a quick tip describing that feature’s functionality.
Home page
From the home page, you have access to a missed call log, shortcuts widget and emergency location information.
1. The last 10 missed calls field dynamically changes as calls are received and unanswered.
• Click on a phone number in this list to initiate a click-to-dial session.
• Click on the name to add to your contact list.
• You can see more missed calls in the call logs menu.
2. The shortcuts widget allows you to type or copy/paste a 10-digit number into the call this number field to use
click-to-dial functionality. You can also quickly enable or disable do not disturb, call forwarding and remote
office features.
3. The emergency location information identifies your base location address and your current location
address. Your current location is the address where emergency services will be dispatched if you call 911.

page 6 of 66
Services not available everywhere. Business customers only. Lumen may change, cancel or substitute products and services,
or vary them by service area at its sole discretion without notice. ©2022 Lumen Technologies. All Rights Reserved.
Call logs
Historical call logs are available in the portal for up to 60 days. Basic call logs are enabled by default. Your administrator
has the option to enable enhanced call logs.
Basic call logs let you can access the last 20 each of missed, incoming and outgoing calls. From your call logs, you
will be able to:
• View the date/time of the call, name and phone number.
• Sort by date/time of the call, name or phone number.
• Initiate a call by clicking on the phone number.
• Add a caller to your contact list by clicking on the name.
• Export call logs into Excel.
If your administrator has enabled enhanced calls logs, you will have visibility to the last 100 each of missed, incoming
and outgoing calls for up to 60 days. Call duration will also show in call logs.
View and sort call logs
1. Hover your cursor over call logs in the main menu.
2. From the dropdown menu, click on the call log you wish to view – missed, incoming or outgoing.
3. All call logs display column headers for date/time, name and phone number.
4. Incoming and outgoing call logs will also display a column header for call duration.
Note: Call duration will only be populated if your administrator enabled enhanced call logs.
5. Records can be sorted by clicking on any column header.
6. To update data in your call logs while you’re in the portal, click the refresh button.
Initiate a call from call logs
1. From any call log type (missed, incoming, outgoing) click on the phone number.

page 7 of 66
Services not available everywhere. Business customers only. Lumen may change, cancel or substitute products and services,
or vary them by service area at its sole discretion without notice. ©2022 Lumen Technologies. All Rights Reserved.
2. Click call in the action box to place a call.
3. Depending on your phone settings, your phone either goes off-hook immediately and begins dialing the number,
or your phone rings and you’ll have to answer it prior for the outbound call to be sent.
Add a contact a call from call logs
1. From any call log type (missed, incoming, outgoing) click on the name.
2. In the add contact box, you can edit the name/number.
3. Click the favorite box to add this contact to your list of favorites.
4. Click save to add to your contacts.
Exporting call logs
In addition to having the ability to view call log detail, you can export call logs to retain records for future reference.
1. Click on call logs from the main menu and select missed, incoming or outgoing from the sub menu.
2. Click the export call logs button.

page 8 of 66
Services not available everywhere. Business customers only. Lumen may change, cancel or substitute products and services,
or vary them by service area at its sole discretion without notice. ©2022 Lumen Technologies. All Rights Reserved.
3. In the export call logs window, choose which report(s) you wish to export.
4. Click the export button.
5. Records will be exported to an Excel spreadsheet.
6. Records can then be saved and manipulated using all standard Excel features/functions and formatting options.
Call features
The call features menu allows you to manage several features including:
Call recording Find me/follow me
Call settings Hoteling
Call treatment schedule Privacy
Some call features described below may not be available to you depending on your seat type and the features
granted to you by your company administrator.
Call recording
If you were assigned a call recording license, you can manage various call recording settings here. As each State
has legal requirements with regards to informing callers they’re being recorded, be sure you understand your State's
requirements before proceeding.
1. Hover your cursor over call features in the main menu.
2. Click on call recording from the dropdown menu.

page 9 of 66
Services not available everywhere. Business customers only. Lumen may change, cancel or substitute products and services,
or vary them by service area at its sole discretion without notice. ©2022 Lumen Technologies. All Rights Reserved.
3. In the record call section, click the appropriate radio button to set the frequency you would like to record calls.
• Always – automatically records all calls in their entirety. Recording cannot be paused or stopped.
• Always with pause/resume – recording automatically starts when the call connects, displaying a pause
soft key; when pause is pressed/tapped, a resume soft key displays; call recording stops when the call
ends, storing the recorded portion of the call in the call recording dashboard
• On demand – recording mode starts when the call connects but the recorded file is not saved until you tap
record>start; when start is pressed/tapped, the recording is saved; recording stops when the call ends
• On demand with user initiated start – call recording does not begin until a record soft key displays; to
start recording press/tap record>start; press/tap pause, resume, stop as necessary
• Never – turns off call recording; recording does not initiate and the phone never displays call recording soft
keys
4. By default the play call recording start/stop announcement is enabled. Uncheck the box to disable.
5. Select from three pause/resume notification settings by clicking the appropriate radio button:
• None – does not provide notification
• Beep – notifies call participants with a beep when call recording is paused and resumed
• Play announcement – notifies call particpants with an announcement when call recording is paused and
resumed
6. To periodically remind callers they are being recorded throughout the call, click the repeat record call waiting
tone and enter how often to play the reminder in seconds, which can range from 10 to 1800 seconds.
7. Click the save button.

page 10 of 66
Services not available everywhere. Business customers only. Lumen may change, cancel or substitute products and services,
or vary them by service area at its sole discretion without notice. ©2022 Lumen Technologies. All Rights Reserved.
Call settings
Call settings gives you quick access to call control features including:
Call waiting Barge-in exempt
Auto callback Directed call pickup with barge-in
Push to talk Music on hold
Automatic hold/retrieve Call center standard service
To access your call settings:
1. Hover your cursor over call features in the main menu.
2. Click on call settings from the dropdown menu.
3. To change a setting, click the appropriate radio dial or edit buttons.
4. For features that requires you to change settings or edit fields, complete the required fields as necessary.
5. Click the save button.
Call settings are described below.
Remember: While in the portal, you can hover your mouse over the question mark icon (“?”) to see a
description of that feature’s functionality.
Call waiting
Call waiting allows you to receive another call while you’re on the phone. You can turn it on or off for all calls and then
selectively turn it back on or off using the feature access codes.

page 11 of 66
Services not available everywhere. Business customers only. Lumen may change, cancel or substitute products and services,
or vary them by service area at its sole discretion without notice. ©2022 Lumen Technologies. All Rights Reserved.
Auto callback
Auto callback allows you to request notification when a busy line within your office becomes available. A distinctive ring
is used to notify you when the user is available.
Push to talk
Push to talk is like an intercom feature. Control users allowed to call you in this manner.
Once push to talk is on, press the edit button to configure the settings.
1. When auto answer is on, your phone automatically answers incoming push to talk calls.
2. Outgoing connection type allows two options:
• Select one-way voice to establish a one-way path. If this option is selected, then the originator of the call
can talk to the party receiving the call, but the party receiving the call cannot talk to the originator of the call.
• Select two-way voice to establish a two-way path. If this option is selected, then both the originator of the
call, and the party receiving the call can talk to each other.
3. Access list options include the following:
• Check allow calls only from the users selected below to accept push to talk calls only from users
displayed in the list.
• Check allow calls from everyone except the users selected below to accept push to Talk calls from
everyone except users displayed in the list.
4. Available users/selected users:
• Available users are individuals within your group.
• Search for users by last name or first name or use the scroll bar to scroll through the list.
• Drag and drop users from the available users list to the selected users list.
• Click the save button.

page 12 of 66
Services not available everywhere. Business customers only. Lumen may change, cancel or substitute products and services,
or vary them by service area at its sole discretion without notice. ©2022 Lumen Technologies. All Rights Reserved.
Automatic hold/retrieve
Automatic hold and retrieve provides an alternate method to hold and retrieve calls. Incoming calls are automatically
held and retrieved without having to press any keys.
Barge-in exempt
With barge-in exempt enabled, you’re blocking barge-in attempts from other users with directed call pickup with
barge-in; this means they cannot barge into your call. If this feature is disabled, users can join your active calls with or
without a barge-in tone.
Directed call pickup with barge-in
Directed call pickup with barge-in allows you to dial a feature access code followed by an extension to pick up or
barge-in on an active call for a user in your office. If the call has not been answered, then it is picked up. If the call has
been answered, the barge-in occurs. A barge-in results in a three-way call being created between you, the user in your
office being barged-in on, and the other party the user is connected to. You can turn on and off the warning tone for
when you use this feature.
Note: Your administrator controls which users you can use call pickup with
Music on hold
The music on hold setting allows individual users to enable or disable music on hold. To change the setting, click the
appropriate radio button and click the save button.
Note: If your administrator has chosen to not enable the music on hold feature for your group, you won’t be
able to turn it on. This feature can only be enabled/disabled if they’ve allowed you to have music on hold.
Contact center standard
If you’re a member of a contact center, also known as a call center, ACD or call queue, and have a contact center
supervisor or contact center standard seat, you’ll have the ability to sign-in/sign-out, and change agent status within
your portal. You can also perform these functions with soft key integration or via the supervisor or agent clients. This
option is visible in your portal if you have a contact center standard or supervisor seat.
1. Click the edit button to the right of contact center standard.
2. The names of the contact centers you’re a member of are indicated in the call center ID column.
3. Check and uncheck the join call center boxes to join and unjoin the corresponding contact center:
• Checkmark - indicates you’re joined into that contact center
• Unchecked – you’re not joined into that contact center
4. Click the save button.
Note: If you’re unable to uncheck a box by a contact center, this indicates that your company administrator has
not enabled this feature and you’re a permanent member of that contact center.

page 13 of 66
Services not available everywhere. Business customers only. Lumen may change, cancel or substitute products and services,
or vary them by service area at its sole discretion without notice. ©2022 Lumen Technologies. All Rights Reserved.
5. Change your agent status by selecting options from the ACD state dropdown box:
• Sign-In - signs you into any contact center you’re a member of and joined
• Sign-Out - signs you out of any contact center you’re a member of and joined
• Available - makes you ready to receive calls from any contact center you’re a member of and joined
• Unavailable - prevents you from receiving calls from any contact center you’re a member of and joined
• Wrap-Up - allows you to complete post call duties, and changes your status to available automatically once
the timer expires, the timer length is based on a setting made by your company administrator
6. Click the save button.
Call treatment schedules
Call treatment schedules are used to configure services such as call notify, selective call acceptance, selective
call rejection, selective call forwarding, simultaneous ring and sequential ring. Once you set up a schedule and
assign it to various services, you’ll only have to change that schedule once and it impacts all services it’s assigned to.
In this example, we’re going to set up an after hours time schedule, based on the following working hours:
Mon to Thurs 8 a.m. to 5 p.m.
Fri 8 a.m. to noon
Sat and Sun Closed
1. Hover your cursor over call features in the main menu.
2. Click on call treatment schedules from the dropdown menu.
3. Click the add schedule button.
4. Enter a description for your schedule in the schedule name field.
5. Select the appropriate radio button for a holiday or time schedule.
6. Click the save button.

page 14 of 66
Services not available everywhere. Business customers only. Lumen may change, cancel or substitute products and services,
or vary them by service area at its sole discretion without notice. ©2022 Lumen Technologies. All Rights Reserved.
7. After receiving the action completed successfully notice, click the add event button.
8. Enter a name for your event in the event name field; you can have multiple events within one schedule.
9. The start date and end date are selected by clicking on the calendar icons. Start and end dates are based on
whether your event is within the same 24-hour period or crosses to the next.
In this example, the start and end date need to be different 24-hour periods.
10. Select your start and end times by clicking the dropdown boxes for start time and end time.
11. If this schedule will be an all-day event, check the all day event box.
12. Select how often this event will occur from the recurs dropdown box options:
Never Weekly Yearly
Daily Monthly
If never is selected, skip to step 16 and click save.

page 15 of 66
Services not available everywhere. Business customers only. Lumen may change, cancel or substitute products and services,
or vary them by service area at its sole discretion without notice. ©2022 Lumen Technologies. All Rights Reserved.
If an option other than never is selected, additional options will be provided; continue to step 13 for instructions.
In this example, weekly is selected.
13. Enter the recurrence frequency in the every field. If this event will occur every week, enter a “1”.
In this example, 1 is entered since this will occur every week.
14. Select the days of the week for your event.
In this example, the event is for Mon to Thurs, so those days are selected.
15. Choose the end date for your event. Select never if this event should continue indefinitely.
16. Click the save button.
17. You now have an after hours schedule with one event for Mon-Thurs after hours.
18. To add another event to that same schedule, click the add event button.
19. Add the event name.
20. The start date and end date are selected by clicking on the calendar icons. Start and end dates are based on
whether your event is within the same 24-hour period or crosses to the next.
In this example, the event occurs is the same 24-hour period. We will use the same date for start/end.
21. Select your start and end times by clicking the dropdown boxes for start time and end time.
In this example, the event will begin at the close of business on Friday and last until the end of the day Friday.
Or, start at 12 p.m. and end at 11:59 a.m.
22. If this schedule will be an all-day event, check the all day event box.
23. Select how often this event will occur from the recurs dropdown box options.

page 16 of 66
Services not available everywhere. Business customers only. Lumen may change, cancel or substitute products and services,
or vary them by service area at its sole discretion without notice. ©2022 Lumen Technologies. All Rights Reserved.
In this example, the event occurs weekly.
24. Enter the recurrence frequency in the every field. If this event will occur every week, enter a “1”.
In this example, 1 is entered since this will occur every week.
25. Select the days of the week for your event.
In this example, the event is for Friday, so that day is selected.
26. Choose the end date for your event. Select never if this event should continue indefinitely.
27. Click the save button.
28. Your after hours schedule now has an event for Mon -Thurs and Fri.
29. To add your weekend event to that same schedule, click the add event button.

page 17 of 66
Services not available everywhere. Business customers only. Lumen may change, cancel or substitute products and services,
or vary them by service area at its sole discretion without notice. ©2022 Lumen Technologies. All Rights Reserved.
30. Add the event name.
31. Select the start and end date. For this example, it can be the same date.
32. Check the all day event box since this is an all-day event. The start/end time functionality become disabled.
33. Select your recurrence.
34. Enter 1 for every week recurrence, and check Sunday and Saturday.
35. Click the save button.
36. You have now successfully created and saved three events within one schedule.
The after hours schedule can now be used in features such as call forward selective, simultaneous ring and
sequential ring.
37. Click the trash can icon to delete an event at any time.
38. Click the pencil icon to modify or edit an existing event.
page 18 of 66
Services not available everywhere. Business customers only. Lumen may change, cancel or substitute products and services,
or vary them by service area at its sole discretion without notice. ©2022 Lumen Technologies. All Rights Reserved.
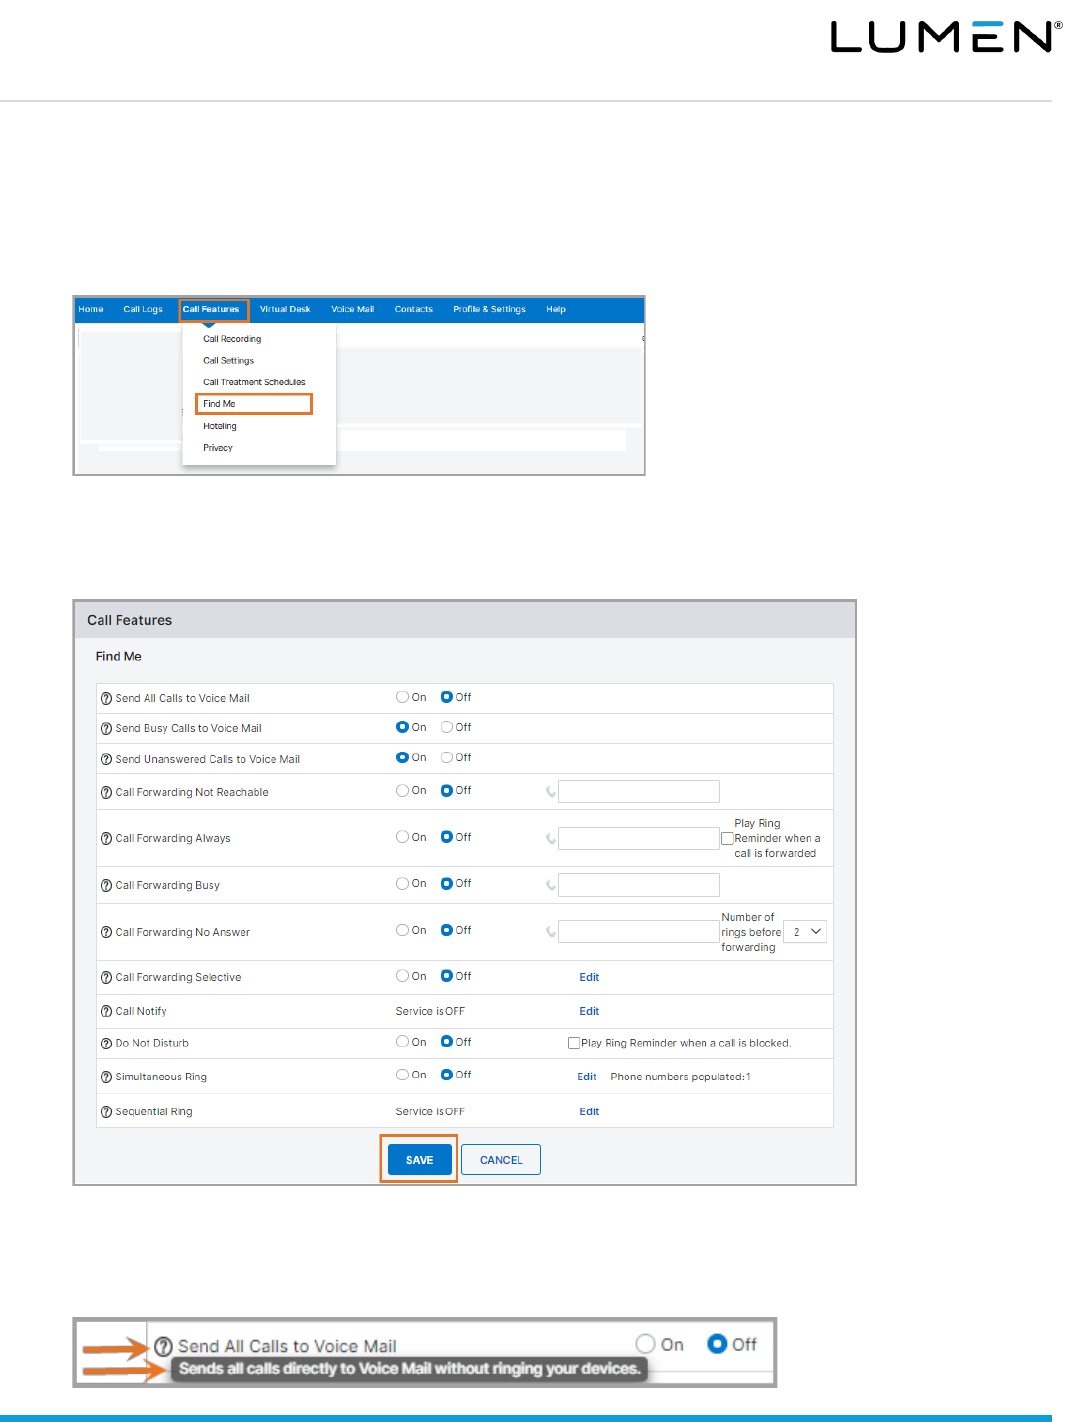
Find me
The find me section of the portal offers quick access to call routing features, including simultaneous ring and
sequential ring.
1. Hover your cursor over call features in the main menu.
2. Click on find me from the dropdown menu.
3. Review the find me features and activate those features you wish to utilize.
Note: Not all features need to be activated or used. It is recommended that you don’t enable multiple features
at the same time. Enable features you will not use can cause unnecessary issues by defining too many rules.
4. After all setting changes have been made, click the save button.
Call settings are described below.
Remember: While in the portal, you can hover your mouse over the question mark icon (“?”) to see a
description of that feature’s functionality.

page 19 of 66
Services not available everywhere. Business customers only. Lumen may change, cancel or substitute products and services,
or vary them by service area at its sole discretion without notice. ©2022 Lumen Technologies. All Rights Reserved.
Send all calls to voicemail
Sends all calls directly to voicemail without ringing your phone.
Send busy calls to voicemail
Sends all calls directly to voicemail if your line is busy; this should be enabled by default.
Send unanswered calls to voicemail
Send unanswered calls to voicemail after ringing at your device; this should be enabled by default.
Call forwarding not reachable
Automatically forwards your calls to another phone number if your device is not reachable, such as a disaster, power
outage, etc.; this should be set up so if an event occurs, your calls ring to the defined numbers.
Call forwarding always
Automatically forwards all your calls to another phone number.
Call forwarding busy
Automatically forwards your calls to another phone number if your line is busy; by default calls roll to voicemail, which is
typically the standard setting for this option.
Call forwarding no answer
Automatically forwards your calls to another phone number if you don’t answer your phone after a determined number
of rings. By default calls roll to voicemail, which is typically the standard setting for this option.
Call forwarding selective
Automatically forward incoming calls to a different phone number when pre-defined criteria, such as a phone number,
time of day or day of week, are met.
1. Click the edit button.
2. Enter the default call forward to phone number/SIP-URL in the field if you want all calls to be forwarded.
Different numbers can be added when you define particular rules.
3. Make sure is active is checked.
4. Checking the play ring reminder when a call is forwarded causes your phone play a short audible ring when
receiving a call; it’s intended as a reminder that your phone is forwarded.
5. Click add rule to display the rule menu.

page 20 of 66
Services not available everywhere. Business customers only. Lumen may change, cancel or substitute products and services,
or vary them by service area at its sole discretion without notice. ©2022 Lumen Technologies. All Rights Reserved.
6. Enter a description for the rule you’re creating.
7. In the forward to section, specify the forwarding number you want to use for this entry. Select from:
• Use default forward phone number/SIP-URI to use the number configured on the previous page.
• Forward to another phone number/SIP-URI to identify a specific number for a specific rule. If you select
this option. you’ll need to enter the phone number in the field provided.
• Do not forward to deliver inbound calls directly to your voicemail.
8. Select a schedule.
• The default time schedule is every day all day.
• The default holiday schedule is none.
• You can add custom time schedules and holiday schedules via the call treatment schedule sub menu.
• You can only select one custom schedule (time or holiday) for each rule.
9. Select which calls you’d like to forward:
• Any phone number will forward all calls.
• Following phone numbers will forward only selected phone numbers.
• Check the any private number box to have all calls from private numbers forwarded.
• Check the any unavailable number box to have all calls from unavailable numbers forwarded.
10. If you chose to following phone numbers, enter those numbers in the text boxes under specific phone
numbers.
• Enter the 10-digit number without spaces or characters.
• You can use a question mark and an asterisk as wild cards.
? Is a wild card that can replace a single digit anywhere in a digit string.
* Represents a digit string and can appear only at the end of a group of digits and "?" wild cards.
• To add more than 12 numbers, you’ll need to add another rule. Modify the description slightly but otherwise
set it up the same way as the current rule.
11. Click the done with add rule button.

page 21 of 66
Services not available everywhere. Business customers only. Lumen may change, cancel or substitute products and services,
or vary them by service area at its sole discretion without notice. ©2022 Lumen Technologies. All Rights Reserved.
Call notify
Send an email with the caller's name and number to a specified email address when pre-defined criteria, such as phone
number, time of day or day of week, are met.
1. Click the edit button next to call notify in the find me menu.
2. Enter the email address where you’d like the call notification sent.
3. Click add rule to display the rule menu.
4. Enter a description for the rule you’re creating.
5. Select a schedule.
• The default time schedule is every day all day.
• The default holiday schedule is none.
• You can add custom time schedules and holiday schedules via the call treatment schedule sub menu.
• You can only select one custom schedule (time or holiday) for each rule.
6. Select which calls you’d like to forward:
• Any phone number will notify you of all calls.
• Following phone numbers will notify you when selected phone numbers calls.
• Check the any private number box to be notified of calls from private numbers.
• Check the any unavailable number box to be notified of calls from unavailable numbers forwarded.
7. If you chose following phone numbers, enter those numbers in the text boxes under specific phone numbers.
• Enter the 10-digit number without spaces or characters.
• You can use a question mark and an asterisk as wild cards.
? Is a wild card that can replace a single digit anywhere in a digit string.
* Represents a digit string and can appear only at the end of a group of digits and "?" wild cards.
• To add more than 12 numbers, you’ll need to add another rule. Modify the description slightly but otherwise
set it up the same way as the current rule.
8. Click the done with add rule button.

page 22 of 66
Services not available everywhere. Business customers only. Lumen may change, cancel or substitute products and services,
or vary them by service area at its sole discretion without notice. ©2022 Lumen Technologies. All Rights Reserved.
Do not disturb
Turning do not disturb to on will forward calls to your voice mail. If voice mail is not configured, caller hears a busy tone.
To receive an audible reminder when do not disturb is on, click the check box next to play ring reminder when a call
is blocked. When do not disturb is activated, the icon next to your extension appears with an “X”, which is a visual that
your phone is in do not disturb mode. When do not disturb is deactivated, the “X” is replaced with a phone icon.
Simultaneous ring
Simultaneous ring allows you to list up to 10 phone numbers or SIP-URI addresses you’d like to ring, in addition to
your primary phone when receiving incoming calls. This feature is helpful when you’re not at your phone and would like
your cell phone to ring for incoming calls. You can turn off simultaneous ring when you’re at your desk.
The criteria for each simultaneous ring entry can be a list of up to 12 phone numbers or digit patterns, a specified time
schedule, and a specified holiday schedule. All criteria for an entry must be satisfied for the call to enter simultaneous
ring (phone number and day of week and time of day).
If the criteria do not match, the call continues as if this service was not turned on.
1. Click the edit button next to simultaneous ring in the find me menu.
2. Select if simultaneous ring should occur for all inbound calls or only when you are not on an active call.
3. Click the add number button to add phone numbers you’d like to ring for incoming calls.

page 23 of 66
Services not available everywhere. Business customers only. Lumen may change, cancel or substitute products and services,
or vary them by service area at its sole discretion without notice. ©2022 Lumen Technologies. All Rights Reserved.
4. Enter the phone number/SIP-URI that you’d like to ring.
5. If preferred, click the answer confirmation required check box.
If checked: The system will require you to press a key on your phone set up with simultaneous ring before
it will pass the call to you. This will prevent a call from going into any voicemail you may have
on your simultaneous ring phones.
If unchecked: If a call is unanswered, there is a chance the caller will go into the voicemail for one of the
phones set up with simultaneous ring instead of your office voicemail.
6. Click the save button. Repeat steps 3–5 until you’ve added all numbers you’d like to ring for incoming calls.
7. If you would like to add additional rules for when simultaneous ringing occurs, click the add rule button.
8. Enter a description for the rule you’re creating.
9. Select a schedule.
• The default time schedule is every day all day.
• The default holiday schedule is none.
• You can add custom time schedules and holiday schedules via the call treatment schedule sub menu.
• You can only select one custom schedule (time or holiday) for each rule.
10. Select which calls you’d like simultaneous ring to be active for:
• Any phone number will simultaneous ring all calls.
• Following phone numbers will simultaneously ring only selected phone numbers.
• Check the any private number box to simultaneous ring all calls from private numbers.

page 24 of 66
Services not available everywhere. Business customers only. Lumen may change, cancel or substitute products and services,
or vary them by service area at its sole discretion without notice. ©2022 Lumen Technologies. All Rights Reserved.
• Check the any unavailable number box to simultaneous ring all calls from unavailable numbers.
11. If you chose following phone numbers, enter those numbers in the text boxes under specific phone numbers.
• Enter the 10-digit number without spaces or characters.
• You can use a question mark and an asterisk as wild cards.
? Is a wild card that can replace a single digit anywhere in a digit string.
* Represents a digit string and can appear only at the end of a group of digits and "?" wild cards.
• To add more than 12 numbers, you’ll need to add another rule. Modify the description slightly but otherwise
set it up the same way as the current rule.
12. Click the done with add rule button.
Sequential ring
Sequential ring allows you to sequentially ring up to 5 devices in addition to your primary device, for a specified number
of rings when calls match your pre-defined criteria. The 5 locations can be either a phone number or a SIP-URI. Use this
service to ring calls from your manager, a family member, or an important customer on your cell phone, alternate
business phone, or home phone.
The criteria for each sequential ring entry can be a list of up to 12 phone numbers or digit patterns, a specified time
schedule, and a specified holiday schedule. All criteria for an entry must be satisfied for the call to trigger sequential
ring (phone number and day of week and time of day). If the criteria do not match, the call continues as if this service
was not turned on.
Several services take precedence over the sequential ring service. Some of these services are:
• Call forwarding always
• Call forwarding selective
• Selective acceptance
• Selective rejection
If you’ve activated any of the above services, the call continues as if the sequential ring service was not turned on.
Conversely, the sequential ring service takes precedence over the following services, among others:
• Call forwarding busy
• Call forwarding no answer
• Voice messaging

page 25 of 66
Services not available everywhere. Business customers only. Lumen may change, cancel or substitute products and services,
or vary them by service area at its sole discretion without notice. ©2022 Lumen Technologies. All Rights Reserved.
To set up sequential ring:
1. Click the edit button next to sequential ring in the find me menu.
2. Enter the phone numbers in the order you would like them to ring from first to last.
3. Check the answer confirmation required check box next to each number if you’d like the system to require
you to press a button on your phone before passing the call to you.
4. Select the number of rings you’d like each location to ring before moving to the next number on the list. Keep
in mind that the more rings you have for each location, the better chance the calling party will disconnect before
cycling through all your numbers.
5. Check the box enable base location first if you want your office phone to ring before the other numbers on the
list.
6. Select the number of rings for your office phone (base location).
7. Check the box continue the search process if base location is busy if you want the system to continue calling
your other numbers when all your office lines are in use.
8. Check the box enable caller to skip searching process if you’d like incoming callers to have the option to go
straight to your voice mail.
9. If you’d like to add a rule for when sequential ring activates, click the add rule button.
10. Enter a description for the rule you’re creating.
11. Select a schedule.
• The default time schedule is every day all day.
• The default holiday schedule is none.
• You can add custom time schedules and holiday schedules via the call treatment schedule sub menu.
• You can only select one custom schedule (time or holiday) for each rule.

page 26 of 66
Services not available everywhere. Business customers only. Lumen may change, cancel or substitute products and services,
or vary them by service area at its sole discretion without notice. ©2022 Lumen Technologies. All Rights Reserved.
13. Select which calls you’d like sequential ring to be active for:
• Any phone number will activate sequential ring for all calls.
• Following phone numbers will activate sequential ring for only selected phone numbers.
• Check the any private number box to activate sequential ring for all calls from private numbers.
• Check the any unavailable number box to activate sequential ring for all calls from unavailable numbers.
14. If you chose following phone numbers, enter those numbers in the text boxes under specific phone numbers.
• Enter the 10-digit number without spaces or characters.
• You can use a question mark and an asterisk as wild cards.
? Is a wild card that can replace a single digit anywhere in a digit string.
* Represents a digit string and can appear only at the end of a group of digits and "?" wild cards.
• To add more than 12 numbers, you’ll need to add another rule. Modify the description slightly but otherwise
set it up the same way as the current rule.
15. Click the done with add rule button.
16. Click the save button to save your settings.

page 27 of 66
Services not available everywhere. Business customers only. Lumen may change, cancel or substitute products and services,
or vary them by service area at its sole discretion without notice. ©2022 Lumen Technologies. All Rights Reserved.
Hoteling
Hoteling host allows users to associate their seat profile to your handset device. Hoteling guest allows you to associate
your profile to a handset device that is defined as a Hoteling Host. To locate hoteling options:
1. Hover your cursor over call features in the main menu.
2. Click on find me from the dropdown menu.
To turn on hoteling host:
1. Click the on radio button next to hoteling host to make your device a hotel host. With hoteling host enabled:
• A GuestIn softkey displays on your phone for guests to login.
• A GuestOut softkey displays for guests to logoff.
Note: These softkeys only display if softkey integration is enabled by your company administrator.
2. Enforce time limit gives you the option to limit how long a guest can associate to your seat. Click the on radio
button and enter a quantity in the hours field. Guests will be forced off your device when reaching that time limit.
3. Permission level allows you to let anyone from within your organization associate to your phone by selecting
tenant, or limit access to only individuals at your location by selecting group.
4. If a guest associates their profile to your handset device, the associated guest field will show their last name,
first name, phone number, extension, location dialing code and association date.
To turn on hoteling guest:
1. Click the on radio button next to hoteling guest to associate your profile with a hotel host device.
2. Enforce time limit gives you the option to limit how long you will be associated to the hotel host. Click the on
radio button and enter a quantity in the hours field. Once that time limit is met, your profile drops from the hotel
host it was associated to.
3. The guest pin allows you to log into a host device. The numeric PIN must be between 6-8 charters in length.
4. To log into a host device, click the GuestIn softkey, enter your 10-digit phone number and the PIN.
5. To log into a host device from the portal, find available hosts and drag/drop them to the associated host field.

page 28 of 66
Services not available everywhere. Business customers only. Lumen may change, cancel or substitute products and services,
or vary them by service area at its sole discretion without notice. ©2022 Lumen Technologies. All Rights Reserved.
6. Click the save button.
Managing PC receptionist users
If you have been assigned a receptionist soft console, you will see manage PC receptionist users in the sub menu.
This feature allows you to add users within the receptionist PC console you wish to monitor. Those users are listed
under favorites within the receptionist PC console and can be easily used to process calls and monitor status of those
individuals.
1. Hover your cursor over call features in the main menu.
2. Click on find me from the dropdown menu.
3. Select a group from the select a group dropdown box to search for users by group, or select search all –
across enterprise to display all users within your company.
4. Find is optional and allows you to refine your search further by selecting from criteria in the dropdown list.
• In the find dropdown list, select from first name, last name or phone.
• Enter the appropriate search criteria in the that includes field. (Partial search is supported.)
5. Click on the search button.
6. Select the users you wish to monitor in the search results field (you can monitor up to a maximum of 200 users
across your enterprise).
7. Drag and drop or use the arrows to move those users to the monitored users field.
8. Once all users are moved to the monitored users field, click the save button.

page 29 of 66
Services not available everywhere. Business customers only. Lumen may change, cancel or substitute products and services,
or vary them by service area at its sole discretion without notice. ©2022 Lumen Technologies. All Rights Reserved.
To sign into the receptionist PC console:
1. Click on the receptionist PC console sign on link in the upper right-hand corner of your portal.
2. When you’ve logged into the receptionist PC console, expand the favorites directory under contacts.
3. The users selected to monitor are displayed.
4. Their phone status indicates whether they’re available, on a call, forwarded or in do not disturb mode.
Privacy
Privacy lets you define call rejection and call blocking settings.
1. Hover your cursor over call features in the main menu.
2. Click on privacy from the dropdown menu.
3. Select your preferred settings. (Settings are described below.)
4. Click the save button.

page 30 of 66
Services not available everywhere. Business customers only. Lumen may change, cancel or substitute products and services,
or vary them by service area at its sole discretion without notice. ©2022 Lumen Technologies. All Rights Reserved.
Anonymous call rejection
Anonymous call rejection allows you to reject calls from callers who have blocked the display of their number. Only
deliberate anonymous numbers are rejected. Callers whose numbers are unavailable, are not rejected.
Callers that are rejected are informed that you’re not accepting calls from unidentified callers. Your phone does not ring
and you don’t receive any indication they called. However, this does not apply to calls within your company. Before
enabling, consider if this will prevent customers from reaching you.
Selective call rejection
Reject calls when pre-defined criteria, such as phone number, time of day or day of week, are met.
1. Click the edit button next to selective call rejection under the privacy menu.
2. Click the add rule button.
3. Enter a description for the rule you’re creating.
4. Select a schedule.
• The default time schedule is every day all day.
• The default holiday schedule is none.
• You can add custom time schedules and holiday schedules via the call treatment schedule sub menu.
• You can only select one custom schedule (time or holiday) for each rule.
5. Select which calls you’d like selective call rejection to be active for:
• Any phone number will reject all calls.
• Following phone numbers will reject only selected phone numbers.
• Check the any private number box to reject all calls from private numbers.
• Check the any unavailable number box to reject all calls from unavailable numbers.

page 31 of 66
Services not available everywhere. Business customers only. Lumen may change, cancel or substitute products and services,
or vary them by service area at its sole discretion without notice. ©2022 Lumen Technologies. All Rights Reserved.
6. If you chose following phone numbers, enter those numbers in the text boxes under specific phone numbers.
• Enter the 10-digit number without spaces or characters.
• You can use a question mark and an asterisk as wild cards.
? Is a wild card that can replace a single digit anywhere in a digit string.
* Represents a digit string and can appear only at the end of a group of digits and "?" wild cards.
• To add more than 12 numbers, you’ll need to add another rule. Modify the description slightly but otherwise
set it up the same way as the current rule.
7. Click the done with add rule button.
8. Click the Save button to save your rule settings.
Selective call acceptance
Accept calls when pre-defined criteria, such as phone number, time of day or day of week, are met.
1. Click the edit button next to selective call acceptance under the privacy menu.
2. Click the add rule button.

page 32 of 66
Services not available everywhere. Business customers only. Lumen may change, cancel or substitute products and services,
or vary them by service area at its sole discretion without notice. ©2022 Lumen Technologies. All Rights Reserved.
3. Enter a description for the rule you’re creating.
4. Select a schedule.
• The default time schedule is every day all day.
• The default holiday schedule is none.
• You can add custom time schedules and holiday schedules via the call treatment schedule sub menu.
• You can only select one custom schedule (time or holiday) for each rule.
5. Select which calls you’d like selective call acceptance to be active for:
• Any phone number will accept all calls.
• Following phone numbers will be accepted only selected phone numbers.
• Check the any private number box to accept all calls from private numbers.
• Check the any unavailable number box to accept all calls from unavailable numbers.
6. If you chose following phone numbers, enter those numbers in the text boxes under specific phone numbers.
• Enter the 10-digit number without spaces or characters.
• You can use a question mark and an asterisk as wild cards.
? Is a wild card that can replace a single digit anywhere in a digit string.
* Represents a digit string and can appear only at the end of a group of digits and "?" wild cards.
• To add more than 12 numbers, you’ll need to add another rule. Modify the description slightly but otherwise
set it up the same way as the current rule.
7. Click the done with add rule button.

page 33 of 66
Services not available everywhere. Business customers only. Lumen may change, cancel or substitute products and services,
or vary them by service area at its sole discretion without notice. ©2022 Lumen Technologies. All Rights Reserved.
8. Click the save button to save your rule settings.
Calling line ID blocking
When the on radio button is selected, caller ID for all outbound calls will be blocked. If you keep this setting to off, you
can selectively block caller ID by pressing *67 on your keypad before dialing the 10-digit phone number.
Virtual desk
The virtual desk menu allows you to manage features that give you access to your calls when you’re not at your desk.
Anywhere
The Anywhere feature allows you to move active calls seamlessly from your IP handset to a defined Anywhere device,
such as a mobile phone. Conversely, you can moves from your assigned Anywhere device to your IP handset.
This feature is only available if you have a premium seat type. If you do not see Anywhere as an option, you do not
have a premium seat type.
1. Hover your cursor over virtual desk in the main menu.
2. Click on Anywhere from the dropdown menu.
3. Available Anywhere numbers are the numbers you can dial to use the Anywhere feature.
4. Alert all locations for click-to-dial calls defaults to off. When turned on, all your devices (primary phone,
shared call appearances, softphones, etc.) will ring when using click-to-dial. Once you answer any of your

page 34 of 66
Services not available everywhere. Business customers only. Lumen may change, cancel or substitute products and services,
or vary them by service area at its sole discretion without notice. ©2022 Lumen Technologies. All Rights Reserved.
devices, a call to the recipient is then dialed. If you don’t answer one of your devices, the call will not be sent.
5. Click the add phone number button to associate a number, e.g., your mobile phone, to an Anywhere number.
6. Enter the 10-digit phone number of the device you wish to use to receive calls away from your office.
7. Enter a description of that device.
8. Select whether you want to enable this location.
If yes Calls to your desktop handset ring your desktop phone and your enabled Anywhere device.
If no Calls to your desktop handset will ring only your desktop phone. You can still move calls between your
desktop handset and Anywhere device.
Note: This feature should be turned to no if you download the Webex application to your smart device.
9. Prevent redirection to voice mail will prevent calls from being redirected to voice mail when yes is selected.
10. Require answer confirmation defaults to no. If you change it to yes, the system will require you to press a key
on your mobile phone before passing the call to you. It is suggested that you keep this feature set to no makes
it easier to answer your call.
11. Enable mobility applications determines whether call control is to be performed by the application server.
12. If you do not want to add selective criteria, click the save button. If you wish to add selective criteria, proceed
to the next section for instructions.

page 35 of 66
Services not available everywhere. Business customers only. Lumen may change, cancel or substitute products and services,
or vary them by service area at its sole discretion without notice. ©2022 Lumen Technologies. All Rights Reserved.
Adding selective criteria
Selective criteria allows you to determine which calls ring to your Anywhere device when pre-defined criteria, such as
phone number, time of day or day of week, are met.
1. After information on the phone number tab is completed, click the selective criteria tab.
2. Click the add button.
3. Enter a description for the rule you’re creating.
4. Click the use anywhere radio button to activate this feature.
5. Select a schedule.
• The default time schedule is every day all day.
• The default holiday schedule is none.
• You can add custom time schedules and holiday schedules via the call treatment schedule sub menu.
• You can only select one custom schedule (time or holiday) for each rule.
6. Select which calls you’d like selective criteria to be active for:
• Any phone number will activate selective criteria for all calls.
• Following phone numbers will activate selective criteria for only selected phone numbers.
• Check the any private number box to activate selective criteria for all calls from private numbers.
• Check the any unavailable number box to activate selective criteria for all calls from unavailable numbers.

page 36 of 66
Services not available everywhere. Business customers only. Lumen may change, cancel or substitute products and services,
or vary them by service area at its sole discretion without notice. ©2022 Lumen Technologies. All Rights Reserved.
7. If you chose following phone numbers, enter those numbers in the text boxes under specific phone numbers.
• Enter the 10-digit number without spaces or characters.
• You can use a question mark and an asterisk as wild cards.
? Is a wild card that can replace a single digit anywhere in a digit string.
* Represents a digit string and can appear only at the end of a group of digits and "?" wild cards.
• To add more than 12 numbers, you’ll need to add another rule. Modify the description slightly but otherwise
set it up the same way as the current rule.
8. Click the save button.
9. You will see your criteria is successfully saved. If you would like to add more criteria, click the add button and
follow steps 3-8. When you have completed adding criteria, click the save button.

page 37 of 66
Services not available everywhere. Business customers only. Lumen may change, cancel or substitute products and services,
or vary them by service area at its sole discretion without notice. ©2022 Lumen Technologies. All Rights Reserved.
Locate your Anywhere pilot number
The Anywhere pilot number is the number you will use to make a call from your Anywhere mobile device and to
seamlessly move calls between your IP handset and your Anywhere mobile device.
1. Hover your cursor over virtual desk in the main menu.
2. Click on Anywhere from the dropdown menu.
3. The Anywhere pilot number you’ll use is listed under the available Anywhere numbers section. It is
recommended that you save this number to your contact list for your anywhere mobile device for easy access.
Move an active call from your IP handset to your Anywhere device
After your Anywhere device is defined, move calls seamless between your IP handset and your Anywhere mobile
device.
1. With an active call on your IP handset, dial your Anywhere pilot number from your Anywhere mobile device.
2. When you hear “destination digits,” enter *11# on your mobile device.
3. The caller moves seamlessly from your IP handset to your Anywhere mobile device.
Make a call from your Anywhere device
Making a call from your Anywhere device sends the caller ID of your IP handset, not the caller ID of your mobile device.

page 38 of 66
Services not available everywhere. Business customers only. Lumen may change, cancel or substitute products and services,
or vary them by service area at its sole discretion without notice. ©2022 Lumen Technologies. All Rights Reserved.
1. Dial the Anywhere pilot number.
2. When asked to enter destination digits, enter the number you wish to dial.
3. The call is sent, and the party you’re calling sees the caller ID of your IP handset.
Move an active call from your Anywhere device to your IP handset
If you placed a call using Anywhere from your mobile device and return to the office, you can seamlessly move that call
to your IP handset.
1. From your IP handset, press the pull softkey
2. This seamlessly moves the call from your Anywhere device to your IP handset.
3. If you don’t have a pull softkey, establish dial tone and dial *11 on your keypad.
Custom ringback
Custom ringback allows you to provide a custom ring tone or recording heard by callers when your line is ringing. This
can be enabled for all calls, or for specific calls matching your pre-defined criteria. Use this service to play a different
ring back to your manager, a family member, or a customer.
The criteria for each custom ringback selective entry can include a list of up to 12 phone numbers or digit patterns, a
specified time schedule, or a specified holiday schedule. All criteria for an entry must be satisfied for the ring back to be
played (phone number and day of week and time of day). Otherwise, regular ring back is played to the caller, as if this
service was not used.
1. Hover your cursor over virtual desk in the main menu.
2. Click on custom ringback from the dropdown menu.
3. Click the create custom ringback button.
4. On the general settings tab, enter a description for your customer ringback setting.
5. Next to active, click the yes radio button to activate this feature, click no at any time to deactivate it.
6. Select a schedule.
• The default time schedule is every day all day.
• The default holiday schedule is none.
• You can add custom time schedules and holiday schedules via the call treatment schedule sub menu.

page 39 of 66
Services not available everywhere. Business customers only. Lumen may change, cancel or substitute products and services,
or vary them by service area at its sole discretion without notice. ©2022 Lumen Technologies. All Rights Reserved.
• You can only select one custom schedule (time or holiday) for each rule.
7. Select which calls you’d like custom ringback to be active for:
• Any phone number will use this rule for all incoming calls.
• Following phone numbers will activate customer ringback for only selected phone numbers.
• Check the any private number box to activate customer ringback for private numbers.
• Check the any unavailable number box to activate customer ringback for unavailable numbers.
8. If you chose following phone numbers, enter those numbers in the text boxes under specific phone numbers.
• Enter the 10-digit number without spaces or characters.
• You can use a question mark and an asterisk as wild cards.
? Is a wild card that can replace a single digit anywhere in a digit string.
* Represents a digit string and can appear only at the end of a group of digits and "?" wild cards.
• To add more than 12 numbers, you’ll need to add another rule. Modify the description slightly but otherwise
set it up the same way as the current rule.
9. Click the save button to save your settings.
10. Click the initial ringback tab to upload your custom ringback file.
11. The ringback file will not play if the radio button for no personal ringback is selected.
12. Click the URL radio button and enter the URL if the the ringback file you want to play is on a network.
13. Click the personal ringback file radio button if you want to upload an audio ringback file from your computer.

page 40 of 66
Services not available everywhere. Business customers only. Lumen may change, cancel or substitute products and services,
or vary them by service area at its sole discretion without notice. ©2022 Lumen Technologies. All Rights Reserved.
14. Click the browse button to locate your audio file based on your operating system.
15. Click the save button to save your settings.
Distinctive ring
Distinctive ring allows you to make your phone ring with different rings based on pre-defined criteria. Use this service
if you want to know when a specific person calls such as your manager or spouse, or when you would like to easily tell
when a call is from inside or outside your group.
The criteria for each distinctive ring entry can be a list of up to 12 phone numbers or digit patterns, a specified time
schedule, and a specified holiday schedule. All criteria for an entry must be met for the phone to ring with a different tone
(phone number and day of week and time of day).
1. Hover your cursor over virtual desk in the main menu.
2. Click on distinctive ring from the dropdown menu.
3. Click the create new distinctive ring button.
4. Enter a description for the rule you’re creating.
5. Click the active radio button to activate this feature..
6. Select a schedule.
• The default time schedule is every day all day.
• The default holiday schedule is none.
• You can add custom time schedules and holiday schedules via the call treatment schedule sub menu.
• You can only select one custom schedule (time or holiday) for each rule.

page 41 of 66
Services not available everywhere. Business customers only. Lumen may change, cancel or substitute products and services,
or vary them by service area at its sole discretion without notice. ©2022 Lumen Technologies. All Rights Reserved.
7. Select which calls you’d like distinctive ring to be active for:
• Any phone number will activate distinctive ring for all calls.
• Following phone numbers will activate distinctive ring for only selected phone numbers.
• Check the any private number box to activate distinctive ring for all calls from private numbers.
• Check the any unavailable number box to activate selective criteria for all calls from unavailable numbers.
8. If you chose following phone numbers, enter those numbers in the text boxes under specific phone numbers.
• Enter the 10-digit number without spaces or characters.
• You can use a question mark and an asterisk as wild cards.
? Is a wild card that can replace a single digit anywhere in a digit string.
* Represents a digit string and can appear only at the end of a group of digits and "?" wild cards.
• To add more than 12 numbers, you’ll need to add another rule. Modify the description slightly but otherwise
set it up the same way as the current rule.
9. Click the save button.
Line status
Line status is an information only screen. It provides information about your phone such as whose line may appear on
your phone as either a BLF or shared call appearance, phones you may appear on, the configuration of those lines, etc.
If changes are needed, contact your company administrator.
1. Hover your cursor over virtual desk in the main menu.
2. Click on line status from the dropdown menu.
3. Hover over the “?” for a description of each feature.

page 42 of 66
Services not available everywhere. Business customers only. Lumen may change, cancel or substitute products and services,
or vary them by service area at its sole discretion without notice. ©2022 Lumen Technologies. All Rights Reserved.
Busy lamp field
• Indicates if your line appears on another user’s phone
• Lists lines appearing on your phone
• Indicates ring type for those users – ring or silent
• Default line key action – normal or automata
• Call appearance status – enabled or disabled
• Remote caller ID – enabled or disabled
Shared call appearances
Lists information about any users you monitor:
• Device name
• MAC address of their device
• User it belongs to
• Action
Shared call appearance configuration
• Status of alerting all appearances when you click-to-dial – yes or no
• Status of your ability to retrieve calls from another location – yes or no
Multiple call arrangement configuration
• Status of bridging between locations – yes or no
• Status of multiple call arrangement – yes or no
• Status of bridging warning tone – yes or no

page 43 of 66
Services not available everywhere. Business customers only. Lumen may change, cancel or substitute products and services,
or vary them by service area at its sole discretion without notice. ©2022 Lumen Technologies. All Rights Reserved.
Mobility (Webex)
Webex is the softphone offered to Hosted VoIP customers. One license allows you to download and use the application
on multiple devices. If you are assigned a Webex, you will receive a welcome email from your administrator.
You can download the Webex desktop/ mobile applications at this link: Cisco Webex | Download.
• The link to download the app will also be included in your welcome email.
• The link to download the app is also in the downloads section under the help menu in the end user portal.
Tip: When downloading the Webex app, click the learn more link to identify which version you should download
Caution: Do not try to sign into the desktop/mobile app until you receive your welcome email confirming you have a
Webex feature assigned to you. Doing so may result in creating a free Webex account which will prevent you from using
your Hosted VoIP Webex account.
To activate mobility between your IP phone, softphone and other devices:
1. Hover your cursor over virtual desk in the main menu.
2. Click on mobility from the dropdown menu.
3. To activate mobility between your IP handset, softphone and another device, click the on radio button.
4. From the phone to ring dropdown box, you can choose your preferred option:
• Both – rings your IP handset, mobile app and your mobile device dialer
• Fixed – rings your IP handset and mobile app (suggested setting)
• Mobile – rings your mobile device dialer only
5. In the mobile number field, enter the mobile number you wish to assign.
6. Toggle the yes or no radio buttons for the remaining features to enable or disable them according to your
preference.
• Alert for click-to-dial – rings the user’s mobile phone when the user makes a click-to-dial call
• Enable division inhibitor – prevents redirection of unanswered incoming calls
• Requires answer confirmation – prompts the user to enter a confirmation digit before completing the
mobile call leg answered by the user
• Use Lumen-based call control services – specifies that call control is to be performed by Lumen and not
by the mobile device
7. Click the save button.

page 44 of 66
Services not available everywhere. Business customers only. Lumen may change, cancel or substitute products and services,
or vary them by service area at its sole discretion without notice. ©2022 Lumen Technologies. All Rights Reserved.
Remote office
Remote office allows you to use your home phone, a mobile phone or a hotel phone as your business phone. When
remote office is enabled (on), calls to your desktop handset only ring to your remote office device, the call will not be
presented to your desk phone.
1. Hover your cursor over virtual desk in the main menu.
2. Click on remote office from the dropdown menu.
3. Enter the 10-digit phone number you want to designate as your remote office location.
4. Next to remote office, click the on radio button to activate this feature; click the off radio button when you do
not wish to utilize this feature.
5. Click the save button.

page 45 of 66
Services not available everywhere. Business customers only. Lumen may change, cancel or substitute products and services,
or vary them by service area at its sole discretion without notice. ©2022 Lumen Technologies. All Rights Reserved.
Voice mail
The voice mail section of the portal allows for quick and easy access to your voice mail messages and mailbox settings.
First, voice mail must be setup through the phone by pressing the messages key or by calling the voice mail retrieval
number found when hovering your cursor over the help menu in the portal.
• Maximum greeting length is 3 minutes open and closed.
• Maximum message length 3 minutes each (50,000 KB)
• Maximum mailbox capacity is 150,000 KB (50 messages).
Click here to access the voice mail quick reference guide.
Inbox
The inbox allows you to view, play and delete your voice mail messages. For each message, you can see the name of
the caller, phone number and time/date stamp for the message.
1. Hover your cursor over voice mail in the main menu.
2. Click on inbox from the dropdown menu.
3. All messages (new and saved) are listed in your inbox.
• New messages will be in bold text with a green dot icon next to them.
• The name, number, received date and length of message is provided for each message.
• Messages can be sorted by clicking on a column header.
4. To play a message, click on either the received date or length for that message. and click the play icon.
5. Click the play icon.
Note: Playing a message in your portal turns off your message waiting light on your phone; it will not mark the
message as played in your phone voicemail box.
6. To download a message, click the download voicemail icon after selecting a message.
Note: You also have the option to delete this message or mark as heard.

page 46 of 66
Services not available everywhere. Business customers only. Lumen may change, cancel or substitute products and services,
or vary them by service area at its sole discretion without notice. ©2022 Lumen Technologies. All Rights Reserved.
7. Follow the steps based on the browser type you are using to complete or retrieve the download.
8. To delete, mark as heard or mark as unheard, check the check box next to the appropriate message(s).
9. Select the appropriate icon to complete the action (delete, mark as unheard, mark as unheard).
Note: Deleting a message from your portal inbox also deletes it from your phone voicemail box.
10. The escape to operator group you’re assigned to is indicated in the upper righthand corner of the inbox window.
• Your escape to operator group is where callers route to if they press “0” while listening to your greeting;
none indicates you’ve not been assigned to an escape to operator group.
11. Callers can choose to flag messages as private, urgent or both.
• A red exclamation point icon indicates the message was flagged as urgent.
• A yellow lock icon indicates the message was flagged as private.

page 47 of 66
Services not available everywhere. Business customers only. Lumen may change, cancel or substitute products and services,
or vary them by service area at its sole discretion without notice. ©2022 Lumen Technologies. All Rights Reserved.
Settings
The settings screen allows you to configure specific mailbox settings, reset your password and enable voicemail
forwarding to email.
1. Hover your cursor over voice mail in the main menu.
2. Click on settings from the dropdown menu.
3. If you click the enable radio button for announcement only mailbox, callers will not be allowed to leave a
message; they’re dropped after your greeting is played.
4. To change the PIN for your telephone voicemail box, enter the new PIN in the mailbox PIN field.
PIN requirements:
• PINs are required.
• PINs must be 6-15 numeric digits in length.
• The PIN cannot solely consist of your VoIP telephone number or any part of your telephone number.
• The same digit cannot be repeated more than twice.
Allowed examples: 11xxxx, xxx88xxx, xxxxxx99
Not allowed examples: 222xxx, xxx444xx, 777777
• The entire PIN value cannot be sequential; or ascending or descending.
Allowed examples: 012347, 98761, 01234560
Not allowed examples: 123456, 0123456789, 765432, 9876543210
5. Confirm the PIN by entering it in the verify mailbox PIN field.
6. From the prompt speed dropdown list, select standard or rapid to control the speed of the telephone user
interface (TUI) when you dial into our voicemail box.
7. Click the enable or disable radio buttons to manage the following features:
• Automatically play envelope information – audibly provides date/time and length of voicemail message
• Play additional ring before greeting – prevents the beginning of your greeting from being cut off
• Auto play -- automatically plays messages when you log into your mailbox

page 48 of 66
Services not available everywhere. Business customers only. Lumen may change, cancel or substitute products and services,
or vary them by service area at its sole discretion without notice. ©2022 Lumen Technologies. All Rights Reserved.
8. Voice mail forwarding allows you to send copies of voicemails to your email inbox. By default, this setting is
disabled. To enable, select an option from the dropdown list:
• Forward & delete – forwards a copy to your email inbox, but doesn’t retain a copy in your phone voicemail
box (the only copy of your message will be in email)
• Forward & save – forwards a copy to your email inbox and retains a copy in your phone voicemail box
9. If enabling this feature, enter an email address(es) in the forward to email address field.
Note: Multiple email addresses and distribution lists can be entered in the forward to email addresses field,
using comma separation.
10. Click the save button.
Names and greetings
From names and greetings, you can record or upload a recording of your name and greetings. You can also select
your open hours greeting type.
To manage recordings from this portal, you’ll first need to set up your voicemail box from your phone by pressing the
messages key or by calling the voice mail retrieval number found when hovering your cursor over the help menu in
the portal. Follow the prompts to record your name, greeting and define your open and closed schedules.
1. Hover your cursor over voice mail in the main menu.
2. Click on name and greetings from the dropdown menu.
3. Click the greeting type you want to manage from the open hours external greeting type dropdown box and
select from the following options:
• Standard greeting with number – caller is greeted with a standard greeting including your number
• Standard greeting with name – caller is greeted with a standard greeting including your recorded name
• External personal greeting – caller is greeted with your recorded external greeting
4. Click the save button.

page 49 of 66
Services not available everywhere. Business customers only. Lumen may change, cancel or substitute products and services,
or vary them by service area at its sole discretion without notice. ©2022 Lumen Technologies. All Rights Reserved.
5. You have the option to manage your recorded name and greetings by recording or uploading a recording.
• Click the appropriate record button to record a greeting or rerecord your name through your computer.
• Click the appropriate upload button to upload a pre-recorded greeting. (G.711 uLAW.wav audio format.)
Notifications
The notifications option allows you to manage the message waiting indicator on your handset, set up outcall
notification to another phone, and set up text notification to receive a notification by email.
1. Hover your cursor over voice mail in the main menu.
2. Click on notifications from the dropdown menu.
Message waiting indication
The message waiting indication tab allows you to enable or disable a light on your desktop phone when you receive
new voice mail messages.

page 50 of 66
Services not available everywhere. Business customers only. Lumen may change, cancel or substitute products and services,
or vary them by service area at its sole discretion without notice. ©2022 Lumen Technologies. All Rights Reserved.
1. The default setting is enabled which turns on a light on your desktop phone when you have new messages.
2. Click the disable radio button to prevent the light from turning on.
3. If you make a change to this setting, click the save button.
Outcall notification
The outcall notification tab allows you to receive a notification by phone at a specified number when you have a new
voice mail message. You will be required to enter your PIN to play the message. You can set up notifications by message
type and based on a schedule you create.
1. Click the outcall notification tab.
2. Click the active schedule dropdown box and choose an option from the list.
3. From the message type notification dropdown box, choose from all messages or urgent.
4. In the out call number field, enter the 10-digit number (no space or special characters) where you would like to
receive the call notification.
5. Delay interval lets you determine how quickly you receive a call notification once a new message is received.
• Delay interval is selected for by message type (urgent/normal). It can be the same or different.
• Interval options are immediate, 1 hour, 2 hours, 4 hours, 1 day or never.
6. Number of times to retry lets you determine the quantity of times you will receive a call notification.

page 51 of 66
Services not available everywhere. Business customers only. Lumen may change, cancel or substitute products and services,
or vary them by service area at its sole discretion without notice. ©2022 Lumen Technologies. All Rights Reserved.
• The number of times to retry is selected by message type (urgent/normal). It can be the same or different.
• The quantity of retry attempts can be from 0 to 10.
• A retry will only occur if you are unable to acknowledge receiving the initial call notification and the number
of times to retry is 1 or greater.
• Retry attempts will cease after you acknowledge receiving the call notification or when the quantity of retry
attempts is reached.
7. Retry interval lets you determine the frequency a retry attempt is made.
• The retry interval is selected by message type (urgent/normal). It can be the same or different.
• The retry interval can be from 0 to 15 minutes.
8. You can schedule when you receive call notifications in blocks of time defined as Monday – Friday and
Saturday – Sunday.
• To receive no notifications, select notifications off, 24 hours a day from the dropdown box.
• To receive notifications 24 hours a day, select notifications on, 24 hours a day from the dropdown box.
• To receive notifications during specific times, select notifications on, during these times**. For this choice,
you will also select the start and end time.
9. Click the save button.
Text (email) notification
The text notification tab allows you to receive a notification by email when a new voice mail message is left.
1. Click the outcall notification tab.
2. In the notification enabled for dropdown box, select from none, all messages or urgent messages.
3. In the email(s) field, enter the email address(es) or distribution lists you would like to receive an email

page 52 of 66
Services not available everywhere. Business customers only. Lumen may change, cancel or substitute products and services,
or vary them by service area at its sole discretion without notice. ©2022 Lumen Technologies. All Rights Reserved.
notification when a message is left.
4. Click the save button.
Work schedule
The work schedule allows you to change the days and time your open and closed greetings play for your callers.
1. Hover your cursor over voice mail in the main menu.
2. Click on work schedule from the dropdown menu.
3. Select the days of the week you want your schedule to take effect by check or unchecking the check boxes.
4. Once your days are select, choose the weekday or weekend schedule based on the days selected.
5. From the weekdays or weekend dropdown box, choose your option from the following:
• Play open/personal greeting 24 hours a day
• Play closed/after hours greeting 24 hours a day
• Play open/personal greeting during these times
Note: Hours outside play open/personal greeting schedule will be designated closed/after hours time.
During those hours, the closed/after hour greeting will play.
6. Click the save button.

page 53 of 66
Services not available everywhere. Business customers only. Lumen may change, cancel or substitute products and services,
or vary them by service area at its sole discretion without notice. ©2022 Lumen Technologies. All Rights Reserved.
Contacts
Contacts allows you to save frequently used contacts in your portal for quick access. Contacts can be added one at a
time or multiple can be added at one time via bulk upload.
Once saved, you can use the click-to-dial feature directly from your contacts list. You can also add/modify your speed
dial 8 and speed dial 100 lists to easily dial from your handset using a 1- or 2-digit code.
Contacts – create and manage
1. Hover your cursor over contacts in the main menu.
2. Click on contacts from the dropdown menu.
Add one contact
1. Click the new contact button.
2. Enter the name of the new contact.
3. Enter 10-digit phone number for the new contact. Do not include spaces or symbols.
4. If you’d like the contact to be a favorite on your handset, click the favorite check box.
5. Click the save button.
6. You contact will now be available in your personal contacts list.
Add multiple contacts
Multiple entries can be added to contacts by uploading a .csv file.
1. Hover your cursor over the “?” next to select a file to upload to view file format requirements.
2. Create and save your file adhering to these requirements.

page 54 of 66
Services not available everywhere. Business customers only. Lumen may change, cancel or substitute products and services,
or vary them by service area at its sole discretion without notice. ©2022 Lumen Technologies. All Rights Reserved.
3. Click the choose file button and select the file you created.
4. You will see the selected file listed next to the choose file button.
5. Click the validate and process button to upload your contacts.
6. All contacts contained in your file will now be available in your personal contacts list.
Managing your personal contacts list
1. Click on column headers name or phone number to sort columns in ascending or descending order.
1. Click directly on the contacts name to edit the contact information.
2. Click directly on the phone number to dial that contact.
3. Click the delete button to delete that contact.
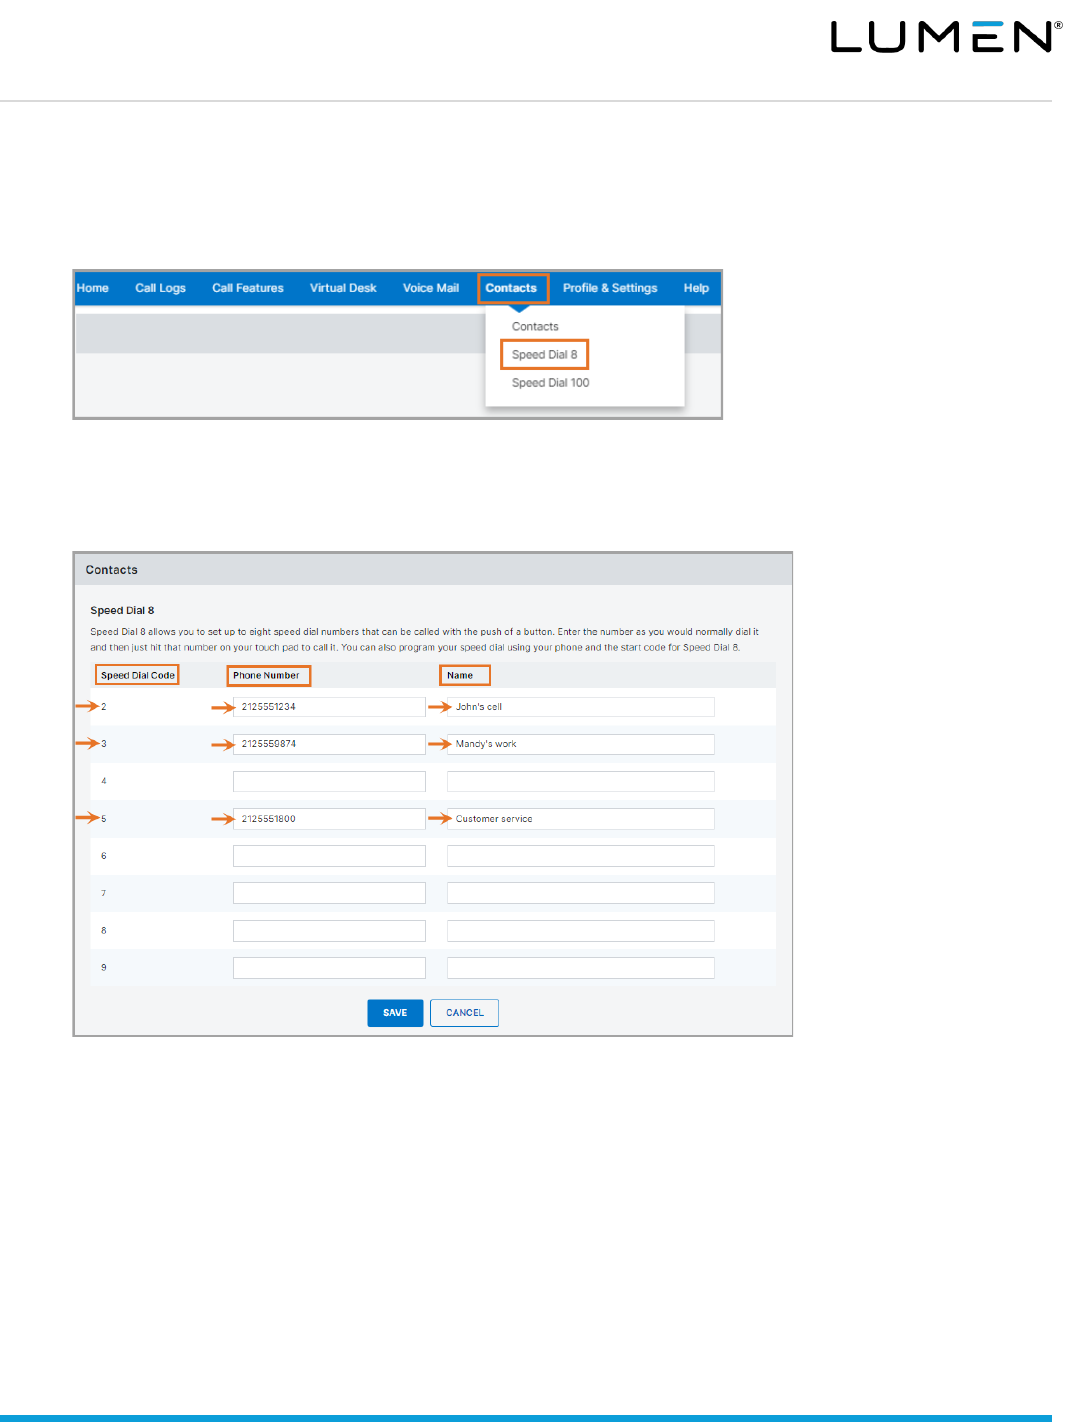
page 55 of 66
Services not available everywhere. Business customers only. Lumen may change, cancel or substitute products and services,
or vary them by service area at its sole discretion without notice. ©2022 Lumen Technologies. All Rights Reserved.
Speed dial 8
Speed dial 8 allows you to program up to eight numbers that can be dialed by entering a 1-digit code.
1. Hover your cursor over contacts in the main menu.
2. Click on speed dial 8 from the dropdown menu.
3. Note the speed dial codes are 2 to 9.
4. Enter the phone number as you would dial it next to the preferred code.
5. Enter a name for each phone number.
6. Click the save button.
7. To call a speed dial 8 number from your handset, without dial tone, enter the 1-digit code on your keypad.
8. Establish a dial tone to make the call. (Depending on your phone, you may tap the dial soft key, lift the handset,
press the speaker phone button or activate your headset.)

page 56 of 66
Services not available everywhere. Business customers only. Lumen may change, cancel or substitute products and services,
or vary them by service area at its sole discretion without notice. ©2022 Lumen Technologies. All Rights Reserved.
Speed dial 100
Speed dial 100 allows you to program up to 100 numbers that can be dialed by entering # plus a 2-digit code.
1. Hover your cursor over contacts in the main menu.
2. Click on speed dial 8 from the dropdown menu.
3. Click the add button.
4. From the speed dial code 100 dropdown box, select the 2-digit code you wish to dial, such as 00.
5. Enter the contact’s name in the name field.
6. Enter the contact’s number, as you would dial it, in the phone number field.
7. Click the save button.
8. To call a speed dial 100 number from your handset, without dial tone, enter # followed by the 2-digit code on
the keypad.
9. Establish a dial tone to make the call. (Depending on your phone, you may tap the dial soft key, lift the handset,
press speaker phone button or activate your headset.)

page 57 of 66
Services not available everywhere. Business customers only. Lumen may change, cancel or substitute products and services,
or vary them by service area at its sole discretion without notice. ©2022 Lumen Technologies. All Rights Reserved.
Managing your speed dial 100 list
1. To remove a contact, check the box next to the appropriate entry in the delete column.
2. Click the delete button.
3. Click the edit button to update the contacts name and/or number.
4. Click the save button.
Call recordings
If you’re defined as a call recording administrator, access recordings for users assigned to you.
1. Click call recordings from the main menu.
2. Refer to the Call Recording User manual, for details on reviewing and managing recorded calls.

page 58 of 66
Services not available everywhere. Business customers only. Lumen may change, cancel or substitute products and services,
or vary them by service area at its sole discretion without notice. ©2022 Lumen Technologies. All Rights Reserved.
Profile & settings
Profile and settings allow you to update overall settings in the portal such as your contact information, password, and
your 911 Location.
Profile
The profile menu allows you to update your contact email address and add additional contact numbers.
1. Hover your cursor over profile & settings in the main menu.
2. Click on profile from the dropdown menu.
3. Update information as needed.
• Notification e-mail address – this is where notifications are sent for password resets, etc.
• You have the option to add a work address, up to two mobile numbers, a pager, home number and up to
two other numbers.
4. If you make any changes, click the save button.

page 59 of 66
Services not available everywhere. Business customers only. Lumen may change, cancel or substitute products and services,
or vary them by service area at its sole discretion without notice. ©2022 Lumen Technologies. All Rights Reserved.
Settings
The settings menu allows you to update your time zone and your portal password.
1. Hover your cursor over profile & settings in the main menu.
2. Click on settings from the dropdown menu.
3. If your time zone is incorrect, choose the correct time zone from the dropdown box.
4. To reset your Hosted Voip portal password, enter a new password into both required fields.
5. Click the save button.
Note: Changing this password changes the password to log into this portal. It also syncs with the password used
to log into various applications such as Webex for Hosted VoIP, supervisor/agent clients and the receptionist
PC console. If you have any of those applications, you’ll use this new password to log into those apps.
911 location
Anytime you're using your phone at a service address other than your base location, you should log into your portal
and update your 911 location. This ensures that any emergency calls placed will be routed to the proper 911 center.
• Your current location defaults to your base location.
• The base location is your primary office address and is registered with 911.

page 60 of 66
Services not available everywhere. Business customers only. Lumen may change, cancel or substitute products and services,
or vary them by service area at its sole discretion without notice. ©2022 Lumen Technologies. All Rights Reserved.
Add a new 911 location
If you will be working for a different location other than the base location, add this location to the portal and make it your
current location.
1. Hover your cursor over profile & settings in the main menu.
2. Click on 911 location from the dropdown menu.
3. Click the link for a full description of limitations and important information on changing your 911
location address.
Note: Be sure to read the entire disclosure on the 911 location page before proceeding.
4. Click the add location button.

page 61 of 66
Services not available everywhere. Business customers only. Lumen may change, cancel or substitute products and services,
or vary them by service area at its sole discretion without notice. ©2022 Lumen Technologies. All Rights Reserved.
5. Enter a location name that describes the location of that address. (This in not passed on to the PSAP.)
6. For address line 1; enter the street number and name.
7. Address line 2 is used to give emergency services more specific location information such as a suite number,
floor or cubicle number. If applicable, enter the appropriate information.
8. Enter city, state and zip code for that location.
9. Click the save button.
10. Your newly added location will show under your locations. Your current location has not changed,

page 62 of 66
Services not available everywhere. Business customers only. Lumen may change, cancel or substitute products and services,
or vary them by service area at its sole discretion without notice. ©2022 Lumen Technologies. All Rights Reserved.
Change your current 911 location
1. Click the pushpin icon under actions to make your newly added location the current location,
2. Click change now in the set as current location window.
3. Confirm the address in the change location window is correct and click OK.

page 63 of 66
Services not available everywhere. Business customers only. Lumen may change, cancel or substitute products and services,
or vary them by service area at its sole discretion without notice. ©2022 Lumen Technologies. All Rights Reserved.
4. Read the change location information and click the ok button.
5. You’ll receive an email notification acknowledging your request to change the address.
6. You’ll receive a second email notification confirming when the change is completed.
7. Your current location will show updated in the portal. You have the option to change the current location back
to the base location, or another location, as appropriate.
Scheduling a 911 location change
You can schedule a future 911 location change. You can only schedule one change at a time. If you try to add a schedule
when one is already present, it overrides the existing one.
1. Click 911 location from the profile & settings sub menu.

page 64 of 66
Services not available everywhere. Business customers only. Lumen may change, cancel or substitute products and services,
or vary them by service area at its sole discretion without notice. ©2022 Lumen Technologies. All Rights Reserved.
2. Click set as current location for any locations you have predefined.
3. Click the schedule a future change button to continue.
4. Using the dropdown boxes, select the date, time and time zone you want the 911 change to take effect.
5. Click the save button.

page 65 of 66
Services not available everywhere. Business customers only. Lumen may change, cancel or substitute products and services,
or vary them by service area at its sole discretion without notice. ©2022 Lumen Technologies. All Rights Reserved.
6. In the schedule future change dialog box, confirm your changes and click the ok button.
7. Read the change location information and click the ok button.

page 66 of 66
Services not available everywhere. Business customers only. Lumen may change, cancel or substitute products and services,
or vary them by service area at its sole discretion without notice. ©2022 Lumen Technologies. All Rights Reserved.
8. You’ll see your current location has not changed.
9. The scheduled change section indicates the time, time zone, date and address of your scheduled change.
10. To cancel this scheduled change, click the cancel change button.
11. You’ll receive an email notification acknowledging your request to change the address approximately 15
minutes prior to the date and time of your scheduled change.
12. You’ll receive a second email notification confirming when the change is completed.
Help
The help menu provides access to guide and training materials including videos.
1. Hover your cursor over help in the main menu.
2. Voice mail retrieval numbers (domestic and International) can be easily located here.
3. Click on user guides & help information to access a list of guides and training materials.
