
macOS Device
Management
VMware Workspace ONE UEM 2209
Contents
1 Introduction to Managing macOS Devices 7
Workspace ONE UEM macOS Management Prerequisites 7
Supported Devices 8
2
macOS Device Enrollment 9
Prerequisites 9
Enrollment Methods 10
End user Enrollment Using the Workspace ONE Intelligent Hub 10
Admin Enrollment Using a Sideloaded Staging Profile 10
Single-User Staging 10
Single Staging with Pre-Registration and Local User 10
Multi-User Staging 11
Bulk Enrollment with Apple Business Manager 11
Enrollment with macOS Intelligent Hub 11
Enable Post Enrollment Onboarding Settings 13
Stage Single User Domain-Bound Web-Based macOS Enrollment 14
Stage Single User Domain-Bound macOS Enrollment Using Apple Business Manager 14
Stage Multi-User Domain-Bound macOS Enrollment 16
Stage Single-User Non-Domain macOS Enrollment 17
Apple Business Manager 20
Custom Bootstrap Packages for Device Enrollment 20
Bootstrap Package Creation 21
3 macOS Device Management 23
Device Dashboard 23
Device List View 24
Device Details Page for macOS Devices 27
Device Actions 32
Configure and Deploy a Custom Command to a Managed Device 36
AppleCare GSX 37
Support of Apple Silicon Mac Processor 38
Create a Smart Group 39
View the Processor Type 39
Filter Devices Based on the Processor Type 39
4 Additional macOS Configurations 40
Kiosks for macOS Devices 40
Build a Device Kiosk for a macOS Device 40
VMware, Inc.
3
Additional macOS Profiles for Kiosk Mode 41
Mirror Screens with Apple AirPlay on macOS Devices 41
Custom Fonts for macOS Devices 42
Product Provisioning for macOS Devices 43
Workspace ONE Assist 43
5 Apps for macOS Devices 44
Workspace ONE Intelligent Hub 44
Configure Settings for the macOS Workspace ONE Intelligent Hub 45
(Legacy) AirWatch Catalog and Workspace ONE Catalog 46
6 Apps and Process Restrictions for macOS 47
Create a System Extension Profile 48
Create a Privacy Preferences Profile for System Extension 48
Use a Custom Settings Profile to Create a Restriction Policy 48
View event logs 51
7
Full Disk Encryption with FileVault
52
Institutional and Personal Recovery for macOS Devices 52
Institutional Recovery for macOS Devices 53
Configure a FileVault Institutional Recovery Key for macOS Devices 53
Personal Recovery for macOS Devices 58
MDM Bootstrap Token 63
8 macOS Device Profiles 68
Device Access 70
Device Security 70
Device Configuration 70
Configure an Accessibility Profile 71
Configure an AirPlay Mirroring Profile 72
Configure an AirPrint Profile 72
Configure an Associated Domains Profile 73
Configure a CalDAV or CardDAV Profile 74
Configure Certificate Transparency Profile 74
Configure a Content Filter Profile 75
Configure a Credentials/SCEP Profile 76
Configure a Custom Attributes Profile 78
Configure a Custom Settings Profile 78
Configure a Directory Profile 80
Configure a Disk Encryption Profile 82
Configure a DNSSetting Profile 84
macOS Device Management
VMware, Inc. 4
Configure a Dock Profile 85
Configure an Email Profile 87
Configure an Energy Saver Profile 88
Configure an Exchange Web Services Profile 88
Configure a File Provider Profile 90
Configure a Finder Profile 90
Configure a Firewall Profile 91
Configure a Firewall(Native) Profile 92
Configure a Firmware Password Profile 93
Configure a Kernel Extension Policy Profile 93
Configure an LDAP Profile 94
Configure a Login Items Profile 95
Configure a Login Window Profile 95
Configure a Managed Domains Profile 96
Configure a Messages Profile 97
Configure a Mobility Profile 97
Configure a Network Profile 98
Configure a NSExtension Profile 100
Configure a Parental Controls Profile 100
Configure a Passcode Profile 101
Configure a Printing Profile 102
Configure a Privacy Preferences Profile 103
Configure a Proxies Profile 105
Configure a Restrictions Profile 107
Configure a Security and Privacy Settings Profile 110
Configure Skip Setup Assistant Profile 111
Configure a Smart Card Profile 111
Configure a Software Update Profile 112
Configure an SSO Extension Profile 114
Configure a System Extensions Profile 116
Configure a Time Machine Profile 117
Configure a VPN Profile 118
Configure a VPN Profile 120
Configure a Web Clips Profile 121
Configure an Xsan Profile 122
Upload a Profile 122
9 Collect Data with Sensors for macOS Devices 123
Sensors Description 123
Workspace ONE UEM Options 123
Workspace ONE Intelligence Options 124
macOS Device Management
VMware, Inc. 5
Sensors Security 125
Create a Sensor for macOS Devices 125
View Sensors in Device Details 127
Examples for macOS Sensors 128
10 Automate Endpoint Configurations with Scripts for macOS Devices 129
Create a Script for macOS Devices 130
View Scripts in Device Details 132
11
Compliance Policies
133
Compliance Policies in Workspace ONE UEM 133
12 Software Distribution and Management for macOS Applications 134
13 Shared Devices 135
Define the Shared Device Hierarchy 136
Log In and Log Out of Shared macOS Devices 137
macOS Device Management
VMware, Inc. 6
Introduction to Managing macOS
Devices
1
Workspace ONE UEM powered by AirWatch provides complete management solutions for
macOS devices. With Workspace ONE UEM's Mobile Device Management (MDM) solution,
enterprises can manage Corporate-Dedicated, Corporate-Shared or Employee Owned (BYOD)
macOS devices throughout the entire device lifecycle.
Workspace ONE UEM supports devices running macOS versions 10.9 and all Apple devices
running those operating system versions.
This guide shows administrators how to:
n Enroll macOS devices or allow end users to enroll the devices by themselves.
n Configure the Workspace ONE Intelligent Hub.
n Create profiles for macOS devices to manage configuration.
n Manage devices through the Workspace ONE UEM console and on the Self-Service Portal
(SSP).
n Integrate with macOS tools such as File Vault 2.
n Enable Product Provisioning.
This chapter includes the following topics:
n Workspace ONE UEM macOS Management Prerequisites
n Supported Devices
Workspace ONE UEM macOS Management Prerequisites
To manage macOS devices, make sure you have the all the prerequisites mentioned in this
section.
You must have the following prerequisites ready:
UEM
n Active Environment – Your active Workspace ONE UEM environment and access to the UEM
console.
n Appropriate Admin Permissions – Type of permission that allows you to create profiles,
policies, and manage devices within the UEM console.
VMware, Inc.
7
n Group ID – A unique identifier for the organization group where the device is enrolled that
defines all configurations the device receives.
n Credentials – User name and password combination used to identify and authenticate the user
account to which the device belongs. These credentials can be AD/LDAP user credentials.
Apple Platform
n Apple Push Notification service (APNs) Certificate – A certificate issued to your organization
to authorize the use of Apple's cloud messaging services. For information about generating an
APNs certificate, see
Generate a New APNs Certificate
in the
Console Basics
documentation.
n Apple ID for Apple Business Manager – An Apple ID is required to purchase the managed
distribution or the user-based licenses when using the Volume Purchase Program (VPP)
with a macOS deployment. It is also used to enroll the macOS devices through Automated
Enrollment. Apple Business Manager is a web-portal which you can use with the Mobile
Device Management (MDM) solution for easily deploying and managing your Apple devices.
For more information about Apple Business Manager, see the
VMware Workspace ONE UEM
Integration with Apple Business Manager
documentation.
Note: Apple ID that is used for VPP or Automated Enrollment must not be entered in the
settings or preferences on the device. For example, do not use for iTunes or iCloud.
Optional
n Enrollment URL – The web address entered into Safari to begin the enrollment procedure.
This location is specific to your company's enrollment environment. For example, this
enrollment URL follows the format of https://<companyspecificdeviceservicesurl>/enroll.
n Apple Business Manager/Apple School Manager account or Automated Enrollment/VPP
accounts.
Supported Devices
Workspace ONE UEM currently supports devices running macOS 10.9 and later, including:
n MacBook
n MacBook Pro
n MacBook Air
n iMac Pro
n iMac
n Mac Mini
n Mac Pro
macOS Device Management
VMware, Inc. 8
macOS Device Enrollment
2
Each device in your organization's deployment must be enrolled in your organization's
environment before it can communicate with Workspace ONE UEM and access internal content
and features.
This chapter includes the following topics:
n Prerequisites
n Enrollment Methods
n End user Enrollment Using the Workspace ONE Intelligent Hub
n Admin Enrollment Using a Sideloaded Staging Profile
n Single-User Staging
n Single Staging with Pre-Registration and Local User
n Multi-User Staging
n Bulk Enrollment with Apple Business Manager
n Enrollment with macOS Intelligent Hub
n Enable Post Enrollment Onboarding Settings
n Stage Single User Domain-Bound Web-Based macOS Enrollment
n Stage Single User Domain-Bound macOS Enrollment Using Apple Business Manager
n Stage Multi-User Domain-Bound macOS Enrollment
n Stage Single-User Non-Domain macOS Enrollment
n Apple Business Manager
n Custom Bootstrap Packages for Device Enrollment
n Bootstrap Package Creation
Prerequisites
n Apple device running macOS version 10.13 or later
n VMware Workspace ONE Intelligent Hub for macOS version 19.04 or later
VMware, Inc.
9
n Workspace ONE UEM version 9.4 or later
Enrollment Methods
There are four ways to initiate enrollment for macOS devices:
n Hub-Based Enrollment - Enroll a device using the Workspace ONE Intelligent Hub
n Staging Enrollment - Enroll a device for later re-assignment to a different user.
n Automated Enrollment - Utilize Apple Business Manager's Automated Enrollment.
n Web-Based Enrollment - Enroll a macOS device using web-based enrollment.
End user Enrollment Using the Workspace ONE Intelligent
Hub
The Hub-based enrollment process secures a connection between macOS devices and your
Workspace ONE UEM environment through the Workspace ONE Intelligent Hub app. The
Workspace ONE Intelligent Hub application facilitates User-Approved Device Enrollment, and
then allows for real-time management and access to device information and resources.
For more information, see:
n
macOS Intelligent Hub
in Apps for macOS Devices section.
n
Enroll with macOS Intelligent Hub
Admin Enrollment Using a Sideloaded Staging Profile
Device Staging on the Workspace ONE UEM console allows a single admin to outfit devices for
other users on their behalf, which can be particularly useful for IT admins provisioning a fleet of
devices. Admins can sideload a staging profile for a single-user devices and multi-user devices.
Single-User Staging
Single-user staging allows an admin to stage devices, such as a company-issued laptop, for a
single user. LDAP binding or pre-registration is required when staging devices for single users.
For more information, see Stage Single User Domain-Bound Agent-Based macOS Enrollment in
Introduction to Managing macOS Devices
.
Single Staging with Pre-Registration and Local User
Workspace ONE UEM also supports a new single staging enrollment flow for a local macOS user
with pre-registration to help macOS admins who are moving towards a deployment model without
domain join. For more information, see Pre-Register Single-User Staging Using Agent-Based
Enrollment in
Introduction to Managing macOS Devices
.
macOS Device Management
VMware, Inc. 10
Multi-User Staging
Multi-user device staging allows an admin to provision devices intended to be used by more
than one user, such as a shared computing lab computer. Multi-user staging allows the device to
dynamically change its assigned user as different network users log into that device.
For more information, see Stage Multi-User Domain-Bound macOS Enrollment in
Introduction to
Managing macOS Devices
.
Bulk Enrollment with Apple Business Manager
Depending on your deployment type and device ownership model, you may want to enroll devices
in bulk. Workspace ONE UEM provides bulk enrollment capabilities for macOS devices using the
Apple Business Manager and Automated Enrollment.
Deploying a bulk enrollment through the Apple Business Manager's automated enrollment allows
you to install a non-removable MDM profile on a device. You can also provision devices in
Supervised mode to access additional security and configuration settings.
For more information about Apple Business Manager, see
Integration with Apple Business
Manager
.
Enrollment with macOS Intelligent Hub
The Hub-based enrollment process secures a connection between macOS devices and your
Workspace ONE UEM environment. Install the Workspace ONE Intelligent Hub application to
facilitate the User-Approved enrollment process to enable real-time management and access to
relevant device information and resources.
Download the Workspace ONE Intelligent Hub installer from https://getwsone.com. When the
Workspace ONE Intelligent Hub is installed, the device begins prompting the user for the
enrollment authentication. For different methods that are available to download Intelligent Hub,
see
macOS Workspace ONE Intelligent Hub Download
.
Procedure
1 Navigate to https://getwsone.com and download the Workspace ONE Intelligent Hub installer
on the device.
2 Open the pkg file and install the Intelligent Hub by following the system prompts. After
installation completes, the Intelligent Hub enrollment screen appears shortly later, or click on
the Intelligent Hub icon in the macOS Menu Bar and click Enroll.
3 Enter the enrollment URL and Group ID, or enter your email address.
If the email autodiscovery is set up, select the email address option for authentication,
instead of entering the enrollment URL and Group ID. For information about configuring
autodiscovery, see the
Autodiscovery Enrollment
topic of the
Managing Devices
documentation.
macOS Device Management
VMware, Inc. 11

If your user account is not allowed or blocked because your account is denylisted and not
approved for enrollment, you will get a message preventing enrollment from continuing.
4 Follow the system prompts in the Workspace ONE Intelligent Hub. For devices running
macOS versions between 10.12.6 and 10.13.1, proceed to Step 7. For devices running macOS
10.13.2 and above, proceed to Step 5.
5 Enter the admin user name and password to install the MDM profile.
6 Once the process is complete, the Workspace ONE Intelligent Hub displays an Enrollment
Complete screen and the device immediately begins receiving the configurations assigned by
the administrator.
7 Follow the Onboarding Experience UI in Workspace ONE Intelligent Hub that displays the
status information on the progress of active installation of apps and resources and notifies
the user. The Onboarding Experience UI is displayed only if the admin has enabled Post-
Enrollment Onboarding Experience in the console.
For more information, see Enable Post Enrollment Onboarding Settings.
8 Click Continue to transition to the Hub's default Account screen.
For more information on Workspace ONE Intelligent Hub for macOS and its deployment, see
Enable the Workspace ONE Intelligent Hub Post-Enrollment Installation section.
macOS Workspace ONE Intelligent Hub Download
The quickest and the easiest option available for downloading the Workspace ONE Intelligent Hub
is from getwsone.com. The most recent version of the Workspace ONE Intelligent Hub is present
and requires no authentication. However, you can also download the Workspace ONE Intelligent
Hub for macOS devices at any time by logging into UEM console.
Download options:
n Workspace ONE UEM console – Navigate to Groups & Settings > All Settings > Devices
& Users > Apple > Apple macOS > Hub Application and select Download Hub.
If the hub is installed after the device enrollment, then the Hub icon
appears in the macOS Menu Bar indicating it is active and no additional end-user interaction is
necessary.
If the hub is installed before the device enrollment, then after the installation the device begins
prompting the user for the enrollment authentication.
Enable the Workspace ONE Intelligent Hub Post-Enrollment Installation
If you are using web-based enrollment, enable the Workspace ONE Intelligent Hub to be installed
on devices after enrollment through the Web.
macOS Device Management
VMware, Inc. 12
If you are enrolling using a method that does not use the Workspace ONE Intelligent Hub such
as web-enrollment or automated enrollment via Apple Business Manager, you can configure
Workspace ONE to automatically install the Workspace ONE Intelligent Hub.
1 From the UEM console Dashboard, navigate to Devices > Device Settings > Apple > Apple
macOS > Intelligent Hub Settings.
2 Click Enabled for Install Hub after Enrollment to automatically install Hub on devices after
enrollment.
3 Select Save.
Enable Post Enrollment Onboarding Settings
For the past few years, administrators have been shifting from imaging-based workflows to
just-in-time provisioning over-the-air. It is important to be able to inform end-users of what's
happening while their device is getting set up. Workspace ONE Intelligent Hub now displays and
notifies the status of applications that are actively being downloaded and installed when enrolling
a macOS device. This feature also provides administrators a basic way to customize an experience
to greet the user during setup.
Enable and Customize the Post-Enrollment Onboarding Experience
This feature can only be activated or deactivated at an Organization Group level.
1 Navigate to the Enrollment Settings page. Navigate through Settings>Devices & Users>
General> Enrollment> Optional Prompt> macOS> Enable Post-Enrollment Onboarding
Experience.
2 Click Enable.
3 Customize the Header, Subheader, and Body Text fields as necessary. Use UEM lookup
values for personalization.
4 Configure and assign some Internal Apps or Apple Business Manager (VPP) apps with
Deployment Type set to Auto.
5 Enroll a device with Workspace ONE Intelligent Hub 21.04 and later.
Note: Enrolling through Intelligent Hub is not required. This feature works for any enrollment
method, including Apple Business Manager (DEP) or Web Enrollment. When installed,
Intelligent Hub, will automatically detect the enrollment and automatically launch the
experience.
Directly after enrollment, Intelligent Hub will automatically launch, displaying your customizations
and tracking all apps which are set to Automatic deployment.
macOS Device Management
VMware, Inc. 13
Stage Single User Domain-Bound Web-Based macOS
Enrollment
Single-User Device Staging on the Workspace ONE UEM Console allows a single administrator to
outfit devices for other users on their behalf, which can be useful for IT administrators provisioning
a fleet of devices.
Prerequisites
n Create a basic user account enabled for Single User Staging.
n Create a basic user account or directory user account. See
Basic User Accounts
and
Directory-
Based User Accounts
in Console Basics guide.
The following steps describe how to configure single-user staging for devices enrolling with Apple
Business Manager:
1 Configure a macOS device profile with the Directory Payload assigned to your devices that
must be staged. See
Configure a Directory Profile
in macOS Device Profiles section.
2 On your Mac device, create a local administrative macOS account.
3 Log in to macOS using the local macOS account and enroll with Safari using the staging
credentials you created in Prerequisites section. See
Enrollment with macOS Intelligent Hub
.
4 To check if the device is domain bound, perform the following steps:
a Navigate to Terminal.app.
b Enter id '<intended user's AD username>`.
The command returns information about the user.
5 Log out of the local administrative macOS account.
6 At the macOS Login Window, the end-user must log in with their domain-based username and
password.
Workspace ONE UEM assigns the device to the end user and begins sending profiles and apps
which are assigned to the user.
Stage Single User Domain-Bound macOS Enrollment Using
Apple Business Manager
Configure single-user staging for devices enrolling with Apple Business Manager.
Prerequisites
n Create a basic user account enabled for Single User Staging.
n Create a basic user account or directory user account. See
Basic User Accounts
and
Directory-
Based User Accounts
in Console Basics guide.
macOS Device Management
VMware, Inc. 14
n Enable automated device enrollment. Sign up for Apple Business Manager in https://
business.apple.com/. Enroll devices using Apple Business Manager. See
Apple Business
Manager - Device Enrollment Program
in Apple Business Manager guide.
1 In your device enrollment profile, set the following options:
n Authentication setting: ON
n Await Configuration : ENABLED
n Account Setup: SKIP
n Create New Admin Account : YES and configure Admin Account details
2 Configure a macOS device profile with the Directory Payload assigned to your devices that
must be staged. See
Configure a Directory Profile
in macOS Device Profiles section.
3 Start the Mac device to Setup Assistant and begin the enrollment process into Workspace
ONE UEM when prompted.
n Authenticate to Workspace ONE UEM using the user account configured for Single-User
Staging (from
Prerequisites
section).
n When the device enrolls during the Setup Assistant, the profile containing the directory
payload is installed during the
AwaitConfiguration
phase. This binds macOS to your
network-based directory service.
n Any other profiles and apps assigned to the device using assignment group are sent to the
device.
4 At the macOS login window, a green dot indicates that network accounts are avaible.
5 When the user logs in with their domain-based username and password, Workspace ONE
UEM assigns the device to the end user and begins sending profiles and apps which are
assigned to the user.
6 Validate the device record has synced from Apple Business Manager:
n Navigate to Devices > Lifecycle > Enrollment Status in the Workspace ONE UEM console
and change the layout to Custom.
n Ensure the device to be staged has synced from Apple Business Manager.
n Ensure that Token Type is Apple Enrollment.
n If the device has no Token Type, navigate to Devices > Devices Settings > Apple > Device
Enrollment Programand click Sync Devices.
7 Validate the device record has the correct Device Enrollment profile:
n Navigate to Devices > Lifecycle >Enrollment Status in the Workspace ONE UEM console
and change the layout to Custom.
n Ensure that the Profile Name matches the profile you created in Step b.
macOS Device Management
VMware, Inc. 15
n If Profile Name is incorrect, select the check box next to the devices to be enrolled
and navigate to More Actions > Assign Profile > select the profile you created in while
you created device enrollment profile > Save. Note: In single-user staging, only the first
network-based user to log in will be the Workspace ONE managed user account. Any
logins by subsequent or different network-based users will not receive user-based profiles
and apps.
Note: When the device is enrolled to the Single User Staging user, the logged-in user is
not yet associated to the enrollment user. Once the first network directory-based account
logs in to the Mac, Workspace ONE UEM associates the logged-in user to a user account
in Workspace ONE UEM. The new directory account becomes both the enrollment user and
managed user.
It is not recommended to set the Authentication setting set to OFF in your DEP profile. For
more information, see Best Practices using Apple Device Enrollment Program (DEP)
Stage Multi-User Domain-Bound macOS Enrollment
Multi-user device/shared device staging allows an IT administrator to provision devices intended
to be used by more than one user. Multi-User staging allows the device to change its assigned
user dynamically as the different network users log into that device.
Multi-User Staging Using Web-Based Enrollment
Configure multi-user staging for devices enrolling with Web-Based enrollment.
Prerequisites
n Apple device running macOS version 10.13.0 (High Sierra) or later
n Workspace ONE UEM version 9.4 or later
n Create a basic user account enabled for multi-user staging.
To configure Multi-User Staging Using Web-Based Enrollment, perform the Steps from 1-6 as
described in
Stage Single User Domain-Bound Web-Based macOS Enrollment
.
Multi-User Staging Using Apple Business Manager Enrollment
Configure multi-user staging for devices enrolling with Apple Business Manager.
To configure multi-user staging using Apple Business Manager, perform the Steps 1-7 as in
Stage
Single User Domain-Bound macOS Enrollment Using Apple Business Manager
.
Note: When the device is enrolled to the multi-user staging user, the logged-in user is not yet
associated to the enrollment user. Once the first network directory-based account logs in to the
Mac, Workspace ONE UEM associates the logged-in user to a user account in Workspace ONE
UEM. The new directory account becomes both the enrollment user and managed user.
It is not recommended to set the Authentication setting set to OFF in your DEP profile. For more
information, see Best Practices using Apple Device Enrollment Program (DEP).
macOS Device Management
VMware, Inc. 16
Stage Single-User Non-Domain macOS Enrollment
When staging without domain binding, the only local macOS user account that can be managed
by Workspace ONE UEM is the local user that installs the enrollment profile.
Pre-Register Single-User Staging Using Agent-Based Enrollment
By pre-registering a user-to-device manually or through batch import, the IT Admin can enroll
the device and assign it to the user without needing to know the end user's directory credentials.
In this way, the IT administrator delivers the device ready to go with only a known set of local
macOS login credentials. Once the user logs into the known local macOS account given to them by
the IT admin, they can change the password to match their directory credentials (or by using the
built-in Kerberos SSO extension, the user can be guided through syncing the local account to their
directory account).
Prerequisites
n Create a basic user account enabled for Single User Staging.
n Create a basic user account or directory user account. See
Basic User Accounts
and
Directory-
Based User Accounts
in Console Basics guide.
n Enable automated device enrollment. Sign up for Apple Business Manager in https://
business.apple.com/. Enroll devices using Apple Business Manager. See
Apple Business
Manager - Device Enrollment Program
in Apple Business Manager guide.
Agent or Web Single-User Staging for Local Users with Pre-Registration
1 Bulk import Device-to-User registration record within the Devices > Lifecycle > Enrollment
Status page:
n Click Add > Batch Import and use the simple template and example for users and devices
listed on the Batch Import page.
n Modify the sample CSV by entering only the Username, FirstName, LastName, GroupID,
Security Type (Directory or Basic), and DeviceSerial.
n Note: Devices can be manually added individually from the Enrollment Status page by
clicking Add > Register Device and enter the same required information described above.
2 On your Mac device, proceed through the Setup Assistant as normal. Ensure the local macOS
account created is the username you want to give the end user of the machine.
3 Enroll with macOS Hub using the Staging User credentials you created in Step 1.
n When the device enrolls, Workspace ONE UEM assigns the device from the staging user to
the user you specified in Step 1 using bulk import.
n Any profiles and apps assigned to the enrollment user (specified by bulk import) are sent
to the device when the local macOS user account you used in Step 3 is logged-in.
Agent or Web Single-User Staging for Local Users with API
macOS Device Management
VMware, Inc. 17

Note: The process to check out a device to an enrollment user can be used when the device-to-
user assignments are not known. In this use case, the code mentioned in Step 6 is included in a
larger onboarding workflow and native application.
1 Create a basic user account configured for single user staging in Workspace ONE UEM.
2 Create a local administrative macOS account.
3 Ensure that the local macOS account created is the username you want to give the end user of
the machine.
4 Log into macOS with the newly created local user account.
5 Using the Staging User credentials you created in Step 1, enroll with macOS Intelligent Hub
6 While logged in as the user that enrolled in Step 5, call the Workspace ONE UEM REST API to
check out the device to the correct enrollment user.
REST API details:
https://%3CAPI\_Server%3E/api/help/\#!/DevicesV2/DevicesV2\_CheckOutDeviceToUser
PATCH /api/mdm/devices/{id}/enrollmentuser/{enrollmentuserid}
* {id} - Workspace ONE UEM Device ID
* {enrollmentuserid} - Workspace ONE UEM Enrollment User ID
* Accept - application/json:version=2
Note: When the end-user logs in with the new local user, Workspace ONE UEM considers that
macOS user to be the managed user and automatically sends any new apps/profiles targeted to
the enrollment user.
Pre-Register Single-User Staging Using Apple Business Manager Enrollment
Configure single-user staging for local users with pre-registration using Apple Business Manager
enrollment.
1 Apple Business Manager Single-User Staging for Local Users with Pre-Registration
a Create a basic Workspace ONE UEM user account configured for single-user staging.
b In your Device Enrollment profile, set the following options:
n Authentication setting: OFF.
n Staging Mode : Single User Device
n Default Staging User : Basic User
n Await Configuration : ENABLED.
n Account Setup: DON'T SKIP
n Optionally, set Create New Admin Account to YES and configure Admin Account
details for a hidden IT administrator account.
macOS Device Management
VMware, Inc. 18
c Validate the device record has synced from Apple Business Manager:
n Navigate to Devices > Lifecycle > Enrollment Status in the Workspace ONE UEM
console and change the layout to Custom.
n Ensure the device to be staged has synced from Apple Business Manager.
n Ensure that Token Type is Apple Enrollment.
n If the device has no Token Type, navigate to Devices > Devices Settings > Apple >
Device Enrollment Programand click Sync Devices.
d Validate the device record has the correct Device Enrollment profile:
n Navigate to Devices > Lifecycle > Enrollment Status in the Workspace ONE UEM
console and change the layout to Custom.
n Ensure that the Profile Name matches the profile you created in Step b.
n If Profile Name is incorrect, select the check box next to the devices to be enrolled and
navigate to More Actions > Assign Profile > select the profile you created in Step b >
Save.
e Bulk import the Device-to-User registration record within the Devices > Lifecycle>
Enrollment Status
n Click Add > Batch Import and use the simple template and example for users and
devices listed on the Batch Import page.
n Modify the sample CSV by entering only the Username, FirstName, LastName,
GroupID, Security Type(Directory or Basic), and DeviceSerial.
n Note: Devices can be manually added individually from the Enrollment Status page
by clicking Add > Register Device and enter the same required information described
above.
n Reload the Enrollment Status page and ensure that device to be staged has a User
name assigned and still has a Token Type of Apple Enrollment.
f On your Mac device, proceed with the enrollment process in Setup Assistant and when
the device enrolls, Workspace ONE UEM automatically assigns the device from the staging
user to the user you specified in Step e using bulk import (the enrollment user).
2 Apple Business Manager Single-User Staging for Local Users with API
a Follow the steps from Step a to Step d as described in
Apple Business Manager Single-
User Staging for Local Users with Pre-Registration.
b Use the Workspace ONE UEM REST API to check out the device from the staging user to
the correct enrollment user.
macOS Device Management
VMware, Inc. 19

REST API details:
https://%3CAPI\_Server%3E/api/help/\#!/DevicesV2/DevicesV2\_CheckOutDeviceToUser
PATCH /api/mdm/devices/{id}/enrollmentuser/{enrollmentuserid}
* {id} - Workspace ONE UEM
* {enrollmentuserid} - Workspace ONE UEM Enrollment User ID
* Accept - application/json:version=2
Apple Business Manager
Devices can also be staged through Apple Business Manager's Device Enrollment Program (DEP).
DEP is a streamlined staging method that is best for corporate-owned devices.
DEP on macOS enables you to:
n Apply standard staging to devices.
n Configure Setup Assistant panes to skip during installation.
n Enforce enrollment for all end users.
n Customize and streamline the enrollment process to meet your organization's needs.
n Hold a device in the Awaiting Configuration state when it reaches the Setup Assistant screen.
n Create a local Hidden Admin account and allow end users to skip the Account Creation screen.
For additional Apple information, see the Apple Business Manager Guide or contact your Apple
Representative.
Custom Bootstrap Packages for Device Enrollment
In a typical device enrollment, the Workspace ONE Intelligent Hub must be installed on a device
before any other installer packages can be run. The Bootstrap Package allows installer packages
to deploy to a device immediately after the device is enrolled.
Bootstrap Packages
Workspace ONE UEM uses the latest Apple MDM commands for deploying Bootstrap Packages.
For enrolled devices on macOS 10.13.6 and higher, the InstallEnterpriseApplication command
is used. For macOS 10.13.5 and lower devices the legacy InstallApplication command is used.
Historically, the Workspace ONE Intelligent Hub handles the download and installation of
application files. Bootstrap Packages allow .pkg files to install immediately after enrollment
whether or not the Workspace ONE Intelligent Hub is installed.
You may want to use alternative tools for device and application management. Bootstrap package
enrollment comprises an enrollment flow paired with a bootstrap package that installs the
alternative tooling and configures the device before the end user begins using the device.
Bootstrap Package Use Cases
macOS Device Management
VMware, Inc. 20
Bootstrap Packages may be useful in certain deployment scenarios. This list is not exhaustive.
n You want to create a custom-branded end user experience, such as launching a window as
soon as enrollment completes, to inform the user about the installation process and instruct
them to wait to use the device until provisioning and installation complete.
n Your deployment does not include the Workspace ONE Intelligent Hub, but you still have
critical software to deploy to devices.
n You want to use Munki for Application Management, and need the Munki client to install
immediately after enrollment so the user can begin installing apps, rather than going through
the Workspace ONE Intelligent Hub and AirWatch Catalog.
n Your deployment only uses MDM for certificate management and software management, and
uses Chef or Puppet for configuration management. In this configuration, Chef or Puppet must
be installed as soon as enrollment completes to finish configuring the device.
Bootstrap Package Creation
Bootstrap packages are deployed to the device as soon as enrollment completes. Bootstrap
packages deployed from the Console will not deploy to existing enrolled devices unless the
devices are specifically queued using the Assigned Devices list for the package.
You must create packages before you deploy them. There are several tools available that can
create a package for use in the Bootstrap Package functionality. Created packages must meet two
criteria:
n The package must be signed with an Apple Developer ID Installer Certificate. Only the
package needs to be signed, not the app, since the Apple Gatekeeper does not check apps
installed through MDM.
n The package must be a distribution package (product archive), not a flat component package.
When you have created a bootstrap package, you must deploy the package to your devices. For
more information, see
Deploy a Bootstrap Package
.
Deploy a Bootstrap Package
Bootstrap packages allow you to make your end users' devices usable sooner after the device
enrolls than a traditional enrollment. Once you have created a bootstrap package, you must
deploy the package to your devices.
Prerequisites
You must create bootstrap packages before you deploy them. There are several tools available
that can create a package for use in the Bootstrap Package functionality. For more information,
see
Custom Bootstrap Packages for Device Enrollment
.
1 Navigate to Resources > Apps > Internal > Add Application.
2 Upload a .pkg file that meets these requirements:
a Package must be signed with an Apple Developer ID Installer certificate.
macOS Device Management
VMware, Inc. 21

b Package must be a distribution package.
For more information about the bootstrap package requirements, see
Custom Bootstrap
Packages for Device Enrollment
3 Select Continue and modify the items in the Details tab and the Images tab if necessary.
4 Select Save & Assign, and then select Add Assignment to configure the App Delivery
Method.
By default, the App Delivery Method is set to Auto. In this configuration, the assigned
bootstrap package will only install on newly-enrolled devices.
To install the bootstrap package on enrolled devices, select On Demand. On-Demand
package deployments require you to manually push the package to devices.
To manually deploy a bootstrap package to enrolled devices, navigate to Applications >
Internal Apps > List View. Select the package you want to assign to open the Application
Details. Use the Devices tab to select devices to push the package to.
Bootstrap Package Status Messages
Workspace ONE UEM displays the status that describes the bootstrap package installation
progression.
To view the App status, Navigate to Apps tab in Device Details.
For each managed application, the following messages are displayed based on the assignment
type when you hover the mouse over the App status:
Action
Assignment
Type App Status Bootstrap Package Status
Install
Command
Dispatched
Auto/
OnDemand
Bootstrap Package Assigned and Install
command dispatched, Last Action Taken:
Install Command Dispatched, Timestamp:
Date/Time
Bootstrap Package assigned and
install command acknowledged.
Install
Command
Ready For
Device
Auto/
OnDemand
Bootstrap Package assigned but install
command not acknowledged yet, Last Action
Taken: Install Command Ready for Device,
Timestamp: Date/Time
Bootstrap Package assigned
but install command not
acknowledged yet.
None Auto Bootstrap Package assigned but device
was already enrolled. It is available for
on-demand deployment but has not been
requested, Last Action Taken: None,
Timestamp: None
Bootstrap Package assigned but
device was already enrolled.
It is available for on-demand
deployment but has not been
requested.
None Auto/
OnDemand
Bootstrap Package assigned for on-demand
deployment but has not been requested,
Last Action Taken: None, Timestamp: None
Bootstrap Package assigned for
on-demand deployment but has
not been requested.
macOS Device Management
VMware, Inc. 22
macOS Device Management
3
After your devices are enrolled and configured, manage the devices using the Workspace ONE ™
UEM console. The management tools and functions enable you to keep an eye on your devices
and remotely perform administrative functions.
You can manage all your devices from the UEM console. The Dashboard is a searchable,
customizable view that you can use to filter and find specific devices. This feature makes it easier
to perform administrative functions on a particular set of devices. The Device List View displays
all the devices currently enrolled in your Workspace ONE UEM environment and their status. The
Device Details page provides device-specific information such as profiles, apps, Workspace ONE
Intelligent Hub version and which version of any applicable OEM service currently installed on the
device. You can also perform remote actions on the device from the Device Details page that are
platform-specific.
This chapter includes the following topics:
n Device Dashboard
n Device List View
n Device Details Page for macOS Devices
n Device Actions
n Configure and Deploy a Custom Command to a Managed Device
n AppleCare GSX
n Support of Apple Silicon Mac Processor
Device Dashboard
As devices are enrolled, you can manage them from the Device Dashboard in Workspace ONE
UEM powered by AirWatch.
You can view graphical representations of relevant device information for your fleet, such as
device ownership type, compliance statistics, and platform and OS breakdowns. You can access
each set of devices in the presented categories by selecting any of the available data views from
the Device Dashboard.
VMware, Inc.
23
From the List View, you can take administrative action: send messages, lock devices, delete
devices, and change groups associated with the device.
n Security – View the top causes of security issues in your device fleet. Selecting any of the
doughnut charts displays a filtered Device List view comprised of devices affected by the
selected security issue. If supported by the platform, you can configure a compliance policy to
act on these devices.
n Compromised – The number and percentage of compromised devices (jailbroken or
rooted) in your deployment.
n No Passcode – The number and percentage of devices without a passcode configured for
security.
n Not Encrypted – The number and percentage of devices that are not encrypted for
security. This reported figure excludes Android SD Card encryption. Only those Android
devices lacking disc encryption are reported in the donut graph. Ownership – View the
total number of devices in each ownership category. Selecting any of the bar graph
segments displays a filtered Device List view comprised of devices affected by the
selected ownership type.
n Last Seen Overview/Breakdown – View the number and percentage of devices that have
recently communicated with the Workspace ONE UEM MDM server. For example, if several
devices have not been seen in over 30 days, select the corresponding bar graph to display
only those devices. You can then select all these filtered devices and send out a query
command so that the devices can check in.
n Platforms – View the total number of devices in each device platform category. Selecting any
of the graphs displays a filtered Device List view comprised of devices under the selected
platform.
n Enrollment – View the total number of devices in each enrollment category. Selecting any
of the graphs displays a filtered Device List view comprised of devices with the selected
enrollment status.
n Operating System Breakdown – View devices in your fleet based on operating system. There
are separate charts for each supported OS. Selecting any of the graphs displays a filtered
Device List view comprised of devices running the selected OS version.
You can view graphical representations of relevant device information for your fleet, such as
device ownership type, compliance statistics, and platform and OS breakdowns. You can access
each set of devices in the presented categories by selecting any of the available data views from
the Device Dashboard.
Device List View
Use the Device List View in Workspace ONE UEM powered by AirWatch to see a full listing of
devices in the currently selected organization group.
macOS Device Management
VMware, Inc. 24

The Last Seen column displays an indicator showing the number of minutes elapsed since the
device has checked-in. The indicator is red or green, depending on how long the device is
inactive. The default value is 480 minutes (8 hours) but you can customize this by navigating
to Groups & Settings > All Settings > Devices & Users > General > Advanced and change the
Device Inactivity Timeout (min) value.
Select a device-friendly name in the General Info column at any time to open the details page for
that device. A Friendly Name is the label you assign to a device to help you differentiate devices
of the same make and model.
Sort by columns and configure information filters to review activity based on specific information.
For example, sort by the Compliance Status column to view only devices that are currently out-of-
compliance and target only those devices. Search all devices for a friendly name or user name to
isolate one device or user.
Customize Device List View Layout
Display the full listing of visible columns in the Device List view by selecting the Layout button and
select the Custom option. This view enables you to display or hide Device List columns per your
preferences.
Once all your customizations are complete, select the Accept button to save your column
preferences and apply this new column view. You can return to the Layout button settings at
any time to tweak your column display preferences.
There is also an option to apply your customized column view to all administrators at or below the
current organization group (OG). For instance, you can hide 'Asset Number' from the Device List
views of the current OG and of all the OGs underneath.
Some notable device list view custom layout columns include the following.
n SSID (Service Set Identifier or Wi-Fi network name)
n Wi-Fi MAC Address
macOS Device Management
VMware, Inc. 25

n Wi-Fi IP Address
n Public IP Address
Exporting List View
Select the Export button to save an XLSX or CSV (comma-separated values) file of the entire
Device List View that can be viewed and analyzed with MS Excel. If you have a filter applied to the
Device List View, the exported listing reflects the filtered results.
Search in Device List View
You can search for a single device for quick access to its information and take remote action on
the device.
To run a search, navigate to Devices > List View, select the Search List bar and enter a user
name, device-friendly name, or other device-identifying element. This action initiates a search
across all devices, using your search parameter, within the current organization group and all child
groups.
Device List View Action Button Cluster
With one or more devices selected in the Device List View, you can perform common actions
with the action button cluster including Query, Send [Message], lock devices, and other actions
accessed through the More Actions button.
Available Device Actions vary by platform, device manufacturer, model, enrollment status, and the
specific configuration of your Workspace ONE UEM console.
Remote Assist
You can start a Remote Assist session on a single qualifying device allowing you to remotely
view the screen and control the device. This feature is ideal for troubleshooting and performing
advanced configurations on devices in your fleet.
To use this feature, you must satisfy the following requirements.
n You must own a valid license for Workspace ONE Assist.
n You must be an administrator with a role assigned that includes the appropriate Assist
permissions.
n The Assist app must be installed on the device.
For more information, see the Workspace ONE Assist Guide.
Select the check box to the left of a qualifying device in the Device List View and the Remote
Assist button displays. Select this button to initiate a Remote Assist session.
macOS Device Management
VMware, Inc. 26

Device Details Page for macOS Devices
Use the Device Details page to track the detailed device information and quickly access user and
device management actions.
You can access the Device Details page by either selecting a device's Friendly Name from the
Device Search page by using any of the available Dashboards or search tools in the UEM console.
Use the Device Details menu tabs to access the specific device information.
Tab Description
Summary View general statistics on: platform/model/OS, compliance, Workspace ONE UEM Cloud Messaging,
enrollment, last seen, firewall, firmware, supervision status, time machine, contact information, groups,
serial number, UDID, asset number, power status, storage capacity, physical memory and virtual memory,
and warranty information. If Apple's Global Service Exchange information is accessible, select the
warranty link to see when the status was last updated.
Compliance Display the status, policy name, date of the previous and forthcoming compliance check and the actions
already taken on the device. The Compliance tab includes advanced troubleshooting and convenience
features. Non-Compliant devices, and devices in pending compliance status, have troubleshooting
functions available. You can reevaluate compliance on a per-device basis (
) or get detailed information about the compliance status on the device (
). Users with Read-Only privileges can view the specific compliance policy directly from the Compliance
tab while Administrators can make edits to the compliance policy.
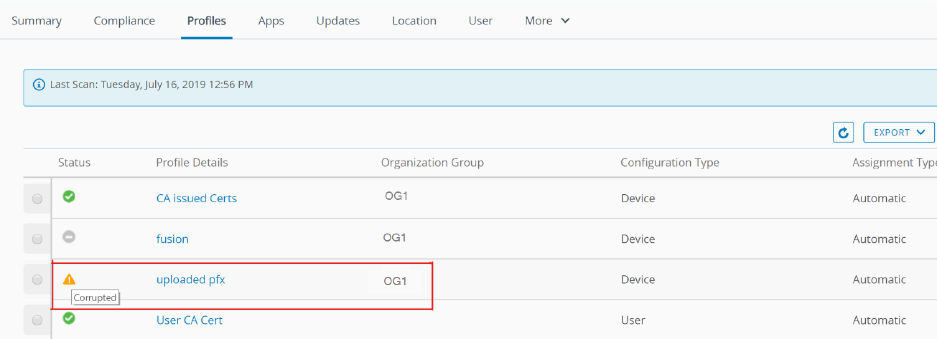
Profiles View all the MDM profiles and their status currently installed on a device. For more information on the
corrupted status of the profiles, see
Certificate Profile Resiliency
.
Apps View all the apps currently assigned and/or installed, including existing installed apps reported by the
system. Note: For non-macOS devices such as Android, iOS, or Windows, the Apps tab displays both
managed apps and all installed applications as one single list in the grid view. For macOS devices, the
following tabs are displayed: Managed Apps - Displays all macOS application and software installers
managed in Workspace ONE UEM. You can select single items in this list and perform ad-hoc Install or
Remove actions. All Apps - Displays a list of all .app bundles installed on the device, reported by macOS.
Note: By default, Show com.apple.*apps check box is deselected. It filters out Apple system applications
to only show third-party applications.If you select Show com.apple.*apps check box, all installed Apple
system apps will be displayed in the list.
Security View the last received security information statuses from the device. Security tab shows System Integrity
Protection (SIP) status, FileVault encryption status, Personal Recovery Key status, Firewall status,
Supervision status, Secure Boot status (macOS 10.15 or later devices), Recovery Lock Password Status
(Apple Silicon macOS 11.5 or later devices), and Managed Admin User details. For more information
on accessing and rotating managed admin password, see
Admin Password Auto-Rotation
. For more
information on setting and viewing recovery lock password, see
Recovery Lock Password
.
Location View current location or location history of a device.
User Access details about the user of a device and the status of the other devices enrolled to this user.
Additional menu tabs are available by selecting More from the main Device Details tab.
macOS Device Management
VMware, Inc. 27

Tab Description
Network View current network status (Cellular, Wi-Fi, Bluetooth) of a device.
Restrictions View all restrictions currently applied to a device. This tab also shows specific restrictions by
Device, Apps, Ratings, and Passcode.
Notes View and add notes regarding the device. For example, note the shipping status or if the device is
in repair and out of commission.
Certificates Identify device certificates by name and issuant. This tab also provides information about the
certificate expiration.
Products View the complete history and status of all packages provisioned to the device and any
provisioning errors.
Custom Attributes View the Custom Attributes associated with the device.
Files/Actions View the files and other actions associated with the device.
Shared Device Log View the history of the shared device including past check-ins and check-outs and status.
Troubleshooting View Event Log and Commands logging information. This page features export and search
functions, enabling you to perform targets searches and analysis. Event Log – View detailed
debug information and server check-ins, including a Filter by Event Group Type, Date Range,
Severity, Module, and Category. In the Event Log listing, the Event Data column can display
hypertext links that open a separate screen with even more detail surrounding the specific event.
This information allows you to perform advanced troubleshooting such as determining why a
profile fails to install. Commands – View detailed listing of pending, queued, and completed
commands sent to the device. Includes a Filter that allows you to filter commands by Category,
Status, and specific Command.
Status History View history of device in relation to the enrollment status.
Targeted Logging View the logs for the Console, Catalog, Device Services, Device Management, and Self Service
Portal. You must enable Targeted Logging in settings and a link is provided for this purpose. You
must then select the Create New Log button and select a length of time the log is collected.
Attachments Use this storage space on the server for screenshots, documents, and links for troubleshooting
and other purposes without taking up space on the device itself.
Terms of Use View a list of End User License Agreements (EULAs) which have been accepted during the device
enrollment.
Certificate Profile Resiliency
Workspace ONE repushes profiles containing credential payloads when the certificate is detected
as missing in the device Certificate List sample.
When a profile with a certificate payload is installed on a device and if the certificate goes missing
from the keychain on the device, Workspace ONE reissue the certificate to the device. Certificates
can go missing due to a number of reasons, but most commonly due to the following:
n The certificate does not install properly in the keychain.
n Some installed software (such as security tools) on the device removes the installed certificate.
n The end-user manually removes the certificate from the keychain.
macOS Device Management
VMware, Inc. 28
Note: The certificate will only be repushed to the device if the system detects that it is missing
from the Certificate List sample. No certificates will be pushed after the initial profile installation if
the sample confirms that it is installed. To prevent looping, the reinstall command is queued only
one time until a successful response is received from the device.
Corrupted State Detection
Each time the system receives a certificate list sample from the device, a check is conducted
to determine if there are any missing certificates based on the device's assigned profiles. If a
certificate is detected as missing, the profile certificate is considered to be in Corrupted state and
the device profile status is set to Not Installed.
In this scenario, when a device profile status is set to Not Installed, a command is queued
automatically to reinstall the profile on the device. Reinstalling the profile reinstalls the certificate
to the device. The following certificate types are not supported:
n User Certificate (S/MIME)
n SCEP
Admin Password Auto-Rotation
From the UEM console, you can view the password of the macOS device admin account that is
created during the DEP enrollment. To help re-secure the admin accounts, these passwords are
automatically rotated 8 hours after they are accessed.
Prerequisites
Device must be DEP enrolled with a DEP profile with the Unique Random Password enabled for
the admin account.
To view the password in Device Details:
1 Navigate to Device > List View and select a macOS device.
macOS Device Management
VMware, Inc. 29

2 Select the Security tab and then select View Admin Password under the Managed Admin
User section. The View Admin Password page appears displaying the current password with
the timestamp it was set. You can also view the password using the following API:
GET /api/mdm/devices/<DeviceUUID>/security/managed-admin-information
What to do next:
When the admin password is viewed from the Device Details page on the UEM console or
accessed using an API, an MDM command is automatically queued to rotate the admin password
after 8 hours. The event logs show logs for when the password was accessed and when it was
rotated in the Troubleshooting section.
Note: Alternatively, the following API can also be used to rotate passwords on-demand:
POST /api/mdm/devices/<DeviceID>/commands?command=RotateDEPAdminPassword
Lock Devices
From the Device Details page, you can lock the devices. To lock a device, perform the following
steps:
1 From the device list view, Click Lock.
2 Enter a six digit unlock PIN for your device.
3 Enter the message that needs to be displayed on the device's PIN lock screen.
4 Click Lock Device.
You can view the device status message using Security tab. To view the device status:
1 From the device list view, click Security > MDM.
2 Click View Device Lock Pin to check the PIN and the last reported date.
Note: If the device is unlocked, you can view the message that the device is unlocked. When
the device lock pin is accessed, it is reported in the event log. You can view the event log by
navigating to List View > Troubleshooting > Event Log.
Recovery Lock Password
You can set the recovery lock password for an enrolled Apple Silicon macOS 11.5 and later devices
through MDM Commands V3 Admin API.
The following APIs are used to issue the SetRecoveryLock command:
n POST /api/mdm/devices/<DeviceUUID>/commands/SetRecoveryLock
n POST /api/mdm/devices/commands/SetRecoveryLock/device/<searchBy>/<AlternateID>
Ensure that V3 admin API must be included in the header and clear_password is set to false in the
API request.
For example, When making an API call, include below header:
macOS Device Management
VMware, Inc. 30

Accept : application/json; version=3
Additional details must be inlcuded in the body of the API call. For example:
{
"set_recovery_lock": {
"current_password": "",
"clear_password": false,
" password_policy":
{ "length": 10, "include_numbers": true, "include_letters": true,
"include_special_characters": true }
}
Field Data Type Description
Current_password String Optional. The current recovery lock password set on the device. If provided,used for
issuing the command to set a new password or clear the existing password. If not
provided, the last Applied Password through Workspace ONE UEM will be used.
Clear_password Boolean Optional. If set to true, ignores the password policy in the request and clears the
password set on the device. Also disables Recovery Lock password
Password_policy - Optional. Specifies the complexity of the Recovery Lock password generated
and sent to the device as part of the SetRecoveryLock command. If all of
include_numbers, include_letters and include_special_characters are false, then
the password can contain all the characters.
The following GET Security info API return the new key IsRecoveryLockEnabled for macOS device:
n GET /api/mdm/devices/<Device ID>/security – Retrieves the security information of the
device identified by the device ID.
n GET /api/mam/devices/security/<searchBy>/<AlternateID> – Retrieves the security
information of the device identified by the alternate ID of the device.
The following GET API retrieves the device Recovery Lock Password information for a macOS
device identified by the device UUID:
GET /api/mdm/devices/<DeviceUUID>/security/recovery-lock-password
In the UEM Console, you can also view if the recovery lock is set or not in the device details page.
To view the Recovery Lock status in Device Details:
1 Navigate to Devices > List View and select a macOS device.
2 Select the Security tab and then navigate to Recovery Lock Password section.
The password status is displayed if it is set or not.
3 To view the password, click View Recovery Lock Password.
The recovery key displays the applied password with the timestamp. It also displays the
submitted password that is still not accepted by the device.
View the Recovery Lock Event Log
macOS Device Management
VMware, Inc. 31

When the SetRecoveryLock command is requested, confirmed, or when the recovery password
lock is accessed in the device details page or via the API, it can be viewed in the UEM console.
These events are tracked in Troubleshooting tab in the Device Details page. To view them:
1 Navigate to Devices > List View and select a macOS device.
2 Navigate to Troubleshooting > Event Log.
Erase All Contents and Settings (EACS)
EACS allows the administrators to make a used macOS device ready for another user, with a
simple, clean workflow. It wipes all the personal content from the device and reverts the settings
to the default state without the need to reinstall the OS. When the process is complete, the device
is ready to be set up from scratch.
Note: EACS option is available only for macOS 12.0.1 with Apple Silicon or the Apple T2 Security
chip, and later devices.
The following API is used to perform a EACS action on a macOS device. You can search by
MacAddress, Udid, SerialNumber, ImeiNumber, or EasId.
n POST : /api/mdm/devices/commands/DeviceWipe/device/{searchBy}/{id}
n POST : /api/mdm/devices/{deviceUuid}/commands/DeviceWipe
To perform a device wipe action:
1 Navigate to Devices > List View > Select the macOS device.
2 Navigate to More Actions > Device Wipe.
3 In the Restricted Action - Device Wipe page, select the Obliteration Behaviour. Choose from
the following options:
Settings
Description
Default The device responds to the server with an error status or no status, and then attempts
obliteration.
Do Not Obliterate The device responds with an error status, and no obliteration occurs.
Obliterate With Warning The device responds with an acknowledgement or warning status, and then attempts
obliteration.
Note: This option is available for oly macOS 12.0.1 and later devices.
4 Click Continue.
5 In the Confirm Security PIN page, enter the Unlock Pin and the PIN.
A message is displayed that the device wipe command is successfully requested on the device.
Device Actions
Perform common device actions with the action button cluster including Query, Send, and other
actions accessed through the More Actions button.
macOS Device Management
VMware, Inc. 32

Device Details Action Button Cluster
Note: Available Device Actions vary by device model, enrollment status and type, and the specific
configuration of your Workspace ONE UEM console. For more information on full listing of remote
actions that you can invoke using the UEM console, refer VMware Workspace ONE UEM Mobile
Device Management Guide.
Run commands remotely to individual (or bulk) devices in your fleet. Each of the following device
actions and definitions represents remote commands that you can invoke from the UEM console.
n Add Tag – Assign a customizable tag to a device, which can be used to identify a special
device in your fleet.
n Apps (Query) – Send an MDM query command to the device to return a list of installed apps.
n Certificates (Query) – Send an MDM query command to the device to return a list of installed
certificates.
n Change Organization Group – Change the device's home organization group to another pre-
existing OG. Includes an option to select a static or dynamic OG.
n Change Ownership – Change the Ownership setting for a device, where applicable. Choices
include Corporate-Dedicated, Corporate-Shared, Employee Owned and Undefined.
n Delete Device – Delete and unenroll a device from the console. Sends the enterprise wipe
command to the device that gets wiped on the next check-in and marks the device as Delete
In Progress on the console. If the wipe protection is turned off on the device, the issued
command immediately performs an enterprise wipe and removes the device representation in
the console.
n Device Information (Query) – Send an MDM query command to the device to return basic
information on the device such as friendly name, platform, model, organization group,
operating system version and ownership status.
n DeviceWipe - Send an MDM command to wipe a device clear of all data and operating system.
This puts the device in a state where recovery partition will be needed to reinstall the OS. This
action cannot be undone.
n Edit Device – Edit device information such as Friendly Name, Asset Number, Device
Ownership, Device Group and Device Category.
n Enroll – Send a message to the device user to enroll their device. You may optionally use a
message template that may include enrollment information such as step-by-step instructions
and helpful links. This action is only available on unenrolled devices.
macOS Device Management
VMware, Inc. 33
n Enterprise Wipe – Enterprise Wipe a device to unenroll and remove all managed enterprise
resources including applications and profiles. This action cannot be undone and re-enrollment
will be required for Workspace ONE UEM to manage this device again. Includes options to
prevent future re-enrollment and a Note Description field for you to add any noteworthy
details about the action.
n Enterprise Wipe is not supported for cloud domain-joined devices.
n Location – Reveal a device's location by showing it on a map using its GPS capability enabled
via the macOS Workspace ONE Intelligent Hub. Also requires user approval to enable the
functionality in macOS System Preferences.
n Lock Device – Send an MDM command to lock a selected device, rendering it unusable until it
is unlocked.
n Profiles (Query) – Send an MDM query command to the device to return a list of installed
device profiles.
n Query All – Send a query command to the device to return a list of installed apps (including
Workspace ONE Intelligent Hub, where applicable), books, certificates, device information,
profiles and security measures.
n Reboot Device – Send an MDM command to restart macOS 10.13+ devices remotely. This
action reproduces the effect of powering the device off and on again.
n Security (Query) – Send an MDM query command to the device to return the list of active
security measures (device manager, encryption, passcode, certificates, etc.).
n Send Message – Send a message to the user of the selected device. Choose between Email,
Push Notification (through AirWatch Cloud Messaging), and SMS.
n Start AirPlay – Stream audiovisual content from the device to an AirPlay mirror destination.
The MAC address (format "xx:xx:xx:xx:xx:xx" with no case-sensitive) of the destination is
required. A passcode can also be specified if required. Scan Time defines the number of
seconds (10-300) to spend searching for the destination. Requires macOS 10.10 or greater.
n Install macOS Workspace ONE Intelligent Hub – Send an MDM command to the device to
install the latest seeded macOS Workspace ONE Intelligent Hub.
n Managed settings – Managed settings lets you enable or Bluetooth through an MDM
command. Requires macOS 10.13.4 or greater.
n Shut Down – Send an MDM command to shut down macOS 10.13+ devices remotely.
n Request Device Log - You can retrieve detailed logs related to operations taken by
Workspace ONE Intelligent Hub from corporate-owned macOS devices and access them in
the console to quickly resolve issues on the devices.
The Request Device Log option in the UI is available only for enrolled macOS devices with Hub
version 20.05 and above installed.
For more information, see
Request Device Logs
.
Request Device Logs
macOS Device Management
VMware, Inc. 34

You can access the logs from the console to review both Hub and relevant system logs to aid in
troubleshooting issues on the device. The Request Device Log dialog box allows you to customize
your logging request for macOS devices with Hub 20.05+ installed.
Request Device Logs from the Console
Prerequisites
n Intelligent Hub 20.05 installed.
n Navigate to Groups & Settings > All Settings > Devices and Users > General > Privacy.
In Current Setting, you have the following menu items:
n Collect and Display.
n Collect Do Not Display.
n Do Not Collect.
n Scroll down to Request Device Log. By default, Collect and Display is selected.
Note: Employee-owned devices are not allowed to be selected due to privacy concerns.
1 Navigate to Devices > Details View.
2 Select a macOS device from the list and then navigate to More Actions > Request Device Log.
3 In the Request Intelligent Hub Logs page, customize the log settings.
Setting
Description
Type Determine the type of the logs to be included. (Snapshot or Timed). Snapshot - Select Snapshot
to retrieve the latest log records available from devices immediately. Multiple log files will be sent
to Workspace ONE UEM in the form of a ZIP file. Note: If you have selected Snapshot, the option
Level is not available. By default, the Level is set to Info. Timed - Select Timed to collect a rolling log
over a specified period. Multiple log files will be sent to Workspace ONE UEM in the form of a ZIP
file. The option Level (Info or Debug) is available. Select the Duration for the log collection from the
drop-down menu.
Level Determine the level of details to be included in the log Info or Debug. Info - Select Info to collect
the logs in their default state. Debug - Select Debug to enable additional advanced verbose logging.
If you want to stop the debug logging before the Timer is over, and request the logs immediately,
navigate to Device Details View > More Actions > Stop Debug Logging
Request
User
Consent
Select Enabled to request user consent for collecting logs and system files. The privacy prompt
contains the information about the data collected in the logs and it requires the user acceptance
before the logs are transmitted. To know more about the data collected during the log collection such
as device info, crash details, install logs, see
VMware Workspace ONE UEM Device-Side Logging
in
VMware Workspace ONE UEM Troubleshooting and Logging guide.
4 Select Save.
5 To review the log files, navigate to Device Details > More > Attachments > Documents.
macOS Device Management
VMware, Inc. 35
To require the user consent whenever the user sends logs, navigate to Settings > Device and
Users> Apple macOS > Intelligent Hub and Settings> Show user Privacy Prompt for log
collection and Enabled and Save the settings.
n To retrieve the detailed logs from corporate-owned macOS devices and view them in the
console, navigate to Intelligent Hub> Help and click Collect and Send Logs.
n To request the debug log on the device, click Debug Session > Start Session.
Note: It collects the debug logs for specific amount of time and displays the time remaining.
n If you want to end the session, select End Session.
Note: If you select Show in Finder, it allows you to see the logs locally in a ZIP file that can be
used to troubleshoot. If you select Send, it allows you to send the logs to console.
Configure and Deploy a Custom Command to a Managed
Device
Workspace ONE UEM enables administrators to deploy a custom XML command to managed
Apple devices. Custom commands allow more granular control over your devices.
Use custom commands to support device actions that the UEM console does not currently
support. Do not use custom commands to send commands that exist in the UEM console as
Device Actions. Samples of XML code you can deploy as custom commands are available in the
Workspace ONE UEM Knowledge Base at https://kb.vmware.com/s/article/2960669.
Important: Improperly formed or unsupported commands can impact the usability and
performance of managed devices. Test the command on a single device before issuing custom
commands in bulk.
1 In the UEM console, navigate to Devices > List View.
2 Select one or more macOS devices using the check boxes in the left column.
3 Select the More Actions drop-down and select Custom Commands. The Custom Commands
dialogue box opens.
4 Enter the XML code for the action you want to deploy and select Send to deploy the command
to devices.
Browse XML code for Custom Commands on the Workspace ONE UEM Knowledge Base at
https://kb.vmware.com/s/article/2960669.
If the Custom Command does not run successfully, delete the command by navigating to
Devices > List View. Select the device to which you assigned the custom command. In the
Device Details View, select More > Troubleshooting > Commands. Select the Command
you want to remove, and then select Delete. The Delete option is only available for Custom
Commands with a Pending status.
macOS Device Management
VMware, Inc. 36
AppleCare GSX
Apple Global Service Exchange (GSX) allows administrators to look up device details related to the
display model name, the device purchase and warranty status directly from the UEM console.
If any devices in an organization group are missing a display model name, then a time scheduler
runs periodically to search and update these names using the GSX information that was configured
for the devices at that organization group level.
Only authorized Apple employees or organizations that have registered with Apple’s Self-
Servicing Account Program can access GSX information.
Create a GSX Account
Before you can integrate your deployment, you must create an Apple GSX account. To apply for a
GSX account, you must have a service contract with Apple. Contact your Apple Account Executive
to learn more about GSX.
To apply for a GSX account, visit http://www.apple.com/support/programs/ssa/.
Obtain an Apple Certificate to Integrate AppleCare GSX
To integrate AppleCare GSX with your Workspace ONE UEM deployment, you must first obtain an
Apple certificates and convert them to .p12 format.
For more information, see
Obtain an Apple Certificate to Integrate AppleCare GSX
.
Configure AppleCare in the UEM console
Once you have obtained and configured an Apple Certificate, you must upload the certificate to
the UEM console and configure your AppleCare instance.
For more information, see
Configure AppleCare GSX in the UEM console
.
Obtain an Apple Certificate to Integrate AppleCare GSX
To integrate AppleCare GSX with your Workspace ONE UEM deployment, you must first obtain an
Apple certificate and convert them to .p12 format.
1 Generate a certificate signing request (CSR) using OpenSSL or Java Keytool.
2 Send the CSR and the following GSX account information to Apple to receive Apple certificates
(.pem files).
a. GSX Sold-To account number
b. Primary IT contact name
c. Primary IT contact email
d. Primary IT contact phone number
e. Outgoing static IP address of the server that sends requests to GSX Production
If your environment is hosted on the AW SaaS, refer to https://support.air-watch.com/articles/
115001662168 for the IP address. If the IP range for your environment is not listed, please open
a support ticket to have our Network Operations team facilitate it.
macOS Device Management
VMware, Inc. 37

Apple generates the Apple certificate(.pem) and returns a signed certificate and a chain
certificate. For ease of use, rename the files “cert.pem” and “chain.pem” for use in subsequent
steps.
You may also receive a file labeled “issuer” that is not needed for this process.
3 Convert the Apple certificates to .p12 format.
a. Create a .p12 file using the private key and Apple certificates by executing the following
command:sudo openssl pkcs12 -export -inkey privatekey.pem -in cert.pem -certfile
chain.pem -out GSX_Cert.p12
b. The certificate saves as a .p12 file in the location you specified. If you do not specify a path
before the file name when running the conversion command, the file saves to your working
directory.
Configure AppleCare GSX in the UEM Console
Once you have obtained and configured an Apple Certificate, you must upload the certificate to
the UEM console and configure your AppleCare instance.
1 Navigate to Groups & Settings > All Settings > Devices & Users > Apple > AppleCare.
To configure a GSX connection with the UEM console, you must have a GSX account
with manager-level access, access to web services, and access to coverage and warranty
information.
2 Enter GSX settings including:
Setting
Action
GSX User ID Enter the account user ID.
GSX Password Enter the account password.
Sold-to Account Number Enter the 10-digit service account number. This account number can be found in the GSX
portal at the bottom of the web page.
Time Zone Use the drop-down menu to select the appropriate time zone.
Language Use the drop-down menu to choose a language.
1 Select Save to complete the integration with AppleCare.
2 Navigate to the List View, select a device, and use the More menu to find AppleCare
information in the UEM console.
Support of Apple Silicon Mac Processor
With the introduction of Apple Silicon Macs, administrators may need to separate assignments
based on CPU type. Workspace ONE UEM now provides the administrator the ability to select
the processor type for an enrolled macOS device in Smart Groups, filter the devices based on the
processor type in Device List View, and view the processor type info in the Device Details page.
macOS Device Management
VMware, Inc. 38
Create a Smart Group
You can select the processor type while creating a Smart Group.
1 Navigate to Groups & Settings > Assignment Groups > Add a Smart Group
2 In Platform and Operating System, select Apple macOS.
3 In CPU Architecture, select from the options:
n Any
n Apple Silicon (ARM64)
n Intel (X86)
4 Click Save.
View the Processor Type
Device Details page allows you to view the devices based on the processor type.
1 Navigate to Devices > Details View.
2 CPU Architecture will be listed in the Device Info section
Note: When an older version of Workspace ONE Console is upgraded to the version in which this
feature is supported (2107), there would be a slight delay in detecting the processor architecture
information of a device. This is because the devices have to send the DeviceInformation sample
after the upgrade and it happens during the next sample schedule. The CPU Architecture
information would be shown as Unknown before the update and the Workspace ONE Console
triggers Smart Group reconciliation once the sample data has been received.
Filter Devices Based on the Processor Type
You can now filter devices based on the processor type.
1 Navigate to Devices > List View
2 On the left side filter, select Device Type > CPU Architecture.
3 Select the desired types and Apply the filter.
macOS Device Management
VMware, Inc. 39
Additional macOS Configurations
4
Learn more about the available macOS Configurations.
This chapter includes the following topics:
n Kiosks for macOS Devices
n Build a Device Kiosk for a macOS Device
n Additional macOS Profiles for Kiosk Mode
n Mirror Screens with Apple AirPlay on macOS Devices
n Custom Fonts for macOS Devices
n Product Provisioning for macOS Devices
n Workspace ONE Assist
Kiosks for macOS Devices
Workspace ONE UEM offers the ability to utilize devices in your mobile fleet as kiosks. Kiosks
limit your users to a single website browsing and to specific applications. For example, a retail
establishment can deploy devices in device kiosk mode for use in store, utilizing corporate
applications for in-store functionality like querying inventory and checking product pricing as well
as custom branding to enhance the kiosk functionality.
A kiosk is configured from individual profiles. To build a kiosk, create profiles in the UEM console,
and then let the device handle the configuration of a kiosk profile. Use device kiosks to remotely
configure allowed applications, desktop wallpapers, allow widgets, specify websites and create
other restrictions.
Build a Device Kiosk for a macOS Device
Finder and Dock profile configuration is required in order to lock the file system and manage
system commands. Configure these profiles in the UEM console.
VMware, Inc.
40
Configure the Dock profile
n Allow specific applications and items to show on the Dock. By default, user adjustments are
deactivated, but you can activate these adjustments as needed. Do not select any check boxes
that would allow the user to make changes to the settings. Also, do not allow these settings
to merge with the user dock. If you choose to override the Dock, it will not be reverted to its
original state when the profile is removed or upon an enterprise wipe.
Configure the Finder profile.
n Restrict access to the file system and commands using the Simple Finder and then choose
commands to limit on the computer such as Shut Down. De-select the commands to make
them unavailable to the user.
Additional macOS Profiles for Kiosk Mode
To use Kiosk mode effectively, enable additional profiles in the UEM console.
Safari browsing
Configure profiles to control web browsing. Create a content filter within the Parental Controls
profile and a list of allowed websites. These sites show up as Bookmarks in the Safari browser.
Optionally, use the Global HTTP Proxy profile to limit network access.
Restrictions
Customize a Restrictions profile to match your control Preferences, widgets and more.
Apply Media restrictions to prevent mounting of external drives. This prohibits USB or
external storage devices from connecting and transferring files. Additionally, deactivate AirDrop
functionality.
Apply Desktop restrictions to lock wallpaper on the desktop and allow for the configuration of
default wallpaper
Time Limits and Schedules
Create a device curfew in the Parental Controls profile to limit use to operating hours.
Accessibility
Accommodate all users by configuring settings for enhanced vision, hearing, and keyboard and
mouse interactions to further improve the usability of the kiosk.
Mirror Screens with Apple AirPlay on macOS Devices
Apple AirPlay allows administrators to mirror screens from a macOS computer or tvOS on the
same subnet. If an end user needs assistance, simply send an AirPlay request to share your screen
with an end user's computer running macOS Yosemite or higher.
1 Navigate to Devices > List Viewand select the device. The device summary screen appears.
macOS Device Management
VMware, Inc. 41
2 Select More > Support > Start AirPlay in the administrative menu bar. An AirPlay window
appears.
3 Select Add a Destination to start adding destinations to view. An Add New AirPlay
Destination window appears.
4 Configure the destination information including:
n Destination Name – Friendly name for the device.
n Destination AddressmacOS address of the device to view.
n Password – Password for the destination.
n Scan Time – Length of time that the device may search for the destination. The default
value is 30 seconds.
n Select the Set as Defaultcheck box to make the current destination the default destination.
The next time AirPlay is used, the default destination appears as the Destination Name. It
does not have to be entered again.
5 Select Save and Start to send the AirPlay request to the device.
n This destination is saved for the next request in the Destination Name drop-down menu.
6 To Stop AirPlay on devices, navigate back to the UEM console. Go to Devices > List View >
Select the Device > Support > More > Stop AirPlay.
7 To edit an AirPlay destination:
n Navigate to Devices > List View > Select Device > Support > More > AirPlay. An AirPlay
window appears.
n Choose the Device Destination to edit from the drop-down menu.
n Select Edit to start editing the destination settings. An Edit AirPlay Destination window
appears.
n Select Save and Start to send the AirPlay request to the device.
Custom Fonts for macOS Devices
Available to the devices running iOS 7 and later, the UEM console provides a means to upload
fonts and install them onto devices.
Installing specific fonts allows users to view and read text that is not supported by standard means.
Compatible font file types include .ttf or .otf. There is no limit to the number of fonts you install on
devices, and you can remove a font at any time.
Manage Fonts on macOS Devices
Manage fonts by installing, deploying, and deleting them through the UEM console at any time.
1 Navigate to Devices > Device Settings > Apple > Install Fonts.
2 Drag and drop a supported font file type (.ttf or .otf) onto the screen.
macOS Device Management
VMware, Inc. 42

3 Locate the font file and select Save to send the font to all the devices enrolled in the current
organization group.
4 Click the
button to delete a font.
5 Click the
button to view and export the XML file.
Product Provisioning for macOS Devices
Product provisioning enables you to create, through Workspace ONE ™ UEM, products containing
profiles, applications, files/actions, and event actions (depending on the platform you use).
These products follow a set of rules, schedules, and dependencies as guidelines for ensuring your
devices remain up-to-date with the content they need.
Product provisioning also encompasses the use of relay servers. These servers are FTP(S) servers
designed to work as a go-between for devices and the UEM console. Create these servers for
each store or warehouse to store product content for distribution to your devices.
For more information on using product provisioning with macOS devices, see the Product
Provisioning for macOS Guide.
Workspace ONE Assist
Workspace ONE Assist, previously named Advanced Remote Management (ARM), allows you to
connect remotely to end-user devices so you can help with troubleshooting and maintenance.
Assist requires your macOS device and the end-user device to connect to the Assist Server to
facilitate communication between the Workspace ONE UEM console and the end-user device.
For more information, see
VMware Workspace ONE Assist Documentation
on docs.vmware.com.
macOS Device Management
VMware, Inc. 43
Apps for macOS Devices
5
Combine Workspace ONE UEM MDM features with Workspace ONE UEM apps to even further
enhance security and functionality. Easily manage Workspace ONE UEM apps throughout the
entire lifecycle across employee-owned, corporate-owned, and shared devices from the UEM
console. This section provides you more information on the supported managed applications on
macOS devices.
For more information about managing applications, see Mobile Application Management guide.
This chapter includes the following topics:
n Workspace ONE Intelligent Hub
n Configure Settings for the macOS Workspace ONE Intelligent Hub
n (Legacy) AirWatch Catalog and Workspace ONE Catalog
Workspace ONE Intelligent Hub
With the Workspace ONE Intelligent Hub installed on the devices, users authenticate with the
Hub and enroll their devices. Based on the admin UEM console configurations, users can access
the enterprise applications and Web applications through the Intelligent Hub Catalog and other
services of the Hub.
Note: The Hub features detailed in the following sections are supported only in the Intelligent Hub
19.04 and later version.
Intelligent Hub Accounts Screen
When the Hub Services are activated on the UEM console, users can click the Intelligent Hub
Accounts icon in the bottom left corner of the screen to access the Hub Accounts page. If the Hub
Services are deactivated, the Accounts page is the default landing page.
Note: Hub Services is available only with cloud-hosted deployments. For more information on
enabling the Hub services, see the
Rolling Out VMware Workspace ONE Intelligent Hub
guide.
The following information found on the Accounts page can be used for troubleshooting purpose
and to contact support.
n This Device - Displays device enrollment status, device information, compliance status,
network data, and messages.
VMware, Inc.
44

n Support - Users can call or email support. Collect Logs link lets users easily collect all logs and
information in a compressed .zip format.
n About - Intelligent Hub app version, legal, and privacy information can be viewed.
Intelligent Hub Catalog as App Catalog
Users can access and install their enterprise applications and Web applications through the
Intelligent Hub Catalog. During the app installation, a pop-up appears to let users know what
is happening next. The information displayed is based on the app type and platform. For more
information about enabling access to apps (such as purchased VPP apps, Non-App Store macOS
apps, and web apps), see the Mobile Application Management guide.
Other Services of Intelligent Hub
The Workspace ONE Intelligent Hub's services differ depending on the Hub configurations with
or without VMware Identity Manager in the UEM console. If you enable the Hub service without
VMware Identity Manager, users can have access to services such as Hub Catalog, Home tab,
and Branding. If the Hub service is enabled with the VMware Identity Manager, users can access
People and Notification services. For more information on integration of Hub services with and
without VMware Identity Manager, see the
Rolling Out VMware Workspace ONE Intelligent Hub
guide.
Configure Settings for the macOS Workspace ONE
Intelligent Hub
You can configure settings specific to the macOS Workspace ONE Intelligent Hub and its impact
on the installed device through the UEM console.
1 From the UEM console, navigate to Devices > Device & Users > Apple > Apple macOS >
Intelligent Hub Settings.
2 Click the Override radio button to enable setting modification, if necessary.
3 Configure the Hub settings:
Setting
Description
Always Use the
Latest Version of the
Hub
Select this check box to use the latest version of the Hub.
Hub Version In the dropdown, the versions of Intelligent Hub that are compatible with your Console
version will be displayed. Select the specific Hub version from the available versions of
the Hub. You can decide which Intelligent Hub version is deployed to all new devices
during Automated Enrollment via Apple Business or School Manager, or during web-based
enrollment. Also, the Intelligent Hub Auto-Updates will deploy the specified version.
Install Hub after
Enrollment
Activate or deactivate the option to automatically install the Hub on devices after
enrollment through Apple Business Manager's DEP or Web enrollment. Install Workflow
Engine after Enrollment: Activate or deactivate the option to automatically install a
required supplemental component for Freestyle Orchestrator and Scripts. This seeded
component is governed by the Auto-Update setting as Hub.
macOS Device Management
VMware, Inc. 45

Setting Description
Check-in Interval Enter the frequency for the Hub to check in with the server to receive new commands.
Data Sample Interval Enter the frequency for the Hub to scan devices to collect data such as product
provisioning status, disk encryption status, custom attributes, GPS location, and other basic
system information.
Data Transmit
Interval
Enter the frequency for the Hub to send data samples to the Hub UEM server.
Uninstall Privileges Activate or deactivate the option to provide end users the ability to uninstall the Hub
application from their devices.
Note: The Workspace ONE Intelligent Hub file for the macOS devices is distributed through
the Device Services (DS) server. If the Content Delivery Network (CDN) is configured, then the
Hub file is distributed through the CDN.
4 Click Save.
(Legacy) AirWatch Catalog and Workspace ONE Catalog
Apart from using the Intelligent Hub Catalog as an app catalog, users can also use the Workspace
ONE app or the (legacy) AirWatch Catalog depending on the app catalog settings established
in the UEM console. Deploy an app catalog to your end users to access enterprise and Web
applications that you manage in the UEM console.
The Workspace ONE app integrates resources from environments that use VMware Identity
Manager and Workspace ONE UEM. If your catalog deployment does not use VMware Identity
Manager, you can publish the legacy (AirWatch Catalog) as a Webclip to the device. The webclip
can be installed on all macOS devices enrolled to an organization group by enabling the legacy
catalog at Settings > Apps > Workspace ONE > AirWatch Catalog > General > Publishing. Saving
this page with the toggle enabled redeploys the webclip to devices.
macOS Device Management
VMware, Inc. 46
Apps and Process Restrictions for
macOS
6
macOS Intelligent Hub uses Apple's Endpoint Security System Extension framework to monitor
system events to help administrators block specific software from running on a managed device.
While security tools should still be used for malware, viruses, or other malicious software, this
functionality helps with basic restrictions such as games, CLI tools, messaging apps, or even OS
update installers.
Currently there is no UI available for configuration in the Workspace ONE UEM console. To create
the restriction policies you can use custom settings XML.
Prerequisites
1 The enrolled device is running macOS 10.15 or later.
2 Workspace ONE Intelligent Hub 21.04 or later is installed.
3 System Extension profile for Intelligent Hub installed.
4 Privacy Preferences for Intelligent Hub installed.
Note:
If you are using Workspace ONE UEM console version 2105, you do not need to manually
create the System Extension and Privacy Preferences profiles. The 2105 console automatically
seeds and installs these profiles with the existing Intelligent Hub Privacy Preferences seeded
payload.
If you are using Workspace ONE UEM console version 2102 or below, you must configure
these profiles manually, as instructed below. Once you have updated to Workspace ONE
console 2105, you can remove these profiles as they will be automatically installed.
This chapter includes the following topics:
n Create a System Extension Profile
n Create a Privacy Preferences Profile for System Extension
n Use a Custom Settings Profile to Create a Restriction Policy
n View event logs
VMware, Inc.
47
Create a System Extension Profile
Use the System Extension profile in the Workspace UEM console to automatically approve the
Intelligent Hub extension.
Note: If you are using Workspace ONE UEM console version 2105 or higher, you need not
configure System Extension profile.
1 Create a System Extension profile with the following settings in the Allowed System
Extensions:
n Team Identifier - S2ZMFGQM93
n Bundle Identifier - com.vmware.hub.EndpointSecurity
2 Save and assign the profile to your devices.
Create a Privacy Preferences Profile for System Extension
Apple's Endpoint Security System Extension currently invokes some privacy restrictions on macOS
10.15 and later such as Full Disk Access. However, you can use the Privacy Preferences profile in
the UEM Console to automatically approve the Intelligent Hub extension.
Note: If you are using Workspace ONE UEM console version 2105 or higher, you need not
configure Privacy Preferences profile.
To create a privacy preferences profile, perform the following steps:
1 Create a Privacy Preferences profile.
2 Click Add App and create a new entry with the following settings:
n Identifier - com.vmware.hub.EndpointSecurity
n Identifier Type - Bundle ID
n Code Requirement - anchor apple generic and
identifier "com.vmware.hub.EndpointSecurity" and (certificate
leaf[field.1.2.840.113635.100.6.1.9] /* exists */ or certificate
1[field.1.2.840.113635.100.6.2.6] /* exists */ and certificate
leaf[field.1.2.840.113635.100.6.1.13] /* exists */ and certificate
leaf[subject.OU] = S2ZMFGQM93)
3 Save and assign the profile to your devices.
Use a Custom Settings Profile to Create a Restriction Policy
Currently, there is no UI in the UEM Console to create the restriction policy configuration. Use the
Custom Settings profile to configure the restrictions.
The following table describes the parameters for a custom profile with the payload type
com.vmware.hub.mac.restrictions:
macOS Device Management
VMware, Inc. 48

Key Type Value
Restrictions Array of
Dictionaries
Required. An array of apps or processes that must be blocked from running. If
you desire to block multiple apps or processes in this way, deploy a single custom
settings XML profile that contains multiple apps or processes in this Restrictions
array.
Each dictionary in the Restrictions array must contain the following keys and values:
Key Type Value
Attributes Dictionary Required. A dictionary containing information to identify the app or process to be
blocked.
Actions Array of
Integers
Required. A list, mapped by integers, of actions to take if the item is found to be
running.In Intelligent Hub, only one action is currently supported: 1 - Block process
and display dialogue window to the user containing a message (defined below)
Message String Required. A message to display to the user in a dialogue box if the process is
found running and blocked.A maximum of 250 characters is allowed.
IsSilentNotify Boolean Optional. Select to silently block the process with no message dialogue to the user.
If this option is selected, the Message key is not required.
The Attributes dictionary must contain at least one of the following keys and values *
* Multiple unique keys can be used. If a process matching any one or more of the attributes is
found to be running, it will be blocked.
Key
Type Value
bundleId String or Array
of Strings
The bundle identifier of the app or executable. Examples of how to get the
BundleID: Check Info.plist of .app bundle in *.app/Contents/Info.plist for key
CFBundleIdentifier In terminal, use /usr/bin/mdls /usr/bin/mdls /Applications/
zoom.us.app | grep kMDItemCFBundleIdentifier In terminal, use /usr/bin/
otool
/usr/bin/otool -P /usr/bin/ssh
Find the
CFBundleIdentifier
key
cdhash String or Array
of Strings
The CDHash of the item In terminal, use: /usr/bin/codesign -dvvv /path/to/app/or/
executable /usr/bin/codesign -dv --verbose=4 /path/to/app/or/executable Look for
CDHash key
name String or Array
of Strings
Name of the .app bundle or process. For example: WhatsApp CCleaner Messages
path String or Array
of Strings
Actual binary path of the application.
For example: /Applications/WhatsApp.app/Contents/MacOS/WhatsApp /Applications/
Messages.app/Contents/MacOS/Messages /System/Applications/Utilities/Bluetooth File
Exchange.app/Contents/MacOS/Bluetooth File Exchange
sha256 String or Array
of Strings
The SHA 256 hash of the item: In terminal, use shasum or openssl cli /usr/bin/shasum -a
256 /System/Applications/TextEdit.app/Contents/MacOS/TextEdit /usr/bin/openssl
dgst -sha256/System/Applications/TextEdit.app/Contents/MacOS
Example of custom settings XML for blocking WhatsApp.
<dict>
<key>Restrictions</key>
macOS Device Management
VMware, Inc. 49

<array>
<dict>
<key>Attributes</key>
<dict>
<key>cdhash</key>
<string>fd02694e8489e59664d568a546e41681d2f53bd2</string>
<key>name</key>
<array>
<string>WhatsApp</string>
<string>WhatsApp Helper (GPU)</string>
<string>WhatsApp Helper (Plugin)</string>
<string>WhatsApp Helper (Renderer)</string>
</array>
<key>path</key>
<string>/Applications/WhatsApp.app/Contents/MacOS/WhatsApp</string>
<key>bundleId</key>
<array>
<string>WhatsApp</string>
<string>WhatsApp-Helper</string>
</array>
<key>sha256</key>
<string>a3a459093d5660bd37493c91e90f95445dae031cf6374a06e87a7d792498166b</
string>
</dict>
<key>Actions</key>
<array>
<integer>1</integer>
</array>
<key>Message</key>
<string>You are not permitted to use WhatsApp</string>
</dict>
</array>
<key>PayloadDisplayName</key>
<string>Restricted Software Policy</string>
<key>PayloadIdentifier</key>
<string>HubSettings.93f1655a-59fb-42dc-bc31-9571275cb12b</string>
<key>PayloadOrganization</key>
<string>VMware</string>
<key>PayloadType</key>
<string>com.vmware.hub.mac.restrictions</string>
<key>PayloadUUID</key>
<string>1D7F0D17-369B-4766-9CA0-D2B4537657C1</string>
<key>PayloadVersion</key>
<integer>1</integer>
</dict>
Once the user tries to launch WhatsApp, Intelligent Hub displays a message that the application is
not permitted to run.
macOS Device Management
VMware, Inc. 50
View event logs
You can view event logs related to the configuration, detection, and remediation of restricted
software in the console.
1 In the UEM Console, navigate to Device Details > Troubleshooting.
2 Navigate to events displayed under the Intelligent Hub Module and Security Category.
macOS Device Management
VMware, Inc. 51
Full Disk Encryption with FileVault
7
Enforce an encryption policy on macOS computers to protect data on the hard drive and
escrowing recovery keys stored in Workspace ONE UEM so the keys can be recovered at later
time.
With FileVault2, Workspace ONE UEM builds on native capabilities to encrypt the drive and
provides functionality within the Workspace ONE Intelligent Hubto force the user to complete the
encryption process.
Once the decision is made to encrypt your managed devices, you have options that allow you to
choose the best recovery model for your deployment. These include recovery keys for Personal
use, Institutional use, or a combination of both.
This chapter includes the following topics:
n Institutional and Personal Recovery for macOS Devices
n Institutional Recovery for macOS Devices
n Personal Recovery for macOS Devices
n MDM Bootstrap Token
Institutional and Personal Recovery for macOS Devices
Institutional and Personal recovery is useful if the user will benefit from viewing and keeping a
Personal Recovery Key, but the company will need a quick way to decrypt the device using a
Institutional Recovery Key when necessary.
1 Configure a new Disk Encryption profile.
2 Choose Personal & Institutional as the recovery type and configure the recovery key settings
as needed.
3 Configure a FileVault Primary Keychain. For more information, see the
Configure a FileVault
Institutional Recovery key
section.
4 Upload the FileVaultMaster.cer to the Disk Encryption profile to encrypt the assigned
computers with your Institutional Recovery Key
Result
Once FileVault is enabled on the device, the Personal Recovery Key will be reported to the server.
VMware, Inc.
52
Institutional Recovery for macOS Devices
Institutional recovery is beneficial because the network administrator can decrypt any device
using a single Institutional Recovery Key, saving time by not needing to enter a unique Personal
Recovery Key for each computer.
Generally, Institutional recovery is reserved for Corporate Owned, Line-of-Business devices where
the user does not have the ability to decrypt the device if they forget the login password.
1 Configure a new Disk Encryption profile.
2 Choose Institutional as the recovery type and configure the recovery key settings as needed.
3 Configure a FileVault Primary Keychain. For more information, see the
Configure a FileVault
Institutional Recovery key
section.
4 Upload the FileVaultMaster.cer to the Disk Encryption profile to encrypt the assigned
computers with your Institutional Recovery Key
Result
Once FileVault is enabled on the device, the Institutional Recovery Key will be reported to the
server.
Configure a FileVault Institutional Recovery Key for macOS Devices
An Institutional recovery key is a pre-made recovery key that can be installed on a system prior
to the encryption process. Institutional recovery keys are not automatically generated and must be
manually created before they can be used.
This section explains how to create an Institutional Recovery Key for macOS High Sierra (10.13) and
above. However, the steps to create an Institutional Recovery Key for macOS Sierra (10.12) and
below can be found at https://support.apple.com/en-us/HT202385.
To distribute the corporate recovery key through Workspace ONE UEM, first create the FileVault
Corporate Recovery Key and then upload it to the configuration profile on the UEM console by
following the steps:
1 Create FileVault Keychain.
2 Copy FileVaultMaster Keychain to Documents.
3 Unlock FileVaultMaster Keychain.
4 Add FileVaultMaster Keychain to Keychain Access Utility.
5 Validate FileVaultMaster Keychain Unlock.
6 Delete and Confirm Private Key Deletion.
7 Export FileVault Recovery Key Certificate.
8 Some of the additional steps to perform after exporting FileVaultMaster Recovery Key
certificate are to:
macOS Device Management
VMware, Inc. 53
a. Re-Lock the FileVaultMaster Keychain.
b. Delete keychain from keychain access – To remove references to the FileVaultMaster
keychain in Keychain Access.
c. Store the keychain and password – Store both the keychain (containing the certificate and
private key) and the Keychain Password in multiple, secure locations. Without both you will be
unable to decrypt any FileVault 2 drives encrypted with this Institutional Recovery Key.
Create FileVault Keychain
1 On a macOS computer (10.13+), select the Launchpad icon and then select Others > Terminal.
2 In the Terminal window, type the following command to create a FileVaultMaster keychain.
Follow the prompts to apply password to the created keychain.sudo security create-
filevaultmaster-keychain /Library/Keychains/FileVaultMaster.keychain.
3 Once the command is complete, launch the Finder.
4 Press Shift+command+G and enter /Library/keychains as the folder name.
5 Select Go to access the folder and to fetch the created keychain.
Ensure you make copies and securely store both the keychain file and the password used to create
the keychain. This keychain contains the certificate and private key to decrypt any FileVault 2
encrypted devices.
Copy FileVaultMaster Keychain to Documents
Before you start using the created FileVaultMaster keychain, make a copy of it and save in a
secure location. Because, you need the modified keychain to encrypt a device and unmodified
keychain to recover encryptrd devices.
In Terminal, type the following to copy the keychain file. When prompted, enter your admin
account password to elevate your rights.
cp /Library/Keychains/FileVaultMaster.keychain ~/Documents/FileVaultMaster.keychain
sudo cp /Library/Keychains/FileVaultMaster.keychain /Library/Keychains/
FileVaultMaster2.keychain
Unlock FileVaultMaster Keychain
You can unlock the FileVaultMaster keychain using command followed by providing password.
Unlock the FileVaultMaster keychain by entering the following command and enter the password
you used when the keychain was created.
security unlock-keychain /Library/Keychains/FileVaultMaster.keychain
If you get an unexpected result during this step, the unlock idle time might have elapsed. You
need to re-issue the unlock command in the Terminal window.
Add FileVaultMaster Keychain to Keychain Access Utility
Add the FileVaultMaster keychain to the Access Utility using the keychain access application.
macOS Device Management
VMware, Inc. 54

Prerequisites
Before you add the FileVaultMaster keychain to the Keychain Access Utility, open the Keychain
Access application through Terminal window using the following command.
open /Applications/Utilities/Keychain\ Access.app/
Procedure
1 Select File.
2 Select Add Keychain.
3 Browse to the Library folder.
4 Select Keychains.
5 Select FileVaultMaster.keychain.
6 Select Add.
Results
macOS Device Management
VMware, Inc. 55

If you unlocked the keychain correctly, the keychain should show the unlocked icon in Keychain
Access Utility. If it does not, you need to re-issue the unlock and re-add the keychain.
Validate FileVaultMaster Keychain Unlock
Validate the FileVaultMaster keychain to ensure it is unlocked.
After adding the FileVaultMaster keychain file, validate if it is unlocked by performing the following
steps.
Procedure
1 Ensure that the FileVaultMaster keychain shows unlocked icon.
2 Ensure that you can view the private key and certificate in the keychain.
Delete and Confirm Private Key Deletion
Once the validation of FileVaultMaster keychain file is complete, ensure you delete the
FileVaultMaster Password Key (private key).
Procedure
1 Navigate to FileVault Master Password Key > Delete "FileVault Master Password Key" and
select Delete to confirm deletion of the private key.
2 Enter your administrative User Name and Password.
macOS Device Management
VMware, Inc. 56

3 Select Modify Keychain.
By the end of this step, you have a FileVaultMaster.keychain file which does not contain the
private key. This Keychain can be placed in \Library\Keychains in order to manually enable
FileVault2 encryption with an Corporate Recovery Key.
Export FileVault Recovery Key Certificate
The configuration profile which configures the Institutional recovery key on the Workspace ONE
UEM console requires only the certificate and not the keychain file.
Procedure
1 Select the FileVault Recovery Key certificate in the FileVaultMaster keychain.
2 Select Export FileVault Recovery Key (....)...
3 Provide the certificate name as FileVaultMaster (in keeping the name consistent with the
keychain file that it was created from).
4 Choose the location to save the certificate where you can access the key from your browser.
(In this example, ~/Documents/).
macOS Device Management
VMware, Inc. 57

5 Select Save.
By the end of this step, you now have a certificate file which DOES NOT contain the private key.
Personal Recovery for macOS Devices
Enabling Personal as the recovery type will allow the user of the device to use a recovery key
to decrypt their device. Additionally, that key can be reported to the UEM console to allow
administrators to use the key to decrypt the device if necessary.
Use Personal keys rather than Enterprise keys because Workspace ONE UEM can audit access
to these keys, since they are escrowed in the UEM console. Also, Personal keys are beneficial
because they are unique to each device. This means that the compromise of one key on one
device does not compromise the security of other devices.
Once this profile is deployed to the device, the user will see a prompt from the Workspace ONE
Intelligent Hub taking them through the process of encrypting the disk. If configured, users may
also be shown the recovery key to give them the option of saving it for later use. After a reboot,
the device will begin the encryption process in the background and the user can continue their
daily tasks normally without fear of interruption.
Enable Personal Recovery Encryption for a macOS Device
Personal recovery encryption is useful if the user wants the benefit of viewing and keeping a
Personal Recovery Key from decrypt.
1 Configure a new Disk Encryption profile.
2 Choose Personal as the recovery type and configure the recovery key settings as needed.
Once FileVault is enabled on the device, the Personal Recovery Key will be reported to a
Workspace ONE UEM server or another designated server.
View Escrowed Personal Recovery Key on the UEM Console
The personal recovery key is generated when FileVault 2 encryption is enabled and remains valid
until the personal recovery key is changed or the disk is decrypted using that key.
macOS Device Management
VMware, Inc. 58

To view an escrowed recovery key, perform the following within the Device Details page on the
UEM console.
1 Select the Security tab.
2 Select View Recovery Key.
3 Note the Personal Recovery Key that is escrowed.
4 If required, note the Previous Recovery Key. The Previous Recovery Key field is loaded with
the old key only if the Personal Recovery Key had been rotated at least once.
5 Close when finished viewing the key.
If an encrypted macOS volume is decrypted and then re-encrypted, then the previous
personal recovery key would become invalid and a new one is created as part of the re-
encryption process.
View Escrowed Personal Recovery Key on the SSP
The personal recovery key can also be viewed on the Self Service Portal, where the FileVault
Personal Recovery Key (PRK) is automatically rotated 15 minutes after being accessed by the
device user.
Prerequisites
To view an escrowed recovery key on the SSP portal, perform the following steps:
1 Enter the https://<AirWatchEnvironment>/MyDevice URL in the browser.
2 Select Go to Details icon.
3 elect Security from the More drop down menu.
4 Select the View Recovery Key and note the Personal Recovery Key that is escrowed.
macOS Device Management
VMware, Inc. 59

5 If required, note the Previous Recovery Key. The Previous Recovery Key field is loaded with
the old key only if the Personal Recovery Key had been rotated at least once.
6 Close when finished veiwing the key.
Recover an Encrypted Disk Using a Personal Recovery Key
If you forget your personal password for FileVault, you can use a Recovery Key to regain access.
1 Start into recovery-mode (CMD+R at start), a different partition or connect the disk to another
macOS.
2 Access the terminal and run the following command. The command fetches a list of the Logical
CoreStorage Volumes.diskutil cs list.
3 Find the Logical Volume (last on the list) and copy the UUID – it is in the format of XXXXXXXX-
XXXX-XXXX-XXXXXXXXXXXX. Logical Volume is used to specify which volume must be
unlocked and decrypted.
macOS Device Management
VMware, Inc. 60

4 Ensure that you have the Personal Recovery Key available and run the command below.
Replace "UUID" with the UUID retrieved in step 3. You are prompted to enter the Passphrase
and the Personal Recovery Key.
diskutil cs unlockVolume UUID
You can now see a response showing that the volume is unlocked and mounted. Now, you can
recover any necessary files.
5 Now that the volume is unlocked, you can begin the decryption process by using the following
command and replacing "UUID" with the UUID retrieved in step 3. You are prompted to enter
the Passphrase and the Personal Recovery Key.diskutil cs revert UUID
To monitor the decryption status, use the following command. The status is located in the
Logical Volume Family information.
diskutil cs list
Personal Recovery Key Rotation
macOS Device Management
VMware, Inc. 61
To maintain the security of the FileVault Personal Recovery Key (PRK), Workspace ONE UEM
supports a native MDM mechanism to automatically rotate the key after they have been accessed
by a user in Self-Service Portal or by an administrator in the UEM Console in Device Details. This
enforces a security practice that the PRK should only be viewed when needed to unlock a disk,
and it needs to be re-secured in a timely manner
To use the automatic recovery key rotation feature, you must have:
n The latest UEM console or the existing UEM console that is upgraded to the latest version.
n macOS devices 10.14 and later
n The devices must be encrypted and have an existing recovery key escrowed to the UEM
console.
Automatic Recovery Key Rotation When Viewed
When the Personal Recovery Key (PRK) is accessed through the Device Details page or the Self
Service Portal, 15 minutes later, the native MDM command to rotate the PRK is queued for the
device to process the command on the next check-in. Additionally, an event log is captured with
the details, such as when the key was last viewed and by what user. The event logs also report the
status of the PRK rotation command lifecycle.
Recovery key rotation can be performed by both the admins (through the UEM console) and the
users (through the SSP). Step 1 details the procedure for admins and step 2 details the procedure
for users.
Procedure
Device must be encrypted with a Personal Recovery Key escrowed to the UEM console.
Prerequisites
1 To access the Device Details page, navigate to Devices > List View and select a macOS
device.
a Select the View Recovery Key under the Security section of the Summary tab. The View
Recovery Key page appears displaying the Current Personal Recovery Key with the
timestamp it was rotated and additionally the previous recovery key for backup
If the recovery key was never rotated, the Previous Personal Recovery Key field remains
empty
b Approximately 15 minutes after completing step a, the MDM command to rotate the
recovery key is queued for the device. For more information on auditing the key access
and rotation lifecycle, see the
View Rotated Recovery Key Event Logs
section.
2 To access the device through SSP, enter the https://<AirWatchEnvironment>/MyDevice URL
in the browser.
a Select the View Recovery Key under the Security section of the Summary tab. The View
Recovery Key page appears displaying the Current Personal Recovery Key with the
timestamp it was rotated and additionally the previous recovery key for backup.
macOS Device Management
VMware, Inc. 62
b Approximately 15 minutes after completing step a, the MDM command to rotate the
recovery key is queued for the device.
View Recovery Key Event Logs
When the command to rotate the recovery key is initiated, or when the recovery key sample is
received, or any event related to the PRK occurs, it can be viewed on the UEM console. The
events are tracked as Event Logs in the Troubleshooting tab on the Device Details page.
1 Navigate to Device > List View and select a macOS device to access the Device Details page.
2 To view Event Logs and Commands information, select Troubleshooting from the More
Actions drop-down menu.
Retrieve the Recovery Key from API
The automatic recovery key rotation feature is available only for macOS devices. This feature
was introduced to maintain the security of the FileVault Personal Recovery Key (PRK). Due to
server performance reasons, the automatic rotation from APIs which returns the recovery key
is removed. The automatic rotation functionality is available when the PRK is viewed in Device
Details or SSP.
Note: It is recommended to follow up with a second API call to rotate the key as the automatic
rotation will not occur.
Following GET APIs are used in retrieving the recovery key:
n /devices/security - Retrieves the security information of the device identified by device ID
n /devices/<id>/security - Retrieves the security information of the device identified by device
ID
n /devices/<uuid>/security/recovery-key - Retrieves the recovery key by the device UUID
Rotate Key Via API
To rotate the recovery key, use the following API:
POST /devices/{deviceId}/commands?command=RotateFileVaultKey
Note: Use this API after calling one of the above GET calls.
MDM Bootstrap Token
macOS 10.15 Catalina introduces the Bootstrap Token feature to help with granting a SecureToken
to mobile account users and the optional administrator account created during device enrollment
through Apple Business Manager. This feature does not affect how local accounts are granted
SecureTokens.
About SecureToken
macOS Device Management
VMware, Inc. 63
The introduction of Apple File System (APFS) in macOS 10.13 changed how FileVault encryption
keys are generated and stored. These keys are generated either during the initial local user
account creation or during the first login by a user. The SecureToken, which contains the
generated keys, is a wrapped Key Encryption Key (KEK) protected by the user’s password. Any
macOS account that must use FileVault authentication is required to have a SecureToken enabled.
Directory (network) users are not eligible for SecureToken enablement.
Before macOS Catalina, enabling a mobile account user for SecureToken required specific
workflows, some of which required entering existing SecureToken enabled administrator
credentials to enable the new user account for SecureToken. Bootstrap Token eliminates this
process for MDM enrolled devices.
For User Approved MDM (UAMDM) enrolled devices on macOS 10.15.4 or later, a Bootstrap
Token is automatically generated and escrowed to Workspace ONE UEM on the first login by any
user who is SecureToken enabled. If needed, a Bootstrap Token can also still be generated and
escrowed manually using the /usr/bin/profiles command-line tool.
Note:
A Bootstrap Token cannot be generated and escrowed automatically if a local user account
creation is skipped during Setup Assistant.
After the Bootstrap Token is escrowed in Workspace ONE UEM, future user accounts can use it
during login to be automatically enabled with a SecureToken. When a mobile account or device
enrollment created administrator logs in, macOS automatically requests the Bootstrap Token from
the UEM server and uses it with the user credentials to enable a unique SecureToken for that user
on that volume.
The Bootstrap Token is a unique key used for only this purpose by MDM and cannot be used
instead of a Personal Recovery Key (PRK).
For existing deployed systems, administrators can use the /usr/bin/profiles command-line tool
with user credentials for an existing SecureToken enabled administrator account to manually
generate a Bootstrap Token for future logins by mobile accounts.
Using console API's, administrators can now check for BootstrapTokenEscrowStatus for macOS
devices. For macOS Big Sur devices, additional details about Bootstrap Token will also be
returned.
The following device security info API responses are updated to contain bootstrap token
information:
Action - GET
Version - 1
URL - https://<host>/mdm/devices/security?searchby=<searchby>&id=<id>
URL - https://<host>/mdm/devices/<device id>/security
Prerequisite:
n Device OS must be macOS Catalina 10.15.0 and later.
macOS Device Management
VMware, Inc. 64

n For macOS 10.15.4 and later, the device only needs to be User Approved MDM Enrolled.
n For macOS between 10.15.0 and 10.15.3, the device must be enrolled through Apple Business
Manager to use Bootstrap Token.
n For macOS Catalina, Bootstrap Token primarily aids with enabling SecureToken for users with
Mobile Accounts. This requires the Mac to be bound to a supported directory service like
Active Directory. Network Users are not supported.
n For macOS Big Sur and above, Bootstrap Token also supports SecureToken enablement for
Local Account users.
Manually Create a Bootstrap Token
After a macOS 10.15 device is enrolled, an MDM setting will be automatically sent to the device to
make Bootstrap Token available for escrow in UEM.
To verify the availability and to generate a Bootstrap Token, perform the following steps:
1 On the Mac, navigate to Applications > Utilities > Terminal.
2 To know if Bootstrap Token is supported, run the following command:
sudo profiles status -type bootstraptoken
This command will return output similar to the following:
Bootstrap Token supported on server:YES
Bootstrap Token escrowed to server:YES(Or NO)
The first line indicates that UEM supports Bootstrap Token and the second line indicates if it
has already been escrowed or not. If the Bootstrap Token has not yet been escrowed, proceed
to Step 3.
Note: The automatic escrow of Bootstrap Token only happens on macOS 10.15.4 or later. For
versions between 10.15.0 and 10.15.3, it must be manually done.
3 To generate and escrow a Bootstrap Token, run the following command:
sudo profiles install -type bootstraptoken
This command is interactive and requires the admin username and password to be entered.
Enter the admin username:adminuser
Enter the password for user 'adminuser':
profiles: Create Bootstrap Token created
profiles: Bootstrap Token created
profiles: Bootstrap Token escrowing to server...
profiles: Bootstrap Token escrowed
macOS Device Management
VMware, Inc. 65

After the Bootstrap Token is escrowed, you can run the command from Step 2 again to verify:
sudo profiles status –type bootstraptoken
Bootstrap Token supported on server: YES
Bootstrap Token escrowed to server: YES
4 For further verification, run the following command to list which accounts can unlock the
FileVault encrypted disk:
diskutil apfs listcryptousers /
This command must return the UUID of the newly enabled mobile account and the Bootstrap
Token External Key.
You can compare this list with sudo fdesetup list to verify the UUIDs of SecureToken
enabled accounts:
Cryptographic users for disk1s5 (3 found)
|
+-- 16C00654-9A3E-4129-BF21-A66261BBA58C
| Type: Local Open Directory User
|
+-- 2457711A-523C-4604-B75A-F48A571D5036
| Type: MDM Bootstrap Token External Key
|
+-- C3701A60-377E-4A55-94B8-3147975C357A
Type: Local Open Directory User
sudo fdesetup list
adminuser,16C00654-9A3E-4129-BF21-A66261BBA58C
mobileuser,C3701A60-377E-4A55-94B8-3147975C357A
Manually Delete a Bootstrap Token
If you want to remove the Bootstrap Token for a device, run the following command:
sudo profiles remove -type bootstraptoken
Enter the admin username:adminuser
Enter the password for user 'adminuser':
profiles: Bootstrap Token deleted
profiles: Bootstrap Token clearing on server...
profiles: Bootstrap Token cleared
Bootstrap Token is deleted from the device and the UEM server.
View the Event Logs
To view the event logs in Workspace ONE UEM console, navigate to Devices> Details View >
Troubleshooting.
macOS Device Management
VMware, Inc. 66
Filter by Module = Devices to see Event Logs related to Bootstrap Token:
n GetBootstrapTokenRequestProcessed
n GetBootstrapTokenRequested
n
BootstrapTokenEscrowed
n SetBootstrapTokenRequested
n BootstrapTokenRemoved
n RemoveBootstrapTokenRequested
macOS Device Management
VMware, Inc. 67
macOS Device Profiles
8
Profiles are the primary means to manage devices. Configure profiles so your macOS devices
remain secure and configured to your preferred settings.
You can think of profiles as the settings and rules that, when combined with compliance policies,
help you enforce corporate rules and procedures. They contain the settings, configurations, and
restrictions that you want to enforce on devices.
A profile consists of the general profile settings and a specific payload. Profiles work best when
they contain only a single payload.
macOS profiles apply to a device at either the user level or the device level. When creating macOS
profiles, you select the level the profile applies to. Some profiles can only be applied to the user
level or device level.
This chapter includes the following topics:
n Device Access
n Device Security
n Device Configuration
n Configure an Accessibility Profile
n Configure an AirPlay Mirroring Profile
n Configure an AirPrint Profile
n Configure an Associated Domains Profile
n Configure a CalDAV or CardDAV Profile
n Configure Certificate Transparency Profile
n Configure a Content Filter Profile
n Configure a Credentials/SCEP Profile
n Configure a Custom Attributes Profile
n Configure a Custom Settings Profile
n Configure a Directory Profile
n Configure a Disk Encryption Profile
VMware, Inc.
68
n Configure a DNSSetting Profile
n Configure a Dock Profile
n Configure an Email Profile
n Configure an Energy Saver Profile
n Configure an Exchange Web Services Profile
n Configure a File Provider Profile
n Configure a Finder Profile
n Configure a Firewall Profile
n Configure a Firewall(Native) Profile
n Configure a Firmware Password Profile
n Configure a Kernel Extension Policy Profile
n Configure an LDAP Profile
n Configure a Login Items Profile
n Configure a Login Window Profile
n Configure a Managed Domains Profile
n Configure a Messages Profile
n Configure a Mobility Profile
n Configure a Network Profile
n Configure a NSExtension Profile
n Configure a Parental Controls Profile
n Configure a Passcode Profile
n Configure a Printing Profile
n Configure a Privacy Preferences Profile
n Configure a Proxies Profile
n Configure a Restrictions Profile
n Configure a Security and Privacy Settings Profile
n Configure Skip Setup Assistant Profile
n Configure a Smart Card Profile
n Configure a Software Update Profile
n Configure an SSO Extension Profile
n Configure a System Extensions Profile
n Configure a Time Machine Profile
macOS Device Management
VMware, Inc. 69
n Configure a VPN Profile
n Configure a VPN Profile
n Configure a Web Clips Profile
n Configure an Xsan Profile
n Upload a Profile
Device Access
Some device profiles configure the settings for accessing a macOS device. Use these profiles to
ensure that access to a device is limited only to authorized users.
Some examples of device access profiles include:
n Secure a device with a Passcode profile. For more information, see
Configure a Passcode
Policy Profile
n Configure Apple's Gatekeeper functionality, which secures application downloads and controls
specific settings related to user passwords. For more information, see
Configure a Security
and Privacy Settings Profile
.
n Configure accessibility options to accommodate end users' needs. For more information, see
Configure an Accessibility Profile
.
Device Security
Ensure that your macOS devices remain secure through device profiles. These profiles configure
the native macOS security features or configure corporate security settings on a device through
Workspace ONE UEM.
Some examples of device security profiles include:
n Use a Wi-Fi profile to connect enrolled devices to your corporate Wi-Fi without sending
the network credentials to users. For more information, see
Configure a Network Profile for
macOS Devices
.
n Implement digital certificates to protect corporate assets. For more information, see
Configure
a Credentials/SCEP Profile
n Ensure access to internal resources for your devices with the VPN profile. For more
information, see
Create a VPN
Profile
and
Create a VPN
On Demand Profile
.
Device Configuration
Configure the various settings of your macOS devices with the configuration profiles. These
profiles configure the device settings to meet your business needs.
macOS Device Management
VMware, Inc. 70

Some examples of device configuration profiles include:
n Set up access to Microsoft Outlook and corporate files with an Exchange Web Services profile.
For more information, see
Configure an Exchange Web Services Profile for macOS Devices
.
n Ensure that the devices remain up to date with the macOS Updates profile. For more
information, see
Configure a Software Update Profile for macOS Devices
.
Configure an Accessibility Profile
Configure accessibility options for end users by creating an Accessibility profile.
Procedure
1 Navigate to Resources > Profiles & Baselines > Profiles and select Add. Select Apple macOS,
and then select whether this profile will apply to only the enrollment user on the device User
Profile, or the entire device Device Profile.
2 Configure the profile's General settings.
3 Select the Accessibility payload.
4 Configure options for Seeing, including:
Setting
Description
Zoom Options Enable zoom function using scroll wheel and keyboard, set max/min zoom, smooth images
and show preview rectangle when zoomed out.
Display Options Invert colors, use grayscale, enhance contrast and set cursor size to normal, medium, large or
extra large.
Voiceover Options Enable voiceover for the device.
5 Configure options for Hearing, including:
Setting
Description
Flash the screen when an alert occurs Enable flashing for alerts.
Play stereo audio as mono Allow stereo to play as mono.
6 Configure options for Interaction, including:
Setting
Description
Sticky Keys Enable Sticky Keys, beep when a modifier is set and display pressed keys on screen.
Slow Keys Enable Slow Keys, use click key sounds and set key acceptance delay.
Mouse Keys Enable Mouse Keys, set initial delay and max speed, and ignore device's built-in trackpad.
7 Select Save & Publish when you are finished to push the profile to devices.
macOS Device Management
VMware, Inc. 71

Configure an AirPlay Mirroring Profile
Configuring the AirPlay payload allows you to accept a specific set of devices to receive broadcast
privileges according to a device ID.
Additionally, if the display access to a device is password-protected, you can pre-enter the
password to create a successful connection without revealing the PIN to unauthorized parties.
Note: AirPlay Mirroring currently only pertains to macOS Yosemite devices.
1 Navigate to Resources > Profiles & Baselines > Profiles > Add > Add Profile. Select Apple
macOS, and then select whether this profile will apply to only the enrollment user on the
device (User Profile), or the entire device (Device Profile).
2 Configure the profile's General settings.
3 Select the AirPlay Mirroring payload tab.
4 Select Add under Allowed AirPlay Destinations.
5 Enter the destinations and device information, including:
Setting Description
Destination Name This is the name of the destination display. The name must match the device name and is
case-sensitive. The device name can be found on the device.
Allowed Destination
Device ID
This is the device ID for the destination display. Device IDs include the BonjourID.
Password This is the password that shows on the user's device when attempting to mirror to the
destination. This password is only required if a password is required to mirror to the
device.
6 Click Save & Publish when you are done configuring AirPlay settings.
Configure an AirPrint Profile
Configure an AirPrint payload for an Apple device to enable computers to automatically detect an
AirPrint printer even if the device is on a different subnet than the AirPrint printer.
1 Navigate to Resources > Profiles & Baselines > Profiles > Add and then Add the appropriate
platform. If you select Apple macOS, then select whether this profile will apply to only the
enrollment user on the device (User Profile), or the entire device (Device Profile).
2 Configure the profile's General settings.
macOS Device Management
VMware, Inc. 72

3 Select the AirPrint payload tab.
Setting Description
IP address Enter the IP address (XXX.XXX.XXX.XXX).
Resource Path Enter the Resource Path associated with the AirPrint printer (ipp/printer or printers/
Canon_MG5300_series). To find the Resource Path and IP address information of a printer, see
the Retrieve AirPrint Printer Information section.
4 Select Save & Publish.
Configure an Associated Domains Profile
To establish a connection between your domain (website) and your application, to share data or
credentials or for the features of the application that are based on your website, configure an
Associated Domains profile. Associated Domains can be used with features such as Extensible
AppSSO, universal links, and Password AutoFill.
Prerequisites
Before you configure an Associated Domains profile, you need to have an apple-app-site-
association file on your website and an entitlement in your application. An associated domain
matches the associated domains entitlement with an apple-app-site-association file. For more
information, see Apple Documentation
1 Navigate to Resources > Profiles & Baselines > Profiles and select Add. Select Apple macOS
and then select User Profile or Device Profile.
2 Select the Associated Domains payload.
3 Configure Associated Domains settings including:
Setting
Description
App Identifier Enter the identifier of the application to associate with the domains. The application
identifier or the bundle ID should be in the following format <Team Identifier>.<Bundle
Identifier>
Associated Domains Each string should be in the form of <service>:<fully qualified domain>[:port number].
To match all subdomains of an associated domain, specify a wildcard with the prefix *.
before the beginning of a specific domain (the period is required).
Enable direct
download (macOS 11
and later)
If enabled, date for this domain should be downloaded directly instead of through a CDN.
4 Select Save & Publish when you are finished to push the profile to the devices.
macOS Device Management
VMware, Inc. 73

Configure a CalDAV or CardDAV Profile
Configure a CalDAV or CardDAV profile to allow end users to sync corporate calendar items and
contacts.The ability to use CalDav or CardDAV applies to User Profiles only.
1 Navigate to Resources> Profiles & Baselines > Profiles and select Add. Select Apple macOS,
and then select User Profile, since email settings can only apply to a single user.
2 Configure the profile's General settings.
3 Select the CalDAV or CardDAV payload.
4 Configure CalDAV or CardDAV settings, including:
Settings Description
Account Description Enter a brief description of the account.
Account Hostname Enter/view the name of the server for CalDAV use.
Port Enter the number of the port assigned for communication with the CalDAV server.
Principal URL Enter the web location of the CalDAV server.
Account Username Enter the username for the Active Directory account.
Account Password Enter the password for the Active Directory account.
Use SSL Select this check box to enable Secure Socket Layer usage.
5 Select Save & Publish when you are finished to push the profile to devices.
Configure Certificate Transparency Profile
Use this profile to configure the certificate transparency options.
1 Navigate to Resources > Profiles & Baselines > Profiles and select Add. Select Apple macOS,
and then select Device Profile.
2 Select the Certificate Transparency payload and click ADD.
Setting
Description
Disabled Domains Each entry should contain a domain that is excluded from certificate transparency
enforcement. Wildcards can be used to capture subdomains such as "
.example.com".
Wildcards cannot be used to capture top level domains such as "
.com".
Disabled
Certificates
Each entry should contain the hash of a server certificate's subjectPublicKeyInfo that is
excluded from certificate transparency enforcement. The only available hash algorithm
currently supported is SHA-256.
macOS Device Management
VMware, Inc. 74

Configure a Content Filter Profile
This payload allows you to configure settings and authentication with third-party web content
filters.
1 Navigate to Resources > Profiles & Baselines > Profiles > Add > Add Profile. Select Apple
macOS, and then select whether this profile will apply to only the enrollment user on the
device (User Profile), or the entire device (Device Profile).
2 Select the Content Filter payload.
3 In the Filter Type, see that Plug-in is enabled.
4 Complete the required Content Filter information including:
Setting Description
Filter Name Enter the name of the filter that displays in the app and on the device.
Identifier Enter the bundle ID of the identifier of the plug-in that provides filtering service.
Service Address Enter the hostname, IP address or URL for service.
Organization Choose the organization string that is passed to the 3rd party plug-in.
Filter WebKit Traffic Select this check box to choose whether to filter WebKit traffic.
Filter Socket Traffic Select this check box to choose whether to filter Socket traffic.Note: Either
WebKit or Socket traffic needs to be enabled in order for the payload to work.
Socket Filter Bundle ID (macOS
10.15 and later)
Enter the bundle ID of the filter data provider system extension.
Socket Requirement (macOS
10.15 and later)
Enter the designated requirement of the filter data provider system extension.
This can be found by running the following command: codesign --display -r
- /path/to/app/binary
Filter Network Packets (macOS
10.15 and later)
Enable this option to filter the network packets.
Packet Bundle ID (macOS 10.15
and later)
Enter the bundle ID of the filter packet provider system extension.
Packet Requirement (macOS
10.15 and later)
Enter the designated requirement of the filter packet provider system extension.
This can be found by running the following command: codesign --display -r
- /path/to/app/binary
Filter Grade (macOS 10.15 and
later)
The filter grade determines the order if multiple content filters are used. Filters
specified as Firewall will see network traffic before those specified as Inspector.
macOS Device Management
VMware, Inc. 75

5 Configure the Authentication information including:
Setting Description
User Name Use look-up values to pull directly from the user account record. Ensure your Workspace
ONE UEM user accounts have an email address and email username defined.
Password Enter the password for this account.
Payload Certificate Choose the authentication certificate.
6 Add Custom Data which includes keys required by the third-party filtering service. This
information goes into the vendor config dictionary.
7 Select Save & Publish.
Configure a Credentials/SCEP Profile
Even if you protect your corporate email with Wi-Fi and VPN with strong passcodes and
other restrictions, your infrastructure remains vulnerable to brute force and dictionary attacks or
employee error. For greater security, you can implement digital certificates to protect corporate
assets.
Prerequisites
To do this, you must first define a certificate authority. Then configure a Credentials payload
alongside your Exchange Web Service, Wi-Fi, or VPN payload. Each of these payloads has
settings for associating the certificate authority defined in the Credentials payload.
To push down certificates to devices, you must configure a Credentials or SCEP payload as part of
the profiles you created for EAS, Wi-Fi, and VPN settings. Use the following instructions to create
a credentials payload:
1 Navigate to Resources > Profiles & Baselines > Profiles > Add > Add Profile. Select Apple
macOS, and then select whether this profile will apply to only the enrollment user on the
device (User Profile), or the entire device (Device Profile).
2 Configure the profile's General settings.
3 Select either the Exchange Web Services, Wi-Fi, or VPN payload to configure. Configure the
payload you selected.
4 Select the Credentials (or SCEP) payload and Upload a certificate or select Defined Certificate
Authority from the Credential Source drop-down menu.
Note: Certificate Preference and Identity Preference options are available only if you have
selected User Profile in Step 1.
a Select the Credential Source as Upload. Enter the Credential Name and Certificate. The
Certificate Preference option is available only if you have selected Credential Source as
Upload.
macOS Device Management
VMware, Inc. 76
Note: If you have multiple servers or emails that use the same certificate, you can create a
Certificate Preference to define the URLs or email which automatically use this certificate.
A Certificate Preference specifies which certificate to be automatically used when users
access specified URLs, emails, or domains through Safari or other applications that use
WebKit or native macOS URL APIs. When the profile gets installed, the certificate and
corresponding Certificate Preference are installed in the user’s keychain. In a profile, you
can add multiple Certificate Preference payloads as needed.
Certificate Preference payload is available for macOS 10.12 and later.
b Select Credential Source as Defined Certificate Authority and enter Certificate Authority
and Certificate Template.
The Identity Preference option is available only if you have selected Credential Source as
Defined Certificate Authority.
Note: If you use multiple client identity certificates, you can create an Identity Preference
to define the URLs which must automatically use this preference.
An Identity Preference specifies which SSL client certificate to be automatically used when
users access specified URLs, emails, or domains through Safari or other applications that
use WebKit or native macOS URL APIs. When the profile gets installed, the certificate and
corresponding Identity Preference are installed in the user’s keychain. In a profile, you can
add multiple Identity Preference payloads as needed.
Identity Preference payload is available for macOS 10.12 and later.
5 Navigate back to the previous payload for Exchange Web Services, Wi-Fi, or VPN. Specify the
Identity Certificate in the payload:
a Exchange Web Service – Select the Payload Certificate under Login Information.
b Wi-Fi – Select a compatible Security Type (WEP Enterprise, WPA/WPA2 Enterprise or
Any (Enterprise)) and select the Identity Certificate under Authentication.
c VPN – Select a compatible Connection Type (for example, CISCO AnyConnect, F5
SSL) and select Certificate from the machine/User Authentication drop-down. Select the
Identity Certificate.
6 Return to the Credentials payload and choose the following allowances:
a Allow access to all applications – Select to allow or prevent applications to access the
certificate in the Keychain. When this option is enabled, it is not required for the end
users to explicitly select the 'allow access to all applications' to access the installed SCEP
Certificate and enter credentials to grant access.
b Allow export of private key from Keychain – Select whether to allow or prevent users
from exporting the private key from the installed certificate.
7 Select Save and Publish.
macOS Device Management
VMware, Inc. 77
Configure a Custom Attributes Profile
Write a command or script and report it as a custom attribute using the Workspace ONE
Intelligent Hub for macOS v.2.3 and higher. Choose when to run the command or script on hourly
intervals or during an event.
Custom Attributes can also be used in Assignment Rules for Products. For more information about
Products, see Product Provisioning for macOS.
1 Navigate to Resources > Profiles & Baselines > Profiles and select Add then Add Profile.
Select Apple macOS, and then select Device Profile, since this profile is only applicable to the
entire device.
2 Scroll down the menu bar on the left and select Custom Attributes followed by Configure.
3 Enter the Attribute Name.
4 Enter the Script/Command to run. Expand the text box as needed.
5 Choose an Execution Interval to allow for scheduling to report either in hours or as an event
occurs.
6 Use the + and - buttons at the bottom of the payload to create multiple scripts.
7 Select Save & Publish when you are finished to push the profile to devices.
Note: Custom Attribute values cannot return the following special characters: / \ " * : ; < > ?
|. If a script returns a value which contains these characters, the value is not reported on the
console. Trim these characters from the script's output.
Configure a Custom Settings Profile
The Custom Settings payload can be used when Apple releases new functionality or features that
Workspace ONE UEM does not currently support through its native payloads.
If you do not want to wait for the newest release of Workspace ONE UEM to be able to control
these settings, you can use the Custom Settings payload and XML code to manually activate or
deactivate certain settings.
You can create a "test" organization group to avoid affecting users before you are ready to save
and publish the new settings.
Do not assign a profile to any smart group as it might give an encrypted value when viewing XML.
1 Navigate to Resources > Profiles & Baselines > Profiles > Add > Add Profile. Select Apple
macOS > macOS.
2 Configure the profile's General settings.
3 Configure the appropriate payload (for example, Restrictions or Passcode).
4 Select Save and Publish.
macOS Device Management
VMware, Inc. 78

Note: Ensure that the profile created in Steps 1–4 is not assigned to any smart group.
Otherwise, the data might be encrypted when viewing xml.
5 Navigate back to the Profiles page and select a profile using the radio button next to the
profile name. Menu options appear above the list.
6 Select </> XML from the menu choices. A View Profile XML window appears.
To download the metadata (Plist) file after the initial upload or save, click Export. Edit the file to
add advanced or custom configurations.
1 Find and copy the section of text starting with <dict>...</dict> that you configured previously,
for example, Restrictions or Passcode. This text contains a configuration type identifying
its purpose, for example, restrictions. You must copy a single dictionary content inside the
Payload Content as shown in the example.
<plist version="1.0">
<dict>
<key>PayloadContent</key>
<array>
<dict>
<key>safariAcceptCookies</key>
<real>2</real>
<key>safariAllowAutoFill</key>
<true />
<key>PayloadDisplayName</key>
<string>Restrictions</string>
<key>PayloadDescription</key>
<string>RestrictionSettings</string>
<key>PayloadIdentifier</key>
<string>745714ad-e006-463d-8bc1-495fc99809d5.Restrictions</string>
<key>PayloadOrganization</key>
<string></string>
<key>PayloadType</key>
<string>com.apple.applicationaccess</string>
<key>PayloadUUID</key>
<string>9dd56416-dc94-4904-b60a-5518ae05ccde</string>
<key>PayloadVersion</key>
<integer>1</integer>
</dict>
</array>
<key>PayloadDescription</key>
<string></string>
<key>PayloadDisplayName</key>
<string>Block Camera/V_1</string>
<key>PayloadIdentifier</key>
<string>745714ad-e006-463d-8bc1-495fc99809d5</string>
<key>PayloadOrganization</key>
<string></string>
<key>PayloadRemovalDisallowed</key>
<false />
<key>PayloadType</key>
<string>Configuration</string>
<key>PayloadUUID</key>
macOS Device Management
VMware, Inc. 79

<string>86a02489-58ff-44ff-8cd0-faad7942f64a</string>
<key>PayloadVersion</key>
<integer>1</integer>
</dict>
</plist>
For more examples and information on the XML code, refer to the KB article: https://
support.workspaceone.com/articles/115005038288.
2 If you see encrypted text between dict tags in the XML window, you can generate the
decrypted text by modifying the settings in the profiles page. To do this:
a Navigate to Groups & Settings > All Settings > Devices > Users > Apple > Profiles.
b Override the custom settings option.
c Deactivate Encrypt Profiles option and then Save.
3 Navigate back to Custom Settings profile and paste the XML you copied in the text box. The
XML code you paste should contain the complete block of code, from <dict> to </dict>.
4 Select Save and Publish.
Configure a Directory Profile
By binding a device to the directory service, the device comply with any domain policies and
password security settings. You may bind a single device to multiple directories by sending
multiple directory service profiles.
Procedure
1 Navigate to Resources > Profiles & Baselines > Profiles and select Add. Select Apple macOS,
and then select Device Profile, since this profile is only applicable to the entire device.
2 Configure the profile's General settings.
3 Select the Directory payload. Then, choose the Directory Type, Open Directory or Active
Directory.
If multiple profiles enforce separate policies on a single device, the most restrictive policy
is enforced. If your password policy is being managed by your directory for network users
logging into the devices, Workspace ONE UEM does not recommend a passcode policy.
4 Choose Authentication settings including:
Setting
Description
Directory Type Choose Active Directory or Open Directory or LDAP from the drop-down menu.
Server Hostname Enter the directory server name.
macOS Device Management
VMware, Inc. 80

Setting Description
Username and
Password
Enter the credentials of the administrator used to authenticate and bind the device to the
server. Administrator credentials should not include the domain. Use "administrator" only, do
not use "domain\administrator."
Client ID Enter the identifier associated with the device in the directory. Enter the Client ID in a format
that is allowed by the directory you're attempting to bind. Workspace ONE UEM recommends
using {SerialNumber}. Other lookup values (device asset number, etc.) may not generate
computer names that comply with Netbios Naming Conventions.
5 Choose User Experience settings for Active Directory Accounts:
Setting Description
Configure a mobile account at
login
Select this option to create a mobile account. When this option is selected, the
users' data is stored locally and they are automatically logged into a mobile
account.
Require confirmation Send a confirmation message to the end user.
Use UNC path Select to determine the UNC specified in the Active Directory when mounting the
network home.
Mount Choose either the AFP or SMB protocols.
Default user shell Specify the default shell for the user after logging into the computer.
6 Select the Mappings tab to specify an attribute to be used for equivalent acronym (GID). By
default these are derived from the domain server.
7 Select Administrative tab and configure settings including:
Setting
Description
Group Names Specify groups to determine who has local administrative privileges on the computer.
Preferred domain server Enter the name of the domain server.
Namespace Select the primary account naming convention based on forest or domain.
Packet signing Choose how to ensure data is secure.
Packet Encryption Choose to encrypt data.
Password trust interval Set to determine how often the computer trust is updated.
Restricts DDNS Add interfaces to specify updates. Use the format: en0, en1, en2 etc.
8 Select Save & Publish to push the profile to the device.
macOS Device Management
VMware, Inc. 81

Configure a Disk Encryption Profile
If you are using macOS 10.9 and later versions, configure the disk encryption profile and push
the profile to the device, whether the Workspace ONE Intelligent Hub is installed or not. Other
Workspace ONE UEM enhancements with 10.9 and later versions include the role-based access
for recovery keys and the ability to audit who views recovery keys and when.
Procedure
1 Navigate toResources > Profiles & Baselines > Profiles and select Add.
2 Select Apple macOS and then select Device Profile. This profile is only applicable to the entire
device.
3 Configure the profile's General settings.
4 Select the Disk Encryption payload and configure the following settings.
Native Device
Management (FileVault
2 Encryption Settings) Description
Recovery Key Type Select the type of recovery key required to decrypt the disk. The available options are
Personal, Institutional, and Personal and Institutional.
FileVault Enterprise
Certificate
This option appears only when you select Institutional or Personal and Institutional
recovery key type. Select the FileVaultMaster.cer for the disk encryption that was
uploaded into the Credentials payload. For information about using certificates with the
disk encryption profile, see the Institutional Recovery for macOS devices section.
Display Personal
Recovery Key
Enable the option to display the personal recovery key to the user when the key is
generated.
Escrow Personal
Recovery Key to UEM
Server
Enable the option to retain the recovery key on the UEM server so that it is always
accessible in the Device Details page. For information about recovery keys, see the
configuration profile reference guide in the Apple Developer portal.
FileVault User Select the type of user to enable for FileVault. The available user types are: Current or
Next Login User - Enables FileVault for the user who is logged in when the profile is
installed. If no user is logged in, then the next local or mobile user account is prompted
to enable FileVault.Specific User - Enables FileVault only to a specifically defined user.
Username If Specific User is selected as the FileVault user type, enter the user name for the
account.
When to prompt user To prompt the user to enter the password to enable FileVault at different stages, select
one of the following options: Both Login and Logout Logout Only Login Only
macOS Device Management
VMware, Inc. 82

Native Device
Management (FileVault
2 Encryption Settings) Description
Bypass Login(s) Enter the number of times a user can bypass the FileVault prompt during login. Min
number of times is 0 and max number of times is 10.
Require user to
unlock FileVault after
hibernation
Enable the option to require a password to unlock the FileVault after hibernation and to
restore the state of the FileVault when it was last saved.
Intelligent
Hub Device
Management
Settings Description
Use Intelligent Hub
for enforcement
Activate or deactivate the Intelligent Hub enforcement of disk encryption. If deactivated, no
Hub notifications are prompted to the user. Only the native device management settings that
are defined are applied.
Encryption
disabled
notification
Enable the option to display the notification to the user to log out allowing the operating
system to prompt users for their password to start encryption.
Notification title Enter the title for the encryption notification. Min length is 1 char and max length is 29 char.
Allowed characters are: a–z, A–Z 0–9 Special characters - #,;:'"?.!@{}+_-
Notification
Message
Enter the message for the encryption notification stating the user to log out and log back
in when prompted. Min length is 1 char. Keeping the message under 135 characters avoids
truncating the notification in the Notification pane. However, message with 63 characters is
the max for keeping the notification preview from being truncated. Allowed characters are:
a–z, A–Z 0–9 Special characters - #,;:'"?.!@{}+_-
Notification
dismissal
Enter the number of times for the user to close logout notifications. Min number of attempts
is 0 and max number of attempts is 100.
Dismissal interval Enter the time interval between dismissed notifications. Min interval is 1 hour, and max
interval is 168 hours.
Action after last
dismissal
Select the action type that must take place after the last allowed notification dismissal.
Force Logout - Automatically sends notifications to the users after the last allowed dismissal
prompting to save their work before the system automatically logs them out.Do Nothing - No
action is taken.
Prompt for
password if
encrypted
Enable the option for the Hub to prompt users for their password to rotate the recovery key
to escrow if the device has already been encrypted.
Notification title Enter the title for notification requesting for the password that allows Hub to rotate the
recovery key. Min length is 1 char and max length is 29 char. Allowed characters are: a–z,
A–Z 0–9 Special characters - #,;:'"?.!@{}+_-
Notification
message
Enter the message for notification requesting for the password that allows Hub to the
rotate recovery key. Min length is 1 char. Keeping the message under 135 characters avoids
truncating the notification in the Notification pane. However, message with 63 characters is
the max for keeping the notification preview from being truncated. Allowed characters are:
a–z, A–Z 0–9 Special characters - #,;:'"?.!@{}+_-
Dismissal interval Enter the time interval between dismissed notifications. Min interval is 1 hour, and max
interval is 168 hours.
macOS Device Management
VMware, Inc. 83

Intelligent
Hub Device
Management
Settings Description
Prompt title Enter the title for the password prompt to rotate the FileVault recovery key. Min length is 1
char and max length is 50 char. Allowed characters are: a–z, A–Z 0–9 Special characters -
#,;:'"?.!@{}+_-
Prompt message Enter the message for the password prompt to rotate the FileVault recovery key. Min length
is 1 char and max length is 50 char. Allowed characters are: a–z, A–Z 0–9 Special characters
- #,;:'"?.!@{}+_-
Success title Enter the title for the notification when the recovery key validation is successful. Min length is
1 char and max length is 50 char. Allowed characters are: a–z, A–Z 0–9 Special characters -
#,;:'"?.!@{}+_-
Success Message Enter the message for the notification when the device is compliant with the organization's
disk encryption policy after successful password entry. Min length is 1 char and max length is
150 char. Allowed characters are: a–z, A–Z 0–9 Special characters - #,;:'"?.!@{}+_-
Error title Enter the title for the error notification when the recovery key rotation fails. Min length is 1
char and max length is 50 char. Allowed characters are: a–z, A–Z 0–9 Special characters -
#,;:'"?.!@{}+_-
Error Message Enter the error message stating the user to contact the IT administrator when the recovery
key rotation fails. Min length is 1 char and max length is 150 char. Allowed characters are: a–z,
A–Z 0–9 Special characters - #,;:'"?.!@{}+_-
Retries before
error message
Enter the maximum number of passwords retry attempts before displaying an error
notification that asks end user to contact the IT administrator. As an admin, you can view
the corresponding error event logs in the HubEventLogs.log file and take the necessary
troubleshooting steps.Once the error is fixed, use the following hubcli command to reset the
Hub to prompt for password retry attempts.sudo hubcli reset-recoverykey
5
Select Save & Publish to push the profile to the devices.
Note: If no CoreStorage logical volume groups are found, the Disk encryption fails and
errors out. Disk encryption can be determined by running the following command on devices
(10.12.6 or lower) without FileVault 2. If no CoreStorage Volumes are found, the drive must be
reformatted using FileVault 2.
diskutil cs list
Configure a DNSSetting Profile
Use the DNSSetting profile to add DNS settings to your end user devices.
1 Navigate to Resources > Profiles & Baselines > Profiles and select Add. Select macOS, and
then select Device Profile.
macOS Device Management
VMware, Inc. 84

2 Select the DNSSetting payload and click ADD. Enter the server configuration settings
Setting Description
DNS Protocol Specify if devices will use HTTPS or TLS to communicate with the DNS server.
Server Addresses Specify the list of DNS server IP addresses.
Server Name If you select TLS as the DNS protocol, specify the hostname of the DNS server used to
validate the server certificate.
Server URL If you select HTTPS as the DNS protocol, specify the hostname or address used to
validate the server certificate.
Supplemental domains Enter all domains that will use the DNS server. If this is empty, all domains will use the
DNS server.
Action if network
matches
Specify when the DNS Settings will take effect: Connect: Apply DNS Settings when a
match occurs Disconnect: Do not apply DNS Settings when a match occurs Evaluate
Connection: Apple DNS Settings with per-domain exceptions when the dictionary
matches.
Action Used when the Action is set to Evaluate Connection. NeverConnect: Do not use the
DNS Settings for the specified domains ConnectIfNeeded: Allow the DNS Settings for
the specified domains
Domains Enter the list of domains for which to take the previously defined Action.
DNS domain matching If enabled, the rule will match if any of the domains specified in the DNS Domains list
match any domain in the device's search domains list.
DNS server matching If enabled, the rule will match if any of the domains specified in the DNS Server
Addresses list match any of the network's specified DNS servers.
SSID matching If enabled, the rule will match if any of the SSIDs specified in the Network SSIDs list
match the current network.
Interface Type The rule matches only if the primary network interface hardware matches the specified
type.
URL to probe The rule matches if the specified URL returns a 200 HTTP status code without
redirection.
Configure
a Dock Profile
Configure a Dock profile to manage the look and feel of the dock and the applications that will
display on it. Configuring Dock settings from the UEM console allows for additional control of the
users' devices by determining whether or not the users can adjust their own settings later. For
example, removing or adding an app from the Dock.
1 Navigate to Resources > Profiles & Baselines > Profiles and select Add. Select Apple macOS,
and then select whether this profile will apply to only the enrollment user on the device User
Profile, or the entire device Device Profile.
2 Configure the profile's General settings.
3 Select the Dock payload.
macOS Device Management
VMware, Inc. 85

4 Configure Size & Position settings, including:
Setting Description
Dock Size Use the scale to determine the desired size for the Dock.
Allow user to adjust Dock Size Allow or prevent users from modifying their own Dock Size settings on their
devices.
Magnification Use the scale to determine the desired magnification for the Dock.
Allow user to adjust
Magnification
Allow or prevent users from modifying their own Magnification settings on their
devices.
Position Use the drop-down menu to select the position of the Dock on the screen.
Allow user to adjust Dock
Position
Allow or prevent users from modifying their own Dock Position settings on their
devices.If you have specified certain Apps, they cannot be removed but they can
be rearranged.
5 Configure Items settings, including:
Setting Description
Dock Applications Select Add to specify applications to appear on the Dock.
Dock Items Select Add to specify files and folders to appear on the Dock.
Add Other Folders Configure folder for My Applications, Documents, and Network Home in the
Dock.
Allow user to adjust Dock
Applications and Items
Allow or prevent users from modifying their own Dock Applications settings
on their devices.
6 Configure Options settings, including:
Setting
Description
Minimize Using Select either Genie or Scale animation for minimizing the Dock.
Allow user to adjust Minimize effect Allow user to adjust Minimize effect.
Minimize Window Into Application
Icon
Select this to create an icon to represent an open window in the Dock
when the window is minimized.
Allow user to adjust Minimize into
Application icon
Allow or prevent users from modifying their own Minimize windows
settings on their devices.
Animate Opening Application Enable animation when launching an application from the Dock.
Allow user to adjust Animate Opening
Application
Allow or prevent users from modifying their own animation settings on
their devices.
7 Select Save & Publish when you are finished to push the profile to devices.
macOS Device Management
VMware, Inc. 86

Configure an Email Profile
Configure an email profile for macOS devices to configure email settings on the device. The ability
to use email profile applies to User Profiles only.
1 Navigate to Resources > Profiles & Baselines > Profiles and select Add. Select Apple macOS,
and then select User Profile, since email settings can only apply to a single user.
2 Configure the profile's General settings.
3 Select the Email payload.
4 Configure Email settings, including:
Settings Description
Account Description Enter a brief description of the email account.
Account Type Use the drop-down menu to select either IMAP or POP.
Path Prefix Enter the name of the root folder for the email account (IMAP only).
User Display Name Enter the name of the end user.
Email Address Enter the address for the email account.
Host Name Enter the name of the email server.
Port Enter the number of the port assigned to incoming mail traffic.
Username Enter the username for the email account.
Authentication Type Use the drop-down menu to select how the email account holder is authenticated.
Password Enter the password required to authenticate the end user.
Use SSL Select this check box to enable Secure Socket Layer usage for incoming email
traffic.
Host Name Enter the name of the email server.
Port Enter the number of the port assigned to incoming mail traffic.
Username Enter the username for the email account.
Authentication Type Use the drop-down menu to select how the email account holder is authenticated.
Outgoing Password Same As
Incoming
Select this to auto-populate the password field.
Password Enter the password required to authenticate the end user. Select Show Characters
if you want users to see characters as they type.
Use SSL Select this check box to enable Secure Socket Layer usage for incoming email
traffic.
5 Select Save & Publish when you are finished to push the profile to devices.
macOS Device Management
VMware, Inc. 87

Configure an Energy Saver Profile
An Energy Saver profile enforces the settings for when the computer should sleep and configure
wake options.
Procedure
1 Navigate to Resources> Profiles & Baselines > Profiles and select Add. Select Apple macOS,
and then select Device Profile, since this profile is only applicable to the entire device.
2 Configure the profile's General settings.
3 Select the Energy Saver payload.
4 Configure Energy Saver settings, including:
Setting Description
Desktop Sleep Options – Set the length of time for the computer or display to go to sleep. Wake Options – Set
when the computer will wake depending on Ethernet network administrator access, pressing the power
button and automatically after a power failure.
Laptop Laptop power options are identical to desktop power options. Configure specific configurations when
the laptop is using battery power or when connected to a power adapter.
Schedule Set the computer to start up or go to sleep at specific times. Also set unique schedules depending on
weekday, specific day and any day.
5 Select Save & Publish when you are finished to push the profile to devices. If you push a
laptop profile to a desktop device, or vice versa, the profile is ignored by the receiving device.
Configure an Exchange Web Services Profile
An Exchange Web Services profile allows the end user to access corporate email infrastructures
and Microsoft Outlook accounts from the device. The ability to use Exchange Web Services applies
to User Profiles only
Note: This payload is fully supported on macOS v.10.9 and higher, however, macOS will only
configure Contacts when this is installed on v10.7 and v10.8.
1 Navigate to Resources> Profiles & Baselines> Profiles and select Add. Select Apple macOS,
and then select User Profile, since email settings can only apply to a single user.
2 Configure the profile's General settings.
3 Select the Exchange Web Services payload.
macOS Device Management
VMware, Inc. 88

4 Configure Exchange Web Services settings including:
Setting Description
Email Client Configure the native mail client or Microsoft Outlook on the device. Outlook requires
Workspace ONE Intelligent Hub v.1.1.0+ to be installed on the device.
Account Name Enter the name for the EWS account.
Exchange Host Enter the name of the Exchange host. This option appears when Microsoft Outlook is
selected.
Exchange Port Enter the port number for the Exchange Host. This option appears when Microsoft
Outlook is selected.
Use SSL Select to enable Secure Socket Layer usage for communication. This option appears when
Microsoft Outlook is selected.
Delete all user data
when profile is
removed
Select to erase all user information, mail, settings, and all configured accounts in Outlook,
whether the user is managed or unmanaged. This option appears when Microsoft Outlook
is selected. CAUTION: Do not make this selection if deploying to a personal computer. This
forces Outlook to quit and deletes all information from the computer's Microsoft User Data
folder.
Username Enter the username for the email account.
Email Address Enter the email address for the email account.
Full Name Enter the first and last name associated with the account. This option appears when
Microsoft Outlook is selected.
Password Enter the password required to authenticate the end user.
Payload Certificate Select the certificate upload for EAS use. This option appears when Native Mail Client is
selected.
Domain Enter the domain for the email account. This option appears when Microsoft Outlook is
selected.
5 Configure more options for Native Mail Client:
Setting
Description
Internal Exchange Host The name of the secure server for EAS use. This option and following appear when
Native Mail Client is selected.
Port Enter the number of the port assigned for communication with the internal
Exchange host.
Internal Server Path The location of the secure server for EAS use.
Use SSL For Internal
Exchange Host
Select this check box to enable Secure Socket Layer (SSL) usage for communication
with the Internal Exchange Host.
External Exchange Host The name of the external server for EAS use.
Port Enter the number of the port assigned for communication with the External
Exchange Host.
macOS Device Management
VMware, Inc. 89

Setting Description
External Server Path The location of the external server for EAS use.
Use SSL For External
Exchange Host
Select this check box to enable Secure Socket Layer (SSL) usage for communication
with the External Exchange Host.
6 Configure Directory Services for Microsoft Outlook.
Settings Description
Directory Server Enter the location of the secure server.
Directory Server Port Enter the port number of the secure server.
Search Base Enter the search base of the secure server.
Directory Server Requires SSL Select this check box if the directory server requires Secure Socket Layer (SSL).
7 Select Save & Publish when you are finished to push the profile to devices.
Configure a File Provider Profile
Use this payload to configure a file provider profile. You can enable this payload to allow managed
file providers to have access to requesting process.
1 Navigate to Resources > Profiles & Baselines > Profiles and select Add. Select Apple macOS,
and then select Device Profile.
2 Select the File Provider payload and click ADD.
3 Enable Allow managed file providers access to request attribution to have access to the path
of requesting process.
Configure a Finder Profile
A Finder profile controls general settings related to what end users can see on their devices and
the actions they are allowed to perform.
Procedure
1 Navigate to Resources > Profiles & Baselines > Profiles and select Add. Select Apple macOS,
and then select whether this profile will apply to only the enrollment user on the device User
Profile, or the entire device Device Profile.
2 Configure the profile's General settings.
3 Select the Finder payload.
macOS Device Management
VMware, Inc. 90

4 Configure settings on the Preferences, including:
Setting Description
Use Regular Finder/Use Simple Finder Allow user to access either Regular Finder or Simple Finder as a default.
Hard Disk Show the device's Hard Disk icon on the Desktop.
External Disk Show any connected external disk icons on the Desktop.
CDs, DVDs, and iPods Show any inserted media icons on the Desktop.
Connected Server Show any connected servers icons on the Desktop.
Show warning before emptying the
Trash
Present user with prompt before emptying the Trash.
5 Configure settings on the Commands, including:
Setting Description
Connect to server Allow users to open a dialog box and find servers on a network.
Eject Allow users to eject removable media and mountable volumes.
Burn Disc Allow users to write permanent information to a CD or DVD.
Go to Folder Allow users to open files or folders by typing the path name.
Restart Allow users to access the restart command from the Apple Menu.
Shut Down Allow users to access the shutdown command from the Apple Menu.
6 Select Save & Publish when you are finished to push the profile to devices.
Configure a Firewall Profile
Push a firewall profile with the Workspace ONE Intelligent Hub v2.2+ for macOS to filter
unauthorized connections to your enterprise network.
Using the native firewall combined with the Workspace ONE Intelligent Hub, you can monitor
firewall settings and revert settings if unauthorized changes occur. Also, use the firewall to control
incoming connections and protect computers against probing requests.
1 Navigate to Resources > Profiles & Baselines > Profiles and select Add. Select Apple macOS,
and then select Device Profile, since this profile is only applicable to the entire device.
2 Select the Firewall payload.
3 Select Enable to allow firewall protection.
macOS Device Management
VMware, Inc. 91

4 Configure the following firewall settings:
Description Setting
Enable Select this option to enable the macOS firewall.
Block all incoming connections Select this to block all incoming connections from sharing services, except for
connections required for basic Internet services.
Automatically allow signed
software to receive incoming
connections
Select this to automatically allow only software signed by a developer and
approved by Apple to provide services accessed from their network.
Enable stealth mode Select this to prevent the computer from responding to or acknowledging
requests made from test applications.
5 Select Save & Publish to push the profile to the device. All Workspace ONE Intelligent Hub
functionality continues including Push Notifications even if Block incoming connections is
selected.
Configure a Firewall(Native) Profile
Manage the device firewall using only native MDM settings. You can manage the overall firewall
behavior, as well as specify how traffic is handled on a per-application basis.
Using the native firewall combined with the Workspace ONE Intelligent Hub, you can monitor
firewall settings and revert settings if unauthorized changes occur. Also, use the firewall to control
incoming connections and protect computers against probing requests.
1 Navigate to Resources > Profiles & Baselines > Profiles and select Add. Select Apple macOS,
and then select Device Profile, since this profile is only applicable to the entire device.
2 Select the Firewall payload.
3 Select Enable to allow firewall protection.
4 Configure the following firewall settings:
Description
Setting
Enable firewall Select this option to enable the macOS firewall.
Block all incoming connections Select this to block all incoming connections from sharing services, except
for connections required for basic Internet services.
Enable stealth mode Select this to prevent the computer from responding to or acknowledging
requests made from test applications.
Enable Logging (macOS 12 and
later)
Select this option to ebable firewall logging.
Logging behavior(macOS 12 and
later)
Specify the type of firewall logging: Throttled, Brief, or Detail.
Apps Specify individual applications with connections to be controlled by the
firewall.
macOS Device Management
VMware, Inc. 92

Description Setting
App Bundle ID Specify the bundle ID for each application.
Allow connections Specify whether connections should be allowed for this application.
5 Select Save & Publish to push the profile to the device. All Workspace ONE Intelligent Hub
functionality continues including Push Notifications even if Block incoming connections is
selected.
Configure a Firmware Password Profile
Enforce a firmware password to increase security at the hardware level when allowing macOS
v10.10+ to start up using an external drive, partition, or using Recovery Mode.
Prerequisites
The Workspace ONE Intelligent Hub v2.2+ for macOS is required with this profile that provides
enhanced security and allows you to determine when end users need to enter firmware
passwords.
Important: If a firmware password is already set on the computer, then profile installation will fail.
1 Navigate to Resources > Profiles & Baselines > Profiles and select Add. Select Apple macOS,
and then select Device Profile, since this profile is only applicable to the entire device.
2 Configure the profile's General settings.
3 Configure the Firmware Password:
Setting
Description
Firmware
Password
Enter the password for the device.
Mode Select the Mode when end users are required to enter the password: Command Mode – Require
the password when attempting to boot to another drive or partition. After the end user enters the
password, the computer begins using Command Mode. Then, the macOS Hub prompts the end
user to re-start the computer.Full Mode – Require the password every time the computer starts
up. After the end user enters the password, the macOS Hub prompts the end user to re-start the
computer. When the computer re-starts, it begins using Full Mode.Once the profile is configured,
it cannot be removed remotely.
4 Select Save & Publish to push the profile to the device.
Configure a Kernel Extension Policy Profile
Use a Kernel Extension Policy profile to explicitly allow applications and installers that use kernel
extensions to load on your end users' devices.
macOS Device Management
VMware, Inc. 93

This profile controls restrictions and settings for User Approved Kernel Extension Loading on
macOS v10.13.2 and later.
1 Navigate to Resources > Profiles & Baselines > Profiles and select Add. Select Apple macOS,
and then select Device Profile.
This profile is not enabled for the User level.
2 Select the Kernel Extension Policy payload.
3 Select the Allow User Overrides check box to approve additional kernel extensions not
explicitly allowed by configuration profiles.
This option allows any application to install on the end users' devices without approval for
a kernel extension. If you select this option, the extension policy settings below provide no
additional functionality.
4 If you choose not to allow users to override kernel extensions, configure the extension policy
settings.
Setting Description
Allowed Team
Identifiers
Team identifiers for which all validly signed kernel extensions will be allowed to load.Use
the Add button to add additional identifiers.
Allowed Kernel
Extentions
Signed kernel extensions that will always be allowed to load on the machine. Enter a
Team Identifier and a Bundle ID for each app. For unsigned legacy kernel extensions, use
an empty key for the team identifier.Use the Add button to add additional extensions.
Allow Non-admin
User Approval
Select this option to allow standard users to approve additional kernel extensions in the
Security and privacy preferences.
Configure an LDAP
Profile
An LDAP profile allows end users to access and integrate with your corporate LDAPv3 directory
information. The ability to use LDAP applies to User Profiles only.
1 Navigate to Resources > Profiles & Baselines > Profiles and select Add. Select Apple macOS,
and then select User Profile, since these settings can only apply to a single user.
2 Configure the profile's General settings.
3 Select the LDAP payload.
4 Configure LDAP settings:
Setting
Description
Account Description Enter a brief description of the LDAP account.
Account Hostname Enter/view the name of the server for Active Directory use.
Account Username Enter the username for the Active Directory account.
Account Password Enter the password for the Active Directory account.
macOS Device Management
VMware, Inc. 94

Setting Description
Use SSL Select this check box to enable Secure Socket Layer usage.
Search Settings Select Add and enter settings for Active Directory searches run from the device.
5 Select Save & Publish when you are finished to push the profile to devices.
Configure a Login Items Profile
A Login Items profile enables you to control the behavior of the users' devices when they launch.
1 Navigate to Resources > Profiles & Baselines > Profiles and select Add. Select Apple macOS,
and then select whether this profile will apply to only the enrollment user on the device (User
Profile), or the entire device (Device Profile).
2 Configure the profile's General settings.
3 Select the Login Items payload.
4 Configure Login Items settings, including:
Setting Description
Applications Specify which applications to launch at login. Enter the full path of the application, for
example, /Applications/Contacts.app.
Files and Folders Specify which files and folders to launch at login. Enter the full path of the file or
folder.
Authenticated Network
Mounts
Specify which network mounts to authenticate with the user's login name and
password. Use Active Directory (AD) credentials for user login. Enter the full mount
path and volume, including protocol, for example, smb://server.example.com/
volume.
Network Mounts Specify which volumes to mount at login. Use AD credentials for user login.
Enter the full mount path and volume including protocol, for example, smb://
server.example.com/volume.
Add network home
SharePoint
Select this to enable network home SharePoint configuration on the device.
User may press shift
to prevent items from
opening
Select this to allow the user to hold shift upon login to prevent items from opening.
5 Select Save & Publish when you are finished to push the profile to devices.
Configure a Login Window Profile
Configure the Login Window profile to control the look and feel of the login window, including
options for logging in, and directory user access to the device.
macOS Device Management
VMware, Inc. 95

Procedure
1 Navigate to Resources> Profiles & Baselines > Profiles and select Add. Select Apple macOS,
and then select Device Profile, since this profile is only applicable to the entire device.
2 Configure the profile's General settings.
3 Select the Login Window payload.
4 Configure Login Window settings using the tabs, including:
Tab Description
Window Show additional information in the menu bar, including host name, macOS version, and IP address when
the menu bar is selected. Enter custom banner message.Show local user, mobile accounts, network
accounts, device admins and "other" information.how device power options, including Shut Down,
Restart and Sleep.
Options Show password hint and set amount of retries before hint is shown, if available. Enable automatic login,
console access, Fast User SwitchingLog out users, enable computer admin to refresh or deactivate
management.Set computer name to computer record name, activate external accounts, allow guest
user.Set screen saver to start and set actual screen saver.
Access Allow or deny specific user accounts from accessing device. Allow local-only users to log-in; use
available workgroup settings and nesting Combine available work group settings and always show work
group dialog during login Note: This only works with Directory Users, not local users on the device. The
device must be bound to the same directory that Workspace ONE UEM is pulling users from.
Scripts Set EnableMCXLoginScripts to TRUE.Set MCXScriptTrust to match the binding settings used to connect
the client computer to the directory domain.
5 Select Save & Publish when you are finished to push the profile to devices.
Configure a Managed Domains Profile
Managed domains are another way Workspace ONE UEM enhances Apple's "open in" security
feature on macOS computers. Use the "open in" feature and manage email domains to protect
corporate data by helping end users verify which emails are sent to corporate accounts.
Procedure
1 Navigate to Resources > Profiles & Baselines > Profiles > Add > Add Profile. Select Apple
macOS, and then select whether this profile will apply to only the enrollment user on the
device (User Profile), or the entire device (Device Profile).
2 Configure the profile's General settings.
3 Select the Managed Domains payload from the list.
4 Enter Managed Emails Domains to specify which email addresses are corporate domains.
For example: mdm.company.com. Emails sent to other domains are highlighted in the email
application to indicate that the address is not part of the corporate domain.
5 Select Save & Publish.
macOS Device Management
VMware, Inc. 96

Configure a Messages Profile
You can create a Messages profile to pre-configure end user laptops to use a Jabber or AOL
Instant Messenger (AIM) account. Accounts can be authenticated through SSL certificates or
Kerberos. The ability to use Messages applies to User Profiles only.
Procedure
1 Navigate to Resources > Profiles & Baselines > Profiles and select Add. Select Apple macOS,
and then select User Profile to apply enrollment to the user's device.
2 Configure the profile's General settings.
3 Select the Messages payload.
4 Configure Messages settings for Jabber , including:
Settings Description
Account Type Allow user to access either a Jabber or AIM account.
Account Description Configure a brief description of the profile that indicates its purpose. This option appears if
AIM is selected.
Account Name Enter the name of the account.
User Name Enter the user name for this account. Use lookup values (for example, {EnrollmentUser} to
pull data from the UEM console.
Password Optionally enter the password required to authenticate the account. Leave it blank to
prompt end users to enter their account password.
Host Name Enter the name of the account server.
Port Enter the number of the port assigned to the account.
Use SSL Select this check box to enable Secure Socket Layer (SSL) usage for authentication.
Use Kerberos v5 Select this check box to enable Kerberos v5 usage for authentication.
5 Select Save & Publish when you are finished to push the profile to devices.
Configure a Mobility Profile
Mobility profiles allow configuration of portable home directories for network accounts, so users
can log into the network even when they are not connected to the network.
With a mobility profile, you can also set home and preference sync settings to optionally sync the
home folder with a central server.
1 Navigate to Resources > Profiles & Baselines > Profiles and select Add. Select Apple macOS,
and then select whether this profile will apply to only the enrollment user on the device (User
Profile), or the entire device (Device Profile).
2 Configure the profile's General settings.
macOS Device Management
VMware, Inc. 97

3 Select the Mobility payload.
4 Using the Account Creation tab, set up the mobile account profile. When this account is
set up, a local copy of the user's network home folder is created for use when they are not
connected to the network.
Settings Description
Configure Mobile
account
Select to configure the account for the user to log into the network.
Require
Confirmatio
Select to send a confirmation message to the end user.
Show "Don't ask me
again"
Select to allow end users to skip the confirmation message after the initial prompt to create
the mobile account.
Configure Home
Using
Choose settings to either Network home and default sync settings or Local home template
from the drop-down navigation menu.
Home folder
location
Choose either the on startup volume folder, at path and enter the path location on the
user's computer where the home folder will reside, or set the location that the user chooses.
Encrypt Contents
with FileVault
Select to encrypt contents with FileVault. If you choose to enable Encryption, select the
following settings:Select the Require computer master password check box to require
a master password.Select Restrict Size to restrict the size of the network home quota.
Determine a Fixed Size with megabytes or a Percentage of the home network quota and
the Size of the percentage.
Delete mobile
accounts
Select to determine how and when to delete the account.Select the Delete mobile accounts
check box to configure options for deleting the account.Choose After and select how many
hours, days or weeks to delete the account after it expires. Setting the value to 0 causes the
account to be deleted as soon as the computer is able to delete it.Select Delete only after
successful sync to delete the device after it syncs with the central server.
5 Choose the Rules tab to configure sync options:
Setting
Description
Preference
Sync
Enable syncing for user preferences. Choose when, what folders to sync and items that do not
need to be synced. Select Merge with User Settings check box to add or append the user's
sync settings. If this is not selected, the user's settings will be wiped when the new settings are
applied.
Home Sync Enable syncing for desktop preferences. Choose when, what folders to sync and items that do
not need to synced and may be skipped.Select Merge with User Settings check box to add or
append the user's sync settings. If this is not selected, the user's settings will be wiped when the
new settings are applied.
6 Select Save & Publish to push the profile to the device.
Configure a Network Profile
A network profile allows devices connect to corporate networks, even if they are hidden,
encrypted, or password protected.
macOS Device Management
VMware, Inc. 98

This can be useful for end users who travel and use their own unique wireless network or to end
users in an office setting where they need to automatically connect their devices to a wireless
on-site.
1 Navigate to Resources > Profiles & Baselines > Profiles and select Add. Select Apple macOS,
and then select whether the profile applies to only the enrollment user on the device (User
Profile), or the entire device (Device Profile).
2 Configure the profile's General settings.
3 Select the Network payload.
4 Choose to configure Wi-Fi or Ethernet settings.
Setting Description
Network Interface Select to connect to network payload using Wi-Fi or Ethernet. If Ethernet is selected,
you have multiple ethernet interface payload types available for connection from the
drop-down list. Payloads with 'active' in their name apply to Ethernet interfaces that are
working at the time of profile installation. If there is no active Ethernet interface working,
the First Active Ethernet interface type gets configured with the highest service order
priority.Payloads without 'active' in the name apply to Ethernet interfaces according to
service order regardless of whether the interface is working or not.
Service Set
Identifier
Enter the name of the network to which the device connects.
Connectivity Select the type of connectivity. Hidden – Allows a connection to network that is not open
or broadcasting. Auto-Join – Determines whether the device automatically connects to the
network.
Security Type Select the method for connection encryption to the wireless network.
Use as
login window
configuration
Allows the user to authenticate to the network at login. This option appears when WiFi and
Security Typeis Enterprise This option also appears when Ethernet is selected.
Protocols Select protocols for network access. This option appears when WiFi and Security Type is
any of the Enterprise choices. This option also appears when Ethernet is selected.
Password Enter the password required to join the Wi-Fi network.
5 Configure Authentication settings that vary by protocol including but not limited to:
Setting
Description
Use as Login Window
Configuration
(For Device Profiles only) Select this if any enterprise protocols were selected for
the network. Allow authentication with the target machine's directory credentials.
Username Enter the username for the account.
User Per-Connection
Password
Request the password during the connection and send with authentication.
Password Enter the password for the connection.
Identity Certificate Select the certificate for authentication.
macOS Device Management
VMware, Inc. 99

Setting Description
TLS Minimum Version Select the minimum version 1.0, 1.1, and 1.2. If no value is selected, the minimum
TLS version defaults to 1.0. Note: Minimum and Maximum TLS versions can be
configured only for TLS , TTLS, EAP-Fast, and PEAP protocol types.
TLS Maximum Version Select the maximum TLS version 1.0, 1.1, and 1.2. If no value is selected, the
maximum TLS version defaults to 1.2
Inner identity Select the inner identification method.
Outer identity Select the external authentication method.
6 Enter the name(s) of server certificates.
7 Select Allow Trust Exceptions to enable the end user to make trust decisions.
8 Configure Proxy settings for either Manual or Auto proxy types.
9 Select Save & Publish when you are finished to push the profile to devices.
Configure a NSExtension Profile
Use this profile to specify the bundleIDs for extensions that are allowed and not allowed to run on
the system.
1 Navigate to Resources > Profiles & Baselines > Profiles and select Add. Select Apple macOS,
and then select Device Profile.
2 Select the NSExtension payload and click ADD.
Setting
Description
Allowed extension Specify any bundle IDs for extensions that are allowed to run on the system.
Denied extensions Specify any bundle IDs for extensions that are not allowed to run on the system.
Denied extension endpoints Specify any extension points for extensions that aren't allowed to run on the system.
Configure a Parental Controls Profile
A parental control profile manages settings that limit profanity, denylist or allowlist specific URLs,
time allowances and curfews.
Procedure
1 Navigate to Resources > Profiles & Baselines > Profiles and select Add. Select Apple macOS,
and then select whether this profile will apply to only the enrollment user on the device User
Profile, or the entire device Device Profile.
2 Configure the profile's General settings.
3 Select the Parental Controls payload.
macOS Device Management
VMware, Inc. 100

4 Configure Content Filter settings , including:
Setting Description
Enable use of Dictation Select this check box to allow user access to Dictation feature.
Hide Profanity in Dictionary and
Dictation
Select this check box to remove profane terminology.
Limit Access To Websites By Select this check box to enable web restrictions. Then, select the applicable
radio button for your desired restriction and add denylisted and allowlisted
URLs as needed.
5 Configure Time Limits settings:
Setting Description
Enforce Limit Select this check box to enable time limit restrictions.
Allowances Select the applicable check boxes to set allowed device usage to either weekdays or weekends and
use the drop-down menus to specify time limits for daily device usage.
Curfews Select the applicable check boxes to prevent the end user from accessing the device during
weekdays or weekends and use the drop-down menus to set specific time frames when device
usage is not allowed.
6 Select Save & Publish when you are finished to push the profile to devices.
Configure a Passcode Profile
Device passcode profiles secure macOS devices and their content. Choose strict options for
high-profile employees, and more flexible options for other devices or for those part of a BYOD
program.
If multiple profiles enforce separate policies on a single device, the most restrictive policy is
enforced. If your password policy is being managed by your directory for network users logging
into the devices, Workspace ONE UEM does not recommend a passcode policy.
1 Navigate to Resources > Profiles & Baselines > Profiles and select Add. Select Apple macOS,
and then select whether this profile will apply to only the enrollment user on the device (User
Profile), or the entire device (Device Profile).
2 Configure the profile's General settings.
3 Select the Passcode payload.
4 Configure Passcode settings:
Setting
Description
Require passcode on device Enable mandatory passcode protection.
Allow simple value Allow the end user to apply a simple numeric passcode.
macOS Device Management
VMware, Inc. 101

Setting Description
Require Alphanumeric Value Restrict the end user from using spaces or non-alphanumeric characters in their
passcode.
Minimum Passcode Length Select the minimum number of characters required in the passcode.
Minimum Number of Complex
Characers
The minimum number of complex characters that a passcode must contain. A
complex character is a character other than a number or a letter, such as & % $
#.
Maximum Passcode Age (days) Select the maximum number of days the passcode can be active.
Auto-lock (min) Select the amount of time the device can be idle before the screen is locked
automatically.
Maximum Grace Period The maximum grace period, in minutes, to unlock the phone without entering a
passcode.
Passcode History Enter the number of passwords to store in order to prevent end users from
recycling passwords.
Maximum Number of Failed
Attempts
Select the number of failed attempts allowed. If the end user enters an incorrect
passcode for the set number of times, the device locks.
5 Select Save & Publish when you are finished to push the profile to devices.
End users are only prompted to change their password if the Workspace ONE Intelligent Hub
is installed and the Enforce Passcode check box is selected in the Workspace ONE Intelligent
Hub settings in the UEM console. For more information about configuring the Workspace ONE
Intelligent Hub, see
Apps for macOS
Devices
section.
Configure a Printing Profile
By creating a Printing profile you can tell devices which default printer to use and set printer
access and footer options.
1 Navigate to Resources > Profiles & Baselines > Profiles and select Add. Select Apple macOS,
and then select whether this profile will apply to only the enrollment user on the device (User
Profile), or the entire device (Device Profile).
2 Configure the profile's General settings.
3 Select the Printing payload.
4 Select Add Printer. An Add Printer window appears.
5 Configure the Printer settings including:
Setting
Description
Name Enter the name of the printer to add.
Printer address Enter the printer address.
Location Specify the friendly location name.
macOS Device Management
VMware, Inc. 102

Setting Description
Model/Driver Choose the printer type. Set model/driver to Custom if the printer does
not support generic drivers for macOS devices. If using Custom Driver, the
driver text must be the exact name, which can be found by locating the
configured printer on the computer and copying the Kind listed under the
printer description.
Lock printer settings Force the user to enter an Admin password to access the printer settings.
Advanced Unlock the PPD file location and enter it.
Default Printer Select a printer to be the default printer.
Allow user to modify printer list Enable end users to modify printers on the device.
Allow printers to connect
directly to the device
Enable printers to connect automatically. If checked, you can also require admin
passcode.
Only show managed printers Allow end users to view a list of managed printers available to the device.
Print page footer Select this to auto-populate the footer with user information and time of print.
Include macOS Address Add a macOS address to show the location of the pages that print and specify
the font name and size of the footer.
Font Name Specify the font name.
Font Size Specify the size of the footer.
6 Select Save & Publish when you are finished to push the profile to devices.
Configure a Privacy Preferences Profile
With the release of macOS Catalina 10.15, Apple has added few more security enhancements
around user data protection and privacy. With the enhancements, macOS prompts the user's
consent for an application or process to access specific data. If users do not consent to the data
access, the applications and processes might fail to function.
The Privacy Preferences profile allows you to manage data access consent on behalf of the user on
macOS 10.14 and later devices. Through the Privacy Preferences profile, you can allow or disallow
the application's request to access various macOS services. For example, if an application requests
access to user's Calendar data, you can allow or deny the request.
Note:
The profile can only be delivered to devices that are User Approved MDM Enrolled and macOS
10.14 and later devices. The profile must not be installed on devices before the devices are
upgraded else the settings cannot apply. It is required to create a Smart Group for macOS 10.14
and later devices to assign the profile, so that the devices automatically pick up the profile on
upgrade.
macOS Device Management
VMware, Inc. 103

From macOS 11 and later, a new authorization key AllowStandardUserToSetSystemService is used
in the following services:
n Listen Event
n Screen Capture
This key permits Standard Users on macOS to change permissions for apps using these services.
1 Navigate to Resources > Profiles & Baselines> Profiles and select Add. Select Apple macOS,
and then select Device Profile.
2 Configure the profile's General settings.
3 Select the Privacy Preferences payload.
4 Select Add App to define the application or the process and configure the following settings.
Settings Description
Identifier Enter the bundle ID or installation path of the application or process.
Identifier Type Select the Identifier type either as Bundle ID or Path.Application bundles are identified
by bundle ID. Non-bundled applications are identified by installation path. Helper tools
embedded within an application bundle automatically inherit the permissions of their
enclosing application bundle.
Code Requirement Enter the designation displayed by running the following command: codesign --
display -r - /path/to/app/binary
Static Code Validation If enabled, the process or application statically validates the code requirement. Enable
this feature only if the process invalidates its dynamic code signature.
Comment Enter notes for your own use. This is not used by macOS.
Services Following are the services offered by Apple to pre-configure in this profile. If there are
conflicting configurations, the most restrictive settings (deny) are used.
Address Book Allow or disallow the contact information managed by Contacts.app.
Calendar Allow or disallow the calendar information managed by Calendar.app.
Reminders Allow or disallow the reminders information managed by Reminders.app.
Photos Allow or disallow the pictures managed by Photos.app -/Pictures/.photoslibrary
Camera Access to the camera cannot be given in a profile, it can only be denied.
Microphone Access to the microphone cannot be given in a profile, it can only be denied.
Accessibility Allow or disallow to control the application through the Accessibility subsystem.
Post Event Allow or disallow the application to send the CoreGraphics APIs to send CG Events to
the system event stream.
System Policy All Files Allow or disallow the application access to all protected files.
System Policy Sys
Admin Files
Allow or disallow the application access to some files used in system administration.
macOS Device Management
VMware, Inc. 104

Settings Description
File Provider Presence
(macOS 10.15)
Allows the application to access documents and directories that are stored and
managed by another application's File Provider extension.
Listen Event (macOS
10.15)
Disallow the application to monitor events from input devices such as mouse, keyboard,
and trackpad. Allows a standard user to set system service (macOS 11+).
Media Library (macOS
10.15)
User's collection of images, audio, and video from various media sources, such as
iTunes or Aperture.
Screen Capture (macOS
10.15)
Disallow the application to access control for screen capture and recording. Allows a
standard user to set system service (macOS 11+).
Speech Recognition
(macOS 10.15)
Allows the application to use speech recognition capabilities.
System Policy Desktop
Folder (macOS 10.15)
Allows the application to access files on the Desktop.
System Policy
Documents Folder
(macOS 10.15)
Allows the application to access files in the Documents folder.
System Policy
Downloads Folder
(macOS 10.15)
Allows the application to access files in the Downloads folder.
System Policy Network
Volumes (macOS 10.15)
Allows the application to access files on Network Volumes.
System Policy
Removable Volumes
(macOS 10.15)
Allows the application to access files on Removable Volumes.
Apple Events Allow or disallow the application to send a restricted Apple event to another process.
You can add multiple Apple events for an application.
Receiver Identifier Enter the receiver identifier of the process or application receiving an Apple Event sent
by the Identifier process. It is required only for the Apple Events service and is not valid
for other services.
Receiver Identifier Type Enter the type of Apple Event Receiver Identifier value. Must be either bundleID or
path. It is required only for the Apple Events service and is not valid for other services.
Receiver Code
Requirement
Enter the Code requirement for the receiving application. It is required only for
the Apple Events service and is not valid for other services. Note: Receiver Code
Requirement is found using the same method as the Code Requirement for the app or
service you are defining in the profile.
5 Select Save.
6 Navigate back to the Privacy Preferences payload's default page to view the list of applications
holding the payload policies.
Configure a Proxies Profile
Direct traffic through a designated proxy server for Wi-Fi connections.
macOS Device Management
VMware, Inc. 105

Choose from multiple proxy connections to properly route traffic depending on your organizations
needs and add proxy exceptions as needed.
1 Navigate to Resources > Profiles & Baselines > Profiles and select Add. Select Apple macOS,
and then select whether this profile will apply only to the enrollment user on the device (User
Profile), or to the entire device (Device Profile).
2 Configure the profile's General settings.
3 Select the Proxies payload from the list.
4 Choose Network Proxies for systems running macOS 10.11, or choose Global HTTP Proxy for
legacy support on systems running macOS 10.9 and 10.10.
a For Network Proxy settings, choose:
Setting Description
Auto Proxy
Configuration
Choose this and enter the Proxy PAC File URL to automatically configure the device to
PAC file settings.
Web Proxy (HTTP) Choose to enable this and enter the Host Name and optionally enter the Port used to
communicate with the proxy. This tells the device to use this proxy for any HTTP traffic.
Secure Web Proxy
(HTTPS)
Choose to enable this and enter the Host Name and optionally enter the Port used
to communicate with the proxy. This tells the device to use this proxy for any HTTPS
traffic.
FTP Proxy Choose to enable this and enter the Host Name and optionally enter the Port used to
communicate with the proxy. This tells the device to use this proxy for any FTP traffic.
SOCKS Proxy Choose to enable this and enter the Host Name and optionally enter the Port used
to communicate with the proxy. This proxy establishes a TCP traffic connection to a
device.
Streaming Proxy Choose to enable this and enter the Host Name and optionally enter the Port used
to communicate with the proxy. This proxy is configured using a RTSP if needed for
applications such as AirPlay.
Gopher Proxy Choose to enable this and enter the Host Name and optionally enter the Port used to
communicate with the proxy. Gopher proxy enables Gopher-based content.
b For Global HTTP Proxy settings, choose:
Setting
Description
Proxy Type Select the type of proxy. Select Manual for proxies that require authentication, or Auto
to specify a Proxy PAC URL.
Proxy PAC File URL Only required if the proxy type is Auto. This option appears when Auto is selected.
Proxy Server Enter the URL of the Proxy Server. This is required if you selected Manual as the proxy
type. This option appears when Manual is selected.
macOS Device Management
VMware, Inc. 106

Setting Description
Proxy Server Port Enter the port used to communicate with the proxy. This is required if you selected
Manual as the proxy type. This option appears when Manual is selected
Proxy Username/
Password
If the proxy requires credentials, you can use look-up values to define the
authentication method. This is required if you selected Manual as the proxy type. This
option appears when Manual is selected.
5 Enter Proxy Exceptions as needed.
6 Activate or deactivate Passive FTP Mode (PASV).
7 Select Save & Publish when you are finished to push the profile to devices.
Configure a Restrictions Profile
Use restrictions to secure the native functionality on macOS devices, protect the corporate
information, and enforce the data-loss prevention. Restriction profiles limit how employees can
use their macOS devices and provide the control needed for the effective lock down of a device if
necessary.
1 Navigate to Resources > Profiles & Baselines > Profiles and select Add. Select Apple macOS,
and then select User Profile or Device Profile to apply the profile only to the device's
enrollment user or to the entire device.
2 Configure the profile's General settings.
3 Select the Restrictions payload.
4 Configure Preferences restrictions.
Setting
Description
Restrict System
panes
Select to view and edit the system preference restrictions options (such as Accessibility,
App store, Bluetooth, CDs and DVDs, Date & Time, Desktop & Screen Saver, Dictation
& Speech, Displays, Dock, Energy Saver, Extensions, Fibre Channel, Flash Player, iCloud,
Ink, Internet Accounts, Keyboard, Language & Region, Mission Control, MobileMe, Mouse,
Network, Notifications, Parent Controls, Printers & Scanners, Profiles, Security & Privacy,
Sharing, Software Update, Sound, Spotlight, Startup Disk, Time Machine, Trackpad, Users and
Groups, and Xscan).
Enable selected
items
Select to restrict the functionality. Then, make restriction selections for the available items.
Disable selected
items
Select to allow the preferences. Then, make the selections for the available items.
macOS Device Management
VMware, Inc. 107

5 Configure Application restrictions
Setting Description
Game Center To restrict or allow the use of Game Center, select the option.
Safari To prevent autofilling web forms, storing login information, or iCloud Keychain details,
restrict or allow the use of AutoFill when using Safari.
App Store To install updates, restrict or allow the use of the App Store, app store adoption, and use
of passwords. When the Restrict App Store to Software Updates is enabled, prevents third-
party app updates from the App Store.
Apple Music To permit users to stream music from Apple Music to their devices, selectAllow Music
Service.
Launch
Restrictions
Choose to restrict applications from launching. Use the Add buttons to specify allowed
applications, allowed folders and disallowed folders.Note: Use the absolute path of the
application for the restriction to work. Relative path of the application (with ~ symbol ) does
not work.
6 Configure Widgets.
Setting Description
Allow only configured widgets Select to allow widgets. To specify the allowed device widgets, click the Add
button.
7 Configure Media restrictions.
Setting
Description
Network Access Allow or restrict the network access for AirDrop.
Hard Disk Media Access Determine what media formats are allowed, require authentication and read-only access
for the end user. You can also force to auto-eject media at log out.
8 Configure Sharing restrictions.
Setting
Description
Restrict which sharing
services are enabled
Select which Sharing services, such as AirDrop, Facebook, and Twitter, are enabled on
the device. You can also select the Automatically enable new sharing services check
box as a restriction.
9 Configure Functionality restrictions.
Setting
Description
Lock desktop picture Select to prevent changing of the desktop picture.
Desktop picture path Enter the path for the desktop picture. Leaving the path blank locks the current
desktop picture and prevents it from being changed.
Allow screen capture Restrict or allow capturing of screen recordings and saving screenshots of
the display. It also prevents the Classroom application from observing remote
screens.
macOS Device Management
VMware, Inc. 108

Setting Description
Camera - Allow Use of Built-in
Camera
Restrict or allow the use of the built-in camera. When restricted, all applications
whether the native or the enterprise are unable to access the camera.
iCloud Restrict or allow the use of the iCloud functions. Allow iCloud documents
and data Allow use of iCloud password for local accounts Allow backup to
My macOS iCloud service Allow Find My Mac iCloud service Allow iCloud
Bookmark syncAllow iCloud Mail servicesAllow iCloud Calendar servicesAllow
iCloud Reminder servicesAllow iCloud Address Book servicesAllow iCloud Notes
servicesAllow iCloud Keychain sync Allow iCloud Desktop & Documents Services
Continuity - Allow Handoff Restrict or allow users to have the capability of Handoff when switching between
multiple devices that are all signed in with the same Apple iCloud account
(macOS 10.15 and later).
Content Caching - Allow
Content Caching
Select to allow end users to enable Content Caching on their devices (macOS
10.13 and later).
Spotlight - Allow Spotlight
Suggestions
Restrict or allow the use of Spotlight suggestions when using Spotlight for
searching.
AirPrint Restrict or allow the use of the AirPrint functions: Force AirPrint to use trusted
certificates for the TLS printing communication (macOS 10.13 and higher).Allow
the iBeacon discovery of AirPrint printers. Enabling iBeacon discovery prevents
spurious AirPrint Bluetooth beacons from phishing for the network traffic
(macOS 10.13 and higher).
Passwords Restrict auto filling of passwords on the devices and sharing of Wi-Fi passwords
to the nearby devices.
Allow Remote Screen
Observation (macOS 10.14.4
(Supervised) and macOS 15)
Enable this option to allow remote screen observation by the Classroom app.
Allow Erase All Contents
and Settings (macOS 10.14.4
(Supervised))
If enabled, allows the Erase All Content And Settings option in the Reset UI.
Force unprompted screen
observation for managed
classes (macOS 10.14.4
(Supervised))
If enabled, a student enrolled in a managed course with the Classrom app will
automatically grant permission to a teacher's request to observe the student's
screen.
Allow unprompted app and
device lock in unmanaged
classes (macOS 10.14.4
(Supervised))
Enable this option to allow the teacher to lock apps or the device without
prompting the student.
Allow automatic joining of
unmanaged classes (macOS
10.14.4 (Supervised))
If enabled, teacher's requests will be automatically granted permission without
prompting the student.
Force students to request
permission to leave
unmanaged classes (macOS
10.14.4 (Supervised))
If enabled, a student enrolled in an unmanaged course through the Classroom
app requests permission from the teacher when attempting to leave the course.
macOS Device Management
VMware, Inc. 109

10 To push the profile to the devices, select Save & Publish. The addition or removal of some
Restrictions profile payloads might not take effect until the target application or utility is
restarted on the device.
Configure a Security and Privacy Settings Profile
The security and privacy settings profile lets you configure Apple's Gatekeeper functionality
settings, which are used for secure application downloads. Gatekeeper also controls specific
settings related to user passwords.
Procedure
1 Navigate to Resources > Profiles & Baselines > Profiles and select Add. Select Apple macOS,
and then select whether this profile will apply to only the enrollment user on the device User
Profile, or the entire device Device Profile.
2 Configure the profile's General settings.
3 Select the Security and Privacy payload.
4 Choose locations from which apps may be downloaded.
5 Configure OS Updates settings to perform a force delay in updating OS especially from
updates being visible to end user for a specified number of days.
Setting
Description
Delay Updates
(Days)
Enable this option and specify the number of days to delay the software update. Number of days
range from 1 to 90. (macOS 10.13.4+ devices). The number of days dictate the length of time
after the release of the software update and not after the time of installation of the profile.
6 Configure Gatekeeper settings.
Setting
Description
Gatekeeper Choose to restrict which types of applications may be downloaded. The available
options are: - Mac App StoreMac App Store and identified developersAnywhere
Do not allow user to override
Gatekeeper setting
Select to prevent the user from modifying settings to Gatekeeper.
7 Configure Security settings.
Setting
Description
Apple Watch to Unlock Select to allow Apple Watch to unlock a paired macOS device (macOS 10.12
and higher).
Touch ID to Unlock Select to allow Touch ID to unlock a macOS device (macOS 10.12.4 and
higher).
Allow user to change Password Select to allow end users to change their passwords (macOS 10.9+).
macOS Device Management
VMware, Inc. 110

Setting Description
Require password after sleep or
screensaver begins
Select to require a password after sleep or screen saver begins. Set the
grace period to determine when a password should be entered.
Allow user to set lock message Select to allow end users to set a lock message on their devices (macOS
10.9+).
8 Configure Privacy settings to automatically send diagnostic and usage data to Apple.
9 Select Save & Publish when you are finished to push the profile to devices.
Configure Skip Setup Assistant Profile
Use Setup Assistant profile to skip Setup Assistant screens on the device after an OS update.
1 Navigate to Resources > Profiles & Baselines > Profiles and select Add. Select Apple macOS,
and then select Device Profile.
2 Select the Skip Setup Assistant payload and click ADD.
Setting Description
Choose Your Look Skips the Choose Your Look window.
Apple ID Setup Skips the Apple ID setup window.
iCloud Storage Skips the iCloud Storage window.
Privacy Skips the Privacy consent window.
Screen Time Skips the Screen Time window.
Siri Skips the Siri setup window.
Touch ID Skips the Touch ID setup window.
True Tone Skips the True Tone Display window.
Unlock with Watch Skips the "Unlock with Watch" screen.
Accessibility Skips the "Accessibility" screen.
Configure a Smart Card Profile
The Smart Card profile controls the restrictions and settings for the Smart card pairing on macOS
10.12.4 and later devices.
Procedure
1 Navigate to Resources> Profiles & Baselines > Profiles and select Add Profile. Select Apple
macOS, and then select the type of profile to apply either to the enrollment user on the device
User Profile, or to the entire device Device Profile.
macOS Device Management
VMware, Inc. 111

2 Configure the profile's General settings.
3 Select the SmartCard payload from the list.
4 Configure the Smart Card settings:
Setting Description
Allow Smart Card
authentication
Activate the option to use the Smart Card for logins, authorizations, and screensaver
unlocking. If deactivated, Smart Card cannot be used for logins, authorizations, or
screensaver unlocking, but can be still used for signing emails and web access. After
assigning the profile, the user must restart the device for the change in the settings to
take effect.
Require Smart Card for
all authentication
Enable the option to allow the user to log in or authenticate only with a Smart Card.
Show user pairing
dialog
Enable the option to allow the user to view the pairing dialog box to add new Smart
Cards. If deactivated, the user cannot view the pairing dialog box, although existing
pairings still work.
Restrict one card per
user
Enable the option to allow the user to pair with only one Smart Card, although existing
pairings are allowed if already set up.
Certificate trust check
validation
By default, the Additional revocation check is deactivated. If enabled, the standard
certificate trust validity check is performed with the additional revocation check. The
available additional revocation check types are: Soft - If selected, the certificate trust
check is turned on with a soft revocation check. The certificate is considered as valid
until the CRL/OCSP explicitly rejects it. Soft revocation check implies that unavailable or
unreachable CRL/OCSP allows the check to succeed. Hard - If selected, the certificate
trust check is turned on with a hard revocation check. The certificate is considered as
invalid unless CRL/OCSP explicitly says this certificate is OK. Hard revocation check is
the most secure option.
Screen saver on Smart
Card removal
Enable the option to activate the Screen saver on the Smart Card removal.
Configure a Software Update Profile
A software update profile allows you to specify the update server that will be tied to the device for
all versioning and update control.
Use this profile to connect to a macOS server with the Workspace ONE Intelligent Hub and
configure schedules that actively check and perform updates much more frequently that the
system does. If needed, connect to a corporate server to perform updates. Either way, this profile
provides a simple solution for managing software updates, restart options and notification updates
for end users.
Note: Software update profile only updates minor software update patches and not major
software updates.
1 Navigate to Resources > Profiles & Baselines > Profiles and select Add. Select Apple macOS,
and then select Device Profile, since this profile is only applicable to the entire device.
2 Configure the profile's General settings.
macOS Device Management
VMware, Inc. 112

3 Select the Software Update payload.
4 Configure Software Update settings:
Setting Description
Update Source Choose a server to configure communication with the client computers' .plist.If choosing
Corporate SUS, enter the hostname of the server (for example, http://server.net:8088/
index.sucatalog) Note: Corporate SUS has been depracted in macOS 10.15.
Install macOS
updates
Select how and when to check for and control updates. Install Updates Automatically –
Downloads and installs all updates; sends notifications to the end user. Download Updates in
Background – Downloads the updates; sends notifications; the end user installs updates when
ready.Check for updates only – Checks for updates and sends notifications to the end user; the
user downloads and installs the updates. Don't Automatically Check for Updates – Turns off
the ability to update software; monitors .plist settings to match profile only.
Choose Updates Choose updates to send to the computer. Choose All – Sends all updates including Apple
updates.Recommended only – Sends only security updates.
Allow
installation of
macOS beta
releases
Select this check box to allow beta releases on the server. This option may be best for testing
environments only. This does not require the Workspace ONE Intelligent Hub.
Install app
updates
Select to allow app updates.
Notify the user
updates are
installing
Send the end user notifications about receiving updates on the device.
Schedule Schedule updates with the Workspace ONE Intelligent Hub, Configure Update Interval –
Choose how often to check for updates in two-hour increments. Update a Specific Time –
Choose specific days and times to check for updates. Choose times to control updates when
there are concerns about use during peak business hours or band-width utilization
Force Restart (if
required)
Automatically restart the computer if required to complete the software update.This setting has
no effect on devices with Apple Silicon hardware. Grace Period– Choose to defer a reboot
for a certain period of time. After this time expires, the computer automatically reboots. Note:
Grace Period settings will also be translated to the screensaver settings.This setting will also be
translated to the screensaver settings. Allow user to defer – Enable the user to choose to defer
re-starting the computer for a certain period of time. Defer time – Chose how often to prompt
the user to re-start the computer after deferment. After each allowed deferment, a message
appears prompting the user to re-start the computer. Max number of defers – Choose how
many times the user can defer from re-starting the computer before it is automatically re-
started to complete the update process.
5 Select Save & Publish when you are finished to push the profile to devices.
macOS Device Management
VMware, Inc. 113

Configure an SSO Extension Profile
To enable single sign-on for native macOS apps and websites with various authentication
methods, configure the SSO Extension profile with the Generic extension type. You can also use
the new built-in Kerberos extension on macOS 10.15 to log users into native apps and sync local
user passwords with the directory. With the SSO Extension profile, users do not have to provide
their user name and password to access specific URLs. This profile is applicable only to macOS
10.15 and later devices.
On macOS 10.15, the SSO Extension profile is only available in Device context. Starting from
macOS 11 Big Sur, admins can create either Device or User profile configuration based on their
deployment needs. The support of User profile configuration is only available on macOS 11 or later.
1 Navigate to Resources > Profiles & Baselines > Profiles and select Add. Select Apple iOS, and
then select User Profile or Device Profile to apply the profile only to the device's enrollment
user or to the entire device.
2 Configure the profile's General settings.
3 Select the SSO Extension payload.
4 Configure the profile settings.
Setting
Description
Extension Type Select the type of the SSO extension for the application. If Generic is selected, provide the
Bundle ID of the application extension that performs the SSO for the specified URLs in the
Extension Identifier text box. If Kerberos is selected, provide the Active Directory Realm
and Domains.
Type Select the type of SSO, either Credential or Redirect. Use the challenge/response
authentication for Credentials extension. Use OpenID Connect, OAuth, and SAML
authentication for Redirect extension.
Team Identifier Enter the Team Identifier of the application extension that performs the SSO for the
specified URLs. Team Identifier is required on macOS and the value must be apple for the
Kerberos extension.
URLs Enter one or more URL prefixes of identity providers where the application extension
performs SSO. Required for Redirect payloads. Ignored for Credential payloads. The URLs
must begin with http:// or https://, the scheme, and host name are matched case-
insensitively, query parameters and URL fragments are not allowed, and the URLs of all
installed Extensible SSO payloads must be unique.
Additional Settings Enter additional settings for the profile in XML code which is added to the ExtensionData
node.
Active Directory
Realm
The option appears only if Kerberos is selected as the Extension Type. Enter the name for
the Kerberos Realm which is the realm name for Credential payloads. This value should
be properly capitalized. The key is ignored for Redirect payloads. If in an Active Directory
forest, this is the realm where the user logs in.
Domains Enter the host names or the domain names which can be authenticated through the
application extension. Host or domain names are matched case-insensitively, and all the
host/domain names of all installed Extensible SSO payloads must be unique.
macOS Device Management
VMware, Inc. 114

Setting Description
Use Site Auto-
Discovery
Enable the option to make the Kerberos extension to automatically use LDAP and DNS to
determine the Active Directory site name.
Allow Automatic
Login
Enable the option to allow passwords to be saved to the keychain.
Require User Touch
ID or Password
Enable the option to require the user to provide Touch ID, FaceID, or passcode to access
the keychain entry.
Certificate Select the certificate to push down to the device which is in the same MDM profile.
Allowed Bundle IDs Enter a list of the application bundle IDs to allow access to the Kerberos Ticket Granting
Ticket (TGT).
Denied Bundle IDs
(macOS 12)
Available when Extension Type is set to Generic. Specify the Bundle IDs of any apps that
may not use the SSO provided by this extension.
Screen Lock
Behavior (macOS
12)
Available when Extension Type is set to Generic. If set to Cancel, authentication requests are
cancelled while the screen is locked. If set to DoNotHandle, the request continues without
SSO.
Use as default
realm
Available when Extension Type is set to Kerberos. If enabled, the configured realm will be
the default realm if there is more than one Kerberos extension configuration.
Delay User Setup
(macOS 11)
Available when Extension Type is set to Kerberos. If enabled, the user is not prompted to
setup the Kerberos extension until either the administrator enables it with the app-sso tool
or a Kerberos challenge is received.
Credential use
mode (macOS 11)
This setting defines how the credential will be used. Below are the available options: Always
- The extension credential will always be used if the SPN matches the Kerberos Extension
Hosts array. The credential will not be used if the calling app is not in the allowed bundle
IDs. When not specified - The credential will only be used when another credential has
not been specified by the caller and the SPN matches the Kerberos Extensions Hosts array.
The credential will not be used if the calling app is not in the allowed bundle IDs. Default
Kerberos - The default Kerberos processes for selecting credentials is used which normally
uses teh default Kerberos credential. This is the same as turning off this capability.
Monitor credential
cache (macOS 11)
Available when Extension Type is set to Kerberos. If disabled, the credential is requested on
the next matching Kerberos challenge or network state change.
Require TLS
(macOS 11 and
later)
Available when Extension Type is set to Kerberos. If enabled, LDAP connections will require
the use of TLS
Principal name
(macOS 11 and
later)
Available when Extension Type is set to Kerberos. This field is the principal name (aka
username) to use. You do not need to include the realm.
Custom Username
Label
Available when Extension Type is set to Kerberos. The custom user name label used in the
Kerberos extension instead of "Username". For example, this could be "Company ID".
Help Text (macOS
11 and later)
Available when Extension Type is set to Kerberos. The text to be displayed to the user at
the bottom of the Kerberos login window. It can be used to display help information or
disclaimer text.
Site Code Available when Extension Type is set to Kerberos. The name of the Active Directory site the
Kerberos extension should use. This value will likely not need modification as the Kerberos
extension can normally find the site automatically.
macOS Device Management
VMware, Inc. 115

Setting Description
Preferred KDCs Available when Extension Type is set to Kerberos. The ordered list of preferred Key
Distribution Centers to use for Kerberos traffic. Use this option if the servers are not
discoverable through DNS. If the servers do not respond, then the device falls back to DNS
discovery. Each entry is formatted in the same way as it would be in a krb5.conf file.
Allow Kerberos
to use credential
(macOS 12 and
later)
Available when Extension Type is set to Kerberos. If enabled, the Kerberos extension
allows the standard kerberos utilities including TicketViewer and klist to access and use
the credential.
Require managed
apps (macOS 12 and
later)
Available when Extension Type is set to Kerberos. If enabled, the Kerberos extension allows
only managed apps to access and use the credential.
Password change
URL (macOS 10.15
and later)
Available when Extension Type is set to Kerberos. This is the URL will launch in the user's
default web browser when they initiate a password change.
5 Configure Password Settings when Kerberos is selected as the Extension type for the
application.
Setting Description
Allow Password Change Activate or deactivate the option to have the password change.
Sync Local Password Activate or deactivate the syncing of local password. Syncing password does
not work if the user is logged in with a mobile account on macOS devices.
Match AD Password Complexity Activate or deactivate the option for the passwords to meet Active Directory's
password complexity.
Password Change Message Provide the text for the password requirements to the user.
Minimum Password Length (in
characters)
Enter the value for the minimum number of characters to be used for a user's
password.
Password History Count
(number of passwords)
Enter the number to specify the amount of prior passwords that cannot be
reused on the domain.
Password Minimum Age (in
days)
Enter the minimum number of days before the user can change their password.
Password Expire Notification
(in days)
Enter the number of days before the user gets notification of their password
expiry.
6 Select Save and Publish.
Configure a System Extensions Profile
Use a System Extensions profile to explicitly allow applications and installers that use system
extensions to load on your end users' devices. The profile controls restrictions and settings for
loading System Extensions on a User Approved MDM enrolled device running macOS v10.15 and
later.
Procedure
macOS Device Management
VMware, Inc. 116
The System Extensions framework allows an application to provide any of the following
capabilities:
n Network extensions (supported network extension apps such as content filters, DNS proxies,
and VPN clients can be distributed as system extensions).
n Endpoint security extensions (supported endpoint security clients such as Endpoint Detection
and Response software and antivirus software).
n Device driver extensions (supported drivers are those drivers that are developed using the
DriverKit framework for USB, Serial, NIC, and HID devices).
1 Navigate to Resources > Profiles & Baselines > Profiles and select Add. Select Apple macOS,
and then select User Profile or Device Profile to apply the profile only to the device's
enrollment user or to the entire device.
2 Configure the profile's General settings.
3 Select the System Extensions payload.
4 If you want the users to approve additional extensions that are not specified in the profile,
enable
Allow User Overrides.
5 Configure Allowed System Extension Types settings. Provide the Team Identifier of the
application extension and allow all or any of the supported system extension types to load on
the device. You can configure multiple System Extension types in the same way. The default
top row with the Team Identifier '*' represents global settings. Settings for specific Team
Identifiers take precedence over any settings applied to this row.
6 Configure Allowed System Extensions by providing the Team Idenfier or Bundle Identifier of
the application extension. You can also configure multiple System Extensions.
7 Select Save and Publish.
Configure a Time Machine Profile
By creating a Time machine profile you can specify a backup server location used to mount and
backup the device.
Procedure
1 Navigate to Resources >Profiles & Baselines > Profiles and select Add. Select Apple macOS,
and then select Device Profile, since this profile is only applicable to the entire device.
2 Configure the profile's General settings.
3 Select the Time machine payload.
macOS Device Management
VMware, Inc. 117

4 Configure Time machine settings, including:
Setting Description
Backup all volumes Secure all volumes associated with the device. By default, only the startup
volume is backed up.
Backup system files and
folders
Secure all system files and folders, which are skipped by default.
Enable automatic backup Back up the system automatically at determined intervals.
Enable local snapshots (10.8+) Configure local backup snapshots when device is not connected to the network.
Backup size limit Set a maximum size allowed to backup the system. Enter 0 (zero) to set
unlimited.
Paths to backup Choose specific filepaths to backup, in addition to the default startup volume.
Paths to skip Choose specific filepaths to skip during backup from the startup volume.
5 Select Save & Publish when you are finished to push the profile to devices.
Once the profile is pushed to the device, the login user's network credentials are used to
configure the system keychain for the backup volume defined in the profile. The backup
volume will not mount using a local account because network credentials are required at login
to authenticate the drive. After the system keychain is configured the first time, all backups
from that computer will be associated with the original user's backup volume.
Configure a VPN Profile
Virtual private networks (VPNs) provide devices with a secure and encrypted tunnel to access
internal resources. VPN profiles enable each device to function as if it were connected through the
on-site network.
1 Navigate to Resources > Profiles & Baselines > Profiles > Add. Select Apple macOS, and then
select whether this profile will apply to only the enrollment user on the device (User Profile), or
the entire device (Device Profile).
2 Configure the profile's General settings.
3 Select the VPN payload.
4 Configure Connection settings.
The following settings vary depending on the type of connection selected.
Settings
Description
Connection Name Enter the name of the connection name to be displayed on the device.
Connection Type Enter the name of the connection name to be displayed on the device.
macOS Device Management
VMware, Inc. 118

Settings Description
Connection Type Select one of the following network connection method from the drop-down menu. For
detailed information on each of the connection methods, refer to the individual pages.
L2TP (default connection) PPTP IPSec (Cisco) (applicable for VPN On Demand) F5 SSL
(applicable for VPN On Demand) Custom SSL (applicable for VPN On Demand) F5 Access
(applicable for VPN On Demand) Note: VPN on demand is the process of automatically
establishing a VPN connection for specific domains. For increased security and ease of
use, VPN on demand uses certificates for authentication instead of simple passcodes.
Server Enter the hostname or IP address of the server to be connected.
Account Enter the user account name for authenticating the VPN connection.
Send All Traffic Select this check box to force all traffic through the specified network.
Per App VPN Rules For macOS v10.9 devices, use Per-App VPN to choose what apps should connect to what
networks.
Provider Type Select the type of the VPN service. If the VPN service type is an App proxy, the VPN
service tunnels the traffic at the application level. If it is a Packet Tunnel, the VPN service
tunnels the traffic at the IP layer.
Exclude Local
Networks
Enable the option to include all networks to route the network traffic outside the VPN.
Include All Networks Enable the option to include all networks to route the network traffic through the VPN.
Connect
Automatically
Select this check box to allow the VPN to connect automatically to chosen Safari domains.
Enable Safari
Domains
Enable this setting to set specific domains or hosts that open the secure VPN connection
in the Safari browser. Add domains as needed. If you configure a VMware Tunnel Per-
App Tunnel network traffic rule for the Safari app for macOS, Workspace ONE UEM
deactivates this setting. The network traffic rules override any configured Safari Domain
rules.
Enable Mail Domains Enable this setting to set specific domains or hosts that open the secure VPN connection
in the Mail client. Add domains as needed.
Enable Contact
Domains
Enable this setting to set specific domains or hosts that open the secure VPN connection
in the Contact domain. Add domains as needed.
Enable Calendar
Domains
Enable this setting to set specific domains or hosts that open the secure VPN connection
in the Calendar domain. Add domains as needed.
App Mapping Enable this setting to allow specific applications to open a secure VPN connection. Add
app bundle ID(s) for applications allowed to open a secure VPN connection.
5 Configure Authentication information.
Settings
Description
User Authentication Select the radio button to indicate how to authenticate end users through the VPN,
through either password or RSA SecurID.
Password Enter the password for the VPN account.
Machine Authentication Select the type of machine authentication to authorize end users for the VPN
access.
macOS Device Management
VMware, Inc. 119

Settings Description
Identity Certificate Enter the credentials to authorize end users for the VPN connection (if Certificate is
selected as machine authentication).
Shared Secret Select either Manual or Auto as the proxy type to configure with this
VPN connection.
Server Enter the URL of the proxy server.
Port Enter the port used to communicate with the proxy.
Username Enter the user name to connect to the proxy server.
Proxy Server Auto Config
URL
Enter the proxy server auto configuration URL.
Provider Designated
Requirement
Use this field only when the VPN provider is implemented as a System extension.
6 Select Save & Publish when you are finished to push the profile to devices.
Configure a VPN Profile
VPN on demand is the process of automatically establishing a VPN connection for specific
domains. For increased security and ease of use, VPN on demand uses certificates for
authentication instead of simple passcodes.
1 Ensure your certificate authority and certificate templates in the Workspace ONE UEM are
properly configured for certificate distribution.
2 Make your third-party VPN application of choice available to end users by pushing it to
devices or recommending it in your enterprise App Catalog.
3 Navigate to Resources > Profiles & Baselines > Profiles and select Add. Select Apple macOS,
and then select whether this profile will apply to only the enrollment user on the device (User
Profile), or the entire device (Device Profile).
4 Configure the profile's General settings.
5 Select the VPN payload and configure settings as outlined above.
6 Specify the Connection Info for a connection type that supports certificate authentication:
IPSec (Cisco), F5 SSL, SSL, or F5 Access.
a. Server – Enter the hostname or IP address of the server for connection.
b. Account – Enter the name of the VPN account.
7 Authentication – Select a certificate to authenticate the device.
8 Identity Certificate – Select the appropriate credentials.
9 Include User PIN – Select this check box to ask the end user to enter a device PIN.
macOS Device Management
VMware, Inc. 120

10 Check the Enable VPN On Demand box. Add the Domains, and choose the On-Demand
Action.
a Always Establish– Initiates a VPN connection regardless of whether the page can be
accessed directly or not.
b Never Establish– Does not initiate a VPN connection for addresses that match the
specified the domain. However, if the VPN is already active, it may be used.
c Establish if Needed– Initiates a VPN connection only if the specified page cannot be
reached directly.
Important: For wildcard characters, do not use the asterisk (*) symbol. Instead, use a dot in
front of the domain. For example, .air-watch.com.
11 Select Save and Publish. After the profile installs on a user's device, a VPN connection
prompt will automatically display whenever the user navigates to a site that requires it, such as
SharePoint.
Configure a Web Clips Profile
Web Clips are web bookmarks that you can push to devices that display as icons and point to
commonly used or recommended web resources.The ability to use Web Clips applies to User
Profiles only.
1 Navigate to Resources > Profiles & Baselines > Profiles and select Add. Select Apple macOS,
and then select User Profile.
2 Configure the profile's General settings.
3 Select the Web Clips payload.
4 Configure Web Clip settings, including:
Settings
Description
Label Enter the text displayed beneath the Web Clip icon on an end user's device. For
example: "AirWatch Self-Service Portal."
URL Enter the URL the Web Clip that will display. Below are some examples for Workspace ONE
UEM pages: For the SSP, use: https://<AirWatchEnvironment > /mydevice/.For the app catalog,
use: https://<Environment > /Catalog/ViewCatalog/{SecureDeviceUdid}/{DevicePlatform}.For
the book catalog, use: https://<Environment > /Catalog/BookCatalog?uid={DeviceUid}
Icon Select this option to upload as the Web Clip icon. Upload a custom icon using a .gif, .jpg, or .png
format, for the application. For best results, provide a square image no larger than 400 pixels on
each side and less than 1 MB in size when uncompressed. The graphic is automatically scaled and
cropped to fit, and converted to .png format if necessary. Web Clip icons are 104 x 104 pixels for
devices with a Retina display or 57 x 57 pixels for all other devices.
Show in App
Catalog
Select this option to list the application in your App Catalog.
5 Select Save & Publish when you are finished to push the profile to devices.
macOS Device Management
VMware, Inc. 121

Configure an Xsan Profile
Apple's Xsan, or storage access network allows macOS with Thunderbolt to Fibre Channel
capabilities to quickly access the shared block storage. Configure a payload to manage Xsan
directly from the UEM console.
1 Navigate to Resources > Profiles & Baselines > Profiles and select Add. Select Apple macOS,
and then select (User Profile) to apply the enrollment to the user's device.
2 Configure the profile's General settings.
3 Select the Xsan payload.
4 Configure Connection Info for Xsan including:
Setting Description
XSAN name Enter the name of the storage system.
Authentication Secret Enter the authentication key for the server.
File System Name Servers Enter the Hostname or IP address of the file system name servers. Use the + button to
add additional file system servers as needed.
5 Select Save & Publish when you are finished to push the profile to devices.
Upload a Profile
Administrators can now upload .mobileconfig profiles for macOS into Workspace ONE UEM.
1 Navigate to Resources > Profiles and Baselines > Add > Select Upload Profile.
2 On the Upload Profile page, select macOS.
3 On the Upload File page, click Upload. In the File Upload screen, choose a .mobileconfig file
from the local click Save and Continue.
Note: Only .mobileconfig file type is allowed.
4 If a profile with the same PayloadIdentifier already exists in the DB, then the below error is
displayed.
"A profile with the same identifier already exists, you must change the identifier before
uploading this profile".
5 On the macOS General page, enter details and click Save and Publish.
macOS Device Management
VMware, Inc. 122
Collect Data with Sensors for
macOS Devices
9
macOS Desktop devices contain multiple attributes such as hardware, OS, certificates, patches,
apps, and more. With Sensors, you can collect data for these attributes using the Workspace ONE
UEM console. Display the data in Workspace ONE Intelligence and in Workspace ONE UEM.
Important: Sensors are not permitted to be assigned to Employee-Owned devices for privacy
reasons.
This chapter includes the following topics:
n Sensors Description
n Workspace ONE UEM Options
n Workspace ONE Intelligence Options
n Sensors Security
n Create a Sensor for macOS Devices
n View Sensors in Device Details
n Examples for macOS Sensors
Sensors Description
Workspace ONE UEM tracks a limited number of device attributes by default. However with
Sensors, you can track the specific device attributes you want. For example, you can create a
Sensor that tracks the number of battery charge cycles, last updated date of a virus definition
file, or the build version of a specific security agent. Sensors allow you to track various attributes
across your devices using common scripting languages like Bash, Python 3, and Zsh. These sensor
scripts can be configured to run periodically, or based on system events like Login, Logout, and
Startup.
Find Sensors in the main Workspace ONE UEM console navigation under Resources.
Workspace ONE UEM Options
n Bash, Python 3, or Zsh Scripts - Use your preferred language to create the sensor script. The
script you create collects the value of each sensor. For examples of what types of sensors you
can create, see
Examples for macOS Sensors.
VMware, Inc.
123
n Support for Variables - If your sensor script requires dynamic or sensitive information that
must be defined outside of the script, variables can be used to securely store this information.
Variable data is encrypted at-rest and in-transit. For Bash/Zsh sensors, the variables can
be referenced in the code directly by name $myvariable. Python 3 sensors can reference
variables by importing the os module and using os.getenv('myvariable').
n Sensors Triggers - When configuring Sensors, you can configure triggers to control when the
device runs and reports the sensor data back to the Workspace ONE UEM console. You can
schedule these triggers based on the Intelligent Hub Sample Schedule (periodically) or specific
device events such as login and logout.
n Technical Preview
n Device Details> Sensors - You can see data for single devices on the Sensors tab in a
device's Device Details page.
Note:
n Currently this feature is in Technical Preview state and may not be available in your
environment.
n New UEM infrastructure (also required for Freestyle Orchestrator) must be enabled in
your environment so that Workspace ONE UEM can display Sensors data for devices
on the Sensors tab and use in Freestyle Orchestrator.
n Workspace ONE UEM enables this configuration for SaaS customers. VMware is
working on the solution for On-Premises environments, but until released, the Sensors
tab will not available in Device Details for On-Premises deployments.
n Use Sensor values in Freestyle workflows to manage endpoint resources with more
granular criteria conditions. For more information, see Freestyle Orchestrator Guide.
Workspace ONE Intelligence Options
If you use the Workspace ONE Intelligence service, you can run a report or create a dashboard
to view and interact with the data from your Sensors. When you run reports, use the Workspace
ONE UEM category, Device Sensors. You can find your sensors and select them for queries in
reports and dashboards.
Encryption
All data at rest is encrypted in Workspace ONE Intelligence. For details, refer to the content on the
VMware Cloud Trust Center. This site has reports with details on compliance certs, CAIQ, SOC2,
SOC3, and other security best practices.
Workspace ONE Intelligence Documentation
For details on how to work in Workspace ONE Intelligence, see VMware Workspace ONE
Intelligence Products.
macOS Device Management
VMware, Inc. 124
Sensors Security
On the macOS device, Sensor data and values are encrypted using Workspace ONE Intelligent
Hub AES-256 bit symmetric key before being stored in a local database. Only Workspace ONE
Intelligent Hub can read Sensor data at rest and the end-user cannot read the Sensor data or
values. Sensor data sent to the Workspace ONE UEM Console is always transmitted over HTTPS.
On the Workspace ONE UEM Console, administrators can view the Sensors data and returned
values from Device Details > Sensors tab. Access to this tab can be restricted in Admin Roles
settings.
Note: The new Sensors tab requires the new Workspace ONE UEM infrastructure to be rolled out
across SaaS in phases in future releases.
Create a Sensor for macOS Devices
Create Sensors in the Workspace ONE UEM console to track specific device attributes such as
remaining battery, specific version or build information, or average CPU usage. Each sensor
includes a script of code to collect the desired data. You can upload these scripts or enter them
directly into the console.
Sensors can use Bash, Python 3, or Zsh scripts to gather attribute values. You must create these
scripts yourself either before creating a sensor or during configuration in the scripting window.
Each script contains only one sensor. If a script returns multiple values, VMware Workspace ONE
Intelligence and Workspace ONE UEM reads the entire output as one value. If a script returns
a null value, VMware Workspace ONE Intelligence and Workspace ONE UEM do not report the
sensor.
Prerequisites:
If you want to view Sensors for multiple devices and interact with the data in reports and
dashboards, you must opt into VMware Workspace ONE Intelligence. If you want to view Sensors
data for a single device, you do not need VMware Workspace ONE Intelligence. Go to the device's
Device Details page and select the Sensors tab to view the data.
The configuration Device State must be enabled in your data center so that Workspace ONE
UEM can display Sensors data for devices on the Sensors tab. Workspace ONE UEM enables this
configuration for SaaS customers.
1.In the Workspace ONE UEM console, navigate to Resources > Sensors.
2.On the Sensors page, click Add and select macOS.
3.In the New Sensor page, navigate to General > Name and enter the following:
macOS Device Management
VMware, Inc. 125

Setting Description
Name Enter the name of the sensor. The name must start with a lowercase letter followed by alpha-numeric
characters and underscores. The name must be between 2 and 64 characters.
Description Enter the description of the sensor.
4.Click Next.
5.Configure the sensor settings in the Details tab.
Setting Description
Language Select the language. Select either Python 3, Bash, or Zsh.
Excecution Context Select either System or Current User. This settings control whether the script for the sensor runs
on a user or system context.
Response Data Type Select the type of response to the script for the sensor. You can choose between: - String-
Integer Boolean Date Time
Code Upload a script for the sensor or write your own in the text box provided.
6.Click Next.
7.In the Variables tab, you can optionally define variable names and values to use in your Sensor
script. These variables are securely stored, encrypted at-rest, and only used temporarily during
script execution in the scripting environment.
Variables support static text or UEM lookup values. The lookup values are resolved before being
delivered to the device for execution.
Bash/Zsh scripts can reference the variables directly by name from the environment like
$myvariable. Python 3 scripts can reference the variables by importing the os module and then
using os.getenv('myvariable').
8.Click Save or Save and Assign.
You can save the sensors information and go back to menu or can move to the Assignment page
to add sensors to a smart group.
What to do next:
To add a sensor to a smart group, perform the following steps:
1 In the New Assignment page, enter the Assignment Name and Select Smart Group. Click
Next
2 In the Deployment page, configure the Triggers settings. Select any trigger.
Trigger
Description
Periodically Run the script periodically based on the Intelligent Hub Sample schedule.
Login Run the script at login.
macOS Device Management
VMware, Inc. 126

Trigger Description
Logout Run the script at logout.
Startup Run the script at startup.
User Switch Run the script after the macOS user login via fast user switching.
Network Change Run the script whenever a network change is detected on the device (for example, switching from
Ethernet to Wi-Fi or changing Wi-Fi networks). Requires macOS Intelligent Hub 21.04.
3.Click Save.
After the assignment group is saved, you can prioritize the assignments if multiple smart groups
are configured with potentially overlapping sets of devices. Once this step is done, devices with
Intelligent Hub installed will receive the Sensor configurations on the next check-in. Intelligent Hub
will then run the Sensor and report the data back to Workspace ONE UEM.
View Sensors in Device Details
Sensor data can be viewed in the Workspace ONE UEM console in Device Details > Sensors
tab. The configuration Device State must be enabled in your data center so that Workspace ONE
UEM can display Sensors data for devices on the Sensors tab. Workspace ONE UEM enables this
configuration for SaaS customers.
Note: Workspace ONE UEM is working on a solution for on-premises environments, but until
this solution is created, the Sensors tab is not available in Device Details for on-premises
deployments.
1 In the Workspace ONE UEM console, navigate to Device > Details View and select the
Sensors tab.
The following details are displayed in the Sensors tab:
n Name - Name of the Sensor.
n Value - Value reported by the device.
n Last executed date - The timestamp for when the Sensor value was collected.
2 To request the device to on-demand, run the Sensor and report the value back, select a
Sensor name, and click Run.
Note: Run button is displayed in Device Details only if the Hub version is supported. The
minimum supported macOS Hub version is 21.01.
3 To view information about Sensors execution, navigate to Details View > Troubleshooting. In
the event log filters, select Sensors.
Note: This is seen only if the event log level is set to capture information or debug messages.
macOS Device Management
VMware, Inc. 127

Examples for macOS Sensors
When you create Sensors for macOS devices, you must upload a script or enter the Bash, Python
3, or Zsh code in the text box provided during configuration in the Workspace ONE UEM console.
The code in this script should return the values for the Sensor attributes.
Sensor Script Examples
The following examples contain the settings and the code needed.
Note: Any Sensor that returns a date-time data type value uses the ISO format.
n Get the number of battery charge cycles:
n Language: Bash or Zsh
n Execution Context: System
n Response Data Type: Integer
/usr/sbin/ioreg -r -c "AppleSmartBattery" | grep -w "CycleCount" | awk '{print $3}' |
sed -n 'p;N;'
n Get the current Mac HostName:
n Language: Bash or Zsh
n Execution Context: System
n Response Data Type: String
/usr/sbin/scutil --get HostName
n Get Firefox version:
n Language: Bash
n Execution Context: System
n Response Data Type: String
if [ -f "//Applications/Firefox.app/Contents/Info.plist" ] ; then
/usr/bin/defaults read /Applications/Firefox.app/Contents/Info.plist
CFBundleShortVersionString ;
else
echo "0" ;
n Get current console username logged in:
n Language: Python 3
n Execution Context: System
n Response Data Type: String
from SystemConfiguration import SCDynamicStoreCopyConsoleUser
print(SCDynamicStoreCopyConsoleUser(None, None, None)[0])
macOS Device Management
VMware, Inc. 128
Automate Endpoint
Configurations with Scripts for
macOS Devices
10
Use Scripts to run Bash, Python 3, or Zsh for endpoint configurations on macOS devices using
Workspace ONE UEM.
Important: Scripts are not permitted to be assigned to Employee-Owned devices for privacy
reasons.
Scripts Description
With Scripts, located in the main navigation under Resources, you can push code to macOS
devices to do various configuration processes. For example, push a Bash script that changes the
device's hostname.
Use Variables in your scripts to protect sensitive static data like passwords and API keys, or use
UEM lookup values for dynamic data such as device ID and user name. You can also make this
code available to your macOS users so they can run it on their devices when needed. Make code
available by integrating the Workspace ONE Intelligent Hub with Scripts so that users can access
the code in the Apps area of the catalog.
Note: If you are publishing scripts to less than 2000 (default value) devices, the devices are
notified immediately to fetch the resource. However, if the smart groups assigned have more than
2000 devices, then the devices will receive the resource the next time the devices checks-in with
Workspace ONE UEM console.
How Do You Know Your Scripts Are Successful?
You can find out if Scripts ran successfully using the Scripts tab in a device's Device Details page.
In the Workspace ONE UEM console, go to the applicable organization group, select Devices >
List View, and choose an applicable device. On the Scripts tab, look in the Status column for an
Executed or Failed status. Statuses depend on the exit code (also known as error code or return
code).
n Executed - Workspace ONE UEM displays this status after the exit code returns a 0.
n Failed- Workspace ONE UEM displays this status after the exit code returns any value that is
not a 0.
This chapter includes the following topics:
n Create a Script for macOS Devices
n View Scripts in Device Details
VMware, Inc.
129

Create a Script for macOS Devices
Scripts for macOS managed by Workspace ONE UEM supports using Bash, Python 3, or Zsh
to run code on end user devices. Integrate Scripts with the Workspace ONE Intelligent Hub for
macOS and enable self-service to Scripts for your users.
Note:
Scripts functionality requires Intelligent Hub 20.10 and Workflow Engine 20.10 for macOS.
1 In the Workspace ONE UEM console, navigate to Resources > Scripts > Add.
2 Select macOS.
3 Configure the script settings for the Generaltab.
Settings Description
Name Enter a name for the script
Description Enter a description for the script
App Catalog
customization(Optional)
Enable offering self-service access to Scripts in the Workspace ONE Intelligent Hub
catalog. Display Name - Enter the name that users see in the catalog. Display
Description - Enter a brief description of what the script does. Icon- Upload an icon
for the script. Category - Select a category for the script. Categories help users filter
apps in the catalog. Although you have completed the settings for the script in the
catalog, there is another configuration to set to display your script in the Workspace
ONE Intelligent Hub. When you assign the script to devices, enable the Show in Hub
menu item or these customizations do not display in the catalog.
4 Click Next.
5 Configure the script settings for the Details tab.
Settings
Description
Language Enter the scripting language. Select either Bash, Python 3 or Zsh.
Execution Context This setting controls whether the script runs in the user or system context.
Timeout In case the script gets looped or is unresponsive for some reason, enter a length of time in
seconds for the system to run the script and then stop.
Code Upload a script or write your own in the text box provided.
6 Click Next.
7 In the Variables tab, configure key and value pairs to be accessible in the scripting
environment:
macOS Device Management
VMware, Inc. 130

Add static values, such as API keys, service account names or password by providing the key
and the value of the variable. Or, add dynamic UEM lookup values such as {enrollmentuser}
by providing a key name and then selecting the lookup value icon. To use variables in a
Bash/Zsh script, reference the variable directly by name using $myvariable. To use variables
in a Python 3 script, you must first import the os module, then use the getenv method like
os.getenv('myvariable').
For instance, if the variable definition has a key named SystemAccount and a value of
admin01, the script can assign the variable to a script-variable, named account as shown
below:
Bash/Zsh
$account = $SystemAccount
Python 3
import os
account=os.getenv('SystemAccount')
8 Click Save.
You have successfully created a Script.
What to do next:
After creating Scripts, you can assign it to smart groups.
1 To assign the script to a smart group, select a script from the Scripts page, and click Assign.
2 Click New Assignment and enter Assignment Name and select the smart group. Click Next.
3 In the Deployment page, select any of the following triggers:
Settings
Description
Run Periodically Run the script at a scheduled time. Enter the schedule for every 4/6/8/12 hours.
Run Once Immediately Run the script on all currently enrolled assigned devices automatically. Run the script
immediately after a device is enrolled.
Login Run the script at login.
Logout Run the script at logout.
Startup Run the script at startup.
Network Change Run the script at the occurrence of network changes.
4 Enable Show In Hub (optional) to show your App Catalog Customization settings for the script
in the Workspace ONE Intelligent Hub. You can deactivate this option to hide a script from
assigned smart groups in the catalog.
5 Click Save.
macOS Device Management
VMware, Inc. 131
You have successfully assigned a Script to a smart group and added triggers.
View Scripts in Device Details
Navigate to the Scripts tab in a device's Device Details to view the execution status of your
Scripts.
1 Navigate to Device> Details View > Scripts.
2 In the list you can view name of the script, last execution time, status, and log details.
macOS Device Management
VMware, Inc. 132
Compliance Policies
11
The compliance engine is an automated tool by Workspace ONE UEM powered by AirWatch that
ensures all devices abide by your policies. These policies can include basic security settings such
as requiring a passcode and having a minimum device lock period.
This chapter includes the following topics:
n Compliance Policies in Workspace ONE UEM
Compliance Policies in Workspace ONE UEM
For certain platforms, you can also decide to set and enforce certain precautions. These
precautions include setting password strength, blocking certain apps, and requiring device check-
in intervals to ensure that devices are safe and in-contact with Workspace ONE UEM. Once
devices are determined to be out of compliance, the compliance engine warns users to address
compliance errors to prevent disciplinary action on the device. For example, the compliance
engine can trigger a message to notify the user that their device is out of compliance.
In addition, devices not in compliance cannot have device profiles assigned to it and cannot have
apps installed on the device. If corrections are not made in the amount of time specified, the
device loses access to certain content and functions that you define. The available compliance
policies and actions vary by platform.
For more information about compliance policies, including which policies and actions are
supported for a particular platform, see the Managing Devices documentation.
VMware, Inc.
133
Software Distribution and
Management for macOS
Applications
12
All file types (.dmg, .pkg, .mpkg) for macOS applications can be managed in the Internal
Applications section of the Workspace ONE UEM console. Workspace ONE UEM powered by
AirWatch offers the software distribution feature that helps you deploy these macOS applications
using the same application flow that exists for all the other internal applications.
For a successful deployment of the macOS applications using the software distribution method,
you must perform the following actions:
n Enable Software Management in the Workspace ONE UEM console.
n Generate the pkginfo metadata file for the macOS application before uploading the
application to the console. You can generate a pkginfo metadata file using VMware AirWatch
Admin Assistant Tool.
For more information about configuring the software distribution feature and deployment of
macOS applications through the software distribution process, refer the
Software Distribution
Management
documentation.
VMware, Inc.
134
Shared Devices
13
Shared Device/Multi-User Device functionality in Workspace ONE UEM powered by AirWatch
ensures that security and authentication are in place for every unique end user. Shared devices
can also allow only specific end users to access sensitive information.
Issuing a device to every employee in certain organizations can be expensive. Workspace ONE
UEM powered by AirWatch lets you share a mobile device among end users in two ways: using
a single fixed configuration for all end users, or using a unique configuration setting for individual
end users.
When administering shared devices, you must first provision the devices with applicable settings
and restrictions before deploying them to end users. Once deployed, Workspace ONE UEM uses
a simple login or log-out process for shared devices in which end users simply enter their directory
services or dedicated credentials to log in. The end-user role determines their level of access to
corporate resources such as content, features, and applications. This role ensures the automatic
configuration of features and resources that are available after the user logs in.
The login or log-out functions are self-contained within the Workspace ONE Intelligent Hub. Self-
containment ensures that the enrollment status is never affected, and that the device is managed
whether it is in use or not.
Shared Device capabilities are also possible natively on Apple iPads integrated with Apple
Business Manager. This functionality called Shared iPads for Business leverages the user's
Managed Apple ID for login and does not take place in the Workspace ONE Intelligent Hub for
login and logout. To know more about configuring Shared iPads for Business with Apple Business
Manager and steps to achieve this functionality, see Shared iPads for Business in
Introduction to
Apple Business Manager Guide
available on docs.vmware.com.
Shared Devices Capabilities
There are basic capabilities surrounding the functionality and security of devices that are shared
across multiple users. These capabilities offer compelling reasons to consider shared devices as a
cost-effective solution to making the most of enterprise mobility.
Functionality
n Personalize each end-user experience without losing corporate settings.
n Logging in a device configures it with corporate access and specific settings, applications, and
content based on the end-user role and organization group (OG).
VMware, Inc.
135
n Allow for a log in/log out process that is self-contained in the Workspace ONE Intelligent Hub
or Workspace ONE Access.
n After the end user logs out of the device, the configuration settings of that session are wiped.
The device is then ready for login by another end user.
Security
n Provision devices with the shared device settings before providing devices to end users.
n Log in and log out devices without affecting an enrollment in Workspace ONE UEM.
n Authenticate end users during a login with directory services or dedicated Workspace ONE
UEM credentials.
n Authenticate end users using Workspace ONE Access.
n Manage devices even when a device is not logged in.
Platforms That Support Shared Devices
The following devices support shared device/multi-user device functionality.
n Android 4.3 or later
n iOS devices with Workspace ONE Intelligent Hub 4.2 or later.
n For details about logging in and out of shared iOS devices, see the topic
Log In and Log
Out of Shared iOS Devices
in the iOS Platform Guide, available on docs.vmware.com.
n MacOS devices with Workspace ONE Intelligent Hub 2.1 or later.
This chapter includes the following topics:
n Define the Shared Device Hierarchy
n Log In and Log Out of Shared macOS Devices
Define the Shared Device Hierarchy
While strictly optional, making an organization group (OG) specific to shared devices offers many
benefits due to multi-tenancy and inherited device settings.
If you have a large number of shared devices in your fleet and you want to manage them apart
from single user devices, you can make a shared device-specific OG. Making a shared device
hierarchy in your OG structure is optional. Features like smart groups and user groups mean you
do not have to rely strictly on OG hierarchy design to simplify device management.
However, having a shared device OG (or nested OGs) simplifies device management by enabling
you to standardize device functionality through profiles, policies, and device inheritance without
the processing overhead required by a smart group or a user group.
1 Navigate to Groups & Settings > Groups > Organization Groups > Organization Group
Details.
Here, you can see an OG representing your company.
macOS Device Management
VMware, Inc. 136

2 Ensure the Organization Group Details displayed are accurate, and then use the available
settings to make modifications, if necessary. If you make changes, select Save.
3 Select Add Child Organization Group.
4 Enter the following information for the first OG underneath the top-level OG.
Setting Description
Name Enter a name for the child organization group (OG) to be displayed. Use alphanumeric
characters only. Do not use odd characters.
Group ID Enter an identifier for the OG for the end users to use during the device login. Group IDs are
used during the enrollment of group devices to the appropriate OG.Ensure that users sharing
devices receive the Group ID as it might be required for the device to log in depending on
your Shared Device configuration.If you are not in an on-premises environment, the Group ID
identifies your organization group across the entire shared SaaS environment. For this reason,
all Group IDs must be uniquely named.
Type Select the preconfigured OG type that reflects the category for the child OG.
Country Select the country where the OG is based.
Locale Select the language classification for the selected country.
Customer
Industry
This setting is only available when Type is Customer. Select from the list of Customer Industries.
Time Zone Select the time zone for the OG's location.
5 Select Save.
Log In and Log Out of Shared macOS Devices
Multiple users can log in to and out of a macOS shared device, activating the automatic push of
device profiles.
Log In to a macOS Device - Using assigned Network credentials, log in to a macOS device that
has been staged and you receive the profiles assigned to your account in Workspace ONE UEM.
Log out of a macOS Device - The standard macOS log-out procedure also logs the device out of
your assigned Workspace ONE UEM user profile.
macOS Device Management
VMware, Inc. 137
