
Page 1 of 23
Medicaid Waiver
Management Application
(MWMA)
Emergency Requests for
SCL Waitlist Individuals
Quick Reference Guide
January 2022

Page 2 of 23
Emergency Requests for SCL Waitlist Individuals QRG
Document Control Information
Document Information
Document Edit History
Version Date Additions/Modifications Prepared/Revised by
• 0.1 • 02.02.2022 • Final • Deloitte Consulting
•
•
• •
• • • •
Purpose
The purpose of this document is to help MWMA users request and review requests for
emergency capacity for Individuals who are currently waitlisted in the Supports for Community
Living (SCL) waiver program.
Document Name
Emergency Requests for SCL Waitlist Individuals QRG
Project Name
Kentucky MWMA
Client
Kentucky Cabinet for Health and Family Services
Document Author
Deloitte Consulting
Document Version
0.1
Document Status
Final
Date Released

Page 3 of 23
Table of Contents
1
Emergency Requests – External Users ....................................................................................... 4
1.1
Overview ................................................................................................................................. 4
1.2
Accessing Emergency Requests ............................................................................................ 4
1.3
Creating a New Emergency Request .................................................................................... 6
1.4
Viewing Submitted Emergency Requests ............................................................................ 8
1.4.1
Overview ...................................................................................................................... 8
1.4.2
Emergency Request Status ...................................................................................... 10
1.4.1.1 Draft ...................................................................................................... 10
1.4.1.2 Submitted ............................................................................................. 10
1.4.1.3 Not Approved ....................................................................................... 10
1.4.1.4 Incomplete ........................................................................................... 11
1.4.1.5 Approved .............................................................................................. 12
1.4.1.6 Cancelled .............................................................................................. 12
1.5
Cancelling Emergency Requests ......................................................................................... 13
2
Emergency Requests – Internal Users ..................................................................................... 14
2.1
Overview ............................................................................................................................... 14
2.2
Reviewing Emergency Requests ......................................................................................... 14

Page 4 of 23
1 Emergency Requests – External Users
1.1
Overview
Waiver programs each have a defined amount of capacity that can be allocated to Individuals each
year. Sometimes, due to an Individual’s changing needs and circumstances, an Individual on the
waitlist may meet the emergency criteria to receive services in the SCL waiver. Emergency
Requests can be submitted by Application Initiators and Case Managers so that urgency of need
can be determined by Capacity Administrators.
1.2
Accessing Emergency Requests
Emergency Requests can be accessed via the Program Summary screen for the SCL waiver
program. By clicking the Emergency Request button on this screen, Application Initiators and Case
Managers can view existing Emergency Requests and create and submit new Emergency Requests
for the Individual.
1.
To access the Program Summary screen, click on the Waiver Program under Waiver
Program Information on the Individual Summary screen.

Page 5 of 23
2.
On the Program Summary screen, click Emergency Request under the Program Action
column.
3.
Users can view and edit existing Emergency Requests or create and submit new Emergency
Requests on the View Emergency Requests screen.

Page 6 of 23
1.3
Creating a New Emergency Request
MWMA Users can submit a new Emergency Request for a waitlisted Individual via the View
Emergency Requests screen. This screen also displays a record of the previous Emergency
Requests that were created if they were not cancelled by the Application Initiator or Case Manager.
1.
On the View Emergency Requests screen, click Create a New Emergency Request.
2.
On the Emergency Request screen, provide information explaining why the Individual needs
emergency placement in the waiver program.

Page 7 of 23
3.
Next, complete the Emergency Request Form and upload it to the Document Upload
Section.
I. Download the Emergency Request Form for SCL using the hyperlink.
II. Select Emergency Request Form from the Document Type drop-down box.
III. Click Browse and select the completed Emergency Request Form for upload.
IV. Add Comments, if necessary.
V. Click Attach.
Tip: The submit button will be disabled until the Emergency Request Form has been uploaded.
4.
Once the Emergency Request explanation is provided and the Emergency Request Form is
uploaded, attach any additional documentation that may help demonstrate the need for
emergency allocation. Then click Submit.

Page 8 of 23
1.4
Viewing Submitted Emergency Requests
1.4.1 Overview
MWMA users can view an Individual’s submitted Emergency Requests, as well as the Emergency
Request Status, on the View Emergency Requests screen. Users may also cancel Emergency
Requests depending on the Emergency Request Status at that time.
1.
On the View Emergency Requests screen, click View to open the submitted Emergency
Request.

Page 9 of 23
2.
On the Emergency Request screen, users may view the Emergency Request Details and
Capacity Summary for the Individual’s Emergency Request, as well as the Emergency
Request Form that was submitted.

Page 10 of 23
1.4.2 Emergency Request Status
On the Emergency Request screen, there are a few different statuses that can be displayed
depending on where the Emergency Request lies in the submission and review process. These
statuses include Draft, Submitted, Not Approved, Incomplete, Approved, and Cancelled.
1.4.2.1 Emergency Request Status: Draft
The Emergency Request Status appears as ‘Draft’ if the request is in the process of creation or if
the request has been saved but not submitted.
1.4.2.2 Emergency Request Status: Submitted
The Emergency Request Status appears as ‘Submitted’ if the Emergency Request has been
submitted by a Case Manager, Application Initiator, or another relevant external user.
1.4.2.3 Emergency Request Status: Not Approved
The Emergency Request Status appears as ‘Not Approved’ if the Capacity Reviewer determines that
the Individual does not qualify for Emergency Capacity.
Page 11 of 23
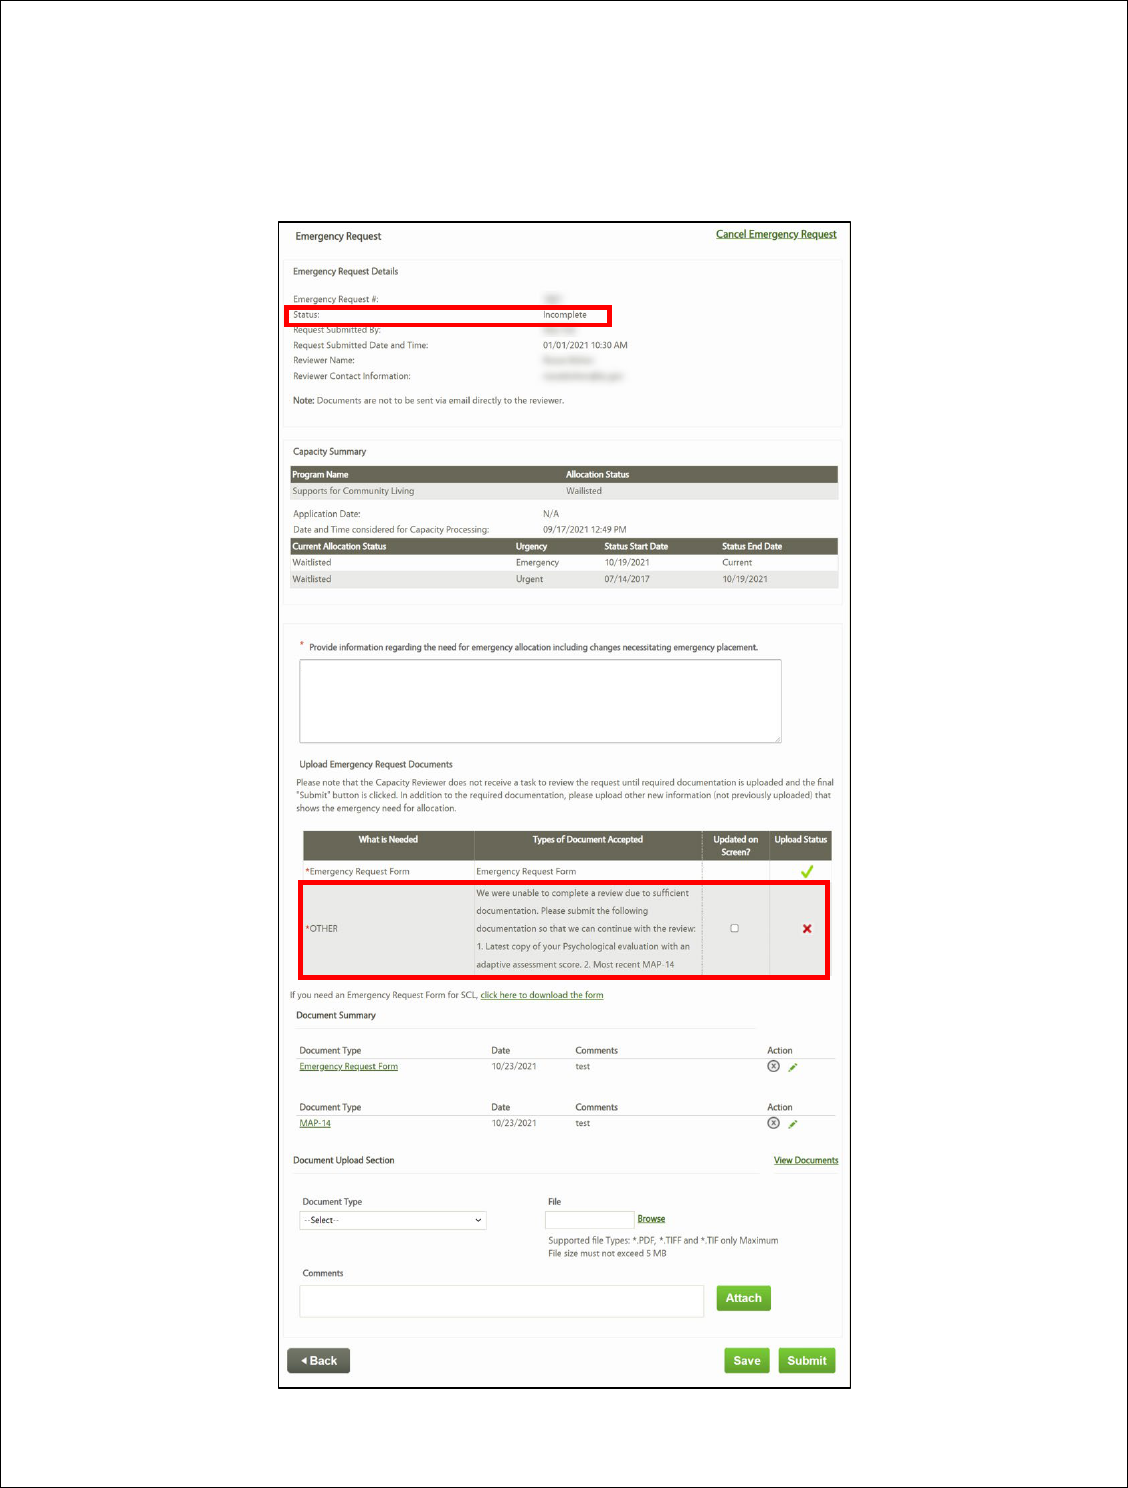
1.4.2.4 Emergency Request Status: Incomplete
The Emergency Request Status appears as ‘Incomplete’ if the Capacity Reviewer indicates that
there is a lack of information (LOI) for the Emergency Request. When this occurs, a new task will be
created for the Case Manager or Application Initiator to provide additional information.
Note: this text box is to be completed with specific information about the need.

Page 12 of 23
1.4.2.5 Emergency Request Status: Approved
The Emergency Request Status appears as ‘Approved’ if the Capacity Reviewer determines that the
Individual does qualify for Emergency Capacity.
1.4.2.6 Emergency Request Status: Cancelled
The Emergency Request Status appears as ‘Cancelled’ if a user determines that Emergency
Capacity is no longer needed for the Individual before the Capacity Reviewer has approved or
denied the request.

Page 13 of 23
1.5 Cancelling Emergency Requests
Emergency Requests can be cancelled by users when the Emergency Request Status is listed as any
of the following: Draft, Submitted, Incomplete. Case Managers or Application Initiators should cancel
Emergency Requests if they determine that Emergency Capacity is no longer needed for the
Individual.
1.
On the Emergency Request screen, click Cancel Emergency Request.
2.
In the pop-up window, enter Comments explaining why the Emergency Request is being
cancelled. Then, click Confirm to cancel the Emergency Request.

Page 14 of 23
2 Emergency Requests – Internal Users
2.1
Overview
Following the submission of an Emergency Request by an external user, a new task will be created
for a Capacity Reviewer (internal user) to review the Emergency Request and choose to either
approve or deny the request. It is the Capacity Reviewer’s responsibility to review the Emergency
Request details and any relevant documents to determine if the Individual meets the emergency
allocation criteria for a specific waiver program.
2.2
Reviewing Emergency Requests
Tasks to review Emergency Requests are located on the Task Dashboard under the Waiver
Capacity Reviewer queue for users with the Waiver Capacity Reviewer role.
1.
On the Task Dashboard, locate the Emergency – Urgency of Need Review task for the
Individual and click Start.

Page 15 of 23
2.
On the Individual Summary screen, click Next to proceed to the Emergency Request Review
screen.

Page 16 of 23
3.
On the Emergency Request Review screen, review the Emergency Request Details, Capacity
Summary, and Document Summary sections to determine if the Individual meets the
emergency allocation criteria for the waiver program. Then click Next.
4.
On the Emergency Request Determination screen, indicate if additional documentation or
information is needed to make a decision on the Emergency Request.

Page 17 of 23
I. Yes, additional documentation or information is needed.
If the Capacity Reviewer determines that there is a lack of information (LOI), then they must
indicate that additional documentation or information is needed.
1. On the Emergency Request Determination screen, click Yes if additional documentation or
information is needed to make a decision on the Emergency Request.
2. Provide Comments explaining what additional documentation or information is needed.
3. Confirm that the pre-populated Reviewer Name and Reviewer Contact Information is
correct.
4. Click Submit.
5. In the pop-up window, click Confirm to confirm the request for additional information.

Page 18 of 23
II. No, additional documentation or information is not needed.
If the Capacity Reviewer determines that all necessary documentation and information is present,
they must indicate that no additional documentation or information is needed.
1. On the Emergency Request Determination screen, click No if additional documentation or
information is not needed to make a decision on the Emergency Request.
2. Select Yes or No to indicate if the Individual meets the emergency criteria for SCL.
3. Provide Comments explaining why the Individual does or does not meet the emergency
criteria for SCL.
4. Click Submit.
A. Yes, the Individual meets the emergency criteria for SCL.
i. In the pop-up window, click Confirm to approve the Emergency Request
Determination.
ii. Proceed with steps 5-8.

Page 19 of 23
B. No, the Individual does not meet the emergency criteria for SCL.
i. In the pop-up window, click Confirm to deny the Emergency Request
Determination.
ii. Proceed to the Task Dashboard and complete the task to print and send
the denial notice to the Individual via certified mail.
5. On the Urgency of Need Determination for SCL screen, users may view a history of the
Emergency Requests for the Individual and upload additional documents, if necessary.
Click Next to proceed.

Page 20 of 23
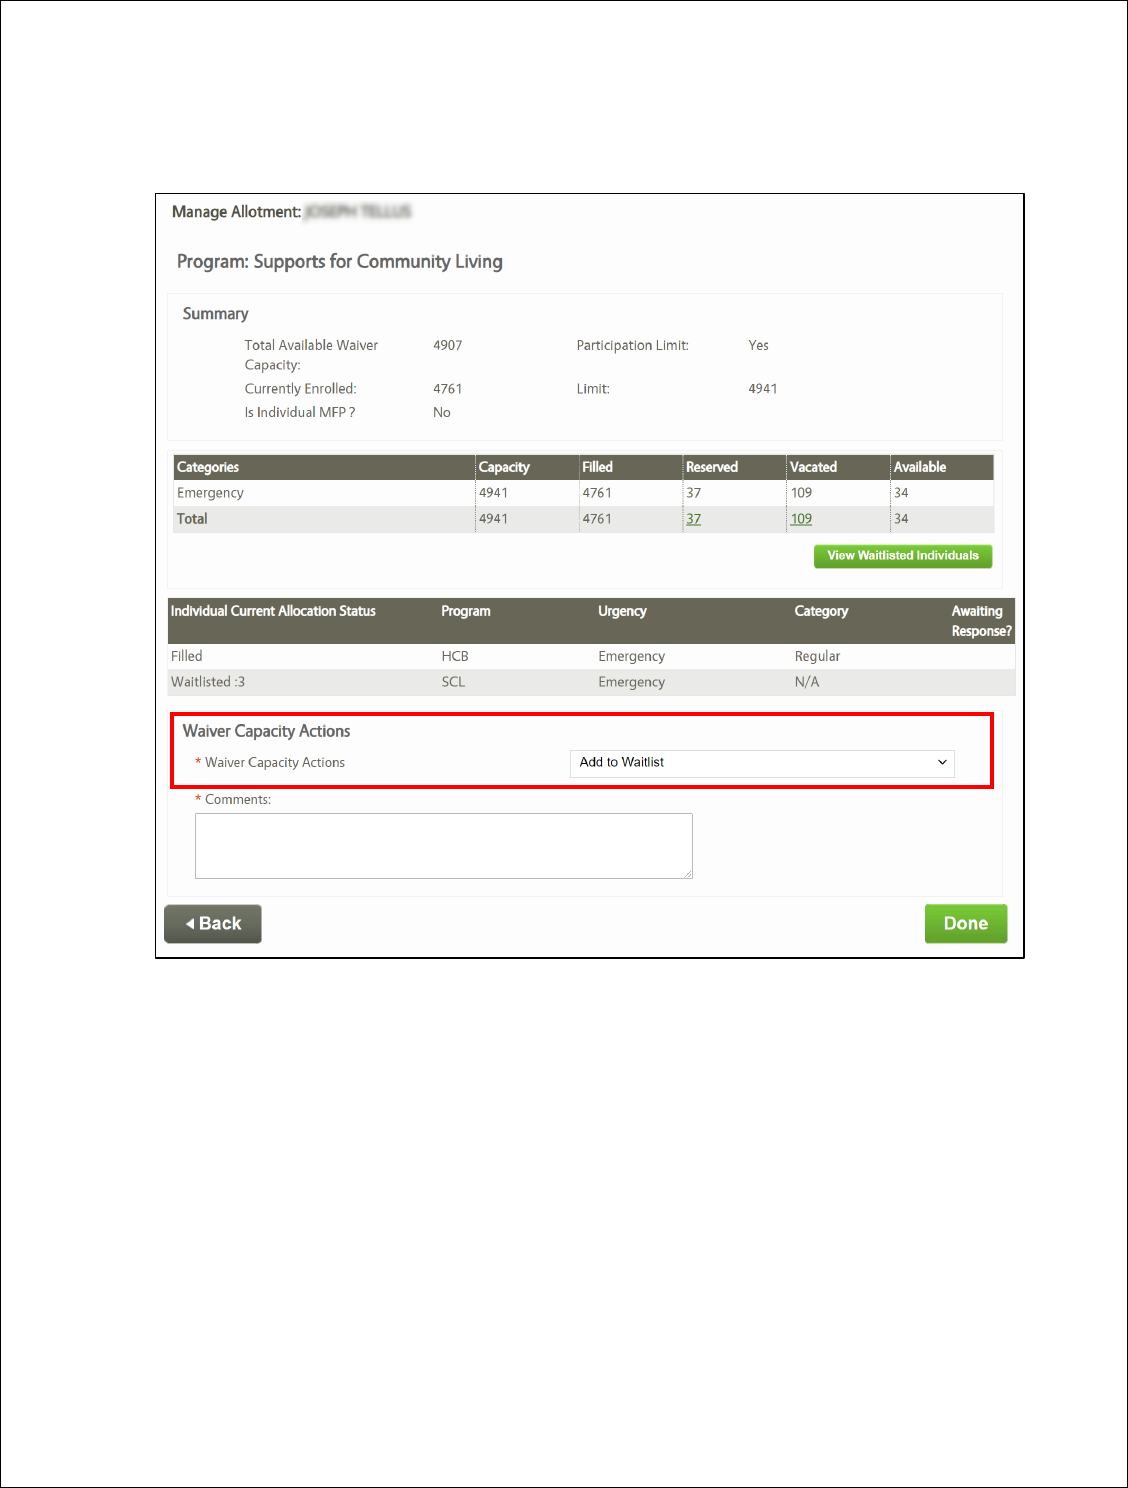
6. On the Manage Allotment screen, select a Waiver Capacity Action from the drop-down
list.

Page 21 of 23
a. Reserve Capacity
If the Capacity Reviewer selects Reserve Capacity from the Waiver Capacity Actions
drop-down list, then they are choosing to reserve capacity for the Individual.
Afterwards, they must select Emergency from the Reserve Category drop-down list.
Page 22 of 23
b. Add to Waitlist
If the Capacity Reviewer selects Add to Waitlist from the Waiver Capacity Actions
drop-down list, then they are choosing to add the Individual to the waitlist.

Page 23 of 23
7. Add Comments explaining your decision.
8. Click Done.
