
Aware IM
Version 8.8
User Guide
Copyright © 2002-2023 Awaresoft Pty Ltd

Aware IM 8.8 User Guide
Copyright © 2002-2023 Awaresoft Pty Ltd Page 2 of 479
CONTENTS
AWARE IM DOCUMENTATION STRUCTURE..................................................................................... 8
INTRODUCTION ................................................................................................................................ 9
AWARE IM CONCEPTS ................................................................................................................... 10
ASPECTS OF INFORMATION MANAGEMENT SYSTEM............................................................................... 11
BASIC CONCEPTS............................................................................................................................ 12
Business Objects as Carriers of Data .......................................................................................... 12
Business Rules as Carriers of Business Logic ............................................................................. 13
Processes as Links between User Interface and Business Logic ................................................... 14
Reference Attributes .................................................................................................................. 16
Business Space......................................................................................................................... 18
Business Object Groups............................................................................................................. 19
USER INTERFACE ............................................................................................................................ 21
Visual Perspective ..................................................................................................................... 22
Operations ................................................................................................................................ 23
DATA ENTRY AND EDITING ................................................................................................................ 24
Business Object Forms .............................................................................................................. 24
Form Sections................................................................................................................................................................... 26
Navigation Style ............................................................................................................................................................... 27
Form Operations .............................................................................................................................................................. 28
DATA STORAGE .............................................................................................................................. 28
DATA RETRIEVAL ............................................................................................................................ 31
Configuring Queries ................................................................................................................... 31
Queries that Require User Input.................................................................................................................................... 33
Running Queries in the Operation Mode...................................................................................... 34
Building Queries in the Operation Mode ...................................................................................... 35
Searching for Data using Forms.................................................................................................. 35
DATA PRESENTATION....................................................................................................................... 37
Standard Form of Query Results................................................................................................. 37
Custom Form of Query Results................................................................................................... 38
Business Object Presentation ........................................................................................................................................ 39
Hyperlinks.......................................................................................................................................................................... 41
Calendar Form of Query Results................................................................................................. 42
DATA PROCESSING.......................................................................................................................... 42
Rule Evaluation ......................................................................................................................... 43
Context............................................................................................................................................................................... 44
Action Execution............................................................................................................................................................... 46
Evaluation of Rule Collections ....................................................................................................................................... 49
Evaluation of Unordered Rule Collections ................................................................................................................... 50
Context of Rule Execution .............................................................................................................................................. 60
Evaluation of Rules Containing WAS CHANGED expressions ..................................................................................... 66
Initialization Rules ............................................................................................................................................................ 68
Summary of Rule Evaluation.......................................................................................................................................... 69
Rules and Transactions.............................................................................................................. 71
Long Operations............................................................................................................................................................... 72
Batch Operations ............................................................................................................................................................. 73
Process Failure Rules ..................................................................................................................................................... 74
Execution Log ........................................................................................................................... 76
Rule Debugger .......................................................................................................................... 79
Configuration of Rules................................................................................................................ 80
PRODUCTIVITY FEATURES ................................................................................................................ 80

Aware IM 8.8 User Guide
Copyright © 2002-2023 Awaresoft Pty Ltd Page 3 of 479
Access Control .......................................................................................................................... 80
Access Level..................................................................................................................................................................... 80
Predefined Access Levels .............................................................................................................................................. 82
Conditional Access .......................................................................................................................................................... 82
Login ........................................................................................................................................ 83
Handling Login and Logout Events ............................................................................................................................... 86
Working with Documents and Reports......................................................................................... 86
Document Management.................................................................................................................................................. 86
Document Generation ..................................................................................................................................................... 87
Reports .............................................................................................................................................................................. 90
User Defined Documents and Reports......................................................................................................................... 94
Communication with Other Systems ............................................................................................ 94
Intelligent Business Objects ........................................................................................................................................... 94
Requesting Services and Sending Notifications ......................................................................................................... 96
Integration with Stripe Payments................................................................................................. 96
Scheduling ................................................................................................................................ 96
E-mail Handling ......................................................................................................................... 96
Outgoing Email ................................................................................................................................................................. 97
Incoming Email ................................................................................................................................................................. 98
Export and Import ...................................................................................................................... 99
Export and Import in the Operation Mode.................................................................................................................. 101
Export and Import from Business Rules..................................................................................................................... 101
Exporting and Importing Relationships....................................................................................................................... 102
Setting Initial Values of the Application .......................................................................................103
Extending Aware IM ..................................................................................................................104
Performance Profiler .................................................................................................................105
CONFIGURATION PROCESS ..............................................................................................................105
Business Space Versions and Version Control ...........................................................................105
Productivity Features ................................................................................................................107
Testing Mode ...........................................................................................................................107
Working with Aware IM in Hosting Environment ..........................................................................108
Configuration Guidelines ...........................................................................................................109
Configuration steps ........................................................................................................................................................ 109
Configuration principles................................................................................................................................................. 112
CONFIGURING APPLICATIONS .....................................................................................................119
OVERVIEW OF THE CONFIGURATION TOOL..........................................................................................119
WORKING WITH BUSINESS SPACE VERSIONS ......................................................................................120
LIFECYCLE OF A BUSINESS SPACE VERSION .......................................................................................121
MAJOR AND MINOR VERSIONS..........................................................................................................122
Creating Minor Version..............................................................................................................122
Creating Major Version..............................................................................................................123
LOADING BUSINESS SPACE VERSION.................................................................................................123
UPDATING BUSINESS SPACE VERSION ...............................................................................................124
CHECKING VERSION INTEGRITY ........................................................................................................124
TESTING BUSINESS SPACE VERSION .................................................................................................125
Embedded Testing....................................................................................................................126
PUBLISHING BUSINESS SPACE VERSION ............................................................................................126
WORKING WITH A BUSINESS SPACE VERSION IN A MULTI-DEVELOPER MODE ...........................................128
DELETING BUSINESS SPACE VERSION ...............................................................................................128
VIEWING PROPERTIES AND HISTORY OF THE BUSINESS SPACE VERSION.................................................128
EXPORTING BUSINESS SPACE VERSION .............................................................................................130
IMPORTING BUSINESS SPACE VERSION..............................................................................................130
REFRESHING BUSINESS SPACE VERSION ...........................................................................................130
WORKING WITH CONFIGURATION ELEMENTS.......................................................................................131
Adding Elements ......................................................................................................................131
Editing/Viewing Elements ..........................................................................................................131

Aware IM 8.8 User Guide
Copyright © 2002-2023 Awaresoft Pty Ltd Page 4 of 479
Deleting Elements.....................................................................................................................132
Copying Elements.....................................................................................................................132
Pasting Elements......................................................................................................................132
FINDING WHERE ELEMENT IS USED ...................................................................................................133
ADDING/EDITING BUSINESS OBJECTS ................................................................................................134
Specifying General Properties ...................................................................................................134
Defining Forms .........................................................................................................................136
Adding/Editing Forms .................................................................................................................................................... 137
Form Properties.............................................................................................................................................................. 138
Adding/Editing Form Sections...................................................................................................................................... 146
Defining Form Section Layout...................................................................................................................................... 148
Adding Custom HTML forms ........................................................................................................................................ 161
Adding/Editing Panel Operations ................................................................................................................................ 161
Defining Presentations ..............................................................................................................165
Defining Intelligent Business Objects .........................................................................................166
ADDING/EDITING ATTRIBUTES ..........................................................................................................174
Common Properties ..................................................................................................................174
Setting Properties of Plain Text Attributes...................................................................................182
Setting Properties of Number Attributes......................................................................................184
Setting Properties of Date, Timestamp and Duration Attributes ....................................................187
Setting Properties of Reference Attributes ..................................................................................188
Configuring References ................................................................................................................................................ 189
Presentation Options for References.......................................................................................................................... 190
Diagram of Object Relationships ................................................................................................................................. 203
Setting Properties of Picture Attributes .......................................................................................207
Setting Properties of Document Attributes ..................................................................................210
Setting Properties of Shortcut Attributes .....................................................................................211
Setting Properties of Yes/No Attributes.......................................................................................212
ADDING/EDITING RULES ..................................................................................................................213
Working with Rule Collection .....................................................................................................213
Adding/Editing Individual Rules ................................................................................................................................... 215
Context Assistant......................................................................................................................219
ADDING/EDITING PROCESSES ..........................................................................................................221
Process Diagrams ....................................................................................................................224
ADDING/EDITING BUSINESS OBJECT GROUPS .....................................................................................226
ADDING/EDITING QUERIES ...............................................................................................................227
Displaying Query Results ..........................................................................................................230
Standard Grid ................................................................................................................................................................. 230
Custom Presentation ..................................................................................................................................................... 238
Calendar/Scheduler Presentation ............................................................................................................................... 244
Chart Presentation ......................................................................................................................................................... 249
Tree Presentation........................................................................................................................................................... 256
Gantt Presentation ......................................................................................................................................................... 257
Kanban Boards............................................................................................................................................................... 257
Displaying Query Results as a Timeline of Events................................................................................................... 258
Specifying Query Using Standard View ......................................................................................258
Specifying Query Using Textual View .........................................................................................260
ADDING/EDITING NOTIFICATIONS ......................................................................................................260
ADDING/EDITING DOCUMENT TEMPLATES ..........................................................................................261
ADDING/EDITING ACCESS LEVELS .....................................................................................................264
Working with Access Level Editor ..............................................................................................265
ADDING/EDITING VISUAL PERSPECTIVES ............................................................................................266
Working with Visual Perspective Editor.......................................................................................267
Defining Frame Properties.........................................................................................................270
Defining Tab Properties ................................................................................................................................................ 273
Defining Content Panel Properties.............................................................................................................................. 274
Defining Content Panel with HTML Content.............................................................................................................. 279
Defining Layout of Content Panels.............................................................................................................................. 282

Aware IM 8.8 User Guide
Copyright © 2002-2023 Awaresoft Pty Ltd Page 5 of 479
Setting Menu Properties ............................................................................................................297
Setting Menu Item Properties....................................................................................................................................... 301
MULTI-STEP PROCESSES.................................................................................................................308
FORM AND GRID STYLES .................................................................................................................309
CREATING APPLICATIONS IN DIFFERENT LANGUAGES ...........................................................................309
Adding/Editing Locales..............................................................................................................310
RIGHT-TO-LEFT SUPPORT ................................................................................................................312
ADDING/EDITING SERVICES .............................................................................................................312
SCHEDULING .................................................................................................................................314
ADDING/EDITING BUSINESS SPACES .................................................................................................316
SETTING OPTIONS FOR INCOMING E-MAIL HANDLING............................................................................317
HANDLING LOGIN EVENTS................................................................................................................319
HANDLING LOGOUT EVENTS.............................................................................................................320
SENDING OUTGOING E-MAIL ............................................................................................................321
HANDLING UNSENT E-MAIL ..............................................................................................................322
ADDING APPOINTMENT OBJECTS ......................................................................................................322
WORKING WITH DATA STORED IN EXISTING DATABASE TABLES OR LDAP ...............................................323
Defining Business Objects that Use Existing Database Tables.....................................................324
Defining Business Objects that Use Data from LDAP Server /Active Directory ..............................326
Using LDAP/Active Directory for Login .......................................................................................327
Bypassing Aware IM Login for Active Directory/LDAP Users ................................................................................. 328
LOGIN VIA SOCIAL MEDIA SITES AND OTHER APPLICATIONS.....................................................................329
IMPLEMENTING SINGLE SIGN-ON USING SAML PROTOCOL ....................................................................329
GENERATING DOCUMENTATION ........................................................................................................329
SHOW SYSTEM OBJECTS.................................................................................................................330
SEARCHING FOR ELEMENTS IN A BUSINESS SPACE VERSION .................................................................331
BACKING UP AND RESTORING OPERATIONAL DATA ..............................................................................332
MANAGING CONFIGURATION USERS ..................................................................................................333
WORKING ON THE SAME BUSINESS SPACE VERSION CONCURRENTLY (MULTI-DEVELOPER MODE)..............334
PROTECTING BUSINESS SPACE VERSION ...........................................................................................334
COMPARING BUSINESS SPACE VERSIONS ..........................................................................................335
LOGGING INTO THE OPERATION MODE ...............................................................................................335
RE-CONNECTING TO THE AWARE IM SERVER ......................................................................................335
UNDOING AND REDOING CHANGES....................................................................................................336
WORKING WITH REPORT/PRESENTATION DESIGNER ............................................................................336
Report/Presentation Bands........................................................................................................338
Adding Report/Presentation Elements ........................................................................................339
Editing Report/Presentation Elements ........................................................................................343
Selecting Elements ........................................................................................................................................................ 343
Scaling and Moving Elements...................................................................................................................................... 344
Deleting Elements .......................................................................................................................................................... 345
Copying and Pasting Elements.................................................................................................................................... 345
Changing Element Properties ...................................................................................................................................... 345
Using Toolbar to change Report/Presentation Elements ..............................................................357
Setting Report/Presentation Properties.......................................................................................358
Setting Band Properties ............................................................................................................359
Add/Delete Group Bands...........................................................................................................360
Adding/Deleting Custom Font ....................................................................................................360
Finding Design Element ............................................................................................................361
Aligning Elements .....................................................................................................................362
Positioning Elements in Band ....................................................................................................362
Changing Size of Elements .......................................................................................................362
Working with Charts ..................................................................................................................363
Previewing the Report ...............................................................................................................368
Miscellaneous Commands.........................................................................................................368
BUILDING RUNTIME EXECUTABLE ......................................................................................................370

Aware IM 8.8 User Guide
Copyright © 2002-2023 Awaresoft Pty Ltd Page 6 of 479
CONFIGURING APPLICATIONS FOR MOBILE DEVICES ............................................................................372
CREATING NATIVE MOBILE APPLICATIONS ..........................................................................................372
DETERMINING CURRENT LOCATION OF THE USER ................................................................................372
RULE LANGUAGE REFERENCE ....................................................................................................372
RULE............................................................................................................................................373
RULE CONDITION ...........................................................................................................................374
Comparison..............................................................................................................................375
String Expression .....................................................................................................................376
EXISTS Expression ..................................................................................................................376
IN Expression ...........................................................................................................................377
Range Expression ....................................................................................................................377
WAS CHANGED Expression .....................................................................................................378
IS UNDEFINED Expression.......................................................................................................379
IS NEW Expression ..................................................................................................................379
Negation ..................................................................................................................................379
CALCULATIONS ..............................................................................................................................380
Constants.................................................................................................................................380
Arithmetic Operations................................................................................................................380
Functions .................................................................................................................................381
Aggregate Calculation ...............................................................................................................381
ACTIONS .......................................................................................................................................382
Modify Attribute Action ..............................................................................................................383
INCREASE BY and REDUCE BY Actions ..................................................................................383
INSERT and REMOVE Actions..................................................................................................384
REPLACE Action ......................................................................................................................384
CREATE Action ........................................................................................................................384
DUPLICATE Action...................................................................................................................385
DELETE Action ........................................................................................................................386
CLEAN Action ..........................................................................................................................386
DELETE FILE Action ................................................................................................................387
COPY FILE Action ....................................................................................................................387
MAKE DIRECTORY Action .......................................................................................................387
SEND Action ............................................................................................................................387
REQUEST SERVICE Action......................................................................................................388
REPORT ERROR Action...........................................................................................................388
PROTECT Action .....................................................................................................................389
FIND Action..............................................................................................................................390
ENTER NEW Action .................................................................................................................392
EDIT Action ..............................................................................................................................393
VIEW Action .............................................................................................................................393
DISPLAY PERSPECTIVE Action ...............................................................................................393
DISPLAY LAYOUT Action .........................................................................................................394
DISPLAY DOCUMENT Action ...................................................................................................394
PRINT DOCUMENT Action .......................................................................................................395
EXPORT DOCUMENT Action....................................................................................................395
IMPORT DOCUMENT Action ....................................................................................................397
EXPORT action ........................................................................................................................397
IMPORT Action ........................................................................................................................398
SET Action ...............................................................................................................................399
UPDATE Action ........................................................................................................................400
IMPORT RELATIONSHIPS Action .............................................................................................401
DISPLAY MESSAGE Action ......................................................................................................401
DISPLAY QUESTION Action .....................................................................................................402
DISPLAY URL Action................................................................................................................402
PICK FROM Action ...................................................................................................................403

Aware IM 8.8 User Guide
Copyright © 2002-2023 Awaresoft Pty Ltd Page 7 of 479
DISPLAY Action .......................................................................................................................403
PRINT FORM Action.................................................................................................................404
EXECUTE PROGRAM Action....................................................................................................404
EXEC_SP Action ......................................................................................................................404
CONNECT TO EMAIL and DISCONNECT FROM EMAIL Actions................................................405
SAVE SCREEN Action..............................................................................................................405
RENAME DOCUMENT Action ...................................................................................................406
CLOSE TAB Action...................................................................................................................406
EXEC_STRING Action ..............................................................................................................406
EXEC_SQL Action ....................................................................................................................406
LOG2 Action.............................................................................................................................407
LOG2 CONTEXT Action............................................................................................................407
CLEAR CONTEXT Action .........................................................................................................407
COMMIT TRANSACTION Action ...............................................................................................407
MOBILE CAMERA SNAP INTO Action.......................................................................................407
MOBILE CAMERA GET INTO Action .........................................................................................408
MOBILE GET LOCATION INTO Action ......................................................................................408
MOBILE START LOCATION WATCH Action ..............................................................................408
MOBILE STOP LOCATION WATCH Action................................................................................409
MOBILE SUBSCRIBE Action.....................................................................................................409
MOBILE PUSH Action...............................................................................................................409
EXEC_SCRIPT Action ..............................................................................................................409
END_PROCESS Action ............................................................................................................410
SET PROGRESS Action ...........................................................................................................410
CLEAR OFFLINE DATA Action .................................................................................................410
ADD OFFLINE DATA Action......................................................................................................411
GO OFFLINE Action .................................................................................................................411
CREATE BUCKET action ..........................................................................................................411
Process Call Action...................................................................................................................411
FUNCTIONS ...................................................................................................................................412
Date and Time Functions ..........................................................................................................412
Text Functions ..........................................................................................................................423
Mathematical Functions ............................................................................................................428
Financial Functions ...................................................................................................................431
Miscellaneous Functions ...........................................................................................................432
GLOSSARY ....................................................................................................................................442
APPENDIX A. AWARE IM PROPERTY FILES ..................................................................................466
APPENDIX B. KNOWN BUGS AND LIMITATIONS...........................................................................469
APPENDIX C. NUMBER FORMAT IN JAVA PROGRAMMING LANGUAGE......................................472
APPENDIX D. LINKS TO AWARE IM OPERATIONS ........................................................................473
APPENDIX E. REGULAR EXPRESSIONS........................................................................................476
Summary of regular-expression constructs ............................................................................................................... 476

Aware IM 8.8 User Guide
Copyright © 2002-2023 Awaresoft Pty Ltd Page 8 of 479
Trademarks
Aware IM is a trademark of Awaresoft Pty Ltd.
Java is a trademark of Sun Microsystems.
Microsoft Windows, Microsoft Access, Microsoft SQL Server, Microsoft
Internet Explorer are trademarks of Microsoft Corporation.
MySQL is a trademark of MySQL AB.
Cloudscape is a trademark of IBM Corporation.
Netscape Navigator is a trademark of Netscape Communication Corp.
Aware IM Documentation Structure
Aware IM documentation consists of the following documents:
1. Aware IM Installation Guide
2. Aware IM Getting Started
3. Aware IM User Guide (this document)
4. Aware IM Rule Language Reference
5. Aware IM Programmer’s Reference
6. Aware IM How To
7. Aware IM for Mobile Devices
Aware IM Installation Guide contains instructions on the installation, deployment and
start-up of the Aware IM software.
Aware IM Getting Started contains a brief introduction into configuring and running
applications with Aware IM.
Aware IM User Guide is the main document in the set, which explains how to use Aware
IM software to configure powerful and flexible web applications.
Aware IM Rule Language Reference contains the description of the Aware IM Rule
Language used in business rules.
Aware IM Programmer’s Reference describes how to add programming extensions to
Aware IM.
Aware IM How To contains answers to some frequently asked questions and describes
how to perform certain common tasks in Aware IM.
Aware IM for Mobile Devices contains guidelines on how to develop Aware IM
Applications for mobile devices, such as iPhone, iPad, Android, Windows phone or
Blackberry.

Aware IM 8.8 User Guide
Copyright © 2002-2023 Awaresoft Pty Ltd Page 9 of 479
Introduction
Aware IM is a software tool that was created to help organizations address many of their
data processing needs. The main design goal for Aware IM was to substantially reduce
the technical complexity of managing information and give non-technical people much
greater control over the process. As a result the information management task becomes
easier, more intuitive, predictable, manageable, and ultimately less expensive.
With Aware IM one can automate the organization’s policies, procedures, guidelines,
checklists, document handling, form input validation, event registration, decision making,
e-mail notifications, data tracking, report generation, task scheduling, periodic
processing, information sharing, bulk data exchange, and many other tasks in a flexible
and cost-efficient manner. It can help to increase awareness, enforce standards,
improve quality control, lift compliance level, simplify communication, and save time and
efforts across the organization.
Aware IM is configurable information management software that can be adjusted by
users without special computer skills to manage their specific information. In a simple
intuitive way users can specify the information they want to manage and the rules on
how to process the information. Aware IM automatically performs all the technical work
required to manage information such as storage, retrieval, calculation, security, sharing,
presentation, communication, etc.
Aware IM works in two modes: the configuration mode and the operation mode. The
configuration mode allows the configurator, that is, a person configuring an information
management system, to specify the contents and behaviour of the system. Once the
definition work is finished the configurator makes the system operational. In the
operation mode Aware IM analyses the system configuration and manages the
information according to the instructions provided by the configurator. Regular users
access the system in the operation mode in the course of conducting their day-to-day
business activities.
The following picture illustrates the two modes of Aware IM:

Aware IM 8.8 User Guide
Copyright © 2002-2023 Awaresoft Pty Ltd Page 10 of 479
Configurator
Configurattion
Tool
Operation
Engine
Regular
User
Aware IM
Definition
Operation
Objects,
Processes,
Rules
Data,
Transactions
The configuration of an information system, as defined by the configurator, can be
exported out of Aware IM and saved in a file on a computer disk, just like any other
electronic document. Similarly, a configuration can be imported into Aware IM from a
file. This allows people to share configurations they create so that other people can
adapt existing configurations for their own needs or reuse some parts of such
configurations to incorporate into their own information systems.
Aware IM can be installed on a personal computer. If such a computer is a part of an
office computer network the people in the office can use the system from their
computers using a standard Internet browser. People outside of the office can also
access the system as long as the computer on which Aware IM is installed is connected
to the Internet. Alternatively Aware IM can be installed on a computer managed by an
Internet hosting service provider so that users can access the information system via the
Internet.
Aware IM Concepts
The following section describes how to use Aware IM to configure and operate
applications that manage business information. The section is divided into several parts.
The first part identifies the main generic aspects of essentially any information
management application, describes how these generic aspects can be implemented in
Aware IM and the specifics of the Aware IM approach to this implementation. The

Aware IM 8.8 User Guide
Copyright © 2002-2023 Awaresoft Pty Ltd Page 11 of 479
second part identifies other features that most applications are likely to require and
describes how they can be implemented in Aware IM. Finally the last part provides an
overview of the configuration process and lists the productivity features of the Aware IM
Configuration Tool that help configurators create flexible and powerful applications.
See also:
Aspects of Information Management System
Basic Concepts
User Interface
Data Entry and Editing
Data Storage
Data Retrieval
Data Presentation
Data Processing
Productivity Features
Configuration Process
Aspects of Information Management System
Aware IM is a software tool that allows creation of essentially any data management
system. Therefore by nature it is very generic. It is built on the assumption that most
data management applications have many common aspects such as:
- Data entry
- Data storage
- Data retrieval
- Data editing
- Data processing
- User Interface
Essentially any application would require some data to be entered and stored
somewhere (usually in a database), it would also require the data to be found, retrieved
and edited and it would offer some user interface to perform all these operations. Most
applications would also perform some processing of this data according to certain rules
(this is also often referred to as “business logic” of an application) – for example, car
insurance policies would need their premium to be calculated, banking applications
would need to calculate daily interest rates etc.
Apart from these main generic aspects most applications would also need to do the
following:
- Take care of security issues
- Manage documents
- Generate data reports
- Communicate with other software systems and hardware devices

Aware IM 8.8 User Guide
Copyright © 2002-2023 Awaresoft Pty Ltd Page 12 of 479
We will explain in detail how Aware IM deals with all these issues in the following
sections of the document.
See also:
Basic Concepts
User Interface
Data Entry and Editing
Data Storage
Data Retrieval
Data Presentation
Data Processing
Productivity Features
Basic Concepts
See:
Business Objects as Carriers of Data
Business Rules as Carriers of Business Logic
Processes as Links between User Interface and Business Logic
Business Space
Business Object Groups
Business Objects as Carriers of Data
In Aware IM the world of data management application consists of business objects.
Business objects encapsulate the data that needs to be entered, retrieved, edited and
processed.
In fact, there is no data in an Aware IM-configured system that exists outside of some
business object.
In a way this model very closely reflects the real world. Business objects exist in every
business - customers, accounts, orders, payments etc. The data that a business object
encapsulates is represented as attributes of a business object. For example, an order
may have the placement date, customer, line items, shipment address, shipment date,
shipment number, delivery instructions, order status, etc.
Attributes of a business object may be of different types – text, number, date, document
etc (see Adding/Editing Attributes for a complete list of attribute types).
One of the most important attribute types is a reference attribute type. Reference
attribute type (or simply reference) reflects the fact that business objects may be linked

Aware IM 8.8 User Guide
Copyright © 2002-2023 Awaresoft Pty Ltd Page 13 of 479
with other related objects. For example, an order may be linked to its order line items.
References are explained in detail in the Reference Attributes section.
Given that business objects encapsulate the data in a data management application, the
main aspects of the system related to data entry, storage, retrieval and processing boil
down to the following:
- Data entry is the process of entering of the attributes values of some business object
- Data storage is the storage of attribute values
- Data retrieval is finding instances of business object(s) that match a certain criteria
- Data editing is the process of changing values of of a business object’s attributes
- Data processing is using attribute values of business objects to create instances of
other business objects and/or modify the existing attribute values.
NOTE: In the Configuration Mode one can configure definitions of business objects
and their attributes. In the Operation Mode one can create actual objects filling their
attributes with specific data and linking them with other objects. While there is a single
definition describing a business object in the Configuration Mode, there may be many
instances in the Operation Mode representing the same business object. For example,
you can configure a Customer object and then create many instances of a Customer
objects in the Operation Mode, each representing a different customer. A formal way of
making the distinction between objects in the two modes is to refer to the configuration-
mode object as object definition and to the operation-mode objects as object instances.
This document uses the formal notation when it is necessary to avoid confusion between
the two modes. When it is clear which mode is being described, the term object is used.
Configuration of business objects is described in detail in the Adding/Editing Business
Objects section.
Business Rules as Carriers of Business Logic
In Aware IM data processing (or business logic) is encapsulated in business rules.
A rule specifies one or more actions that should be executed when the rule conditions
are met. Conditions are optional and if none are specified the actions are executed
unconditionally. In other words a rule states what should happen and when.
Here are some examples of rules:
1. If Account.Holder.Age < 16 Then
REPORT ERROR 'Account holder must be 16 years old or over'
2. LineItem.Total = LineItem.Price * LineItem.Quantity
3. If Reservation.Status WAS CHANGED TO 'Offered' Then SEND
ReservaitonOfferEmail TO Reservation.Member

Aware IM 8.8 User Guide
Copyright © 2002-2023 Awaresoft Pty Ltd Page 14 of 479
4. REQUEST SERVICE ProcessPayment OF PaymentProcessingSystem
5. If Fee.Status='Applied' Then PROTECT Fee.Amount FROM ALL
Actions of business rules can perform a variety of tasks. Most importantly they can
create and modify business objects, i.e. perform data processing. They can also perform
calculations, create or print documents, display information, exchange data with other
software, etc.
Evaluation of rules is triggered when certain events happen inside the system. Most
importantly rules are triggered when data is entered or edited or, in Aware IM terms,
when business objects are created or modified.
When a value of an attribute changes Aware IM considers all rules related to the object
and executes the actions of those rules for which the conditions are met. Note that
execution of actions may have a ripple effect because an action may change values of
other attributes which may in turn cause evaluation of other rules and so on. Aware IM
continues this process of rule evaluation until there are no more actions to execute. This
process is described in detail in the Rule Evaluation section.
There are also other events apart from the modification of a business object that may
trigger rule evaluation and action execution – a full list of these events is provided in the
Rule Evaluation section.
Configuration of business rules is explained in detail in Adding/Editing Rules, details of
rule conditions and actions syntax is provided in the Rule Language section and the
“Aware IM Rule Language Reference” document.
Processes as Links between User Interface and Business
Logic
As we said in the Business Rules as Carriers of Business Logic section business logic of
an application Aware IM is encapsulated in business rules, which get triggered
whenever business objects are created or modified. Let us now have a look at when
these creations and modifications take place.
The initial trigger that leads to the creation or modification of a business object is almost
always some external request to the system usually from a user who sends this request
via the system’s User Interface. The user can perform this request in two ways – she
can explicitly ask the system to create a new instance of a business object or edit an
existing instance. More often though a user asks the system to start a process, which
will then create or modify a business object(s).

Aware IM 8.8 User Guide
Copyright © 2002-2023 Awaresoft Pty Ltd Page 15 of 479
A process usually consists of actions that are executed in a pre-defined order. These
actions usually create business objects or find the existing business object and modify it.
As a result business rules are triggered. These rules may start a chain reaction of other
modifications, which take place until there are no more actions to execute. After data
processing has been completed the process usually communicates the results back to
the user.
Therefore a process represents a link between the User Interface and business rules – it
triggers business rules in response to the request from the User Interface by performing
initial creation or modification of a business object and then communicates the result
back to the User Interface. This is shown on the diagram below:
NOTE: Even though a process itself usually consists of rules it is not supposed to
implement any business logic other than triggering the initial change as described
above.
NOTE: A process may be started not just by the User Interface but also by other
forms of external requests – for example, a request from other software system through
a service (see Communication with Other Systems)
The illustration below shows the make up of a process transferring funds between two
accounts.
Note that the process is very small and is mainly concerned with allowing the user to
enter necessary details and presenting the results of the operation to the user. All the
business logic behind the funds transfer operation (such as checking whether there are

Aware IM 8.8 User Guide
Copyright © 2002-2023 Awaresoft Pty Ltd Page 16 of 479
sufficient funds in the source account, calculation of fees for the transfer operation etc) is
expressed in business rules related to the object FundsTransfer (they are not shown
here). Aware IM evaluates these rules as soon as the user enters the data for the
FundsTransfer object (between “Display funds transfer form” and “Check for transfer
success” operations).
Configuration of processes is discussed in detail in the Adding/Editing Processes
section.
Reference Attributes
Attributes that refer to other business objects are called reference attributes or simply
references. References represent relationships between business objects. For example,
the Account business object may contain a reference to a list of account transactions
(represented by the Transaction business object) or the Employee business object
may have a reference to the Company business object.
The relationships between objects represented by reference attributes may be of several
types:
- Relationships can be single or multiple
- Relationships can be matching or non-matching
- Relationships can be peer, parent or child.
Single and multiple relationships.
“Single” relationship indicates that a business object may only refer to a single instance
of another business object through this relationship (for example, the Employee object
may refer to only one instance of the Company object). “Multiple” relationship indicates
that a business object may refer to one or more instances of another business object
through this relationship (for example, the Account object may refer to multiple
instances of the Transaction object).
Matching and non-matching relationships
With matching relationships if an attribute of one business object refers to another
business object there is a reference attribute in this other object (matching attribute) that
refers to the first object. For example, if the Account object refers to the Transaction
object through an attribute with the name MyTransactions there may be a matching
attribute in the Transaction object called MyAccount that refers to the Account
object. This is shown on the picture below:

Aware IM 8.8 User Guide
Copyright © 2002-2023 Awaresoft Pty Ltd Page 17 of 479
Note that the MyTransactions attribute on the Account business object represents a
“multiple” relationship (account may have multiple transactions) whereas the matching
MyAccount attribute in the Transaction object represents a “single” relationship
(transactions belong only to one account). Generally speaking, any combinations of
single and multiple references are possible within the matching relationship.
Matching relationships are very convenient as far as navigation between objects is
concerned. In the example above once an instance of the Account object has been
added to a particular Transaction in the Operation Mode the added Account will
automatically have the Transaction in its list of transactions and vice versa – if an
instance of a Transaction has been added to the list of transactions on the Account,
the Account is also automatically attached to the Transaction. The corresponding
forms of both the Account and Transaction objects will automatically allow
navigation to the referred instances (unless presentation options are explicitly specified
not to allow this – see Presentation Options for References).
With non-matching relationships there are no matching attributes on the referred object.
Consequently if an instance of the second object is added to the first object in the
Operation Mode only the first object will know that it has references to the instance of
the second object – the instance of the second object will not know that some instance
of the first object refers to it. Thus navigation from the instance of the second object
directly to the instance of the first object will not be possible. Note that if the reference
attribute on the first object has no matching attribute in the second object it does not
mean that the second object may not refer to the first object at all through its own
reference (matching or non-matching). If such reference does exist it is a completely
different relationship. This is shown in the example below (FamilyMember object has a
non-matching single relationship to its Family and the Family object has independent
non-matching single relationship to the FamilyMember object – HeadOfFamily):
Peer, Parent and Child relationships
Peer relationships represent relationships when instances of both business objects
participating in the relationship can exist on their own. With parent (“owner”) and child

Aware IM 8.8 User Guide
Copyright © 2002-2023 Awaresoft Pty Ltd Page 18 of 479
(“owned”) relationship on the other hand, instances of the business object representing
the “child” part of the relationship cannot exist without the instance of its “parent”
business object. For example, the instance of a Transaction does not make sense if it
is not attached to some account, so we could say that the Account and Transaction
are related via a parent-child relationship where Account is parent and Transaction
is child.
The following applies for parent-child relationships:
1. If an instance of the parent business object is deleted instances of all “child” business
objects attached to the “parent” are automatically deleted as well
2. If an instance of a “child” object is removed from the instance of its “parent” object it
is automatically deleted.
The above behaviour saves the trouble of configuring rules to delete child instances
explicitly.
See also: Working with References in the Operation Mode.
Business Space
One can think of a business space as a place where Aware IM keeps both configuration
definitions of an application (such as business objects, processes, business rules etc)
and its operational data (data created by the end users of the application). Therefore,
business space encapsulates everything related to a data management system in a
business.
Business space is secure. Only the parties registered with the business space can get
access to the information in the business space, whether in the Configuration or the
Operation modes. Aware IM can manage multiple business spaces on the same
computer, but it keeps such business spaces completely separate from each other. It is
impossible to directly access operational data of one business space from another
business space
1
. When configuring multiple applications it is possible, however, to re-
use configuration information used in one business space and copy it into another
business space – see Copying Elements.
Since a business space is designed to cover all information management needs of an
organization, most users will only need to manage a single business space. However,
some users may need to maintain multiple business spaces, for example if they do it for,
or on behalf of, multiple unrelated organizations.
1
It is possible, however, to call services of one business space from another business space – see
Business Space as Intelligent Business Object.

Aware IM 8.8 User Guide
Copyright © 2002-2023 Awaresoft Pty Ltd Page 19 of 479
NOTE: Aware IM keeps configuration data completely separate from operational
data, which makes it very easy to provide a new version of the configuration data without
affecting the operational data.
Business Object Groups
Business object groups in Aware IM offer you a simple and convenient way to handle
similar yet different data.
Let us consider an application that registers client communication history, such as
meetings, phone calls, letters, e-mails, etc. A summary of the history should be
presented as a chronological list on the client form. The user should be able to see full
details of any list item on a separate form.
Some details are common across all communications, like the contact time, summary or
description. Other details are specific to a particular communication type, like the status
of an outgoing e-mail can be Sent or Unsent, and the user should be able to prepare
and send an e-mail, say by clicking a button. The status of an incoming e-mail can be
Read or Unread. Phone conversations do not have any status at all. Letters should have
a letter document attached to them, etc.
How would we represent communication details in our application? One way would be to
combine the details of all communication types in a single business object called, say,
Communications. The problem with the single business object is that depending on
the communication type we would have to hide non-applicable details and operations
from the data form or dynamically manipulate the values of the same attribute (like
Status for incoming and outgoing e-mails). Alternatively, we could make several forms
specific to each communication type. Then we would have to add some logic to all
places where a communication form is displayed, like from the history list on the client
form, to check the type and display an appropriate form. We would have to do the same
check in all other places where the user can navigate to the communication form, like in
a search result table.
Another way of going about it could be to create separate business objects for different
communication types, like Outgoing Emails, Incoming Emails, Outgoing
Letters, etc. Each of these objects would have its own data form. The trouble with
separate objects is that it would be very difficult (if not impossible) to show records from
separate objects in a single chronologically sorted list, say on a client form, or do a
search across multiple objects.
With the solution that Aware IM offers you would create separate business objects for
different communication types, like OutgoingEmail, IncomingEmail,
OutgoingLetter, then create a business object group, say, called Communication,
and include all the specific objects as its members. This is all it takes.

Aware IM 8.8 User Guide
Copyright © 2002-2023 Awaresoft Pty Ltd Page 20 of 479
Each member of a group usually contains attributes common to all other members. In
the example above the common attributes would be the date when the communication
was sent or received and the state of the communication. Each member would also
have some specific attributes not found in other group members, for example, telephone
number for telephone communication; e-mail address for e-mail communication etc.
Business object groups are treated in the same way as regular business objects - they
can be used in business rules, queries, document templates, and they also appear in the
list of available attribute types. So, we would simply add a multiple reference attribute
ContactHistory of type Communication to Client to display a list of
communication records on the client form. When the user clicks on an item in the list, a
form for the specific record will be automatically shown to the user.
Business object groups are useful in the following scenarios:
1. Business object groups can be used in queries to search the system for objects of
different types based on the criteria that use common attributes of the group – see
Data Retrieval.
2. Business object groups can be referred to by reference attributes as shown in the
above example – the ContactHistory attribute on the Client object refers to a
group rather than to a particular object.
3. Business object groups can be used in business rules – again in this case rules may
only use common attributes of the group. For example consider the following rules:
FIND Communication WHERE Communication.SentDate = CURRENT_DATE
Communication.State = 'SENT'
Here the second rule would set the value of the state attribute of any communication
object found by a query irrespective of its type.
TIP: If business rules attached to different members of a group are exactly the same
it is better to use group names in the rules rather than names of a particular group
member. In this case changes made to a rule attached to one member will be
automatically transferred to the equivalent rules attached to other members – see also
Adding/Editing Rules.
Configuration of business object groups is explained in the Adding/Editing Business
Object Groups section.

Aware IM 8.8 User Guide
Copyright © 2002-2023 Awaresoft Pty Ltd Page 21 of 479
User Interface
We can now explain in greater detail how the generic aspects of a data management
application are implemented in Aware IM. We will start with the User Interface.
Applications configured by Aware IM have HTML-based user interface that can be
viewed by any web browser such as Google Chrome, Internet Explorer or Firefox. After
a user logs into the system Aware IM displays the screen similar to the one shown
below (this shows screen layout for the CRM application):
In Aware IM the screen is divided into several areas:
- The optional area at the top is called the banner (not shown on the picture above)
- The leftmost area if defined may contains the menu of the system (as on the picture
above) or some other information
- The optional toolbar area at the top of the screen may have an additional menu (as
on the picture above)
- The main central area is called the main page and it contains a number of panels
showing data list and calendar (called content panels)
- The optional area at the bottom is called the status bar
The banner area at the top of the screen usually contains the logo of the system and
possibly some advertisements. The menu always contains the main operations that can
be performed by the user. The main page is the working area of the screen that displays
data forms, data search results etc. The status bar if present shows the name of the
currently logged in user and the name of the business space. You can also allocate

Aware IM 8.8 User Guide
Copyright © 2002-2023 Awaresoft Pty Ltd Page 22 of 479
special areas to the left, right and underneath the main page, that usually contain static
controls (like in the example above), news, advertisements etc.
Whether each of these areas (also called frames) will be shown as well as the contents
of each area can be specified in the application configuration. The following section
explains how this is done.
See also:
Visual Perspective
Operations
Visual Perspective
The Aware IM concept of the screen layout is called a visual perspective. The visual
perspective defines the look and feel of an application. Aware IM always generates the
default visual perspective, but in most cases configurators will change the default
perspective to provide their own layout.
Visual perspectives allow configurators to define the following:
- Names of menu items as well as operations that they invoke (see Operations)
- Frames that will be present
- Initial layout of the main page
- Layouts of each frame. You can display several pages (tabs) within a frame. A user
will be able to switch between pages. Each page can be further split up into several
content panels. Every content panel can show an HTML page or show the results of
a menu command (for example, run a query or a process).
- Color/font scheme (“theme”)
Configuration of a visual perspective is described in detail in the Adding/Editing Visual
Perspectives section.
It is possible to define several visual perspectives for an application and switch between
them when necessary. This may be useful if the application contains several relatively
independent functional areas that need to look different to the user and/or offer different
sets of menu operations. For example, there may be an area that provides management
of forums and another area that handles orders and purchases. Switching visual
perspectives is achieved by configuring a special type of a menu operation called
“Change Perspective” (see Setting Menu Item Properties) – when a user selects the
menu item of this type Aware IM shows the visual perspective configured for this menu
item.

Aware IM 8.8 User Guide
Copyright © 2002-2023 Awaresoft Pty Ltd Page 23 of 479
Operations
The screen layout would be rather worthless if it did not allow invoking operations. Most
operations are invoked from the main menu that is configured as part of a visual
perspective (see Visual Perspective).
The content of the main menu is entirely up to the configurator to define. The menu
consists of menu items that can be arranged in a hierarchical structure. Some menu
items (folder items) may only contain other items whereas other menu items (leaf items)
may actually perform a particular operation. Configurators define the name of the menu
item as well as the type of the operation that it invokes. There are a number of operation
types that Aware IM offers. Arguably the most important ones are those that initiate data
creation, editing, retrieval and processing. These are the following operation types:
Create Object
When a user selects a menu item of this type Aware IM shows the form that allows
entering attribute values of a new instance of the specified business object (see
Business Objects as Carriers of Data). When the user submits the form the new
instance of the object with the entered values is created (see Data Entry and Editing).
For example, the “New Account” menu item may be configured to create a new instance
of the Account business object.
Run Query
When a user selects a menu item of this type Aware IM runs the specified query and
shows the business objects found (see Data Retrieval and Data Presentation). For
example, the “Expired Policies” menu item may be configured to run a query that looks
for instances of a Policy business object with the value of State attribute equal to
“Expired”.
Start Process
When a user selects a menu item of this type Aware IM starts the specified process
(see Processes as Links between User Interface and Business Logic). For example, the
“Transfer Funds” menu item may be configured to start the “TransferFunds” process that
displays the appropriate form for the creation of FundsTransfer business object and
prints out the receipt after the object has been created (and the funds have been
transferred by the business rules attached to this object).
Other types of operations allow building a query dynamically, generating a report,
exporting and importing business objects etc. The complete list of operation types
supported by Aware IM via the main menu is available in the Setting Menu Item
Properties section.
NOTE: Operations of an application may be invoked not only from the main menu but
also from business object forms (see Form Caption and Form Operations), from the
standard query results screen (see Standard Form of Query Results) and from the
hyperlinks defined in business object presentations (see Hyperlinks).

Aware IM 8.8 User Guide
Copyright © 2002-2023 Awaresoft Pty Ltd Page 24 of 479
Data Entry and Editing
As described in the Business Objects as Carriers of Data section, data entry and editing
in Aware IM is achieved by creating and updating instances of business objects.
Instances of business objects can be created either explicitly by the user when she
selects a menu item of the “Create Object” type (see Operations) or by a process when
it executes the ENTER NEW action of the Rule Language
2
.
In both cases Aware IM displays a form that allows the user to enter values of the
attributes of the business object. When the user submits the form the new instance of
the business object is created (this triggers evaluation of business rules, if there are any,
attached to this business object – see Business Rules as Carriers of Business Logic). If
the form was displayed by the ENTER NEW action of a process, the process continues its
execution after the business rules attached to the object have been evaluated.
Editing of business object instances occurs either when a user presses the “Edit” button
on the query results screen (see Data Presentation) or when a process executes the
EDIT action of the Rule Language
3
. Again in both cases Aware IM displays a form that
allows a user to modify the values of the attributes of the business object. When the user
submits the form the existing instance of the business object is replaced with the
changed values (this triggers evaluation of business rules attached to this business
object – see Business Rules as Carriers of Business Logic). If the form was displayed by
the EDIT action from a process, the process continues its execution after the business
rules attached to the object have been evaluated.
See also: Business Object Forms
Business Object Forms
As we saw in the Data Entry and Editing section whenever data entry and editing occurs
Aware IM displays a form that allows a user to enter or modify the values of the
attributes of a business object. In this section we will look at this process in greater
detail.
2
The instance of a business object may also be created from a process or business rule by executing the
CREATE action of the Rule Language, but we will not be considering this possibility in this section because
it does not involve data entry as in this case the object is created with either default and/or specified
attribute values.
3
Business objects may also be modified by business rules that change attribute values, but again we do
not consider this possibility in this section, as it does not involve data editing.

Aware IM 8.8 User Guide
Copyright © 2002-2023 Awaresoft Pty Ltd Page 25 of 479
The form that Aware IM displays during data entry or editing may be defined as part of
the business object’s configuration. When the configurator provides a definition of a
business object Aware IM generates the default form. This default form is used for data
entry/editing unless the configurator defines a different form. The default form contains
input controls for each attribute defined in the business object. The type of the input
control corresponds to the type of the attribute – for example, text and numbers are
represented by a simple text box, input fields for document attributes are represented by
a text box with the Browse button next to it (the button allows choosing the document);
reference attributes are represented by a reference table. For a complete list of attribute
types and their default representation on the business object form see Adding/Editing
Attributes. The input controls on the default form are laid out in a top-down fashion –
every subsequent input control is placed underneath the previous one. An example of
the default form is shown on the picture below:

Aware IM 8.8 User Guide
Copyright © 2002-2023 Awaresoft Pty Ltd Page 26 of 479
It is possible to change the default form and specify which attributes will be shown on
the form and in which order, or specify different type of an input control for a particular
attribute. It is also possible to provide a completely customized layout of the form.
One can also define more than one form for a business object. For example, one form
may be used when a new instance of a business object is created and another one –
when an existing instance is modified. This may be useful if some attributes are only
relevant when the object is being modified and irrelevant when a new instance is being
created or vice versa. Certain forms may be used on special occasions only – for
example, when clients register themselves as new system users or when the form is
displayed by a particular process only (the name of the form may be explicitly specified
in the ENTER NEW, EDIT or VIEW actions). Certain forms may also be used only for
certain categories of users – see Access Control).
Configuration of forms is described in detail in the Defining Forms section.
Form Sections
Certain business objects may have quite a large number of attributes so putting them all
on one form may not be practical. Aware IM allows breaking the form up into smaller
chunks called form sections. Each form section may contain only a subset of attributes
of the business object. In the Operation Mode such form sections are either displayed as
tabs (each tab showing the name of the form section) so the user can access each form
section in a random order or the form sections are displayed in a strictly defined order –
one after the other. The following picture shows different form sections for the
Customer business object (form sections are Main, Communication, Alerts and
Signature; the currently open form section is Main)
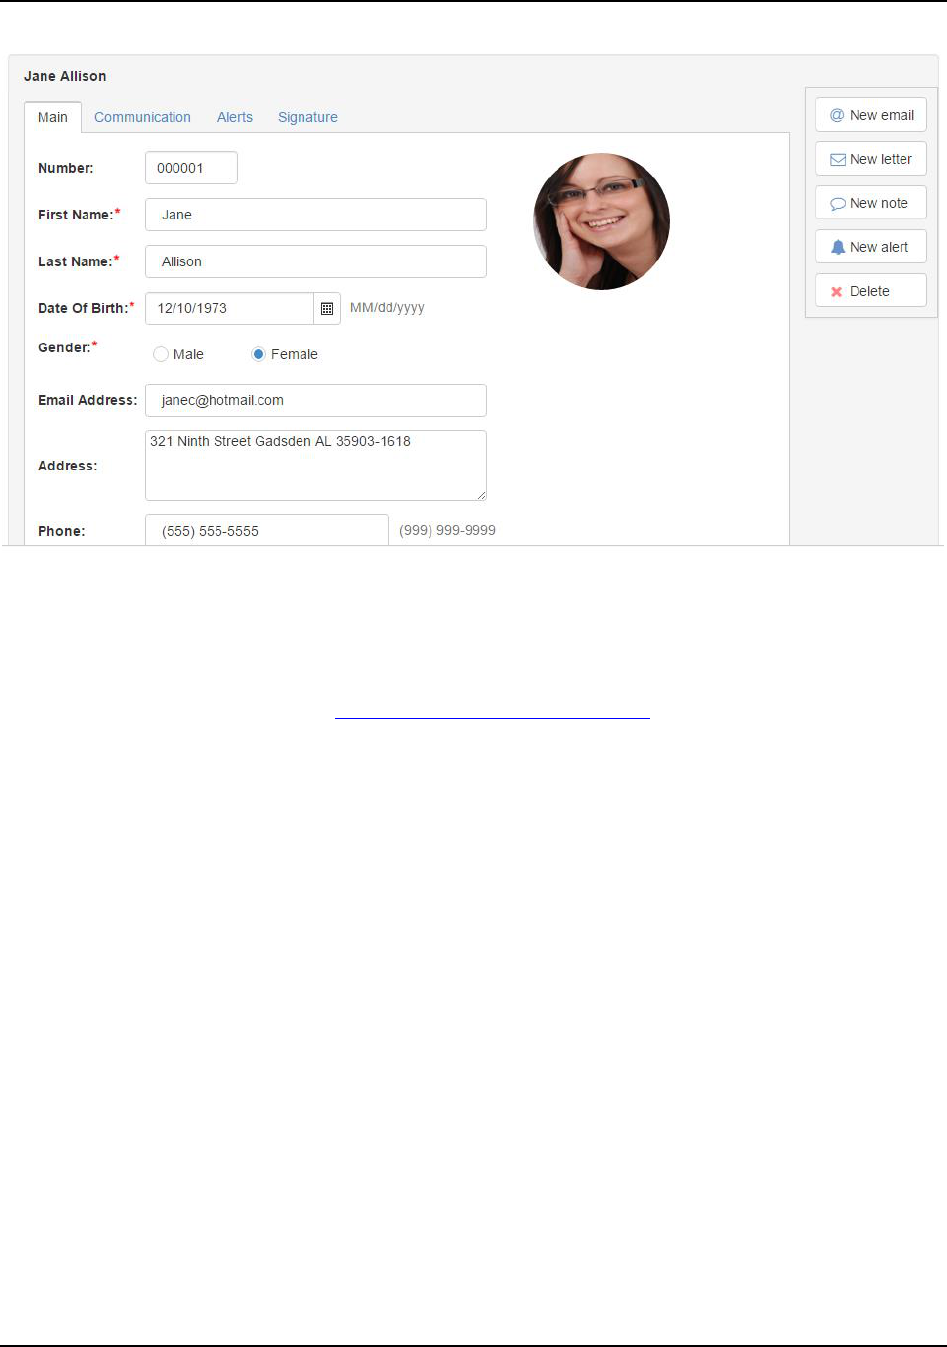
Aware IM 8.8 User Guide
Copyright © 2002-2023 Awaresoft Pty Ltd Page 27 of 479
Aware IM creates a layout of a form section automatically whenever there is a request
to show the form section in the Operation Mode. By default the attributes defined for the
form section are generated in a top-down fashion using input controls corresponding to
the attribute types (it is possible to change the default top-down layout and place
attributes in a single row – see Adding/Editing Form Sections). If a definition of a
business object changes so that new attributes are added or existing attributes are
deleted or modified, the layout of the form section is automatically re-generated in the
Operation Mode to reflect the changes. The picture showing form sections of the
Customer business object above is an example of a form section.
Navigation Style
There are two ways a user can navigate between the form sections of a form (these
ways of navigation are called navigation styles) – random and wizard-like.
With random navigation style the names of the form sections are displayed as tabs. A
user can click on any tab at any time and Aware IM will show the layout of the
corresponding form section. The order of form sections defined in the Configuration
Mode only determines the order in which tabs are displayed and does not affect the
order of navigation. The users may freely switch between different form sections and
enter or change the attribute values as they wish. The form may be submitted from any
of the form sections.
With wizard-like navigation form sections are displayed in the order that they are defined
on the form – to navigate to the last section a user has to go through all the previous
sections. The form may be submitted only from the last section. Wizard-like navigation
may be very useful when input of a business object is performed in logical steps where

Aware IM 8.8 User Guide
Copyright © 2002-2023 Awaresoft Pty Ltd Page 28 of 479
one step can only be performed once the previous step has been accomplished (this is a
very popular style in the Internet-based systems).
NOTE: sometimes the information displayed on the next form section may depend on
the information entered on the previous form sections. For example, there may be a
business rule that calculates the value of an attribute based on the values of other
attributes. Aware IM performs all necessary calculations during the transition between
form sections and displays the correct value when the next form section is displayed.
NOTE: an attribute of a business object may be shown on more than one form
section. In this case the value of the attribute is retained when a user switches between
the form sections. This applies both to random and wizard-like navigation styles.
NOTE: there is an alternative way of implementing wizard forms in Aware IM – see
Multi-step Processes.
Form Operations
A form of a business object can be associated with particular operations that can be
invoked for this object. The list of these operations can be configured as part of the form
definition and they appear as a toolbar above and/or underneath the form. Unlike
operations invoked from the main menu (see Operations) the operations invoked from
the form usually have something to do with the instance of the business object being
edited.
Data Storage
Any data management application needs to store data. The data in Aware IM is
encapsulated in business objects (see Business Objects as Carriers of Data) and so
Aware IM needs to store instances of business objects.
In Aware IM most business objects are stored in a database. Database management
systems (DBMS) are complex software and development of applications using traditional
methods requires a lot of effort dedicated to the implementation of database-related
issues, such as a thorough design of database tables that includes relationships
between the tables; interface to database management software and database
transactions.
Aware IM takes care of the database-related issues automatically.
Aware IM performs database-related tasks automatically behind the scenes. When
configurators define business objects, attributes, queries, etc they do not need to worry
about database tables and relationships between them. Aware IM automatically creates
database tables when new business objects are defined and automatically alters them

Aware IM 8.8 User Guide
Copyright © 2002-2023 Awaresoft Pty Ltd Page 29 of 479
when object definitions change. When object definitions do change Aware IM makes
every effort to preserve the existing data whenever possible. For example, when a new
attribute is added to a business object the existing data for this business object is not
affected in any way or when the attribute type is changed from Number to Plain Text the
existing numbers are automatically converted to text. Obviously when an attribute is
deleted from a business object the existing data for the attribute is deleted as well. In
any event, if the existing data is going to be affected Aware IM warns the configurator
about the possibility of the data loss and indicates which configuration changes will
affect the data (see also Publishing Business Space Version).
In the Operation Mode when users create or modify instances of the business objects
Aware IM performs all the database-related tasks behind the scenes creating and
modifying rows of data as required.
Aware IM supports different data types.
Aware IM supports most data types including images and documents, small and large
text, dates, numbers, binary data etc. Again configurators need not be concerned with
the actual representation of these data types in a specific DBMS – Aware IM takes care
of all these issues.
Aware IM is designed to be DBMS independent.
Aware IM is designed to be independent of a particular database management system
used by its clients. Due to quite significant differences in capabilities and functionality of
different DBMS implementations Aware IM does include the code specific to a particular
DBMS. This code however is well isolated and supporting more database vendors is just
a matter of time. At the moment Aware IM has been tested with IBM Cloudscape/Derby,
MySQL, Microsoft SQL Server/SQL Server Express/Azure, Oracle, PostgreSQL and
Maria DB. More database systems will be supported in the near future.
Aware IM is designed to support different data storage media.
Database is not the only place where business objects can be stored in Aware IM.
Aware IM abstracts the concept of the data storage so in principle business objects may
be stored in other types of data storage media, such as memory or LDAP. At the
moment persistence in memory only is supported (apart from persistence in a
database). Memory persistence can be useful when business objects are created for
temporary purposes only and are not stored permanently in the system. For example, an
instance of a business object may be created only to trigger business rules that perform
some calculations attached to this object (see Business Rules as Carriers of Business
Logic). Configuration of a persistence type for a business object is described in the
Specifying General Properties section.
Aware IM takes care of transactions and data integrity issues.
Aware IM makes every effort to preserve the integrity of data – for example, when an
instance of a business object is deleted, all references to this instance in other business
objects (if any exist) are deleted as well. Also if some data operation fails all data
operations that occurred prior to the failed operation within one logical request are

Aware IM 8.8 User Guide
Copyright © 2002-2023 Awaresoft Pty Ltd Page 30 of 479
automatically rolled back, so the data stays consistent. For example, if money is
transferred from one account to another one in two steps (withdrawal and deposit) and
the deposit step fails for whatever reason, withdrawal is rolled back as well. This multi-
step operation is called a transaction in database systems. For more details on how
Aware IM handles transactions see Rules and Transactions.

Aware IM 8.8 User Guide
Copyright © 2002-2023 Awaresoft Pty Ltd Page 31 of 479
Data Retrieval
Retrieval of data in Aware IM is achieved by means of a data query (or simply a query).
A query goes through all data in the system and compares it against some criteria. The
data that matches the criteria is retrieved. Since data in Aware IM is encapsulated in
business objects (see Business Objects as Carriers of Data) a query looks for the
instances of a business object that match the criteria of the query.
Data may be retrieved not only explicitly by a user but also by processes and business
rules. This is achieved by executing the FIND, PICK FROM or DISPLAY actions of the
Rule Language. Executing this action is equivalent to running a query – in fact, almost
any query (other than very specific queries in SQL form) may be represented as a FIND
action.
See also:
Configuring Queries
Running Queries in the Operation Mode
Building Queries in the Operation Mode
Searching for Data using Forms
Configuring Queries
Queries can be defined at the configuration stage - a user can run such pre-configured
queries in the Operation Mode. Pre-configured queries can also be referenced by rules
(see FIND action).
When defining a query the configurator has to indicate the business object, (or business
object group) the instances of which the query will be searching. Then the configurator
has to indicate the conditions of search – only those instances of the business object
that have attribute values matching the specified conditions will be retrieved by the query
(if conditions are not specified all instances of the business object will be retrieved). For
example, if a query is to retrieve accounts of John Smith, the query has to include a
condition that compares the value of the OwnerName attribute with ‘John Smith’:
FIND Account WHERE Account.OwnerName = 'John Smith'
One can define multiple conditions for a query – the conditions may be linked with the
AND or OR keywords.
Note that query conditions allow specifying not only attributes of the business object that
the query will be searching, but also attributes of the related objects. For example, if

Aware IM 8.8 User Guide
Copyright © 2002-2023 Awaresoft Pty Ltd Page 32 of 479
account owner is a Customer object related to the Account object via the Owner
reference attribute, the above query could be specified as follows:
FIND Account WHERE Account.Owner.Name = 'John Smith'
It is also possible to indicate attributes of objects related to the related objects, for
example, Account.Owner.Company.Name. There is no limit on the level of nesting of
the related objects.
The configurator may indicate that instances of a business object found by a query
should be sorted by a particular attribute(s) in a particular order and also indicate how
these instances should be displayed in the Operation Mode – see Data Presentation.
Configuration of queries is described in more detail in the Adding/Editing Queries
section.
NOTE: If a query searches for instances of business objects belonging to a business
object group, the conditions of the query may only use attributes common to all
members of the group (see Business Object Groups). When the results of such a query
are presented to the user the presentation is only allowed to show common attributes of
the group (see Data Presentation).

Aware IM 8.8 User Guide
Copyright © 2002-2023 Awaresoft Pty Ltd Page 33 of 479
NOTE: It is possible to define a query with conditions that use attributes of a business
object that the query is not searching for (they are also called dynamically resolved
attributes or simply dynamic attributes). Consider the following query as an example:
FIND Account WHERE Account.OwnerName = Customer.Name
The business object Customer used in a query condition is not the object that the query
is searching for. Aware IM replaces references to such attributes with the actual values
at run time – just before the search is performed. For example, if the value of the Name
attribute of the Customer object is ‘John Smith’ the actual query performed by Aware IM
is:
FIND Account WHERE Account.OwnerName = 'John Smith'
Where does Aware IM find the instance of the Customer object and what happens if
there are no instances of this object or if there are more than one instance? The answer
to the first part of the question is that the instance is taken from the Context (this is
explained in the Other Usages of Context section); the answer to the second part is that
if Aware IM cannot find the instance of the object in the Context it logs a run-time error
and the query is not run. The queries using dynamic attributes should only be used in
situations where such attributes can be unambiguously resolved.
See also Queries that Require User Input
Queries that Require User Input
Quite often a value that a query should use in its conditions must be entered by a user at
run time rather than pre-configured. For example, consider a query that finds the
owner’s accounts after the owner’s name has been entered by the user. Aware IM
allows configuring such a query – the configurator will need to specify the business
object that the query should be looking for as well as the attributes and criteria
participating in the query condition(s). However, instead of specifying a particular value
of the attribute(s) in the condition(s) the configurator will need to indicate that the value
should be entered at run time. When the user runs such a query in the Operation Mode
Aware IM automatically generates a form where the user enters the required value(s) (in
the above example - the name of the owner that the query will be looking for). After the
required value has been entered Aware IM performs the search and displays the
results.
A query may require several values to be specified by the user (for example, a query
that finds accounts of owners with the names that start with the specified value and with
balances that are greater than the specified amount). In this case Aware IM generates a
form that prompts for the values of every attribute that requires input from the user.

Aware IM 8.8 User Guide
Copyright © 2002-2023 Awaresoft Pty Ltd Page 34 of 479
It is possible to mix conditions that check for pre-configured values with conditions that
require input from the user within a single query.
NOTE: If the user does not provide any value, the corresponding condition is not
considered at all when the search is performed. For example, if the user does not
provide a value of the owner’s name in a query that looks for accounts of the specified
owners, the query will find all existing accounts. If the user does not provide the value of
the account balance in a query that looks for the accounts of the specified owners with
balances greater than the specified amount, but provides the name of the owner the
query will find the accounts of the specified owner. If the user provides the balance
amount but not the owner’s name, the accounts with a balance greater than the
specified amount will be found. Finally, if the user does not provide values for both the
owner’s name and the balance all existing accounts will be found. This capability may be
quite useful in those types of searches where users only enter values for those criteria
that they are interested in.
Running Queries in the Operation Mode
Usually the user would run a query by selecting an item of the “Run Query” type from the
main menu, provided that such an item has been configured in the visual perspective –
see Operations. The user may not even realize that selecting a particular menu item will
run a pre-configured query. For example, the configurator can define a query that finds
accounts with balances larger than a certain amount and configure a menu item in a
visual perspective called “Large Balances”. When the user selects this menu item in the
Operation Mode the system will display the accounts with a large balance as expected
and the user would not even be aware of the invocation of a query mechanism behind
the scenes.
Note that as explained in Operations a query can also be implicitly invoked from the
hyperlink of the business object presentation (see Hyperlinks) or from a business object
form (see Form Caption and Form Operations). Again in both cases the user may not be
aware of the existence of queries in the system.
There is also another way of running queries in the Operation Mode – that is, selecting a
menu item of the “Search Objects” type (provided that one has been configured). An
operation of this type shows the screen where the user can select a specific query that
she wants to run from a list of all queries configured in the system. Note that since the
user selects a particular query from a list of all available queries she should be well
aware of the existence of queries in the system. Normally an operation of this type
should be used by system administrators only.

Aware IM 8.8 User Guide
Copyright © 2002-2023 Awaresoft Pty Ltd Page 35 of 479
Building Queries in the Operation Mode
In certain systems it may be necessary for the users to build and run their own queries
rather than run pre-configured queries. The functionality of building queries dynamically
in the Operation Mode is available from operations of the “Manage Queries” and “Run
User Defined Queries” types – see Operations.
The process of building a query in the Operation Mode is divided into several steps. For
each step Aware IM shows the appropriate screen. It is possible to move forward and
backwards between the steps. The parameters of a query that need to be specified
during these steps are very similar to those specified when a query is defined in the
Configuration Mode – see Adding/Editing Queries. After all steps have been
accomplished the built query is run and the found instances of the business objects are
displayed.
Note that the query built in this way does not become part of the system configuration –
however, it is accessible to end users of the system. Usually a system administrator
would build such queries before other users start working with the system.
Searching for Data using Forms
Another way of retrieving data in the Operation Mode is using forms to search for
business objects (see Business Object Forms). The idea is that the user is presented
with a blank form of a business object. She can enter values in any field of the form, and
when the form is submitted Aware IM will search for instances of this business object
using the entered data. To do this Aware IM automatically builds and runs a query.
When building a query Aware IM constructs a query condition for every value entered by
a user and connects them using the “AND” operator. Blank fields are ignored.
For example, let’s say we have a Customer business object with the following
attributes: FirstName, LastName, DOB, Address and TelephoneNo. If the user
enters “John” in the “FirstName” field of the form and “Smith” in the “LastName” field
Aware IM will find all customers with the first name “John” and the last name “Smith”.
It is also possible for a more advanced user to enter not only simple values into the
fields of a form but also expressions. The following table lists all possible keywords that
can be entered into a field:
Keyword
Aware IM search behaviour
Literal value (string,
number, date,
timestamp)
For Plain Text attributes Aware IM will search for objects
the attribute values of which contain the specified value;
for all other attribute types – that are equal to the specified
value
<
All objects with attribute values less than the specified
value, for example: “<5”

Aware IM 8.8 User Guide
Copyright © 2002-2023 Awaresoft Pty Ltd Page 36 of 479
>
All objects with attribute values greater than the specified
value, for example: “>5”
<=
All objects with attribute values less or equal than the
specified value, for example: “<=5”
>=
All objects with attribute values greater or equal than the
specified value, for example: “>=5”
<>
All objects with attribute values not equal to the specified
value, for example: “<>5”
=
All objects with attribute values equal to the specified
value, for example: “=’John Smith’”
CONTAINS
All objects with attribute values that contain the specified
value, for example: “CONTAINS 25”
STARTSWITH
All objects with attribute values that starts with the
specified value, for example: “STARTSWITH ‘John’”
ENDSWITH
All objects with attribute values that ends with the
specified value, for example: “ENDSWITH ‘ith’”
BETWEEN, AND
All objects with attribute values that are in the specified
range, for example “BETWEEN 5 AND 10”
AND
Both conditions are included, for example “<5 AND >20”
OR
Either of the conditions is included, for example “<5 OR
>20”
NOTE: If the user enters data into the field of a reference attribute Aware IM will
search through the related instances.
To configure an operation that will invoke a search using forms as explained above the
configurator has to tick the “Using form” checkbox on the query property editor – see
Adding/Editing Queries.
NOTE: When you use form-based queries it is also possible to specify query
conditions when defining a query. These conditions will be used as extra conditions and
will be automatically added to the query after the user enters data into the query form.
Advantages and disadvantages of using form-based search versus defining
queries that require user input.
If you want users to be able to enter their search criteria dynamically at run time, you
have two configuration options at your disposal – configure queries requiring user input
or using business object forms to search for data. Which one is better? There are
advantages and disadvantages of using either method:
- Using forms often requires less configuration effort, as you don’t need to configure a
query (in some cases, however, you may want to configure a special form)

Aware IM 8.8 User Guide
Copyright © 2002-2023 Awaresoft Pty Ltd Page 37 of 479
- Using forms may be more flexible as it offers a large number of attributes to the user
to search by. However, it may be confusing to some users as some of the attributes
may not be relevant to a particular search.
- Forms offers the power of expressions to advanced users, however, for users who
do not want or cannot use expressions it is better to offer a simple way of entering a
value only.
- Even though forms allow entering expressions, not all queries can be expressed with
forms.
Data Presentation
After data has been retrieved from the system it needs to be presented to the user so
that she can inspect and modify it if necessary. As explained in the Data Retrieval
section data is retrieved by a query. The following section describes how Aware IM
presents instances of business objects found by a query to the user. (Data may also be
presented by generating a document or report – see Working with Documents and
Reports)
Business object instances found by a query may be presented in a standard or custom
manner. Unless the configurator defines the query to use a presentation of the business
object to display its results, the results of the query execution are displayed in the
standard manner. This is explained in more detail in the following sections.
See:
Standard Form of Query Results
Custom Form of Query Results
Calendar Form of Query Results
Standard Form of Query Results
The standard form of query results is generated by Aware IM automatically. The
standard form displays query results as a table. Every instance of a business object
occupies a row in this table. Columns of the table display values of certain attributes of
the business object. This is illustrated on the picture below:

Aware IM 8.8 User Guide
Copyright © 2002-2023 Awaresoft Pty Ltd Page 38 of 479
The attributes shown in the columns are specified when a query is configured. If they are
not defined, Aware IM picks attributes to display at random.
The rightmost columns of every row in the table show the operations that can be
performed with an instance represented by the row (in the above example there is the
“Edit” and “Delete” operations). When defining a query it is possible to configure which
operations will be available – see Adding/Editing Queries.
The leftmost column of every row in the table may have a checkbox that allows selecting
multiple instances of a business object to perform operations with.
If the number of instances found by a query is large only a limited number of these
instances is displayed on one page (this number is 20 by default and can also be
specified when a query is configured). To navigate between pages a user can press one
of the navigation buttons located in the bottom left corner of the list and traverse to the
start or end of the list and to the previous or next page or go directly to a particular page.
Clicking on a particular column allows sorting the list by the value of the column.
Custom Form of Query Results
The custom form of query results shows instances of a business object found by a query
according to a custom HTML template or a presentation defined for this business object.
This may be useful if the configurator wants to provide a more customized layout of the
query results than the one offered by the standard form and/or include different visual
effects not supported by the standard layout, such as foreground or background images.

Aware IM 8.8 User Guide
Copyright © 2002-2023 Awaresoft Pty Ltd Page 39 of 479
On the picture above each instance of the Customer object is represented by an HTML
fragment that shows the Name, Title and Photo attributes of the customer.
See:
Business Object Presentation
Hyperlinks
Business Object Presentation
Presentation of a business object is defined as part of the business object configuration
(see Defining Presentations) and is designated to display the results of a particular
query in a non-standard fashion (see Custom Form of Query Results). The layout of a
presentation is created using the Report/Presentation Designer in the Configuration
Tool. The following picture shows an example of a presentation defined for a business
object Product.

Aware IM 8.8 User Guide
Copyright © 2002-2023 Awaresoft Pty Ltd Page 40 of 479
If such a presentation is designated to display results of a query that finds all available
products, running such a query in the Operation Mode will produce the following:
The presentation layout consists of different sections called bands. Each band has its
own purpose in the generation of the final output. Each band may contain design
elements. There are several types of design elements, such as static texts, tags,
images, rectangles, lines, conditional elements and sub-presentations. Probably the
most frequently used design element is the tag element, which may refer to attributes of
a business object and also contain arithmetic expressions with these attributes. Most of
these elements are explained in detail in Working with Documents and Reports.
The Report/Presentation Designer is a powerful tool that allows creating flexible and
comprehensive layouts for reports and presentations. Some of the functionality of the
Report/Presentation Designer may be familiar to those who used to work with report

Aware IM 8.8 User Guide
Copyright © 2002-2023 Awaresoft Pty Ltd Page 41 of 479
generators before (such as, for example, Crystal Reports). In a way a presentation is
similar to a report (see Working with Documents and Reports) in that it allows providing
a title and summary, break the data into groups, display headers and footers for each
group etc. Unlike reports presentations may include hyperlinks that invoke different
operations – start processes, run queries, view other presentations etc – see Hyperlinks.
Presentations can be displayed not only from the query results screen but also from
operations invoked on a business object form (see Form Caption and Form Operations),
from hyperlinks of some other presentation (see Hyperlinks) and from processes (using
the VIEW action). In all these cases there is an instance of a business object, which
owns the presentation that is being viewed. If the presentation is viewed from a business
object form this instance is the instance of the object that the form displays; if it is viewed
from a hyperlink this is the instance of the object that the hyperlink is associated with. If
a presentation is viewed from a process this is the instance of the object in the Context.
Also in all these cases only a single instance of a business object is displayed by a
presentation unlike the situation when a presentation shows query results where in most
cases multiple instances are displayed. When designing the layout of a presentation it is
important to remember whether the presentation will be used to display a single or
multiple instances of a business object. Some presentations should only be used to
display query results (i.e. showing multiple instances) while others should only be used
from forms, hyperlinks or processes (i.e. showing single instances).
Hyperlinks
Hyperlinks invoke operations from a presentation. They are defined using the
Report/Presentation Designer as part of the presentation layout (see Setting Hyperlink
Properties).
Hyperlinks can be optionally attached to text, tag and image design elements. When
defining a hyperlink the configurator has to specify the type of operation that the
hyperlink invokes if clicked on by the user in the Operation Mode. These operations can
start a process, run a query, display a form or presentation of a business object or
navigate to a particular URL. The full list of operation types is described in the Setting
Hyperlink Properties section.
In the Operation Mode a hyperlink is most often associated with a particular instance of
a business object. If a presentation where the hyperlink is defined shows one instance of
a business object (see Business Object Presentation) this is the instance that the
hyperlink is associated with. If the presentation shows multiple instances and the
hyperlink is defined in the Details band of the presentation there will be as many
hyperlinks as there are instances of the business object – each hyperlink will be
associated with its own instance.
When an operation that a hyperlink invokes starts, the instance of a business object that
the hyperlink is associated with becomes available as context for this operation. If the
operation starts a process this instance may be used by rules of the process (process

Aware IM 8.8 User Guide
Copyright © 2002-2023 Awaresoft Pty Ltd Page 42 of 479
input); if the operation runs a query this instance may be used by the query for attributes
resolved dynamically (see Configuring Queries); if the operation displays the form for
editing this instance is the one that gets edited.
Calendar Form of Query Results
Calendar form of query results can be used to show business objects of the
Appointment type in a calendar style layout (see picture below).
Users can switch between different calendar views (daily, weekly, monthly etc), create
and modify appointments, set priority of appointments. See also Adding Appointment
Objects.
Data Processing
As explained in the Business Rules as Carriers of Business Logic section in Aware IM
data processing logic (or business logic) is configurable and centralized. It is expressed
in the form of business rules rather than in a more traditional programming or scripting
language. Implementation of this business logic is based on the fact that business rules
get evaluated and their actions are executed as soon as the rule conditions are met.

Aware IM 8.8 User Guide
Copyright © 2002-2023 Awaresoft Pty Ltd Page 43 of 479
This section explains in detail how this happens – how rule conditions are evaluated and
what happens when rule actions are triggered.
See also:
Rule Evaluation
Rules and Transactions
Execution Log
Rule Debugger
Configuration of Rules
Rule Evaluation
In Aware IM rules are evaluated if either of the following happens:
- An instance of a business object is created (provided that there are rules attached to
this business object)
- Value of an attribute of a business object instance is modified (provided that there
are rules attached to this business object)
- A process implemented by rules is started
- Aware IM receives a notification (provided that there are rules associated with this
event)
- A notification is created (provided that there are rules associated with this event)
- Scheduling rules are triggered by a timer event – see Scheduling
So what exactly do we mean by saying that “rules are evaluated”? Essentially this
means that Aware IM starts checking whether rule conditions are met and if so begins
execution of the corresponding actions. Before we explain how this happens for a
number of rules, let us have a look first at the evaluation of a single rule.
See also:
Context
Action Execution
Evaluation of Rule Collections
Evaluation of Unordered Rule Collections
Context of Rule Execution
Evaluation of Rules Containing WAS CHANGED Expressions
Initialization Rules
Summary of Rule Execution

Aware IM 8.8 User Guide
Copyright © 2002-2023 Awaresoft Pty Ltd Page 44 of 479
Context
When evaluating a rule Aware IM checks if rule conditions are met and if so executes
the action specified by the rule
4
.
Let us consider the following rule as an example (taken from an application that
manages car insurance policies – the rule itself may or may not be very realistic, but it
does not matter for the purposes of this example):
IF Driver.Age > 70 Then INCREASE Policy.Excess BY 100
According to this rule the system is supposed to evaluate whether the age of the driver
is greater than 70 and if so, increase the excess of the policy by 100 dollars. The
question is – which driver and which policy? The system may have details about
thousands of drivers and thousands of policies in its database – so, which ones are we
talking about? If you ask a businessperson this question, she will probably answer
something along the lines of “Of course, I know what I am talking about – the driver here
is the person who has asked for a quote and the policy is the policy we are calculating
for her”. Judging from this imaginary but quite possible answer, one can draw a
conclusion that a businessperson always has a certain context in mind when she talks
about business rules. In the example above this context is the fact that someone asked
for a quote already - the business rule is therefore evaluated within this context and so
“the driver” and “the policy” have a very specific meaning.
The concept of Context therefore is the key to rule evaluation and action execution –
when deciding which instances of the business objects to consider when checking rule
conditions and executing actions, Aware IM looks for such instances in the Context (with
one exception that we will consider later). The Context can be regarded as a special
place within Aware IM where it keeps “relevant” instances of the business objects and
notifications. Still the question is how this Context is formed – how does Aware IM know
which instances are relevant and which ones are not?
There are certain formal events within Aware IM that affect the contents of the Context.
The full list of such events is described in the Data Processing section. Here we only
mention two of them:
- If an instance of a business object is created by the ENTER NEW or CREATE actions,
it is placed in the Context.
- If rules attached to a business object are being evaluated the instance of the
business object, for which rules are being evaluated, is placed in the Context.
4
Strictly speaking this is not necessarily true. For un-ordered rule collections an action is not executed
immediately but is placed on the agenda first. An action on the agenda may or may not be executed – see
Evaluation of Unordered Rule Collections. In this section, however, we will assume for simplicity that
actions are always executed

Aware IM 8.8 User Guide
Copyright © 2002-2023 Awaresoft Pty Ltd Page 45 of 479
Now let us go back to our rule – to get a full picture of what is going on when it is being
evaluated we must consider what was happening before and restore the context of rule
evaluation. We assume here that the software calculates the details of the requested
policy after someone has asked for a quote. It is therefore quite reasonable to assume
that there is some process that displays the form with the driver’s details to be filled out
by a user and after the form has been filled out calculates the details of the policy. The
rules of the process might look something like this:
ENTER NEW Driver
CREATE Policy
We assume here that the Driver and the Policy business objects are defined and
that the Policy business object has our rule attached to it as well as other rules that
calculate all the details of the policy. The first action displays the form of the Driver
business object on the user’s screen. As soon as the user enters all the details the
instance of the Driver object is created and is placed in the Context (if there are any
rules attached to the Driver object they are evaluated as well). Then the instance of
the Policy object is created and placed in the Context and the rules attached to the
Policy business object (including our rule) are evaluated. Therefore when our rule is
being evaluated the appropriate instances of the Driver and Policy business objects
will have been already made available in the Context and the system uses the values of
the attributes of these objects to check the rule conditions and execute actions. By the
time the system finishes the creation of the Policy object all the details of the policy will
have been calculated!
More detailed information about the Context is given in the Context of Rule Execution
section.
Aggregate Operations
In the Context section we have mentioned that there is one exception to the fact that
Aware IM looks for instances of the business objects to work with in the Context. This
exception applies to aggregate operations. Aggregate operations are those rule
expressions that start with keywords EXISTS, COUNT, SUM, MIN, MAX, AVG (see
EXISTS Expression and Aggregate Calculations). When such an expression is
encountered Aware IM always looks at all data available in the database and considers
all instances in the database that match the conditions of the aggregate operation, not
only instances in the Context. For example,
IF EXISTS Policy WHERE Policy.Excess > 1000 Then DoSomething
Here Aware IM looks at all existing policies in the database to find out if there is any
policy with excess greater than one thousand dollars.

Aware IM 8.8 User Guide
Copyright © 2002-2023 Awaresoft Pty Ltd Page 46 of 479
Let us now have a look at what happens when the conditions of a rule have been met
and the corresponding action(s) are triggered. See Action Execution.
Action Execution
Before an action triggered by a rule is executed the system’s data is assumed to be in a
stable state. The “data” here means the entire collection of data available– all instances
of all business objects stored in the database or in some other storage media known to
Aware IM. A stable state means that all the data is consistent and nothing is happening
– the state of the system is “fixed” at this moment in time
5
.
An action may disturb the stable state of the system by doing one of the following:
- Creating a new instance of some business object
- Modifying the existing instance of some business object
After the disturbance occurs Aware IM starts checking if there are rules defined
anywhere in the system that react to the creation or modification of the business object
instance. If that is the case Aware IM starts evaluation of such rules. These rules in turn
may create or modify other instances of business objects and cause other disturbances
and so on – thus starting a chain reaction that stops only when there are no rules to
evaluate any more, in which case the system moves to a stable state again (but this
state is different from the previous state as the the data is probably different).
We said above that if there are rules anywhere in the system that react to the creation or
modification of the business object instance, they are evaluated. What does “anywhere
in the system” mean here? It means the following:
1. Rules attached to a business object the instance of which has been created or
modified.
6
2. Rules attached to other business objects that refer to the business object instance
that has been created or modified.
The first set of rules has already been mentioned before – whenever a new instance of a
business object is being created or the existing instance is being modified, and there are
rules attached to this business object, they are evaluated. In the example of the previous
section rules attached to the Driver business object are evaluated after the form has
been filled out (this is when the instance of the Driver object is created in the system).
Rules attached to the Policy business object are evaluated immediately after the
5
This may not be true if the action was triggered in the middle of the evaluation of an un-ordered
collection of rules – see Evaluation of Unordered Rule Collections. In this section, however, we will
assume for simplicity that the state of the system is always stable prior to the execution of an action.
6
This does not apply to the instance of a business object the rules of which are already being evaluated
as part of an un-ordered collection of rules - see Evaluation of Unordered Rule Collections. We will ignore
this case for purposes of the current discussion.

Aware IM 8.8 User Guide
Copyright © 2002-2023 Awaresoft Pty Ltd Page 47 of 479
CREATE action creates a new instance of the Policy object. Let us suppose now that
we modify our process to add an action that sets the state of the policy after it has been
created, so the process now looks like this:
ENTER NEW Driver
CREATE Policy
Policy.State='Calculated'
The action in the third rule unconditionally modifies the attribute of the Policy object –
this causes the rules attached to the Policy object to be evaluated again.
The second set of rules (those rules that refer to the instance of the business object that
has been created or modified) is called cross-reference rules. An explanation of what
these are, are given in the Cross-reference Rules section.
Cross-reference Rules
Cross-reference rules are rules that refer to a particular instance of a business object
through the reference attribute of another object. For example, let us assume that our
Policy business object has a reference attribute declared – this reference is to the
Driver for which the policy is made. Let us assume that the name of this attribute is
MyDriver. Our age rule should now be written like this:
IF Policy.MyDriver.Age > 70 Then INCREASE Policy.Excess BY 100
We should also make modifications to the process that enters the details of the driver
and calculates the policy to initialize the MyDriver attribute of the Policy object
appropriately:
ENTER NEW Driver
CREATE Policy WITH Policy.MyDriver=Driver
The age rule written in the above form refers to the instance of the Driver object
through the reference of the Policy object (Policy.MyDriver.Age). This rule
therefore is a cross-reference rule.
Cross-reference rules are evaluated whenever the instance of the object they refer to is
changed. Consider what happens if a policy for some driver has been calculated but
then the user realizes that she had made a mistake and entered the wrong age of the
driver. She brings up a form for the driver and changes the value of the Age attribute.
Let us see what happens when the changes are submitted. The particular instance of a
Driver object is modified and therefore if there are any rules attached to the Driver
object they are evaluated. Let us assume for simplicity that there are no such rules.
There is however a rule that refers to the Driver object – this is our age rule. Aware IM
automatically finds the instance of the Policy object that refers to the instance of the

Aware IM 8.8 User Guide
Copyright © 2002-2023 Awaresoft Pty Ltd Page 48 of 479
modified Driver object and starts evaluating the cross-reference rule. Thus the system
guarantees that the excess is correctly calculated no matter where the change that
affects its calculation happens! If the age value entered first was 70 and the correct age
is 71 then the excess will be re-calculated as soon as the correct age of 71 is submitted.
Note that Aware IM will re-calculate cross-reference rules only for those instances of
business objects that refer to the modified instances – in our example, only the Policy
instance that refers to the modified Driver object will be re-calculated; all other policies
will not be considered.
There is a flag in the Configuration Tool that allows you to explicitly turn off the cross-
reference rule mechanism for a particular rule (see Advanced Rule Options). When this
flag is turned off for a rule the rule is never recognized as a cross-reference rule, so if
any attributes referred to by this rule are modified the rule is not evaluated. Turning off
this flag may be useful if evaluation of a cross-reference rule as a result of an attribute
change leads to modification of a large number of business object instances. For
example, let us say that our Policy object refers to a StampDuty object in a rule that
calculates commission of the policy:
Policy.Commission = Policy.Value/20 + Policy.StampDuty.Rate/100
If rate of the StampDuty object changes this change will cause re-calculation of all
policies in the system through the above rule, which is normally interpreted as a cross-
reference rule. If there are a large number of policies in the system their re-calculation
may take up significant time. You may want to warn the user about the effect of such
change or even defer the execution of the change until nighttime. In this case you would
like to configure a process that would control the changes to critical attributes of the
system and turn off automatic recognition of cross-reference rules.
Other Points Related to Action Execution
There are also a couple of other interesting points worth mentioning when describing
execution of actions.
a) When a reference attribute of some object is modified and this reference attribute
has matching attribute on the referred object, the referred object is modified as well
and its rules (if any) are evaluated (see Reference Attributes for the explanation of
what matching attribute is).
For example, let us assume that the Policy object has a reference to the Driver
object like in the previous example. Let us also assume that this attribute has a matching
reference on the Driver object called MyPolicies, which refers to all the policies of a
driver. The relationships between objects are illustrated in the following diagram:

Aware IM 8.8 User Guide
Copyright © 2002-2023 Awaresoft Pty Ltd Page 49 of 479
Let us also assume that there is a rule somewhere that sets the reference of some
instance of the Policy object to some instance of the Driver object:
Policy.MyDriver=Driver
This action modifies the instance of the Policy object and so any rules attached to the
Policy are evaluated. This is not the only thing that happens, however. Because the
MyDriver attribute of the Policy object has a matching attribute in the Driver object
(MyPolicies), the instance of the Driver object that is set into the Policy is
modified as well – the instance of the Policy object appears in its list of policies.
Consequently if there are any rules attached to the Driver object they are evaluated as
well.
b) The rules that check whether the existing member has been changed in a list are
considered to be cross-reference rules.
Let us assume hypothetically that the Driver object has the attribute TotalExcess
that is supposed to store the cumulative excess across all policies of a particular driver.
Consider the following rule attached to the Driver object, which re-calculates the value
of total premium whenever one of its policies changes in any way:
IF Policy FROM Driver.MyPolicies WAS CHANGED Then
Driver.TotalPremium = SUM Policy.Excess WHERE Policy IN
Driver.MyPolicies
Even though there is no attribute of some business object that is referred to through a
reference of another business object in this rule, the rule is still considered to be a cross-
reference rule. So if a user modifies attributes of some Policy object the rules of the
related instance of the Driver object are automatically evaluated as well and the total
premium is re-calculated.
Evaluation of Rule Collections
We had a look at how Aware IM identifies instances of the business objects to work with
and also what happens when actions are executed. Let us now look in more detail at
how rules are evaluated. In the Rule Evaluation section we have provided the list of
events that trigger rule evaluation. When any of these events occur there is a number of
rules that are considered for evaluation – if a process has been started these are the

Aware IM 8.8 User Guide
Copyright © 2002-2023 Awaresoft Pty Ltd Page 50 of 479
rules that implement the process, if an instance of a business object is created or
modified, these are the rules attached to the business object and so on. We will call
these sets of rules rule collections.
Rule collections can be ordered or un-ordered. Ordered rule collections are evaluated
one-by-one in exactly the same order that they appear in the rule collection. The only
example of an ordered rule collection is a process implemented by rules, which has the
“Maintain rule order” flag turned on – see Adding/Editing Processes. When such a
process is started its first rule is evaluated and the actions are executed if rule conditions
are met. If actions create any instances of the business objects they are placed in the
Context as described in the Context section. If actions create or modify instances of
business objects the rules attached to these business objects (if there are any) are
evaluated, cross-reference rules (if there are any) get evaluated as well – as described
in Action Execution. When action(s) of the first rule finish their execution, the second rule
of the ordered rule collection of the process is examined – its conditions are evaluated
and if they are met the corresponding actions are executed. This cycle is repeated until
the last rule in the collection has been evaluated.
Evaluation of un-ordered rule collection is very different. So different in fact that an entire
section in this document is dedicated to the evaluation of un-ordered rule collections.
See Evaluation of Unordered Rule Collections.
Evaluation of Unordered Rule Collections
Evaluation of an un-ordered rule collection in Aware IM is implemented by a rule engine,
so the terminology used in this section will probably be familiar to those who used to
work with rule-based systems before and knows the theory behind the algorithms
employed by rule engines.
See also:
Overview of Rule Engine Framework
Example of Rule Engine Execution
“While” Semantics
Did it Change?
Rule Priorities
Overview of the Rule Engine Framework
Most rule collections in Aware IM are un-ordered, such as rule collections attached to
business objects and notifications as well as processes that have the “Maintain rule
order” flag turned off. From the name of the rule collection it is clear that the order of
rules in the collection does not matter. So how does the rule engine in Aware IM decide
which rules to evaluate first, second and so on?

Aware IM 8.8 User Guide
Copyright © 2002-2023 Awaresoft Pty Ltd Page 51 of 479
The answer is that when the rule engine starts evaluating an un-ordered rule collection it
evaluates all rules of the collection at once. Actions for those rules for which conditions
have been met are stored in a separate container called the agenda. The fact that there
are actions on the agenda does not mean that all these actions are immediately
executed – the actions are waiting until they are taken off the agenda and are executed.
Actions are stored on the agenda in blocks. Action block corresponds to exactly one rule
that triggers the actions of the block in the first place. Usually an action block contains
just one action, however, if a rule triggers several actions the block contains several
actions.
So what happens after all rules have been evaluated and placed on the agenda? The
first action block is taken off the agenda and is executed. Which action block is first? The
answer to this question is undefined. It is impossible to predict which action block will be
executed first - the action block is taken off the agenda at random
7
.
What happens next? The actions of the first block randomly taken off the agenda are
executed. What happens during execution of such actions is described in Action
Execution. The only difference is that if the un-ordered rule collection represents rules
attached to a business object and the actions modify some attribute of the same
business object, then the entire collection of rules does not get re-executed again, since
it is already being executed.
After the first action block has finished execution the rule engine starts to re-evaluate
conditions of the rules, since the actions could have changed the state of the system
(represented by values of attributes of business objects that are in the rule engine
terminology called facts). Note that only those rules that depend on the facts changed by
the action(s) are re-evaluated. The agenda is reviewed as well – those action blocks that
represent rules with the conditions that no longer hold are removed from the agenda and
the new action blocks representing rules for which the conditions hold are placed on the
agenda.
After the agenda has been re-structured another action block is randomly taken off the
agenda and executed. The cycle is repeated until there are no more action blocks on the
agenda.
This algorithm can be summarized by the following flowchart:
7
In fact the order is random only for action blocks that have equal priority – see priorities later in this
section. In the current discussion we assume for simplicity that the order is completely random.

Aware IM 8.8 User Guide
Copyright © 2002-2023 Awaresoft Pty Ltd Page 52 of 479
Example of Rule Engine Execution
To better illustrate how the rule engine works let us consider the following example.
Suppose that our Policy object has the following rules defined (again it does not
matter whether this example is very realistic):
1. Rule 1 (initialization of State attribute):
IF Policy.State IS UNDEFINED Then Policy.State = 'NEW'
2. Rule 2 (initialization of Excess):
IF Policy.Excess IS UNDEFINED Then Policy.Excess = 0

Aware IM 8.8 User Guide
Copyright © 2002-2023 Awaresoft Pty Ltd Page 53 of 479
3. Rule 3 (calculation of excess for young drivers)
IF Policy.State = 'NEW' AND Policy.MyDriver.Age < 70 Then
Policy.Excess = 100
4. Rule 4 (calculation of excess for elderly drivers)
IF Policy.State = 'NEW' AND Policy.MyDriver.Age >= 70 Then
Policy.Excess = 200
5. Rule 5 (calculation of final state)
IF Policy.Excess > 0 Then Policy.State = 'CALCULATED'
Let us assume that an instance of the Policy object is being created, Policy is
initialized with a reference to the Driver, whose age is 30 and all other attributes of
the Policy object are initially undefined. Now let us see what happens when the rule
engine starts evaluating the rules for this new instance of the Policy object.
Scenario 1:
Step 1: all rules are evaluated. The conditions are met for Rule 1 (State is initially
undefined) and Rule 2 (Excess is initially undefined) only. Conditions of Rule 3 and
Rule 4 are not met because the State is not ‘NEW’; conditions of Rule 5 are not met
because the Excess is undefined. The agenda is formed and it initially contains
actions blocks of Rule 1 and Rule 2 (each action block has one action):
Agenda:
- Policy.State = 'New' (from Rule 1)
- Policy.Excess = 0 (from Rule 2)
Step 2: an action block is randomly taken off the agenda. Let us assume that it is the
action block from Rule 2. After it is executed the value of Excess attribute becomes 0.
The agenda now only has the action block from Rule 1.
Agenda:
- Policy.State = 'New' (from Rule 1)
Step 3: Rules that depend on the changed attribute Excess are re-evaluated. Rule 2
and Rule 5 only depend on the value of Excess attribute (Rule 3 and Rule 4 set this
value but do not depend on it). The conditions of Rule 2 and Rule 5 are re-evaluated.
Both conditions are not met (Excess is defined and equal to 0). Therefore their actions
are not placed on the agenda. Existing agenda is reviewed as well – its only action is
from Rule 1, which does not depend on the changed attribute and so is left intact. The
agenda therefore still has one action block from Rule 1.
Agenda:

Aware IM 8.8 User Guide
Copyright © 2002-2023 Awaresoft Pty Ltd Page 54 of 479
- Policy.State = 'New' (from Rule 1)
Step 4: an action block is randomly taken off the agenda. There is only one action
block on the agenda so it is executed. The value of the State attribute becomes
‘NEW’
Agenda: (empty)
Step 5: Rules that depend on the changed attribute are re-evaluated. Rule 1, Rule 3
and Rule 4 depend on the value of the State attribute, so their conditions are re-
evaluated. Only conditions of Rule 3 are met because the State is now defined and
the age of the driver is 30. So the action of Rule 3 is placed on the agenda.
Agenda:
- Policy.Excess = 100 (from Rule 3)
Step 6: the only action block is taken off the agenda and is executed. The value of
excess becomes 100.
Agenda: (empty)
Step 7: The conditions of Rule 2 and Rule 5 that depend on the Excess attribute are
re-evaluated. The condition of Rule 5 is met and the corresponding action is placed on
the agenda.
Agenda:
- Policy.State = 'CALCULATED' (from Rule 5)
Step 8: the only action block is taken off the agenda and is executed. The value of
state is now CALCULATED.
Agenda: (empty)
Step 9: The conditions of Rule 1, Rule 3 and Rule 4 that depend on the State
attribute are re-evaluated. Neither condition is met; nothing is placed on the agenda.
Agenda: (empty)
Step 10: The agenda is empty; the algorithm finishes. The value of Excess is 100, the
value of State is CALCULATED
Agenda: (empty)
Let us see now what would happen if a different action block was taken off the agenda
at Step 2.
Scenario 2:
Step 1 is the same as before.

Aware IM 8.8 User Guide
Copyright © 2002-2023 Awaresoft Pty Ltd Page 55 of 479
Step 1: all rules are evaluated. The conditions are met for Rule 1 (State is initially
undefined) and Rule 2 (Excess is initially undefined) only. The agenda has the
corresponding actions
Agenda:
- Policy.State = 'New' (from Rule 1)
- Policy.Excess = 0 (from Rule 2)
Now we take the action from Rule 1 off the agenda.
Step 2: The action block from Rule 1 is taken off the agenda. It is executed and the
value of State attribute becomes ‘NEW’. The agenda now only has the action block
from Rule 2.
Agenda:
- Policy.Excess = 0 (from Rule 2)
Step 3: The conditions of Rule 1, Rule 3 and Rule 4 are re-evaluated because they
depend on the value of the changed attribute State. The condition of Rule 3 only is
met (state is ‘NEW’ and driver age is 30) so its action is placed on the agenda. The
agenda is reviewed as well – the rule of its existing action block does not depend on
the State attribute and so the action is left intact. The agenda now has 2 actions.
Agenda:
- Policy.Excess = 0 (from Rule 2)
- Policy.Excess = 100 (from Rule 3)
Step 4: an action block is randomly taken off the agenda. Let us assume that it is the
action block from Rule 3. After it is executed the value of the Excess attribute
becomes 100. The agenda now only has the action block from Rule 2.
Agenda:
- Policy.Excess = 0 (from Rule 2)
Step 5: The conditions of Rule 2 and Rule 5 are re-evaluated because they depend on
the value of the changed attribute Excess. The condition of Rule 5 only is met so its
action (Policy.State = 'CALCULATED') is placed on the agenda. The existing
action on the agenda is reviewed as well. The action comes from Rule 2 that depends
on the changed attribute so the condition is re-evaluated – it no longer holds
(Policy.Excess is no longer undefined as its value is now 100)! This means that the
action is removed from the agenda! Therefore the only action that remains on the
agenda is the action from Rule 5.
Agenda:
- Policy.State = 'CALCULATED' (from Rule 5)
Further steps are equivalent to steps 8, 9 and 10 in the previous scenario. At the end of
the algorithm we will also have the value of State=’CALCULATED’ and the value of
Excess=100.

Aware IM 8.8 User Guide
Copyright © 2002-2023 Awaresoft Pty Ltd Page 56 of 479
Finally let us consider what would have happened if a different action was taken off the
agenda at step 4 of the second scenario.
Scenario 3:
The first 3 steps are the same:
Step 1: all rules are evaluated. The conditions are met for Rule 1 (State is initially
undefined) and Rule 2 (Excess is initially undefined) only. The agenda has the
corresponding actions
Agenda:
- Policy.State = 'New' (from Rule 1)
- Policy.Excess = 0 (from Rule 2)
Step 2: The action block from Rule 1 is taken off the agenda. After it is executed the
value of the State attribute becomes ‘NEW’. The agenda now only has the action
block from Rule 2.
Agenda:
- Policy.Excess = 0 (from Rule 2)
Step 3: The conditions of Rule 1, Rule 3 and Rule 4 get re-evaluated because they
depend on the value of the changed attribute State. The condition of Rule 3 only is
met (state is ‘NEW’ and driver age is 30) so its action is placed on the agenda. The
agenda is reviewed as well – the rule of its action does not depend on the State
attribute and so the action is left intact. So the agenda now has 2 actions.
Agenda:
- Policy.Excess = 0 (from Rule 2)
- Policy.Excess = 100 (from Rule 3)
Now we take the action from Rule 2 off the agenda.
Step 4: The action block from Rule 2 is taken off the agenda. After it is executed the
value of the Excess attribute becomes 0. The agenda now only has action block from
Rule 3.
Agenda:
- Policy.Excess = 100 (from Rule 3)
Step 5: The conditions of Rule 2 and Rule 5 are re-evaluated because these rules
depend on the changed attribute Excess. The conditions of neither rule are met
(Excess is defined and is equal to 0). The existing action on the agenda is reviewed
as well – its rule depends on the changed attribute, but its conditions still hold, so the
action remains on the agenda.
Agenda:
- Policy.Excess = 100 (from Rule 3)

Aware IM 8.8 User Guide
Copyright © 2002-2023 Awaresoft Pty Ltd Page 57 of 479
Step 6: the only action block is taken off the agenda and is executed. The value of
Excess is now 100.
Agenda: (empty)
Step 7: The conditions of Rule 2 and Rule 5 are re-evaluated because they depend on
the value of the changed attribute Excess. The condition of Rule 5 only is met so its
action is placed on the agenda.
Agenda:
- Policy.State = 'CALCULATED' (from Rule 5)
Further steps are equivalent to steps 8, 9 and 10 of the scenario 1. At the end of the
algorithm we get the value of State=’CALCULATED’ and the value of Excess=100
again.
Interestingly, no matter in which order we take the actions off the agenda the end result
is the same! This is only possible, though, if every single rule in the un-ordered collection
of rules is self-contained (independent of how and when other rules are evaluated) and
consistent (makes sense from the business point of view) and this is what business rules
are supposed to be! This is worth stressing again – business rules must be self-
contained and consistent!
“While” Semantics
Normally when the rule engine finishes execution of an action it starts re-evaluating rules
that depend on changed facts only. However, generally speaking, it must also re-
evaluate conditions of the rule that triggered the last action irrespective of whether the
rule depends on the changed facts or not. The rationale behind this is that if conditions
of a rule are met its actions must be executed. There is no guarantee that the action that
has just been executed had changed anything that could have affected its conditions, so
the engine must evaluate the rule again
8
.
This behaviour means that the same rule may be evaluated over and over again
provided that its conditions still hold. Thus a rule may encapsulate the semantics of the
“while” statement – instead of defining a rule as “IF something is true then do something”
we might as well define it as “WHILE something is true then do something”.
The only problem with the above behaviour is that the subtlety of the “while” semantics
is easy to overlook. Anyone defining business rules must be very careful as the incorrect
usage of rules may cause infinite loops (the rule engine will eventually time out and
abort if an infinite loop does occur). Consider the following rule:
8
There is a guarantee that conditions of other rules, which do not depend on changed facts and which
actions are not on the agenda, do not hold (otherwise they would have been on the agenda) – this is the
reason the algorithm does not consider them after execution of an action.

Aware IM 8.8 User Guide
Copyright © 2002-2023 Awaresoft Pty Ltd Page 58 of 479
IF Glass.State <> 'FULL' Then INCREASE Glass.WaterLevel BY 10
The rule is supposed to add some water to a glass if it is not full already. If we only have
this single rule defined for a Glass object and we evaluate it for a glass with the State
attribute not FULL initially, the rule will keep executing the INCREASE action until the
engine times out. However, if we add the following rule to the Glass object everything
will be fine:
IF Glass.WaterLevel = 100 Then Glass.State = 'FULL'
Aware IM supports a special flag that makes it possible to turn off the “while” semantics
behaviour for a rule (see Advanced Rule Options). If this flag is turned off the rule engine
will not evaluate the rule that triggered the execution of the last action block taken off the
agenda (unless the conditions of the rule depend on the values of attributes that the
action of the rule changes). For example, if the flag for the rule
IF Glass.State <> 'FULL' Then INCREASE Glass.WaterLevel BY 10
is turned off, the rule will be evaluated initially and its action will be executed (jf state is
not FULL), but it will not be executed immediately again. Other actions (if there are any)
will get executed and if those actions do not change the value of the State attribute our
rule will not be re-evaluated again. However, if our rule were written like this:
IF Glass.WaterLevel <> 100 Then INCREASE Glass.WaterLevel BY 10
it would be re-evaluated repeatedly after the execution of the INCREASE action
irrespective of the value of the “while semantics” flag. This is because the INCREASE
action changes the value of the WaterLevel attribute and the rule condition depends
on this value.
Did it Change?
The subtle issue described in this section is related to a stage in the rule engine
algorithm where it detects which rules depend on the changes made by the previously
executed action. The subtle point here is that even though the action has been executed
it may not have changed the state of the system, even if it had attempted to modify the
value of some attribute. This happens, for example, if an action sets the value of the
attribute that is equal to its current value. This situation is considered to be a non-event
from the rule engine point of view and the rule engine simply ignores the fact that the
action has been executed. Consequently it does not re-evaluate the rules and review the
existing agenda even for a rule that triggered the last action.
This behaviour helps to avoid infinite loops in certain rules even if they support “while”
semantics. Consider the following rule, for example:

Aware IM 8.8 User Guide
Copyright © 2002-2023 Awaresoft Pty Ltd Page 59 of 479
If Policy.Driver.Age > 70 Then Policy.Excess = 200
If a rule supports the semantics of a “while” statement (see While Semantics) the rule
can be interpreted as “while driver’s age is greater than 70 set excess to 200”. The
driver’s age will never change here and so we might think that this rule would cause an
infinite loop. This does not happen, however. After the action has been executed for the
first time and the new value has been set to 200, all subsequent executions of the action
would not change the value of the attribute and so the rule is not evaluated again.
NOTE: the rule engine will not execute unconditional rules over and over again if the
action keeps changing the value of some attribute, since such action guarantees to
cause infinite loop. For example, the following rule with no conditions:
INCREASE Policy.Excess BY 100
will only be executed once.
Rule Priorities
When describing the rule engine algorithm in the Overview of the Rule Engine
Framework section we said that action blocks are taken off the agenda at random. This
is not quite true - the order of action blocks on the agenda is not completely random, but
arranged according to rule priorities. The higher the priority of the rule corresponding to
the action block the sooner it will be executed. The rule engine guarantees that action
blocks corresponding to rules with higher priority are always executed before action
blocks corresponding to rules with lower priority – whatever actions exist on the agenda
are sorted according to the priorities of their rules and are taken off the agenda in that
order.
It is important to stress, though, that if priorities of the rules are the same, the order of
the corresponding action blocks is random. Most often action blocks on the agenda
correspond to rules that have the same priority – that is why we ignored rule priorities
when describing the rule engine algorithm.
So when are priorities important? First of all, when we are dealing with rules that invoke
actions that do not modify the value of some attribute, but call predefined system
operations, such as REPORT ERROR, SEND etc. By default Aware IM assigns lower
priorities to such rules than the priorities of rules invoking actions that modify attributes.
The rationale is that unlike modification of an attribute, the predefined system operations
are one-off actions that usually have drastic effects that cannot be undone. For example,
the REPORT ERROR action immediately aborts the execution of the rule engine without
giving it a chance to change anything (unless process failure rules are defined).
Consider the following rules:

Aware IM 8.8 User Guide
Copyright © 2002-2023 Awaresoft Pty Ltd Page 60 of 479
Rule 1: If Policy.State IS UNDEFINED Then REPORT ERROR 'State must
always be defined'
Rule 2: If Policy.State IS UNDEFINED Then Policy.State = 'NEW'
If priorities of these rules were equal there is a chance that Rule1 is executed before
Rule 2. If this happened the engine would be immediately aborted without being able to
change the value of the Policy.State to NEW and by doing so avoid execution of Rule
1. This does not happen as Aware IM assigns lower priority to Rule 1 than to Rule 2 or
any other “modify attribute” rule. Therefore validation rules like Rule 1 are only evaluated
after the values of all attributes have “stabilized”.
Another type of rule that is prioritised by Aware IM by default is a rule that has an action,
which generates documents from document templates (see Document Generation).
Again documents should only be generated after values of all attributes have stabilized
and so such a rule has low priority.
It is relatively rare that someone might need to prioritize rules explicitly. One such need
may arise from the necessity to specify the default action to be taken if all else fails. For
example, there may be a situation when we enumerate possible options and take action
in each case: “If condition1 then do something”; “If condition2 then do something else”;
“If condition 3 then do something else again” and so on. Finally we may want to take a
default action that is executed if neither of the conditions holds. We could write a rule
that would negate all the conditions: “If NOT condition1 and NOT condition2 and NOT
condition3 … then take default action”. If there are many conditions it may be quite
tedious and impractical to negate them all. An alternative would be to assign lower
priority to the rule that takes the default action compared to the rules that check
conditions.
Context of Rule Execution
In the Context section we have introduced the concept of Context and explained where
Aware IM looks for instances of business objects and notifications while evaluating
rules. This section provides more details about the Context; in particular, it explains how
and when the Context is formed.
See also:
How Context is Formed
Instances Prefixes
Other Usages of Context
How Context is Formed
The Context is used by Aware IM to resolve values of attributes of business objects
during evaluation of rule collections (both ordered and un-ordered – see Evaluation of
Rule Collections). It is important to emphasize that each rule collection has its own

Aware IM 8.8 User Guide
Copyright © 2002-2023 Awaresoft Pty Ltd Page 61 of 479
Context; there is no single Context that is shared by all rule collections. For example, let
us suppose that we are executing a rule collection representing rules of a process. This
rule collection has a Context associated with it (let us not worry for now how it was
formed). If some action modifies the value of an attribute of some business object
Aware IM starts evaluating the rules attached to this business object. Before doing so it
assigns a new Context to this collection of rules (again let us not worry for now what
gets written into this Context). Once the rules attached to the business object finish
execution, the Context associated with the rule collection is discarded and Aware IM
continues evaluation of the process rules. Now, if some action of these rules starts
another process Aware IM assigns another Context and starts evaluating the rules of a
sub-process. When the sub-process finishes Aware IM discards the Context and returns
to the evaluation of the rules of the original process.
Let us now have a look at what gets written into the Context and when. The contents of
the Context is changed under the following scenarios:
1. Instances of the business objects found by the FIND and PICK FROM actions are
written into the Context of the rule collection that invokes these actions
9
.
For example, let us look at the following process:
FIND Driver WHERE Driver.Name = 'John Smith'
Driver.Age = 40
The first rule in this process finds the driver with the name John Smith. If such an
instance is found it is written into the Context.
2. Instances of business objects or notifications created by the CREATE or ENTER NEW
actions are written into the Context of the rule collection that invokes the actions.
The following example is similar to the previous one:
CREATE Driver WITH Driver.Name = 'John Smith'
Driver.Age = 40
3. When Aware IM starts evaluating the rules attached to a business object the
instance of the business object is written into the Context. The instance is either
taken from the parent Context (such as when an instance of a business object is
modified by a process) or is provided by the external request (such as when a user
changes attribute values on the business object form and submits the changes to the
system).
9
If an un-ordered collection is executing the instances are written into the Context of the action block - see
Note 3 later in this section.

Aware IM 8.8 User Guide
Copyright © 2002-2023 Awaresoft Pty Ltd Page 62 of 479
In the process from the first scenario the second rule modifies the attribute of the driver’s
instance found by the previous rule. If the Driver object has rules attached to it Aware
IM assigns a new Context to these rules, writes the instance of the Driver from the
process Context into the new Context and starts evaluating rules of the Driver object.
4. When Aware IM starts executing a process the instances of the business objects
representing process input are written into the Context. The instances are taken from
the parent Context.
For example, consider the following process:
FIND Policy WHERE Policy.MyDriver.Name = 'John Smith'
CalculatePremium
Here we assume that CalculatePremium process that calculates the premium of the
policy has the Policy object declared as its input. The first rule finds the policy
belonging to John Smith and writes it into the Context of the main process. Then Aware
IM creates a new Context for the CalculatePremium process, writes the instance of
the Policy from the main process’s Context into the new Context and starts evaluating
rules of the CalculatePremium process.
5. When a new instance of a business object or notification is created by the CREATE
action Aware IM writes the contents of the parent Context into the new Context
which is created when rules attached to the business object or notification are
evaluated.
In other words the Context of the parent rule collection is available when a new business
object or notification are being created. For example consider the following process,
FIND Policy WHERE Policy.ExpiryDate < CURRENT_DATE
CREATE ExpiryEmail
SEND ExpiryEmail TO Policy.Driver
The first rule of the process finds the expired policy and puts the found instance into the
Context of the process. The second rule of the process creates the notification
ExpiryEmail and evaluates any rules attached to the creation of this notification
10
.
The new Context is assigned to these rules, but now not only the created notification is
written into this Context but the entire contents of the existing Context is written into the
new Context as well. Therefore in this example Policy instance is available to any
initialization rules of the notification. The created notification is also written into the
original Context (as a result of creation), so in this particular case both Contexts have
identical contents.
10
In this example the CREATE rule is actually unnecessary. The SEND action would automatically create
the notification if it has not been created already.

Aware IM 8.8 User Guide
Copyright © 2002-2023 Awaresoft Pty Ltd Page 63 of 479
NOTE: The following instances of business objects are always accessible to rules
directly – there is no need to find them using the FIND action, as they are always
implicitly present in any Context:
a. An instance of a business object representing logged in user (must be a member of
the SystemUsers group) – this instance can be referred to using LoggedIn prefix
(see Instance Prefixes), for example LoggedInLibraryMember where
LibraryMember is a business object belonging to the SystemUsers group.
b. Instances of intelligent business objects with Business or System intelligence
types. There are always only single instances of such business objects in the
system, so they can always be unambiguously resolved.
c. An instance of the SystemSettings object.
NOTE: If there are multiple instances of the same business object in the Context any
action that operates on such a business object operates on all instances of the object
present in the Context. For example, in the scenario 1 above which describes the
modification of the Driver object found by the FIND action, if the action finds several
instances of the Driver object all these instances are written into the Context.
Consequently the action that modifies the Age attribute modifies every single instance of
the Driver object found by the FIND action. Similarly in scenario 5 if there are several
expired policies the email is sent to owners of each policy.
NOTE: When rules of an un-ordered rule collection are executed (see Evaluation of
Unordered Rule Collection) instances of business objects and notifications created by
the CREATE or ENTER NEW actions or found by the FIND or PICK FROM actions are not
written into the Context of the un-ordered rule collection. Instead these instances are
made available only within the action block that contains the FIND (PICK FROM) or
CREATE (ENTER NEW) actions. This means, for example, that it is quite meaningless
to attach rules to a business object, which have single FIND action. However, having an
action block that finds some object and then does something with the found instance
within this block may be quite meaningful.
Instance Prefixes
Normally rules do not distinguish between instances of the same business object.
Instances are resolved from the Context and if there is more than one instance of the
object in the Context the action is applied to all such instances.
However, in certain relatively rare circumstances it may be necessary to distinguish
between instances of the same business object stored in the Context. In these cases
special instance prefixes added to the attribute path just before the name of the
business object can be used.

Aware IM 8.8 User Guide
Copyright © 2002-2023 Awaresoft Pty Ltd Page 64 of 479
Consider, for example, the following rule attached to a business object SystemUser,
which checks that there is only one instance of the SystemUser with the specified login
name in the system:
If EXISTS SystemUser WHERE (SystemUser.LoginName =
ThisSystemUser.LoginName) Then REPORT ERROR 'User with this name
already exists'.
Here the This prefix added to the name of the business object
(ThisSystemUser.LoginName) indicates the SystemUser instance located in the
Context as opposed to the SystemUser instances in the rest of the system, which are
searched by the aggregate operation.
There are several special prefixes that are used in the Rule Language to distinguish
between instances of business objects in the Context:
- This
- That
- Other
- LoggedIn
- Added
- Removed
- Changed
- Failed
This prefix indicates the first instance of an object that has been added to the Context
by any of the scenarios described in the How Context is Formed section.
That prefix indicates the second instance of an object added to the Context. Usually it is
the instance found by the FIND or PICK FROM action or created by the CREATE or
ENTER NEW actions. For example, consider the process that has the following rules
defined:
1. FIND Policy WHERE Policy.MyDriver.Name='John Smith'
2. If ThisPolicy.Excess > ThatPolicy.Excess Then…
Let us assume that the above process has the Policy object as its input. When this
process is executed the instance of the Policy object being the input of the process is
put in the Context first. This instance may be referred to by the This prefix. The first rule
of the process finds another instance of the Policy object (the one belonging to John
Smith). The result is put into the Context as well. As John Smith’s policy is the second
instance of the Policy object in the Context it will have the That prefix, so the second
rule will compare the excess of the process input instance with the excess of John
Smith’s policy.

Aware IM 8.8 User Guide
Copyright © 2002-2023 Awaresoft Pty Ltd Page 65 of 479
If the FIND rule found more than one instance of the Policy object, then these
instances could be referred to with the Other prefix – so we could refer to the initial
policy as ThisPolicy and to all other policies as OtherPolicy.
The LoggedIn prefix can be used in conjunction with the name of the business object
that is using the system (member of the SystemUser group) to refer to the instance of
the currently logged in user. For example,
If LoggedInAssociate.LoginName='john' Then DoSomething.
Added, Removed and Changed prefixes are used in conjunction with WAS CHANGED
expression, which tracks changes in the list – see Evaluation of Rules Containing WAS
CHANGED Expressions.
The Failed prefix is used to indicate the object that caused a failure in process failure
rules – see Process Failure Rules.
Other Usages of Context
Aware IM uses the Context not only when rules are executed. It is also used in the
following situations:
- When queries using dynamic attributes are run (see Configuring Queries)
- When documents and presentations are generated (see Document Generation)
Queries using dynamic attributes may be invoked either from form operations in the user
interface or from hyperlinks in presentations or from rules (see FIND action). When a
query is invoked from a form operation the instance of the business object displayed by
the form is written into the Context and used if the query refers to the attributes of this
object dynamically. Similarly if a query is invoked from a hyperlink in a presentation the
instance of the object that the hyperlink is associated with is written into the Context and
used if the query refers to attributes of this object dynamically. If a query is invoked from
rules the dynamic attributes are resolved from the Context of the currently executing rule
collection – see How Context is Formed.
NOTE: a query using dynamic attributes may not be invoked from a menu item (see
Operations) as there is no Context when the menu item is selected. If this happens run
time error occurs.
When documents or presentations are generated attribute values referenced by tags
inside documents or tags and conditional elements inside reports or presentations are
resolved from the Context. The following scenarios are possible:
1. A document with the data source property set to “Determined at Run-time” is
generated in the Operation Mode using an operation of the “Create Document” type

Aware IM 8.8 User Guide
Copyright © 2002-2023 Awaresoft Pty Ltd Page 66 of 479
(see Setting Menu Item Properties) after a user selects one or more instances of the
business object on the Query Results screen. In this case selected instances of the
business object are written into the Context and used when the document is
generated.
2. A document with the data source determined by some query is generated in the
Operation Mode using the operation of the “Create Document” type. In this case the
query is run before the document is generated and the instances of a business object
found by the query are written into the Context and used when the document is
generated.
3. A document is generated in the Operation Mode by invoking the operation of the
“Create Document” type from the form of a business object (see Form Caption and
Form Operations). In this case the instance of the business object being displayed by
the form is written into the Context and used when the document is generated.
4. A document with the data source property set to “Determined at Run-time” is
generated from rules (for example, when some attribute is being initialized to some
document template – see Document Generation). In this case the document uses the
Context of the currently executing rule collection.
5. A document with the data source determined by some query is generated from rules
as in the previous scenario. In this case the query is run before the document is
generated and a separate Context is formed. This Context contains the results of the
query execution as well as any contents of the Context of the currently executing rule
collection. The resulting Context is used when the document is generated.
6. A presentation of some business object is generated to display the instances of a
business object found by a query (see Business Object Presentation). In this case
the instances found by the query are written into the Context and used when the
presentation is generated.
7. A presentation is generated from a form operation or from a hyperlink located on
some other presentation. In this case the instance of a business object that the form
is displaying or that the hyperlink is associated with is written into the Context and
used when the presentation is generated.
8. Sub-report or sub-presentation is generated as part of the generation of the master
report or presentation (see Document Generation). In this case a query associated
with the sub-report or sub-presentation is run first and then a special Context is
formed. This Context contains the results of the query and the current instance of the
business object in the master report for which the sub-report is generated. (Note that
the query associated with the sub-report or sub-presentation may use this instance
for attributes resolved dynamically). This Context is used when the sub-report or sub-
presentation are generated.
Evaluation of Rules Containing WAS CHANGED expressions
Evaluation of rule conditions containing WAS CHANGED expressions (and also
expressions that track changes in the list – WAS ADDED TO, WAS REMOVED FROM, WAS
CHANGED FROM – see WAS CHANGED Expression) is somewhat different from
evaluation of other expressions. Whereas most expressions check the absolute value of

Aware IM 8.8 User Guide
Copyright © 2002-2023 Awaresoft Pty Ltd Page 67 of 479
an attribute (such as “If Driver.Age > 70”), WAS CHANGED expressions check the
relative value of the attribute – that is, the current value of the attribute compared to the
old value of the attribute. The question is which value is considered to be “old”? Similarly
if an expression checks whether some element has been added to a list, the question is
– added when?
Before answering this question we must explain the meaning of the term last stable
version of a business object instance. The last stable version is the version of the
business object instance that is stored in the system and no rule processing of the rules
attached to the object is occurring. When an instance of the business object is modified
and rules attached to this business object start to be evaluated the instance of the
business object is considered to be in an unstable state. When rule evaluation and
action execution for the instance of the business object finish the instance of the object
moves to a stable state again. Any new modification to the business object instance
from the outside (for example, by a user or by a process) will cause rule evaluation and
action execution to occur again and move the object back to the unstable state.
Now we can answer the question which value Aware IM considers to be “old” when
evaluating WAS CHANGED expressions. The “old” value is the value corresponding to the
last stable version of the business object instance. For example, consider the following
rule:
If OLD_VALUE(Policy.State) = 'CALCULATED' AND Policy.State WAS
CHANGED Then REPORT ERROR 'Cannot change state of the policy once
it is calculated'
OLD_VALUE here is the function that returns the value of the attribute corresponding to
the last stable version. Let us assume that the value of the State attribute currently
stored in the system is CALCULATED. Let us assume that a user brings up a policy form
and changes the value of the State attribute to NEW. When the changes to the policy
are submitted Aware IM starts evaluating the policy rules. When evaluating the rule
above it will compare the value of the last stable version of the State attribute
(CALCULATED) with the current value (NEW) and trigger the REPORT ERROR action.
Note that WAS CHANGED expression will return true each time it is evaluated provided
that the current value is different from the value of the last stable version. So in our
example if a rule above is evaluated again as a result of execution of other actions it will
still return TRUE. It will keep returning TRUE while rules are being evaluated for the
instance of the business object.
Once rule evaluation finishes the instance of the business object moves to the stable
state again. Consider the following rules on the Policy object:
1.IF Policy.State WAS CHANGED Then DoSomething
2.IF Policy.MyDriver.Age > 70 Then Policy.Premium = 200
3.IF Policy.Premium = 200 Then Policy.State='BIG PREMIUM'

Aware IM 8.8 User Guide
Copyright © 2002-2023 Awaresoft Pty Ltd Page 68 of 479
Let us assume that there is a policy for a driver aged 45, the value of Premium is 100
and the policy state is NORMAL PREMIUM. If a user changes the age of the driver to 50,
neither of the actions of the three rules will be triggered (the value of the State attribute
for the current and last stable versions are the same and the age is still less than 70).
Now, if the user changes the age of the driver to 75 (again without changing the state of
the policy) the following will happen after the initial evaluation of rules:
a. Condition of Rule 1 will not hold because the current state is equal to the state of
the last stable version
b. Condition of Rule 2 will hold and so its action will be placed on the agenda
c. Condition of Rule 2 will not hold initially because premium is still 100
After the premium is changed to 200 by the action of Rule 2 the action of Rule 3 will be
triggered. This action will change the value of the State attribute to BIG PREMIUM.
This will cause the conditions of Rule 1 to be evaluated. Now, the current value of the
State attribute will be different from the value of the last stable version and
DoSomething will be triggered. After that the policy instance will move to the stable
state again so the “stable” value of the State attribute becomes BIG PREMIUM. If now
the user changes the driver’s age to 80 the action of the first rule will not be triggered.
Evaluation of list tracking expressions is quite similar – they compare the condition of the
list in the last stable version of the business object with the current condition.
Initialization Rules
The Rule Evaluation section enumerates all occasions when rules are evaluated in
Aware IM. There is one other occasion not mentioned in this section albeit this occasion
has a rather secondary nature compared to the ones described before.
When the user brings up a form to create a new instance of a business object (this may
happen as a result of the user selecting a menu item of the “Create Object” type or as a
result of the execution of the ENTER NEW action in some process), before the form is
displayed the rules attached to the business object are evaluated and the appropriate
actions are executed. The objective of rule evaluation is to initialize the attributes with
their initial values. Because of this not all rules attached to the object are evaluated -
only the initialization rules.
By default the system considers the following rules to be initialization rules:
1. Unconditional rules that set attribute values, for example
Policy.State = 'NEW'

Aware IM 8.8 User Guide
Copyright © 2002-2023 Awaresoft Pty Ltd Page 69 of 479
2. Rules that check whether a value is undefined and if so initialize this value, for
example
IF Policy.Excess IS UNDEFINED Then Policy.Excess = 0
It is also possible to explicitly specify whether the rule will or will not be used during
initialization - see Advanced Rule Options.
All other rules are ignored at the initialization stage. However, when the form is
submitted with the values entered by the user (who could have changed the initial
values) all rules are evaluated as usual.
Summary of Rule Evaluation
The following section provides a brief summary of what has been described in the
previous sections regarding rule evaluation and action execution in Aware IM.
1. Rules are evaluated when the following happens:
- An instance of a business object is created (provided that there are rules attached
to this business object)
- Value of an attribute of a business object instance is modified (provided that there
are rules attached to this business object)
- A process implemented by rules is started
- Aware IM receives notification (provided that there are rules associated with this
event)
- Notification is created (provided that there are rules associated with this event)
- Scheduling rules are triggered by a timer event
- Values of attributes of business objects are taken from the Context except for
aggregate operations such as EXISTS. When aggregate operations are
evaluated Aware IM looks at all data available in the system – see Aggregate
Operations.
2. The following events change the contents of the Context (see How Context is
Formed):
- Business objects found or selected by the FIND or PICK FROM actions are
written into the Context of an ordered rule collection or into the Context of the
currently executing action block of an un-ordered rule collection.
- Business objects and notifications created by the CREATE and ENTER NEW
actions are written into the Context of an ordered rule collection or into the
Context of the currently executing action block of an un-ordered rule collection.
- Before a rule collection attached to a business object is evaluated the instance of
the business object for which evaluation occurs is written into the Context.

Aware IM 8.8 User Guide
Copyright © 2002-2023 Awaresoft Pty Ltd Page 70 of 479
- Before a rule collection attached to a notification event (creation or receiving) is
evaluated the instance of the notification for which evaluation occurs is written
into the Context.
- Instances of business objects representing process input are written into the
Context prior to execution of the process.
3. Whenever a change to the system state occurs as a result of the creation of a new
instance of a business object or notification or modification of the existing instance,
Aware IM starts evaluation of the appropriate set of rules, i.e.
- Rules attached to a business object, an instance of which has been created or
modified.
- Rules attached to other business objects that refer to the business object
instance that has been created or modified (cross-reference rules).
4. Cross-reference rules are rules attached to some business object that also refer to
some other object via a reference attribute or check whether an existing element in a
list has been changed – see Cross-reference Rules.
5. When a reference attribute of some object is modified and this reference attribute
has matching attribute on the referred object, the referred object is modified as well
and its rules (if any) are evaluated.
6. Rule collections can be ordered and un-ordered. Ordered rule collections are
evaluated one-by-one in exactly the same order that they appear in the rule
collection. Un-ordered rule collections are evaluated by the rule engine using a
special algorithm – see Evaluation of Rule Collections.
7. The rule engine works as follows (see Overview of Rule Engine Framework):
- Initially all rules of the un-ordered rule collection are evaluated and the initial
agenda is formed.
- The first action block is taken off the agenda. The block is taken off according to
its priority. If priorities of actions blocks on the agenda are equal the block is
taken off at random.
- The actions of the action block are executed. The changes to the system facts
occur.
- Rules that depend on the changed facts are re-evaluated. The remaining actions
on the agenda are also reviewed to check if the conditions that triggered them are
still valid. The new agenda is formed.
- Another action block is taken off the agenda and executed. The process is
repeated until there are no more actions on the agenda.
8. Even though actions may be randomly taken off the agenda by the rule engine the
end result is the same provided that business rules are self-contained and
consistent.

Aware IM 8.8 User Guide
Copyright © 2002-2023 Awaresoft Pty Ltd Page 71 of 479
9. Rules may support “while semantics” in which case conditions of the rule that
triggered action execution will be repeatedly re-evaluated irrespective of whether rule
conditions depend on changed facts – see While Semantics.
10. Actions that assign an attribute value equal to the existing value do not cause re-
evaluation of rules, as the system’s state is not changed as a result of such an action
– see Did it Change?
11. Aware IM assigns default priorities to rules – actions that modify attribute have
highest priority; actions that call “system services” have lower priority and actions
that generate documents from templates have the lowest priority – see Rule
Priorities.
12. It is possible to distinguish between instances of the same business object by using
instance prefixes – see Instance Prefixes.
13. The last stable version is the version of a business object instance that is stored in
the system and no rule processing of the rules attached to the object is occurring.
The WAS CHANGED expressions compare the current value of an attribute (or the
current state of a list) with the value of the last stable version – see Evaluation of
Rules Containing WAS CHANGED expressions.
14. Initialization rules are rules that set attribute values either unconditionally or after
checking whether the value is undefined. Such rules are executed before a form for
the new instance of a business object is displayed – see Initialization Rules.
Rules and Transactions
In Aware IM data processing may occur under the following scenarios:
1. An external request has been issued to the system, which triggered rule evaluation
(see Rule Evaluation). This external request may have been issued either from the
User Interface or from an external software system.
2. A notification has been received by Aware IM, which triggered rule evaluation.
3. A timer event triggered scheduled processes to start executing (see Scheduling).
The following section describes how Aware IM handles database transactions when
processing data under the above scenarios (transactions are described in the Data
Storage section).
With scenarios 1 and 3 data processing occurs within a context of a single transaction.
This means that if something goes wrong all changes that have been done by any of the
rules between the start of the external request (or when the scheduled process started)
and the error are discarded (transaction is rolled back).

Aware IM 8.8 User Guide
Copyright © 2002-2023 Awaresoft Pty Ltd Page 72 of 479
What can go wrong? First of all a transaction is rolled back if any of the rules issues the
REPORT ERROR action. This action indicates an unrecoverable operation error so the
current transaction is immediately rolled back and any prior changes are discarded
11
. A
transaction is also rolled back in case of an internal error.
With scenario 2 the behaviour of the system is slightly different. The rules attached to a
notification event are considered to be independent and are executed within separate
database transactions, so if one rule fails anywhere it does not affect other rules
attached to the notification – their changes are committed provided that these changes
themselves did not cause errors.
See also:
Long Operations
Batch Operations
Process Failure Rules
Long Operations
An action executed by a rule may start an operation that takes a long time to complete.
For example, an action may request a service from some other system (see
Communication with Other Systems) and the other system may take minutes, days or
months to implement the request. Or an action may start an operation in the user
interface and wait for the input from a user (there is a number of such actions in the Rule
Language – see Rule Language Reference). Again it may take a user minutes or hours
to provide this input.
Aware IM seamlessly supports operations that take a long time to complete. If a reply
has not been delivered to Aware IM within a certain time frame the current request that
started the long operation is suspended. This means that Aware IM stores the current
state of the external request that started rule execution in the first place in the database
and continues with other tasks. As soon as a reply has been received (no matter how
long it took to receive the reply) Aware IM restores the state of the request and resumes
execution of rules as if no long operation has taken place. While Aware IM is waiting for
the reply the request is considered to be “active” – it is possible to look at the list of all
active processes in the system by selecting the menu item of the “Active Processes”
type in the Operation Mode (see Setting Menu Item Properties).
When an action requests a service of another system Aware IM waits for a reply for one
minute before it suspends the current request. After that it waits for the reply indefinitely
(unless the request is cancelled by the user from the Active Processes screen).
11
Transaction is not rolled back if process failure rules are defined for a process that started rule
evaluation in the first place – see Process Failure Rules.

Aware IM 8.8 User Guide
Copyright © 2002-2023 Awaresoft Pty Ltd Page 73 of 479
When an action starts an operation of the user interface the request is suspended
immediately. If a reply from the user has not been received within half an hour (this is
the default value which can be changed in the system’s property file – see Appendix A)
the request is automatically cancelled.
When a request is suspended Aware IM commits the current database transaction.
When a reply is received a new transaction is started. This means that if an error occurs
after the reply has been received only changes since the request has been resumed are
rolled back. Any changes before the request was suspended remain committed. This
behaviour means that it is generally not a good idea to perform any changes to the
system prior to the execution of a potentially long operation, such as invocation of a user
interface operation – all user interface operations need to be executed first and then the
data collected from a user should be used to perform changes to the system.
Batch Operations
When Aware IM executes the FIND action it runs a query and finds instances of
business objects that match the conditions of the query. The instances found are written
into the Context (see How Context is Formed) and any further actions operate with the
found instances. If the number of found instances is large enough further operations
happen in batches. This means that instead of operating on all instances at once further
actions operate only on a subset of instances (a batch). When the query is run for the
first time the first batch is returned. After all actions finish their execution the query is run
again and the next batch is returned. Action execution continues until no more batches
are returned by the query. At each iteration after actions finish execution of the current
batch the database transaction is committed.
For example, consider the following process consisting of two rules:
Rule 1: FIND Account WHERE Account.Balance < 100
Rule 2: Account.State = 'CLOSED'
The first rule runs a query that finds all accounts with balances less than 100. The
second rule changes the state of found accounts. If the number of accounts found by the
query is larger than the batch size the query will initially return only the first batch and
the second rule will change the states only of the first batch. After the second rule
finishes processing the first batch the transaction is committed (so the changes to the
first batch are not rolled back if an error occurs when processing any subsequent
batches). After committing the first batch the rule 1 is executed again and the query
returns the second batch. This process continues until the query returns the last batch.
The size of the batch is 1000 by default, but the default value may be overridden by
specifying the size explicitly in the FIND action.

Aware IM 8.8 User Guide
Copyright © 2002-2023 Awaresoft Pty Ltd Page 74 of 479
Process Failure Rules
As explained in the previous sections when a rule issues the REPORT ERROR action the
execution of the current request is terminated and the current transaction is rolled back.
However, what about the situations when we do not want this to happen? Consider, for
example, the following scenario. We have a banking system and we want to define a
process that would be scheduled to run overnight to find all pending fund transfers and
execute them. Some of the fund transfers may fail (for example, there may be not
enough funds in the bank account from which the transfer is made). Our process may
look something like this:
1. FIND FundsTransfer WHERE FundsTransfer.State = 'READY'
2. FundsTransfer.State = 'APPLIED'
The first rule finds all the pending transfers and the second one executes them. Let us
assume that the FundsTransfer object has the following validation rule, which checks
that there are enough funds:
If FundsTransfer.State WAS CHANGED TO 'APPLIED' AND
FundsTransfer.Amount > FundsTranfer.FromAccount.Balance Then
REPORT ERROR 'Not enough funds in the account for transfer
operation'
If our process encounters a transfer with insufficient funds and tries to change its state to
‘APPLIED’ the above validation rule will be triggered. The problem is that this rule will
abort the current transaction and the entire process will be terminated. What we want,
though, is not to terminate the current process, but make the appropriate record about
the failed transfer and continue execution of the process. One way to solve the problem
would be to change the validation rule, so that instead of reporting an error it would set
the state of the transfer to “FAILED”, for example:
If FundsTransfer.State WAS CHANGED TO 'APPLIED' AND
FundsTransfer.Amount > FundsTranfer.FromAccount.Balance Then
FundsTransfer.State = 'Failed'
This solution may be valid in some situations; however, the main problem with it is that it
makes rules of the object dependent on the context in which the object is used. For
example, when setting the state to FAILED in the rule above we make an assumption
that the object will be used within the context of the scheduled process and this is the
reason why we are setting the state rather than reporting the error. What if the object is
used in other contexts – for example, a user sets the state of the transfer manually on
the object form?
The recommended solution to the above problem is to define process failure rules.
These rules may be attached to a process and they will be executed whenever the
process fails as a result of the execution of the REPORT ERROR action anywhere during

Aware IM 8.8 User Guide
Copyright © 2002-2023 Awaresoft Pty Ltd Page 75 of 479
the course of the process. Failure rules are supposed to perform corrective actions to
neutralize the effects of the failure. Most importantly, if failure rules are defined for a
process, execution of the process continues after failure and the current
transaction is not rolled back (unless failure rules themselves report an error). The
sequence is as follows:
1. A process starts executing
2. A failure occurs by rules of any object affected by the process issuing the REPORT
ERROR action.
3. If process failure rules are not defined, the execution of the current request is
terminated and the transaction is rolled back. If process failure rules are defined they
start executing and performing corrective actions.
4. Process execution continues as if there was no failure.
In our example we could define the failure rules as follows:
FailedFundsTransfer.State = 'FAILED'
FailedFundsTrasfer.FailureReason = ProcessError.Message
If we define process failure rules like shown above we can still leave the REPORT ERROR
action in the validation rule of the FundsTransfer object.
Note the usage of the special “Failed” prefix in front of the FundsTransfer object. This
prefix can be used to distinguish the instance of the FundsTransfer object that
caused the failure from all other instances of the FundsTransfer object (see also
Instance Prefixes). In fact, all objects that were involved in the failed operation are
placed in the Context and are accessible via the Failed prefix – for example, if in
response to changing its state to APPLIED the FundsTransfer object created or
modified another object, which created or modified yet another object the rules of which
issued the REPORT ERROR action, all these objects are written into the Context and are
available to process failure rules. If there can only be one instance of a particular object
it can also be accessed by the failure rules without the Failed prefix.
Note also the usage of a special predefined object called ProcessError. The instance of
this object is automatically created by the system for the process failure rules to use (it is
not available to any other rules). The attributes of this object are explained in the
following table:
Attribute name
Comments
Message
Error message issued by the REPORT ERROR action that
caused the failure
FailedObject
The name of the business object the rules of which issued
the REPORT ERROR action
FailedRuleName
The name of the rule that issued the REPORT ERROR action

Aware IM 8.8 User Guide
Copyright © 2002-2023 Awaresoft Pty Ltd Page 76 of 479
FailedRule
The text of the rule that issued the REPORT ERROR action
CurrentObject
The name of the business object used directly by the
process, the modification or creation of which ultimately
caused the REPORT ERROR action (can be UNDEFINED or
can be the same as FailedObject)
CurrentRuleName
The name of the rule inside the process that the process was
executing when the failure occurred.
CurrentRule
The text of the rule inside the process that the process was
executing when the failure occurred.
NOTE: Process failure rules are also executed if a process has been cancelled by the
user. For example, if a process calls ENTER NEW action the form of the object will be
shown to the user. If the user clicks on the Cancel button on the form, the process will
be cancelled and the failure rules (if any) will be activated. In this case no special
predefined object describing the failure is written into the context.
Execution Log
The results of rule evaluation and action execution are written into the execution log.
This log can be very useful when checking whether business rules behave as expected
(especially when testing new configuration – see Testing Mode).
The log record consists of the record timestamp, the name of the business space in
which the user that has issued the request operates and the name of the user. For
example,
2004-06-18 20:26:07,760 AIS#admin -Executing action
Associate.RegisteredOn=CURRENT_DATE from rules of object
Associate
Here the name of the business space is “AIS” and the name of the user is “admin”.
The execution log supports different levels of logging:
Rules only
This is the default level – only evaluation/execution results of rules attached to business
objects or used in processes are recorded in the log. Evaluation and execution results of
scheduling rules are not shown.
All server events except timer and SQL events
At this level the log contains records of all requests that the server receives. It also has
results of rule evaluation/execution (except scheduiling rules)

Aware IM 8.8 User Guide
Copyright © 2002-2023 Awaresoft Pty Ltd Page 77 of 479
All server events excluding SQL
This is the same as the previous level. Evaluation/execution of scheduling rules are also
included in the rule log
All server events including SQL
This is the most verbose level. This is the same as the previous level, but the rule log
also includes records of all SQL commands that Aware IM sends to the database.
The levels may be set up using the Aware IM Control Panel (Settings/Logging menu
item) or in the “logger.props” file located in the BIN directory of the Aware IM Server
installation.
When you run the Settings/Logging command you can also specify whether the system
will log any events into a log file or not. If you tick the corresponding checkbox the
system will store events of all applications running in the production mode in the file
AwareIM/bin/main.log, and it will store events of all applications running in the
testing mode in the file AwareIM/bin/test.log
Log Viewer
The execution log may be viewed using the Aware IM Control Panel. There are several
menu items that can view the log:
View/Production Log menu item – opens the current log for all
applications running in the production mode
View/Testing Log menu item – opens the current log for all
applications running in the testing mode
File/Open Log File – opens the specified log file
Aware IM displays the log as a tree structure where every node represents a single log
record. The nodes of the tree are hierarchical – for example, all log records spawned by
an external request (such as a request to start a process or update an instance of a
business object) are children of the node representing the external request. This is
illustrated on the picture below:

Aware IM 8.8 User Guide
Copyright © 2002-2023 Awaresoft Pty Ltd Page 78 of 479
The picture shows execution of the DeleteTopic process – the corresponding nodes
are expanded to show all details of the log. Note also that the Log Viewer shows
different types of log records with different icons and colors. Using the Log Viewer one
can quickly browse through the log and delve into the details of a particular request only
when necessary.
Setting Logging Options
You can specify what each log record will contain by choosing the View/Log View
Options menu item. This menu item opens a dialog where you can specify whether
each record will contain timestamp, business space name and user name.You can also
filter the log and display only records that belong to the specified user in the specified
business space or to all users in the specified business space.
Traversing the log
It’s often useful to quickly traverse the log by only going through certain records,
skipping records that you are not interested in. To do this you need to specify which
records will be filtered out during traversal. This is done by selecting the Edit/Find
Log Record menu item. In this menu command you specify your filtering criteria and
then you traverse the log by pressing the F3 button. Each time you press this button the
system will display the next log record that meets your search criteria.

Aware IM 8.8 User Guide
Copyright © 2002-2023 Awaresoft Pty Ltd Page 79 of 479
The Edit/Find Log Record menu item opens a dialog where you can set the
following options:
By text of the log message
Only log records containing the specified text will be traversed.
By business space name
Only log records that belong to the specified business space (and optionally to the
specified user in this business space) will be traversed.
By message type
The following record types are supported:
EXECUTING ACTION – these are records that indicate that an action of some
rule is about to be executed
ADD ACTION TO THE AGENDA – these are records that indicate that the
conditions of a rule are satisfied and the actions of the rule are placed on the
agenda of the rule engine
SQL – these are records that show SQL being sent to the database
OTHER – all records that do not belong to any of the categories above
By reply to process
Only log records that are involved in the execution of the specified process are traversed
By time difference with previous
Only log records that have timestamp that is different from the timestamp of the previous
records by the specified amount or more are traversed. This can be very useful when
identifying performance bottlenecks in the system. For example, if you specify 30
seconds than you will immediately go to log records that show operation where
execution time was 30 seconds or more.
Rule Debugger
If your business rules do not perform as expected you may need to use special tools to
find out what’s wrong. One of such tools is the Rule Log that shows in detail what is
going on in the system. Another tool that can be extremely useful is the Rule Debugger.
The Rule Debugger is very similar to debuggers used to debug code, written in some
programming language. The idea is that you can set one or more “breakpoints” on the
lines of your code and the system “stops” when execution reaches the breakpoint. At
this point you can inspect the data – local and global variables and so on. You can then
continue one line at a time and see how your lines of code get executed.
In the Aware IM Rule Debugger you can set breakpoints on business rules wherever
those rules are used - for example, rules of a process, rules of a business object,
notification and so on. Whenever Aware IM executes these rules the system will stop
and show you the current Context, the stack and the log up to this point. You can set

Aware IM 8.8 User Guide
Copyright © 2002-2023 Awaresoft Pty Ltd Page 80 of 479
breakpoints not only on rules but on actions of the rules. The Rue Debugger is explained
in detail in this video tutorial.
Configuration of Rules
The configuration process for business rules is described in detail in the Adding/Editing
Rules section.
Productivity Features
In the previous sections we described in detail how Aware IM implements the generic
aspects of a data management application, such as data entry and editing, data storage,
data retrieval, data processing and the user interface (see Basic Concepts). In the
following section we will describe how Aware IM implements some other features that
most applications are likely to require.
See:
Access Control
Login
Working with Documents and Reports
Communication with Other Systems
Scheduling
E-mail Handling
Export and Import
Extending Aware IM
Performance Profiler
Access Control
One of the issues that most applications have to deal with is security. A system has to
make sure that sensitive data is only available to those users who are authorized to view
and operate this data. The system therefore has to control access to this data. The
following section describes how access control issues are implemented in Aware IM.
See also
Access Level
Predefined Access Levels
Conditional Access
Access Level
Broadly speaking access level determines which business objects, attributes, processes,
queries, documents and services are accessible to the user that belongs to this access

Aware IM 8.8 User Guide
Copyright © 2002-2023 Awaresoft Pty Ltd Page 81 of 479
level. First of all we need to explain what “the user belonging to a particular access level”
means.
In an application created with Aware IM, just like in many other applications, anyone
wishing to use the application has to log in, i.e. provide credentials that identify the user
to the application (see Login). In Aware IM anyone using the application must be
represented by an instance of a business object. During login Aware IM tries to find the
instance of this business object, which has attribute values matching the provided
credentials. Therefore the configurator has to define a business object representing a
user and the system administrator has to create an instance of this object with the
appropriate credentials before the person represented by this instance can start using
the application (some applications may allow users to self-register, i.e. the users
themselves can create their own instances).
A business object representing the user must be a member of the predefined
SystemUsers business object group. Aware IM always creates the default member of
this group called RegularUser. Configurators can use this object to represent users of
the system and/or define other objects (provided that they add them as members to the
SystemUsers group). This group mandates that the following attributes be declared in
all its members (if these attributes are not defined they are automatically added to any
object when it is added to the SystemUsers group):
- LoginName
- Password
- AccessLevel
The first two attributes represent user credentials whereas the third attribute represents
the access level. When a user logs in Aware IM finds the instance of the object that
matches the provided credentials and checks the value of the AccessLevel attribute of
this instance. This value is the name of the access level that is assigned to the logged in
user (every access level has a unique name). Once the access level has been assigned,
access to business objects, their attributes, processes and queries is determined by this
access level.
The value of the AccessLevel attribute can be set either explicitly by the system
administrator when she creates instances of the business object representing users or
automatically by rules attached to this business object (for example, if the user
represents an organization the access level may be set depending on the name of the
organization).
Configuration of access levels is described in detail in the Adding/Editing Access Levels
section.
After the access level has been assigned to the user Aware IM performs the appropriate
protection. If a certain configuration element (for example, business object) has been
defined as “not available” by the access level Aware IM removes the element from all

Aware IM 8.8 User Guide
Copyright © 2002-2023 Awaresoft Pty Ltd Page 82 of 479
lists and menus of the application. If an attribute has been defined as “not available”
Aware IM removes it from all auto-generated forms and its value is not returned by any
query (even if the query is defined to display it) or by any document (even if the
document has a tag referring to the attribute). If an attribute has been defined as “read
only” Aware IM makes sure that the attribute cannot be edited.
Predefined Access Levels
There are two access levels that Aware IM always creates for any configuration – the
“Administrator” access level and the “Guest” access level. The “Administrator” access
level by default implies no access restrictions whatsoever – all elements are accessible
to the administrator. The deafault business object representing a user called
RegularUser is assigned the “Administrator” access level (see Access Level). Aware
IM always creates one instance of the RegularUser object to represent the system
administrator. The default values for the predefined attributes of this instance are:
Attribute
Value
LoginName
admin
Password
password
AccessLevel
Administrator
System administrators may use the default credentials to log into the application initially
and create instances of other users (as well as change their own passwords).
Unlike the “Administrator” access level the “Guest” access level is heavily restricted.
This access level is assigned to users who may access the application without having to
log in (see Guest Entry). Naturally no elements are accessible by default to such users
except services.
The default settings for the “Administrator” and “Guest” access levels can be changed
but the access levels cannot be deleted.
Conditional Access
Access levels protect configuration elements, such as business objects, processes etc,
unconditionally, i.e. under any circumstances. If it is necessary to protect business
objects or their attributes based on certain conditions business rules invoking the
PROTECT or READ PROTECT actions should be used instead of the access level.
For example, in a banking system it may be necessary to protect a transaction once its
state has been set to ‘APPLIED’. The following rule will not allow anyone to change any
of the transaction’s attributes in this state:
If Transaction.State='APPLIED' Then PROTECT Transaction FROM ALL

Aware IM 8.8 User Guide
Copyright © 2002-2023 Awaresoft Pty Ltd Page 83 of 479
The following rule disallows changes to anyone but the administrator:
If Transaction.State='APPLIED' Then PROTECT Transaction FROM ALL
EXCEPT Administrator
Login
Most users of an application created with Aware IM need to log in before they can use it.
The exception to this are “guest users” who do not need to log in – these users however
are always assigned the “Guest” access level, which is normally heavily restricted, so
not many operations are available to such users (see Predefined Access Levels). Guest
users may register themselves with the system if the system has been configured to
allow this (to configure such an operation a menu type of the “Register User” type has to
be defined and made available to a “guest” user – see Operations). Another exception
are users logging in through LDAP/Active Directory – see the Using LDAP/Active
Directory for Login section for more details.
As explained in the Access Level section the system administrator must create
instances of the user object before any users can log in. Once this is done the users log
into the system by pointing their Internet browser to one of the system’s URL’s.
These URL’s have the following format:
BaseURL/action?param1=value1¶m2=value2¶m3=value3...
Where BaseURL is the address of the Aware IM server. For a local machine installation
it is usually http://localhost:8080/AwareIM; action is a login option-
dependent operation; param1=value1 – zero or more name=value parameters,
depending on the login option.
The table below presents a summary of the supported login options. The following
sections describe each option in detail.
Type
Action
Business
space
Login
name
Password
Testing
mode
1.
Guest entry
logonGuest.aw
Param
N/A
N/A
No
2.
Full login, interactive
(old UI)
logonAdmin.html
UI
UI
UI
UI
3.
Full login, interactive
(new UI)
logonAdmin.jsp
UI
UI
UI
UI
4.
Full login,
parameterised
logonOp.aw
Param
Param
param
param
5.
Simple login, default
business space (old
UI)
logon.html
Default
UI
UI
No

Aware IM 8.8 User Guide
Copyright © 2002-2023 Awaresoft Pty Ltd Page 84 of 479
6.
Simple login, default
business space(new
UI)
Logon.jsp
Default
UI
UI
No
7.
Simple login with the
“forgotten password”
link, default business
space
logon2.html
Default
UI
UI (with
“forgot your
password?”
link)
No
8.
Simple login, custom
business space
logonOp.aw
Param
UI
UI
No
9.
Invoke “forgotten
password”
functionality
logonFp.aw
Param
N/A
N/A
N/A
The following table lists the URL parameters that can be optionally added to the
logonGuest.aw and logonOp.aw URL’s. For example:
logonOp.aw?domain=CRM&userName=admin&password=password&testingMode=false
URL
parameter
name
Value
Comments
1.
domain
Name of the
business space
Instructs the system to login into the specified business
space.
2.
userName
Login name of
the user
Instructs the system to use the specified name rather
than take it from the user interface.
3.
password
Password of
the user
Instructs the system to take the specified value rather
than take it from the user interface.
4.
testingMod
e
“true” or
“false”
If the value is “true” the login will be into the test
database.
5.
logonPage
Name of the
logon page to
use
This can be used to in logonOp.aw to indicate a page
to be displayed. For example,
logonOp.aw?domain=CRM&logonPage=logon2.html
will display a page with “forgotten password” link
6.
perspectiv
e
Name of the
visual
perspective
Instructs the system to display a particular visual
perspective, rather than the default one, upon user
login. It can be used to bring the user to a specific
section of the system, rather than the default page (see
Visual Perspective).
7.
firstComma
nd
The command to
execute after
the startup
The command is assumed to be in the following format:
commandName,parameter
Where commandName is the name of the Javascript
function that can be invoked from links (see Links to
Aware IM Operations) and the parameter is a
combination of parameters to the Javascript function
separated by the comma symbol. For example,
firstCommand=editObject,MyObject,256
This will invoke editing of the object with the name
MyObject and id 256

Aware IM 8.8 User Guide
Copyright © 2002-2023 Awaresoft Pty Ltd Page 85 of 479
8
dynamic
True
If this parameter is specified Aware IM will allow to
directly enter the system without logging in if the
current browser already has an active session. In this
case you do not need to specify userName and
password parameters
9
captcha
true
If this parameter is specified the login form will include
“captcha” – the user will have to enter characters
displayed by a random image. This is a standard
protection against robots. For example:
logonOp.aw?domain=CRM&captcha=true
This will load the page logon_captcha.html. This page
is fairly basic. You can edit it to add your own style,
logo etc
10
e
All the above
parameters
encrypted
using the
ENCRYPT_B64
function
This parameter should be used if you don’t want users
to see values of other parameters, for example,
password object ID’s etc. In this case you can encrypt
all parameters and then use the encrypted string as a
value of the “e” parameter, for example:
DISPLAY URL
‘localhost:8080/AwareIM/logonOp.aw?e=ENCRYPT_B
64(‘domain=MyBusinessSpace&userName=john&pass
word=123’)
Examples of typical URL’s:
1. http://localhost:8080/AwareIM/logon.html
Show a dialog to enter user name and password. Once the user enters the values
the system will log into the default business space in the regular mode using the
specified credentials
2. http://localhost:8080/AwareIM/logonOp.aw?domain=CRM
Show a dialog to enter user name and password. Once the user enters the values
the system will log into the specified business space (CRM) in the regular mode
using the specified credentials
3. http://localhost:8080/AwareIM/logonOp.aw?domain=CRM&userName=admin&pa
ssword=password&testingMode=false
Log into the CRM business space in the regular mode without showing a dialog. Use
“admin” as user name, “password” as password.
4. http://localhost:8080/AwareIM/logonAdmin.html
Show a dialog to enter business space, user name, password and testing mode.
Once the user enters the values the system will log into the specified business space
in the specified mode using the specified credentials
5. http://localhost:8080/AwareIM/logonGuest.aw
Enter the default business space as a guest user
6. http://localhost:8080/AwareIM/logonGuest.aw?domain=CRM
Enter the CRM business space as a guest user
7. http://localhost:8080/AwareIM/logonFP.aw?domain=CRM
Invoke a process that handles “forgotten password” functionality. Can be used in
links on custom login forms.

Aware IM 8.8 User Guide
Copyright © 2002-2023 Awaresoft Pty Ltd Page 86 of 479
NOTE: Login parameter tables above do not include login options for Aware IM
mobile applications. For details how to login to the mobile applications see the document
“Aware IM for Mobile Devices”
Handling Login and Logout Events
It may be necessary for a system to execute certain rules when a new user logs in or out
the application. For example, the system might collect the statistics of how many users
are online or how many people have been using the system.
To handle login and logout events the configurator needs to define a special login
notification or logout notification and attach rules to these notifications – see Handling
Login Events and Handling Logout Events.
Working with Documents and Reports
Most data management applications need to be able to produce documents. At the very
least an application should be able to store, retrieve and print documents, but in most
cases it should also be able to generate documents. The following section describes
how these issues are addressed in Aware IM.
See:
Document Management
Document Generation
Reports
Document Management
Data management applications created with Aware IM can store, retrieve and print
documents. Documents are stored as values of attributes of the Document type, so the
configurator has to define a business object that will own the document and define an
attribute of the Document type to hold the document (configuration of attributes is
described in the Adding/Editing Attributes section).
In the Operation Mode an attribute of the Document type is displayed on a business
object form as a text box with the Browse button next to it (see Business Object Forms).
A user can press the Browse button and select a document from a file on disk. When the
form is submitted the file is uploaded to the Aware IM database and is stored
permanently in the database. There are no restrictions on the type of file that can be
stored.
To retrieve the stored document the user has to find an instance of a business object
that stores the document and bring up its form for editing (see Data Retrieval). The
attribute of the Document type is displayed as a text box with the Browse button next to

Aware IM 8.8 User Guide
Copyright © 2002-2023 Awaresoft Pty Ltd Page 87 of 479
it. The text box contains the name of the original file, which the document has been
loaded from. There is also the button that allows viewing the document. When the user
clicks on this link Aware IM downloads the original document from its database to the
user’s machine. If the document belongs to one of the types that Aware IM recognizes
Aware IM displays the document in a browser. Otherwise the copy of the document is
downloaded to a file on disk (the original document remains stored in the system’s
database). If the document is displayed in a browser, it can be viewed and printed from
the browser. If the document has been downloaded to a file, it has to be opened and
printed with the software that can work with documents of that type.
Documents stored as attribute values can be displayed, printed, exported and imported
from rules (see DISPLAY DOCUMENT, PRINT DOCUMENT, EXPORT DOCUMENT and
IMPORT DOCUMENT actions).
It is also possible to search for documents using queries. While you cannot use the
contents of the documents in queries directly you can use the values of other attributes
to search for documents. For example, one could define a business object that would
store a document in the attribute of the Document type and a keyword of search in
another attribute of the Plain Text type. Then a query could search by keyword and
retrieve the instances of the business object storing the documents that include the
keyword.
Document Generation
When documents are simply stored and retrieved (see Document Management) Aware
IM does not do anything with the contents of the documents – it stores documents in its
original form and never modifies them in any way. However, document storage and
retrieval is not the only way Aware IM can work with documents – it can also generate
documents from document templates.
Document Templates
Document templates are defined in the Configuration Tool. When defining a document
template the configurator has to indicate the type of template and design the template
layout. The following types of document templates are supported:
- Report
- MS Word
- MS Word (XML format)
- MS Excel
- Text
- HTML
Custom types can be plugged in as well (see Extending Aware IM). Layout of the
template is specified using the software corresponding to the type of the template (for
example, MS Word for Word templates, any text editor for text templates etc). Report

Aware IM 8.8 User Guide
Copyright © 2002-2023 Awaresoft Pty Ltd Page 88 of 479
templates are created using the Report/Presentation Designer (see Reports and
Working with Reports/Presentation Designer).
Configuration of document templates is described in the Adding/Editing Document
Templates section.
Tag Elements
The essential feature of document templates is that they can contain tag elements. A tag
element is a special text within a document template that starts with the “<<” symbol and
ends with the “>>” symbol. Whatever text is contained between these symbols is called
tag contents. Tag contents must be of a particular format that corresponds to the format
of arithmetic expressions in the Rule Language – see the “Usage of rules inside tags”
section in the “Aware IM Rule Language Reference” document. Most tag elements refer
to a value of a particular attribute of a business object. For example,
<< Account.Balance>>
Below is an example of the usage of this tag element within some document template
(which can be of any type). This document template could be part of an account
statement or part of a letter to a customer:
“The current value of your account’s balance is <<Account.Balance>> dollars.”
Document generation creates documents out of document templates by replacing tag
elements with the appropriate values. Tag elements referring to attributes are replaced
with the values of these attributes. In the example above if the actual value of the
Balance attribute is 1000 the text in the resulting document will look like this:
“The current value of your account’s balance is 1000 dollars.”
If tag elements contain expressions with attributes Aware IM calculates the expressions
and replaces tag elements with the resulting values. The values of attributes are taken
from the Context (see Context of Rule Evaluation and Other Usages of Context). In the
example above it is assumed that the instance of the Account business object is
present in the Context.
Tag elements used in document templates may also contain conditional expressions
that let you specify conditions under which attribute values or static text will be printed
out. The format of a conditional expression is the standard format used in rules. The only
difference is that these expressions must contain the special SHOW action. An example
of a conditional expression:
<<IF Account.Balance > 1000 Then SHOW Account.Holder.Name>>
If balance of the account is greater than 1000 then include the name of the holder in the
document.

Aware IM 8.8 User Guide
Copyright © 2002-2023 Awaresoft Pty Ltd Page 89 of 479
You can also conditionally include the entire sections of a document template into the
final document. To define a condition of section inclusion, add the condition followed by
the action “SHOW SECTION_START”. This also marks the start of the section. To mark
the end of the section include, the following tag: <<SECTION_END>>. For example,
<<IF Account.Balance > 1000 THEN SHOW SECTION_START>>
The text of the section follows …
<<SECTION_END>
The rest of the text follows
NOTE: conditional inclusion of document sections is only available for MS Word and
HTML document templates. Some document templates types allow inclusion of tables
using LIST_TABLE and LIST_TABLE_START/END functions. MS Word document
templates also support inclusion of sub-documents using SUB_DOCUMENT function (see
Miscellaneous Functions).
The mechanism of document generation that works by replacing tag elements with the
corresponding values can be very effectively used to generate multiple documents from
the same document template. For example, one could define a template of a letter to a
customer. When this letter is sent to a particular customer, the tag elements in this letter
referring to customer’s name, address etc will be replaced with the details of this
particular customer.
When documents are generated
Aware IM generates documents from document templates in the following scenarios:
1. When instances of business objects containing attributes of the Document type are
created provided that the attributes are initialized with a document template.
It is possible to initialize an attribute of the Document type with the name of a
document template (see Setting Properties of Document Attribute). In this case when
an instance of a business object containing such an attribute is created Aware IM
uses the document template that the attribute is initialized from to generate the
document. The instance of a business object being created is available in the
Context and may be referred to by tag elements of the template (Note that all other
attributes of the business object are guaranteed to be properly initialized before
document generation occurs – see Rule Priorities). Once the document has been
generated it is stored as the value of the Document attribute (see Document
Management).
2. When the name of a document template is specified in certain actions from within
business rules.
The DISPLAY DOCUMENT, EXPORT DOCUMENT and PRINT DOCUMENT actions of the
Rule Language can specify the name of a document template to display, export or

Aware IM 8.8 User Guide
Copyright © 2002-2023 Awaresoft Pty Ltd Page 90 of 479
print. It is also possible to assign a value of an attribute of the Document type to the
name of a document template, for example
Account.Statement = 'StatementTemplate'
In each of these cases Aware IM generates the document out of the specified
template before executing the action (for example, when Aware IM executes the
DISPLAY DOCUMENT action it generates the document out of the template first and
then displays the resulting document). The current Context of rule execution is used
to resolve the tag contents.
3. When a user invokes an operation of the “Create Document” type in the Operation
Mode.
An operation of the “Create Document” type can be configured to be part of the main
menu or can be invoked from a form of a business object or a query. The Context for
document generation is formed from the instances of the business objects that a user
selects and/or the data source of the document template (see Other Usages of
Context).
4. When tag elements are used in the initialization text of attributes of the Plain Text
type.
Tag elements may be used in the initialization expressions of the Plain Text
attributes. In this case there is no document template involved but nevertheless
Aware IM replaces tag elements used in the initialization expressions with the
appropriate values before assigning initial text to the attribute.
Reports
One of the document template types supported by Aware IM is the Report type.
Document templates of this type are somewhat different from other document templates.
The main difference is in the document generation algorithm. Whereas for other types
Aware IM just replaces tag elements with the appropriate values (see Document
Generation), for reports Aware IM also repeats a particular section of the document
template for each instance of a business object found in the Context. The following
section describes this process in detail.
Report Bands
The layout of a document template of the Report type (or simply report) is designed
using the Report/Presentation Designer. The layout of any report consists of special
sections called bands. Each band may contain report elements and is processed in a
special manner during document generation. The following bands can be defined:

Aware IM 8.8 User Guide
Copyright © 2002-2023 Awaresoft Pty Ltd Page 91 of 479
Title
This band represents the title of the report.
Page Header
This band represents a header of each page in the report.
Page Footer
This band represents a footer of each page in the report.
Column Header
If the report has multiple columns this band represents the header of each column.
Column Footer
If the report has multiple columns this band represents the footer of each column.
Details
This band is the main section of the report that is repeated for each instance of a
business object in the Context.
Summary
This band represents the summary of the report.
Group Bands
Instances of a business object shown in the Details band may be divided into groups –
for example, each group may only show data starting with a particular letter of the
alphabet. A group may also contain other groups. Each group is represented by a Group
header and a Group footer. Elements of the group header are included into the resulting
document at the start of each group and elements of the group footer – at the end of
each group. Each group has a group condition, i.e. the expression that is calculated
during the report generation to check whether a new group should be started (see
Report Generation).
The details of defining bands in the Report/Presentation Designer are provided in the
Setting Band Properties section.
Report Elements
The following elements may be included in any of the report bands:
Text
This element usually contains static text. It is possible to include tags, which will be
resolved during the report generation, inside the static text. For example,
“The account balance is <<Account.Balance>>”
Tag
See “Tag Elements” in the Document Generation section.

Aware IM 8.8 User Guide
Copyright © 2002-2023 Awaresoft Pty Ltd Page 92 of 479
Line
This element represents a straight line.
Rectangle
This element represents a rectangle.
Image
This element represents an image.
Sub-report
This element refers to another existing report that is embedded into the current (master)
report. Sub-report elements are often used to display instances of a business object
referenced by a particular reference attribute – for example, if a master report shows
accounts, the sub-report for each account may show transactions of the account. When
defining a sub-report it is necessary to indicate a query that finds the data for the sub-
report. The query usually finds the instances referenced by an attribute, for example:
FIND Transaction WHERE Transaction IN Account.Transactions
Note that the query uses the dynamic attribute Account.Transactions, which refers
to the instances of the Account business object in the master report – see Configuring
Queries and Other Usages of Context.
Conditional element
All elements mentioned before are always included into the final document by the report
generation algorithm. A conditional element, on the other hand, allows specifying
conditions, which define when a particular element should be included into the final
document (if at all). Moreover, it makes it possible to designate several sub-elements for
the same area in the report and specify conditions, which define when a particular sub-
element will be printed. For example, consider a conditional element that includes two
tag elements – both tag elements refer to the Balance attribute of the Account object
(<<Account.Balance>>), except that one is displayed in green and another one - in
red. The conditional element defines the conditions that specify that the first text element
should be included if the value of the account balance is greater than 100 and another
one – if it is less than 100. The final document therefore will display the account balance
in red if it is less than 100 dollars and in green if it is greater than 100 dollars.
The details of defining elements in the Report/Presentation Designer are provided in the
Adding Report/Presentation Elements section.
Report Generation
We can now describe what happens when a report document is generated from a report
layout. First of all the Title band is generated. When we say that a certain band is
generated it means that the report elements included in the band are transferred into the
final document. Static elements, such as static text, rectangles, lines and images are

Aware IM 8.8 User Guide
Copyright © 2002-2023 Awaresoft Pty Ltd Page 93 of 479
transferred into the final document as is, whereas dynamic elements such as text
elements with tags, tag elements, conditional elements and sub-reports are generated
and the result is included into the final document. This is how the dynamic elements are
generated:
- Text elements with tags and tag elements are resolved from the Context as
described in Document Generation.
- Conditions of conditional elements are calculated and the appropriate sub-element is
included into the final document (or nothing is included at all). If the sub-element is a
dynamic element it is generated as well.
- A query attached to a sub-report element is run, the Context for the sub-report is
formed (see Other Usages of Context) and the report generation algorithm is
executed for the sub-report. The resulting document is included into the master
document.
After the Title band has been generated Aware IM starts generating pages of the report
by generating the Details band for every instance of a business object in the Context
independently. If, for example, a report is generated for a number of accounts the
Details band is generated for each instance of the account. The instances could either
be selected by the user or found by a query attached to the document template (see
Adding/Editing Document Templates).
When generating pages of the report Aware IM checks whether a new page should be
started (the size of the page is specified as part of the properties of the report – see
Setting Report/Presentation Properties). If a new page is to be started Aware IM
generates the Page Footer band for the previous page and the Page Header band for
the new page. Also if the report has been defined to have multiple columns, Aware IM
generates the Column Header and Column Footer bands when starting a new column.
Whenever Aware IM starts processing a new instance of the business object in the
Context it checks whether it should start a new group (provided that group bands have
been defined in the report). The new group is started if the value of the expression
specified as a group condition changes. For example, if the group condition is specified
as Product.Category the new group will be started whenever the value of the
product’s category of the new instance is different from the value of the previous
instance. When a group is started Aware IM generates the Group Footer for the
previous group and the Group Header for the new group.
Finally after pages of the report have been generated Aware IM generates the Summary
band.

Aware IM 8.8 User Guide
Copyright © 2002-2023 Awaresoft Pty Ltd Page 94 of 479
NOTE: Some values used in a report may be provided dynamically by the user just
before the report is generated, rather than hardcoded in the report layout (for example,
the name of the report). Expressions used in the tag elements of the report may refer to
such values using the special syntax (see the “Aware IM Rule Language Reference”
document) – for example, <<{REPORT_NAME}>>. When the user runs such a report
Aware IM automatically generates a form that prompts the user to enter the values of
the report parameters. The entered values are used instead of the corresponding tag
elements when the report is generated.
User Defined Documents and Reports
NOTE: This feature is only available in the Aware IM Developer Edition.
This is explained in detail in the video turotial called “User Defined Documents” in the
Documents section of the Video Tutorials page on the Aware IM web iste
https://www.awareim.com/video-tutorials
NOTE: It is possible to allow users to change the pre-configured document
templates. If a particular pre-configured template has been marked as editable by the
end user (see Adding/Editing Document Templates) and when defining an instance of
the user defined document the user specifies the name of the pre-configured template
as the name of his document, the new template will replace the pre-configured one.
Communication with Other Systems
Many applications need to communicate with other software systems and/or electronic
devices. The following section explains how this communication can be achieved in
Aware IM.
See:
Intelligent Business Objects
Requesting Services and Sending Notifications
Business Space as Intelligent Business Object
Intelligent Business Objects
As described in the Business Objects as Carriers of Data section all data in Aware IM is
encapsulated in business objects. Software systems and electronic devices that an
application needs to communicate with are also represented in Aware IM by business
objects. Unlike other business objects, though, software systems and electronic devices
contain certain “intelligence”, because they are capable of receiving and/or processing
the electronic data. Communication with software systems and devices is nothing else

Aware IM 8.8 User Guide
Copyright © 2002-2023 Awaresoft Pty Ltd Page 95 of 479
but the exchange of the electronic data between applications configured with Aware IM
and other software systems and devices.
Human beings and organizations can also be modelled as intelligent business objects
provided that Aware IM has electronic means of communication with them (for example,
e-mail or fax).
Intelligent business objects are, therefore, those elements of a business capable of
receiving, sending and processing electronic information thus ensuring meaningful
communication.
Aware IM can communicate with intelligent objects in two ways: sending notifications or
requesting services. A notification is a way of communicating where a party can send a
message to another party without having to identify itself and without expecting a reply
back from the other party. It is entirely up to the other party to decide how to react upon
receiving a notification. E-mail is a good example of a notification. Configuration of
notifications is described in the Adding/Editing Notifications section.
A service is a more formal and comprehensive way of communication than a notification.
A party requesting a service from another party must first identify itself to the other party,
and can expect a meaningful reply back. For example, sending payment details to a
payment processing system for completion and getting a payment reference number
back.
Aware IM communicates with external parties through channels. A channel is software
adaptor carrying information between Aware IM and an intelligent business object.
Aware IM offers several standard channels including an e-mail channel and a SOAP
channel. In practice it means the following:
- Aware IM can send e-mails to people and organizations as long as they are
configured as intelligent objects with the e-mail channel (see also Outgoing Email).
- Aware IM can use electronic services of service providers over the Internet as long
as the service providers are configured as intelligent objects with a suitable channel.
If you need to get Aware IM to communicate with a system or a device that does not
support the standard protocols, you can develop a custom channel and plug it into
Aware IM (see “Aware IM Programmer’s Reference”). This way you can communicate,
for example, with legacy software systems, or process data input from devices such as
barcode readers, utility meters, inventory trackers, etc.
Configuration of intelligent business objects is described in detail in the Defining
Intelligent Business Objects section.

Aware IM 8.8 User Guide
Copyright © 2002-2023 Awaresoft Pty Ltd Page 96 of 479
Requesting Services and Sending Notifications
Once an intelligent business object has been configured and its services have been
defined or discovered it is possible to communicate with such an object. Communication
can only be performed from business rules. Use REQUEST SERVICE action to request
services of an intelligent business object and use SEND action to send notifications to
the object. For example,
REQUEST SERVICE RegisterProduct OF Awaresoft
SEND ReminderEmail TO Customer
Integration with Stripe Payments
Stripe is a very well-known payment platform and it supports multi-party payments
where sellers receive electronic payments from their customers and you as a developer
of the platform (see https://stripe.com/docs/connect) for sellers and their customers
receive a cut from each electronic payment (along with Stripe, who have their cut as
well). This can be quite lucrative for application developers using Aware IM as their
platform. For details on how to integrate Aware IM with stripe multi-party payments see
this video tutorial.
Scheduling
Quite often applications need to perform processing of data at some regular time
intervals, for example, financial reports may need to be compiled at the end of each
quarter; reminder e-mails may need to be sent about meetings each Friday.
Aware IM allows configuring scheduling items that determine the times when this data
processing occurs. The data processing must be encapsulated in a process (see
Processes as Links between User Interface and Business Logic). It is possible to start a
process as a one-off event or as a regularly recurring event. Configuration of scheduling
items is described in the Scheduling section.
E-mail Handling
Many applications need to work with e-mails: e-mails often need to be automatically sent
under the appropriate circumstances (for example, to remind customers that their
insurance policy is about to expire) and certain actions need to be automatically
performed upon receiving e-mails (for example, automatically register a support request
from a customer). The following section describes how this can be done in Aware IM.
See:
Outgoing Email
Incoming Email

Aware IM 8.8 User Guide
Copyright © 2002-2023 Awaresoft Pty Ltd Page 97 of 479
Outgoing Email
Sending outgoing e-mails is a part of a communication between Aware IM and an
external party, such as an individual or an organization. Communication between Aware
IM and external parties is described in the Communication with Other Systems section.
An outgoing e-mail represents a notification sent by an Aware IM –based application to
an external party. The external party must be represented by an intelligent business
object and must have a communication channel of the “e-mail” type defined. E-mail can
be sent from business rules using the SEND action of the Rule Language.
There are, therefore, 3 steps involved in the configuration of an application that needs to
send e-mails:
1. Define an intelligent business object representing the addressee of the e-mail with
the communication channel of the “e-mail” type.
2. Define a notification representing a particular e-mail.
3. Define a business rule that will use the SEND action to send the e-mail under the
appropriate circumstances.
Step 1 is described in the Defining Intelligent Business Objects section. Once the
channel has been defined Aware IM automatically adds the special attribute called
EmailAddress to the definition of the intelligent business object. The value of this
attribute is used by Aware IM to determine the e-mail address of the e-mail recipient
when the e-mail is sent. The value of this attribute can be set on the form of the
business object by the user or by rules.
Step 2 is described in the Adding/Editing Notifications and Sending Outgoing E-mail
sections. When configuring a notification representing the e-mail it is important to define
the Subject and Message attributes, the values of which will be used by Aware IM to
specify the subject and body of the outgoing e-mail respectively. Also if the email has
attachments the notification has to define attributes of the Document type – one attribute
per attachment. The documents stored as values of these attributes will be used as e-
mail attachments (see also Document Management).
Step 3 is described in the SEND action section of the Rule Language Reference. One
point to note here is that it is not necessary to create the notification representing the
email explicitly using the CREATE action – Aware IM will automatically create and
initialize the notification before it is sent if it has not been created explicitly. Initialization
expressions of the notification may use tag elements referring to the current Context
(see Document Generation). For example, one could define the ExpiryEmail
notification with the Message attribute initialized to the following text:
“Dear <<Customer.Name>>, your policy is about to expire”.
Then one could define the following rules:

Aware IM 8.8 User Guide
Copyright © 2002-2023 Awaresoft Pty Ltd Page 98 of 479
FIND Customer WHERE Customer.Policy.ExpiryDate=CURRENT_DATE
SEND ExpiryEmail TO Customer
This is equivalent to the following:
FIND Customer WHERE Customer.Policy.ExpiryDate=CURRENT_DATE
CREATE ExpiryEmail WITH ExpiryEmail.Message='Dear
<<Customer.Name>>, your policy is about to expire'
SEND ExpiryEmail TO Customer
Incoming Email
Just like outgoing e-mails incoming e-mails are represented by a notification. Unlike
outgoing e-mails there is only one notification that represents an incoming e-mail. Its
name is IncomingEmail. The name and attributes of this notification cannot be
changed.
Conceptually this notification is received by a business space, so to define this
notification the configurator must indicate that the business space will be receiving
incoming e-mails. This process is described in detail in the Setting Options for Incoming
E-mail Handling section. Basically the configurator has to provide the name of the email
server and the details of the e-mail account. After this Aware IM will automatically add
the definition of the IncomingEmail notification to the business space.
Once the IncomingEmail notification has been added to the list of notifications it is up
to the configurator to define business rules that will be triggered once the e-mail is
received (see Data Processing). The rules may check the attribute values of the
IncomingEmail notification and perform the appropriate actions. The attributes of the
notification contain the date when the e-mail was sent, who it was sent from, the subject
and the body of the e-mail etc. There are also three attributes of the Document type
representing the e-mail attachments. The first two attachments (if present) are contained
in the first two attachment attributes. If e-mail has more than two attachments all other
attachments are zipped up and stored in the third attachment attribute.
Example of a rule attached to the IncomingEmail notification:
If IncomingEmail.Subject = 'Support Request' Then CREATE
SupportRequest WITH SupportRequest.Contents =
IncomingEmail.Message
This rule creates the business object SupportRequest initialized to the body of the
received e-mail.
The SET action of the Aware IM Rule Language can be useful for analysing the received
e-mail provided that the body of the e-mail is in a format required by the SET action.

Aware IM 8.8 User Guide
Copyright © 2002-2023 Awaresoft Pty Ltd Page 99 of 479
Export and Import
Aware IM includes the functionality to import and export instances of a business object
to and from the system. This functionality may be useful under the following scenarios:
1. The user wants to enter large amounts of data into the system – it may be too
tedious and slow to enter each instance of a business object using the business
object form (see Data Entry and Editing). It is much faster and easier to use a text
editor or a spreadsheet to prepare the data in a file and then import the file in one go.
2. A variation of the first scenario. The user wants to modify large amounts of data.
Again it may be too slow and tedious to do it using a business object form. It may be
much faster to export the required instances from the system, change the data using
some text editor or a spreadsheet and import the data back into the system.
3. It may be necessary to transfer data from some other (non-Aware IM) system into
the Aware IM-based system. The data from another system can be imported from a
CSV or XML file.
4. It may be necessary to transfer data from the Aware IM-based system into some
other (non-AwareIM) system. The data to be transferred can be exported into a
comma delimited CSV file.
When data is exported from a system Aware IM writes out attribute values of those
instances of a business object that have been selected for export. The attribute values
are written into a comma-separated file (CSV), which is supported by a large number of
software programs including Microsoft Excel.
For options 3 and 4 above the best approach is to define your own import or export
template that defines mapping between the columns in the data file format supported by
an external package and attributes of the object in Aware IM. Aware IM includes a
sophisticated mapping module that allows end users to define such templates. For more
details about this please watch the video tutorial about import and export templates.
There are several options that control how export is performed:
For update
It is possible to indicate whether values of the ID attribute will be written into the output
file. If this option is switched on Aware IM writes out values of the ID attribute for each
instance of the exported business object. When such a file is imported back into the
system Aware IM detects that the data contains the ID attribute and tries to find the
corresponding instance in its database. Then it uses the data in the record to modify the
instance rather than to add a new one. Thus this option controls whether exported data

Aware IM 8.8 User Guide
Copyright © 2002-2023 Awaresoft Pty Ltd Page 100 of 479
will later be used to import the new data as in scenario 1 or modify the existing data as
in scenario 2.
NOTE: It is possible to use a particular attribute, rather than ID attribute to
indicate update operation. If you add “*” symbol before the name of the object and
attribute in the header of the CSV file, Aware IM will use values of this attribute to
find instances of business objects to modify (only one instance must be found for
each value of the attribute). This may be useful when exchanging data with non-
Aware IM systems that do not have the ID attribute.
Export Binary
It is possible to select which attributes will be exported and optionally specify whether
attributes of the Binary, Document or Picture types should be exported
Export Relationships
It is possible to indicate whether reference attributes should be exported – see Exporting
and Importing Relationships
When the data is imported from a CSV file Aware IM checks whether the imported file
includes values of the ID attribute and if so tries to find the corresponding instances and
update the attribute values with the data from the file. Obviously it changes values only
of those attributes that are present in the file leaving other values intact. If the file does
not have the values of the ID attribute Aware IM creates a new instance of the business
object for each record in the file and initialises it from the data in the record. The
following import options can be specified:
With validation
This option indicates whether Aware IM will perform validation of the instances when the
data is imported. This option allows bypassing the execution of rules that are attached to
the business object being imported. When validation is off Aware IM does not execute
the rules thus leaving the possibility of storing logically invalid data. The option exists
purely for efficiency reason – importing with validation off is faster, yet it becomes the
user’s responsibility to provide valid data.
Batch size
Aware IM imports records in batches of the specified size. After each batch has been
imported Aware IM commits the database transaction thus making the changes
permanent (see also Batch Operations).
Import and export can be performed either from the user interface of the Operation
Mode (see Export and Import in the Operation Mode) or from business rules (see Export
and Import from Business Rules).

Aware IM 8.8 User Guide
Copyright © 2002-2023 Awaresoft Pty Ltd Page 101 of 479
Export and Import in the Operation Mode
In order to perform export or import from the user interface an operation of the “Export”
or “Import” type has to be configured (see Setting Menu Item Properties).
If you want import or export to use one of the templates that you have defined select the
template from the list. Attribute mapping will be defined by this template. If you choose
not to use a template, Aware IM will create a special header row describing attributes of
the object contained in each column during export and it will expect the file to contain
such a row during import.
When exporting the data the user has to indicate which instances of which business
object should be exported (unless a template is used). This is specified by either
selecting a business object (if all instances are to be exported) or by selecting a query
(the instances found by the query will be exported). Then the user can specify export
options as described in the Export and Import section. When specifying export options it
is possible not only to indicate which attributes should be exported but also specify the
export format of each attribute. By default the format in which the value of the attribute is
exported is the format defined in the attribute (see Adding/Editing Attributes). The user
can override the default format and provide custom format. For example, if the
Account.OpeningDate attribute is defined to have “dd/MM/yy” format, the user can
override this format and define the export format to be “dd/MM/yyyy”. This option can be
useful if data is to be transferred to another system as described in scenario 4 of the
Export and Import section.
After the selected instances have been exported the resulting export file in CSV format
can be downloaded to the user’s computer.
When importing data the user has to indicate instances of which business object are to
be imported (unless a template is used) and specify import options as described in the
Export and Import section. The user also has to provide the name of the file to import
from and indicate whether this file is a relationships file. After the instances have been
imported Aware IM displays the export or import log. If there were any records in the
import file that could not be imported for whatever reason, the log shows the records that
have not been imported. The user can modify the import file by excluding all records that
have been successfully imported; fixing the records that had errors and re-importing the
file.
The format of the CSV and XML file is described in the file ExportImport.txt located
in the DOC directory of your Aware IM installation.
Export and Import from Business Rules
Export and import can be performed from business rules by executing the EXPORT or
IMPORT actions of the Rule Language. The export and import options described in the
Export and Import section can be specified as parameters of the actions. The name of a

Aware IM 8.8 User Guide
Copyright © 2002-2023 Awaresoft Pty Ltd Page 102 of 479
business object to export or import is also specified as the action parameter. The actual
instances of the specified business object to export or import are taken from the current
Context of rule execution (see Context of Rule Execution).
Exporting and Importing Relationships
Aware IM can export and import not only simple attributes of business objects but also
reference attributes that represent relationships between business objects. When values
of reference attributes are exported Aware IM writes out the following information:
- For single references the name and the value of the ID attribute of the referred
instance is exported. The name and ID are separated by the “#” symbol.
- Values of all “multiple” references of the object are written into a separate file called
the relationships file. Each record in the file includes the ID of the reference owner
(see ID attribute), the name of the referred instance, the ID of the referred instance
and the name of the reference attribute.
Importing relationships is arguably most useful when importing data from other systems
as described in scenario 3 of the Export and Import section. Relationships of a business
object are represented in the import file by values of one or several attributes in each
record. The first record in the import file contains names of the imported attributes; the
names of reference attributes must include the name of the reference attribute and the
name of some attribute in the referred object – for example,
Account.Owner.FirstName. When Aware IM imports a record containing
relationships it reads attribute values representing a relationship and uses these values
to find the instance of the referred object in the database. Values of reference attributes
must point to only one instance of the referred object (in other words, these attributes
must uniquely identify the instance) – for example, values of attributes
Account.Owner.FirstName and Account.Owner.LastName uniquely identify the
owner of the account. If Aware IM finds the single instance of the referred object in the
database it associates this instance with the imported instance through the specified
reference attribute (Account.Owner in the above example). If Aware IM finds more
than one instance of the referred object it does not import the relationship and adds an
error record into the import log.
It is possible that referred instances have not been imported into the system yet, so
Aware IM does not find any instance of the referred object from the values of the
reference attribute. In this case Aware IM creates a relationship file where it writes the
ID of the reference owner and the values of the reference attributes. Later on, when
referred instances have been imported into the system, this relationship file can be re-
imported to recreate the relationships.
For example, let us assume that we are importing accounts of the account owners. The
Customer object is referenced by the Account.Owner attribute and an instance of the
owner is identified by the Account.Owner.FirstName and

Aware IM 8.8 User Guide
Copyright © 2002-2023 Awaresoft Pty Ltd Page 103 of 479
Account.Owner.LastName attributes. Let us assume that we are importing a single
record representing a new instance of the Account object. The record has the following
values:
Account.Date
Account.Balance
Account.Owner.FirstName
Account.Owner.LastName
22/06/2004
1000
John
Smith
When Aware IM imports this record it creates a new instance of the Account object
with the value of the Date attribute equal to 22/06/04 and the value of the Balance
attribute equal to 1000. Account.Owner.FirstName and
Account.Owner.LastName represent a relationship of the account, so Aware IM tries
to find the instance of the Customer object with the value of the FirstName attribute
equal to “John” and the value of the LastName attribute equal to “Smith”. If it finds such
an instance it creates a relationship between the new instance of the Account object
and the found instance of the Customer object. If Aware IM does not find the instance
of the Customer object with these values it writes the following record into the
relationship file (here we assume that the value of the ID attribute of the new Account
object automatically assigned by Aware IM is 1734):
Account.ID
Account.Owner.FirstName
Account.Owner.LastName
1734
John
Smith
Once the instance of the Customer object representing John Smith has been imported
into the system we can import the above relationship file created when importing
accounts. This time Aware IM will find the instance of the Customer object representing
John Smith and create a relationship between the account with ID 1734 and this
instance.
Setting Initial Values of the Application
Quite often it may be necessary to nitialise an application with attribute values specific
to a particular group of end users. For example, in a generic application for schools it
may be necessary to nitialise the application with values specific to a particular school,
such as specify the name of the school, number of lessons per day etc.
Usually such initialisatuion on is performed by the administrator of the system, who does
it once before the majority of users access the system.
Aware IM includes the predefined business object SystemSettings that can help in
setting the initial values of the application. The SystemSettings business object is
automatically included in all business space versions – it has a number of predefined
attributes and configurators can also add their own attributes. The instance of the
SystemSettings object can be created by the administrator of the system or created
automatically by rules. The interesting feature of the SystemSettings object is that

Aware IM 8.8 User Guide
Copyright © 2002-2023 Awaresoft Pty Ltd Page 104 of 479
there can only be one instance of this object in the system – Aware IM will not let you
create the second instance. This makes it possible for Aware IM to always keep this
single instance in the Context and configurators can use this object anywhere in
business rules or inside tags without having to worry about placing this instance in the
Context first.
The SystemSettings object essentially lets you use its attributes as parameters of the
application. For example, if the application that you configure includes document
templates that have logos of the end users you may want to let the system administrator
provide the logo of the specific end user before this user starts working with the system.
You can solve this by adding “LogoImage” attribute of the Picture type to the
SystemSettings object and design document templates to contain the reference to
this attribute (<<SystemSettings.LogoImage>>) rather than providing the specific
image in the document template. You will then define the menu item (for the system
administrator only) that will create the instance of the SystemSettings object and
bring up its form. The administrator will use this menu item and provide the specific
image as the value of the “LogoImage” attribute.
Extending Aware IM
Aware IM is a powerful software system that allows users to configure fully functional
Internet enabled applications without programming in most cases. Thus Aware IM can
be used not only by professional developers but also by business professionals.
In certain cases, however, it may be necessary to add programming extensions to
Aware IM in order to implement application functionality that is otherwise very difficult or
impossible to configure using available configuration tools. This mostly applies to
calculation extensive functionality (for example, some mathematical algorithms) or
interaction with some non-standard hardware that is not supported by Aware IM out-of-
the-box.
It is important to stress, though, that in order to support such functionality programmers
do not have to learn new technologies or understand at a very deep level the internals of
the Aware IM software.
Aware IM allows programmers to write extensions (plug-ins) in the following areas:
- Custom processes implemented by software components rather than by configured
rules (see Adding/Editing Processes)
- Custom forms (see Defining Forms)
- Custom channels for intelligent business objects (see Intelligent Business Objects)
- Custom function libraries
- Custom document types (see Working with Documents)
- Report calculation components (see Setting System Calculation Properties)

Aware IM 8.8 User Guide
Copyright © 2002-2023 Awaresoft Pty Ltd Page 105 of 479
The details on how to write code for Aware IM extensions are provided in the “Aware IM
Programmer’s Reference”.
Performance Profiler
If some part of your application is performing poortly you can use the Performance
Profiler that can help identify performance bottlenecks (these can be caused by various
reasons – poorly optimized rules, queries, applicability conditions and so on). To enable
the Performance Profiler a developer needs to add two special commands to the
application that turn profiling on and off. Then the developer needs to turn profiling on,
reproduce the problematic scenario and then turn profiling off. At this point he will get a
performance report that shows how long it took for various components of the system to
execute the request. The Performance Profiler is explained in detail in this video tutorial.
Configuration Process
In the previous sections we have frequently mentioned configuration of different
elements of an application such as business objects, business rules, processes etc. The
following section provides an overview of the configuration process while the details are
provided in the Working with Configuration Tool section.
See also:
Business Space Versions and Version Control
Productivity Features
Testing Mode
Working with Aware IM in Hosting Environment
Configuration Guidelines
Business Space Versions and Version Control
To configure an application is to configure a business space. At the end of the day it is
the business space that must contain all the configuration elements – business objects,
business rules, processes etc. The default business space is created during Aware IM
installation (see the “Aware IM Installation Guide”). This business space is usually the
one that represents the application.
Application configuration is not a trivial process – it involves detailed preparation as the
configurator has to collect and analyse requirements of the system and think how these
requirements are translated into business objects, business rules etc, and it usually
evolves over time as new requirements and new business rules appear or old
requirements are changed or become irrelevant.
To help manage changes of a business space Aware IM includes a built-in version
control mechanism. It allows configurators to make and test changes to a business
space without affecting the normal operation of the system. When a change to a

Aware IM 8.8 User Guide
Copyright © 2002-2023 Awaresoft Pty Ltd Page 106 of 479
business space needs to be made a new business space version must be created and
the change must be made in that version. Thus all elements of a configuration are
always contained within some business space version.
With the version control mechanism configurators can also keep track of changes made
to the application over time. For example, one can find out which rules and processes
were in effect at a particular date and time or what specific information was being
registered by the system by inspecting a particular business space version that was
current at that time.
Some business space versions are treated differently from others. This treatment is
based on their state – this is explained below.
Most business versions undergo the following lifecycle:
1. The version is created (either as a blank version or from some base version – see
Major and Minor Versions) in the NEW state. The configurator makes changes to the
version by creating or making modifications to the configuration elements, such as
business objects, business rules etc
2. Once the configurator is happy with the version she makes it available for testing and
the state of the version becomes UNDER TEST (see Testing Business Space
Version). At this moment the configurator can test the version in the Operation Mode
to verify that the changes work as expected. Aware IM keeps the version being
tested separately from the current operating version, so the testing is not going to
disrupt operation activities (see Testing Mode). If testing discovers that more
changes need to be made to the version the version is moved back to the NEW state
and step 2 is repeated.
3. Once the configurator is satisfied with the version she makes it operational (see
Publishing Business Space Version). Aware IM makes any necessary adjustments
and starts using the updated configuration information in the operation mode. The
state of the version becomes CURRENT.
4. When some other version is made operational the version becomes OBSOLETE. It
can be deleted or kept for historical purposes. It is also possible to return to the
obsolete version and make it operational again if for whatever reason the new
version has been proven not satisfactory.
See also Lifecycle of a Business Space Version.

Aware IM 8.8 User Guide
Copyright © 2002-2023 Awaresoft Pty Ltd Page 107 of 479
Productivity Features
Aware IM offers a number of productivity features that help configurators work with
business space versions:
- A business space version can be exported to, or imported from a file, so that
configurations can be shared (see Exporting Business Space Version and Importing
Business Space Version). This makes it possible to prepare configuration templates
for others to use.
- A business space version in the CURRENT or UNDER TEST state must be consistent,
i.e. it must not have invalid rules, references to non-existent business objects etc.
Aware IM performs rigorous checks of the validity of the version’s elements before
the version is made operational or made available for testing. This process is called
integrity checking – see Checking Version Integrity.
- On configurator’s request Aware IM can generate documentation for a particular
version. This documentation has the names, properties and descriptions of all
elements in the version (business objects, business rules, processes etc) in the
format that can be easily viewed or printed. The documentation is an entirely
separate structure and no access to Aware IM software is required to view it. The
documentation can be used for reference and/or audit purposes. See also
Generating Documentation.
Testing Mode
As described in the Business Space Versions and Version Control section a business
space version can be put under test to verify that the version works as expected before
making the version operational.
To test the business space version the configurator has to log into the system in the
Operation Mode using the URL described in the Login section. The screen displayed by
Aware IM includes the “Testing Mode” check box – this checkbox needs to be ticked to
indicate that Aware IM should operate in the testing mode.
Using the application in the Operation Testing Mode is very similar to using the
application in the regular Operation Mode. The main difference is that the operation data
created when the application works in the Operation Testing Mode is stored in a
completely separate database, so that the main data of the system is not affected by any
operations performed in the testing mode. There are also some other relatively minor
differences that are summarized below:
1. Users with the “Guest” access level (see Predefined Access Levels) cannot log into
the system in the testing mode. If one wants to test the “Guest” access level while
working in the testing mode the following can be done:
a. Log in as administrator into the testing mode as described above.

Aware IM 8.8 User Guide
Copyright © 2002-2023 Awaresoft Pty Ltd Page 108 of 479
b. Create a new instance of the RegularUser object and set the value of its
AccessLevel attribute to ‘Guest’
c. Logout and login as the newly created user.
2. Menu item of the “Login” type will attempt to login the user into the regular mode, not
the testing mode.
3. Menu item of the “Register User” type: when the user completes registration the
system automatically logs in the user into the regular mode of the same business
space using the newly entered login name and password.
4. If a business space version is configured to process incoming e-mails (see E-mail
Handling) it will periodically check the specified mailbox on the mail server, whether
in the regular or testing mode. Therefore, if there is an operational version in the
regular mode and the one in the testing mode that are both configured to receive e-
mails from the same source they will compete for incoming e-mails. As a result new
incoming e-mails can end up in either regular or testing version. To avoid this
situation, change the version to be put under test to use an alternative mailbox.
5. It is not possible to save newly built queries in the testing mode (see Building
Queries in the Operation Mode).
Working with Aware IM in Hosting Environment
The main components of the Aware IM software are the Aware IM Server and the
Configuration Tool. Aware IM Server is the core component of the software that stores
configuration and operational data and executes processes and business rules, whereas
the Configuration Tool provides the functionality that allows configurators to define
business objects, processes, business rules and other elements of an application.
Normally the Configuration Tool works in tandem with the Aware IM Server – the
changes to the configuration data performed in the Configuration Tool are stored on the
Aware IM Server and vice versa – the Configuration Tool obtains the initial configuration
data from the Aware IM Server (see also Configuration Process). This makes it possible
to store and update the configuration information in one repository managed by the
Aware IM Server.
Aware IM allows users to access their business space in the Operation Mode from any
location via the Internet using a standard Web browser. This requires the Aware IM
Server to be installed on a computer that has a permanent connection to the Internet
with sufficient speed and bandwidth. The users who do not have a suitable Internet
connection can run the Aware IM Server on a remote computer managed by an Internet
hosting service provider (this set-up is called a hosting environment – see also “Aware
IM Installation Guide”). Users who only need to access their application within a single
location do not need a hosting environment.
In the hosting environment the Configuration Tool is unable to work with the Aware IM
Server directly. However, one can prepare and test configurations on the local machine

Aware IM 8.8 User Guide
Copyright © 2002-2023 Awaresoft Pty Ltd Page 109 of 479
and then export the configuration into a BSV file. Once saved to a file the configuration
information can then be uploaded to the remote Aware IM Server from the user interface
of the Operation Mode.
In order to upload the configuration file to the Aware IM Server the system has to be
configured to include the menu item of the “Publish Business Space Version” type (see
Setting Menu Item Properties). When the user selects this menu item in the Operation
Mode Aware IM displays a form where the user can specify the configuration file and
provide the description of the changes. When the user submits the form the version is
uploaded to the Aware IM Server and becomes operational (at this point Aware IM also
performs the usual checks of the version to make sure that it is consistent – see
Checking Version Integrity).
A few other features that can be very helpful for users that need to operate with the
remote Aware IM Server can also be configured:
- Operation of the “List Business Space Versions” type shows all business space
versions available on the server in the Operation Mode. One can view the properties
of the versions and delete them if necessary. This is like having a bit of functionality
of the Configuration Tool in the Operation Mode
- Operation of the “Create Business Space” type allows creating a new business
space in the Operation Mode. The functionality is equivalent to the similar
functionality in the Configuration Tool. A system of an Internet host may include this
operation to allow their users to create their own business space and work in it.
Configuration Guidelines
See:
Configuration steps
Configuration principles
Configuration steps
This section describes the recommended sequence in which configuration elements
should be defined when configuring a new application.
See:
Business objects
Business object rules
Processes
User interface
Business objects
Business objects are the central elements of any Aware IM-based application. None of
the other elements would be of any use without business objects. It is therefore

Aware IM 8.8 User Guide
Copyright © 2002-2023 Awaresoft Pty Ltd Page 110 of 479
important to start working on an application by configuring objects of the business
environment for which the application is being created.
Which objects need to be configured depends entirely on the nature of the business.
You can, therefore, start by identifying the business elements that people deal with as
part of their day-to-day activities.
See section Business Objects as Carriers of Data for general description of business
objects. See section Configuration principles for recommendations on configuring
business objects and object groups.
Business object rules
Once you have created your business objects you can start attaching rules to the
objects. All data processing in Aware IM is done by object rules. Such rules can find,
create or delete objects, perform initialisation, validation and calculation operations,
communicate with other software systems or people, etc.
Rules are found everywhere in a business environment. You need to identify the rules
that are applicable to your application and attach them to the appropriate objects. Some
rules may be well-known and easy to spot. For example:
- No account can be open for a person under 16 years old.
- Once a transaction is approved its amount cannot be changed.
- If an item is not returned to the library by due date a reminder e-mail is sent to the
borrower.
Other rules can be found by inspecting processes and procedures performed by people
in the course of their day-to-day activities. You would need to break these procedures
into steps and configure each step as one or more rules attached to one or more
business objects.
To configure effective object rules it is essential to understand how rules work in
Aware IM. See section Business Rules as Carriers of Business Logic for introduction
into object rules, Data Processing for detailed explanation of rule processing,
Configuration principles on important guidelines on configuring object rules.
Processes
Now, that you have the business objects and object rules that handle information
processing, you can add processes to provide a convenient way of making and handling
incoming requests for information or operations. See section Processes as Links
between User Interface and Business Logic for details on the purpose and use of
processes.
To make it easier for the users to perform an operation that applies to a particular object
you can configure a process that takes that particular object as its input. For example, a

Aware IM 8.8 User Guide
Copyright © 2002-2023 Awaresoft Pty Ltd Page 111 of 479
transaction approval operation can be configured as a process ApproveTransaction
that takes Transaction object as its input and contains the following two rules:
– Transaction.State=’Approved’
– DISPLAY MESSAGE ‘Transaction has been completed’
Processes with a single object as their input will be available for users to start on the
corresponding object forms. Therefore, rather than having to manually change the state
of a pending transaction and submit the form, the authorized user can simply choose
process ApproveTransaction on the transaction object form.
You can also define processes with no input objects, which are useful for creating new
objects or performing other operations that do not require selecting a particular single
object upfront. Such processes can be made available to the users as operations via the
main menu of the system. For example, an account opening process could be
configured as follows:
– ENTER NEW Account
– PRINT DOCUMENT AccountOpeningLetter
– VIEW Account
Remember that processes should not be configured to process information. This is a job
for object rules – see Configuration principles for more details.
User interface
When you configure a new application Aware IM provides the default interface for the
users of the application. This includes the main menu with a set of generic operations
allowing the users to search for business objects in the system, create new objects or
documents and perform some other actions. For each of the business objects you
configure Aware IM generates the default object form to allow the users to edit the
object. There are several steps you can take to enhance and fine-tune the user access
to the system.
First, inspect the auto-generated object forms. With very little effort you can adjust the
forms by selecting the attributes to appear on forms. For complex objects with many
attributes you can split the form into several sections and select the attributes for each of
the sections. If you have configured processes to start operations that are applicable to
particular objects, such operations will be available on the object form for the users to
start, making the system easier for people to use.
The main menu of the system the users see when they log into the system can also be
easily customized. You can hide the generic actions from the menu and add specific
operations such as finding customers, creating accounts, registering members, etc. To
initiate such specific operations you can define queries looking for particular objects
matching the search criteria entered by the users. You can also attach to the menu the

Aware IM 8.8 User Guide
Copyright © 2002-2023 Awaresoft Pty Ltd Page 112 of 479
no-input processes, as described in the previous section, to let the user perform
operations.
If you want the object information to appear differently to users of different categories
you can define additional access levels and specify the information and operations
available to users of each level. Aware IM will adjust object forms and the main menu
accordingly. In addition, you can configure different object forms and different visual
perspectives, which include the main menu and other visual settings, for different access
levels. This gives you more options of controlling the way the users work with the
system.
Configuration principles
This section contains several key recommendations on configuring Aware IM
applications. The rationale behind these recommendations is to help creating
applications that have fewer elements, easier to understand and, most critically, easier
to maintain. People familiar with development of data management applications may find
some of the recommendations familiar and obvious. Certain things, however, are done
differently in Aware IM compared to traditional development tools. This is why reading
these guidelines would be beneficial for experienced developers as well.
The recommendations of this section describe the general principles of configuring
applications.
Business objects represent elements of business environment
Business object groups unite dissimilar objects
Object rules perform all information processing
Object rules are self-contained
Object rules are attached to the right objects
Business objects represent elements of business environment
It is very important that each object you configure represents some real element of the
business, not just an arbitrary collection of data. Systems having objects with unclear
purpose and processing logic are difficult to operate and maintain.
Examples of legitimate business objects, commonly found in many business
organizations, could be customers (clients, members, etc.), accounts (contracts,
policies, etc.), orders, fees, payments, etc. They would have attributes and rules clearly
identifiable from day-to-day business activities.
Business object groups unite dissimilar objects
Use a business object group only when the objects in the group cannot be configured as
a single object. Unnecessarily creating several similar objects will lead to duplicating of
configuration information such as attributes and rules. Whenever the configuration of
one of such objects needs to be changed, other similar objects are likely to require the
same change.

Aware IM 8.8 User Guide
Copyright © 2002-2023 Awaresoft Pty Ltd Page 113 of 479
You need to configure business elements of similar nature as separate objects, as
opposed to a single object, when:
- Attributes of one of the objects are not applicable to other objects and should not be
displayed on an object form for the other objects.
- Different processing logic applies to different objects. There would be too many rules
for one object and they would become too complicated because of the differences.
For example, different forms of customer communication such as email, telephone call,
fax or traditional letter, have to be configured as separate objects because of the
different way the message information is stored and presented to the user. Withdrawal
and deposit transactions, while both being financial transactions applicable to accounts,
have to be configured separately because of different processing rules that apply to the
transactions.
When objects differ only to a minor extent the difference may be covered by an attribute
in a single object. For example, a library catalogue may contain items of different types
such as books, videos, CDs, etc. Other attributes such as title, author, description, or
catalogue number would be identical. Therefore, a single LibraryItem object may be
configured that has an additional attribute representing the item type.
Object rules perform all information processing
All essential processing logic in the system should be specified as individual rules
attached to applicable objects, not processes. There are two important reasons for this
principle.
Reason 1. There may be many scenarios causing a change to an object. If the
processing logic is spread across various scenarios, any change to the logic needs to be
propagated throughout the scenarios. With the object rules approach, for each object
you specify all rules that make sense from that particular object point of view. None of
these rules are duplicated anywhere else in the system.
For example, Aware IM will automatically evaluate the following validation rule on
account whether a new holder is linked to the account, or the existing holder’s age is
changed:
If Account.Holder.Age < 16
Then REPORT ERROR ‘Account holder must be 16 years old or
over’
Reason 2. Object rules are independent from each other and therefore allow configuring
each step in multi-step procedures separately from other steps. A really complex
procedure would be difficult to configure as a single process because of multiple
conditional, parallel or overlapping steps it may contain.

Aware IM 8.8 User Guide
Copyright © 2002-2023 Awaresoft Pty Ltd Page 114 of 479
Let us consider an example of a withdrawal transaction, which requires an approval by
an authorised person if the withdrawal amount exceeds 5000. Before the transaction is
approved all necessary validation checks should be made. After the approval the
account balance should be updated accordingly.
We will first demonstrate how this procedure can be implemented by object rules. We
configure WithdrawalTransaction object with its State attribute initialised to ‘New’.
We then attach a pre-approval validation rule to the object:
If WithdrawalTransaction.State = ‘New’ AND
WithdrawalTransaction.Account.Balance <
ABS(WithdrawalTransaction.Amount)
Then REPORT ERROR ‘Insufficient funds on account’
In a similar manner we could attach all other validation rules as necessary. Next, we
need to see if the transaction can be approved automatically, which is done by attaching
the following rule to WithdrawalTransaction:
If WithdrawalTransaction.State = ‘New’ AND
ABS(WithdrawalTransaction.Amount) < 5000
Then WithdrawalTransaction.State = ‘Approved’
If the transaction amount is larger the transaction will wait for manual approval (or
rejection) by an authorized person. The manual approval will change its state to
‘Approved’ signalling the start of the second step in the processing of the transaction,
namely the updating of the account balance. This can be done by attaching the following
rule to Account object (note that Transaction here is a name of object group that
has WithdrawalTransaction as well as objects for other transaction types as its
members):
Account.Balance = SUM Transaction.Amount WHERE
(Transaction IN Account.Transactions AND
Transaction.State = ‘Approved’)
Let us now see how the same procedure could be configured using processes, a more
traditional approach, which is not recommended for use in Aware IM. We would need
two processes. The first is called EnterTransaction and contains the following
sequential rules:
– ENTER NEW WithdrawalTransaction WITH
WithdrawalTransaction.Account = Account
– If ABS(WithdrawalTransaction.Amount) < 5000 Then
WithdrawalTransaction.State = ‘Approved’
REDUCE Account.Balance BY
ABS(WithdrawalTransaction.Amount)

Aware IM 8.8 User Guide
Copyright © 2002-2023 Awaresoft Pty Ltd Page 115 of 479
The second process is called ApproveTransaction and used by an authorised
person to complete pending transactions. It contains the following rules:
– WithdrawalTransaction.State = ‘Approved’
– REDUCE Account.Balance BY
ABS(WithdrawalTransaction.Amount)
What is wrong with these processes? Several things:
1. The rule updating the account balance is duplicated in both processes. All other
similar processes, configured to handle other transaction types, would also have to
include a step updating the account balance. Compare this with the object rules
approach where there is only one rule on the Account object that updates the
balance whenever a new transaction is applied.
2. Transaction processing logic is entangled with the user interface step that allows the
user to enter the transaction details. If the transaction needed to be created without
the user input, for example as a part of a funds transfer transaction, the validation
and calculation rules would have to be duplicated in the transfer process.
3. If the logic of updating account balance needs to be changed, the change would
need to be propagated throughout all the processes configured in the system that
update account balance.
Object rules are self-contained
Each individual rule attached to an object should be self-explanatory and independent of
other rules. In other words, it should include all necessary conditions to clearly specify
when the rule action should be executed. There are two important reasons for this
principle.
Reason 1. If specific conditions for the rule action are not defined, the action can be
executed at the wrong time leading to the wrong results.
Reason 2. A rule cannot depend on execution of actions of other rules since the order in
which object rules are executed is not defined.
For example, the following rule initialises the account address with a default value. Once
the address is given the rule action will not be executed again:
If Account.Address IS UNDEFINED
Then Account.Address = Account.Holder.Address
If we removed the condition the rule would execute every time the Account object is
changed, thereby overwriting the address manually entered by the user.
In another example the rule below ensures that the transaction amount cannot be
changed once the transaction is completed. If the condition were removed the system
would not allow changing the amount at any time, including the initial entry of the
transaction details:

Aware IM 8.8 User Guide
Copyright © 2002-2023 Awaresoft Pty Ltd Page 116 of 479
If Transaction.State = ‘Approved’
Then PROTECT Transaction.Amount FROM ALL
Let us consider yet another example in which the final action is determined by several
possibly dependent events or facts. There may be a requirement to notify the library
member when an item the member reserved is returned to the library. If the e-mail
address of the member is known the member is notified by e-mail, otherwise a letter is
posted to the member. These requirements are implemented in Aware IM by two self-
contained and independent rules attached to the Reservation object:
Rule 1:
If Reservation.Status WAS CHANGED TO ‘Offered’
AND Reservation.Member.EmailAddress IS DEFINED
Then SEND ReservaitonOfferEmail TO Reservation.Member
Rule 2:
If Reservation.Status WAS CHANGED TO ‘Offered’
AND Reservation.Member.EmailAddress IS UNDEFINED
Then PRINT DOCUMENT ReservaitonLetter
Object rules are attached to the right objects
A rule attached to an object should specify the logic that applies to that object, not other
objects. In particular, a rule that modifies an attribute of an object should be attached to
the object to which the attribute belongs. There are two important reasons for this
principle.
Reason 1. The right rule attached to the wrong object will lead to the wrong results.
Reason 2. When you need to make a change to an object configuration you will see all
relevant rules in one place. You will not need to search through the system to see what
other object rules can make a change to the object and when. This may also help
reducing the number of similar rules, which will further simplify the system.
Let us illustrate this principle with examples. Consider a validation rule that a person
must be 16 or over to be an account holder. This rule should be attached to the
Account object and can be specified as follows:
If Account.Holder.Age < 16
Then REPORT ERROR ‘Account holder must be 16 years old or
over’
However, the same rule attached to the Person object would have a very different
meaning:
If Person.Age < 16

Aware IM 8.8 User Guide
Copyright © 2002-2023 Awaresoft Pty Ltd Page 117 of 479
Then REPORT ERROR ‘Account holder must be 16 years old or
over’
This is because the latter rule would essentially state that no person under 16 can be
registered in the system, whether to be an account holder or for any other purpose.
While this may very well be another business rule on its own right, it is definitely not
what the original rule was meant to specify.
As for the object-modifying rules, consider an example when an account balance is
updated following a financial transaction applied to the account. A rule on the
transaction could update the account balance:
If Transaction.State WAS CHANGED TO ‘Approved’
Then INCREASE Transaction.Account.Balance BY
Transaction.Amount
Now suppose that there are a number of transactions in the system, each represented
by a separate object. The above rule would have to be configured, essentially
duplicated, for each specific transaction object. The correct way of updating the account
balance, and also a safer one, would be for the account to update its own balance
following the addition of a new transaction. This is done by attaching the following rule to
Account object:
Account.Balance = SUM Transaction.Amount WHERE
(Transaction IN Account.Transactions AND
Transaction.State = ‘Approved’)
Note that Aware IM will execute the above rule whenever any of the account details
change, including the transaction list, or the state of a transaction, that is already in the
list, changes. We can be more specific and state that the balance should be updated
only when the transaction list changes (i.e. a new transaction is added), but not when
other account details change. Then we would need to add a corresponding condition to
the above rule:
If Account.Transactions WAS CHANGED
Then Account.Balance = SUM FinancialTransaction.Amount WHERE
(FinancialTransaction IN Account.Transactions AND
FinancialTransaction.State = ‘Approved’)
In this case, however, we should also remember to update the balance when a pending
transaction is approved, which can be done by adding the following rule to Account:
If Transaction FROM Account.Transactions WAS CHANGED
AND ChangedTransaction.State WAS CHANGED TO ‘Approved’
Then Account.Balance = SUM FinancialTransaction.Amount WHERE
(FinancialTransaction IN Account.Transactions AND

Aware IM 8.8 User Guide
Copyright © 2002-2023 Awaresoft Pty Ltd Page 118 of 479
FinancialTransaction.State = ‘Approved’)

Aware IM 8.8 User Guide
Copyright © 2002-2023 Awaresoft Pty Ltd Page 119 of 479
Configuring Applications
Overview of the Configuration Tool
Applications are configured in the Configuration Tool. The screen area of the
Configuration Tool is divided into several regions:
Elements Tree (red)
Working Area. (orange)
Main Element Properties (green)
Selection Properties (blue)
Additional Windows (yellow)
The Elements Tree contains the configured elements presented as a hierarchical tree
structure. Right clicking on a tree node brings up a pop-up menu specific to the selected
element. Most elements provide the New and Open commands in their pop-up menus
that allow adding new elements or editing the existing ones. Once the user selects the
New or Open command from a pop-up menu the editor corresponding to the selected
element appears in the Working Area. The user can then enter properties of the new
element or change properties of the existing element using the controls of the editor.
You can also edit an existing element by double clicking on it.
It is possible to enter/edit properties of several elements at the same time – the editors
are displayed as different tabs and it is possible to switch between editors by clicking on
the corresponding tab. See also Adding Element, Editing Element.
The “Main Element Properties window” contains a list of properties of the element being
edited – for example, a business object. The “Selection Properties” window shows the
properties of the selected sub-element that belongs to the main element. For example,
an attribute of the business object being edited.
The “Additional Windows” area contains some other windows – for example, results of
search and a list of integrity problems of the business space version.
Note that most windows can be moved around the screen, so that the user can re-
arrange them the way it suits him/her.
The screen of the Configuration Tool also contains the main menu and the toolbar that
allows performing frequently used operations.

Aware IM 8.8 User Guide
Copyright © 2002-2023 Awaresoft Pty Ltd Page 120 of 479
Configuration elements of an application are contained in business space versions;
business space versions exist in a business space. After the initial installation the
Configuration Tool contains one business space with two business space versions
(which have some pre-defined elements). One of these versions is in the NEW state and
is ready for modifications. Configuration work usually begins with configuring business
space-specific elements in this version – see Working with Business Space Versions.
Working with Business Space Versions
Business objects, rules, processes and other elements of the system belong to a
business space. A business space may have a number of business space versions,
each containing different versions of the elements that you configure. The following
section explains the life cycle of a business space version and the steps required to
create and edit the version.
Lifecycle of a Business Space Version
Creating Minor Version
Creating Major Version
Updating Business Space Version
Loading Business Space Version

Aware IM 8.8 User Guide
Copyright © 2002-2023 Awaresoft Pty Ltd Page 121 of 479
Checking Version Integrity
Testing Business Space Version
Publishing Business Space Version
Deleting Business Space Version
Viewing Version Properties and History
Exporting Business Space Version
Importing Business Space Version
Lifecycle of a Business Space Version
As work on the configuration of the application evolves the business space version
undergoes certain stages in its lifecycle.
Business space version in the NEW state.
When a business space version is initially created its state is always NEW. A version in a
NEW state may not be deployed for the end users nor can it be tested. It exists purely as
the working version of the configurator. The Configuration Tool displays the business
version in the NEW state in green. Once the configurator is happy with the contents of the
version she can make the version available for testing (or even publish it straight away,
although publishing without testing is strongly discouraged) – see Testing Business
Space Version.
Business space version in the UNDER TEST state.
Once the version has been made available for testing its state becomes UNDER TEST. A
version in this state can be tested by the configurator in the Operation Mode (see
Testing Mode). The purpose of testing is to ascertain that the configured system works
as expected. The operation data created during testing is stored in a separate database
and does not affect operation data of the end users. There may only be one business
space version in the UNDER TEST state in a business space – if there is already a
version in the UNDER TEST state it will move back to the NEW state after a new version
has been made available for testing.The Configuration Tool displays business space
versions in the UNDER TEST state in pink.
Business space version in the CURRENT state.
If the configurator finds some problems with the version during testing, she can start
editing the version under test (which moves the version to the NEW state) or create a
new minor or major version (see Creating Minor Version and Creating Major Version)
from the version being tested, correct errors in this new version and then make the new
version available for further testing. Once the configurator is finally happy with the
version she can publish (deploy) it so that it can be used by the end users (see
Publishing Business Space Version). When the version is published its state becomes
CURRENT. There may only be one version in the CURRENT state in a business space. If
there is already a CURRENT version it is moved to the OBSOLETE state after the new
version has been published.

Aware IM 8.8 User Guide
Copyright © 2002-2023 Awaresoft Pty Ltd Page 122 of 479
Once the version has been published it may not be changed by anyone. If further
changes to the version are required a new major or minor version may be created from
the current version and the changes may be introduced in this new version.
The Configuration Tool displays business space versions in the CURRENT state in black.
Business space version in the OBSOLETE state.
A business space version currently used by the end users is made obsolete when the
configurator publishes a new version. The new version moves to the CURRENT state and
the previously used version is moved to the OBSOLETE state. A version in this state may
not be modified, however, it can be published again (if for whatever reason the
configurator decides to go back to the old version). It is also possible to create a new
minor or major version from the OBSOLETE version and then make changes to the new
version (see Creating Minor Version and Creating Major Version). The Configuration
Tool displays a version in the OBSOLETE state in grey.
Business space version in the IN DEVELOPMENT state.
A version in this state indicates that the business space is running in a multi-
developer mode when several developers are working on the same business space
version concurrently. For more details about the multi-developer mode please watch the
Milti-Developer Mode video tutorial. The Configuration Tool displays business space
versions in the IN DEVELOPMENT state in orange.
Major and Minor Versions
Each business space version has a number associated with it that uniquely identifies the
version within a business space. This number has the format “n.m” where “n” is the
number identifying the major version and “m” is the number identifying the minor version.
Major versions usually represent big steps forward compared to the previous version,
whereas minor versions usually contain small modifications to the previous version. This
is, however, entirely up to the configurator to decide whether the new version will be
major or minor.
Creating Minor Version
Creating Major Version
Creating Minor Version
A new minor version is always created from some existing base version. When a new
minor version is created the entire contents of the base version is copied into the new
version and the new version is assigned a new number being an increment of the
maximum minor version number used already. The new version is created in the NEW
state – see Lifecycle of a Business Space Version.

Aware IM 8.8 User Guide
Copyright © 2002-2023 Awaresoft Pty Ltd Page 123 of 479
To create a new minor version:
1. Click on the base version in the Elements Tree to select it.
2. Select “Version/New Minor Version” in the menu or right click to bring up the pop-up
menu and select “New Minor Version”. The new version must appear in the Elements
Tree.
3. The Configuration Tool will bring up a dialog where you can enter any comments
about the new version being created and the press the OK button. Alternatively press
the Cancel button if you do not want to enter any comments.
Creating Major Version
A new major version can either be created from some existing base version or from a
blank version. When a new major version is created from a base version the entire
contents of the base version is copied into the new version. When a new version is
created from a blank version the version only contains pre-defined elements (such as
the RegularUser business object) and nothing else. The number of a major version
assigned to a new version is the increment of the maximum version number used
already. The new version is created in the NEW state – see Lifecycle of a Business
Space Version.
To create a new major version from the existing version:
1. Select “Version/New Major Version” in the menu or right click on the base version in
the Elements Tree to bring up the pop-up menu and select New Major Version. The
new version will appear in the Elements Tree.
2. The Configuration Tool will bring up a dialog where you can enter any comments
about the new version being created and the press the OK button. Alternatively press
the Cancel button if you do not want to enter any comments.
Loading Business Space Version
When the Configuration Tool starts up it does not load the contents of some versions for
efficiency reasons. When such versions are displayed in the Elements Tree the tree only
shows version number and state – there is no little “plus” sign next to the version to
indicate that the contents of the version have been loaded from the server. If you want to
view and/or change the elements of such a version you have to load its contents from
the server.
To load a business space version:
1. Click on the node displaying version number and state in the Elements Tree to select
it.

Aware IM 8.8 User Guide
Copyright © 2002-2023 Awaresoft Pty Ltd Page 124 of 479
2. Select “Version/Load Version” in the menu or right click to bring up the pop-up menu
and select “Load Version”. Once the version is loaded a little “plus” sign is displayed
next to its node in the Elements Tree. You can now expand the node and
view/change its contents.
Updating Business Space Version
Any changes to a business space version have to be saved to the Aware IM server. If
you do not update the version data on the server your configuration changes will be lost
when you close the Configuration Tool (unless you export the version to a file and then
import it back next time you start the Configuration Tool – see Exporting Business Space
Version and Importing Business Space Version).
To update the version:
1. Click on the version you want to update in the Elements Tree to select it
2. Select “Version/Update” in the menu or right click to bring up the pop-up menu and
select “Update”.
Checking Version Integrity
A business space version being published or made available for testing must be
consistent, i.e. must not have invalid rules, references to non-existent business objects
etc. The Configuration Tool performs rigorous checks of the validity of the version’s
elements when they are being created and/or edited. However, such checks are not
made when significant modifications to the version elements are taking place and
elements are being deleted and replaced. In this scenario it is easy to overlook a
reference to an obsolete element.
To make sure that the version is consistent the Configuration Tool always checks the
integrity of the version when it is being published or made available for testing. The
Configuration Tool will not allow publishing or testing an inconsistent version. If a version
is inconsistent the Configuration Tool displays a list of the version’s problems and does
not proceed with publishing or testing. It is also possible at any time to check the
integrity of the version irrespective of the state it is in.
To check version integrity:
1. Click on the version that you want to check in the Elements Tree to select it.
2. Select “Version/Check Integrity” in the menu or right click to bring up the pop-up
menu and select “Check Integrity”. A list of the problems from the last time you ran
the integrity check will be shown in the “Problems” window (the list is empty if
integrity is being checked for the first time).

Aware IM 8.8 User Guide
Copyright © 2002-2023 Awaresoft Pty Ltd Page 125 of 479
If a version has integrity problems the Configuration Tool will display a list where each
entry in the list contains the description of the problem. You can double click on the entry
to bring up the editor that will allow you to fix the problem.
TIP: If a problem is inside a report or presentation the integrity checker will tell you
which report or presentation has a problem but it will not take you directly to the
problem. You can open the report or presentation manually and find the offending
element using the Find Design Element feature of the Report/Presentation Designer –
see Find Design Element.
Testing Business Space Version
Once you are happy with your changes to the business space version you can make the
version available for testing. You may need to test the version in order to make sure that
your business rules and processes work as expected, presentations and reports look
good etc. It is recommended that you always test your version prior to publishing it for
the end users. Once the version has been made available for testing its state changes to
UNDER TEST, and you can now try creating instances of different business objects from
this version, run processes, reports etc in the Operation Mode (see Testing Mode).
Instances of objects created during testing are stored in a separate database so the
operational data of the end users is not affected by any testing activity – see also
Lifecycle of a Business Space Version.
To make a version available for testing:
1. Click on the version you want to test in the Elements Tree to select it (make sure that
the version is loaded – see Loading Business Space Version).
2. Select “Version/Put under Test” in the menu or right click to bring up the pop-up
menu and select “Put under Test”.
3. If you already have a version in this business space in the UNDER TEST state, you
will be offered a choice of whether to copy the operation data from the existing test
version or create the test version with no operational data at all. If you already had
some test instances of business objects from the previous rounds of testing it may be
helpful to use the same instances during the new round. Once you select the
required option the version will be moved to the UNDER TEST state (this may take
some time) and displayed in pink.
If your business space version has already been in the UNDER TEST state before
Aware IM will display a dialog asking you whether to perform integrity checking of the
version and whether to use the existing data for testing or clear the testing data. If you
are going through many testing cycles during development and put version in and out of
testing many times then constantly answering the questions of this dialog can be
tedious. To avoid the dialog and to get Aware IM to use the default values (no integrity

Aware IM 8.8 User Guide
Copyright © 2002-2023 Awaresoft Pty Ltd Page 126 of 479
checking and using the existing data for testing) you can use the “Put under Test
(quickly)” command available in the main menu or in the popup menu instead of the “Put
under Test” command. You can also use the Ctrl+Q shortcut to make it even quicker.
Embedded Testing
“Embedded testing” allows you to test your business space version not in the standalone
browser but in the browser embedded in the Configuration Tool. A separate tab in the
Working Area of the screen is opened and the default browser is started inside this
window. An advantage of using embedded testing is that you can not only test the
version in the UNDER TEST state but you can also test the version you are currently
editing (which is in the NEW state) provided that this version is based on some version in
the UNDER TEST state.
The rationale for embedded testing is to free the developer from constantly putting the
version under test and then editing it again in order to make further changes. With
embedded testing you can perform changes to the version and test it in the embedded
browser straight away. You can have the embedded browser open and once you make
your changes you can continue working with the browser, which should automatically
pick up the changes you made
Not all changes, however, are allowed if you want to continue working with the
embedded browser. If you make changes that affect the database structure (such as,
add, delete or rename an attribute of a business object) or if you make changes to a
document template you won’t be able to continue with the embedded browser – it will
automatically close and you will have to put your version under test and start a new
testing session.
To start embedded testing select the version you want to test (it can be in the UNDER
TEST state or in the NEW state) and then select “Version/Start Embedded Browser” in
the menu or right click and select “Start Embedded Browser” from a popup menu. This
will open the embedded browser for the selected version in a separate window. If you
already have this browser open you can just switch to this window and the browser will
automatically pick up your changes.
Publishing Business Space Version
Once a business space version has been tested and you are happy with how your
business rules and processes work, the business space version can be published.
Publishing business space version makes it available to the end users. The version is
moved into the CURRENT state – see also Lifecycle of a Business Space Version.

Aware IM 8.8 User Guide
Copyright © 2002-2023 Awaresoft Pty Ltd Page 127 of 479
If you already have a version in the CURRENT state it is recommended that you publish
the new version when no one is using the old version in the Operation Mode. Aware IM
will not proceed with publishing of the new version until there is no user activity with the
old version, so if the old version is being heavily used Aware IM will keep waiting until
there is a break in the old version usage. Once the new version has been published any
current users of the old version will not be able to use the old version any more – they
will be advised to log out and log into the new version.
It is also highly recommended that you back up your existing operation data
before publishing the version – see Backing up Operation Data.
Publishing business space version is a complicated process – in particular, if any new
business objects have been defined in the version being published or definitions of the
existing business objects have been changed, Aware IM will build and/or alter the
corresponding database tables.
CAUTION: If there is already operational data created by the end users while working
with the previous versions, publishing a new version may destroy this data if changes to
the business object in the new version are such that it is not possible to preserve the
existing data – for example, if a definition of a business object has been deleted, all
instances of the business object are lost. Similarly if some attribute of a business object
has been deleted, the existing data corresponding to this attribute is lost. Aware IM does
everything it can to preserve the existing data whenever possible (for example, when an
attribute type is changed) and the Configuration Tool warns the user immediately if the
configurator’s changes lead to any loss of data – see also Adding/Editing Business
Objects.
To publish a business space version:
1. Make sure that the version you want to publish is loaded – see Loading Business
Space Version.
2. Click on the business space version you want to publish in the Elements Tree to
select it (the version must be in either the UNDER TEST, OBSOLETE or NEW state)
3. Select the “Version/Publish” command in the menu or right click to bring up the pop-
up menu and select “Publish”. The version will be moved to the CURRENT state (this
may take some time) and displayed in black.
NOTE: before a version is moved to the CURRENT state the integrity checking of the
version is performed. If the version has any integrity problems it will not be published,
instead the list of integrity problems will be displayed – see Checking Version Integrity.

Aware IM 8.8 User Guide
Copyright © 2002-2023 Awaresoft Pty Ltd Page 128 of 479
Working with a Business Space Version in a Multi-Developer
Mode
Several developers can work on the same business space version concurrently (this is
called a “multi-developer mode”). In this mode developers lock (check-out) those
elements of the version that they are working on (business objects, queries, processes
etc). To make changes to the version they have to check-in their changes. To start the
multi-developer mode a system administrator has to “put a business space version in
development”. To do this:
1. Click on the business space version you want to put in development in the Elements
Tree to select it
2. Select the “Version/Put In Development” command from the menu or right click to
bring up the pop-up menu and select “Put In Development”.
For more details about the multi-developer mode please watch the Milti-Developer Mode
video tutorial.
Deleting Business Space Version
To delete a business space version:
1. Click on the business space version you want to publish in the Elements Tree to
select it
2. Select the “Edit/Delete” command from the menu or right click to bring up the pop-up
menu and select “Delete”.
NOTE: a business space version in the CURRENT state cannot be deleted.
CAUTION: Deleting a business space version is not an undoable operation; so once
deleted the business space version cannot be recovered. Make sure that you only delete
those versions that you no longer need.
Viewing Properties and History of the Business Space
Version
To view business space version properties and history of changes:
1. Double click on the business space version you want to view in the Elements Tree to
edit it.
2. The Working Area of the screen will show the details of the selected version:
a. The name of the business space to which the version belongs.

Aware IM 8.8 User Guide
Copyright © 2002-2023 Awaresoft Pty Ltd Page 129 of 479
b. The state of the version.
c. Version number.
d. The description of the version.
The “History of Changes” section will show what has been done to the version before. In
particular:
a. When a version has been created.
b. When a version has been updated on the server.
c. When a version state has been changed.
d. When a version has been imported.
The Properties window will show other properties of the business space version:
Application Title - this title will be used in the <title> HTML tag of the application.
Timeout Page – a page that the system will display when a browser session times
out. If not specified the default one will be used
Incoming Emails – whether the version handles incoming emails (see Incoming
Emails for details)
Login options – how the system will handle login. See Login Options for more
details.
Login page – this defines properties of the default login page. You can specify the
title of the page, the image displayed at the top of the page (if any), the text that
prompts user to sign up (if any) and the link to handle “forgotten password”
functionality (if any).
Default date/time formats – this property defines default formats for attributes of
the Date and Timestamp types. New attributes of these types will be created with
the specified formats by default. Here it is also possible to change existing
attributes of the Date and Timestamp types to the specified formats.
Page Margins – this property defines default page margins to be applied to pages
with dynamic content.
Database scripts - in most cases there is no need for you to worry about
database scripts, as Aware IM will take care of the database issues for you. In
some cases, however, you may want to add custom database scripts to your
application. Usually you may want to do this if you implement a query using a
stored procedure (see the EXEC_SP action) or if you implement your own
indexing of the database tables automatically created by Aware IM. Saving a
database script with the business space version saves you the trouble of applying
these scripts manually every time you install your Aware IM application on your
customer’s site, as Aware IM will automatically run the scripts when the business
space version is published for the first time.
Password protection – whether a configurator needs to specify a password to
look at the configuration of the version
Push notification – whether the version supported push notifications for mobile
devices – see the “Mobile Applications” document for more details.

Aware IM 8.8 User Guide
Copyright © 2002-2023 Awaresoft Pty Ltd Page 130 of 479
Exporting Business Space Version
A business space version may be saved to a file to be later imported back (see
Importing Business Space Version) or uploaded to the Aware IM server in the Operation
Mode.
To export a business space version:
1. Click on the business space version you want to view in the Elements Tree to select
it.
2. Select the “Version/Export” command in the menu or right click to bring up the pop-
up menu and select ”Export”. The Configuration Tool will display the File Selection
Dialog.
3. Select the file you want the version to be written to or type in the name of the file and
click OK.
Importing Business Space Version
To import a business space version from a file:
1. Click on the business space version you want to import into in the Elements Tree to
select it (the version must be in the NEW state)
2. Select the “Version/Import” command in the menu or right click to bring up the pop-
up menu and select “Import”. The Configuration Tool will display the File Selection
Dialog.
3. Select the file you want the version to be read from or type in the name of the file and
click OK. The current contents of the business space version will be replaced with
the contents of the version read from the file.
Refreshing Business Space Version
If several configurators are working with the business space versions at the same time it
may be necessary to upload the current contents of the business space and/or business
space version from the Aware IM server to see the new changes to the versions
performed by other configurators.
To refresh a business space version:
1. Click on the business space version you want to refresh in the Elements Tree to
select it
2. Select the “Version/Refresh” command in the menu or right click to bring up the pop-
up menu and select “Refresh”. The current contents of the business space version
will be uploaded from the server and displayed in the Elements Tree.

Aware IM 8.8 User Guide
Copyright © 2002-2023 Awaresoft Pty Ltd Page 131 of 479
Working with Configuration Elements
Business space version elements are added/edited using property editors specific to the
element being added/edited. However, certain editing principles described in the
following sections are common to all configuration elements.
Adding Elements
Editing/Viewing Elements
Deleting Elements
Copying Elements
Pasting Elements
Adding Elements
To add a new configuration element of any type:
1. Click on a node in the Elements Tree that represents the collection of elements of the
required type – for example, to add a new process click on Processes; to add a new
business object click on Business Objects (the version that you are adding to must
be in the NEW state– see Lifecycle of a Business Space Version)
2. Select the “File/New” command from the menu or right click to bring up the pop-up
menu and select “New”. The editor appropriate to the given type of element will be
displayed in the Working Area of the screen.
3. Specify properties specific to the element being added in the editor and/or in the
properties of the element and its sub-elements. When finished press the Save button
in the toolbar (or select File/Save from the menu) to save the new element in the
business space version or close the editor tab to discard the changes.
Editing/Viewing Elements
To edit an existing configuration element of any type just double click on the element in
the tree. Alternatively do the following:
1. Click on the element’s node in the Elements Tree to select it.
2. Select the “File/Open” command in the menu or right click to bring up the pop-up
menu and select “Open”.
The editor appropriate to the given type of element will be displayed in the Working Area
of the screen. Modify properties specific to the element being edited inside the editor
and/or in the properties windows for the main element and its sub-elements. When
finished press the Save button in the toolbar (or select the “File/Save command from the

Aware IM 8.8 User Guide
Copyright © 2002-2023 Awaresoft Pty Ltd Page 132 of 479
menu) to save the changes to the element in the business space version. Close the
editor tab to discard the changes.
Deleting Elements
To delete an element of any type:
1. Click on the element’s node in the Elements Tree to select it (the element must
belong to a business space version in the NEW state – see Lifecycle of a Business
Space Version)
2. Select the “Edit/Delete” command in the menu or right click to bring up the pop-up
menu and select “Delete”.
NOTE: Certain elements of a business space version may not be deleted. This
applies to those elements that are added to the business space version automatically
and are required for the business space version to operate correctly. Examples of such
elements are the RegularUser business object and the SystemUsers business
objects group. An attempt to delete such an element will result in an error message.
Copying Elements
Elements of a business space version may be copied within a single business space
version, between business space versions of the same business space or between
business versions of different business spaces. Only compatible elements may be
copied – for example it is possible to copy an attribute into a business object or
notification but it is not possible to copy an attribute into a process or rule.
To copy an element to the clipboard:
1. Click on the element’s node in the Elements Tree to select it
2. Select “Edit/Copy” in the menu or right click to bring up the pop-up menu and select
“Copy”.
Pasting Elements
Elements of a business space version may be copied within a single business space
version, between business space versions of the same business space or between
business versions of different business spaces. Only compatible elements may be
copied – for example it is possible to copy an attribute into the business object or
notification but it is not possible to copy an attribute into a process or rule.
To paste an element which has been previously copied into the clipboard:

Aware IM 8.8 User Guide
Copyright © 2002-2023 Awaresoft Pty Ltd Page 133 of 479
1. Click on a node in the Elements Tree that represents the element into which the
element in the clipboard is being pasted – for example, to paste a process click on
Processes; to paste an attribute into a business object select the business object.
The business space version where an element is being pasted must be in the NEW
state – see Lifecycle of a Business Space Version
2. Select the “Edit/Paste” command in the menu or right click to bring up the pop-up
menu and select “Paste”. Pasted element will appear in the Elements Tree.
NOTE: If an element with the same name already exists in the business space
version Aware IM will change the name of the pasted element so that it is unique (you
can later change this name to whatever you want) – for example, if a business object
with the name Account is pasted into the version which already has a business object
named Account, the name of the pasted object will become Account1 (or Account2
if Account1 exists as well).
NOTE: If a rule is being pasted the Configuration Tool may inspect the contents of the
rule and offer to rename certain identifiers used in a rule. For example, if the following
rule is pasted into the rule collection attached to the Account business object:
Account1.Balance = 100
The Configuration Tool will detect the usage of the identifier Account1 possibly
inconsistent with the name of the owner of the rule collection (Account) and offer to
rename Account1 to Account (see also Adding/Editing Rules).
Finding where Element is Used
To find out where a particular element is used in a business space version:
1. Select the node of the element in the tree
2. Select “Edit/Find References” in the menu or right click and select “Find References”
Aware IM will will list all elements of the business space version that refer to the
selected element in the Search Window. For example, if you have a menu item defined
in a visual perspective that starts a process and you selected this process to check
where it is used, the menu item that starts the process will be listed in the window.
Note that this command will not search everything – it will not search scripts and HTML,
for example. To search absolutely everything in a business space version, use the
Search Version command.

Aware IM 8.8 User Guide
Copyright © 2002-2023 Awaresoft Pty Ltd Page 134 of 479
Adding/Editing Business Objects
The following section describes how to work with the editor of business objects when
adding a new business object or editing the existing one. Business objects are described
in the Business Objects as Carriers of Data section.
Specifying General Properties
Defining Forms
Defining Presentations
Defining Intelligent Business Objects
Specifying General Properties
The editor of business objects has several tabs – Attributes, Forms, Update Rules,
Delete Rules and Presentations. The Property window contains the following properties:
Name
Specify the name of the business object uniquely identifying it within the business space
version. The following restrictions apply:
a) The name must start with a character (not digit) or underscore symbol. All other
symbols in the name must be either characters (including underscore symbol) or
digits. No spaces or special symbols are allowed.
b) The name must be unique among the names of other business objects, business
object groups and notifications.
c) The name must not start with one of the instance prefixes – This, That, Added,
Removed, LoggedIn, Changed or Failed.
d) The name must not be one of the reserved names – File, Day, Question,
EmailSender, ReceivedEmail, IncomingEmail.
e) The name must not coincide with the name of the basic attribute types – Number,
Date, Duration, Timestamp, Shortcut, Document or Picture.
Description
Specify any text that describes what the business object is for, the business concept that
it represents, how it is used etc. Any description if defined is included into the generated
documentation for the business space version – see Generating Documentation. To
provide the description for the business object, click on the Menu button in the top right
corner of the screen and select “Business object description”.
Category
You can group objects by category. Objects belonging to a particular category are
grouped in the Elements Tree. Enter a new category or select from the list of existing
ones. You can apply the same category to several objects at once if you paste them
under this category in the Elements Tree.

Aware IM 8.8 User Guide
Copyright © 2002-2023 Awaresoft Pty Ltd Page 135 of 479
Persistence
You must specify where instances of the business objects will be stored:
Usually business objects are permanently stored in the database that is
automatically managed by Aware IM. This is the default persistence option
(Database: Aware IM automatic).
Sometimes it may be necessary to use existing database tables not initially
created by Aware IM (see Working with Data Stored in Existing Database Tables
or LDAP for details). To select this option choose Database:existing external (for
data stored in external databases) or LDAP (for data stored in a LDAP server)
from the persistence drop-down.
If you choose Not persisted option instances of the business object will be
temporarily created in memory (see Data Storage). In this case the instances are
destroyed when they are no longer needed by those rules that create and use
them.
o Here you can also check the “Store Session Values” checkbox to indicate
that this object will be special – the instance of this object will be
automatically created when a user logs in. There is only one instance of
this object per user and the instance is always present in Context. Which
means that you can use the object to store attribute values that are
persisted in memory only for the duration of the user session.
Select Custom option if you develop a Java plug-in that implements custom
persistence storage (see Programmers Reference Guide for more details).
Specify the fully quialified name of the plug-in by clicking on the Settings button.
Communication
Intelligent business objects are those that Aware IM can communicate with through the
defined channels (see Intelligent Business Objects). By default business object is not
intelligent. To make business object intelligent define the Communication channels of
the object by clicking on the “Communication” property and defining its communication
channels – see Defining Intelligent Objects for details.
Attributes tab
Any business object must have at least one attribute defined. Attributes are defined and
displayed on the Attributes tab of the business object editor.
a) To add a new attribute, select the “Attributes” tab and click on the icon. See
Adding/Editing Attributes for details on how to add attributes of the specific types.
b) To edit an existing attribute select the attribute you want to edit and change its
properties in the Selection Properties window. See Adding/Editing Attributes for
details on how to edit attributes of the specific types.
c) To delete an existing attribute click on the attribute you want to delete in the
Attributes table to select it and then press the icon at the top of the attributes
table.

Aware IM 8.8 User Guide
Copyright © 2002-2023 Awaresoft Pty Ltd Page 136 of 479
Forms tab
Forms define how attributes of a business object are presented to the user when an
instance of the object is added or edited in the Operation Mode. There must be at least
one form defined for the business object. The Configuration Tool generates the default
form automatically when a new business object is created – you can add more forms
and/or edit the default form. See Defining Forms for details.
Update and Deletion Rules tabs
Selecting these tabs displays rules attached to the business object – see Adding/Editing
Rules. The Update rules are invoked when an instance of the object is being created or
modified. The Deletion rules are invoked when an instance of the object is deleted.
NOTE: When you save changes to the business object by pressing the Save button
the Configuration Tool may ask you whether you want the same changes to apply to
other members of the business object groups. This question will be asked if the business
object being edited is a member of one or more business object groups and you have
changed any of the attributes that are common to the members of the business object
group. If you agree to apply changes to other members of the group, exactly the same
changes that you have done to the attributes of the business object will be performed
with the attributes of other group members.
The same principle applies when you edit rules of the business object that is a member
of some business object groups – the changes will be applied to the rules attached to
other members of the groups provided that the rules in all members are equivalent and
that you agree to perform changes to other members. See also Adding/Editing Rules.
Presentations tab
Presentations may be defined to provide a custom layout of the attributes of a business
object when its instance(s) are displayed by a query or by a process. See Defining
Presentations for details.
Defining Forms
Business object forms are used in the Operation Mode under the following
circumstances:
1. When a new instance of a business object is being created as a result of:
a. The user creating an instance of the business object explicitly using the New
Object command (see Data Entry and Editing).
b. A process executing the ENTER NEW action.
c. The user registering herself with the Aware IM system.
2. When an existing instance of a business object is being edited or viewed as a result
of:

Aware IM 8.8 User Guide
Copyright © 2002-2023 Awaresoft Pty Ltd Page 137 of 479
a. The user editing or viewing an instance of the business object explicitly.
b. A process or rule executing the EDIT or VIEW actions.
c. Execution of the Change Login Details command (see Setting Menu Item
Properties).
In each of the above scenarios a form containing input fields representing different
attributes of a business object is presented to the user. The user enters the values of the
business object’s attributes and submits the form. After receiving the values of the
object’s attributes Aware IM creates a new instance of the business object or modifies
the existing one (if there are any rules attached to the object they are evaluated as well).
Using the Configuration Tool it is possible to define one or several forms of the business
object and specify which attributes will be displayed in each form as well as under which
circumstances the form will be used.
See also:
Adding/Editing Forms
Form Properties
Adding/Editing Forms
There must be at least one form defined for a business object. When a new business
object is being defined the Configuration Tool creates the default form automatically.
You can add new forms and/or edit the default one.
Add
To add a new form switch to the “Forms” tab and click on the icon at the top of the
Forms table. There are two types of forms you can create – Aware IM-managed forms
and custom HTML forms. Aware IM-managed forms are fully managed by Aware IM –
you can customize the appearance of such forms using the Form Designer. Raw HTML
forms are created outside of Aware IM using any 3
rd
party HTML editors, They are then
imported into Aware IM and input fields of these forms are mapped to the attributes of
the business object where the form belongs. For more details about custom HTML forms
watch the Custom HTML Forms video tutorial. All further discussion in this and
subsequent sections will apply to AwareIM-managed forms.
Enter the name of the new form and the form entry will be displayed in the table. You
can now define properties of the new form in the Selection Properties window – see
Form Properties.
Edit/View
To edit/view an existing form select the form in the Forms table and the properties of the
selected form will be displayed in the Selection Properties window. You can edit these
properties – see Form Properties. You can also expand the form entry and edit the form
sections of the form – see Adding/Editing Form Sections.

Aware IM 8.8 User Guide
Copyright © 2002-2023 Awaresoft Pty Ltd Page 138 of 479
Delete
To delete an existing form select the form in the Forms table and press the icon at the
top of the Forms table.
Preview
To see how the form will look like in the browser use “form preview”. The preview of the
selected form in the embedded browser is displayed underneath the forms table. All
changes to the form will be automatically shown in the embedded preview. To turn the
embedded preview on/off click on the icon at the top of the forms table. To set
preview settings (such as the “theme” and font size) click on the icon. To see how the
preview will look in the standalone browser click on the icon.
Apply Style
Clicking the icon allows the user to apply a particular presentation style to the form.
For more details about styles see Form and Grid Styles section.
Form Properties
To change properties of a form of a business object:
1. Begin adding or editing the business object – see Adding Element and Editing
Element.
2. Click on the “Forms” tab at the bottom of the screen. Select the form you want to edit.
The properties of the form will be displayed in the Selection Properties window. The
following properties can be defined:
Name
Specify the name of the form. Can be any text including space symbols. The name must
be unique among other form names of the business object.
Description
Specify the description of the form. Can be any text including space symbols.
Width
Specify the width of the form in pixels. If you leave this value blank (default) the form will
occupy all the available width of the screen
Height
Specify the height of the form in pixels. If you leave this value blank (default) the form
will automatically calculate its height based on its contents. In this case no vertical scroll
bar will be displayed. If you specify a particular height of the form the vertical scroll bar
may be displayed if the content of the form does not fit the specified height.

Aware IM 8.8 User Guide
Copyright © 2002-2023 Awaresoft Pty Ltd Page 139 of 479
Stretch to bottom of screen
When this checkbox is ticked height of the form will be calculated automatically to make
sure that the bottom of the form aligns with the bottom of the screen.
Panel Header
Select this property to define how the header of the form will look like. The following
options are available:

Aware IM 8.8 User Guide
Copyright © 2002-2023 Awaresoft Pty Ltd Page 140 of 479
Default Header / Custom Header/No Header
Aware IM can either display a default header, a custom header or no header at all. The
default header includes a special area at the top of the form that may optionally contain
the caption of the form, the icon and “tools” (form operations specifically designated for
this area) – see the form below.
The orange area at the top represents the default form header that contains default icon,
default caption and default “tool operations”
To define a custom header, specify HTML of the header. It will be displayed at the top of
the form. The form below shows custom header with the following simple HTML:
<span style='font-family:Arial;font-size:18px;color:orange;padding:15px'>REGULAR
USER</span>
For forms with “wizard” navigation you can also select the “Show Wizard Steps” radio
button. If this radio button is selected the panel header will only display the “stepper”
widget and nothing else – see the Navigation Type property of the form.

Aware IM 8.8 User Guide
Copyright © 2002-2023 Awaresoft Pty Ltd Page 141 of 479
Default Caption
Select this radio button if you want Aware IM to use the default caption – for forms with
one form section it is the caption of the form section; for forms with multiple form section
it is the name of the business object.
Use This Caption
Select this radio button to display the specified text as caption.
No Caption
Select this radio button if you do not want the caption of the form to be displayed.
Put caption in the application toolbar at the top
You want want to save real estate by displaying caption of the form inside the
application toolbar (one must be defined in the Top Bar area of the corresponding visual
perspective). In this case you can turn the header of the form off completely but still
display its caption. This option is especially useful if a form is displayed on mobile
phones where screen real estate is limited.
Icon, No Icon, Default Icon
Select these radio options to display or hide the icon inside the header area of the form.
Show Caption/Show Icon
Tick these checkboxes to show caption or icon in the default header.

Aware IM 8.8 User Guide
Copyright © 2002-2023 Awaresoft Pty Ltd Page 142 of 479
NOTE:. Even if the caption/icon are not shown in the default header you may define
them, so that they are displayed as the caption or icon of the tab where the form is
displayed (if a form is displayed on a tab of a visual perspective)
Mobile Style Header
If this option is selected a special CSS style is assigned to the default header – the
caption is displayed with large bold letters in the middle of the header. This style is
useful when the form is displayed on mobile phones.
Panel can be collapsed/expanded
If this option is selected the “tools” displayed in the header include an icon to collapse or
expand the form
Panel is initially expanded
This option can only be used if “Panel can be collapsed expanded” option is selected. If
this option is selected the form is initially displayed in a collapsed state.
Use automatic
The following options specify the times at which Aware IM will use the form in the
Operation Mode (see Defining Forms).
a. Tick the “Object creation” checkbox if you want the form to be used when new
instances of the business object are created.
b. Tick the “Object editing” checkbox if you want the form to be used when existing
instances of the business object are edited/viewed
c. Tick the “User registration” checkbox if you want the form to be used when the end
users register themselves with the system (if your system supports this feature).
d. Click on the “Access levels” property if you want the form to be used only when the
user creating or editing an instance of the business object has a particular access
level(s). By default a form is used by users of all access levels. You can exclude
certain access levels by selecting them in the left list box and using the Right arrow
button to move the selected access levels into the right list box.
NOTE: Among all forms defined for the business object there must be at least one
that is used when creating new instances of the object and at least one that is used
when editing instances of the business object (could be the same form). Also there must
not be an access level that does not have creation or editing form defined for it,
otherwise Aware IM will not know which form to use when the user with this access level
creates or edits an instance of the business object.
NOTE: The default form created by Aware IM automatically for a new business object
is intended for both creation and editing and covers all access levels (you can change
this if you like).

Aware IM 8.8 User Guide
Copyright © 2002-2023 Awaresoft Pty Ltd Page 143 of 479
NOTE: Some forms may be created only to be used by the ENTER NEW or EDIT
actions in a particular process. You can uncheck the “automatic usage” check box for
such forms, as Aware IM will not be using these forms automatically.
Navigation Type
The navigation type of form sections in a form determines how form sections are
navigated in the Operation Mode (this is relevant, of course, if a form has more than one
form section). There are two types of the navigation style – tabs and wizard.
With “tabs” the order of form sections in the form is undefined – the user can navigate
between form sections at random choosing any form section after the current one (this is
like working with the tabbed dialog). The names of the existing form sections are
displayed above the form and the name of the currently displayed form section is
highlighted. The user can click on the name of the form section to navigate directly to
this section – see also the picture shown in Form Sections.
With wizard-like navigation the order of form sections is strictly defined. The user can
only navigate to the next or previous form section in the defined order. The currently
displayed form section contains the Next and Previous buttons that brings the user to
the next or previous form section. For wizard forms it is also possible to display a special
widget that shows where in the sequence the user currently is – see below:

Aware IM 8.8 User Guide
Copyright © 2002-2023 Awaresoft Pty Ltd Page 144 of 479
To display the widget select the Show Wizard Steps radio button in the Panel Header of
the form - see panel header for object forms
NOTE: there is an alternative way of implementing wizard forms in Aware IM – see
Multi-step Processes.

Aware IM 8.8 User Guide
Copyright © 2002-2023 Awaresoft Pty Ltd Page 145 of 479
Tab reordering
Tick this checkbox if the user is allowed to change the order of the tabs(form sections)
defined by the configurator. The user will then be able to save the new order of tabs.
Mobile tabs
Tick this checkbox if the tabs of the form are to be displayed using a “mobile” style – the
tabs are then bigger than usual and the icon is displayed above the text
Tabbar position
Select whether the tabbar will be displayed at the top, bottom, left side or right side of
the form
Centre Align Form
Tick this checkbox if you want the form to be displayed in the centre of the screen
(otherwise the form will be left-aligned).
Autosave
Normally when the user closes or abandons a form without saving his changes the
system automatically asks whether the user wants to save the changes. Tick this box to
suppress this prompt – in this case the form will be automatically saved without asking
the user. There will also be a Cancel button that allows user to close the form without
saving the changes.
Display Mask
Tick this checkbox if you want to see the “Executing…” message every time the changes
of the user are committed to the server – either when the changes are “auto-saved” (see
the paragraph above) or when dynamic rule execution happens (see Advanced Rule
Options).
Button Aligment
By default Save and Close buttons are displayed center-aligned. You can select different
alignment here.
Panel Operations
This option allows you to define operations that you can do with the instance of a
business object while the form is being edited or viewed in the Operation Mode. See
Adding/Editing Panel Operations for details.

Aware IM 8.8 User Guide
Copyright © 2002-2023 Awaresoft Pty Ltd Page 146 of 479
Form Auto Refresh Settings
Select this option from the menu if you want to specify how the form refreshes itself
when some operation in the system has been done. By default Aware IM will
automatically refresh the form when the form is saved or when a process is started from
the form itself. Sometimes it may be necessary to refresh the form when other
processes are executed or other forms are saved. You can specify such processes and
objects in the Auto Refresh dialog.
Form panel resizing
Select this option from the menu to allow/disallow the user to resize the form at run time
and/or specify size constraints. The Resizing Options dialog will be displayed. Tick the
“Resize Width” checkbox to allow user to change width of the form; tick the “Resize
Height” checkbox to allow user to change the height. If you tick the “Allow User to
Save/Restore Current Size” checkbox user will be able to save the current settings of
width and height, so that the form is displayed again with the saved width and height
when the user logs in again (note, that the settings are maintained by Aware IM per
user). The user will also be able to restore the form to the configured settings.
CSS Style and CSS class
Here you can also assign CSS style and/or class to the form. You may want to do this if
you want to customise the appearance of the form. See the “How to use CSS” section in
the How To Guide for more details.
Responsiveness
Select this option from the menu to make the form “responsive” to changes of the screen
size. For more details please watch the video tutorial.
Tour
The “Tour” feature allows configurators to add explanation to the elements of the form,
so that the user can understand the screen better. The explanation of the element is
displayed to the user at the bottom of the screen with the marker pointing to the element
of the screen being displayed. The user can jump between the elements of the screen
and Aware IM automatically scrolls to the element being explained and displays the
marker for the element. For more details about tours see the “How to use the Screen
Tour feature” in the How To Guide.
Scripts
For users who are familiar with Javascript this dialog allows specifying additional
parameters when forms are initialized and displayed. See Programmers Reference
Guide for more details.
Adding/Editing Form Sections
To add or edit a form section:

Aware IM 8.8 User Guide
Copyright © 2002-2023 Awaresoft Pty Ltd Page 147 of 479
1. Begin adding or editing a business object – see Adding Element and Editing
Element.
2. Select the Forms tab and then select the form that owns the form section.
3. To add a form section click on the icon at the top of the forms table. In the dialog
that appears select the “New section” radio button and specify the name of the new
section. Click OK on the dialog and the new entry for the form section will be
displayed underneath the form. Select this entry and edit the form section properties
in the Selection Propertes window.
4. To edit a form section expand the form that owns the section and select the form
section to edit. Its properties will be displayed in the Selection Properties window.
The following properties can be specified:
Name
Specify the name of the form section. The name may contain any characters including
spaces. The name must be unique among the names of other form sections in the form.
Description
Specify the description of the form section.
Caption
Specify the caption of the form section. By default it is the name of the business object
that owns the form.
Icon
Specify the icon that will be displayed inside the tab representing the section in the
Operation Mode (only for sections with random navigation order).
ID
Specify a unique ID of the section. This ID can be used in the Tour feature.
Not present when
You can specify that under a certain condition the form section should not be displayed.
If the specified condition holds true the tab showing the section will not be displayed or
(for wizard-style navigation) the section will be skipped during navigation. When
specifying conditions you can only use attributes of the object whose form the section
belongs to.
TIP: To use attributes of the referred instances in conditions define shortcut attributes
that refer to the required attributes (see Reference Attributes and Setting Properties of
Shortcut Attributes) and use shortcuts instead of reference attributes.

Aware IM 8.8 User Guide
Copyright © 2002-2023 Awaresoft Pty Ltd Page 148 of 479
Tour
This is the similar to the Tour property of a form, except that the tour element is meant to
explain what the form section is for.
Badge
Click on this property to display a “badge” for the tab representing the form section. A
badge is a little icon on top of the tab usually showing a number (for example, a number
of unread messages for the current user). This number is constantly refreshed – it can
be changed by the rules and the number will then be displayed, When specifying badge
properties you have to define an expression for the number (or text) displayed on the
badge. You can then specify the background color of the badge as well as the refresh
rate and tooltip.
Scripts
For users who are familiar with Javascript this dialog allows specifying additional
parameters when form sections are initialized and displayed. See Programmers
Reference Guide for more details.
Defining Form Section Layout
To define the layout of a form section, double click on the form section entry on the
Forms tab of a business object (or click on the icon at the top of the table. The Form
Section designer for the selection section is then displayed in a separate window.
The layout of the section represents a table consisting of rows and columns. Each cell in
this table represents an attribute (sometimes several attributes) or it can contain an
HTML or be empty. By default the table has a single column so the attributes are laid out
in a top-down fashion.
The Form Section Designer has two modes – the Preview mode and the Table Layout
mode. In the Preview mode the changes you make to the layout of the form section are
immediately displayed in the embedded browser, so that you can immediately see how
the form will look like in the browser. A form is represented by a table consisting of cells.
Each cell contains specific information – either an attribute or several attributes or HTML
or a Google Map. In the Table Layout mode the cells are represented by an entry in the
table (see the picture below). In the Preview mode cells are harder to see but you can
still notice small dividing lines between them. You switch between modes by clicking on
the and icons at the top of the editor.
The pictures below show a particular form section in the Table Layout mode and
Preview mode respectively:

Aware IM 8.8 User Guide
Copyright © 2002-2023 Awaresoft Pty Ltd Page 149 of 479

Aware IM 8.8 User Guide
Copyright © 2002-2023 Awaresoft Pty Ltd Page 150 of 479
Most of the time you will be working in the Preview mode so that you can immediately
see how the form looks in the browser. But sometimes selecting the cells you want to
work with is difficult in the Preview mode, so in this case you can switch to the Table
Layout mode, perform the changes and switch back to the preview mode. Note also that
you can always see how the form section looks like in the standalone browser by
clicking on the icon.
Specifying which attributes will be shown on the form
You can control which attributes will be shown on the form section by including them into
the layout. If the form section is the only section of the form Aware IM automatically

Aware IM 8.8 User Guide
Copyright © 2002-2023 Awaresoft Pty Ltd Page 151 of 479
includes all attributes of the business object into the form section and lays them out in
the top-down fashion. If you do not want the form section to show all attributes you can
delete the corresponding cell by clicking on the cell and pressing the icon at the top of
the editor.
If the form section is not the only one in the form you have to specify which attributes will
be shown. To do this:
1. Click on the icon at the top editor
2. In the dialog that appears tick the attributes you want to insert and click OK
Alternatively you can drag and drop a particular attribute by selecting it from a panel of
available attributes on the right of the form.
The rows representing the attributes will appear in the form section. You can change the
order of the attributes by clicking on the Up and Down icons in the toolbar of the editor.
Cell Properties
By default each attribute on the auto-generated form section will be displayed according
to the presentation information specified for the attribute (see Adding/Editing Attributes).
It is possible, however, to override the default presentation of the attribute when it is
displayed on a particular form section. To do this, click on the cell that contains the
attribute and the cell properties will be displayed in the Selection Properties window. You
can then specify the presentation properties of the attribute as described in the
Adding/Editing Attributes section. If it’s an HTML or a Google Map cell, the Selection
Properties window will display the properties specific to the type of the cell.
Multiple columns
Each attribute in the resulting form is displayed according to the presentation information
defined for the attribute – see Adding/Editing Attributes. The default top-down fashion of
laying out attributes can be easily changed so that the form section contains more than
one column. To do this:
1. Click on the icon in the toolbar of the editor.
2. A blank column will be added to the form.
3. Click on the cell representing the attribute you want to display in a different column.
Drag and drop the cell to the new column
The pictures above show an example of a multi-column form section:
Column properties
To select a column rather than an individual cell depress the SHIFT key and click on any
cell that belongs to the column you want to select. Alternatively toggle “column selection”
mode by clicking on the icon and then click on the column you want to select. The
column is highlighted and its properties are displayed in the Selection Properties
window. You can specify the following properties:

Aware IM 8.8 User Guide
Copyright © 2002-2023 Awaresoft Pty Ltd Page 152 of 479
Column Width
Specify percentage of the overall width occupied by the column. If you have two
columns like on the picture above the default value for the width of each column is 50%,
which means that each column will occupy equal share of the total width of the form
section. You can make a particular column wider or narrower.
Label Alignment
You can specify how labels of the controlled are aligned relative to the control itself.
Labels can be placed on the left of the column (left aligned or right-aligned) – see the
Item Type form above. Or labels can be placed above controls as in the Contact Note
form above.
Label Width
This setting is relevant only when labels are placed to the left of the control and defines
the width of the label column. Width can be specified as an absolute value or
percentage. Percentage is especially useful for forms displayed on mobile phones.
Width of input control
Usually width of the input control is specified in the Presentation properties of the
corresponding attribute. However, you can override the value in the control by selecting
“Width in percentage” or “Entire width less” radio buttons. The former is used when label
width is specified in percent. In this case the control occupies the rest. If you select the
“Entire width of the column less” radio button all controls of the column will occupy the
entire width of the column less specified value in pixels or percent.
Note that columns can be swapped by dragging a selected column on the column that
you want to swap the selected column with.

Aware IM 8.8 User Guide
Copyright © 2002-2023 Awaresoft Pty Ltd Page 153 of 479
Merging and splitting cells
It is possible to define cells that span across several columns. Only an attribute cell can
span rows like this and it can only be merged with empty cells. You can see In the
Appointment form above that the Subject, Description and StaffResponsible attributes
span across two columns. To achieve this we need to merge the corresponding cells.
First we need to select the leftmost non-empty cell that should be merged. Note that the
Merge icon becomes enabled. We click on the icon and the two cells are merged.
Note that a separate column is formed and we can now define properties of this column.
To split a cell that has been merged before select the cell and click on the icon.
Displaying reference tables
If you put a reference attribute represented by a table into a layout cell the reference
table will be displayed as part of the form section – see how the Items attribute is
displayed in the Item Type form below:

Aware IM 8.8 User Guide
Copyright © 2002-2023 Awaresoft Pty Ltd Page 154 of 479
Here the “Items” attribute is put into its own cell. It is also possible to display references
in tabs at the bottom of the form section as shown on the Contact Note form below – see
In Reply To, Replies and Alert tabs.

Aware IM 8.8 User Guide
Copyright © 2002-2023 Awaresoft Pty Ltd Page 155 of 479
Here “ReplyTo”, “Replies” and “Alerts” attributes (all are references) are each displayed
in their own tab. To achieve this effect one has to place reference attributes into the
same cell. This should be done in the Table Layout mode. To do this select the cell with
one reference attribute and drag it to the cell with another reference attribute.
Alternatively, select the cell with the reference attribute and click on the “Attribute name”
property in the Selection Property window. Then tick other reference attributes in the
dialog that comes up to indicate that these reference attributes should be added to the
cell.
Putting cells inside group boxes
You can enclose a group of logically related cells into a named group box:

Aware IM 8.8 User Guide
Copyright © 2002-2023 Awaresoft Pty Ltd Page 156 of 479
To insert a group box:
1. Click on the icon (or alternatively drag and drop the Start Separator element from
the palette of available elements on the right of the form).
2. In the dialog that appears specify the title of the group box, for example “Library
Details” and click OK.
3. Using the Up and Down arrows move the separator row to the required place.
If you click on the separator row you can define the following properties of the group
box:
Title
The title of the group box

Aware IM 8.8 User Guide
Copyright © 2002-2023 Awaresoft Pty Ltd Page 157 of 479
Width and Height
Width and height of the group box in pixels. If left blank Aware IM will calculate these
automatically
Collapsible
If you tick this box Aware IM will display a control that will allow users to collapse the
group box to save space – see the little triangle next to the Library Details text above.
CSS style
Specify the CSS style of the group box.
CSS class
CSS class of the group-box. This class has to be defined in the custom CSS file of the
application.

Aware IM 8.8 User Guide
Copyright © 2002-2023 Awaresoft Pty Ltd Page 158 of 479
Collapsed initially
If you tick this box the group box will be collapsed initially when the form is displayed. On
the picture above the “Outgoing email” and “Incoming emal” group boxes are initially
collapsed
NOTE: At the moment you can only define group boxes located beneath each other,
you cannot define group boxes located next to each other.
Not present when
It is possible to include a group box conditionally. Here you can specify a condtion when
the group box will not be included. If left blank the group box will always be included.
Adding HTML
Using Form Section Designer you can also add arbitrary HTML to your forms. For
example, you may want to add some static images or add a descriptive and text. To add
HTML to your form:
1. Click on the drop down next to the icon of the Form Designer toolbar icon (or
alternatively drag and drop the HTML element from the palette of available elements
on the right of the form).
2. Select “HTML row from the drop down menu.
3. The HTML dialog will come up. Add HTML to be placed into the form cell
NOTE: If you refer to images in your HTML place the image files into some
subdirectory of the web application directory of the web server. For the default Windows
installation of Aware IM this directory could be
c:\AwareIM\Tomcat\webapps\AwareIM\myimages.
Here is an example of a form that uses an HTML cell:

Aware IM 8.8 User Guide
Copyright © 2002-2023 Awaresoft Pty Ltd Page 159 of 479
Note the explanation with the greay background at the top of the form has the following
HTML:
<div style="border: solid 1px gray;PADDING: 8px; BACKGROUND-COLOR: lavender;
TEXT-ALIGN: justify; LINE-HEIGHT:1.2em">
Click on an item in the list to see more details on a separate form.
Use buttons in the caption of the table to filter the list.
</div>
You can refer to the attributes of the object whose form is being displayed. For example,
<b><<Customer.EmailAddress>></b>
NOTE: You can embed video in your form if you refer to the document attribute
representing a video in your HTML cell – see How To document for more details.
Adding buttons/links to forms
To add buttons or hyperlinks to your form:
1. Click on the drop down menu next to the icon of the Form Designer toolbar icon
(or alternatively drag and drop the Buttons element from the palette of available
elements on the right of the form).
2. Select “Button/Link Row” from the drop down menu.
3. The dialog will be displayed where you can define operations that your buttons will
perform – one button per operation. See Adding/Editing Panel Operations. The
Operation dialog has a checkbox that specifies whether to generate a hyperlink
rather than a button.

Aware IM 8.8 User Guide
Copyright © 2002-2023 Awaresoft Pty Ltd Page 160 of 479
You can also add buttons when you specify HTML for the HTML row (see the previous
section). To do this clicki on the “Add Button” button displayed on the dialog where you
specify the HTML code. You can then specify the operation that will be performed when
the user clicks on the button. The button itself will be styled according to the currently
used theme. Note that Aware IM will generate a special HTML element representing the
button. You do not need to understand what this element contains, but the button will be
properly generated at run time. If you want change the parameters of the button you
have to re-create it – you cannot edit it.
Alternatively, you can provide an HTML hyperlink using one of the Javascript operations,
for example:
<a href=”#” onclick=”AwareApp.startProcessFromForm (‘My process’,
‘main’, this, true)>My Process </a>
Forms that use Google Maps
Using the Form Section Designer you can also get your forms to display Google Maps.
You would do this only if you want to show some address on a Google Map. The object
that owns the form must have an attribute that stores the complete address. Note that
you cannot display a Google map when you are creating an object. To add a Google
Map to your form:
4. Click on the drop down menu next to the icon of the Form Designer toolbar icon
(or alternatively drag and drop the Google Map element from the palette of available
elements on the right of the form).
5. Select “Google Map Row” from the drop down menu.
6. The dialog with Google Map properties will come up. Select the attribute that stores
the complete address that can be shown on a Google Map or an attribute that stores
a reference to a special MGeoLocation object that stores location latitude and
longitude (See Mobile Applications document for details about MGeoLocation)
7. Select other map properties and click OK.
NOTE: For details how to use the “Polygons” feature of the Google Map please
refer to the How To Guide.
NOTE: Some usages of Google Maps require you to create an account and
specify a special key. If you need to provide a key for your Google Maps account you
can do this in the predefined GoogleMapsKey attribute of the SystemSettings object.
Forms that use Gauge Chart
Using the Form Section Designer you can also get your forms to display a gauge chart.
This is useful when you want to show the value of a particular attribute as a gauge. To
do this you need to define a cell of the Gauge type. The steps for defining such a cell are

Aware IM 8.8 User Guide
Copyright © 2002-2023 Awaresoft Pty Ltd Page 161 of 479
similar to defining the Google Map cell. You also need to select an attribute whose value
will be displayed on the gauge chart and provide min. and max. values for the gauge
(either as fixed numbers of refer to values of some attributes).
Show preview of the form on phones and tablets
To see how the form looks on the phone click on the icon. To see how the form looks
on the table click on the icon.
Adding Custom HTML forms
Native Aware IM forms that you can create using embedded Form Designer are very
powerful and normally you don’t need to use any other forms. However, if you want to
use very specific styling which is difficult to achieve using native Aware IM forms, you
can create such forms outside of Aware IM using any HTML editor of your choice and
then import them into Aware IM mapping input fields in the HTML form to the attributes
of the business object that owns this form. Please watch the video tutorial, which
explains this process in great detail.
Adding/Editing Panel Operations
This section describes how you can define “context” operations that can be invoked from
the form. Note that this section is also relevant for queries – when the results of a query
are displayed users can perform operations relevant to the query. The buttons
representing operations are usually displayed in the toolbar at the top or bottom of the
form/query, but they can also be displayed in the “tools area” in the default panel header
(see “Panel Header”) or they can be temporarily added to the system menu. In the latter
case buttons for the form or query are added to the system menu when the form/query is
displayed and removed from the menu when the form/query is closed.
An instance of the object shown by the form is automatically added to the Context of the
operation. For a query the Context is formed when the user selects one or more records
shown by the query (provided that the operation is marked as Applicable to Multiple –
see below)
To add/edit panel operations to a form or query:
1. Begin adding or editing the business object or query – see Adding Element and
Editing Element. If editing a business object select the required form on the Forms
tab.
2. The properties of the selected form will be displayed in the Selection Properties
window, while the properties of the query will be displayed in the Element Properties
window.
3. Click on the “Panel Operations” property to bring up the “Panel Operations” dialog.

Aware IM 8.8 User Guide
Copyright © 2002-2023 Awaresoft Pty Ltd Page 162 of 479
Add/Edit
These buttons let you add/edit an operation to the form or query (see below for more
details)
Edit Toolbar
If an operation is located on one of the toolbars of the form or query this button allows
you to further edit the contents of the corresponding toolbar:
Add Separator
This button lets you define a “separator” to the toolbar – a vertical dividing line
separating groups of operations.
Add Text
You can add not only operations to your toolbar but also arbitrary text. You can use
HTML tags here and you can refer to the values of object attributes using tags.
Add Input Control
You can add text input elements or combo-boxes to your toolbar. When the user enters
data into the text box or makes a selection in the combo-box Aware IM will write the
entered value into the attribute of the object that you specify (it can either be the
SystemSettings object or the object representing the logged in user, or the “session”
object (a non-persistent object that has been marked as storing “session” values). Once
the value has been written into the attribute Aware IM will run the operation that you
specify. The operation can use the stored value and do something with it – run a query
or start a process, for example.
Add Folder
You can add a “folder” to your toolbar. A folder consists of operations that you can add
to this folder. At runtime Aware IM will show a “menu button” representing this folder. If
the user clicks on such a button a list of operations of the folder will pop down.
Right Aligner
When you add “right aligner” all operations, text, folders and separators added to the
toolbar after the right aligner will be aligned to the right of the menu. You can have only
one right aligner in the menu.
Delete/Change Order
Use these buttons to delete selected operations or change their order
Adding/Editing an operation
You can set the following properties when adding/editing an operation
Name
Specify the name of the operation. This name will be displayed in the menu. Any
identifier is allowed including HTML tags.

Aware IM 8.8 User Guide
Copyright © 2002-2023 Awaresoft Pty Ltd Page 163 of 479
Description
Specify the description of the operation. This description will be shown as a tooltip when
the user hovers the mouse over the text/icon representing the operation.
Location
Specify where the button of the operation will be located – as explained before you can
choose one of the toolbars around the form/query, “tools” area in the default header,
“bottom of the form” area (where Save and Close buttons are by default), or you can
choose to temporarily add operation button to one of the system menus.
Applicability condition
This option allows you to specify the condition(s) that must be satisfied in order for the
operation to appear on the form of the business object. For example, if you specified the
condition Loan.Status=’CURRENT’, the operation will appear only for loans with
current statuses. If condition is left blank the operation will always appear on the form.
The format of the condition must satisfy the format of the Rule Language condition (see
Rule Language).
Text Color
Allows specifying the color of the text displayed on the button (provided that the Display
Operation Name” is ticked)
Background Color
Allows specifying the background color of the button representing the operation
CSS class
You can assign custom CSS class to the button representing the operation. This can be
useful if you assign button colors in the CSS rather than explicitly. In this case changing
colors in the CSS will change them for all operationbuttons where the CSS class is used.
Display Image on the Button
If this box is ticked an icon will be displayed along with the name of the operation (if
“Display Operation Name” is ticked) to represent the operation. You can choose an icon
by specifying an icon file or referring to a CSS class. See “How to use icons fonts to
display an icon for a button” section in the How To Guide.
Display Operation Name on the Button
If this box is ticked the name of the operation will be displayed along with the icon (if
“Display Icon” is on) to represent the operation.
Operation Type and Parameters
The most common types of operations are described below:
Start Process
This operation type starts a process. When the Start Process operation type is selected
the Configuration Tool displays the combo box containing all processes defined in the

Aware IM 8.8 User Guide
Copyright © 2002-2023 Awaresoft Pty Ltd Page 164 of 479
business space version. Select the process you want started when the operation is
invoked. If the process has input then you may need to provide the value for this input.
Two scenarios are possible:
- If the object defined as the process input is the same as the owner of the form, you
don’t have to do anything, as the system will automatically provide the input when the
process starts.
- If the object defined as the process input is different from the owner of the form, you
must specify the input in the “Value” column of the “Process Input Table”. Click on
the appropriate cell in the “Value” column and enter the process input as the
reference attribute of the form owner. For example, let us assume that we are
creating a Forum management system where we have a Topic and a Forum
objects defined. The Topic object has a single reference attribute named MyForum
that refers to the Forum where the Topic belongs. Let us assume also that we are
editing the form of the Topic object and we want to define the operation that starts
the PostNewTopic process, which allows posting a new topic from the form of the
existing one. Let us assume that the PostNewTopic process requires Forum as its
input. When defining the operation we would define the operation type that starts the
PostNewTopic process and we would specify “Topic.MyForum” in the “Value”
column of the Process Input Table (note that Topic is the owner of the form we are
editing) as the process input.
Run Query
An operation of this type runs the specified query. When the “Run Query” operation type
is selected the Configuration Tool displays the combo box containing all queries defined
in the business space version. Select the query you want run when the operation is
invoked.
Create Document
An operation of this type generates a document from the specified document template or
report and displays the resulting document (see Document Generation). When the
Create Document operation type is selected the Configuration Tool displays the combo
box containing all document templates defined in the business space version. Select the
document template you want to generate the document from when the operation is
invoked. Alternatively you can let users choose the document at run-time from the list of
pre-configured document templates or user-defined documents.
Delete Object
An operation of this type deletes the instance of the business object being edited (a
warning is displayed before the object is deleted). This operation type has no
parameters.
Edit
An operation of this type allows editing a different form of the business object from the
one shown currently (if one is defined). Select the name of the form to be edited and the
form section to be displayed when editing starts.

Aware IM 8.8 User Guide
Copyright © 2002-2023 Awaresoft Pty Ltd Page 165 of 479
View
An operation of this type either shows the specified presentation of the business object
that owns the form (see Business Object Presentation) or shows a different form of the
business object. In the latter case the form being shown has all input controls disabled
so that a user cannot change attribute values. Select the presentation or form you want
to show when the operation is invoked.
Create Object
An operation of this type allows creating an instance of an object. Select the name of the
object to create and the form of the object to be used during creation.
Execute Javascript
An operation of this type executes the specified Javascript. This can be used by
advanced developers who are familiar with Javascript. One of the common uses of this
operation is integration of custom Cordova plugins for native mobile applications. This is
described in detail in the Programmer’s Reference Guide. When a script is executed the
following Javascript objects are available:
parser (controller of the corresponding widget
context – an array of objects containing objectName and objectId of the record
that the operation is for
Defining Presentations
Presentations are explained in the Business Object Presentation section.
Presentation layout is created in the Report/Presentations Designer – see Working with
Report/Presentation Designer.

Aware IM 8.8 User Guide
Copyright © 2002-2023 Awaresoft Pty Ltd Page 166 of 479
Add
1. To create a new presentation click on the Presentations tab in the business object
editor and click on the icon located at the top of the Presentations table. New
Presentation dialog will be displayed
2. Enter the name of the new presentation (the name must be unique among the
presentations of the business object) and optionally specify the description of the
presentation
3. Click OK and the entry for the new presentation will appear in the table of
presentations.
4. Click the Save button on the application toolbar (or select “File/Save” from the menu
to save changes to the business object.
5. Double click on the presentation entry to open the Report/Presentation Designer
where you can design the layout of the presentation - see Working with
Report/Presentation Designer.
Edit/View
Double click on the presentation entry in the table of presentations of the business
object. The Report/Presentation Designer will be displayed where you can change the
layout of the presentation - see Working with Report/Presentation Designer
Delete
1. Select the presentation you want to delete in the table of presentations of the
business object
2. Click on the icon located at the top of the table.
Export
Exporting a presentation may be useful if you want to reuse the layout of the
presentation in another presentation or report. To export the presentation layout open
the Report/Presentation Designer and export it from there see Working with
Report/Presentation Designer:
Import
Importing a presentation may be useful if you want to reuse the layout of the
presentation in another presentation or report. To import the presentation layout open
the Report/Presentation designer and use its import functionality - see Working with
Report/Presentation Designer
Defining Intelligent Business Objects
Intelligent business objects are described in the Intelligent Business Objects section.
In order to define an intelligent business object the configurator has to click on the
“Communication” property of a business object and define communication channels of
the object in the “Communication Channels” dialog that comes up.

Aware IM 8.8 User Guide
Copyright © 2002-2023 Awaresoft Pty Ltd Page 167 of 479
Aware IM supports the following types of communication channels out-of-the-box:
- E-mail channel – communication with an intelligent business object is via e-mail
- SOAP channel – communication with an intelligent business object is via Web
services mechanism which supports SOAP (Simple Object Access Protocol)
- URL channel – communication with an intelligent business object is via HTTP URL
(Unified Resource Locator)
- REST channel – communication with an intelligent business object is via a popular
REST protocol
In addition to the above pre-defined types it is possible to plug-in custom channel types
– see “Aware IM Programmer’s Reference”.
A particular object may expose several communication channels at once – when a
notification or service request are sent to the object it is possible to indicate which type
of channel the request or notification should be sent through (see SEND and REQUEST
SERVICE actions). Therefore the configurator has to indicate which channels the
intelligent business object exposes.
Every channel has certain properties specific to its type. To set the properties of a
channel tick the channel type in the “Communication Channels” dialog and define its
properties.
Setting Properties of the SOAP Channel
To set properties of the SOAP channel you need to provide settings to discover web
services offered through this channel. Discovering services is getting Aware IM to
automatically figure out which services are exposed by an intelligent object by sending a
special discovery request through the communication channel provided that the channel
supports the service discovery protocol.
To discover services press the Discover button next to the Services table. Discovered
services (if any) will be displayed in the Services table.
NOTE: Business objects declared as service input and reply are automatically added
to the business space version once you have saved the changes for the intelligent
business object you are defining or editing.
NOTE: If the service provider changes definitions of services the services may be re-
discovered in the same way as described above. The Configuration Tool will
automatically replace all services and business objects declared as service input and
replies with the new definitions.
Setting Properties of the E-mail Channel
The following properties should be specified:

Aware IM 8.8 User Guide
Copyright © 2002-2023 Awaresoft Pty Ltd Page 168 of 479
Outgoing mail host
The DNS name of your e-mail server that will send outgoing e-mails to the intelligent
business object.
“From” address
The e-mail address that your e-mails to the business object will have as the “from”
address. Note that the “from address” must be recognized by your email server, so it
must be registered on this server.
Login details
If your outgoing e-mail server requires that you log in select the “Login Required” option,
press the Details button and enter login credentials. Otherwise select the “No Login
Required” option.
NOTE: When an e-mail channel is defined for a business object the Configuration
Tool automatically adds the EmailAddress attribute to the business object. This
attribute can be used to set the e-mail address of a particular instance of the business
object in the Operation Mode. When the e-mail channel is removed from the business
object the EmailAddress attribute is automatically removed as well.
NOTE: If you select the “Use values from SystemSettings object” radio button the
system administrator will have to provide the values for the outgoing mail host, from
address and login details when the system is initialised – see Setting Initial Values of the
System.
Setting Properties of the URL Channel
Communication with an intelligent business object via the URL channel assumes that
Aware IM sends service requests to the specified URL. It is expected that when this
URL is called the browser will go to the web site of the service provider. When this web
site finishes its task it will return to the Aware IM-based application, A typical scenario
for the URL channel service is a payment system (such as PayPal) that collects credit
card details and returns to the web site of the merchant.
If services exposed by the business object require input (see Defining Services) the
attribute values of the business object instances representing service input will be
passed to the specified URL as request parameters. For example, if a service requires
the business object URLParameters that has Parameter1, Parameter2 and
Parameter3 attributes defined and the provider’s URL is www.provider.com the service
requests will be sent to the following address:
www.provider.com?Parameter1=value1&Parameter2=value2&Parameter3=value3
where value1, value2 and value3 are values of the Parameter1, Parameter2 and
Parameter3 attributes respectively.

Aware IM 8.8 User Guide
Copyright © 2002-2023 Awaresoft Pty Ltd Page 169 of 479
The following properties should be specified:
URL of the service provider
This is the URL where the requests will be sent. This property is mandatory.
Request parameter identifying the URL to return to if success
The service provider represented by the intelligent business object may expect that the
request contain the URL that the provider should return to in case of the successful
fulfilment of the service. Aware IM will take care of supplying the appropriate URL
provided that it knows the name of the request parameter that should contain this URL.
For example, if you specify “successURL” as a request parameter the service request
sent to the service provider will be:
www.provider.com?Parameter1=value1&Parameter2=value2&Parameter3=value3&succ
essURL=returnURL
where “returnURL” is the value that Aware IM will supply so that when the reply from the
provider is delivered via this URL Aware IM will know that the service has been
completed successfully. If this parameter is not specified Aware IM will assume that any
service request sent to the provider has been successfully completed without waiting for
any reply from the provider.
Request parameter identifying the URL to return to if a failure occurs
This is the same as the previous parameter except that the return URL indicates failure
rather than success. If this parameter is not specified Aware IM will either assume that
any service request sent to the provider has been successfully completed without
waiting for any reply from the provider (if success request parameter is also not
specified) or it will wait for the service reply from the provider and if the provider’s
service fails the service request will eventually time out (this scenario should be avoided
unless the provider’s service can never fail).
Setting Properties of the REST Channel
Communication through the REST channel involves sending an HTTP call to a particular
URL. Unlike the URL channel no user interface is involved in the call – the service
returns straight away and the execution of the rules continues. Services exposed by an
intelligent object through the REST channel can be discovered if the provider supplies a
file in an Open API format describing exposed services. They can also be added
manually as described below.
To discover services automatically click on the “Discover” button above the services
table. Then provide the URL of the file in the Open API format (with .json or .yaml
extension). Aware IM will automatically discover services exposed by the provider and
will display them. You can then select the services you will be using in your application.

Aware IM 8.8 User Guide
Copyright © 2002-2023 Awaresoft Pty Ltd Page 170 of 479
To add a service manually, click on the “Add” button above the services table. To edit
the service details click on the “Edit” button and to delete a service click on the Delete
button. You can also copy a service that you have already defined to use it as a basis for
another service. To do this select a service, click on the “Copy” button, then click on the
“Paste” button to create a duplicate of the service and then click on the “Edit” button to
modify it.
The following properties can be specified when adding/editing a service.
Name
Specify the name of the service. The name must be unique among other services of the
business object. The name must start with a character or underscore symbol and
contain characters, digits or underscore symbols. Spaces are not allowed in the name.
Description
The optional description of the service: what it does, how it is used etc.
Base URL
The URL to call when the service is requested. This URL should not include any URL
parameters. You can use tag expressions to refer to attributes of the objects in Context
here.
HTTP Verb
HTTP verb to use when the service is called – usually GET or POST
Parameters
Parameters of the service can be specified in different ways depending on what the
provider requires.
URL-encoded string
If a provider requires that parameters must be specified in the URL of the call, specify
them here. You can use tag expressions to refer to attributes of the objects in Context.

Aware IM 8.8 User Guide
Copyright © 2002-2023 Awaresoft Pty Ltd Page 171 of 479
Request Body
Use these values if parameters need to be encoded into the bodiy of the request. You
can define the details if you click on the Details dialog. A body of the request may
consist of several “parts” if parameters include binary content. Usually, though, the
request contains just one part. To specify the content of the part you either need to
provide the text string containing all parameters or refer to an attribute of some object in
Context or refer to the entire object.
If you specify a parameter string you next to specify “text/plain” as ContentType and
then provide the parameter string by selecting the “Use this String” radio button. The
string may refer to attributes of the objects in Context in tag expressions.
The value of the parameter may also be stored in an attribute of some object in Context
in which case you should select the “Take From Context” radio button and then select
the name of the object and attribute that holds the parameter. You also need to specify
the correct Content Type of the value stored in the attribute.
If you select the “Take From Context” radio button, specify the object, but do not specify
the attribute Aware IM will automatically convert the entire instance of the object either
into JSON or XML representation (depending on whether the Content Type is specified
as “application/json” or “text/xml”. You can then customize how the conversion will occur
by clicking on the “Name Mapping” and “Attribute Encoding” links and also specifying
how undefined values will be encoded.
If your service provider requires that you provide binary content as parameter along with
some primitive values (for example, text or number) you should specify each parameter
in its own part. For example, if you need to provide a binary value and a number you
should define two parts – the first part (binary) should have “application/octet-stream” as
Content Type and it should refer to the attribute of some object in Context of the Picture
or Document type. The second part should have “text/plain” as Content Type and then
refer to some attribute of the Number or Plain Text type.
NOTE: If you are referring to the entire object in Context and this object has an
attribute of the Picture or Document type, the picture or document will be automatically
encoded without you having to define an additional part.
NOTE: If a provider requires that the value of some attribute is an array of primitive
values and you are referring to the entire object in Context, please make sure that the
value of the “array” attribute is a string that concatenates all array members delimited by
the “#” symbol, for example Object.Attribute = “Value1#Value2#Value3”

Aware IM 8.8 User Guide
Copyright © 2002-2023 Awaresoft Pty Ltd Page 172 of 479
NOTE: If a provider requires that the value of some attribute is a dictionary and you
are referring to the entire object in Context, please make sure that the value of the
“dictionary” attribute is a string containing pairs of key/values separated by the “|”
symbol. Each key/value pair must be separated by the “~” symbol, for example
Object.Attribute = “Key1~Value1|Key2~Value2|Key3~Value3”
To add a part, click on the “Add” button above the list of the defined parts.
HTTP Headers
Click on the “HTTP Headers” link to define one or more optional HTTP headers that will
be added to the HTTP request if the provider requires them. For each header provide its
name and value. Note that the value may refer to the current Context of the process
when the service is called. To do this, enclose the value in “tags” (double angular
brackets), for example: <<MyObject.MyAttribute>>
Reply
If the REST call returns a reply that you need to handle in your application you should
select the “Reply returned of type” radio button and then click on the “Details” button.
Then you should provide the details of the reply in a similar way that you define the body
of the request (see “Parameters” above). However, when you define a reply you should
always specify just one part:
1. For text replies all you can do is write the string with the reply into some
attribute of an existing object in Context of the process where the service is
called. You need to specify the name of the object and the attribute where the
reply will be stored. You will then need to add further rules to analyse the
provided reply and perform further actions
2. For JSON and XML replies you can get Aware IM to automatically parse the
contents of the reply into attributes of some object. Aware IM will create a new
instance of such object and populate its attributes from the values of the
corresponding fields in the reply. By default Aware IM will try to find an
attribute with exactly the same name as in the JSON/XML attribute definition,
but you can also provide your own mapping between names in JSON/XML
and the corresponding Aware IM attribute names.
OAuth Support
Many vendors providing REST services support OAuth protocol that mandates that the
caller of the service authenticates himself using a special protocol before a call to the
service is made. If this is the case you need to tick the “OAuth Supported” checkbox
underneath the services table and then click on the “Details” button to provide further
details:
Provider
Aware IM already includes settings that you need to specify for many popular REST
service vendors, so if your vendor is already in the list you can prepopulate most
settings with vendor-specific values by selecting the vendor from the drop down list.

Aware IM 8.8 User Guide
Copyright © 2002-2023 Awaresoft Pty Ltd Page 173 of 479
You can also add your own providers to the list if you know their values. To do this
modify the file
AwareIM/ConfigTool/eclipse/plugins/com.awaresoft.awareim.configto
ol_xxx.jar. This file is a zip file, so you can open it with an archiver utility. Then add
the appropriate property file to the config/oauth directory within this archive, You can
take a look at any existing property file in this folder for an example.
OAuth version
Different vendors support different versions of the OAuth protocol. The settings are quite
different depending on which version is supported. Choose either version 1.0 or 2.0
API Key, API Secret
The caller of the service must be registered with the vendor to make OAuth-based REST
calls. The vendor issues API Key and API secret to the caller. These need to be
specified here. If these values are stored in the attributes of some object (for example,
SystemSettings) you can refer to this attribute by using tag expressions, for example
<<SystemSettings.APISecret>>
Also when registering your application with a provider, make sure that you include the
following URI as “redirect URI”:
http://YourServerName:8080/AwareIM/req.awurl
Scope
Some vendors require that you specify the “scope” of the service request. This is
vendor-specifc – refer to the documentation of the vendor.
Signature type
This value is only for OAuth 1.0. Refer to the documentation of the vendor as to which
signature type you need to provide
Request for request token
The values in this section are only for OAuth 1.0 that requires that the system first sends
a request for a “request token” to the specified URL. The URL then returns a reply that
contains “request token” and “request secret”. You need to specify the URL to send the
request to, the HTTP verb of the request, the type of return and regular expressions to
extract token and secret from the reply.
Request for access token
A call to the service using OAuth can only be done if the vendor issues an “access
token”, which is then used for authentication. To get an access token the system first
needs to call an “authorization URL” that provides a special code in the reply. This code
is then used in the call to the “access token URL” that returns the access token, which
then needs to be stored in an attribute of some object (so that it can be used in the
service call). You need to specify the “authorization URL”, the name of the parameter of
the reply that contains authorization code, the “access token URL”, the regular
expression that extracts access token from the reply and finally an expression where to
store the access token. When specifying the expression use a tag expression, for
example, <<LoggedInRegularUser.AccessToken>>. The object referred to in the

Aware IM 8.8 User Guide
Copyright © 2002-2023 Awaresoft Pty Ltd Page 174 of 479
expression must be in the Context of the service call. For more details please refer to
the OAuth and vendor’s documentation.
Token expiry
Access tokens may expire. If a call to the service is made with an expired token an error
message will be returned. The error message is specific to the vendor. If you help
Aware IM identify the “token expiry” error message it will automatically invoke the
access token workflow again and request a new token. Otherwise, it will just display the
error message. To support automatic token expiry click on the “Token Expiry” button,
tick the “Check for expired tokens” checkbox and provide the string that distinguishes
token expiry error messages from other error messages.
Adding/Editing Attributes
The following section describes how to add or edit attributes of business objects or
notifications. Attributes are added or edited on the Attributes tab of a business object or
notification editor. To add an attribute click on the icon at the top of the attributes
table.
See also:
Common Properties
Setting Properties of Plain Text Attributes
Setting Properties of Number Attributes
Setting Properties of Date, Timestamp and Duration Attributes
Setting Properties of Reference Attributes
Setting Properties of Picture Attributes
Setting Properties of Document Attributes
Setting Properties of Shortcut Attributes
Setting Properties of Yes/No Attributes
Setting Options of Binary Data Attributes
Common Properties
Each attribute of a business object or notification must be assigned a particular type
(Plain Text, Number, Date etc). Some properties of the attributes are specific to the
assigned type whereas others are common to attributes of all types. Both common and
specific properties are specified in the Selection Properties window. When you select the
specific attribute its properties are displayed in the window. Which properties are
displayed depend on the attribute type. The following section describes properties
common to all attribute types.
Name
Specify the name of the attribute. The following restrictions apply:

Aware IM 8.8 User Guide
Copyright © 2002-2023 Awaresoft Pty Ltd Page 175 of 479
a. The name must start with a character (not digit) or underscore symbol. All other
symbols in the name must be either characters (including underscore symbol) or
digits. No spaces or special symbols are allowed.
b. The name must be unique among the names of other attributes of the business
object or notification owning the attribute.
c. The name cannot be one of the names reserved for system use – ID,
BASVERSION, BASTIMESTAMP, AccessLevel, LoginName, Password,
PersonalSettings.
d. The name cannot be the name of an identifier used in SQL – FROM, SELECT, IN,
INTEGER, TEXT, BLOB, CHAR, VARCHAR etc.
Description
Specify any text that describes what the attribute is for, the business concept that it
represents, how it is used etc. Any description if defined is included into the generated
documentation for the business space version – see Generating Documentation.
Type
Any attribute must be assigned a type. Choose the required type from the “Type” combo
box. The list of types contains basic types (Plain Text, Number, Date, Timestamp,
Yes/No, Binary Data, Document, Picture, Shortcut) and reference types. Reference
types include the names of all business objects and business object groups defined in
the business space version – see Reference Attributes.
Required
If you tick the “Required” checkbox Aware IM will check that there is a non-blank value
for the attribute when an instance of the business object that owns the attribute is
created or edited. The check will be made irrespective of whether the instance of the
business object is created or edited by the user or created/changed by rules. If the value
of the attribute is blank the appropriate message will be issued to the user and any
currently executing processes or rules will be aborted. If the user is creating or editing an
instance of the business object the input control displaying the attribute value will have a
red star next to it to indicate that the value of this attribute must be provided.
Calculated
If you tick the “Calculated” checkbox the user will not be able to change the value of the
attribute – the attribute will be read-only. The value of the attribute can only be changed
by rules. This option is not applicable for attributes owned by notifications.
Initial Value
Most attribute types allow specifying the initial value of the attribute. The initial value is
the value that the attribute is initialised with when an instance of the business object or
notification is created. This applies both to business objects created by the user or to
objects and notifications created by rules. If the user is creating an object she will see
the initial value when the form of the object is displayed. She can then change this value
if necessary. Be also aware of the following:

Aware IM 8.8 User Guide
Copyright © 2002-2023 Awaresoft Pty Ltd Page 176 of 479
- The type and format of the initial value must correspond to the type of the attribute.
- Rule expressions are not allowed as initial values (with the exception of expressions
that set the current date or time, such as CURRENT_DATE). If the attribute value
should be initialised to some expression a rule has to be attached to the business
object or notification that owns the attribute – see Adding/Editing Rules.
Choices
Most attribute types allow specifying a number of choices for the attribute value. Choices
indicate that the attribute may take values from the specified list. Clicking on the
“Choices“ property brings up the “Choices” dialog where you can add or delete choices.
If the “Other values allowed” checkbox is unchecked on the “Choices” dialog the
attribute may not take any other values. In this case if the attribute value is different from
the one specified in choices an error message will be issued to the user and the
currently executing process or rules will be aborted. When no other values are allowed
an attribute with choices is displayed on the form of the business object as a combo box
or as radio buttons.
If the “Other values allowed” checkbox is ticked the attribute may take values different
from the ones specified in choices. In this case Aware IM makes no checks of the
attribute value and the list of choices exists purely for convenience of the user. When a
form is generated the field is displayed as an editable combo box where you can choose
values from the list and also specify other values.
It is also possible to specify different values for when a choice is displayed to the user
and what is stored in the database. For example, if you have a choice of gender you can
display “Male” and “Female” as choices but store “M” and “F” in the database. By default
display value is equal to the database value.
It is also possible to use tag expressions as choice values – for example
<<SystemSettings.TaxRate>>
- To add a new choice entry click on the cell in the Choices list box and type in the text
of the choice entry. Press Enter to finish. To add another entry click on the next cell
and type in the text.
- To modify the existing choice entry click on the cell containing the entry in the
Choices list box, modify the text of the entry and press Enter.
- To delete the existing choice entry click on the cell containing the entry in the
Choices list box and press the Delete button located next to the Choices list box.
- To change the order of entries click on the cell containing the entry and press the Up
or Down buttons next to the Choices list box.
- If you want to add more blank entries to the list box press the “More Rows” button.
NOTE: The type and format of a choice value must correspond to the type of the
attribute.

Aware IM 8.8 User Guide
Copyright © 2002-2023 Awaresoft Pty Ltd Page 177 of 479
NOTE: Choices are not applicable for attributes owned by notifications.
Dynamic Choices
A list of choices can be calculated at run-time rather than explicitly specified by the
configurator. When the user clicks on the drop down with choices Aware IM can
dynamically run a query to load the choices into the drop down. This will happen if you
select the “Choices are determined at runtime” radio button on the “Choices” dialog. You
can specify any existing query that will be run to extract choices or define any custom
query. As a convenience option you can also select “Use Existing Attribute Values” radio
button. In this case Aware IM will automatically construct a query that will extract all
existing values of the current attribute and present them as choices.
Allow end users to add and edit choices
Ticking this checkbox will allow end users to manage the list of choices in the Operation
Mode. This may be necessary if the configurator does not know up front the list of
choices relevant for a particular end user and he does not want end users to work with
the Configuration Tool directly. If this option is on end users of particular access levels
(usually the system’s administrator) will see an icon on the object form next to the
attribute control. If they click on this icon a window will pop-up where they will be able to
add, edit or modify a list of choices.
The initial list of choices seen by end users will be pre-populated with the choices
entered by the configurator in the Configuration Tool (if any).
NOTE: The option for end users to edit list of choices will not be available if the
configurator provides her own list and specifies that “other values are not allowed”.
Include empty text
Tick this checkbox to include an empty line into the list of choices to allow the user to
select a “blank” value
Indexed
This is the database specific option for the advanced users. If the “Indexed” checkbox is
ticked Aware IM will instruct the underlying database system to create an index for this
attribute. Creating a database index for the attribute can significantly speed up database
queries involving the attribute. If your database is likely to have lots of records of
instances of the business object that owns the attribute and end users are likely to
frequently perform queries on this attribute you may consider making the attribute
“indexed”. The “Indexed” option is not available for attributes owned by notifications.
Validate as
This dropdown allows you to select an Input mask that will control how validation of Plain
Text attributes is performed. For example, an e-mail address attribute needs to conform
to the input standards of the e-mail address, some attributes need to be alphanumeric
only etc. When you specify the input mask for the attribute Aware IM will perform
validation of the values entered by the user to make sure that they conform to the

Aware IM 8.8 User Guide
Copyright © 2002-2023 Awaresoft Pty Ltd Page 178 of 479
requirements of the input mask. There are several pre-defined input masks provided by
Aware IM and you can also define your own input masks. The input masks provided by
Aware IM are:
E-mail
URL
Alpha (characters only)
Alphanumeric (characters and digits only)
US Phone (999) 999-9999
If you need to provide an input mask different from the above you can enter a regular
expression defining the mask. The regular expression must start and end with the “/”
symbol, for example:
/\\(?\\d{3}\\)? ?\\d{3}[-.]\\d{4}/
The information about format of regular expressions can be found in the Appendix E or
on the following site: http://www.regular-expressions.info/reference.html
If you want to re-use the same regular expression in different attributes you can assign a
textual name to your expression. To do this you have to modify the UIConfig.props file
located in the BIN directory of your Aware IM installation to add an entry representing
your expression. The entry must start with the “TextInputMask” prefix and contain the
name of the expression followed by the “#” symbol and then followed by the expression
itself, for example:
TextInputMask1=US Phone#/\\(?\\d{3}\\)? ?\\d{3}[-.]\\d{4}/
Once you define your expression in the UIConfig.props file you need to re-start the
Configuration Tool and the name of your expression will appear in the “Input Mask”
combo box.
SQL type
Aware IM automatically manages database for all attributes that the configurator defines,
so SQL types of each attribute are usually determined by default. It is, however, possible
to specifically indicate an SQL type to be used for a particular attribute, for example:
DECIMAL (2,10)
Attribute Presentation
All attribute types allow specifying presentation options for the attribute. These options
control how the input control displaying attribute value will be generated on a business
object form.

Aware IM 8.8 User Guide
Copyright © 2002-2023 Awaresoft Pty Ltd Page 179 of 479
NOTE: Presentation options specified for an attribute will be used by default when the
attribute is shown on forms unless a particular form section overrides the default options
– see Adding/Editing Form Sections.
The following presentation options are common to many attributes:
Label
Specify the label that will be displayed next to the input control. By default it will be the
name of the attribute (if this name has capital letters they will be replaced with spaces –
for example, if the attribute name is AccountBalance the default label displayed will
be “Account Balance”). You can also indicate an empty label.
Do not add ‘:’ after label
By default Aware IM will automatically add the colon symbol after the label, Ticking this
checkbox prevents this and the label is displayed as is.
Icon
Specify the icon that will be displayed together with the label next to the input control. By
default no icon is displayed. Click on the “Edit” button to specify the icon.
Description
If you want to provide the description of the attribute click on the “Description” property
to bring up the “Attribute Description” dialog. You can type it in in the “Description” text
area. If the “Show description underneath the control” radio button is selected the
description will appear underneath the input control representing the attribute on the
form (see the “Max Borrow Number” attribute on the picture below):

Aware IM 8.8 User Guide
Copyright © 2002-2023 Awaresoft Pty Ltd Page 180 of 479
If the “Show description as popup window” radio button is selected, a little icon will be
displayed next to the control representing the attribute. When a user moves the cursor
over this icon a small popup window containing the text of the description will be shown
– see the “Max Renewals” attribute.
If the “Show description to the right of input control” radio button is selected the
description will be shown to the right of the control – see the “Max Loan Period” attribute.
NOTE: You can enclose attribute description in HTML tags to improve its
presentation, for example: <p style=”color:#ff0000”>This description will be displayed in
red. </p>
Save form on selection change
This option is only valid if an attribute has choices. Ticking this checkbox will make the
sure that the form of the object will be saved as soon as the user chooses a different
choice in the selection.
Save form on focus loss
This option is only valid if an attribute does not have choices. Ticking this checkbox will
make the sure that the form of the object will be saved as soon as the user moves away
from the control representing the attribute.
Widget property (Radio buttons)
For many attribute types there is a “Widget” property that allows you to specify which
widget will be used to display the attribute. If an attribute has choices and no other
values other than choices are allowed it will be possible to select “Radio buttons” as a
widget type. In this case you will also be able to set the “Number of columns” property.
Widget property (Checkboxes)
This option is only available for an attribute of the Plain Text type and only if it has
choices defined. Selecting this option indicates that the user can choose multiple
choices and each choice is represented as a checkbox. Setting details of this option is
similar to setting options of radio buttons.
NOTE: Aware IM represents selected choices as a single delimited string. You must
make sure that the length of the attribute is no less than the string formed as a result of
concatenation of all possible choices (in case a user selects all checkboxes) plus
delimiters.

Aware IM 8.8 User Guide
Copyright © 2002-2023 Awaresoft Pty Ltd Page 181 of 479
Input control style
This property allows you to define styling properties of the input control of the widget –
colors, fonts, borders etc
Label style
This property allows you to define styling properties of the label – colors, fonts, borders
etc
Presentation rules
This property allows you to define conditions when certain presentation elements are
displayed. You need to define a condition and select the type of the presentation
element that the condition applies to. Then you need to define properties of the element
specific to the selected element type. If a condition is not specified the properties of the
element will be applied unconditionally.The following element types are supported:
ICON – this element type controls how attribute will be displayed in different lists,
such as in query results or in reference lists. Instead of displaying a value for the
attribute you can display an icon representing the value.. For example, you can
display different icons for the Balance attribute of the Account object –
depending on the value of the balance. You can also display icon only or both
icon and value – this is specified when you define a query or set up presentation
options for references.
STYLE – this element type allows you to specify different CSS style options for
particular attributes when they are displayed on forms. By default attributes are
displayed using predefined colors, fonts and other properties. The “Style” element
type allows you to override the default settings. For example, you can display
account balance in red if its value is less than 50 or in green if it is more than 50.
To do this define two styles with different color settings and specify a condition for
the first style as Account.Balance<=50 and for the second one as
Account.Balance>50.
DISPLAY FORMAT – this element type allows you to display attributes on forms
or inside query results using a different format than the format defined in the
attribute itself. This can be especially useful when displaying numbers – you may
want to display numbers in different formats on different forms. You can even
store the format in an attribute of some object – in this case you should specify a
tag expression as the format value, for example
<<SystemSettings.NumberFormat>>
LABEL - this element type allows you to specify different labels for attribute
depending on conditions
ACCESS – this element type allows you to make an attribute visible or read-only
based on a condition. This can be especially useful if you define a presentation
rule for an attribute on a particular form – this way you can make attribute visible
or read-only on a particular form only
REQUIRED – this element type allows you to make an attribute mandatory based
on a condition. This can be especially useful if you define a presentation rule for

Aware IM 8.8 User Guide
Copyright © 2002-2023 Awaresoft Pty Ltd Page 182 of 479
an attribute on a particular form – this way you can make attribute mandatory on
a particular form only
INPUT MASK - this element type allows you to specify an unput mask for
entering text attributes on forms, which can be different to the mask defined in the
attribute itself. You can even store the input mask in an attribute of some object –
in this case you should specify a tag expression as the input mask value, for
example <<SystemSettings.InputMask>>
Script
For users who are familiar with Javascript this dialog allows specifying additional
attribute configuration parameters when attributes are initialized and displayed. See
Programmers Reference Guide for more details.
Setting Properties of Plain Text Attributes
The Plain Text attribute type represents text strings. Most properties you need to specify
for attributes of the Plain Text type are common to all attribute types – see Common
Properties. The properties specific to the Plain Text type are:
Maximum length
This value specifies the maximum number of characters that the text string representing
the value of the attribute may have.
Content
You can choose “Standard” , “HTML” or Color. If you choose “HTML” it is assumed that
the text represents HTML. A text in the HTML format is displayed as HTML on forms
and can be edited using the built-in HTML editor (see Presentation Options below). If
you choose “Color” it is assumed that the text holds color value and can be edited with a
special Color Picker widget. In queries such text is displayed as a color box by default.
Presentation Options
Some common presentation options, such as “label” and description are described in
Common Properties. You can also define the following properties for the Plain Text
attributes:
Widget
If text has no choices there are two types of widgets that you can choose from – “Text
box or “Text area”. In the latter case you can also specify the height of the text area in
pixels and indicate whether the user will see how many characters are left to type
(“Count characters” property). The value specified in the “Width” control specifies the
width of the generated text box or text area in number of characters or pixels (one or the
other). If you select “Text box” you can also specify whether the control represents a
password and whether the user is required to enter password confirmation.

Aware IM 8.8 User Guide
Copyright © 2002-2023 Awaresoft Pty Ltd Page 183 of 479
If the attribute has choices and “Other values allowed” is un-ticked then possible widgets
are “Combo-box” or “Radio buttons” and “Checkboxes”. If “Other values allowed” is
ticked the choices are “Combo-box”, “Checkboxes” or “Multi-selector”.
With the “Multi-selector” widget the user can make multiple choices from the drop-down
list - see the picture of the “Multi-selector” widget below:
Just like “checkboxes” the “Multi-selector” option implies that the attribute can store
multiple strings and so internally all selected choices are stored as strings separated by
a delimiter.
Widget property (HTML Editor)
This option is only available for text in the HTML format. If you select this option the text
will be edited on forms using the built-in HTML editor (see the picture below):

Aware IM 8.8 User Guide
Copyright © 2002-2023 Awaresoft Pty Ltd Page 184 of 479
You can then specify the width and height of the HTML editor and whether this editor will
support the “inline mode”. In the inline mode the toolbar of the editor will only be
displayed when the user starts editing the text – this saves some screen real estate.
Input mask
Use this property to mask user input and only allow particular characters during input.
This is different from the “Validate as” masking which allows any characters during input,
but performs validation according to the mask when the form is submitted. Character
masking, on the other hand, only allows certain characters to be entered in certain
positions. When you click on this property you can define your mask or select from a
number of predefined masks.
Setting Properties of Number Attributes
The Number attribute type represents floating point and decimal numbers. Most
properties you need to specify for attributes of the Number type are common to all
attribute types – see Common Properties. The properties specific to the Number type
are:
Format
The format basically indicates whether the number may have decimal point and also
how many digits should be displayed before and after the decimal point. The format is
specified as a text string with special symbols. The allowed special symbols are
described in the Appendix C. You can specify the format directly or click on the “…” icon
of the property to bring up the “Number Format” dialog. The following settings can be
specified on this dialog:
Number of digits before decimal point
If “Automatic” is selected (this is the default option) the number of digits before the
decimal point is not limited; there will be as many digits displayed before the decimal
point as the number has. If you specify a particular value instead of selecting the
“Automatic” option the number of digits before decimal point will always be equal to this

Aware IM 8.8 User Guide
Copyright © 2002-2023 Awaresoft Pty Ltd Page 185 of 479
value. If the number has fewer digits than the value specified, the remaining digits will be
displayed as zeroes. For example if you specified 4 as the number of digits before the
decimal point, number 10 will be represented as 0010.
Number of digits after decimal point
If zero is specified (the default) the number represents an integer and no decimal point
will be displayed. If some non-zero value is specified the number will be displayed with
the specified number of digits after the decimal point padded with zeroes if necessary.
Custom format
Type the symbols directly into the text box according to the conventions described in the
Appendix C.
Min. value / Max. value
If specified indicates the upper and/or lower limit that the value represented by the
number may take (both are inclusive). Note that it is possible to indicate both upper and
lower limits, lower limit only, upper limit only or no limits at all.

Aware IM 8.8 User Guide
Copyright © 2002-2023 Awaresoft Pty Ltd Page 186 of 479
Auto Incremented
If this property is defined Aware IM will automatically set values of this attribute
incrementing by 1 every time a new instance of the object that owns the attribute is
created. The benefit of using auto-incremented numbers compared to incrementing
numbers by rules is that the auto-incremented number is set into the database
immediately without waiting for the current database transaction to commit. This avoids
the potential problem of having two users having the same number if numbers need to
be unique.
When you click the “…” button of the property you can control how auto-incremented
numbers are applied:
Auto-increment every object instance
This is the default option. Every time the new instance of the object is created the
number will be incremented by 1.
Auto-increment within a group of object instances
Sometimes it may be necessary to increment numbers within a “group” of instances. For
example, you may want to have invoice numbers automatically incremented for
customers from different countries. Every country may have its own group of numbers.
In this case you select this option and then select the attribute of the object that identifies
a “group”, for example Country.
Initial Value
This determines the value for the first instance of the object or the first instance of the
“group” of instances. The default value is taken from the Value Range defined for the
number (if undefined 1 is used). You can also specify an attribute that will hold the initial
value.
NOTE: Aware IM increments values of numbers that do not involve groups of
instances BEFORE rules are evaluated for the object, so if rules use auto-incremented
attributes, their values will already have been calculated. However, if auto-incremented
attributes involve group instances their values are incremented AFTER rules are
evaluated. If you have to use incremented values for such attributes in rules, set the
auto-incremented values “manually” using the NEXT_SEQUENCE_NMB function, for
example:
IF Order.RefNo IS UNDEFINED THEN
Order.AutoIncremented = NEXT_SEQUENCE_NMB(‘Order’,
‘AutoIncremented’, Order.GroupValue)
Order.RefNo = ‘Order Prefix ‘ + OrderAutoincremented

Aware IM 8.8 User Guide
Copyright © 2002-2023 Awaresoft Pty Ltd Page 187 of 479
Presentation Options
Some common presentation options, such as “label” and description are described in
Common Properties. You can also define the following properties for the Number
attributes:
Widget
Most of the choices here are similar to the Plain Text attribute – “Text box”, “Combo-
box”, “Radio buttons” and “Checkboxes”. If the number has “Min. value” and “Max.
value” defined there is also an option to display the number using a slider or a rating
widgets. For the slider you can then specify the orientation, the increment value and
whether to display a tip.
NOTE: the Rating widget can be displayed not only on forms but also in standard and
custom queries. To display rating number as stars in a standard query go to the
properties of the corresponding column and tick the “Display rating widget” checkbox. To
display rating as stars in a custom query refer to the attribute in a custom template like
so: {AttributeName,rating}
Spinner
This checkbox indicates whether or not to generate a spinner control when displaying
the number attribute.
Setting Properties of Date, Timestamp and Duration
Attributes
The Date attribute type represents dates, for example 12/09/95; the Timestamp attribute
type represents date and time, for example 12/09/95 12:45 and the Duration attribute
type represents the duration of an event, for example 2 weeks 10 days 3 hours. Most
properties you need to specify for attributes of the Date, Timestamp and Duration types
are common to all attribute types – see Common Properties. The properties specific to
these types are:
Format
This is the format of the date, timestamp or duration. The format is specified as text with
special symbols. The following symbols are most frequently used:
- d – day in month (number of days for duration)
- M – month in year
- y – year
- h – hour (1-12)
- H – hour (1-24) (number of hours for duration)
- m – minute in hour (number of minutes for duration)

Aware IM 8.8 User Guide
Copyright © 2002-2023 Awaresoft Pty Ltd Page 188 of 479
- s – seconds in hour
- w – number of weeks (duration specific)
For example, first of June 2004 will be displayed as 01/06/2004 if the format is specified
as dd/MM/yyyy.
Rather than specifying the explicit format of the attribute you can choose “Take from
locale” option if your application supports multiple languages. In this case the actual
format of the attribute will be defined by the currently used locale – see Creating
Applications in Different Languages.
Presentation Options
Some common presentation options, such as “label” and description are described in
Common Properties. You can also define the following properties for the Date,
Timestamp and Duration attributes:
Use browser control
By default Aware IM displays its own controls for Date and Timestamp attributes. These
conrols include calendars and drop downs for the selection of time. Some browsers
(especially mobile browsers) have their own controls for representing date and time.
Select this property to use native browser controls for representing date and time.
Time interval, Time min. value, Time max. value
These properties are only available for the attribute of the Timestamp type. Timestamp
control is displayed as a combination of the date control and time control. The time
control represents a drop down of times. You can specify the time increment and the
boundaries for the values displayed in this drop down. Note that if the format of the
Timestamp only includes time (for example, HH:mm) only the time control will be
displayed.
Setting Properties of Reference Attributes
Reference attributes are explained in detail in the Reference Attributes section.
Entering or editing values of reference attributes on a form of a business object in the
Operation Mode is somewhat different to other attribute types.
To provide a value of a reference attribute is to indicate that the instance of the business
object being created or edited is related through this attribute to one or more instances
of another business object. For example, an Account object can be configured to
contain a list of its transactions in a reference attribute called MyTransactions. Thus a
particular instance of the Account object can be related to a number of instances of the
Transaction object.

Aware IM 8.8 User Guide
Copyright © 2002-2023 Awaresoft Pty Ltd Page 189 of 479
To display a value of a reference attribute is to display a list of instances of related
business objects (or maybe just some members of this list).
When displaying a form containing reference attributes Aware IM generates the
appropriate controls required to display, enter or edit values of such attributes. An
example of a reference attribute is shown on the picture below:
The instances of the objects related to the instance currently being edited are shown in a
table where each row represents an instance of a related object. Table columns show
values of certain attributes of the related objects (which attributes will be shown can be
defined at the configuration stage – see Presentation Options for References).
The buttons in the rightmost columns of each row allow performing operations with the
related instance represented by a particular row. The list of operations is configurable –
see Presentation Options for References. In the example above the “Edit” operation
represented by the “Edit” button brings up a form of a related business object.
Configuring References
When configuring references the following properties must be specified:
Multiple allowed
If this checkbox is ticked the reference represents a “multiple” relationship, otherwise a
“single” relationship.

Aware IM 8.8 User Guide
Copyright © 2002-2023 Awaresoft Pty Ltd Page 190 of 479
Matching data
Click on this property to define relationship type (“Peer”, “Owner of” or “Owned by”) and
matching attribute in the referenced object. When defining a matching attribute select
the “None” radio button if the reference attribute represents a non-matching relationship;
if the reference attribute represents a matching relationship select either “Create” or
“Existing” radio buttons.
Create
The “Create” option is available if the new reference attribute is being created or the
reference attribute represents the non-matching relationship. Selecting this option will
create the matching attribute on the referred business object when changes to the
current business object are saved. If you select the “Create” option you must also
specify the name of the matching attribute on the referred object (the name must meet
the requirements imposed on the attribute names – see Common Properties). If the
referred object is a business object group the matching attribute is created for all
members of the group. You can also specify whether the matching attribute created will
be “multiple allowed” or not.
Existing
The “Existing” option is available if the new reference is being created or the reference
attribute represents the non-matching relationship and there is an attribute on the
referred business object or group that refers to the business object being edited through
a non-matching relationship. In this case we are “binding” two non-matching
relationships in one matching relationship. As there may be several attributes on the
referred object having non-matching relationship with the object being edited you may
need to select the attribute you want.
Matching relationships are not applicable to attributes owned by notifications.
Presentation Options for References
For reference attributes presentation options define how instances of the referred object
are displayed (if at all) on a business object form. There are several ways the referred
instances can be displayed on a form – as a table, as a list (either a combo box for
single references or a list box for multiple references), as a tree or as a calendar.
When the referred instances are displayed as a table usually only a few instances (the
most significant ones) are displayed on the form. Also, usually values of only certain
attributes of the referred instances (the most significant ones) are displayed on the form.
To display all attributes of a referred instance the user can press the Edit button next to
the referred instance entry in the table to bring up a form of the referred object. Aware
IM also provides buttons to add and remove instances of the referred object as well as
perform operations with the referred instances. An example of such a table is shown in
the Working with References in the Operation Mode section.

Aware IM 8.8 User Guide
Copyright © 2002-2023 Awaresoft Pty Ltd Page 191 of 479
When the referred instances are displayed as a combo box (for single references) or a
checkbox list (for multiple references) all instances of the referred object are always
displayed. Specific instances that are referred to by the object are selected (only one is
obviously selected in a combo box). Therefore this option is only recommended when
there are not many instances of the referred object in the system so that all of them will
fit into the combo box or the list box. In this case this option is preferable because the
user will see all instances she can choose from on the form. For example, a Car object
may refer to a CarModel object. There are only a fixed number of instances of a
CarModel object so a reference to a CarModel on the form of the Car object may be
represented as a combo box.
The details of the presentation options that can be specified on the Presentation dialog
for references are explained below:
Label
This is the label that will be displayed next to the input control. By default it will be the
name of the attribute (if this name has capital letters they will be replaced with spaces –
for example, if the attribute name is AccountReference the default label displayed will
be “Account Reference”).
Widget
This is is the most important presentation property that determines how the reference
attribute will be presented to the user. The choice of the widget depends on whether it is
a single or multiple reference attribute. For multiple references possible widget types are
“Grid”, “Checkboxes”, “Swap Select”, “Multi-selector”, “Chart”, “Custom List” “Timeline”
or “Tree”. For single references possible widget types are “Grid”, “Combo-box”,
“Checkboxes”, “Tree” and “Form”. Once you select the widget type you need to provide
settinsg of the widget in the “Widget settings” property. Widget settings obviously
depend on the selected widget.
Grid widget
With this widget type referred instances are represented as a standard table (or grid)
This is described in the “Displaying References as a Table” section.
Drop down widget
This option is only applicable for single references. Choose this widget type to display a
referred instance as the current selection in a combo box. The choices in the combo-box
display possible other instances to choose from and set as a referred instance. The
following properties are available for this widget type:

Aware IM 8.8 User Guide
Copyright © 2002-2023 Awaresoft Pty Ltd Page 192 of 479
Fetch records
Two choices are available – “Fetch all records” or “Fetch records as user types”. You
can choose the first option to get Aware IM to fill up the combo box with all existing
instances of the referred object for the user to choose from. Select this option when
there are not too many instances of the referred object in the database.
Choose the second option to get Aware IM to fill up the combo box dynamically. The
user will be able to type in values in the combo box. As soon as the user finishes typing
Aware IM will fill up the combo box with those instances of the referred object that start
with or contain values entered by the user. Select this option if there are a large number
of instances to choose from.
Empty Text
If you type any text into this property the drop down will include the specified text when it
has no value
Mobile style choices
If this checkbox is ticked the drop down pops up from the bottom of the screen. This is
especially useful for mobile applications
Save form on selection
If this checkbox is ticked the form will be saved every time the user selects a value in the
drop down
Include empty text in choices
If this checkbox is ticked Aware IM will add a blank record (if empty text is defined) or
the empty text (if it is defined) into the list of choices. This makes it possible for the user
to “clear out” the value
Page size
If this property is specified the drop down will display one page at a time, so that the
user can choose the page he wants to see. This is useful if the drop down shows large
amount of data
Operations
You can optionally specify the following operations – Add New Reference, Add
Reference, Edit Object, Delete Object and Execute Javascript. The icons representing
these operations will be displayed next to the dropdown.
Displayed columns
By clicking on this property you can specify which attribute(s) of the referred object will
be displayed in the drop down (usually just one). If you select more than one, they will
be separated by spaces if you select the Standard style of display (the Standard radio
button). If you select this radio button you can also optionnaly specify the custom
template with which the data will be displayed - defining this template is similar to
defining custom data template for custom query presentation – see Displaying Query

Aware IM 8.8 User Guide
Copyright © 2002-2023 Awaresoft Pty Ltd Page 193 of 479
Results. The picture of a custom drop down that uses an image, a bold subject on the
first line and the description on subsequent line is shown below:
If you select the “Multii-Column” style the combobox will be displayed with the header at
the top that will show the names of the columns (just like a standard grid). Here you can
also specify the widths of the columns, column labels and even the template of the data
display. Displayed columns in a multi-column drop-down can include attributes of the
Picture type.
HTML Box widget
This option is only available for single refereces. Use it if you want to represent the
reference as read-only HTML. When specifying HTML you can use tag expressions to

Aware IM 8.8 User Guide
Copyright © 2002-2023 Awaresoft Pty Ltd Page 194 of 479
refer to the attribute values of the reference, for example <<Account.Customer.Name>>.
You can also define operations (Add New Reference, Add Reference, Edit Object,
Delete Object and Execute Javascript) – the icons representing operations will be
displayed next to the HTML box
Checkboxes widget
Use this widget type if you want references to be displayed as a list of checkboxes. This
list shows all possible instances of the referred object and the instances referred to by
the attribute are ticked. The option should only be used if the list of all instances is not
too large.
The settings of this widget are similar to the “Grid” widget.
Swap select widget
This option is similar to the checkbox list in that it shows a list of all possible instances
and instances referred to by the attribute. The user moves instances from one list to
another – see the picture below. Just like checkbox list this widget should be used only if
the list of all instances is not too large.

Aware IM 8.8 User Guide
Copyright © 2002-2023 Awaresoft Pty Ltd Page 195 of 479
Multi-select drop down widget
This widget is similar to the “multi-selector” widget used for text attributes. See the
picture below:
Calendar widget
Choose this widget type if you want references to be displayed in a calendar-like fashion
(see Calendar Form of Query Results). Note that only references of the Appointment
type can be presented in this manner. The settings you can specify are similar to the
ones you specify when configuring a calendar query.
Chart widget
Choose this widget type if you want references to be displayed as a chart (see
Displaying Query Results). The settings you can specify are the same as when
configuring a chart.
Custom list widget
Choose this widget type if you want references to be displayed as a custom presentation
of a query (see Displaying Query Results). The settings you can specify are the same as
when configuring custom presentation of a query.
Timeline widget
Choose this widget type if you want references to be displayed as a timeline of events –
see the picture below. See also the “Displaying Results as Timeline of Events” section in
Displaying Query Results

Aware IM 8.8 User Guide
Copyright © 2002-2023 Awaresoft Pty Ltd Page 196 of 479
Record sorting/Filtering
Using this property you can specify whether referred instances will be sorted or filtered
in any way. Clicking on this property brings up the “Record Sorting/Filtering” dialog. The
“Record Filtering” section of the dialog allows setting up a filter to show only referred
instances that match the specified criteria. You can specify these criteria by specifying a
query (either choose the existing query or specify the custom one). For example, it is
possible to show only open accounts of a client (the query will be FIND Account
WHERE Account.Status=’Open’).

Aware IM 8.8 User Guide
Copyright © 2002-2023 Awaresoft Pty Ltd Page 197 of 479
TIP: using different filters you can display different referred instances of the same
reference attribute. For example, you could show open accounts of a client on one form
section and closed accounts on another form section – see Adding/Editing Form
Sections.
Existing query
If you select the “Existing query” radio button you must select the existing query (see
Adding/Editing Queries)
Custom query
If you select the “Custom query” radio button you must specify the query – press the
Edit button located next to this option and specify the query details – see Adding/Editing
Queries.
Clicking on the attribute in the “Record Sorting” table allows sorting the list of references
by the value of the attribute displayed in the column.
See also:
Displaying references as a table
Displaying references as a tree
Displaying references as a table
This section describes how to define settings of the “Grid” widget type When you click on
the “Widget Settings” property the “Standard Grid Sattings” dialog is displayed. You can
define the following settings on this dialog:
Items per page
Specify how many instances of the referred object will be shown in the table by default.

Aware IM 8.8 User Guide
Copyright © 2002-2023 Awaresoft Pty Ltd Page 198 of 479
Width/Height
Specify the width/height of the reference table in pixels. The default width will
accommodate all data in the table.
Allow inline editing
Tick this checkbox if you want to be able to add and edit instances of the referred
objects directly inside the table (see the picture below):
The table of Items on this picture shows Purchase Order Items on the form of the
Purchase Order object. Note that Purchase Order Items can be edited directly on the
form of the Purchase Order. If you click on the “Add New” button a new row will be
inserted.
You can even add/edit references of the referred objects inline. In the example above
each Purchase Order Item refers to a Product. To add/edit references inline you need to
define a shortcut to the reference you want to edit inline and include this shortcut into the
list of attributes to be displayed on the form. In this example Purchase Order Item
defines a shortcut to the referred Product and this shortcut is included into the list of
attributes displayed in the table of Purchase Order Items on the form of the Purchase

Aware IM 8.8 User Guide
Copyright © 2002-2023 Awaresoft Pty Ltd Page 199 of 479
Order object. When a user clicks on the Product cell to edit it Aware IM will display a list
of existing Products and the user will be able to pick a particular Product.
Use popup editor
This option is only available if inline editing is on. If the checkbox is ticked inline editing
will be performed for the entire row by a special popup editor.
Show column menu
If you tick this checkbox each column header in the table will have a button that allows
user to hide/show certain columns.
Show paging bar
If you tick this checkbox paging bar is displayed for the table. You can further control
how paging bar is displayed if you click on the More… button
Select first record
If you tick this checkbox the first record in the table will be selected when the table is
displayed. Using this option is especially useful if you also define a default item
operation for the table (see below). In this case this operation will be automatically
executed for the first record when the table is displayed.
Number rows
Tick this box to show item numbers next to each row
Operations with items
The Operations table shows operations that can be invoked with the instances of the
referred object. The operation types are similar to those configured for form operations.
Hyperlinks containing the names of the operations will be located next to the entry
representing the instance in the list. User invokes the operation by pressing on the
corresponding hyperlink (see the picture in the “Item Display Rules” section below). If
any applicability conditions are defined for the operation the hyperlink will appear only
for those instances that satisfy the applicability condition.
Press the Add button to define a new operation, Edit button to edit the existing operation
and Delete button to delete the existing operation. One of the operations can be marked
as a “default” operation. If such operation is defined it will be executed when the user
clicks on any item of the record, not just the operation hyperlink. In addition, if “Select
first record” option is ticked, the default operation will be automatically executed for the
first record.
Attributes to display
This option allows you to select which attributes of the referred object will be displayed
on the form. To specify which attributes will be displayed tick the “Displayed” checkbox
next to the required attributes. Use the Up and Down arrow buttons to change the order
in which attribute values will be displayed. You can also specify how the attribute will be

Aware IM 8.8 User Guide
Copyright © 2002-2023 Awaresoft Pty Ltd Page 200 of 479
displayed – the value of the attribute only, the value and icon or the icon only. Icons are
displayed according to the presentation rules for ICON elements – see Common
Properties.
Apart from the “Widget Settings” property you can set the following properties when
using the “Grid” widget:
Description
This option allows you to define the description of the attribute. It will be displayed as a
tip for the user.
Panel Operations/Buttons
This option allows you to define buttons that will be displayed on the toolbars around the
table – see Add/Edit Panel Operations for details.
Item Display Rules
This option allows you to highlight certain items in the list of the referred instances by
displaying them in different colors or font styles. Pressing the Item Display Rules button
invokes the “Display Rules dialog”. In this dialog you can specify colors, fonts and other
CSS properties of the highlighted items as well as conditions identifying which items will
be highlighted. Conditions are specified in the green cells whereas colors and fonts are
specified in the Style Dialog invoked by pressing the “Set Style” button. The following
picture shows the example of an item rule. In this example the Customer object has a
multiple reference to the PurchaseOrder object (the Orders attribute). Each referred
order is displayed differently depending on the state of the order: If the state of the order
is NEW it is displayed with a yellow background. The condition entered into the item rule
is: PurchaseOrder.State = ‘NEW’. The style used for this condition is the yellow
background color:

Aware IM 8.8 User Guide
Copyright © 2002-2023 Awaresoft Pty Ltd Page 201 of 479
Grouping
Click on this property to group referred instances based on the specified attribute. All
instances with the same value of the attribute will be displayed together. It will be
possible to expand and collapse the node with these values and specify summaries per
group
Drag-and-drop/Reordering
Clicking on this property allows you to enable users to reorder items in the table or drag
and drop records between different grids. This is explained in detail in the “How to
implement Item Reordering” and “How to implement drag-and-drop between grids”
sections of the “How To” Guide.
Resizing
Select this property to allow users to resize the table and specify minimum and
maximum sizes for the table
CSS Style and CSS class
These properties allow advanced users to customize the appearance of the table using
CSS styles and classes. See the “How to use CSS” section in the How To Guide for
more details.
Expansion of rows
Select this property to specify what happens when the row in the table is expaned. See
Add/Edit Queries for more details.
Filters
Select this option to assign filters to certain columns in the table. See Add/Edit Queries
for more details.
Script
Use this option to control behaviour of the table using Javascript. See Programmers
Reference Guide for more details.
Displaying references as a tree
Select the “Tree” widget type to display references as a tree. In this tree each node
representing a referred object may also have sub-nodes representing referred objects of
this object and so on.
Most of the options that you can specify for the tree representation are the same as for
the table representation. Tree-specific options are explained below:
Expand all levels
Tick this checkbox to get the tree to automatically expand nodes at all levels.

Aware IM 8.8 User Guide
Copyright © 2002-2023 Awaresoft Pty Ltd Page 202 of 479
Tree contents
Clicking on this property brings up the “Tree Contents” dialog. There are two radio
buttons in this dialog. Select the “Show all objects in the tree” radio button if you do not
want to impose any limitations on which objects should be included in a tree. When you
select this option all references of the encountered objects will be included in the tree.
Select the “Show types selected in the table below” radio button if you want to impose
limitations on which business objects and attributes should be included in the tree. You
will then need to define which robjects you want the tree to show.
In the pane on the left you can choose which business objects will be included in the
tree by ticking the box next to the object’s name. When you do this reference attributes
of this object will be displayed in the right pane. You can either select that all reference
attributes of the selected object will be considered when building a reference tree or
select particular attributes by ticking a box next to the attribute’s name. You can also tick
a box indicating whether the details of the selected object should be displayed in a tree.
This may be useful if you want to consider reference attributes of the object in a tree, but
you don’t actually want to display the details of the object itself.
One of the common examples of selecting particular references to be shown in a tree is
when you have a hierarchical object and you want to display this hierarchy in a tree. In
the example shown on the picture below the Part object has Components attribute that
also refers to the Part object – in other words, a Part can have other Parts, which can
have their own Parts etc. If you want the tree to show this hierarchy you would select the
Part object and its Components attribute to be displayed in a tree, but not any other
objects or attributes. The result is show on the picture below:

Aware IM 8.8 User Guide
Copyright © 2002-2023 Awaresoft Pty Ltd Page 203 of 479
Note that inline editing is available for references of the first level when only one object
is displayed in a tree (Part object in this case).
Diagram of Object Relationships
You can easily see all relationships between objects in your application if you right click
on the business space version and select the “Relationships Diagram” from the popup
menu (or select this menu item from the “Version” menu). You will see a picture that
looks something like this:

Aware IM 8.8 User Guide
Copyright © 2002-2023 Awaresoft Pty Ltd Page 204 of 479
This shows all business objects and business object groups in the application –
business object groups are shown with the blue edge. If there is a relationship between
an object and another object or group you can see an arrow from one object to another.
You can also see whether a relationship on either side is single or multiple (1 or 0…*). If
you click on the relationship you can see relationship attributes in the objects that
represent this relationship. You can drag objects around if necessary for better viewing
and you can zoom in/zoom out if you click on the corresponding buttons in the toolbar.
If you click on the “Settings” button you can specify height and width of the box
displayed for each object and you can also remove some objects from the diagram by
selecting those attribute that don’t need to be displayed. You can click on the “Exclude
non-referenced” button to exclude all objects/groups that do not have any relationships
from the diagram. You can also save settings under a particular name by clicking on the
Save button and then load them by clicking on the Open button. This can be useful if
you want to view different parts of a complex diagram – by selecting only the objects you
want and then saving selection.
Probably the best thing about this feature is that you can create/delete relationships
directly on the diagram. Creating a relationship can be done either by pressing the “Add
relationship” button on the toolbar or directly dragging a connector between those
objects that you want to create a relationship for.
When you create a relationship using the “Add relationship” button you need to select
the objects you want to create a relationship for and then specify the name of the
attribute either on the one side of the relationship or on both sides (if the relationship has
matching attribute). You also need to specify the type of the relationship on each side
and whether it is multiple or single.

Aware IM 8.8 User Guide
Copyright © 2002-2023 Awaresoft Pty Ltd Page 205 of 479
To create a relationship by dragging a connector click on one of the objects in the
relationship – this will display black circles around the object to indicate that it is
selected:
Then hover the mouse over one of the black circles:

Aware IM 8.8 User Guide
Copyright © 2002-2023 Awaresoft Pty Ltd Page 206 of 479
and start dragging a connector to another object from this point:

Aware IM 8.8 User Guide
Copyright © 2002-2023 Awaresoft Pty Ltd Page 207 of 479
When you release the mouse the dialog will popup where you can specify the remaining
properties of the new relationship – attribute names, types and cardinality.
To delete a relationship click on the arrow representing the relationship and click on the
“Delete” icon that pops up (or press the Delete key on the keyboard).
Setting Properties of Picture Attributes
The Picture attribute type represents images (pictures). When an attribute of this type is
shown on a form of the business object that owns the attribute Aware IM generates the
Browse button that allows the user to attach a particular image as an attribute value
(only image files, such as .gif, .jpeg, .bmp files should be attached). The image is
displayed on the form (see the example below):

Aware IM 8.8 User Guide
Copyright © 2002-2023 Awaresoft Pty Ltd Page 208 of 479
Most properties you need to specify for attributes of the Picture type are common to all
attribute types – see Common Properties. The properties specific to the Picture type are
described below.
Picture represents signature
Tick this checkbox if a picture attribute stores an electronic signature of the user. If this
option is on at runtime Aware IM will show the box in which the user can provide his
signature by using the mouse (or fingers/stylus pen on mobile devices). The signature
will then be stored as a picture in the attribute.
Stored in
You can specify where the images uploaded by the user for the picture attribute will be
stored. By default all images are stored in the database, but you can also store images
in the file system on disk or in Amazon S3 storage.
Database
This is the default option. Images will be stored by Aware IM in the database. You don’t
need to specify anything else.
File System
If you select the File System option images will be stored in the file system of the server
where Aware IM is running. The exact location of the image is determined from the
value of the specified expression. For example, if the file path of the image is stored in
the Path attribute, the expression should be Object.Path, where Object is the name of
the object that owns the attribute.

Aware IM 8.8 User Guide
Copyright © 2002-2023 Awaresoft Pty Ltd Page 209 of 479
Amazon S3
If you select the Amazon S3 option images will be stored in the Amazon S3 storage
system. You need to do the following:
Create an account with Amazon at this URL: https://aws.amazon.com
Create an IAM user using the IAM console.
Open the Security Credentials tab and click on the “Create Access Key” button.
In the resuling dialog box click "Show User Security Credentials" to view the IAM
user’s access key ID and secret access key.
Click the Settings button in Aware IM next to the “Stored In” property and enter
the access key ID and secret access key in the dialog that opens (note that this
has to be done just once – if you have another attribute which is stored in
Amazon S3, you don’t need to do it again).
Just like with the File System storage you also need to specify an expression that holds
the path to the image in the Amazon S3 storage. This path includes the name of the
AWS bucket and the name of the AWS region:
https://AWSBucketName.s3-AWSRegionName.amazonaws.com/AWSObjectName
For example, if you store the name of the bucket and region in the corresponding
attributes of the SystemSettings object the path may look like this:
'https://' + SystemSettings.AWSBucketName + '.s3-' + SystemSettings.AWSRegionName
+'.amazonaws.com/' + AttributeName + '_' + Object.ID
where Object is the name of the object that owns the attribute.
Max. file size
If specified the value indicates maximum image size that can be stored in this attribute. If
the user uploads a larger image, the image will be automatically rejected.
Allowed extensions
This property specifies file extensions that can be stored in the attribute. If user uploads
an image with a different extension it will be rejected.
Display settings
This property describes presentation settings specific to the picture:
Display picture as circle
Tick this checkbox to show the picture as a circle like on the form above
Thumbnail and actual representation
A picture can be represented on a form or in a query results as a smaller (thumbnail)
version of the actual image. If you want to present a smaller version of the image you
have two options:

Aware IM 8.8 User Guide
Copyright © 2002-2023 Awaresoft Pty Ltd Page 210 of 479
Load two different versions of the image and store them in different attributes of
the object
Load and store just one image and get Aware IM to scale it down automatically
when displaying it on forms or query results
When you select the first option you need to provide the name of another attribute in the
business object (of the Picture type) that would store the larger (actual size) version of
the image. When you select the second option you can specify the scale in which the
image will be displayed on forms and query results independently.
You can also tick the “Show actual representation when thumbnail is clicked” checkbox.
If you do this Aware IM will show the larger (actual size) version of the image when the
user clicks on the thumbnail. The larger version will be shown regardless of whether the
larger image is stored in the same or different attribute. The larger image will be shown
using the popular “lightbox” technology.
Embed image data into HTML
When a picture stored in the database or in the file folder outside of the web application
directory (AwareIM/Tomcat/webapps/AwareIM is displayed to the user, by default
Aware IM extracts the picture from the database and creates a temporary file. This file
is then used by the browser to display the picture. To prevent accumulation of temporary
images you can tick the option to embed the image data into HTML. In this case Aware
IM will encode the image data into the HTML itself, so that the data is directly given to
the browser without the need to create a temporary file.
Allow cropping and resizing
If this checkbox is ticked users will be able to crop and resize the image before it is
saved
Setting Properties of Document Attributes
The Document attribute type represents document files. The term “document” here has
relatively broad sense. Usually document files are reports in the PDF format or MS Word
or MS Excel files, however, essentially any file can be treated as document (see also
Document Management). When an attribute of this type is shown on a form of the
business object that owns the attribute Aware IM generates the Browse button that
allows the user to attach any file as the attribute value.
Most properties you need to specify for attributes of the Document type are common to
all attribute types – see Common Properties. The properties specific to the Document
type are explained below:
Initial Value
The initial value property for attributes of the Document type are different from the Initial
Value property of other attribute types explained in the Common Properties section. You
can only initialize the attribute of the Document type with the name of a Document

Aware IM 8.8 User Guide
Copyright © 2002-2023 Awaresoft Pty Ltd Page 211 of 479
template defined in the business space version (see Adding/Editing Document
Templates) or not nitialise the attribute at all.
If you initialize the attribute with the name of a document template Aware IM will
automatically generate a document from the document template when the business
object owning the attribute is created (see Document Generation).
Stored in
You can specify where the documents will be stored (Database, File System or Amazon
S3) – see the explanation for the Stored In property of Picture attributes above.
Max. file size
If specified the value indicates maximum image size that can be stored in this attribute. If
the user uploads a larger document, the document will be automatically rejected.
Allowed extensions
This property specifies file extensions that can be stored in the attribute. If user uploads
a document with a different extension it will be rejected.
NOTE: If you select “Embedded Spreadsheet” from the list of allowed extensions you
will be able to edit the document at runtime using the Excel-like spreadsheet interface.
For more details about this please read the “How to work with embedded spreadsheets”
section in the How To Guide.
Zoho editing
This checkbox allows users to edit documents in-place using Zoho editors
(www.zoho.com) . Zoho provides powerful web-based editors to edit many types of
documents – MS Word, MS Excel, MS Power Point, Open Office, RTF, HTML etc. The
user edits the document using the browser and when he presses the Save button the
modified document is automatically saved in Aware IM. The details are explained in the
“How to let users edit documents” section in the How To Guide.
Office Online editing
This checkbox allows users to edit Microsoft Office documents in-place using Office
Online editors. The user edits the document using the browser and changes are
automatically saved in Aware IM. The details are explained in the “How to let users edit
documents” section in the How To Guide.
Setting Properties of Shortcut Attributes
Attributes of the Shortcut type are necessary when you want to display the value of an
attribute of the referred object on a business object form or in query results. For
example, if there is an Employee object that refers to the Company object via the
Employer attribute and the Company object has the Name attribute, it may be
necessary to display the company name on a form of the Employee object. This may be

Aware IM 8.8 User Guide
Copyright © 2002-2023 Awaresoft Pty Ltd Page 212 of 479
achieved by defining an attribute of the Shortcut type in the Employee object called
CompanyName. The path to the referred attribute will be Employer.Name. This path is
called the shortcut path. In this example it needs to be defined as the property of the
CompanyName attribute. The value of the attribute referred through the shortcut path is
always displayed as an un-editable label on a business object form.
NOTE: A shortcut path may only be via a single reference – multiple references are
not acceptable as it is not clear the attribute value of which particular instance of the
referred object should be displayed.
NOTE: The Shortcut type is not available for attributes owned by notifications.
The following properties specific to the Shortcut type should be specified:
Path
This is the shortcut path explained above. It must start with the name of a single
reference attribute defined in the business object followed by the name of the attribute in
the referred object (note that nested references are allowed provided that all references
mentioned in the path are single references). You can also press F3 to bring up the
Context Assistant while typing the path.
Presentation Options
You can specify the label that will be displayed next to the attribute value of the referred
object. By default it will be the name of the attribute. You can also optionally specify the
description of the attribute that will appear underneath the attribute value.
Setting Properties of Yes/No Attributes
Attributes of the Yes/No type are useful when the attribute value is either Yes or No.
Attributes of this type are either shown as checkboxes or as switches with the On and
Off state. The properties that you can specify for the attributes of the Yes/No type are:
Initial Value
See Common Properties. Allowed initial values are Yes, No, Y, N, On, Off.
Presentation Options
You can specify the label that will be displayed next to the checkbox or switch
representing the attribute on the business object. By default it will be the name of the
attribute. You can also optionally specify the description of the attribute that will appear
underneath the input control of the attribute. For switches you can also specify strings
that correspond to the “On” and “Off” states.

Aware IM 8.8 User Guide
Copyright © 2002-2023 Awaresoft Pty Ltd Page 213 of 479
Adding/Editing Rules
Rules can be defined in a number of places in the Configuration Tool:
- When rules are attached to a business object (see Business Rules as Carriers of
Business Logic). There are several ways to invoke the editor of rules attached to a
business object:
- When rules are defined as process implementation or to handle process failure – see
Adding/Editing Processes.
- When rules are attached to a notification to specify what happens after the
notification has been received or created.
Rules of a business object, process or notification can be managed on the
corresponding tabs of the respective editor. For example, to edit rules triggered when an
object is updated or created, open the business object for editing and go to the “Update
Rules” tab. The following sections describe how to manage rules on these tabs.
Working with Rule Collection
Setting Filtering Options
Context Assistant
Working with Rule Collection
Rules (or rule collections) are displayed as a table where each row in the table displays
the name of the rule and its textual representation. The table (with its toolbar) is
displayed in the top half of the screen. When you select a particular rule the rule editor
for the selected rule is displayed in the bottom half of the screen and the properties of
the selected rule are displayed in the Selection Property window (see the picture below):

Aware IM 8.8 User Guide
Copyright © 2002-2023 Awaresoft Pty Ltd Page 214 of 479
To add a new rule click on the icon in the toolbar at the top to the table. The Rule
Dialog will be displayed where you can specify the name of the new rule and then the
new entry will appear in the table. You can then enter the text of the rule in the Rule
Editor below and set its properties in the Properties window.
To edit an existing rule click on the rule entry in the table and modify the text of the rule
in the Rule Editor below and/or set its properties in the Selection Properties window.
To delete a rule, click on the rule entry in the table and then click on the icon in the
toolbar at the top of the table.
To change the order of rules in the rule collection, select the rule and press the Up or
Down icons at the top of the table. Note that changing the order of rules in a collection is
only relevant to rule collections implementing processes that have “Maintain rules order”
flag checked – see Adding/Editing Processes.

Aware IM 8.8 User Guide
Copyright © 2002-2023 Awaresoft Pty Ltd Page 215 of 479
NOTE: If you are editing rules attached to a business object Aware IM checks the
names of the objects used in rules. If you use an object name different from the name of
the object that the rules are attached to, Aware IM may issue a warning message when
the rules are saved. This behaviour safeguards you against mistakes when specifying
object names in rules. If you intentionally specified a name different from the name of
the object that the rules are attached to (for example, to use some other object in the
Context) you may ignore the warning message.
Adding/Editing Individual Rules
The text of individual rules is specified in the Rule Editor displayed below the rule
collection table when a particular rule is selected.
The Rule Editor has two tabs – Standard View and Textual View. The Standard View
and the Textual View tabs are two different ways of representing a rule. You can switch
between the tabs to see how the same rule is represented in both views.
Irrespective of which tab you are in, the following rule properties are always visible:
Adding/Editing Rule using Standard View
The Standard View tab of the Rule Editor allows specifying rules in a simpler format
compared to the Textual View. Specifically it is not necessary to type “If” and “Then”
keywords required by the Rule Language.
The Standard View consists of two areas – the area where you specify rule conditions
(displayed in green) and the area where you specify actions (displayed in yellow). The
rule conditions area is the table where each row represents a single condition. A rule
may have multiple conditions connected with AND or OR keywords. You can enter a
condition by clicking on the row in the table and typing the text of the condition directly
into the table. If a rule has more than one condition the conditions will be linked with the
AND keyword by default. To change the keyword click on the last column in the table
and select OR from the combo box that gets displayed. Note that AND or OR keywords
can be entered as part of the condition as well (see the second example below). If your
rule has more conditions than the number of rows currently displayed in the table click
on the icon at the bottom of the editor.
The Actions area is the table where each row represents a single action. To edit an
action, click on the action row in the table. If your rule has more actions than the number
of rows currently displayed in the table click on the icon at the bottom of the editor.
At any time when editing rule conditions or rule actions you can press F3 or F4 to bring
up the Context Assistant.
Let us consider some examples:

Aware IM 8.8 User Guide
Copyright © 2002-2023 Awaresoft Pty Ltd Page 216 of 479
If Policy.ExpiryDate < CURRENT_DATE AND Policy.Owner IS DEFINED
Then
SEND ReminderLetter TO Policy.Owner
Policy.LetterSent = ‘Yes’
To enter this rule in the Standard Form tab you would need to enter the following
conditions into the conditions table:
1. Policy.ExpiryDate < CURRENT_DATE (AND)
2. Policy.Owner IS DEFINED
Note that the AND keyword displayed in brackets will be automatically added by Aware
IM into the last column of the conditions table.
The following actions would need to be entered into the Actions table:
1. SEND ReminderLetter TO Policy.Owner
2. Policy.LetterSent = ‘Yes’
Let us look at another example:
If (Policy.Owner.Age > 70 AND Policy.Owner.Exempt = ‘No’) OR
(Policy.Owner.PostCode < 2030 AND Policy.Garage= ‘No’) Then
Policy.Premum = 300
To enter this rule in the Standard Form tab you would need to enter the following
conditions into the conditions table:
1. Policy.Owner.Age > 70 AND Policy.Owner.Exempt = ‘No’ (OR)
2. Policy.Owner.PostCode < 2030 AND Policy.Garage= ‘No’
Note that the AND keywords in the first and second conditions are entered as part of the
conditions whereas the OR keyword displayed in brackets must be set in the last column
of the conditions table.
NOTE: You cannot enter rules that have “Else” statement using the Standard View –
use the Textual View instead.
Adding/Editing Rule using Textual View
The Textual Form of the Rule dialog allows users to enter rules exactly as they are
specified in the Rule Language. If the rule has syntax error the error message will be
displayed at the bottom part of the tab and the location of the error will be highlighted.
At any time when editing rule conditions or rule actions you can press F3 or F4 to bring
up the Context Assistant.

Aware IM 8.8 User Guide
Copyright © 2002-2023 Awaresoft Pty Ltd Page 217 of 479
NOTE: You can use comments anywhere inside rules specified in the Textual View.
Comments are specified between /* and */ symbols, for example:
IF SomeCondition THEN
/* ActionOne */
ActionTwo
Comments in rules are ignored when the rule is evaluated.
Rule Properties
The following properties can be specified in the Selection Properties window:
Name
This is the mandatory name of the rule. Any identifier is allowed.
Description
This is the description of the rule. Providing a description is highly recommended. Any
description if defined is included into the generated documentation for the business
space version – see Generating Documentation. To provide the description of the rule,
click on the Description button next to the rule’s name. The Configuration Tool will
display the Description dialog – enter the description and press OK.
Enabled
Ticking this checkbox will enable or disable a rule. When the rule is disabled it does not
participate in the evaluation of rules by the Rule Engine.
Priority
The rule priorities are described in details in the Rule Priorities section. By default
Aware IM will assign a priority to the rule based on the rule actions. Actions that modify
attributes will have the highest priority whereas actions that call pre-defined operations
(such as FIND, SEND etc) will have lower priority while actions that initialise documents
from templates will have the lowest priority. You can set rule priority explicitly and
override automatic detection of priorities.
While loop
The rules supporting the semantics of a “while” statement are explained in detail in the
While Semantics section. If you tick the “while loop” checkbox, the conditions of the rule
will be checked repeatedly – immediately after the execution of the rule’s actions.
Form initialiazation
Initialization rules are explained in detail in the Initialization Rules section. Basically
when the user creates an instance of a business object the appropriate form of the
business object is displayed. The form is initialized with values calculated after
evaluation of certain rules attached to the business object. Only initialization rules are
evaluated. You can get Aware IM to automatically determine which rules are considered

Aware IM 8.8 User Guide
Copyright © 2002-2023 Awaresoft Pty Ltd Page 218 of 479
to be initializtion rules by selecting the “Automatic” option (default) or you can explicitly
indicate whether the rule should be evaluated during form initialization or not.
Note that these options are only available for rules attached to a business object.
Dynamic
Sometimes it may be necessary to dynamically re-calculate attribute values on forms
while the user is making changes. For example, you may have a calculation rule that
calculates value of an attribute based on values of other attributes and you want the
user to see the results of re-calculation immediately after he makes a change that
affects the calculation. In this case it is necessary to mark the rule that performs the
calculation as “dynamic”, so that Aware IM executes this rule dynamically while the form
is being changed.
Do not run on server
If you mark the rule as “dynamic” it will be executed both when form is recalculated and
on the server. Sometimes it may be necessary to execute rule only when form is
recalculated and do not execute it on the server. The typical scenario when this may be
necessary is when you want to initialize some attribute with a value after the user makes
a selection in a drop down. But at the same time you want the user to be able to override
the initial value if necessary. The rule that initializes the value based on some other
attribute has to be dynamic and for the user to be able to override the initial value you
need to make sure that the rule doesn’t run on the server
Don’t check referred
This checkbox controls whether the rule will be recognized as a cross-reference rule.
See Cross-reference Rules for details and the example of a scenario when turning off
cross-reference rules might be useful.
Rule Filter Dialog
To invoke the Rule Filter dialog where you can specify which rules will be shown click on
the icon in the toolbar at the top of the table.The following options can be specified:
Rule name
Select this option if you want to view only rules that have the specified text in their
names. You must also provide the text to filter by, whether you want the search for the
names to be case sensitive and whether you want to match rules with the names exactly
equal to the specified text or containing the specified text.
Rule text
Select this option if you want to view only rules that have the specified text anywhere in
their textual expression. You must also provide the text to filter by, whether you want the
search for this text to be case sensitive and whether you want to match rules with textual
expressions exactly equal to the specified text or containing the specified text.

Aware IM 8.8 User Guide
Copyright © 2002-2023 Awaresoft Pty Ltd Page 219 of 479
Show auto-generated rules
Select this option if you want to view rules generated by the Configuration Tool
automatically. When you define attributes of business objects and notifications (see
Adding/Editing Attributes) the Configuration Tool may generate certain rules behind the
scenes. Rules are automatically generated when:
- An attribute has an initial value.
- An attribute has choices.
- The “Value must be provided” option for an attribute is turned on.
- An attribute is “calculated”.
- An attribute has upper or lower limits.
Show rule priorities
Select this option if you want the table of rules to have a special column that shows rule
priorities
Show dynamic rules
Select this option if you want the table of rules to have a special column that shows
whether the rule is “dynamic” – see the “Dynamic” property above.
Context Assistant
The Context Assistant is a little pop-up window that helps you enter and edit expressions
of the Rule Language. The Context Assistant window comes up when you press F3
while typing text of a rule or tag expression. The Rule Editor with the Context Assistant
open is shown on the picture below:

Aware IM 8.8 User Guide
Copyright © 2002-2023 Awaresoft Pty Ltd Page 220 of 479
The main window of the Context Assistant contains prompts relevant to the text of the
rule expression currently being typed – note on the picture above the current text of the
rule expression is “Cu” so the Context Assistant window contains prompts of the existing
pre-defined operations and processes starting with “Cu”. The yellow window to the right
of the Context Assistant’s prompts window contains the explanation of the prompt
selected in the prompts window – the currently selected prompt is the Customer object,
and so the explanation window contains the description of this object.
The Context Assistant may be very useful if you want to type in the names of business
objects, attributes, processes etc without having to leave the rule editor and open the
corresponding node in the Elements Tree or the corresponding element editor. The
Context Assistant is also a very good help if you are not very familiar with the Rule
Language as it automatically suggests the right Rule Language construct when you type
in your rule expression. It also has a list of all expressions and pre-defined actions used
in the Rule Language as well as the list of all functions (all accompanied by the
appropriate explanation).
To use the Context Assistant press F3 while you are typing your Rule Language
expression. The Context Assistant will display a list of prompts relevant to your current
text. Press the Arrow Down button on the keypad to move to the prompted items in the
Context Assistant window. As you are moving between the items the explanation
window will show the explanation of the currently selected item (if there is any). To

Aware IM 8.8 User Guide
Copyright © 2002-2023 Awaresoft Pty Ltd Page 221 of 479
select the item press Enter – the text of the item will appear in the text of your Rule
Language expression. You can also click on a prompt item with a mouse to select it and
see its explanation or double click on the item to get it to appear in the text of the
expression.
If you press F4 instead of F3 the Context Assistant displayed will have a list of all
functions that can be used in rules.
Adding/Editing Processes
The following section describes how to work with the editor of processes when adding a
new process or editing an existing one. Processes are described in the Processes as
Links between User Interface and Business Logic section.
The editor of processes can be started as described in the Working with Configuration
Elements section. It has two tabs – Action Rules and Failure Rules. Properties of the
process are displayed in the Element Properties window. Action and Failure Rules
represent rule collections, which can be edited using the Rule Editor For details how to
work with the Rule Collection see Working with Rule Collection Editor.
Action rules determine what the process will do (unless the process is implemented by a
custom software component – see below). Failure rules deternine what happens (if
anything) if a process fails. Failure rules are explained in the Process Failure Rules
section.
The following properties can be specified for a process:
Name
Specify the name of the process uniquely identifying it within the business space
version. The following restrictions apply:
- The name must start with a character (not digit) or underscore symbol. All other
symbols must be characters (including underscore) or digits. Space symbols are not
allowed.
- The name must be unique among the names of other processes defined in the
business space version.
Description
Specify the description of the process. Providing a description is highly recommended.
Any description if defined is included into the generated documentation for the business
space version – see Generating Documentation.
Category
You can group processes by category. Processes belonging to a particular category are
grouped in the Elements Tree. Enter a new category or select from the list of existing

Aware IM 8.8 User Guide
Copyright © 2002-2023 Awaresoft Pty Ltd Page 222 of 479
ones. You can apply the same category to several processes at once if you paste them
under this category in the Elements Tree.
Process Input
Click on this property to bring up the “Process Input” dialog and specify business objects
and/or business object groups (if any) required by the process.
Instances of the business objects that the process works with may come from two
sources:
1. The process itself may look for the instances of the business objects it needs by
executing FIND action of the Rule Language.
2. The instances of the business objects the process needs may be written into the
Context just before the process starts (see Context of Rule Execution) so when the
process starts these instances are immediately available for the process to use in its
implementation rules. These are the instances of the business objects declared as
process input.
To define business objects or business object groups as process input select the objects
or groups in the left list box and press the Right arrow button to move the selected
objects or groups into the right list box. Similarly if you want to delete certain business
objects or groups from the process input select the objects or groups in the right list box
and press the Left arrow button to move them into the left list box.
Implementation
The following options are available:
- Rules – select this radio button if you will define rules that implement the process (at
least one rule must be defined). Use Action Rules tab to define the rules – see
Working with Rule Collection Editor.
- Custom Software Component – select this radio button if the process is implemented
by a piece of code – see “Aware IM Programmer’s Reference”. If you select this
option you will also need to provide the fully qualified name of the Java class that
implements the process, for example “com.mycompany.MyClass”.
User name
Enter any name that will be displayed to the user to represent a process. Currently only
used in the list of active processes or when a process becomes a background process.
Allow cancel
Aware IM will automatically add the Cancel button when a process runs, so that the user
can abort the execution of the process. Sometimes it may be necessary to disallow the
user to cancel a process. In this case you need to untick this checkbox.
Handles “Forgotten Password” Functionality
Tick this box if you want the process to handle the “forgotten password” functionality. In
this case the process will be called when the user clicks on the “Forgot your password”

Aware IM 8.8 User Guide
Copyright © 2002-2023 Awaresoft Pty Ltd Page 223 of 479
link on the login form, or if the “forgotten password” URL is invoked directly. The process
can ask the user a security question, verify the answer and reset the password or do
something else. Note, there can only be one process that handles the “forgotten
password” functionality.
Run in the background
If a process takes a long time to execute (such as, for example, large import process or
a process handling large queries in batches) it is possible to run such a process in the
background. The user will be able to continue working with the system while the process
is running in the background. The user will be notified when the process completes or
when it requires interaction with the user. Here you can specify a number of seconds
that the system has to wait before it starts running the process in the background. Note
that this property should only be used for processes that the user starts explicitly, not for
processes that are started from other processes. For more details about long-running
processes see this video tutorial.
Single tab mode
By default all intermediate process operations are performed in a popup window. For
example, consider this process that allows user to create a new object and then
redisplays its form for editing:
ENTER NEW Object
VIEW Object
The first and all subsequent actions except the last one are considered to be
intermediate actions. Depending on the nature of the last action it can be treated as an
intermediate one or as the final one. The last action that expects input from the user is
still an intermediate action, but if the action just displays the results and does not expect
input from the user, it is considered to be the final one. The VIEW action does not expect
input from the user, so it is the final one in this case. In most cases intermediate actions
are displayed in a popup window. The final action is displayed according to the
designated output of the process, specified either in a form/query operation or a menu
command (depending on where the process is used). You can also specify that
intermediate actions be displayed in the current tab rather than a popup window. This
option is useful for applications running on a mobile phone where popup windows can
be problematic.
Display under
You can get Aware IM to display the process node in the Elements Tree under a node
of some other process. If you want this select the process under which the current
process should be displayed
Isolation level
This property allows specifying database transaction isolation level that will be used
when the process executes. Transaction isolation level is an advanced subject and its
description is beyond the scope of this document. You can read this article
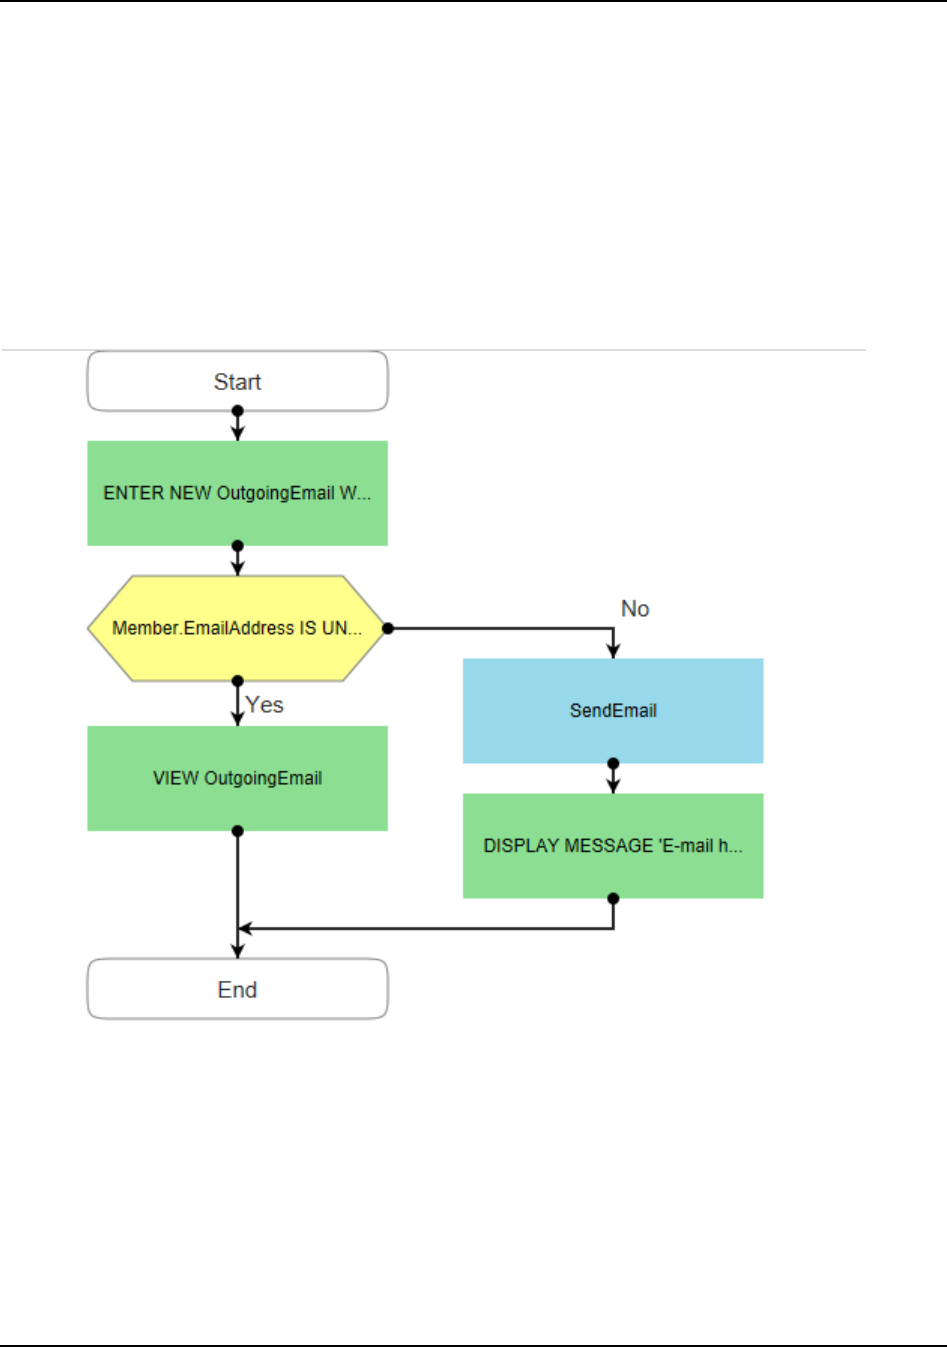
Aware IM 8.8 User Guide
Copyright © 2002-2023 Awaresoft Pty Ltd Page 224 of 479
https://en.wikipedia.org/wiki/Isolation_(database_systems) for more
details. If you don’t specify the isolation level, the default level (“read committed”) will be
used.
Process Diagrams
If you click on the “Diagram” tab at the bottom of the process editor you will see the flow
chart of the process rules as shown on the picture below.
The diagram shows conditions and actions of the rules of the process. You can click on
the condition or action and edit it directly on the diagram (the full text of the action or
condition is displayed at the bottom of the screen and you can edit it there).
If a process calls another process (sub-process) it is displayed as a blue box on the
diagram. You can double click on this box (or click “Expand” at the bottom of the screen)
to see the rules of the sub-process on the same diagram as shown on this picture:

Aware IM 8.8 User Guide
Copyright © 2002-2023 Awaresoft Pty Ltd Page 225 of 479
To collapse the rules of the sub-process click on the “-“ icon in the top right corner of the
sub-process. You can also move actions and conditions around by pressing the arrow
buttons in the toolbar and customize the appearance of the diagram by pressing the
“Settings” button on the toolbar.

Aware IM 8.8 User Guide
Copyright © 2002-2023 Awaresoft Pty Ltd Page 226 of 479
Adding/Editing Business Object Groups
The following section describes how to work with the editor of business object groups
when adding a new group or editing an existing one. Business object groups are
described in the Business Object Groups section.
The editor of business object groups can be started as described in Working with
Configuration Elements. The following properties of a business object group must be
specified:
Name
Specify the name of the business object group uniquely identifying it within the business
space version. The following restrictions apply:
a. The name must start with a character (not digit) or underscore symbol. All other
symbols in the name must be either characters (including underscore symbol) or
digits. No spaces or special symbols are allowed.
b. The name must be unique among the names of other business objects, business
object groups and notifications.
c. The name cannot start with one of the instance prefixes – This, That, Added,
Removed, LoggedIn or Changed.
d. The name cannot be one of the reserved names – File, Day, Question,
EmailSender, ReceivedEmail, IncomingEmail.
e. The name must not be the name of the basic attribute types – Number, Date,
Duration, Timestamp, Shortcut, Document or Picture.
Description
Specify a description of the business object group. Providing a description is highly
recommended. Any description if defined is included into the generated documentation
for the business space version – see Generating Documentation.
Group Members
These are business objects that the group contains. At least one business object must
be defined (most business object groups will have at least two members). To define
business objects as group members select the objects in the left list box containing all
business objects defined in the business space version (you can use SHIFT and
CONTROL keys to select multiple objects) and press the Right arrow button to move the
selected objects into the right list box. Similarly if you want to delete certain business
objects select the objects in the right list box and press the Left arrow button to move
them into the left list box.
Presentations
Presentations can be defined to provide a custom layout of the attributes of a business
object group members when the instance(s) of the group’s members are displayed by a
query or by a process. The presentation concept for a business object group is exactly

Aware IM 8.8 User Guide
Copyright © 2002-2023 Awaresoft Pty Ltd Page 227 of 479
the same as the one for a business object. The presentation defined for a business
object group applies to all members of the group. See Defining Presentations for details.
Adding/Editing Queries
The following section describes how to work with the editor of queries when adding a
new query or editing an existing one. Queries are used in the Operation Mode to search
the system’s data for instances of some business object or business object group that
match some condition(s). Queries can be run by the user or used by FIND, PICK FROM
EXEC_SP EXEC_SQL or DISPLAY actions of the Rule Language. See also Configuring
Queries.
The editor of queries can be started as described in the Working with Configuration
Elements section. It contains 2 tabs – the Standard View and the Textual View. The tabs
represent different ways of specifying a query.
- The Standard View tab provides a convenient user interface for specifying query
conditions. However, not all queries can be specified using the Standard View. See
also Specifying Query Using Standard View.
- Where it is not possible to specify a query using the Standard View it is possible to
specify a query using the Textual View. The Textual View tab allows entering the
FIND , EXEC_SP or EXEC_SQL actions of the Rule Language. See Specifying
Query Using Textual View.
The preview of how the query will look like in the browser is displayed underneath the
query editor. Any changes you make to the query are immediately reflected in the
preview. You can turn embedded preview on or off by clicking on the icon in the
toolbar above the query editor. The settings of the preview (such as the theme used and
font size) can be specified by clicking on the icon. To see query preview in the
standalone browser click on the icon.
To apply a particular presentation style to a query, select the I con in the toolbar. For
more details about styles see Form and Grid Styles section.
The following properties of a query can be specifed:
Name
Specify the name of the query uniquely identifying it within the business space version.
The name must be unique among the names of other queries defined in the business
space version. Any symbols (including spaces) are allowed.
Category
You can group queries by category. Queries belonging to a particular category are
grouped in the Elements Tree. Enter a new category or select from the list of existing

Aware IM 8.8 User Guide
Copyright © 2002-2023 Awaresoft Pty Ltd Page 228 of 479
ones. You can apply the same category to several queries at once if you paste them
under this category in the Elements Tree.
Description
Specify a description of the query. Any description if defined is included into the
generated documentation for the business space version – see Generating
Documentation..

Aware IM 8.8 User Guide
Copyright © 2002-2023 Awaresoft Pty Ltd Page 229 of 479
Panel Operations
The buttons will be displayed at the top, bottom, left or right of the query. Alternatively
they can be temporarily added to the application menu or put in the “tools area” of the
panel header. The menu will allow uses to perform certain operations from the query –
start a process, display a document and so on. The concept is very similar to the panel
operations of the form.
Some spefic operations available for queries include Exporting query results in CSV,
XLSX and PDF formats.
Panel Header
This is exactly the same as defining panel header for object forms.
Item Display Rules
Specify conditions for displaying entries in the results table in different colors and font
styles (this is similar to defining item rules for references – see “Item Display Rules”).
Auto Refresh
Aware IM will automatically refresh query results whenever an object shown in query
results is modified, or when a process invoked by a query operation completes.
Sometimes it may be necessary to refresh the query results screen after some other
object is modified or some other process completes. The “Auto-Refresh” options allow
you to specify such objects and/or processes as well as define a time interval for
periodic automatic refresh.
Resizing
Click on the “Resizing” property to allow/disallow the user to resize the query results
panel at run time and/or specify size constraints. The Resizing Options dialog will be
displayed. Tick the “Resize Width” checkbox to allow user to change width of the panel;
tick the “Resize Height” checkbox to allow user to change the height. Specifying size
constraints can be useful if your application is displayed on different screen sizes and
resolutions. For example, if you specify min. width scroll bars will be displayed on small
screens, but not on the large ones.
CSS style and CSS class
Here you can assign CSS style and class to the query to customise its appearance. See
the “How to use CSS” section in the How To Guide for more details.
Tour
The “Tour” feature allows configurators to add explanation to the elements of the query
results screen, so that the user can understand the screen better. The explanation of the
element is displayed to the user at the bottom of the screen with the marker pointing to
the element of the screen being displayed. The user can jump between the elements of
the screen and Aware IM automatically scrolls to the element being explained and
displays the marker for the element. For more details about tours see the “How to use
the Screen Tour feature” in the How To Guide.

Aware IM 8.8 User Guide
Copyright © 2002-2023 Awaresoft Pty Ltd Page 230 of 479
Script
For users who are familiar with Javascript this dialog allows specifying additional
parameters when queries are initialized and displayed. See Programmers Reference
Guide for more details.
Displaying Query Results
The “Display As” property of the query determines how the instances of business objects
found by the query are displayed in the Operation Mode. When you click on this property
the “Display Query Results” dialog is displayed. You have to select the radio button
indicating how the query will be presented (“Standard Grid”, “Custom”, “Chart” and so
on) and then define settings specific to each type of the presentation. Sometimes these
settings are specified in the dialog and sometimes you can define query properties in the
Element Properties window that are specific to a particular type of query presentation.
Standard Grid
Select this option if you want Aware IM to display the found instances in a standard
manner where every instance is displayed as a row in a table – see Standard Form of
Query Results.
If you select this option you can also specify the following:
Attributes to display
You can specify which attributes of the business object or group will be displayed in the
table. To do this tick the checkbox next to the required attributes. Use the Up and Down
arrow buttons to change the order in which attribute values will be displayed on the
standard screen. You can also specify how the attribute will be displayed – the value of
the attribute only, the value and icon or the icon only. Icons are displayed according to
presentation rules for icon elements – see Common Properties. You can also specify
width of each column in pixels or percents (to specify width in percents add % symbol,
for example 50%), column alignment and whether or not the attribute will be editable
(provided “Inline editing” checkbox is ticked – see below).
The dialog displayed when you click the “Edit…” button allows you to specify the
following additional properties of the column:
Column Label – the default label for the column is the one defined for the
attribute, but you can override this value and provide query-specific label
Display format – you can specify query-specific format of the attribute display. For
example, you can define a dollar symbol in front of the number - $#.00
ID – you can define a unique id of the column to be used in the Tour feature

Aware IM 8.8 User Guide
Copyright © 2002-2023 Awaresoft Pty Ltd Page 231 of 479
Use Attribute Styles – if an attribute has presentation rules for STYLE elements )
see Common Properties) you can get the query to display the attribute with these
styles
Lock - lock a particular column of the grid so that it is always displayed on the
screen even when you scroll the screen
Column Display – you can hide certain columns initially (with or without
conditions). The user can then turn the display of the column on if necessary
(Column Menu must be turned on for the grid)
Screen Responsiveness – these options help to make the grid responsive to
screen size changes. You can turn visibility of the column on or off depending on
the available screen size. You can also make the column bigger or smaller.
Column Grouping – you can group a number of column headers under a certain
name. When you select the same group name to a number of columns all
columns with the same name will be displayed under the header with this group
name (see the picture below)
Summary - you can specify a “summary” that will be displayed at the bottom of
the grid for this column. This could be useful when, for example, you want to
calculate a sum total of values displayed by the query and display it at the bottom
of the table. When entering a summary you can use expressions in tags and
HTML. For example, the following summary will display sum total of account
balances found by a query in bold and right aligned:
<p align=’right’><b>Total balance: <<SUM
Account.Balance>></b></p>
TIP: If you want to display values of attributes of the referred instances you will need
to define shortcut attributes that refer to the required attributes – see Reference
Attributes and Setting Properties of Shortcut Attributes.

Aware IM 8.8 User Guide
Copyright © 2002-2023 Awaresoft Pty Ltd Page 232 of 479
Calculated columns
You can define “pseudo” columns that will only be used to display calculations based on
the values of other columns. If the calculation is only displayed in a particular query you
don’t need to go through the trouble of defining a special calculated attribute and a rule
to calculate this attribute. Instead you can just define a calculated column in the query.
This technique is also much more efficient performance-wise, as the calculations will be
embedded inside the SQL that is generated when the query runs. To do this you need to
click on the “Add Calculation” link above the table of displayed attributes. You should
then provide the name of the pseudo column (has to be unique among all other
displayed columns) and the calculation to perform, for example: Obj.Attr1 +
Obj.Attr2
Operations with records
You can also define operations that the user can invoke with the instances of the
business object shown in query results. The operation types are exactly the same as
those that can be invoked from a form of a business object (see Adding/Editing Form
Operations). Each operation is represented as a hyperlink that the user can click to
invoke the operation. Operations defined here will be located next to the query items.
One of the operations can be designated as a detault operation. The default operation
will be executed if the user clicks anywhere on the row of data – not only on the icon
representing the operation.
Items per Page
Specify the number of instances to display on each page (if there are more instances
found by the query than the specified number, other instances may be navigated to
using the traversal buttons automatically generated in the standard query results
screen).

Aware IM 8.8 User Guide
Copyright © 2002-2023 Awaresoft Pty Ltd Page 233 of 479
NOTE: If you select Unlimited as number items per page the query will be displayed
without any paging at all. The user will be able to scroll through very large sets of data
without having to list the pages. Aware IM will automatically download the required data
from the server during scrolling.
Width, Height
Specify the width and height of the query results table in pixels. If you do not specify any
values the results table will occupy all available width and the height will be calculated
automatically.
Stretch to the bottom of the screen
If this option is selected Aware IM will automatically stretch the grid showing query
results, so that its paging bar is aligned with the bottom of the screen.
Allow inline editing
Tick this box if you want to enable user to modify the instances of the objects found by
the query directly in the table. This is similar to inline editing of references.
Use popup editor
This option is only available if inline editing is on. There are two ways inline editing can
be done – using the standard editor and using the popup editor. The standard editor lets
you edit each cell individually while the popup editor displays a popup window for the
entire row. With the standard editor changes are saved after the user leaves the current
cell and with the popup editor the changes are saved only when the user clicks on the
Update button for the entire row.
Number rows
Tick this box to show item numbers next to each row
Show column menu
If you tick this checkbox each column header in the table will have a button that allows
user to hide/show certain columns.
Show paging bar
If you tick this checkbox paging bar is displayed for the table. You can further control
how paging bar is displayed if you click on the More… button
Display paging bar only when necessary
If you tick this checkbox paging bar will be displayed only if query results have multiple
pages (“Show paging bar” checkbox must be ticked)
Select first record
If you tick this checkbox the first record in the table will be selected when the table is
displayed. Using this option is especially useful if you also define a default item
operation for the query. In this case this operation will be automatically executed for the
first record when the query is displayed.

Aware IM 8.8 User Guide
Copyright © 2002-2023 Awaresoft Pty Ltd Page 234 of 479
Show previous and next buttons/Show buttons with page numbers/Show input control to
enter page number to navigate to/Allow user selecting size of the page returned by the
query (from the More dialog)
These are all different options of the pagebar control. Their meaning is self-explanatory.
Fetch records for all pages at once (More dialog)
If you tick this checkbox Aware IM will display all records found by the query on a single
page – no matter how many there are.
Mobile style rendering of inline edits and filtering on mobile devices
If screen real estate is limited Aware IM can use a different user interface for inline
editing and filters. This option should be turned on if the query with inline editing and/or
filtering is to be used on mobile phones.
There are also some properties specific to the Standard presentation available in the
Element Properties window for the query:
Filters
Click on this property to show one or more text boxes above the query results table (see
the picture – note the text boxes under the First Name and Last Name columns). If the
user enters the value into the text box and presses Enter the query results will be filtered
according to the entered value..
You can select from the following sub-options:

Aware IM 8.8 User Guide
Copyright © 2002-2023 Awaresoft Pty Ltd Page 235 of 479
Show filter button in the corresponding column header
Rather than displaying a text box in a separate row as on the picture abov selecting this
option will only display a filter button in the column header. The user can click on the
button and choose various filtering options.
Show filters as a separate row at the top of the grid
This shows text boxes in a separate row as shown on the picture above but does not
include the filter button next to the text box. The user can only filter using the text boxes.
Show filters both in the column header and in a separate row
This option is shown on the picture above. The filters are displayed in a separate row
and the user can filter both by using text boxes and also the filter button next to the text
box.
Filter attributes
You can select which attributes will be filterable. For those that are not Aware IM will not
display the filter button and/or filter text box.
Grouping
Click this property to group displayed instances based on the specified attribute. All
instances with the same value of the attribute will be displayed together. It will be
possible to expand and collapse the node with these values (see the picture below – on
this picture issues are grouped based on the value of the “Status” attribute.

Aware IM 8.8 User Guide
Copyright © 2002-2023 Awaresoft Pty Ltd Page 236 of 479
You can group by more than one attribute (click the “Add” button to add attributes to
group by). For each attribute you can provide the HTML template with which the header
of the group will be displayed. You can refer to some predefined values in the template
by enclosing them in #= … # symbols, for example:
#=value#
The following predefined values can be used:
value - the current group value
field - the current group field
average - the value of the "average" aggregate (if specified)
count - the value of the "count" aggregate (if specified)
max - the value of the "max" aggregate (if specified)
min - the value of the "min" aggregate (if specified)
sum - the value of the "sum" aggregate (if specified)
The default template is: #=value#(#=count# items)
So if you group by issue status, for exmaple, you get this as group headers:
Open (5 items)
…
Closed (10 items)
…
You can also optionally display a summary for each group. Usually this applies to
number attributes. For example, if your query displays account balances you can display
sub-total of balances per each group. The style of the summary can be specified in the
Presentation column. You can refer to the value of the summary using the {Value}
construct, for example: Total balance in a group is {Value}
You can also allow end users to define their own grouping. Users would do this by
dragging the attribute they want to group by into a special area above the query. You
can define which attributes users will be able to group by as well as the template of the
header of the group.

Aware IM 8.8 User Guide
Copyright © 2002-2023 Awaresoft Pty Ltd Page 237 of 479
Expansion of rows
Clicking on this property allows you to specify what happens when the row in the grid is
expanded (if anything). The following options are available:
Do not allow expansion of grid rows
This is the default option. The user cannot expand rows
Show values of attributes using template
If this option is selected Aware IM will show the specified HTML template. Usually you
would display values of attributes (some long text, for example) here, such as on the
picture below that shows the HTML message of the email communication:
Show results of the operation below
When this option is selected Aware IM will execute the specified operation when the row
is expanded. This is a really powerful option that allows you to define forms inside grids,
related grids (grid hierarchy and so on). The picture below shows the form of the
customer whose record has been expanded:

Aware IM 8.8 User Guide
Copyright © 2002-2023 Awaresoft Pty Ltd Page 238 of 479
Reordering
Clicking on this property allows you to enable users to reorder items in the table. This is
explained in detail in the “How to implement Item Reordering” section of the “How To”
Guide.
When mouse over record
This dialog allows you to specify what happens when the user hovers the mouse over
the record in the query results table. The following options are available:
1. Do nothing – this is the default value
2. Display a default form showing all attributes – when this option
is selected Aware IM will display a form with values of all attributes displayed by
the query
3. Display a default form showing attributes hidden initially –
same as the previous one, but the form only shows those columns that have been
marked as “hidden initially:
4. Display HTML below – with this option you can control exactly what is
displayed and how. You can provide any HTML and refer to the attribute values
using curly brackets, for example <div>Name is: {Name}</div>
Custom Presentation
Select the Custom radio button on the “Display Query Results” dialog if you want the
results of the query to be presented in a custom manner. There are two alternative ways
of using the custom presentation:
1. Use a presentation of the business object or business object group that the query
is looking for – see Defining Presentations. The results of the query will be
displayed according to this presentation. To use this option you need to select the

Aware IM 8.8 User Guide
Copyright © 2002-2023 Awaresoft Pty Ltd Page 239 of 479
“Display Presentation” radio button and then select the presentation you want in
the “Presentation” combo box.
2. Provide an HTML code that will display the data returned by the query (called
data template). The rest of this section will be describing this approach, as it is
very powerful and versatile.
If you want to display query results using an HTML template, you need to select the
“Display custom data template” radio button and then provide the HTML code or select
from the list of predefined templates. The HTML code is displayed for every row of data
that the query returns.
Within the body of your HTML code you can refer to the attributes being displayed by the
query. The name of the attribute must be enclosed in curly brackets, for example,
{Subject}.
Below you will find an HTML fragment from the Sales Portal sample application that
displays query results of an object that has FirstName, LastName, Title and
Photo attributes.:
<div class="nwd-employee">
<div class="nwd-employee-wrapper">
<div class="nwd-employee-list-image">
{Photo}
</div>
<dl class="nwd-employee-list-details">
<dt class="nwd-employee-name">{FirstName} {LastName} </dt>
<dd class="nwd-employee-title">{Title}</dd>
</dl>
</div>
</div>
The result is shown on the picture below:

Aware IM 8.8 User Guide
Copyright © 2002-2023 Awaresoft Pty Ltd Page 240 of 479
The following options are available:

Aware IM 8.8 User Guide
Copyright © 2002-2023 Awaresoft Pty Ltd Page 241 of 479
Use custom data template
If this option is selected you can specify any HTML fragment you like – depending on
your CSS styles it will be displayed either as a vertical list as in the picture above or as
a horizontal list.
With this template you can some options from the standard presentation, such as paging
bar and automatic selection of the first record.
Here you can also tick the “Display mobile scroll view” option. This option is especially
useful for mobile phones. If this option is selected Aware IM will show the template of
one record at a time and the user will be able to swipe back and forth to the
next/previous record.
Use custom mobile template
This template is displayed by a different widget compared to the first option. This widget
can only display vertical lists but it also supports certain features not available if you
select the first option.
The features specifically supported by this widget are
infinite scrolling
Grouping of items based on the value of some attribute (if “Support item
grouping” checkbox is ticked
Ability to fix the grouping headers during scrolling (if “Fixed headers” checkbox is
ticked)
Item operations assigned to a single button (if item operations are defined using
the Menu button)
Simple filtering (if Filters are defined using the Menu button)
Multiple selection using checkboxes
This template is especially useful for mobile phones.The picture below shows an
example of such template with grouping and operation button:

Aware IM 8.8 User Guide
Copyright © 2002-2023 Awaresoft Pty Ltd Page 242 of 479
The following properties specific to the custom presentation of query results are
available in the Element Properties window of the query:
Template body
In this area you can define an HTML code that will be used to display each record found
by the query. You can either enter HTML directly or you can use the Custom Template
Builder that allows building the template interactively and then automatically generates
the corresponding HTML code. To use the Custom Template Builder click on the

Aware IM 8.8 User Guide
Copyright © 2002-2023 Awaresoft Pty Ltd Page 243 of 479
“Build…” button. For details how to use the custom template builder please watch the
video tutorial about custom queries.
Layout
The radio buttons in this section allow specifying how the records in the final display will
be arranged – this is also explained in detail at the end of the video tutorial about
custom queries.
Operations with items
For non-mobile templates operations are displayed in the context menu when the user
clicks on an item with the right mouse button (unless the Custom Template Builder is
used, which provides its own way of defining item operations where each operation is
part of the template itself).. Default operation is performed when an item is clicked. For
mobile templates all item operations are assigned to a button (you can control the icon
displayed for this button). When the user taps this button a popup menu with operations
is displayed.
Filters
For non-mobile templates filters are displayed as text boxes – either in the toolbar at the
top, bottom or inside the default panel header of the query. For mobile templates only a
single filter can be displayed at the top of the query.

Aware IM 8.8 User Guide
Copyright © 2002-2023 Awaresoft Pty Ltd Page 244 of 479
Calendar/Scheduler Presentation
Select this “Calendar” radio button on the “Display Query Results” dialog if you want the
results of the query to be presented in a calendar-like fashion (see Calendar Form of
Query Results). You can only specify this option if a query queries on object of the
Appointment type. You can specify the following options:
Width/Height
Width and height of the calendar/scheduler in pixels
Stretch to the bottom of the screen
If this is ticked the height of the calendar will be automatically calculated to occupy the
entire screen
Allow searching for appointments
If this is ticked the calendar will have a special control that allows users to search for
events with the subject that matches what the user entered in the control.
Working Day Starts (Finishes) At
Specify the time when working day starts and finishes. All hours outside of this range will
be shaded.
List of views
You can specify which views will be shown on the calendar/scheduler. The user will be
able to switch between the selected views at runtime
Default view
Specify the view of the calendar that will be shown when the calendar is displayed.
Major tick interval
This option is valid for “Day” and “Week” views only. It specifies the duration of the main
time interval in these views in minutes ( an hour by default)
Minor ticks
This option is valid for “Day”, “Week” and “Timeline” views only. It specifies the number
of “ticks” for the main time interval (major tick)
Date format
Format of dates displayed in the view
Major time format
Format of time displayed for the main time interval of the view
Minor time format
Format of time displayed for the minor ticks of the view
Editing of Calendar Appointments

Aware IM 8.8 User Guide
Copyright © 2002-2023 Awaresoft Pty Ltd Page 245 of 479
(this is available through the “Editing and Resources” property of a calendar query)
Choose between 3 options:
Built-in popup form editor
When this option is selected Aware IM will open a predefined popup form for the
Appointment object. Note that this form will be created by Aware IM on the fly – it
WILL NOT use any of the forms that you have defined for the object. Here you can also
specify attributes that will be displayed on the popup form by clicking on the “Attributes
to Edit” link. There you can also select whether the form will allow the user to specify
recurrence properties of an appointment. Note that if you want to support recurring
appointments you must use built-in popup form editor
Editing using operations below
Select this option if you want to fully control the layout of your editing form. Here you can
select an operation that will be run by Aware IM when the user clicks on the
appointment to edit it. You can either specify a Create Object, Edit Object, Start Process
or Execute Javascript operation.
Not allowed
Selecting this option will disable creation and/or editing of appointments

Aware IM 8.8 User Guide
Copyright © 2002-2023 Awaresoft Pty Ltd Page 246 of 479
Resources for timeline views
(this is available through the “Editing and Resources” property of a calendar query)
Timeline views show appointments allocated to “resources” – for example, day or week
schedule for a particular person(s). “Resources” must be represented as reference
attributes of the Appointments object shown on the scheduler. For example, if an
appointment is for a particular staff member there must be a reference attribute that links
the Appointment with this staff member. At run time Aware IM will show all appointments
of a particular staff member on one timeline and all appointments of another staff
member – on another timeline. So you just need to provide a reference attribute that
links appointments with its resources.
You can provide up to two different resources. For example, you may show meetings of
a company per room and per staff member as shown on the picture below. Here each
appointment has two reference attributes – one for the staff member and one for the
room:
Other Settings dialog:
The following options are available after you click on the Other Settings dialog:

Aware IM 8.8 User Guide
Copyright © 2002-2023 Awaresoft Pty Ltd Page 247 of 479
Vertical orientation
Tick this option to display calendar/scheduler in the vertical orientation – with days on
the left rather than at the top
Allow moving events/resizing appointments
Tick these options to allow user to move and resize appointments on the
calendar/scheduler
Allow deleting appointments
If this option is selected Aware IM will display a little icon that allows user to delete the
appointment.
Show working hours only
If this option is selected Aware IM will only show working hours as specified by the
Working Day Starts At/Ends At values. Other hours will not be shown.
Fetch all calendar records at once
If this option is selected Aware IM will get ALL appointments of the calendar from the
server when the calendar is displayed. Otherwise, it will only get appointments for the
current page displayed by the calendar and other appointments will be retrieved only
when the user moves to the next or previous page
Mobile style rendering on mobile devices
If screen real estate is limited Aware IM can use a slightly different user interface for the
calendar/scheduler. This option should be turned on if the calendar/scheduler is to be
used on mobile phones.
Firstf Day of the Week
Specify the day that the week should start with.
Row Height
Height of the calendar row.

Aware IM 8.8 User Guide
Copyright © 2002-2023 Awaresoft Pty Ltd Page 248 of 479
Column Width
Width of the calendar column
Starting Date
These options specify which date the calendar/scheduler should show the appointments
for when it is first displayed. You can specify the current date, the date of the first record
found by the query or a specific date.
Operations for the context menu
Here you can define operations that will be shown on a popup menu when the user
presses right mouse button on some appointment in the calendar. The selected
appointment will be placed in the Context of the operation.
Panel Operations property (Element Properties window)
Most panel operations are similar to the ones described in the Adding/Editing Panel
Operations section. However, there are some operations specific to the
calendar/scheduler – these are described below.
Synchronization with Calendar
Select this operation if you want your users to be able to synchronize their Aware IM
calendar with a third-party Calendar (Google, Outlook, Exchange and others – see full
list of supported calendars here: https://www.cronofy.com/ ). When the Aware IM
calendar is displayed it will show a button that will allow users to sychronize their
calendar using either one-way (from a third-party calendar to the Aware IM calendar or
the other way around) or two-way synchronization.
For more details about this please see the How To Guide
Synchronization with Google Calendar
Select this operation if you want your users to be able to synchronize their Aware IM
calendar with the Google Calendar. When the Aware IM calendar is displayed it will
show a button that will allow users to sychronize their calendar using either one-way
(from Google Calendar to the Aware IM calendar or the other way around) or two-way
synchronization.
You also need to register your Aware IM application with Google and specify your client
id and secret by clicking on the Settings button next to the checkbox. For more details
see the How To Guide.
NOTE: Synchronization with the Google calendar has been superceeded with the
Synchronization with a third-party calendar using Cronofy API – see the
“Synchornization with Calendar” section above. For more details see the How To Guide.
Import/export from/to iCal files

Aware IM 8.8 User Guide
Copyright © 2002-2023 Awaresoft Pty Ltd Page 249 of 479
Select these operations if you want to import files in the ICS format (iCal) into your
Aware IM calendar or export files in this format from your Aware IM calendar. This can
be useful if you want to exchange calendar contents with other popular calendar
programs such as MS Outlook and others.
Export to PDF
This operation exports the calendar in the PDF format
Chart Presentation
Select the “Chart” radio button on the “Display Query Results” dialog if you want the
results of the query to be presented as a chart. The chart will display the value of a
certain attribute of the business object the query is looking for on the X-axis and the
value of another attribute on the Y-axis. Thus, instances of the business object returned
by the query will supply data for the chart. The following options are available when
displaying the query results as a chart:
Width/Height
Width and height of the chart in pixels
Stretch to the bottom of the screen
If this is ticked the height of the chart will be automatically calculated to occupy the entire
screen
Show chart title
If this option is ticked the title of the chart will be displayed at the top or bottom of the
chart. You can also select the font with which the title will be displayed.
Chart Type
Select the type of the chart – Standard, Pie, Donut or Radar.
Standard chart
The “Standard” chart includes Bar and Line charts. You can define several series of bars
and lines displayed on the single chart. The picture below shows a chart with two series
– one bar and one line.

Aware IM 8.8 User Guide
Copyright © 2002-2023 Awaresoft Pty Ltd Page 250 of 479
When you select the Standard chart you have to define the attribute shown on the X axis
and then define one or more series displayed on the chart. For each series you have to
select Bar or Line type and then define the attribute that will be shown on the Y axis for
this series. You can also specify the color of the series here.
You can can add and delete series by clicking the Add and Delete button. Clicking on
the Edit button allows you to specify additional options for the selected series:
Invisibility condition – a condition when the series is not displayed. You can use
tag expressions that refer to the object shown by the chart
Label – whether or not labels will be displayed for the series and where. Labels
display Y values shown by the chart. On the picture above the green bar series
includes labels shown “inside” the bars
Stacked bars – if this is ticked bars are stacked on top of each other (see below)

Aware IM 8.8 User Guide
Copyright © 2002-2023 Awaresoft Pty Ltd Page 251 of 479
Flip X and Y axis- if ticked X and Y axis are flipped as on the stacked bars picture
above
Opacity – opacity of the bar as a number between 0 and 1
Gap – distance between bars of the same series as percentage of the bar width
Spacing – distance between bars of the different series as percentage of the bar
width
Display format – a format with which numbers of the Y axis are displayed. This
allows you to override the number format defined for the attribute itself.
Aggregate function – Aware IM can aggregate different Y values for the same X
value. For example, if a chart shows sales records for different people, Aware IM
can aggregate all sales values for the same person and display just an aggregate
value on the chart. In addition, if X-axis of the series represents a date, Aware IM
can automatically aggregate values even if dates are different. Whether two
different dates are considered the same depends on the value of the “Base Unit”
specified for the X axis. For example, if the value is MONTHS, then all dates
belonging to the same month of the same year are considered equal and are
aggregated.. The aggregation feature often frees up developer from performing
aggregate calculations using rules (and possibly storing the results in some
intermediate object to be shown on the chart instead of the original object)
Show markers, dashed and smooth line, line width – various self explanatory
options of the Line series

Aware IM 8.8 User Guide
Copyright © 2002-2023 Awaresoft Pty Ltd Page 252 of 479
Note that it is possible to display additional series on the chart using the criteria defined
by an additional attribute. Consider a scenario when you have to display product sales
per month. The X axis displays a month and Y axis – total number of sales for the
month. However, you also want to display sales per product where each product is
represented by its own series. In this case you will define one series with Y attribute
representing sales quantity and you will also select the “additional” attribute – a
reference to the product as an “alternative” method for defining series.
Pie chart
This chart type represents pie charts (shown below). You cannot define series for this
chart type, but you can define colors of the pie, as well as properties of the labels:

Aware IM 8.8 User Guide
Copyright © 2002-2023 Awaresoft Pty Ltd Page 253 of 479
Donut chart
The donut chart is shown below. You can define series for this chart type. Each series
represents a ring of the donut.
Area chart
The area chart is shown below. You can define series for this chart type. Each series
represents filled area on the chart.

Aware IM 8.8 User Guide
Copyright © 2002-2023 Awaresoft Pty Ltd Page 254 of 479
Radar chart
The radar chart is shown below. You can define series for this chart type. Each series
represents an area on the radar

Aware IM 8.8 User Guide
Copyright © 2002-2023 Awaresoft Pty Ltd Page 255 of 479
Axis Properties
You can specify the following properties of the X and Y axis:
Title
Ttile of the axis displayed near the axis
Format
If the axis displays dates or numbers your can specify how the values will be formatted.
By default values will be displayed using the format specified in the attribute that the axis
shows
Min. Value / Max. Value
By default Aware IM will automatically determine min. and max. values that the axis will
show based on the available records. However, you can override the default behaviour.
For example, if you want the axis to always start with 0 irrespective of the values shown
you can specify 0 as min. value for the axis.
Number of ticks
By default this number is determined automatically but you can override the default and
provide your own value.
Base unit for dates
This value is related to the aggregate calculations for dates explained in the properties
of series section. It determines which dates will be considered “equal” for the purpose of

Aware IM 8.8 User Guide
Copyright © 2002-2023 Awaresoft Pty Ltd Page 256 of 479
aggregation. For example, if you select “weeks” then values for all dates in the same
week will be aggregated
Legend
If you select this property the chart will show the “legend” describing each series at the
specified position on the chart – for example, in the radar chart above the legend is
displayed at the bottom of the chart.
Tip
Tick this option if you want Aware IM to display a tip when the user hovers the mouse
over the value on the chart. You can select the format of the display:
{SeriesName} refers to the name of the current series;
{YValue}, {XValue} refer to the current values.
Other Settings Dialog
The following properties can be specified if you click on the Other Settings button:
Inset Padding
Padding that will be added to the chart area
Background Color, Backgound Image,
Select these options to specify background colo or image of the chart
Border Color
You can specify a color of the border around the chart area
Opacity
Opacity of the chart area as the number between 0 and 1.
Pan and Zoom support
If this option is ticked the chart will support panning and zooming.
Chart ID
You can assign any value as the chart id. You can then use this value in the SAVE
SCREEN action if you want to capture the chart in a file or in a PDF document.
Tree Presentation
Select the “Trees” radio button if you want the results of the query to be presented as
trees. You can specify the following properties:
What to show in the tree
Define which objects and attributes to show in the tree – see presenting a reference
attribute as a tree.
Panel width and height
Width and height of the tree.

Aware IM 8.8 User Guide
Copyright © 2002-2023 Awaresoft Pty Ltd Page 257 of 479
Expand tree
Whether to expand all nodes of the tree when the tree is displayed.
Gantt Presentation
Select the “Gantt” radio button if you want the results of the query to be presented as
Gantt chart. This option is only enabled if the query looks for objects that are members
of the GanttTask group (the group is created automatically when you add support for
Gantt objects into your application). See the “How to add Gantt chart to your application”
article in the How To Guide for more details. See also the video tutorial about Gantt
charts.
Kanban Boards
A query can be used to display Kanban Boards in Aware IM. A picture of a Kanban
board from the Issue Resolution sample application is presented below:
Here a query that retrieves all issues in the system as shown as 3 Kanban columns –
open issues, closed issues and deferred issues (Status attribute of the Issue object has
the value of Open, Closed and Deferred respectively). The user can move an issue from

Aware IM 8.8 User Guide
Copyright © 2002-2023 Awaresoft Pty Ltd Page 258 of 479
one column to the other, thus changing its status For all the details of how to define
Kanban boards in Aware IM please watch the video tutorial.
.
Displaying Query Results as a Timeline of Events
The results of a query can also be displayed as a timeline of events – see the picture of
the Timeline widgets in the Presentation Options for References section. This option
requires that the object returned by the query has at the very least attributes that store
the date and title of the event, To use this option select the “Timeline” radio button. Then
provide the following options:
Event date attribute
Specify the name of the Date or Timestamp attribute that stores the date of the event.
You must provide this.
Event ttle attribute
Specify the name of the Plain Text attribute that stores the title of the event. You must
provide this.
Event sub-title attribute
Specify the name of the Plain Text attribute that stores the sub-title of the event. This
value is optional.
Event description attribute
Specify the name of the Plain Text attribute that stores the description of the event. This
value is optional.
Event image attribute
Specify the name of the Plain Text attribute that stores the event image. This value is
optional.
Orientation
Orientation of the widget can be vertical or horizontal.
All other options in the dialog are self-explanatory.
Specifying Query Using Standard View
The Standard View tab provides a convenient user interface for defining simple queries.
To define a query using the Standard View, follow the steps below:
1. Specify the name of the business object or business object group that the query will
be looking for in the “Business object or group” drop down of the editor. If you want
the query to perform a search using business object form click on the “Use form”

Aware IM 8.8 User Guide
Copyright © 2002-2023 Awaresoft Pty Ltd Page 259 of 479
property in the Element Properties window and select the form of the business object
– see Searching for Data Using Forms.
2. If the query looks for all instances of the business object or business object group or
if you have specified that the query would perform a search using forms, you can
skip this step. Otherwise you must provide the conditions that the instances of the
business object or group must match for the query to find them. To specify the query
conditions do the following:
a. Click on the “Attribute/Expression” cell in the first row of the “Matching Criteria”
table. In the combo box that appears select an attribute of the business object
or an attribute of the referred object.
b. Click on the “Criterion” cell in the table. In the combo box that appears select
the criterion you want.
c. Click on the “Value/Expression” cell in the table and type in the value that the
selected attribute will be compared with using the selected criterion. For
example, if you selected Account.Balance in the “Attribute/Expression” cell,
“>” in the “Criterion” cell and entered 1000 in the “Value/Epression” cell the
query will look for all instances of the Account object with account balances
greater than 1000.
d. If the query uses more than one condition specify other conditions in other
rows of the table. By default the conditions will be linked with the AND
keyword. If you want to link the conditions with the OR keyword click on the
“Link” cell and select OR from the combo box displayed
e. If the query uses more conditions than the number of rows available in the
table click on the icon at the top of the table. If you want to delete a
condition select the condition by clicking on any cell in the condition’s row and
click on the icon.
3. You can optionally sort instances found by the query. You can sort by the value of
the attribute(s) of the business object that the query is looking for. If you specify
several attributes then the instances will be sorted by the value of the first attribute. If
there are equal entries they will be sorted by the value of the second attribute and so
on. You can also specify whether sorting will be performed in the ascending or
descending order.
a. To specify the attribute to sort by tick the checkbox next to the attribute name
in the “Sorting of Results” table.
b. To specify the order of sorting click on the Order cell in the table and choose
“Ascending” or “Descending”.
c. To change the order of entries select the entry and press the Up or Down
buttons at the top of the editor.
4. You can also specify that the query should return only a certain number of instances
(the first ones). This option is usually used in conjunction with sorting – you can sort
the instances found by the query and then return the first “n” instances. To specify

Aware IM 8.8 User Guide
Copyright © 2002-2023 Awaresoft Pty Ltd Page 260 of 479
the number of instances to return select the “Return first” radio button in the “Return
Results” section and specify the number in the text box next to the radio button.
NOTE: You can use the ID attribute in the query conditions and sorting.
NOTE: One of the expressions that you can select when defining query conditions is
“Ask at run time”. This expression indicates that the value of the attribute should be
entered by the user when the query is run (see Queries that Require User’s Input). Note
that if you look at such a query in the Rule Form, the corresponding condition will be
shown with the question mark, for example:
FIND Forum WHERE Forum.Title=?Title
When a user runs this query Aware IM will prompt the user to enter the value of the
Forum Title and then display the result. The string after the question mark indicates the
text that will be displayed when Aware IM prompts for the value of the attribute. By
default this text is equal to the name of the attribute, but you can change it to anything
you like on the Textual View tab (if a text has spaces enclose the text in apostrophe).
Specifying Query Using Textual View
The Textual View tab of the query editor allows specifying a query using the syntax of
the FIND , EXEC_SP or EXEC_SQL actions of the Rule Language. This may be
necessary if a query cannot be specified using the Standard View. Some users may also
find it quicker to specify queries using this form. Using the EXEC_SP or EXEC_SQL
actions allows advanced users to execute SQL queries of any complexity from either
native or external database.
To specify a query using the Textual View tab enter the name of the query and optionally
its description as specified in Adding/Editing Queries and enter the text of the FIND,
EXEC_SQL or EXEC_SP actions in the main pane of the tab. Note that you cannot use
any other action or Rule Language construct when defining a query.
You can specify how instances of the business object will be displayed in the Operation
Mode by clicking on the Display As property and specifying the display options on the
Display Query Results dialog – see Adding/Editing Queries.
Adding/Editing Notifications
The following section describes how to work with the editor of notifications when adding
a new notification or editing an existing one. Notifications are described in the
Communication with Other Systems section.

Aware IM 8.8 User Guide
Copyright © 2002-2023 Awaresoft Pty Ltd Page 261 of 479
The editor of notifications can be started as described in the Working with Configuration
Elements section. The following properties should be specified:
Name
Specify the name of the notification uniquely identifying it within the business space
version. The following restrictions apply:
a. The name must start with a character (not digit) or underscore symbol. All other
symbols in the name must be either characters (including underscore symbol) or
digits. No spaces or special symbols are allowed.
b. The name must be unique among the names of other business objects, business
object groups and notifications.
c. The name cannot start with one of the instance prefixes – This, That, Added,
Removed, LoggedIn or Changed.
d. The name cannot be one of the reserved names – File, Day, Question,
EmailSender, ReceivedEmail, IncomingEmail.
e. The name cannot be the name of the basic attribute types – Number, Date,
Duration, Timestamp, Shortcut, Document or Picture.
Attributes
Any notification must have at least one attribute defined. Attributes are defined and
displayed in the Attributes table of the Attributes tab.
a. To add a new attribute, click on the icon at the top of the Attributes table. See
Adding/Editing Attributes for details how to add attributes of the specific types.
b. To edit/view an existing attribute select the attribute in the table and change its
properties in the Selection Properties window. See Adding/Editing Attributes for
details how to edit attributes of the specific types.
c. To delete an existing attribute click on the attribute you want to delete in the
Attributes table and click on the icon at the top of the Attributes table
Description
Specify any text that describes what the notification is for, when it is sent etc. Providing a
description is not mandatory but is highly recommended. Any description if defined is
included into the generated documentation for the business space version – see
Generating Documentation.
Adding/Editing Document Templates
The following section describes how to work with the editor of document templates when
adding a new document template or editing an existing one. Document templates are
described in the Document Generation section.

Aware IM 8.8 User Guide
Copyright © 2002-2023 Awaresoft Pty Ltd Page 262 of 479
The editor of document templates can be started as described in the Working with
Configuration Elements section. The following properties should be specified:
Name
Specify the name of the document template uniquely identifying it within the business
space version. The name of the document template must be unique among the names
of other document templates defined in the business space version. Any identifier is
acceptable as a name. Space symbols in the name are allowed.
Description
Specify any text that describes what the document template is for, how it is used etc.
Providing a description is not mandatory but is highly recommended. Any description if
defined is included into the generated documentation for the business space version –
see Generating Documentation.
Type
Select the type of the document template from the “Type” combo box. Aware IM comes
with the following pre-defined types:
- Report – the document template represents a report. This type is different from other
types of the document templates in the way Aware IM handles it when it creates a
document from a document template – see Reports.
- Text document – the document template represents an ASCII text.
- MS Excel document – the document template represents a Microsoft Excel file
(.XLS).
- MS Word document – the document template represents a Microsoft Word file (.doc)
– this document type is not available under Linux and Mac OS X operating systems.
- MS Word document (XML format)
– this document type represents an MS Word document saved in the XML
format. It can be used as a replacement for MS Word documents on
Linux and Mac OS X operating systems if an Aware IM server is running
on the above platform and the client browsers are running on the
Windows platform. In this case the XML file will be displayed in the
browser properly using MS Word.
- HTML document – the document template represents an HTML file.
In addition to the pre-defined types it is possible to plug-in custom types – see “Aware
IM Programmer’s Reference”.

Aware IM 8.8 User Guide
Copyright © 2002-2023 Awaresoft Pty Ltd Page 263 of 479
NOTE: If a document type is not supported on a particular platform it is possible to
define an alternative document that Aware IM will automatically use instead of the
original document on the unsupported platform. The alternative document must have the
same name as the original document followed by the suffix Alternative . For
example, if we defined the document OutgoingLetter of the MS-Word type (not
supported on non-Windows platforms) and we want the configured application to work
both on Windows and non-Windows platforms we can define the alternative document
OutgoingLetterAlternative in the format supported on this platform (for example,
plain text). We can define more than one alternative document for different platforms, for
example OutgoingLetterAlternativeMac etc.
Data shown in the document template
The options of this property determine the source of data that Aware IM should use
when generating documents from document templates. This data is used to replace the
contents of tags used in the document template (if any) with the appropriate attribute
values (see Document Generation). The following options can be specified:
Determined at run time
This option indicates that the data should be determined from the context of the
document template usage. For example, the user can select certain instance(s) of a
business object and run the report using these instances as the data source. Or some
attribute of a business object of the Document type initialises itself with the document
template – in this case the document will use the data of this business object’s instance
– see Setting Properties of Document Attributes.
All instances of the specified business object
This option indicates that regardless of how the document template is used, it will use all
instances of the specified business object as its data source. If you select this option you
must select the name of the business object as well.
Run query
This option indicates that Aware IM should always run the specified query and use the
instances of the business objects that it finds as the data source for the document
generation. If you select this option you must also specify whether Aware IM should run
one of the queries already defined in the business space version (select the “Existing
query” radio button and select the query from the combo box) or it should run the query
specifically created for this purpose (select the “Custom query” radio button and press
the Edit button to define the query – see Adding/Editing Queries).
End user access
The options of this property determine whether the document or report will be accessible
for viewing/editing by end users – see User Defined Documents and Reports.
Design of the document

Aware IM 8.8 User Guide
Copyright © 2002-2023 Awaresoft Pty Ltd Page 264 of 479
If you select the “Report” document type Aware IM will display the Report Designer in
the working area of the editor. You can design the layout of the report using the Report
Designer.
For all other types of document templates you should create the design of the document
using the appropriate software (for example, create Word document using Microsoft
Word software) and import this document into the editor (see below).
Import
Importing a layout of a document template can be useful if you want to re-use the same
layout in a different document template. Layouts of reports can also be re-used in
presentations of business objects and business object groups – see Defining
Presentations. To import the existing layout of the document template click on the
icon at the top of the editor. Depending on the type of the document template either the
File Selection Dialog or the Directory Selection dialog will be displayed. Specify the
name of the import file or the directory that contains the single layout file of the
appropriate type and any resources (such as images).
Export
Exporting a layout of a document template can be useful if you want to re-use the same
layout in a different document template. Layouts of reports can also be re-used in
presentations of business objects and business object groups – see Defining
Presentations. To export the existing layout of the document template click on the
icon at the top of the editor. Depending on the type of the document template either the
File Selection Dialog or the Directory Selection dialog will be displayed. Specify the
name of the file or the directory to export the layout file and any resources of the
document template (such as images for HTML templates or reports) into.
Adding/Editing Access Levels
The following section describes how to work with the editor of access levels when
adding a new access level or editing an existing one. When the user logs into the
application in the Operation Mode she is assigned a particular access level that
determines which elements of the business space version (such as business objects,
their attributes, processes etc) she will be able to access. Access levels are described in
more detail in the Access Level section.
Working with Access Level Editor section describes how access levels can be specified
in the Configuration Tool.

Aware IM 8.8 User Guide
Copyright © 2002-2023 Awaresoft Pty Ltd Page 265 of 479
Working with Access Level Editor
The editor of access levels can be started as described in the Working with
Configuration Elements section. Before you start specifying access restrictions you must
provide the name of the access level. The following restrictions apply:
- The name must be unique among the names of other access levels
- The name must start with a character or underscore symbol. All other symbols may
be characters (including underscore symbol) or digits. Spaces within a name are not
allowed.
You can also optionally provide a description of an access level. Providing a description
is not mandatory but is highly recommended. Any description if defined is included into
the generated documentation for the business space version – see Generating
Documentation. To provide the description press the Description button next to the
name and type in the description in the dialog that appears.
The editor of access levels contains a tree with those elements of the business space
version that you can set access to – Business Objects and their attributes, Processes,
Queries, Document Templates and Services. The “Access” column in the tree specifies
access lrestrictions of the corresponding element in this Access Level. You can edit
column directly – click on the cell and select the appropriate values from the drop down
of available values. Most elements support the following values:
Full access
This value indicates that there are no restrictions to the element represented by the
selected row (this is the default access assigned to any newly created element, except
for the Guest access level where the default value is “Not available”).
Not available
This value indicates that an element represented by the selected row is not visible or
accessible to the users of this access level. With this access level Aware IM will
automatically remove the element from any user interface that deals with the ement –
menus, operations and forms. For example, if you specify that a business object is not
available, any operations that create or edit such an object will be removed from the
corresponding menus and toolbars; if you specify that an attribute is not available it will
be automatically removed from all forms that show this attribute.
In addition to the above values business objects and attribute support the following
values:
Read only
If you set this value to a business object it indicates that all attributes of the business
object are read-only – their values can be seen by the user but not changed. Also the
user will not be able to create instances of the business object. If you set this value to an
attribute, this particular attribute will not be editable on all forms where it is present.

Aware IM 8.8 User Guide
Copyright © 2002-2023 Awaresoft Pty Ltd Page 266 of 479
Creator: full access (business objects only)
This value indicates that instances of the business object represented by the selected
row will only be visible to those users who created the instances in the first place. All
users of this access level will be able to create instances of the business object but they
will not be even aware that there are instances of the same business object created by
other users – when they search for the business object the system will only return the
instances created by them, so they will only be able to edit their own instances.
Creator: modify only (business objects only)
This value should only be used for business objects that are members of the
SystemUsers group. It indicates that the users are allowed only modify a attribute
values of the instance of the object that represents themselves (in Change Login Details
operation) but they cannot create instances representing others.
Attribute level (business objects only)
This value indicates that there are no access restrictions as far as the business object
represented by the selected row is concerned but there are access restrictions to the
attributes of the business object. You cannot choose this value – the Configuration Tool
sets it automatically after access restrictions have been set for the attributes of the
business object.
Creator only (attributes only)
This value indicates that the attribute is fully accessible to the user that created the
instance of the business object in the first place; for other users the attribute is not
available (not visible) at all.
Creator – full access; others – read only (attributes only)
This value indicates that the attribute is fully accessible to the user that created the
instance of the business object and read-only for all other users
Clicking on the “Make All Accessible” button applies the “Full Access” level to the
selected row and all its sub-elements (if any). This can be used to make all attributes of
a business object accessible.
Adding/Editing Visual Perspectives
The following section describes how to work with the editor of visual perspectives when
adding a new visual perspective or editing the existing one. A visual perspective defines
how the screen of the application looks like to the user in the Operation Mode (see
Visual Perspective).
The typical screen layout of an application in the Operation Mode is shown in the User
Interface section. As explained in this section the screen layout may consist of several
areas (frames):

Aware IM 8.8 User Guide
Copyright © 2002-2023 Awaresoft Pty Ltd Page 267 of 479
- Banner
- Top bar
- Footer
- Main page
- Status Pane
- Left Pane
- Right Pane
Each frame may consist of one or more tabs and each tab may contain one or more
content panels.
The editor of visual perspectives allows configurators to customize the appearance of
frames, tabs and content panels. It is also possible to define several such screen layouts
for the system and switch between them when necessary.
See also Working with Visual Perspective Editor
Working with Visual Perspective Editor
The editor of visual perspectives can be started as described in the Working with
Configuration Elements section.
The working area of the editor contains a tree structure of a visual perspective – it lists
all the frames of the perspective. You expand the frame to see its tabs (or menu). For
each tab you can see its contents panels and for each menu you can see its menu
items. You can select any element in this structure and set its properties in the Selection
Properties window. The properties of the visual perspective itself can be specified at any
time in the Element Property window.
The bottom half of the editor shows how the screen defined by the current properties of
the visual perspective looks like in the Operation Mode (“embedded preview”). Any
changes you make to the visual perspective’s properties are immediately reflected on
the preview. To turn the preview on or off click on the icon in the toolbar at the top of
the editor. To see how the preview looks in the standalone browser click on the icon.
The following properties of a visual perspective can be specified:
Name
Specify the name of the visual perspective. The name must be unique among the names
of other visual perspectives defined in the business space version. Any identifier is
acceptable.
Description
Description of the visual perspective

Aware IM 8.8 User Guide
Copyright © 2002-2023 Awaresoft Pty Ltd Page 268 of 479
Used in login
This property controls whether the visual perspective will be automatically used by
Aware IM when a user with a particular access level logs in from the device of a
particular platform (desktop, mobile phone or tablet). When you click on this property the
“Used in Login” dialog will be displayed. Tick the “Aware IM will display this visual
perspective when a user logs in” checkbox if you want Aware IM to use the perspective
when the user logs in. If you do not select this option the visual perspective can only be
used by another visual perspective when it makes a switch of perspectives (see below)
or by rules in processes.
If you do select this option you can also specify the following options:
Access levels radio buttons
If this perspective should be used only when users belonging to certain access levels log
in select the “Aware IM will display this perspective for users access levels selected
below” radio button (by default the visual perspective applies to all access levels) and
select the access levels you want the visual perspective to apply to.
Platform support
You can specify that the visual perspective should only be used when the user logs in
from devices of the selected type – desktops, tablets or mobile phones
NOTE: For guidelines how to use Aware IM applications for mobile phones and
tablets see the “Mobile Applications” document.
Iniitialization process
Tick this checkbox if you want Aware IM to run the specified process immediately after
the user logs in but before the visual perspective is displayed. If the process fails (for
example by issuing the REPORT ERROR action), the system will automatically logout the
user and display the appropriate error message. The initialization process can be used
in the visual perspective of the system administrator to perform automatic initialization of
the system with some default values (for example, automatically create and set the
default values into the SystemSettings object if it has not been initialized yet – see
Setting Initial Values of the Information System). Another initialization process can be
used in visual perspectives of non-administrator users to check whether the system is
initialized and issue an error if it is not.

Aware IM 8.8 User Guide
Copyright © 2002-2023 Awaresoft Pty Ltd Page 269 of 479
First command
Define this property if you want Aware IM to run the specified command immediately
after the visual perspective has been displayed. You then need to specify the command
to run in much the same way as you specify menu commands.
Background process
Define this property if you want Aware IM to periodically run the specified process in the
background with the specified frequency. The background processes can be very
effectively used in the combination with the DISPLAY MESSAGE ASYNCH action to
display tips, adverts, check for new messages etc.
Theme
Using the drop down of this property you can choose the theme in which the visual
perspective will be displayed. The theme includes a combination of colors, fonts, visual
style, images etc. Aware IM comes with a number of pre-defined themes but you can
also include your own themes.
Aware IM uses the Kendo UI library (see http://www.telerik.com/kendo-ui) and the
themes used are the themes designed for this library. New themes are being created all
the time and made available to the general public. If you find new themes for the Kendo
UI library you can integrate them into Aware IM (or you can create your own themes if
you are familiar with the HTML and CSS technologies).
See the How To Guide for more details on how to integrate custom themes into Aware
IM.
NOTE: It is also possible to define themes for the currently logged in user. You need
to expose the predefined Theme attribute of the user object, so that it is possible to
modify and save the value of this attribute. Aware IM will automatically populate the
choices for this attribute with available themes. Once a particular theme is saved for a
particular user, this theme will be used when this user logs in.
Font size
Themes depend on the font size used. If you change the font size themes will adapt
accordingly and will still look good. You can choose the font size for your theme here.
Mobile transitions
Tick this checkbox to display animation when one page replaces another page. This is
especially useful for mobile applications
Tour
Select this command from the menu to enable the “tour” feature for the visual
perspective. The “Tour” feature allows configurators to add explanation to the elements
of the visual perspective, so that the user can understand the screen better. The
explanation of the element is displayed to the user at the bottom of the screen with the
marker pointing to the element of the screen being displayed. The user can jump

Aware IM 8.8 User Guide
Copyright © 2002-2023 Awaresoft Pty Ltd Page 270 of 479
between the elements of the screen and Aware IM automatically scrolls to the element
being explained and displays the marker for the element. For more details about tours
see the “How to use the Screen Tour feature” in the How To Guide.
Turn off Aware IM Copyright
Tick this checkbox if you want to completely remove Aware IM logo and copyright
message from the visual perspective – note that this feature is only available in the
Developer Edition.
See also:
Defining Frame Properties
Defining Tab Properties
Defining Content Panel Properties
Defining Layout of Content Panels
Setting Menu Properties
Defining Frame Properties
Most frames consist of one or more pages (tabs). The user can switch between tabs to
display a particular page. Each tab consists of one or more content panels that can be
laid out vertically, horizontally or on a grid. Each content panel can display an HTML
page or invoke an Aware IM command and display its results, for example, run a query
or start a process. The following picture displays the home page of the CRM sample
application. It has the following frames defined – the “top bar” frame at the top showing
the toolbar of system operations, the left frame containing the application menu, the
status bar at the bottom and the main frame. The main frame consists of several tabs.
The currently active tab (Dashboard) consists of 5 content panels each showing the
results of different queries, displaying calendar for this month, a list of customers,
current alerts etc.

Aware IM 8.8 User Guide
Copyright © 2002-2023 Awaresoft Pty Ltd Page 271 of 479
To define how a frame will look like within your visual perspective you need to select the
frame you want to edit, define its properties and specify its contents. The following
properties of a frame can be specified in the Selection Properties window:

Aware IM 8.8 User Guide
Copyright © 2002-2023 Awaresoft Pty Ltd Page 272 of 479
Visible
Tick this checkbox if the frame should be visible in the visual perspective (note that the
Main Frame is always visible)
Displays
Certan frames, such as left or right frames, can contain either an application menu or
content panels. You can specify what the frame will contain.
Title
Specify the title of the frame. The title will be displayed in a special window at the top of
the frame.
Show Borders
Tick this checkbox to display borders around the frame.
Can be resized
Tick this checkbox to allow the user to resize the frame.
Collapsible
Tick this checkbox to allow the user to minimize (“collapse”) the frame by clickling on the
special icon. Once the frame is minimized it will be displayed as a narrow window with
an icon to restore the frame to its previous size.
Show tab even if it is the only one
If this checkbox is ticked Aware IM will always show a tab even if there is only one tab
defined for the frame (if the checkbox is unticked Aware IM will not show tab when there
is one tab defined).
Tab bar location
Tabs can be displayed at the top, bottom, left or right of the page.
Mobile style tabs
Tick this option to display tabs in the style appropriate for mobile phones – with big font
and with the top icon alignment.
Background
You can specify background properties of the frame. You can either specify the
backround color or image or if you are familiar with CSS you can specify advanced
background properties using the CSS dialog.
Invisibility condition
You can specify that for certain screen sizes the frame should be invisible. This option is
one of the main implementation of the “responsiveness” feature. Please watch the video
tutorial about this feature for more details.
Initial size, maximum size, minimum size

Aware IM 8.8 User Guide
Copyright © 2002-2023 Awaresoft Pty Ltd Page 273 of 479
You can specify the initial size of the frame. If you allow resizing the frame you can also
specify maximum and minimum size that the frame can be resized to.
Defining Tab Properties
To add a tab click on the at the top of the editor. You can then specify the following
properties of the tab:
Title
Title of the tab. This title will be displayed on the tab.
Layout
Specify the layout of the content panels within a tab – see Defining Layout of the
Content Panels.
User Can Edit Layout
If you tick this checkbox end users will be able to customize the initial layout provided by
the developer. They can either specify which content panels will be visible or move and
resize content panels using a sophisticated layout editor (for Nested Grid layouts only).
For more details about layout editing please watch this video tutorial.
Closable
If this checkbox is ticked the user will be able to close the tab.
Default panel display settings
Display settings that will be used by default for all new content panels added to this tab –
see Defining Content Panel Properties
icon
You can provide an icon that will be displayed on the tab. You can either provide an icon
file or refer to a CSS class. See “How to use icons fonts to display an icon for a button”
section in the How To Guide.
ID
Specify unique ID of the tab. This ID can be used in the tour feature.
Tour
Specify whether the tab will have a tour
Condition when invisible
You can display a tab conditionally and specify a condition under which the tab will be
invisible. The condition should usually check attributes of either the SystemSettings
object or logged in user. You can also define conditions that depend on the screen size
as part of the “responsiveness” feature. Please watch the video tutorial about this
feature for more details.

Aware IM 8.8 User Guide
Copyright © 2002-2023 Awaresoft Pty Ltd Page 274 of 479
Badge
Click on this button to display a “badge” for the tab. A badge is a little icon on top of the
tab usually showing a number (for example, a number of unread messages for the
current user). This number is constantly refreshed – it can be changed by the rules and
the number will then be displayed, When specifying badge properties you have to define
an expression for the number (or text) displayed on the badge (usually the value of the
attribute that stores this number). You can then specify the background color of the
badge as well as the refresh rate and tooltip.
Defining Content Panel Properties
At least one content panel must be defined for the tab. You can add more content
panels by clicking on the icon located at the top of the editor. If there is more than one
content panel they will be displayed according to the selection of the “Layout” property
(see Defining Layout of Content Panels)
There are many properties of content panels – some of them are specific to the layout
selected for the tab. The following properties of a content panel are common to all
layouts:
Name
Specify the name of the content panel. Every content panel must have a unique name.
This name will be displayed in the caption of the content panel if “Display title” checkbox
is ticked (see below).
Contents
This is the most important property of the content panel. It defines what the content
panel will contain. When you click on the button next to the property the dialog with the
following options will be displayed:
Display results of query
Select this option if you want Aware IM to run the specified query and display its results
inside the content panel. For example, if you are configuring an application that
manages forums you may want to display a list of available forums immediately after the
user logs in. This can be done by specifying a query that finds and displays all available
forums. If you select this option you must also select the query to run from the list of all
configured queries (this radio button is really a shortcut to specify a “Run Query”
command using the “Command” radio button – see below).
Display results of process
Select this option if you want Aware IM to run the specified proces and display its results
inside the content panel.

Aware IM 8.8 User Guide
Copyright © 2002-2023 Awaresoft Pty Ltd Page 275 of 479
DIsplay HTML
Select this radio button if you want Aware IM to display the specified HTML text. Click
on the HTML button to enter the HTML text. This is explained in more detail a little later
in this section.
Import HTML
Select this radio button if you want to provide custom HTML page to be displayed inside
the content panel. If you select this option you must also import the HTML page and any
page resources such as images. To import the page, press the Import button. The
Directory Selection Dialog will be displayed – specify the name of the directory that must
contain a single file with the .html extension and any resources that the page may have.
You can also export the existing page into a directory by pressing the Export button and
specifying the directory where the existing HTML page and all its resources will be
written.
TIP: You can use tag expressions that refer to the SystemSettings object or
LoggedInRegularUser in the HTML page, for example <<SystemSettings.Logo>>.
Calendar
Select this radio button if you want to display a calendar widget inside the content panel.
You will then be able to provide an attribute where the selected date will be stored, as
well as specify a command that will run after the date in the calendar is selected (see the
description of the Input Control Element in the next section)
NOTE: It is also possible to embed the calendar widget in a custom HTML that you
provide when you select the Display HTML option for the content panel. To do this,
define the Calendar widget as described above and press the HTML Code… button.
Then copy this HTML and use it inside your custom HTML code.
Google Map
Google Maps can be displayed as part of the business object presentation or form.
However, displaying a map as a widget in a content panel is even more flexible and
powerful. The properties that can be specified here are similar to defining Google Maps
for object forms
You can define a query that will be run to display markers on the map. One of the
attributes of the object that the query is searching for must store the address. This
address will be marked on the map with a marker. Displaying markers on the map is
optional.
You can define a query that will be run to display polygons on the map. One of the
attributes of the object that the query is searching for must store definition of the polygon
in the KML format.

Aware IM 8.8 User Guide
Copyright © 2002-2023 Awaresoft Pty Ltd Page 276 of 479
By clicking on the Other Settings button you can define which controls will be present on
the map.
Date Range Picker
Select this radio button if you want to display a “date range picker” widget that allows
users to enter start and end dates of the range at the same time. You will need to
specify attributes that will hold both dates, as well as the command that will run when the
range is selected (see the description of the Input Control Element in the next section)
NOTE: It is also possible to embed the Date Range Picker widget in an custom HTML
that you provide when you select the Display HTML option for the content panel. To do
this, define the Date Range Picker widget as described above and press the HTML
Code… button. Then copy this HTML and use it inside your custom HTML code.
Command
Select this option if you want Aware IM to run the specified command and display its
results inside the content panel. You must click on the button next to the radio button to
specify which command to run.
Display empty page
Select this option if you do not want Aware IM to display anything inside the content
panel. This option can be useful if you use the content panel as the target for some other
content panel.

Aware IM 8.8 User Guide
Copyright © 2002-2023 Awaresoft Pty Ltd Page 277 of 479
Width
Specify the width of the content panel in pixels or percent (for some layouts only). If you
do not specify the width the content panel will occupy all available width.
Height
Specify the height of the content panel in pixels. If you do not specify the height it will be
calculated automatically based on the contents of the panel.
Target
If you have more than one content panel defined for a tab you can designate one
content panel to be the target for the other one. This means that if the user clicks on
some hyperlink inside one content panel, the results of this click will be displayed in
another content panel. For example, you can get one content panel to display the results
of a query. If the user clicks on the entry in the query results table the form for the
instance of the business object represented by this entry can be shown underneath the
query results table. You can also specify other targets for the panel. The following
options are available:
Default (blank value)
The target is the panel itself, i.e. when the user clicks on a hyperlink the results will be
displayed in this content panel replacing the current contents.
New Tab
When the user clicks on a hyperlink the results will be shown in a new tab (this requires
that the “Always show tab” checkbox is ticked). Aware IM will create the tab
automatically and the user will be able to close the tab whenever she wants.
Full Screen
When the user clicks on a hyperlink the results will be shown inside the main frame
replacing the current contents – including any tabs and content panels (they will
disappear).
Popup window
When the user clicks on a hyperlink the results will be shown in a popup window. The
user won’t be able to access elements of the screen outside the window until he closes
the window.
Modeless window
When the user clicks on a hyperlink the results will be shown in a modeless window. The
user will be able to access all other parts of the system outside the window. The window
can be resized, repositioned or closed at any time. The user can open as many
modeless windows as he likes
Name of a content panel

Aware IM 8.8 User Guide
Copyright © 2002-2023 Awaresoft Pty Ltd Page 278 of 479
When the user clicks on a hyperlink the results will be shown inside the selected content
panel replacing its contents.
<DIV>
This option allows you to direct the output of the panel into a particular HTML element
(usually <DIV>) that can be located anywhere on the screen. The element must have a
unique id, for example, <div id=”my_id”></div>. The system will prompt you to enter this
id.
Display settings
This option is control how the header of the content panel is displayed – there are two
choices – Classic and Modern. With the classic style you can define the following
options:
Display title
Select this option if you want Aware IM to display the title in the caption of the content
panel. Normally you will not need to tick this box if you display query results or a form
inside the content panel because these already include their own captions.
Collapsible
Tick this checkbox if you want the user to be able to collapse and expand the content
panel. This will force the caption to be shown with a little icon in the top right corner to
collapse/expand the panel.
Show borders
Tick this checkbox to display borders around the content panel.
With the Modern style of the header you can specify the text of the header as well as its
CSS class and style
Hidden initially
Tick this checkbox if you want the panel to be hidden initially. This option is useful if the
tab property “User Can Edit Layout” is selected. In this case the end user can show the
content panel hidden initially if need be.
Outer margins/Inner margins
You can define outer and inner margins of the content panel.
Device visibility
You can specify that the content panel should be invisible on certain types of devices
and visible on others.
Refresh Info
If a content panel has HTML content (static HTML or imported HTML) you can define
conditions when this information is refreshed. Other types of content do not need this
option because they usually include queries or forms that have their own auto-refresh

Aware IM 8.8 User Guide
Copyright © 2002-2023 Awaresoft Pty Ltd Page 279 of 479
settings. The way you define auto-refresh information for HTML content panels is very
much the same as how you define it for queries and forms.
CSS class
You can further customise the appearance of the content panel by assigning a CSS
class to it. See the “How to use CSS” section in the How To Guide for more details.
Scripts
For users familiar with Javascript you can provide your own script here to override the
configuration of the panel that Aware IM generates. See Programmers Reference Guide
for more details.
Defining Content Panel with HTML Content
This section describes in more detail how you can define a content panel that displays
some HTML. As explained before you just need to provide HTML of your content and
Aware IM will display this HTML.
TIP: You can use tag expressions that refer to the SystemSettings object or
LoggedInRegularUser in this HTML, for example <<SystemSettings.Logo>>.
However, what if you want to provide input controls in your HTML? Defining HTML tags
for input controls is not difficult, but, you wouldn’t know how to interact with the server –
how to initialise your controls and how to submit entered data to the server. Aware IM
makes it easy to define such controls as part of your HTML.
When you select “Display HTML” as contents for your panel Aware IM displays a dialog
where you can enter your HTML text. On the right-hand side of the dialog there are “Add
Input” and “Add Button” links that allow adding text fields, combo-boxes and buttons to
your HTML. You define the above widgets not as HTML, but by selecting its properties
directly in the dialogs invoked by these links.. Once you finish defining these properties
Aware IM generates a special HTML element that contains all the properties that you
have specified, and adds this element to your HTML text. You do not have to understand
what’s inside this element – all you need to know that at run-time this element will work
exactly as you have specified.
NOTE: You can edit the properties of the generated HTML element if you select the
HTML code of the element and click on the “Edit…” link.
The following section describes the properties of these special HTML elements that you
can define in the dialog.
Input Control element
Input controls are text fields or combo-boxes. When defining properties of these
elements you must first specify where the resulting value entered by the user will be

Aware IM 8.8 User Guide
Copyright © 2002-2023 Awaresoft Pty Ltd Page 280 of 479
stored. Since there is usually no Context available for content panels you can only use
some attribute of the System Settings or System User object (the user that is currently
logged in) or the Session object (a non-persistent business object that is marked as
storing session values). So you need to specify which object and which attribute of this
object will store the entered value.
When the user submits the value it will be stored in the attribute you have specified and
then Aware IM will execute the specified command. For example, you can define a text
box to search the messages stored in the database (as in the toolbar of the CRM
sample application). You can define a special attribute in the user object called
“SearchFilter” and the following query:
FIND Message WHERE Message.Body CONTAINS
LoggedInRegularUser.SearchFilter
You will provide the SearchFilter attribute as the attribute to store the entered value in
and then you will provide the command to run the above query.
Display choices
If the attribute definition that you have specified has choices you can tick this checkbox
and Aware IM will display a combo-box instead of the textbox. You can also specify that
the choices can be edited by the user.
Initial Value
If the attribute definition that you have specified has initial value defined you can tick this
checkbox to display this initial value when the textbox is displayed
Trigger button class
This is only applicable for textboxes. The value is submitted when the user presses the
Enter key. In addition you can define a button that will be displayed next to the text box.
Clicking on this button will also submit the value.
Width
Width of the control in pixels
Undefined value
The text to be displayed when the control is empty (“Search correspondence” in the
picture above)

Aware IM 8.8 User Guide
Copyright © 2002-2023 Awaresoft Pty Ltd Page 281 of 479
Button element
This element displays a button that will execute the specified command when the user
clicks on it. The button will be styled according to the currently used theme. You can
define the following properties:
Command
A command that will be executed when the button is clicked
Button text
Text of the button (optional)
Icon CSS class
CSS class for the icon displayed on the button (optional). See “How to use icons fonts to
display an icon for a button” section in the How To Guide.
Width
Width of the button in pixels

Aware IM 8.8 User Guide
Copyright © 2002-2023 Awaresoft Pty Ltd Page 282 of 479
Defining Layout of Content Panels
You can select among several layouts when arranging multiple content panels within a
tab. The following layouts can be selected from the Layout dropdown:
Responsive Grid (Simple)
Responsive Grid (Nested)
Vertical Anchor
Vertical Box
Horizontal
Column
Table
Border
Accordion
TIP: Click on the icon at the top of the editor to see pictures and explanation of
each layout Use preview to see how the layout looks in the browser.
Responsive Grid (Simple) Layout
In Aware IM there are two “responsive” layouts, i.e. layouts that can readjust themselves
to the amount of screen real estate available on a particular device according to the
rules you provide. This is important because you want your application to look good on
all types of devices and screen sizes – big screens, smaller screens, tablets, mobile
phones.
The first layout is a “simple” one. In this layout you just provide a list of the content
panels that your screen will contain. The content panels will be displayed as a grid and
you can define the number of rows and columns for this grid for each device type.
For example, let’s say your screen has 12 content panels. On bigger screens you want
to maximise the real estate and display these panels as a grid with 3 rows and 4
columns. On smaller screens you would display the layout as a grid with 3 columns and
4 rows. On tablets – 2 columns and 6 rows; and on phones – one column and 12 rows.
See the picture below:

Aware IM 8.8 User Guide
Copyright © 2002-2023 Awaresoft Pty Ltd Page 283 of 479
To implement this layout in your visual perspective all you have to do is select the
Responsive Grid (simple) layout in the Layout dropdown, define your 12 content panels
and then go to the Layout Properties tab. In this tab you need to define the number of
columns for each device type. You would define 1 for phones (up to 768 pixels wide), 2
for tablets (lup to 992 pixels wide), 3 for medium devices ( up to 1200 pixels wide) and 4
for large devices (wider than 1200 pixels).

Aware IM 8.8 User Guide
Copyright © 2002-2023 Awaresoft Pty Ltd Page 284 of 479
Responsive Grid (Nested) Layout
The simple layout is very useful but it only supports layouts that can be displayed as a
single grid. With the responsive nested layout you can define more complicated layouts
that consist of multiple nested grids – see the picture below:
This is where the “responsive nested” layout becomes useful. The Responsive Nested
layout implements a popular “grid system” by the Twitter’s Bootstrap (see
http://getbootstrap.com/css/ ). In this system you can define the width of your panel not
as an absolute value in pixels but as a relative factor – a number from 1 to 12. A number
of 12 indicates that the panel will always occupy all available width. A number of 1
indicates that the panel will occupy 1/12
th
of the available width.
For each panel you can define this factor for each device type (see Responsive Grid
(Simple) layout for the list of available device types. In addition you can define “parents”
for content panels.
This is best illustrated by an example (from the Sales Portal sample application). Let’s
say that we want our screen to look like this on devices with enough real estate – see
picture below.

Aware IM 8.8 User Guide
Copyright © 2002-2023 Awaresoft Pty Ltd Page 285 of 479
To implement it we first divide the screen into rows at the top level. Here we have the
row that includes the title (Team Efficiency) and input controls (Starts From and To) and
everything else. So we define two panels called Period Container and Main Content
Container (highlighted with red boxes on the picture below).
Within the Period Container we have two sub-panels – the title and input boxes. So we
define two sub-panels underneath the Period Container Panel called Header and Filters.
We want the title to occupy roughly 1/4
th
of the screen with filters occupying the rest. So
we assign a factor of 3 to the Header sub-panel and the factor of 9 – to the Filters sub-
panel. We define these factors for all device types. If there is not enough real estate to
display the sub-panels side-by-side Aware IM will automatically display the filters
underneath the title. We could also assign different factors for different devices – for
example, we could assign a factor of 6 to both sub-panels on large devices and factors
of 3 and 9 on smaller ones.

Aware IM 8.8 User Guide
Copyright © 2002-2023 Awaresoft Pty Ltd Page 286 of 479
Let’s now look at the Main Content panel. In this panel we have two columns – the list of
employees on the left and the rest (see picture below). So we define two sub-panels for
this panel called “Employee List” and “Employee Details Container” We assign the
factors of 2 and 10 to these panels respectively.

Aware IM 8.8 User Guide
Copyright © 2002-2023 Awaresoft Pty Ltd Page 287 of 479
We then continue this process and look at the Employee Details Container. It consists of
3 rows: “Employee Stats Container”, “Employee Sales Chart” and “Employee Schedule”
(see picture below). So we create 3 sub-panels underneath the Employee Details
Container. We want them to occupy all available width so we assign a factor of 12 to
each.

Aware IM 8.8 User Guide
Copyright © 2002-2023 Awaresoft Pty Ltd Page 288 of 479
And finally we break the “Empoyee Stats Container” into sub-panels called “Bio”,
“Quarter Sales” and “Average Sales” and assign equal factors of 4 for each of them (see
the picture below):

Aware IM 8.8 User Guide
Copyright © 2002-2023 Awaresoft Pty Ltd Page 289 of 479
You can check the behaviour and responsiveness of the Sales Portal sample application
by displaying it on different devices or just resizing your browser screen.

Aware IM 8.8 User Guide
Copyright © 2002-2023 Awaresoft Pty Ltd Page 290 of 479
Vertical Anchor Layout
In a vertical layout content panels are placed underneath each other – see the picture
below.
You can control width and height of each content panel individually or you can set the
“Anchor” property of each content panel. The anchor indicates how much space the
horizontal direction the content panel will occupy relative to the space occupied by the
On the picture below the width of the first panel is set to 450 pixels, the width of the third
panel is set to 300 pixels and the anchor of the second panel is set to 40% (of the
available width). The height for each panel is set to 100 pixels.

Aware IM 8.8 User Guide
Copyright © 2002-2023 Awaresoft Pty Ltd Page 291 of 479
Vertical Box Layout
This layout arranges items vertically down a container. This layout optionally divides
available vertical space between panels containing a numeric flex property.
The “Flex” property defines the ratio that this content panel occupies relative to other
content panels. For example, if you have two content panels with flex values of 1 and 2,
the total value is 3 and the first panel occupies 1/3 of the space and the second – 2/3 of
the space (where “space” means width for the horizontal layout and height for the
Vertical Box layout).
Each content panel with a flex value will be flexed vertically according to each panel's
relative flex value compared to the sum of all panels with a flex value specified. In the
example below the fourth button has flex=3 while others have flex=1.

Aware IM 8.8 User Guide
Copyright © 2002-2023 Awaresoft Pty Ltd Page 292 of 479
It is also possible to specify how the panels should be aligned and packed. In the
example shown panels are centre-aligned.
Horizontal Layout
In the horizontal layout content panels are placed next to each other (see the picture
below):
You can specify width and height of each individual content panel.
Column Layout
In the column layout content panels are arranged in columns (see the picture below).

Aware IM 8.8 User Guide
Copyright © 2002-2023 Awaresoft Pty Ltd Page 293 of 479
Note that each column is laid out independently of other columns. This means that there
is no guarantee that the second content panel of the first column will line up nicely with
the second content panel of the second column (it depends on the heights of the first
panel in each column). To line up content panels in rows and columns use the Table
Layout.
Aware IM traverses content panels from the top panel in the table of content panels to
the bottom panel. Wherever there is a column break, Aware IM starts a new column. To
indicate a column break select Yes for the “Last in Column” property of the last content
panel in each column (you don’t have to do it for the last column). You can also indicate
the column width of each column as a percentage of the available width. To do this set
the corresponding value into the Column Width property of the content panel.
Table Layout
Table layout allows arranging content panels in a tabular fashion (see the picture below):

Aware IM 8.8 User Guide
Copyright © 2002-2023 Awaresoft Pty Ltd Page 294 of 479
Unlike the Column Layout, panels in the table layout form not only columns but also
rows. Panels belonging to the same row are aligned at the top. It is possible, however, to
indicate that a particular panel spans several rows or columns by setting the
corresponding properties of the content panel (see the picture below):
The content panel in the second row spans two columns.

Aware IM 8.8 User Guide
Copyright © 2002-2023 Awaresoft Pty Ltd Page 295 of 479
When you select the Table layout you must also specify the number of columns in the
table (in the Layout Properties tab). The panels are traversed “from left to right” – for
example, the second panel in the table becomes the second in the row, the third panel
becomes the first in the second row if the table has two columns or the third in the first
row if the table has 3 columns. The following table shows the properties of the content
panels for the picture above (the number of columns for the layout has been specified as
2):
Name
Width
Height
Column span
Row span
Main
250
100
Panel2
250
100
Panel3
520
100
2
Panel4
250
100
Panel5
250
100
Border Layout
In a border layout the area of the container is divided into a fixed number of regions
called 'centre', 'north', 'south' and 'west'. You must provide the contents of the centre
region, whereas other regions are optional.

Aware IM 8.8 User Guide
Copyright © 2002-2023 Awaresoft Pty Ltd Page 296 of 479
Accordion Layout
The Accordion layout is shown on the picture below:
Only one panel is active at a time, other panels are collapsed. When the user clicks on
the “plus” icon to expand another panel it becomes active and is placed on top (see
below):

Aware IM 8.8 User Guide
Copyright © 2002-2023 Awaresoft Pty Ltd Page 297 of 479
Setting Menu Properties
The menu is the area of the screen in the Operation Mode where the user can select
actions to be performed, such as starting a process, running a query, creating or
modifying an instance of a business object etc.
Some frames in a visual perspective (Top Bar, Left and Right) may contain a menu
rather than tabs (you define this by specifying the “Displays” property of the frame).
When you expand such a frame in the tree structure of the visual perepectives editor
you see the entry for the menu. The following properties of the menu can be specified in
the Selection Propertes window when you select the menu entry:
Widget
Specify the type of the widget that will implement the menu. The following options are
available:

Aware IM 8.8 User Guide
Copyright © 2002-2023 Awaresoft Pty Ltd Page 298 of 479
Standard menu
This menu supports unlimited levels of hierarchy and can be vertical (if placed in the left
or right frames) or horizontal (if placed in the Top Bar frame):
However you cannot add arbitrary HTML or input controls to this menu type.
Toolbar
This menu type supports only two levels of hierarchy, but it can include HTML items and
input controls. It also supports right alignment of items:
This menu type can only be used in the Top Bar frame.
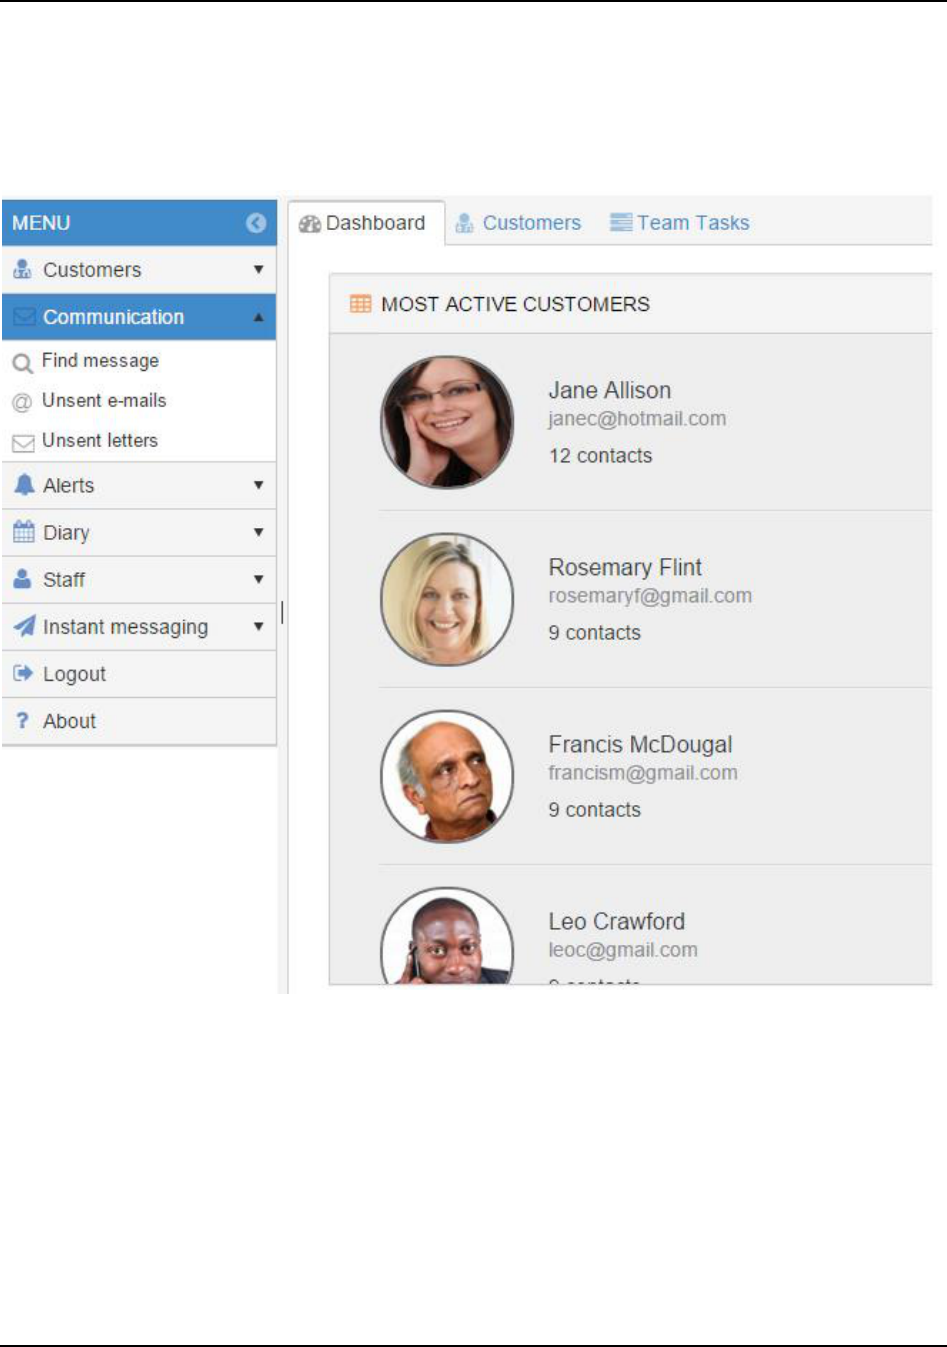
Aware IM 8.8 User Guide
Copyright © 2002-2023 Awaresoft Pty Ltd Page 299 of 479
Panel Bar
This menu type also supports only two levels of hierarchy and can be used only in the
left or right frames. Items of the second level pop down. You cannot use HTML or input
controls for this menu:
Tree
This menu type supports unlimited levels of hierarchy and can be used only in the left or
right frames

Aware IM 8.8 User Guide
Copyright © 2002-2023 Awaresoft Pty Ltd Page 300 of 479
Plain List
This menu type supports one level of hierarchy only. Can be useful for mobile phones
menus.
Header
You can display a header above the menu (vertical menus only). Provide HTML of the
header here
Footer
You can display a footer underneath the menu (vertical menus only). Provide HTML of
the footer here
CSS class / CSS style
Customise the appearance of the menu further by assigning a CSS style or class to the
menu. See the “How to use CSS” section in the How To Guide for more details.

Aware IM 8.8 User Guide
Copyright © 2002-2023 Awaresoft Pty Ltd Page 301 of 479
Setting Menu Item Properties
A menu consists of menu items. You can add an item to a menu if you select the menu
entry in the tree structure of the editor and click on the icon at the top of the editor. To
delete the item click on the icon. The following properties of the menu item can be
specified in the Selection Properties window:
Name
Specify the name of the menu item. Any text is acceptable.
Command
Click on this property to specify the command that will run when the item is selected.
When you specify the command in most cases you also need to provide the settings
specific to the selected command. The commands available and their settings are listed
in the table below:
Command
Description of the action in the
Operation Mode
Settings
Folder
The item represents a folder, which
can only have child items and no
actions.
None
Active Processes
Displays a list of the currently active
processes (see Rules and
Transactions).
None
Change Login
Details
Brings up a form displaying attribute
values of the currently logged in
user so that she can change the
login name, password etc.
None
Change
Perspective
Switches visual perspectives by
displaying the specified perspective.
Select a visual
perspective to switch to
from the list of
perspectives defined in
the business space
version.
Configure User
Defined Processes
This command is only available if
the product includes the “User
Defined Processes” option. This
command allows administrators of
the system to configure “User
Defined Processes” module – define
access levels and user friendly
names of objects and attributes
used in the module. For more
details about user defined
None

Aware IM 8.8 User Guide
Copyright © 2002-2023 Awaresoft Pty Ltd Page 302 of 479
processes please watch the video
tutorial.
Create Business
Space
Creates a new business space in
the Operation Mode (see Working
with Aware IM in Hosting
Environment).
None
Create Document
Creates document(s) from the
specified document template(s) (see
Document Generation) If more than
one document template is specified
for this item Aware IM displays a
choice of these document templates
when the user selects the menu
item. At run time the user will be
able to define a query to be used as
the data source for the resolution of
tag expressions (see Document
Generation)
Select a document
template(s) to be used by
the action by selecting
them from the list of all
document templates
available in the business
space version.
Create Object
Brings up a form for the specified
business object to create a new
instance of this object (see Business
Object Form) If more than one
business object is specified for this
item Aware IM displays a choice of
these business objects when the
user selects the menu item.
Select a business
object(s) to be used by
the action by selecting
them from the list of all
business objects
available in the business
space version.
Create Process
Allows end users to define their own
processes (“user defined
processes”). This command is only
available if the product includes the
“User Defined Processes” option
None
Export
Exports instances of the specified
business object into a file on disk
(see Export and Import) If more than
one business object is specified for
this item Aware IM displays a
choice of these business objects
when the user selects the menu
item.
Select a business
object(s) to be used by
the action by selecting
them from the list of all
business objects
available in the business
space version.
Execute Javascript
Executes the specified Javascript
Specify the Javascript to
execute
Go Back
Goes back to the previous screen
(especially useful for mobile
phones).
None
Go Online
This command finishes the “offline
mode” (when the system works with
None

Aware IM 8.8 User Guide
Copyright © 2002-2023 Awaresoft Pty Ltd Page 303 of 479
no Internet connection) and starts
synchronizing edits performed while
offline with the system’s database.
For more details watch this video
tutorial
Home Page
Displays the initial page (which is
usually shown immediately after the
user logs in) – see also Setting Main
Page Properties.
None
Other menu items
Import
Imports instances of the specified
business object into the system from
a file on disk (see Export and
Import) If more than one business
object is specified for this item
Aware IM displays a choice of these
business objects when the user
selects the menu item.
Select a business
object(s) to be used by
the action by selecting
them from the list of all
business objects
available in the business
space version.
Input Control
Allows adding text boxes and
combo-boxes to the menu of the
toolbar type.
Very similar to defining
text boxes and combo-
boxes for content panels
with static HTML
List Business
Spaces
Lists existing business spaces in the
Operation Mode and allows deleting
or changing properties of the
selected business space (see
Working with Aware IM in Hosting
Environment).
None
List Business
Space Versions
Lists all existing business space
versions of the current business
space in the Operation Mode and
allows deleting or changing
properties of the selected business
space versions (see Working with
Aware IM in Hosting Environment).
None
Locale Editing
Allow users to edit locale strings.
This can be useful if end users need
the ability to customise strings for
their application. This command is
only available if the product includes
the “User Defined Processes”
option. For more details about user
defined processes please watch the
None

Aware IM 8.8 User Guide
Copyright © 2002-2023 Awaresoft Pty Ltd Page 304 of 479
video tutorial.
Login
Displays the screen allowing users
to enter their credentials (user name
and password) to log into the
application.
None
Logout
Logs out of the application.
Specify a URL of the
page that will be
displayed after the logout
is complete. By default
this is the page that just
shows a message that
the logout has been
completed.
Manage
Import/Export
Templates
This command allows end users to
define their own templates for
importing or exporting data in
Aware IM. See this video tutorial for
more details about import/export
templates.
Manage
Import/Export
Templates Events
For every run of import/export
templates Aware IM creates an
event. This command allows users
to see these events. For more
details about import/export
templates see this video tutorial.
Manage E-mail
Templates
This command is only available if
the product includes the “User
Defined Processes” option. Allows
end users to create, edit and delete
e-mail templates to be used when
defining their processes. For more
details about user defined
processes please watch the video
tutorial.
None
Manage Queries
Allows end users to add, edit and
delete their own queries (see
Building Query in the Operation
Mode).
None
Manage
Processes
This command is only available if
the product includes the “User
Defined Processes” option. Allows
end users to edit, delete, copy,
export, import and lock their
processes. For more details about
user defined processes please
watch the video tutorial.
None

Aware IM 8.8 User Guide
Copyright © 2002-2023 Awaresoft Pty Ltd Page 305 of 479
Manage Process
Events
This command is only available if
the product includes the “User
Defined Processes” option. Aware
IM creates an event record every
time a user-defined process is
executed. This command allows
users to view these records. For
more details about user defined
processes please watch the video
tutorial.
None
Offline Data
Management
This command allows the user to
specify which data will be available
in the “offline mode”. For more
details watch this video tutorial
None
Prepare for Offline
This menu command should be
used to start the “offline mode”
(working with the system with no
Internet connection). For more
details watch this video tutorial.
Select a visual
perspective that will be
used in the offline mode
Profiling On
This menu command turns
Performance Profiling on.
None
Profiling Off
This menu command turns
Performance Profiling off and
displays profiling report.
None
Publish Business
Space Version
Uploads the business space version
from a file into the Aware IM server
in the Operation Mode (see Working
with Aware IM in Hosting
Environment).
None
Register User
Registers a new user. The action
will bring up a form to fill out and
create an instance of a user object
when the form is submitted. This
action may be useful for “guest”
users who want to register with the
system – see Adding/Editing Access
Levels.
Select a business object
(must be a member of
the SystemUsers
group) that will be
created by the action.
Run Query
Runs the specified query and
displays the instances found by the
query (see Running Query in the
Operation Mode) If more than one
query is specified for this item
Aware IM displays a choice of these
queries when the user selects the
menu item.
Select a query(ies) to be
used by the action by
selecting them from the
list of all queries
available in the business
space version.
Run User Defined
Allows end users to execute the
None

Aware IM 8.8 User Guide
Copyright © 2002-2023 Awaresoft Pty Ltd Page 306 of 479
Queries
queries they have defined (see
“Manage Queries” operation above)
Run User Defined
Processes
This option allows users to run
processes that they define provided
that the trigger of the processes
allows running them from the menu.
For more details about user defined
processes please watch the video
tutorial.
Search Objects
Shows the screen which allows the
user to search for all instances of
the selected business object, run
the existing query or build a new
query (see Running Query in the
Operation Mode).
None
Slide In Left
Frame/Slide In
Right Frame
These commands can only be used
for the top bar frame. They are only
applicable if you also define a menu
for the left or right frames. When the
user clicks on the button
representing this menu item in the
top toolbar Aware IM will slide-in the
menu defined for the left or right
frame. This method can be used for
defining slide-in menus for mobile
phones.
None
Slide In Control
Panel
This menu item can be very useful
for implementing responsive
applications. When the user clicks
on the button representing this
command Aware IM will slide-in the
specified content panel from your
visual perspective. This content
panel can be displayed on big
screens, but automatically hidden
on smaller screens. Clicking the
button on such smaller screens will
slide-in the panel back into view.
You need to specify the
panel that will slide in as
well as the screen width.
If the screen size is less
than the specified width
the panel will be hidden
and the menu button will
be automatically
displayed. On bigger
screens the panel will be
visible and the menu
button hidden.
Start Process
Runs the specified process. If more
than one process is specified for this
item Aware IM displays a choice of
these processes when the user
selects the menu item.
Select the process(es) to
be used by the action by
selecting them from the
list of all processes
available in the business
space version.
System Settings
Creates a single instance of the
SystemSettings object if it has not
None

Aware IM 8.8 User Guide
Copyright © 2002-2023 Awaresoft Pty Ltd Page 307 of 479
been created yet, or edits the
exitsing instance.
Text
Allows adding arbitrary HTML to the
toolbar menu.
Specify HTML to be
displayed in the menu.
URL
Displays a page at the specified
URL.
Specify the URL to go to
as well as where to
display the page.
Output
Specify where the results of the menu command will be displayed. The following options
are available:
Default
The output will be displayed in the current tab.
New Tab
The output will be shown in a new tab (this requires that the “Always show tab”
checkbox is ticked). Aware IM will create the tab automatically and the user will be able
to close the tab whenever she wants.
Popup window
The output will be shown in a popup window. The user won’t be able to access elements
of the screen outside the window until she closes the window.
Modeless window
The output will be shown in a modeless window. The user will be able to access all other
parts of the system outside the window. The window can be resized, repositioned or
closed at any time. The user can open as many modeless windows as she likes
<DIV>
This option allows you to direct the output of the menu item into a particular HTML
element (usually <DIV>) that can be located anywhere on the screen. The element must
have a unique id, for example, <div id=”my_id”></div>. The system will prompt you to
enter this id.
Show Text
The text of the menu item is its name. You can turn its display on or off.
Show Icon
Specify the icon that will be displayed for the menu item (if any).
Condition when invisible
Specify a condition when the menu item is invisible. If you leave the condition blank, the
menu item will always be visible. The condition must operate with the attributes of the
currently logged in user, for example:

Aware IM 8.8 User Guide
Copyright © 2002-2023 Awaresoft Pty Ltd Page 308 of 479
LoggedInUser.Role=’Auditor’
This menu item will be visible for all users except those whose role has been assigned
to “Auditor”.
Add separator after
Only for toolbars. If this option is selected the separator symbol will be displayed after
this menu item.
Start right alignment
Only for toolbars. If this option is selected all subsequent menu items will be right-
aligned
Expanded
For trees and folder items only. If this option is selected the folder item will be
automatically expanded.
Put in overflow menu
Only for toolbars. If items of the toolbar do not fit on the available screen Aware IM will
automatically display an “overflow” button and all items that do not fit on the screen will
be accessible through this button. Using this option you can prevent certain menu items
to be placed on the overflow button (in this case they will always be displayed
irrespective of the screen size)
CSS class
You can customise the appearance of the menu item by assigning a CSS class to it. See
the “How to use CSS” section in the How To Guide for more details.
Badge
Select this option to display a “badge” for the menu item (available for all types of menus
except trees). A badge is a little icon on top of the menu button usually showing a
number (for example, a number of unread messages for the current user). This number
is constantly refreshed – it can be changed by the rules and the number will then be
displayed, When specifying badge properties you have to define an expression for the
number (or text) displayed on the badge (usually the value of the attribute that stores
this number). You can then specify the background color of the badge as well as the
refresh rate and tooltip.
Multi-step Processes
Multi-step processes are used to implement complex wizard forms in Aware IM where
the sequence of steps is driven by business processes. This is explained in great detail
in this video tutorial.

Aware IM 8.8 User Guide
Copyright © 2002-2023 Awaresoft Pty Ltd Page 309 of 479
Form and Grid Styles
When the Configurator creates a new query or a business object form, Aware IM
automatically applies some default settings to the query or form – for example, it adds
some default panel operations, a default panel header, turns on filters for the displayed
attributes, displays a paging bar and so on. If the Configurator is not happy with some
default settings he can manually change them.
However, if he wants most or all of his forms and queries not to have a header, for
example, then he would need to do it every single time – for every new query or form.
This can become quite tedious. This is where styles can help. Styles allow the
Configurator to specify all the default settings for a query or form and then use them for
new queries or forms instead of the default factory settings. He can also assign a name
to the style and then use a particular style when creating a form or a query. This is very
similar to the concept of styles in MS Word, for example.
Styles can be defined by invoking the “Manage Styles” command from the Edit menu.
There the user can define styles for queries represented by the standard form or for
business object forms. The styles will appear in the editing toolbar of the system and the
current style will be used when a new query of form is created. It is also possible to
apply a style to an existing query or form by selecting the “Apply Style” command from
the burger menu of the corresponding query or form.
For more details about form and grid styles watch the video tutorial.
Creating Applications in Different Languages
Aware IM supports applications in different languages – you can configure your
application to be in any language you like. Not only that, but you can also change the
language dynamically or choose different languages for different users. By default
Aware IM uses English. To define a different language you need to configure a locale.
This is how Aware IM works with different locales:
1. If you do not define your own locale an implicit “system” locale will be used. This
locale will use strings defined in your configuration (attribute labels, description
etc) as is. You can define your configuration strings in any language as long as
your keyboard allows you to type them in. However, there are also “system”
strings – the strings that are used in the application but not defined in the
configuration (standard error messages, standard prompts etc). These strings will
be in English.
2. When you define your own locale you can provide translation to all strings in the
application – both system strings and configuration strings. Aware IM will
automatically collect all strings used in the configuration and add predefined
system strings, so that you can translate them all.

Aware IM 8.8 User Guide
Copyright © 2002-2023 Awaresoft Pty Ltd Page 310 of 479
3. You can configure multiple locales – one for each language. You can also
designate that a particular locale should be used “by default” – that is, the
application will always start in this locale and all users will be assigned this locale
by default. If you just need to run the application in one non-English language,
this is all you need to do – define a non-English locale (or maybe a variation of
the English locale) and mark it as the default locale.
4. If you configure multiple locales the user will be able to switch between locales at
run-time if you include the “Locale Selection” menu command in your menu. You
will also be able to assign different locales to different users by rules. Any
member of the SystemUser business object group includes the Locale attribute
that you can use in rules, for example:
IF RegularUser.Country = ‘Germany’ Then
RegularUser.Locale = ‘German’
Aware IM will automatically use the locale with the name “German” when a user
from Germany logs into the system.
See also:
Adding/Editing Locales
Adding/Editing Locales
The following section describes how to work with the editor of locales when adding a
new locale or editing the existing one. Locales are described in the Creating Applications
in Different Languages section.
The editor of locales can be started as described in the Working with Configuration
Elements section. The working area of the locale editor contains a table of stings used in
the application. When a locale is created for the first time Aware IM automatically
extracts all strings used in the configuration and adds to them the system strings. You
can provide translation to both configuration and system strings by clicking on the
“Translation” column in the table. Initially the translation is set to “use the original string”,
which means that if you do not provide a translation the original string will be used.
Strings that have not been translated are displayed in pink. Translated system strings
are displayed in green and translated configuration strings are displayed in white.
You can also click on the following buttons:
Import
This allows you to import system strings from a file. System strings for some locales are
already provided. You can use those as an example for creating your own files for other
locales.

Aware IM 8.8 User Guide
Copyright © 2002-2023 Awaresoft Pty Ltd Page 311 of 479
Export
This allows you to export locale strings into a file
Refresh
If the configuration has been changed since you defined the locale you can refresh the
strings – Aware IM will re-extract all configuration strings defined in the application and
add the new ones to the table, so that you can provide translation to the newly added
strings or delete those that are no longer used.
Delete
This allows you to delete strings that are no longer used in the application
The following properties of the locale be specified in the Element Properties window:
Name
Specify the name of the locale uniquely identifying it within the business space version.
Default
Tick this box if you want the locale to be used in the application by default – the
application will start in this locale and all users will be assigned this locale unless
changed by rules (see the Creating Applications in Different Languages section).
Date format
Select the date format of the locale. This format will be used for those attributes of the
“Date” type that have “Take from locale” value set as their format (see Adding/Editing
Date Attributes)
Timestamp format
Select the timestamp format of the locale. This format will be used for those attributes of
the “Timestamp” type that have “Take from locale” value set as their format (see
Adding/Editing Date Attributes)
Language of system messages
Some system messages (such as month names used in the calendar control, for
example) have already been translated. You don’t need to provide translation for these
messages, just select the language from the list of languages
Culture
Culture defines default formatting of numbers and dates. For example, in some cultures
decimal point is represented by a dot, whereas in other cultures it is represented by a
comma.

Aware IM 8.8 User Guide
Copyright © 2002-2023 Awaresoft Pty Ltd Page 312 of 479
Right-to-left Support
Aware IM supports right-to-left orientation of the screen (RTL) for certain categories of
users that require this. When a user with RTL support enabled logs in Aware IM
automatically shows the screen in right-to-left orientation. All forms that the user sees
will also support right-to-left input.
To enable RTL-support for a user make sure that the value of the RTL attribute in the
user is set to Yes. The RTL attribute is a predefined attribute that is added by Aware IM
automatically to all members of the SystemUser group. You can set the value of the
RTL attribute by rules or explicitly from the user interface when the user record is
created.
Adding/Editing Services
The following section describes how to work with the editor of services when adding a
new service or editing the existing one. Services are described in the Communication
with Other Systems section.
The editor of services can be started as described in the Working with Configuration
Elements section.
You can define the following settings of the service in the working area of the editor:
Process
Select a process that will implement the service from a list of all processes defined in the
business space version. When the service is requested the specified process will be
executed. If the specified process requires input, this input must be provided by a
service requestor.
SOAP/Web Services support
Choose this option if you want Aware IM to expose the service as “web service”
implementing the SOAP protocol. When the business space containing such service is
published Aware IM will automatically create a WSDL file for the service.
IMPORTANT: After a business space version has been published the system
administrator has to login into the Operation Mode to cause the deployment of a new or
changed service and the creation of the WSDL file.
REST support
Tick this checkbox if the service is to be exposed as REST-ful service (REST-ful service
does not need any special deployment and should be available as soon as the business
space is published). If you tick this checkbox you will also need to provide REST settings
(see below)

Aware IM 8.8 User Guide
Copyright © 2002-2023 Awaresoft Pty Ltd Page 313 of 479
Service Reply
Service reply defines a business object or an array of business objects sent by a service
provider as a reply to the service request. If you select the “Service will return object”
radio button you will need to select the object that will be returned from the list of all
objects. Your implementing process must populate the context with the instance(s) of
the business object being returned. Tick the “Return multiple instances” checkbox to
return an array of instances. Again your implementing process must populate the
context with instances of the object to be returned.
The following properties can be specified in the Element Properties window:
Name
Specify the name of the service uniquely identifying it within the business space version.
The following restrictions apply:
- The name of the service must be unique among the names of other services defined
in the business space version.
- The name must start with a character or underscore symbol; all other symbols must
be characters (including underscore symbol) or digits. Space symbols are not
allowed.
Description
Specify any text that describes what the services does etc. Providing a description is not
mandatory but is highly recommended. Any description if defined is included into the
generated documentation for the business space version – see Generating
Documentation.
REST settings
If you ticked “Rest support” checkbox in the editor you will need to provide the following
details:
Default URL mapping
Services exposed as REST will be called by other parties using a particular URL. If you
choose the default option the default URL the other parties will have to use the default
URL. It has the following format:
http://ServerName:port/AwareIM/REST/BusinessSpace/ServiceName?parameters
for example:
http://myserver.com:8080/AwareIM/REST/CRM/Service1?param1=value1¶m2=valu
e2
URL must contain string
If default URL cannot be used you can construct your own URL by choosing this option
and providing your own custom string. For example, if you provide the following string:
someName1/someName2

Aware IM 8.8 User Guide
Copyright © 2002-2023 Awaresoft Pty Ltd Page 314 of 479
the following URL can be used:
http://ServerName:port/AwareIM/someName1/someName2?parameters
NOTE: If you choose this option you must also provide a file called rest.props and
put it in the AwareIM/CP/eclipse directory of your Aware IM installation. The
file must have a string that specifies the name of the business space containing
REST-ful services, for example DOMAIN=CRM
Name mapping
If your REST-ful service is implemented by a process that takes some object as input
(should only be one object) then values of attributes of this object have to be provided as
parameters in the URL (see example above). The name of the parameters must match
the names of the attributes of the object. If this, however, is impossible for whatever
reason, then you need to provide a mapping between the names of the parameters
(“External Name”) and the name of the corresponding attribute. You should only do it for
those parameters that have different names to the names of the attributes.
Reply Format
If a service returns a reply it can be either in the XML format (also Default) or in JSON
format. The format can also vary depending on the URL used – the extension of the
expected format can be specified in the URL itself. Choose the appropriate option here.
REST Handing of Undefined Values
This only applies to services exposed as REST-ful services. If values of the attributes of
the returned object are undefined, you can choose how Aware IM will encode such
values. By default Aware IM will skip undefined values (“Do not encode” option), but you
can also encode an empty value or a particular string. You can also specify different
encoding options depending on the name of the attribute.
Scheduling
Scheduling is configuration of special rules that execute processes or request services
at a particular time interval. Each rule that executes such a process or service is called a
scheduling item.
Scheduling items are added or edited by the editor of scheduling items, which is started
as described in Working with Configuration Elements. The editor of scheduling items is
essentially the editor of a special rule collection. Working with it is very similar to working
with the editor of standard rule collections as described in Adding/Editing Rules section.
The only difference is in adding/editing of a single rule (which represents a scheduling
item). The difference is that along with the Standard View tab (see Adding/Editing
Individual Rule)” of the editor looks different for the scheduling rules.

Aware IM 8.8 User Guide
Copyright © 2002-2023 Awaresoft Pty Ltd Page 315 of 479
The following information can be specified on the Standard View tab of the scheduling
rules editor:
Recurrence Pattern
Controls in this group box allow you to specify how often a process or service being
scheduled is going to be executed:
Once
Select this radio button if a process or service is to be executed only once (you will also
need to provide the date and time of this event (see Recurrence Range and Start Time
below).
Daily
Select this radio button if a process or service is to be executed every day starting and
finishing on the dates specified in the Recurrence Range group box and at the time
specified in the Start Time group box (see below).
Weekly
Select this radio button if a process or service is to be executed every week starting and
finishing on the dates specified in the Recurrence Range group box and at the time
specified in the Start Time group box (see below). You will also need to provide the
day(s) of the week when the process or service is going to be executed by ticking the
appropriate checkboxes.
Monthly
Select this radio button if a process or service is to be executed on the specified day of
every month starting and finishing on the dates specified in the Recurrence Range group
box and at the time specified in the Start Time group box (see below). You will also need
to provide the day of the month when the process or service is going to be executed.
Yearly
Select this radio button if a process or service is to be executed on the specified day of
the specified month of every year starting and finishing on the dates specified in the
Recurrence Range group box and at the time specified in the Start Time group box (see
below). You will also need to provide the month and the day when the process or service
is going to be executed.
Every few minutes
Select this radio button if a process or service is to be executed every few minutes
Recurrence Range
Controls in this group allow you to specify the starting and ending dates of the time
period when the process or service being scheduled is going to be executed:
- Start date – you must provide the starting date of the recurrent pattern in the
dd./MM/yyyy format (see Recurrence Pattern).

Aware IM 8.8 User Guide
Copyright © 2002-2023 Awaresoft Pty Ltd Page 316 of 479
- No end date – select this radio button if a process or service is to be executed
indefinitely according to its recurrence pattern.
- End by – select this option if you want to specify the end date when the process or
service execution will end.
Start Time
You must specify the time of the day when the process or service is going to be started.
Actions
The options in this group box allow you to specify which process or service is going to
be executed:
- Start process – select this option if you want to start the specified process. You will
also need to select the process from the list of all processes defined in the business
space version.
- Call service – select this option if you want to request the specified service of the
specified service provider. You will also need to select the name of an intelligent
business object providing the service and select the service to be requested.
Adding/Editing Business Spaces
Business space is explained in the Business Space section.
When Aware IM is installed one business space is created by default. The name of this
business space is specified during installation. The elements that you define when
configuring the application usually belong to this default business space. Sometimes,
however, it may be necessary to define other business spaces – for example, if you are
configuring several separate applications or if there are entities within the business that
function more or less as independent units. In these cases you may need to create new
business spaces and/or delete the existing ones. The following section describes how to
do it.
To create a business space, follow the steps below:
1. Click on any existing business space in the Elements Tree.
2. Select File/New in the menu or right click and select “New” from the popup menu.
The Business Space Dialog will be displayed.
3. Specify the following properties of a new business space in the Business Space
Dialog:
a. Name – the name of the new business space. The name must be unique
among the names of other business spaces. It must start with a character

Aware IM 8.8 User Guide
Copyright © 2002-2023 Awaresoft Pty Ltd Page 317 of 479
or underscore symbol; all other symbols must be characters or digits;
space symbols are not allowed.
b. Description – a description of the new business space. Providing a
description is highly recommended.
c. Create options – if you choose the “Create from sample application” radio
button Aware IM will automatically import the file with the selected sample
application into the business space version created with the business
space.
d. Database allocation options – usually Aware IM database tables for
business spaces are stored in the same database named BASDB (or
BASDBTEST in the testing mode). Selecting the “Allocate separate
database” radio button will force Aware IM to allocate a separate database
for the business space. This can be useful if you host an application for
several clients and you want data of your clients to be stored in separate
databases.
e. Default Date/Time Formats – this option specifies the default format of
attributes of the Date and Timestamp. New attributes of these types will
have these formats by default.
f. Theme and Font Size – this allows picking a default theme and font size
for the new business space
4. Press OK on the Business Space Dialog – the new business space will be displayed
in the Elements Tree.
To edit the existing business space:
1. Double click on the node representing the business space in the Elements Tree or
select the business space entry and choose “File/Open” from the menu.
2. Change the description and/or visibility options of the business space in the Element
Properties window. Note that you cannot change the name of the existing business
space.
To delete the existing business space:
1. Right click on the node representing the business space in the Elements Tree to
bring up the pop-up menu.
2. Select “Delete” from the pop-up menu.
CAUTION: Deleting a business space will delete all business space versions defined
in the business space and all the operational data created by the users!
Setting Options for Incoming E-mail Handling
Quite often an application needs to process e-mails arriving to the business’s e-mail
address and perform certain functions automatically based on the e-mail contents. For
example, a customer relationship management system might register all e-mails from

Aware IM 8.8 User Guide
Copyright © 2002-2023 Awaresoft Pty Ltd Page 318 of 479
customers in its database, assign a unique ID to the e-mails and automatically reply to
customers with the details about their request.
In Aware IM it is possible to configure an application to process incoming e-mails and
perform the necessary actions. As mentioned before all communication with the external
parties in Aware IM is performed either via notifications or service requests (see also
Defining Intelligent Business Objects). Incoming e-mails are no exception – Aware IM
treats them as notifications sent to the Aware IM application via a special channel. Once
incoming e-mails have been delivered to Aware IM as notifications Aware IM evaluates
any rules attached to the notification as usual. It is up to the configurator to define the
appropriate rules.
All that the configurator has to do to make sure that the application handles incoming e-
mails is turn on the e-mail handling capability for the business space version, set the
properties of the incoming e-mail channel and define the rules that deal with the
incoming e-mail notification. This is explained in more detail below:
NOTE: Starting from version 5.7 it is now possible to handle incoming e-mails
dynamically from a process. To do this select the business space version in the
Configuration Tree and select the “Add Incoming Email Account” object from the Edit
menu. This will create a special object that stores values of the incoming email account.
You can use instances of this object in the CONNECT FROM EMAIL action in a process.
For more details see the CONNECT TO EMAIL and DISCONNECT FROM EMAIL actions
in the Rule Language Guide.
To turn on incoming e-mail handling capability for a business space version follow the
steps below:
1. Double click on the node representing the business space version to start editing it
(or select File/Open from the menu).
2. Click on the “Incoming emails” property displayed in the Elements Properties window
The “Incoming E-mails” dialog will be displayed.
3. Specify the following properties in the “Incoming E-mails” Dialog:
a. Select the “The system will handle incoming e-mails” radio button to turn
on the e-mail handling capability.
b. Select the “Use values below” radio button and provide the following
values:
i. Specify the DNS name of the mail server that will receive e-mails in
the Mail Host text box.
ii. Specify the credentials (the user name and password) of your
account on the mail server.
iii. Specify the e-mail protocol supported by your mail server and the
port number (check with your e-mail provider if not sure).

Aware IM 8.8 User Guide
Copyright © 2002-2023 Awaresoft Pty Ltd Page 319 of 479
c. Alternatively you can select the “Use values from SystemSettings object”
radio button. In this case the system administrator will have to provide the
values for the DNS name, e-mail protocol and user credentials when the
application is initialized – see Setting Initial Values of the System.
4. Press OK on the “Incoming E-mails” Dialog.
The Configuration Tool will automatically add the following business objects and
notification into the business space version:
IncomingEmail notification
This is the notification that represents an incoming e-mail. This notification has a special
structure that you cannot change (you can define other attributes but you cannot change
the existing ones). The attributes of the notification contain the properties of the received
e-mail, such as who it is from, when it was received etc. Any rules that you want to
specify to handle incoming e-mails must be attached to the events of this notification –
see Adding/Editing Rules. You can check values of the pre-defined attributes of the
notification in your rules and perform the appropriate actions.
To turn off the incoming e-mail handling capability for the business space version select
the “Incoming emails” property of the business space version to bring up the “Incoming
Emails” dialog and select “The system will not handle incoming emails” radio button.
Handling Login Events
It may be necessary for your application to execute certain rules when a new user logs
in. For example, your application may collect the statistics of how many users are online
or how many users have been using the application.
If you want to handle the login events in your application you need to define a special
login notification and attach rules to this notification – see Adding/Editing Rules.
To add the login notification to the business space version:
1. Right click on the “Notifications” node of the business space version in the Elements
Tree to bring up the pop-up menu.
2. Select the “Add Login Notification” or “Add Login Notification Attempt” command from
the pop-up menu (it will be greyed out if the login notification has already been
added). A new notification with the pre-defined name LoginNotification or
LoginNotificationAttempt will appear in the Elements Tree. The difference
between the LoginNotification and LoginNotificationAttempt is that the
first is sent when a user successfully logs into the system and the second one –
when the user’s attempt to login fails.

Aware IM 8.8 User Guide
Copyright © 2002-2023 Awaresoft Pty Ltd Page 320 of 479
The login notification has a special structure that you cannot change (you can define
other attributes but you cannot change the existing ones). This structure includes the
LoginName attribute. The value of this attribute contains the name of the current user.
There is also the RemoteAddress attribute which contains the IP address of the user
who tries to login. You can check the value of these attributes in the rules attached to
this notification and perform appropriate actions if required.
To turn off handling of the login events in the business space version delete the
LoginNotification from the Elements Tree – see Adding/Editing Configuration
Elements.
See also Handling Logout Events.
Handling Logout Events
It may be necessary for your application to execute certain rules when a user logs out.
For example, your application may collect the statistics of how many users are online or
how many users have been using the system.
If you want to handle the logout events in your application you need to define a special
logout notification and attach rules to this notification – see Adding/Editing Rules.
To add the logout notification to the business space version:
1. Right click on the “Notifications” node of the business space version in the Elements
Tree to bring up the pop-up menu.
2. Select the “Add Logout Notification” command from the pop-up menu (it will be
greyed out if the logout notification has already been added). A new notification with
the predefined name LogoutNotification will appear in the Elements Tree.
The logout notification has a special structure that you cannot change (you can define
other attributes but you cannot change the existing ones). This structure includes the
LoginName attribute. The value of this attribute contains the name of the user logging
out. You can check the value of this attribute in the rules attached to this notification and
perform the appropriate actions if required.
To turn off handling of the logout events in the business space version delete the
LogoutNotification from the Elements Tree – see Adding/Editing Configuration
Elements.
See also Handling Login Events.

Aware IM 8.8 User Guide
Copyright © 2002-2023 Awaresoft Pty Ltd Page 321 of 479
Sending Outgoing E-mail
Many applications need to send e-mails – to their customers, internal staff etc. As
described in the Defining Intelligent Business Objects section to send e-mails you need
to define the party you are sending e-mails to as an intelligent business object and
define the e-mail communication channel for this object – see Setting Properties of E-
mail Channel.
The actual e-mail sent to the external party represented by the intelligent business
object must be a notification – see Adding/Editing Notifications. It is up to you how you
define the attributes of this notification and the rules that will be executed when this
notification is created. However, you have to make sure that you define the following
attributes in the notification representing an outgoing e-mail:
1. Subject – this attribute must be of the Plain Text type and must contain the subject
of the e-mail.
2. Message – this attribute must be of the Plain Text type and must contain the body of
the e-mail.
3. HTMLMessage – this attribute must be of the Document type. If value of this attribute
is defined and contains valid HTML document, the email will be sent in HTML format
rather than in a standard text format.
4. CC and BCC - these attributes represent copy and blind copy lists respectively. The
email addresses in the list must be separated by a semi-colon. You can initialize the
list from a list of references by using the LIST_LINE function.
You can also optionally add the EHeaders attribute to this notification if you want to add
special headers to your email. The value of this attribute should be in the following
format:
Header1#Header2#Header3…
where each header represents name and value in the standard header format:
Name: value
The Configuration Tool provides a convenience feature that creates the skeleton of the
outgoing e-mail notification with all the required attributes automatically. You can use
this feature to add the notification and then change it as you wish. To create the
outgoing e-mail notification:
1. Right click on the “Notifications” node of the business space version in the Elements
Tree to bring up the pop-up menu.
2. Select the “Add Outgoing E-mail Notification” command from the pop-up menu. The
new notification with the name OutgoingEmail will appear in the Elements Tree.
Using the steps described above you can add as many outgoing e-mail notifications as
you like. You can then change their names, add other attributes and/or attach creation
rules – see Adding/Editing Rules.

Aware IM 8.8 User Guide
Copyright © 2002-2023 Awaresoft Pty Ltd Page 322 of 479
An email account that will be used when sending a notification is determined either from
the SEND action itself or from the properties of the Email channel defined for the
intelligent object if the account is not specified in the SEND action. An email account
contains properties such as email server, port and authentication details.
If you want to use an email account directly in the SEND action you need to do the
following:
1. Create the definition of the email account object in the Configuration Tool by
selecting the Business Objects node in the tree and then choosing “Add
Outgoing Email Account” menu command. This command will create the object
with the required predefined attributes
2. Define the SEND action with the USING syntax. The instance of the
EmailAccount object is taken from the Context of the rule – exactly one instance
of this object must be present in the Context
3. At runtime the user needs to populate the values of the EmailAccount object
before invoking a process that uses the account in the SEND action.
Handling Unsent E-mail
Aware IM may fail to send an outgoing email (there are many reasons for that – no
Internet connection, invalid email address and so on). By default Aware IM will save
such an email in the AwareIM/UNSENT_EMAIL folder and will attempt to resend the
email every 10 minutes, provided that the original failure was due to connection issues
and hoping that these issues are resolved.
You can, however, override this behaviour and provide something more sophisticated.
To do this you need to add a special UnsentEmailRecord object to your business space
version. (select Business Objects in the Configuration Tree, right click to bring a popup
menu and select the “Add Unsent Email Object” menu item). This object has predefined
attributes that describe the email that has not been sent and the reason of failure. You
can also define your own attributes. When a failure occurs Aware IM will create an
instance of this object and automatically populate the predefined attributes.
You can attach business rules to this object to better control what should happen when
failure occurs – for example, notify the system administrator about this fact.
Adding Appointment Objects
Some applications need to deal with issues that require a calendar – create
appointments, register activities, arrange meetings etc. In Aware IM a business object
encapsulating the concept of an activity that lasts a certain time is called “Appointment”.
In order for Aware IM to be able to show such objects using a calendar the object needs
to have certain attributes defined.

Aware IM 8.8 User Guide
Copyright © 2002-2023 Awaresoft Pty Ltd Page 323 of 479
You can create a template of an Appointment object by selecting “Business Objects”
node in the Elements Tree, bringing up the pop-up menu and selecting “Add
Appointment Object” (you can also do it from the main menu). Once you do this Aware
IM will automatically create a new definition of an Appointment-type object with the
predefined attributes. You can re-name the object and add other attributes to this object,
but you cannot change the predefined attributes. Aware IM will also create the
Appointments business object group. All Appointment objects will be added to this
group. Once an Appointment object has been created you can query on this object
and display results using a calendar.
Working with Data Stored in Existing Database Tables or
LDAP
As explained in section Data Storage Aware IM automatically creates, alters and deletes
database tables. This is great when you want to create new applications, but what if you
need to use existing data stored in database tables created by other software or in
network servers such as LDAP? There are at least two scenarios when you might want
to do this:
1. You have a legacy system that you want to completely transfer to Aware IM.
2. You have an existing database software system(s) (or network server) and you want
to continue using this system, however, you also want to add an extension to this
system to be managed by Aware IM.
For the first scenario the recommended approach is to configure a new application using
Aware IM and then transfer the operational data from the legacy database into Aware
IM using Export/Import. For the second scenario you can get Aware IM to use the data
stored in the existing database tables or network server by configuring business objects
with persistence option “Database: existing external” or “LDAP” (see Specifying General
Properties). With this approach you can configure new business objects managed
automatically by Aware IM but also have business objects that will be shared between
Aware IM and other software systems or network servers that already use the data. You
can get Aware IM to write to the existing database tables or network servers or you can
only perform queries on such objects.
When you define a business object with the “Database: existing external” or “LDAP”
persistence options Aware IM will automatically import columns of the required
database tables or data definitions of the network server and convert them into business
object attributes. You will not be able, however, to add your own attributes to such
objects(except shortcuts to reference attributes).
For existing databases you will also need to designate one or more columns in the
existing database tables as primary keys for the table that uniquely identify a record in

Aware IM 8.8 User Guide
Copyright © 2002-2023 Awaresoft Pty Ltd Page 324 of 479
the table (for example, a unique id of a customer or a combination of his first and last
name etc). If you do not define a primary key for a table Aware IM will be able to
perform queries on such tables but it will not be able to dispay details of particular
records, insert new records or delete the existing ones. For a LDAP server you will need
to specify a distinguished name of a sample record in the LDAP server for Aware IM to
be able to read the data definition of the record.
As you can see this approach has certain limitations (they are summarized below) and
is, therefore, only recommended when all other approaches are not practical. These
limitations are the reason we recommend using export/import for the first scenario when
you want to transfer a legacy system to Aware IM.
Limitations of using data stored in existing database tables or LDAP:
1. You can only use attributes automatically created by Aware IM from the database
tables or network server. You cannot define your own attributes (except shortcuts).
2. Some types of database columns cannot be imported into Aware IM. Aware IM will
ignore such columns.
3. If you do not define a primary key for imported columns Aware IM will not be able to
display details of individual records, create new records or delete the existing ones.
4. You cannot mix objects with different persistence types in one query. For example,
the query
FIND Order WHERE Order.Customer.Name = ‘John’
will not work if Customer object is stored in the existing database.
5. The use of external tables and network servers can make the design of your
application less portable as it will depend on specific connections to existing
databases and network servers.
The rest of this section describes how to configure business objects that use existing
database tables or LDAP server.
Defining Business Objects that Use Existing Database Tables
To get business objects to use existing database tables or views you need to select the
“Database: existing external” option in the “Persistence” drop-down on the business
object property editor (see Specifying General Properties). Then you need to provide the
following details.
First you need to select the “database environment” that describes how to connect to the
existing database. If there are no database environments yet you need to create one by
clicking on the Add button next to the “Database” drop down. The details of this process
are described later in this section.

Aware IM 8.8 User Guide
Copyright © 2002-2023 Awaresoft Pty Ltd Page 325 of 479
After you select the database environment you need to specify the name of the table or
view in the existing database that you want to use. Enter the name of the table or view
into the “Table or view” text box. Then click on the “Discover Attributes” button. At this
point Aware IM will automatically discover all database columns that the specified table
or view has and convert them into the corresponding attributes. The results will be
displayed in the “Attributes” table. If there are any database columns that could not be
converted into attributes Aware IM will display the list of these columns.
If there are any “foreign key constraints” defined for the database table Aware IM will
automatically recognize the constraints and create reference attributes corresponding to
these constraints. If there are no foreign key contraints defined for the database table
but you still want to treat one or more existing columns as foreign keys you can select
the corresponding attributes and click on the “Foreign Keys” button. Aware IM will then
create a reference attribute to replace the selected attributes.
You should then define a primary key for the table if Aware IM hasn’t recognized one
automatically – check the attribute(s) that uniquely identify the record in the database
table, for example, a unique id, unique surname, e-mail address etc. If you do not define
a primary key Aware IM will be able to perform queries on the business object but will
not be able to display individual instances, create new instances or delete the existing
ones.
Once the primay key has been defined (automatically or manually) click OK and the
discovered attributes will appear in the list of business object attributes. You can now
use the business object in the usual way – define queries on the object, business rules,
processes etc.
Defining Database Environment
To define a new “database environment” click on the Add button next to the “Database”
drop down. This will bring up the “Database environment” dialog. First you need to
specify the unique name of your database environment.
Then you need to select the database engine. Aware IM offers several pre-defined
database engines to help you specify connection parameters. If your database engine is
not among the pre-defined engines you need to select “Custom”.
When you select a particular database engine (a pre-defined one or custom) Aware IM
displays connection parameters specific to this database engine. For example, for
MySQL database you need to specify MySQL account credentials, machine name
where MySQL server is running (if not local machine) and port where MySQL is listening
for requests (if not the default one). If you need to specify connection parameters that
are not included into this interface you need to select the “Custom” database engine and
specify these parameters as part of connection URL string.
When you select the Custom database engine you need to make sure that you have the
JDBC driver that allows connections to your database from Java. JDBC drivers exist

Aware IM 8.8 User Guide
Copyright © 2002-2023 Awaresoft Pty Ltd Page 326 of 479
virtually for all known databases. Many database vendors include JDBC drivers as part
of their database offerings. If they don’t you can almost always find a third party JDBC
driver. JDBC driver is usually distributed as a file with a .jar extension. You need to put
the jar file with the driver into the AwareIM/CustomJars directory (create the directory if
needed) and restart Aware IM.
When specifying properties of the Custom connection you need to specify:
Fully qualified name of the driver class (check documentation of your JDBC
driver)
Connection URL string (check documentation of your JDBC driver)
Defining Business Objects that Use Data from LDAP Server
/Active Directory
To get business objects to use data stored in a LDAP server (or LDAP-compliant
Windows Active Directory) you need to select the “LDAP” option in the “Persistence”
drop-down on the business object property editor (see Specifying General Properties).
Then you need to provide the following details.
First of all you need to select a particular LDAP server that you want to connect to. If
there are no LDAP servers yet you need to create one by clicking on the Add button next
to the “LDAP Server” drop down. The details of this process are described later in this
section.
After you select the LDAP server you need to specify the LDAP distinguished name of a
sample record in the LDAP server. The record must represent the data type that you
want to create a business object for. For example, if you want to use data for users
stored in your LDAP server you need to specify a distinguished name of any user stored
in the LDAP server (such as uid=kurt,ou=People,dc=openldap,dc=org). Enter the
distinguished name and click on the “Discover Attributes” button. At this point Aware IM
will automatically discover data definitions stored in LDAP and convert them into the
corresponding attributes. The results will be displayed in the “Attributes” table.
To speed up searches for the object you can also specify the distinguished name of the
node under which all the data for the object resides in an LDAP server (if such a node
exists). If you do not specify anything the entire LDAP tree will be searched.
Once you click OK the discovered attributes will appear in the list of business object
attributes. You can now use the business object in the usual way – define queries on the
object, business rules, processes etc.
Defining LDAP Server
To define a new “LDAP server” click on the Add button on the “LDAP Settings” dialog.
This will bring up the “LDAP Server” dialog. First you need to specify the unique name of
your LDAP server. Then you need to specify the credentials of your LDAP account (if

Aware IM 8.8 User Guide
Copyright © 2002-2023 Awaresoft Pty Ltd Page 327 of 479
you leave the values blank, an anonymous account will be used, provided that your
LDAP server allows that). Then you need to specify the network name of your LDAP
server and the port where it is listening to the requests.
NOTE: If you want to support secure connections to LDAP servers (LDAPS) add
the following entry to the file AwareIM/bin/BASServer.props
LDAP_SECURE_CONNECTION=true
At the moment the setting applies to all LDAP servers
You will then need to add a certificate of the corresponding LDAP server to the list of
trusted certificates of the Java Virtual Machine used by Aware IM and located in the
AwareIM/JDK directory using Java keytool utility. Please refer to the
documentation of the keytool utility
https://docs.oracle.com/en/java/javase/12/tools/keytool.html
Using LDAP/Active Directory for Login
NOTE: This feature is only available for products that include the LDAP option.
Sometimes it is necessary to get Aware IM-based applications to use credentials of
existing users in other systems for login rather than get Aware IM to store credentials in
its own database. For example, if you already have an LDAP server or an Active
Directory that stores corporate users you may want to get Aware IM to use the
credentials of the existing users for logging into Aware IM, or even bypass Aware IM
login altogether if a user is already logged in the other system.
To achieve this, the configurator has to perform the following steps:
1. Define an object that represents an LDAP user (see Definining Business Objects that
use the LDAP Server) – the object must point to the user object in the LDAP
Server/Active Directory
2. Create a regular Aware IM object that represents the logged in user. This object
must be a member of the SystemUser group (see the Access Level section).
3. Create a reference to the LDAP object created at step 1 in the Aware IM object
created at step 2
4. Create business rules that will determine the access level of the Aware IM object
based on the data stored in the referenced LDAP object.
5. Start editing a business space version in the Elements Tree and then click on the
“Login options” property in the Element Properties window to bring up the “Login
Options” dialog. Then select the “Login will be managed by Active Directory/LDAP”
radio button on the dialog and then indicate the names of the objects created at step
1 and 2 and the reference attribute created at step 3.

Aware IM 8.8 User Guide
Copyright © 2002-2023 Awaresoft Pty Ltd Page 328 of 479
When a user logs in Aware IM-based system Aware IM will use the LDAP/Active
Directory login rather than try to find the user in its own database. If LDAP/Active
Directory authenticates the user Aware IM will try to find the instance of the Aware IM
object that corresponds to the user with the specified login name. Aware IM will
automatically create such an instance if it does not exist yet and if such option has been
set up in the LDAP Options dialog. This instance will then be used throughout Aware IM
as a “logged in user”. The access level of such user will be determined by business rules
created at step 4 above.
NOTE: If LDAP users reside in different branches of Active Directory/LDAP server,
you should create multiple LDAP objects – one per branch. You should list all these
objects in the Login Options dialog. For each of the objects you need to provide the
corresponding Aware IM object and the reference attribute in the Aware IM object to the
LDAP object. You can also create a special group and add all these objects to this group
and then specify the name of the group in the Login Options dialog, rather than specify
each object individually. The group may only contain objects persisted in LDAP – it
should not include objects with other types of persistence.
Bypassing Aware IM Login for Active Directory/LDAP Users
Aware IM login can be bypassed altogether by those Active Directory/LDAP users that
are already logged in through LDAP/Active Directory. The configurators have to tick the
“Allow Windows users to enter without logging in” checkbox on the “Login Options”
dialog to allow this. Aware IM will automatically use the user that corresponds to the
currently logged in user in the Active Directory/LDAP.
The users have to use the following URL to enter Aware IM-based system without
logging in:
http://localhost:8080/AwareIM/logonDirect.aw
The above URL will use the default business space. It is also possible to indicate the
name of the business space and testing mode flag using the following parameters:
“domain”, “testingMode”, for example:
http://localhost:8080/AwareIM/logonDirect.aw?domain=CRM&testingMode=true
NOTE: Only users accessing the system via corporate LAN can bypass the Aware IM
login. Such users have to use the Internet Explorer browser and they should also enable
initialising and scripting Active X controls not marked as safe for scripting in the security
options of the Internet Explorer.

Aware IM 8.8 User Guide
Copyright © 2002-2023 Awaresoft Pty Ltd Page 329 of 479
NOTE: It is possible to combine login through Active Directory/LDAP with the
standard Aware IM login, so that some users will login through LDAP and others – in a
standard way. To support this tick the “Allow standard password login” checkbox in the
Login Options dialog. It is also possible to add access level restrictions, so that only
users with the specified access levels will be allowed to use standard login.
Login via social media sites and other applications
If users are already logged in some popular social media sites like Facebook or Twitter
or other applications like Google they can log into their Aware IM-based applications
using the accounts of these applications. In order for them to be able to do this the
configurator has to enable this functionality in the application.
To do this the configurator needs to select the business space version for editing and
then click on the “Login Options” property to bring up the “Login Options” dialog as
explained in the previous section. The configurator then needs to tick the appropriate
checkbox, for example “Allow login via Facebook” and then click the Settings button to
enter the appropriate parameters. For details how to do this please see the How To
Guide.
Implementing Single Sign-on using SAML protocol
Aware IM supports single sign-on using the industry standard SAML protocol.
Implementing this feature requires special setup (not included in the product by default),
so if you want to implement this feature for your application please contact Awaresoft
(support@awareim.com), which will send you required files with instructions how to
install them. The Support Team will also explain how to integrate this feature with your
application.
Generating Documentation
Once you have finished configuring your application you can get the Configuration Tool
to automatically generate the documentation for it. The generated documentation is
represented by a number of HTML pages, which include an overview page from which
you can navigate to all other pages of the documentation. In addition you can generate a
document in the Microsoft Word format (.doc).
Pages of the generated documentation contain descriptions of all business objects,
processes, business rules and other configuration elements defined in the business
space version. The description of any element contains all the information configured for

Aware IM 8.8 User Guide
Copyright © 2002-2023 Awaresoft Pty Ltd Page 330 of 479
the element – for example, the description of a business object contains the description
of its attributes, services etc.
To generate documentation for a particular business space version:
1. Click on the node representing the business space version in the Elements Tree to
select it and then select “Version/Generate Documentation” from the menu.
Alternatively right click on the node representing the business space version in the
Elements Tree and select “Generate Documentation” from the pop-up menu.
2. In the Direction Selection Dialog that appears specify the directory where all the
documentation files will be written.
3. After the Configuration Tool finishes generating the HTML documentation it will ask
whether you want to generate the documentation in the Microsoft Word format.
4. To view the HTML documentation open the configuration.html file in the
specified directory.
Show System Objects
Internally Aware IM uses certain business objects to implement some of its features,
such as user-defined queries, processes and others. The configurator may need to add
his own rules to these objects in order to fine-tune the behaviour of these features. In
order to do this he has to select the business space version and then select the Show
System Objects command from the Version menu. This is an option for advanced
users only who fully understand how system objects work. The following table explains
which system objects are used in Aware IM:
Object Name
Comments
BAS_UDCE
Configuration record for user defined
processes
BAS_UDET
Email template for user defined processes
BAS_UDIE
Event record for import/export templates
BAS_UDIT
Import/export template
BAS_UDP
User defined process
BAS_UDPE
Execution event record for a user defined
process
BAS_UserDefinedChoices
User defined attribute choices
BAS_UserDefinedDocument
User defined document
BAS_UserDefinedQuery
User defined query
BAS_User_Prefs
Saved user settings, such as grid columns,
height, width etc

Aware IM 8.8 User Guide
Copyright © 2002-2023 Awaresoft Pty Ltd Page 331 of 479
Searching for Elements in a Business Space Version
When an application becomes large It is often necessary to find certain elements in a
business space version – business objects, attributes, queries etc. It is also useful to
know where a particular element of a business space version is used by other elements.
The following “search” menu commands are available when you select a business space
version and then either right click to bring up a popup menu or select one of the
commands in the Version/Search group in the main menu.
Search Version
Search Rules
Search Last Modified
Find Element
Unused Elements
Search Version
This command searches the business space version for an occurrence of the specified
string (which can be the name of some object, attribute, query etc). The results are
displayed in the Search window. Each reference to the specified string is displayed as
XML fragment, so that you can easily track down exactly where the reference is by going
through the XML tree. The XML tree is quite straightforward and matches closesly to the
structure of the business space version. You can also double click on the line and Aware
IM will open the corresponding element.
NOTE:, as an alternative to this command you can select a particular element in the
Configuration Tree and then select Find References command. However, this command
will not search the entire version – for example, it will not search scripts and HTML. The
Search Version command, on the other hand, will search everything (it is also faster).
Search Rules
The application that you configure may contain large number of rules so it is often
necessary to find a particular rule. The Configuration Tool provides the feature that finds
rules matching the specified criteria. You can search for rules implementing processes
separately from rules attached to business objects.
To search for rules defined in a business space version specify the following options in
the Search Rules Dialog:
a. Tick the “Process rules” checkbox if you want to include rules
implementing processes in the search.
b. Tick the “Object rules” checkbox if you want to include rules attached to
business objects in the search.
c. Tick the “By rule name” checkbox if you want to search for rules that have
the specified text in their names. You must also provide the text to filter by,
whether you want the search for the names to be case sensitive and

Aware IM 8.8 User Guide
Copyright © 2002-2023 Awaresoft Pty Ltd Page 332 of 479
whether you want to match the rules with the names exactly equal to the
specified text or containing the specified text anywhere inside.
d. Tick the “By rule expression” checkbox if you want to search for rules that
have the specified text anywhere in their textual expression. You must also
provide the text to filter by, whether you want the search for this text to be
case sensitive and whether you want to match rules with textual
expressions exactly equal to the specified text or containing it anywhere
inside.
The Configuration Tool will display the results of the search in the Search window. You
can go directly to the rule editor by double clicking on the rule in the window.
Search Last Modified
This command allows you to search for elements which have been last modified before
or after the specified date or within the specified period. The dialog that opens allows
you to specify the period to search for and the results are displayed in the Search
Window.
Find Element
This command allows you to search for elements in the Configuration Tree whose
names contain the specified string. If only one element is found, Aware IM immediately
opens it. If there is more than one, it shows the list of found elements in the Search
window and you can double click on the element to open it.
Unused Elements
This command allows you to show all elements that are not referenced by any other
elements. These elements are good candidates to be deleted from the version.
Backing up and Restoring Operational Data
The operational data stored by a system is its most valuable asset. All precautions must
be taken to preserve its integrity. It is highly recommended to perform regular database
backups and certainly it is a very good idea to perform a backup before publishing a new
business space version.
As backup and restore processes are quite sensitive it is also recommended to perform
them when no one is using the system in the Operation Mode.
Aware IM uses two databases with the default names BASDB and BASDBTEST. These
two databases need to be backed up on a regular basis. Generally it is recommended
that the database backup be performed using the tools provided by the specific
database used with Aware IM. In certain cases it is possible to perform a simple
directory backup. For example, if the default Derby/Cloudscape database is used it is
possible to backup the DATA directory located underneath the root directory of the

Aware IM 8.8 User Guide
Copyright © 2002-2023 Awaresoft Pty Ltd Page 333 of 479
Aware IM installation. To restore the data after the backup all you need to do is
overwrite the DATA directory with the files from the backup.
NOTE: If you are just doing development and do not care about current data,
then all you need is a BSV, so make sure you always have the current BSV file
whenever you do something make sure that you save your work. If something goes
wrong during publishing the version the easiest solution is recreate a business space
and re-import the BSV. This should always work fine as the BSV includes everything.
If you do have production data already that you care about then any publishing of a
new BSV that involves changes to the database structure (business objects and
attributes) should be considered a MAJOR EVENT. If anything goes wrong during
the publishing operation you may lose your data. This is especially the case when
you rename your objects/attributes and/or change the types of existing attributes.
So you need to prepare properly for this. Before you publish you need to export the
current BSV (and the new one) and perform a FULL BACKUP of the current
database.
If ANYTHING GOES WRONG during publishing the first thing you need to do is
RESTORE THE DATABASE FROM THE FULL BACKUP. NEVER DO ANY
FURTHER WORK ON THE DATABASE THAT YOU ENDED UP WITH AFTER
PUBLISHING ERROR.
The full restore should restore everything properly - there should be no report or any
other errors. This is because the full snapshot of the database should include
EVERYTHING THAT THE SYSTEM NEEDS to work properly.
Managing Configuration Users
When you install Aware IM for the first time the default administrator use of the
Configuration Tool is created. The login name of this user is “admin” and the password
is “password”. Additional users of the Configuration Tool can be created using the
“Manage Configuration Users” command under the Edit menu. When this command is
selected the “Manage Configuration Users” dialog is displayed. In this dialog you can
add, delete and modify configuration users. When adding a configuration user the
following properties can be specified:
Login name
Password
Role (Administrator or Developer). The difference between administrators and
developers is that developers cannot manage configuration users. Developers
cannot put a business space version “in development” to start multi-developer
mode and they cannot put version “in development” under test or publish it. For

Aware IM 8.8 User Guide
Copyright © 2002-2023 Awaresoft Pty Ltd Page 334 of 479
more details about the multi-developer mode watch the Milti-Developer Mode
video tutorial
Access to business spaces – an administrator can limit access to certain
business spaces for different developers. If a developer has been disallowed
access to a particular business space, this business space will not be visible to
this developer in the Configuration Tool
Any user of the Configuration Tool can change his/here password by selecting the
“Change Configurator Password” command under the Edit menu.
Working on the Same Business Space Version Concurrently
(Multi-Developer Mode)
Several developers can work on the same business space version concurrently (this is
called a “multi-developer mode”). In this mode developers lock (check-out) those
elements of the version that they are working on (business objects, queries, processes
etc). To make changes to the version they have to check-in their changes. To start the
multi-developer mode a system administrator has to “put a business space version in
development”. To do this:
3. Click on the business space version you want to put in development in the Elements
Tree to select it
4. Select the “Version/Put In Development” command from the menu or right click to
bring up the pop-up menu and select “Put In Development”.
For more details about the multi-developer mode please watch the Milti-Developer Mode
video tutorial.
Protecting Business Space Version
You can protect a business space version by password. When the business space
version is protected, Aware IM will ask the configurator to provide the password before
loading, importing or opening the business space version.
To protect the business space version:
1. Open the business space version you want to protect for editing by double clicking
on it in the Elements Tree.
2. Click on the “Password protection” property in the Element Properties window to
bring up the context menu and select “Protect”. The business space version
protection dialog will be displayed.
3. Type in the protection password, re-type it to confirm and press OK.

Aware IM 8.8 User Guide
Copyright © 2002-2023 Awaresoft Pty Ltd Page 335 of 479
To remove password protection of the business space version click on the “X” button on
the “Password protection” property.
Comparing Business Space Versions
You can compare two business space versions and see a list of differences between the
versions. To compare two business space versions:
1. “Load” both versions that you want to compare if they are not loaded already
2. Select the first business version in the Elements Tree.
3. Select “Compare…” under the “Version” menu item in the system menu or right click
and select “Compare…” from the popup menu
4. Select the version that you want to compare with in the “Compare Versions” dialog
5. Aware IM will display a list of differences between the versions. If an existing
element (business object, process, query etc) has been modified in one of the
versions the entry for this change in the list of changes will have “View Differences…”
link displayed next to the entry. When you click on this link Aware IM will show what
has been changed for this element. The changes are displayed in an XML format.
Logging into the Operation Mode
You can log into the Operation Mode directly from the Configuration Tool – Aware IM
will automatically launch the default Internet browser and show the login form for system
administrators described in the Full User Login, Interactive section.
To login into the Operation Mode:
1. Select the Operation Mode Login command from the Tools menu.
2. Aware IM will launch the default browser and show the form to login as system
administrator.
NOTE: By default Aware IM will use the following URL to connect to the Operation
Mode:
http://localhost:8080/AwareIM/logon.jsp
If your system uses a different URL (for example, if the Configuration Tool is running on
a separate machine from the Aware IM Server) you can specify this URL in the
Configuration Tool property file – see Appendix A.
Re-connecting to the Aware IM Server
If the Aware IM Server went down for whatever reason during the configuration session
it is possible to re-establish the connection once the server has been re-started. To do
this:

Aware IM 8.8 User Guide
Copyright © 2002-2023 Awaresoft Pty Ltd Page 336 of 479
1. Select the Reconnect command from the Tools menu.
2. Enter the credentials for logging into the Configuration Tool. Once the connection to
the Aware IM server has been re-established the corresponding message will be
displayed.
Undoing and Redoing Changes
You can undo and redo most changes to the business space versions that you perform
while working with the Configuration Tool.
To undo the last change select Undo from the Edit menu or click on the icon in the
toolbar. To undo the change before last select Undo again and so on.
To redo the last change select Redo from the Edit menu or click on the icon in the
toolbar. To redo the change before last select Redo again and so on.
NOTE: The following operations are not undoable:
Updating Business Space Version
Testing Business Space Version
Publishing Business Space Version
Deleting Business Space Version
Creating new Minor or Major Version
Importing Business Space Version
Changing Description of Business Space Version
Creating, updating and deleting Business Space
Working with Report/Presentation Designer
The Report/Presentation Designer is used to create a layout of document templates of
the Report type (or simply reports – see Adding/Editing Document Templates) and
presentations of business objects and business object groups (see Defining
Presentations). When the Report/Presentation designer is started for a new report or
presentation the screen looks like this:

Aware IM 8.8 User Guide
Copyright © 2002-2023 Awaresoft Pty Ltd Page 337 of 479
The working area consists of the Design Area (shown as the white rectangle) and the
Report Designer toolbar. There are also optional horizontal and vertical rulers. Aware
IM also displays a special window (not shown on the picture above) that represents the
“Outline view” of the report design, i.e. all elements that the report contains are listed in
this window as textual entries.
The Design Area is broken into several sections or bands (they are shown as grey titled
bars running across the Design Area). Each band has a special meaning and is
processed in its own manner when the report or presentation is filled out with data at run
time. Bands are explained in more detail in Report/Presentation Bands. The report or
presentation is created by adding report/presentation elements to the appropriate bands
in the Design Area – see Adding Report/Presentation Elements.
Reports or presentations are filled out with data at run time when the documents are
generated from document templates (see Document Generation). For reports the source
of data is determined when a report is configured and for presentations the source of
data is the instance(s) of the business object that owns the presentation. The resulting

Aware IM 8.8 User Guide
Copyright © 2002-2023 Awaresoft Pty Ltd Page 338 of 479
documents are in the Adobe PDF format for reports and in the HTML format for
presentations. Because of the differences between the PDF and HTML formats handling
of reports and presentations is slightly different. The differences are summarized below:
1. While it is entirely possible and sometimes desirable to overlap different elements in
reports, it is not recommended to overlap elements in presentations – if you do only
one of the overlapping elements will be shown.
2. The PDF format only uses a handful of default fonts – if you want to use a different
font it has to be imported as a custom font (see Adding Custom Font). Presentations
on the other hand being HTML pages will ultimately refer to the font available on the
end user’s machine; therefore you have to make sure that the end user’s machine
has the font that you use in a presentation.
3. The Baseline vertical alignment is available for text, tag and image elements in
presentations but not in reports. This alignment corresponds to the baseline
alignment in HTML. In order to use the baseline alignment effectively in
presentations the sizes of rectangles of the elements to be aligned must be identical.
It is worth repeating the first difference as a caution because it may severely impact how
a presentation design is created:
CAUTION: When designing presentations make sure that presentation elements do
not overlap (this applies even to lines – make sure that they do not intersect or start/end
at the same point). If they do, only one of the overlapping elements will be shown.
See also:
Report/Presentation Bands
Adding Report/Presentation Elements
Editing Report/Presentation Elements
Using Toolbar to Change Report/Presentation Elements
Setting Report/Presentation Properties
Setting Band Properties
Viewing Bands
Adding Custom Font
Finding Design Element
Aligning Elements
Positioning Elements in Band
Changing Size of Elements
Miscellaneous Commands
Report/Presentation Bands
The following bands are defined in the Report/Presentation Designer:

Aware IM 8.8 User Guide
Copyright © 2002-2023 Awaresoft Pty Ltd Page 339 of 479
Title
This band usually shows the title of a report or presentation. It is only processed once at
the start of the report when the report or presentation is filled out with data at run time.
Page header and Page footer
A report or presentation may contain several pages (the size of a page is determined in
the Report Presentation properties – see Setting Report/Presentation Properties).
Elements of these bands are shown in the header and footer of each report/presentation
page respectively.
Column header and Column Footer
The data shown in a report or presentation may be displayed as several vertical columns
(the size and number of columns are determined in the Report Presentation properties –
see Setting Report/Presentation Properties). Elements of these bands are shown in the
header and footer of each column respectively.
Details
This is probably the main section of a report or presentation. Elements in the details
band are repeated over and over again for different sets of data available in the data
source at run time (see Reports). For example, if the details band contains elements that
display values of the two attributes of a business object and at run time there are 5
instances of the business object (found by a query, for example) the elements in the
details band will be repeated 5 times. Each time the band will be filled with attribute
values of the corresponding instance. See also the picture in the Defining Presentation
section for an example of a presentation design and the resulting document in the
Operation Mode.
Group bands
The data of a report or presentation may be divided into groups. For example, each
group may only show the data starting with a particular letter of the alphabet. The Group
bands are explained in greater detail in the Reports section. See also the picture in the
Defining Presentation section for the example of a presentation design that has one
group defined (Product Category) and the resulting document in the Operation Mode.
Summary
This band usually shows the report or presentation summary. It is only processed once
at the end of the report.
You can change properties of the bands or specify which ones are visible – see Setting
Band Properties and Viewing Bands.
Adding Report/Presentation Elements
Report or presentation may have the following elements:

Aware IM 8.8 User Guide
Copyright © 2002-2023 Awaresoft Pty Ltd Page 340 of 479
Text
This element represents static text or a mixture of static text and tags (see Reports). To
add a text element:
1. Click on the icon in the toolbar and select “Text”.
2. Draw a rectangle in the appropriate band in the Design Area that will define the
area occupied by the text or click anywhere in the Design Area to get the
rectangle of the default size.
3. The text dialog will be displayed. Enter the text into the dialog. To include a tag
expression, enter tag symbols explicitly. For example: Name is:
<<Account.Name>>
Tag
Tags are explained in the Document Generation section. To add a tag element:
1. Click on the icon in the toolbar and select “Tag Expression”.
2. Draw a rectangle in the appropriate band in the Design Area that will define the
area occupied by the tag element or click anywhere in the Design Area to get the
rectangle of the default size.
3. The text dialog will be displayed. Enter the text of the tag expression into the
dialog (do not include tag symbols). You can press F3 or F4 at any time to bring
up the Context Assistant.
4. Click OK on the dialog to complete the tag element. Note that the contents of the
tag element will be validated at this point and if there is a problem an error
message will be shown.
NOTE: Aggregate operations, such as SUM, MAX, MIN etc when used inside tags in a
report are calculated depending on whether they use conditions or not. Aggregate
operations that do not use conditions operate only on objects iterated over in the report,
whereas aggregate operations using conditions operate on all objects in the system. For
example, if a report prints out all accounts with balance greater than 1000, the
expression <<SUM Account.Balance>> will calculate the total balance of these
accounts, whereas the expression <<SUM Account.Balance WHERE
Account.Balance > 500>> will calculate the total balance of the accounts that are
greater than 500 (even though the report only works with the accounts greater than
1000).
Rectangle
An element represents a rectangle. To add a rectangle element:
1. Click on the icon in the toolbar and select “Rectangle”.
2. Draw a rectangle in the appropriate band in the Design Area.
Line
An element represents a straight line. To add a line element:

Aware IM 8.8 User Guide
Copyright © 2002-2023 Awaresoft Pty Ltd Page 341 of 479
1. Click on the icon in the toolbar and select “Line”.
2. Draw a line in the appropriate band in the Design Area.
Image
An element represents an image. To add an image element:
1. Click on the icon in the toolbar and select “Image”.
2. Click on the spot in the appropriate band in the Design Area where the top left
corner of the new image will be. The Report Designer will display the File
Selection Dialog.
3. Select the file representing an image (must be a .gif or .jpeg format) and press
OK. The new image element will be displayed in the Design Area.
Sub-report or Sub-presentation
This element represents a report or presentation that is embedded into the current report
or presentation. To add a sub-report or sub-presentation:
1. Click on the icon in the toolbar and select “Subreport” (the icon will be greyed
out if there are no reports or presentations other than the current one in the
business space version).
2. Draw a rectangle in the appropriate band in the Design Area that will define the
area occupied by the sub-presentation or sub-report. The Report Designer will
display the Sub-report/Sub-presentation dialog.
3. Specify the properties of the sub-report or sub-presentation as described in
Editing Sub-report/sub-presentation Element and click OK. The new sub-
report/sub-presentation element will be displayed in the Design Area.
Table
This element represents a table. Quite often tables can be used instead of sub-reports to
show related records (such as line items of an order, for example) in a tabular fashion.
To add a table:
1. Click on the icon in the toolbar and select “Table”.
2. Draw a rectangle in the appropriate band in the Design Area that will define the
area occupied by the table. The Report Designer will display the Table dialog.
3. Specify the properties of the sub-report or sub-presentation as described in
Editing Table section and click OK. The new table element will be displayed in the
Design Area.
Barcode
This element represents a barcode.To add a barcode:
1. Click on the icon in the toolbar and select “Barcode”.
2. Draw a rectangle in the appropriate band in the Design Area that will define the
area occupied by the barcode. The Report Designer will display the Barcode
dialog.

Aware IM 8.8 User Guide
Copyright © 2002-2023 Awaresoft Pty Ltd Page 342 of 479
3. Select the type of the barcode and specify an expression that contains the code
(a textual string) of the barcode, for example: <<Package.Code>>
QRCode
This element represents a QRCode element.To add a QRCode:
1. Click on the icon in the toolbar and select “QRCode”.
2. Draw a rectangle in the appropriate band in the Design Area that will define the
area occupied by the QRCode. The Report Designer will display the Barcode
dialog.
3. Specify an expression that contains the code (a textual string) of the QRCode, for
example: <<Package.Code>>
Conditional Element
A conditional element may be represented by any number of previously mentioned
elements. A conditional element includes rules that define under which circumstances a
particular sub-element will be included into the resulting document (see Reports). To
add a new conditional element:
1. Click on the icon in the toolbar and select “Conditional Element”
2. Draw a rectangle in the appropriate band in the Design Area that will define the
area occupied by the conditional element. The Report Designer will display the
Conditional Element dialog.
3. Specify the properties of the conditional element as described in the Editing
Conditional Element section and click OK. The new conditional element will be
displayed in the Design Area.
Chart Element
To add a chart element, do the following:
1. Click on the icon in the toolbar and select “Chart”.
2. Draw a rectangle in the appropriate band in the Design Area that will define the
area occupied by the chart element. The Report Designer will start the Chart
Wizard that will help you design a chart. See the Working with Charts section for
more details.
Page Break Element
When you insert a Page Break element Aware IM will start a new page at the spot where
the break is inserted. To insert a Page Break element:
1. Click on the icon in the toolbar and select “Page Break”.
2. Click on the spot in the Design Area where you want the new page to start.
Google Map
This element represents a Google Map that can show one or more addresses. Note that
this element is only available for object presentations. An object or group that owns the
presentation must have an attribute that stores the complete address or a reference to
Aware IM 8.8 User Guide
Copyright © 2002-2023 Awaresoft Pty Ltd Page 343 of 479
the special MGeoLocation object containing latitude and longitude of the location. To
add a Google Map to your presentation:
1. Click on the icon in the toolbar and select “Google Map”.
2. Draw a rectangle in the appropriate band in the Design Area that will define the
area occupied by the Google Map. The Report Designer will display the Google
Map dialog.
3. Specify the properties of Google Map and click OK. The new element will be
displayed in the Design Area.
NOTE: For details how to use the “Polygons” feature of the Google Map please
refer to the How To Guide.
NOTE: Some usages of Google Maps require you to create an account and
specify a special key. If you need to provide a key for your Google Maps account you
can do this in the predefined GoogleMapsKey attribute of the SystemSettings object.
Editing Report/Presentation Elements
To edit report or presentation elements:
1. Select one or more elements – see Selecting Elements.
2. Move or scale the elements graphically see Scaling and Moving Elements
3. Click on the buttons of the toolbar to change certain properties of the elements,
such as the background color, font settings (for text and tags) etc – see Using
Toolbar to Change Report Presentation Elements.
4. Alternatively change properties of the element(s) in the Selection Properties
window – see Changing Element Properties.
See also:
Deleting Elements
Copying and Pasting Elements
Changing Element Properties
Selecting Elements
To select a report/presentation element, click anywhere in the area occupied by the
element or draw a rectangle around the element(s). When an element is selected the
little black markers are displayed around the element. Alternatively find an element in
the Outline View window and click on its textual entry in this window. This will
automatically select the element in the Design Area as well

Aware IM 8.8 User Guide
Copyright © 2002-2023 Awaresoft Pty Ltd Page 344 of 479
NOTE: If several elements are overlapping and you click on the overlapping area an
element that was created last is selected. If you want to select a different element use
“Bring To Front” and “Send to Back” commands – see Miscellaneous Commands.
To select multiple elements within the same band:
1. Select one element using the technique described above.
2. Press down SHIFT or CTRL key to select other elements.
3. Alternatively press the mouse button on some point not occupied by any element
and hold down the mouse button to drag a box around the elements you want to
select. When you release the mouse button all elements enclosed by the box will be
selected.
You can also move the selection between the elements of the current band.
1. To move the selection to the next element in the band (after the currently selected
element), press the N key on the keyboard. If no element is selected the first
element in the band will be selected.
2. To move the selection to the previous element in the band (before the currently
selected element), press the P key on the keyboard. If no element is selected the
last element in the band will be selected.
Once an element is selected you can scale or move it graphically (see Scaling and
Moving Elements) or edit its properties using the Properties Selection window (see
Changing Element Properties).
Scaling and Moving Elements
To scale a report or presentation element graphically:
1. Make sure that the element is selected – see Selecting Elements.
2. Press the mouse button on one of the markers around the element and drag the
marker to scale the selected element up or down. When you release the mouse
button the element will be scaled. You can also hold down SHIFT key while dragging
to make sure that scaling is proportional in both directions.
To move report or presentation elements:
1. Make sure that the elements are selected – see Selecting Elements.
2. Press the mouse button anywhere inside the area occupied by any of the selected
elements and drag the elements to a new position. When you release the mouse
button the elements will be moved. You can also hold down SHIFT key while
dragging to constraint the movement in a horizontal or vertical direction.

Aware IM 8.8 User Guide
Copyright © 2002-2023 Awaresoft Pty Ltd Page 345 of 479
NOTE: You can also press the arrow keys on the keyboard to nudge the selected
elements left, right, up or down.
See also: Aligning Elements, Positioning Elements In Band, Changing Size of Elements.
Deleting Elements
To delete report or presentation elements:
1. Make sure that the elements are selected – see Selecting Elements.
2. Press the Del key on the keyboard. Alternatively click on the icon in the toolbar or
select Delete from the Edit menu.
Copying and Pasting Elements
To copy report or presentation elements to the clipboard:
1. Make sure that the elements are selected – see Selecting Elements.
2. Press Ctrl-C key on the keyboard. Alternatively click on the icon in the toolbar or
select Copy from the Edit menu.
To paste the elements from the clipboard:
1. Press Ctrl-V key on the keyboard. Alternatively click on the icon in the toolbar or
select Paste from the Edit menu.
Changing Element Properties
Once an element or elements are selected (see Selecting Elements) it is possible to edit
them in the Selection Properties window.
Most properties are specific to the type of element being edited, however, some general
properties are common for any element.
See also:
Editing General Properties
Editing Text Element
Editing Tag Element
Editing Rectangle Element
Editing Line Element
Editing Image Element
Editing Conditional Element
Editing Sub-report/Sub-presentation Element
Editing Table Element
Working with Charts

Aware IM 8.8 User Guide
Copyright © 2002-2023 Awaresoft Pty Ltd Page 346 of 479
Editing General Properties
The following properties are common to all elements being edited:
Size and Position
These properties include X and Y coordinates of the top left corner of the element’s
bounding rectangle (in points) and the width and height of the element’s bounding
rectangle (in points). Note that each point is 1/72 of an inch. You can use the rulers and
grid to help you understand where the left top corner of the element’s bounding
rectangle is.
Colors and Style
These properties determine fill and outline properties of the element. Note that for some
elements the fill properties are not applicable (for example, for lines) whereas for others
– the outline properties are not applicable (for example, for sub-reports). The following
options may be specified:
Fill color
Tick this box if you want the element to be filled with a particular color (if applicable).
You must also select the color by pressing the Edit button and choosing the color in the
Color Dialog. Note also that for text and tag elements this color is the background color
of the text
Line color
Tick this box to specify the line color of an element (for rectangles an outline will be
drawn around the rectangle; for text and tag elements this is the foreground color of the
text). You must also select the color by pressing the Edit button and choosing the color
in the Color Dialog. Note also that for text and tag elements this color is the foreground
color of the text.
Line style
Select whether the line is solid or dotted (if applicable).
Line width
Select the width of the line in points (if applicable).

Aware IM 8.8 User Guide
Copyright © 2002-2023 Awaresoft Pty Ltd Page 347 of 479
Position Type
There are three possible values for this property:
Float. When this value is selected the element floats in its parent section if it is
pushed downward by other elements found above it. It tries to conserve the
distance between it and the neighboring elements placed immediately above it.
Fixed relative to top. When this value is selected the report element
simply ignores what happens to the other section elements and tries to conserve
the y offset measured from the top of its parent report band.
Fixed relative to bottom. If the height of the parent report band is
affected by elements that stretch, the current element tries to conserve the
original distance between its bottom margin and the bottom of the band.
Name
You can optionally specify the name of the element. The name can be used to find an
element in the design – see Finding Design Element. It can also be used by the report
scriptlets (see Setting System Calculation Properties).
Stretchable
This property is only available for tag, line and rectangle elements. Tick this box if you
want the element to automatically stretch downwards to make sure that all its contents
are visible at run time. For example, you could define a tag element that refers to an
attribute of a business object. At run time when the tag contents are replaced with the
attribute value it is possible that the value occupies more space than the height of the
tag element (for example, if the value represents a multi-line text). Ticking this box will
make sure that the value is always visible no matter how high it is; otherwise only part of
the text that fits into the original bounding rectangle of the element will be shown in the
resulting document.
Editing Text Element
The following section explains how to set text specific properties.
Text
Specify the text of the element. Note that if the text element is specified as “calculated
by the system” (see below) you cannot enter the text and the text control is disabled.
Font
Choose the font of the text from the combo box containing available fonts. Note that for
reports the combo box contains the default fonts supported by the PDF format and any
custom fonts added explicitly (see Adding Custom Fonts). For presentations the combo
box contains all fonts installed on your system.
Font style
Select Regular, Bold or Italic font style.
Font size
Select the size of the font in points.

Aware IM 8.8 User Guide
Copyright © 2002-2023 Awaresoft Pty Ltd Page 348 of 479
Underline
Tick this box if the text is to be underlined
Strikethrough
Tick this box if the text is to be strikethrough.
Transparent
Tick this box if the text background should be transparent.
Horizontal alignment
Select how the text should be aligned in the horizontal direction within its bounding
rectangle. Choose between the Left, Right, Center and Justified alignments.
Vertical alignment
Select how the text should be aligned in the vertical direction within its bounding
rectangle. Choose between the Top, Bottom and Middle alignments. Baseline alignment
is also available for presentations (this alignment corresponds to the baseline alignment
in HTML).
Line spacing
If the text consists of multiple lines select the Line Spacing property and specify line
spacing of the text and its indentation.
Borders
If you want borders around the text click on the Borders property of the element and
select the “Dsiplay Borders” radio button on the dialog. Then specify the following
properties:
Border Type
Select Left, Right, Top or Bottom border to specify the properties of this border type. If
this border type is not to be displayed tick the “Do not display this border type”
checkbox. You can also click on the “Copy to All” button to copy the settings of this
border type to all other border types.
Padding
Select the distance in pixels between the element and the border.
Border width, border color, border style
Select the width of the border in pixels, the color of the border and the style.

Aware IM 8.8 User Guide
Copyright © 2002-2023 Awaresoft Pty Ltd Page 349 of 479
Rotation
You can specify rotation of the text as 90 degrees (Left), -90 degrees (Right) or 180
degrees (or Upside Down);
Hyperlink
This property is only available for presentations. Tick the box if you want the text
element to represent a hyperlink. Clicking on the hyperlink in the resulting document in
the Operation Mode will invoke an action as specified in the properties of the hyperlink.
To set the properties of the hyperlink press the Details button next to the “Hyperlink”
checkbox and set the properties in the Hyperlink dialog – see Setting Hyperlink
Properties.
Auto-calculated
Define this property if the text element is calculated by a scriptlet plug-in (see “Aware IM
Programmer’s Reference”). In this case you may not specify the text of the element
explicitly. You must also specify the scriptlet’s settings – see Setting System Calculation
Properties.
NOTE: The text of the element may contain a mixture of static text and tag
expressions, for example “Account balance is <<Account.Balance>>”.
Alternatively such text may be split into the text element (“Account balance is”) and the
tag element (“Account.Balance”). It is more tedious to split the text into text and tag
elements, however it may be necessary if, for example, the tag element represents a
separate hyperlink.
Editing Tag Element
Setting properties of a tag element is very similar to setting properties of a text element –
see Editing Text Element. The differences are summarized below:
1. You can press F3 and F4 at any time when specifying text of the element (tag
contents) to bring up the Context Assistant.
2. It is not necessary to include the tag symbols (“<<” and “>>”) in the text of the
element.
3. The text of the element is validated for syntax errors when you press OK on the
dialog.
4. The “Auto-calculated” property is not applicable for tag elements.
5. You can set the Evaluation Details property of the tag element. This property is only
applicable when the contents of the tag represent a report specific expression (such
as ELEMENT_COUNT function or an aggregate expression without a condition - see
Reports). The property determines when the expression inside the tag is going to be
calculated at run time. The following options are available:

Aware IM 8.8 User Guide
Copyright © 2002-2023 Awaresoft Pty Ltd Page 350 of 479
At the end of the report
Select this option if you want the calculation to be performed only once at the end of the
report or presentation. If, for example, the ELEMENT_COUNT function is used in the tag
expression, the result of the calculation will be the total number of elements in the report.
At the end of each page
Select this option if you want the calculation to be performed at the end of each page of
the report or presentation. If, for example, the ELEMENT_COUNT function is used in the
tag expression, the result of the calculation will be the number of elements on each page
in the report.
At the end of each column
Select this option if you want the calculation to be performed at the end of each column
of the report or presentation. If, for example, the ELEMENT_COUNT expression is used in
the tag expression, the result of the calculation will be the number of elements in the
report column.
At the end of the group
Select this option if you want the calculation to be performed at the end of the specified
group. If, for example, the ELEMENT_COUNT function is used in the tag expression, the
result of the calculation will be the number of elements in the group. You must also
select the name of the group.
Setting Hyperlink Properties
Text, tag or image elements used in presentations can represent a hyperlink. When the
user clicks on this hyperlink in the Operation Mode the action specified in the hyperlink
properties will be performed. The following section explains which properties can be
specified in the Hyperlink dialog.
To specify the properties of the hyperlink you need to select the type of the operation
(action) and specify parameters specific to each operation type. The following operation
types are supported:
Start Process
This operation type starts a process selected from the list of processes defined in the
business space version. If the process has input then you may need to provide the value
for this input. Two scenarios are possible:
- If the object defined as the process input is the same as the owner of the
presentation, you don’t have to do anything, as the system will automatically provide
the input when the process starts.
- If the object defined as the process input is different from the owner of the
presentation, then you must specify the input in the “Value” column of the “Process
Input Table”. Click on the appropriate cell in the “Value” column and enter the
process input as the reference attribute of the presentation owner. For example, let
us assume that we are creating a forum management system where we have the

Aware IM 8.8 User Guide
Copyright © 2002-2023 Awaresoft Pty Ltd Page 351 of 479
Topic and a Forum objects defined. The Topic object has a single reference
attribute named Forum that refers to the Forum where the Topic belongs. Let us
assume also that we are editing the presentation of the Topic object and we want to
define a hyperlink that starts the PostNewTopic process, which allows posting a
new topic from the presentation of the existing one. Let us assume that the
PostNewTopic process requires Forum object as its input. When defining the
hyperlink we would define an operation that starts the PostNewTopic process and
we would specify Topic.Forum in the “Value” column of the Process Input Table as
process input (note that Topic is the owner of the presentation we are editing).
Edit Business Object
An operation of this type brings up a form to edit the specified instance of the business
object. You need to select the instance of the business object to be edited from the
following options:
- Owner of the presentation being edited – this is the current instance of the business
object displayed by the presentation.
- Determined by contents of the tag – specify the expression identifying the instance of
the business object. This is useful when you want to edit instances of the business
objects referred to by the current instance, for example, Transaction.Account.
- Determined by contents of the current tag – this option is available for tag elements
only. It indicates that the instance of the business object is determined by the
contents of the tag element.
Run Query
An operation of this type.runs the specified query. You will need to select the query to
run from the list of queries defined in the business space version. Note that the instance
of the presentation owner may be referred to dynamically by the query (see Configuring
Queries).
View Presentation
An operation of this type shows the specified presentation of the specified instance of
the business object. You will need to define the business object that owns the
presentation to be viewed (see the Edit Business Object operation for the explanation
how to do it) and then select the presentation to view.
Delete Business Object
An operation of this type deletes the specified instance of the business object. You will
need to define the business object to delete (see the Edit Business Object operation for
the explanation how to do it).
Link to URL
An operation of this type navigates to the specified URL. You will need to select the
instance of the business object to be edited from the following options:
- Specify – specify the URL to navigate to

Aware IM 8.8 User Guide
Copyright © 2002-2023 Awaresoft Pty Ltd Page 352 of 479
- Determined by contents of the tag – specify the expression identifying the URL. This
is useful when you want to navigate to the URL which is determined from the value of
the Plain Text attribute of some business object, for example, Person.HomePage
- Determined by contents of the current tag – this option is available for tag elements
only. It indicates that the URL is determined by the contents of the tag element.
NOTE: if a tag element in a presentation refers to an attribute of the Document type
the hyperlink for this tag is automatically generated in the Operation Mode even if the
tag element does not define it. When a user clicks on this hyperlink the document stored
in this attribute is shown in a separate browser.
Setting System Calculation Properties
Text elements and images can be specified as “auto-calculated”. This means that there
is a report/presentation scriptlet plug-in that is executed at run time to calculate the
contents of the text or image element (see “Aware IM Programmer’s Reference”). When
you specify that a tag or image element is calculated by such a scriptlet you also need to
specify the calculation module of the scriptlet. The calculation module is the fully
qualified name of the scriptlet component (that must be written in the Java Programming
Language) - for example, “com.mysystem.myscriptlets.Scriptlet1”.
Editing Rectangle Element
The Element Properties dialog for a rectangle element only contains general properties
– see Editing General Properties.
Editing Line Element
The Element Properties dialog for a line element only contains general properties – see
Editing General Properties.
There is one difference – the “Size and Position” group box for a line element contains
the coordinates of the starting and ending points of the line, instead of the coordinates of
the top left corner of the bounding rectangle and width/height as for other elements.
Editing Image Element
Loaded from file
Select this option if the image is loaded from a file rather than calculated by the system
(see below). Press the Browse button to specify the image file (must be gif or jpeg
format).
Borders
If you want borders around the image click on the Borders property of the element and
select “Display borders” radio button. The values you need to specify are the same as
for the borders of the text element.

Aware IM 8.8 User Guide
Copyright © 2002-2023 Awaresoft Pty Ltd Page 353 of 479
Auto-calculated
Select this option if the image element is calculated by a scriptlet plug-in. You must also
specify the scriptlet’s module – see Setting System Calculation Properties.
Horizontal alignment
Select how the image should be aligned in the horizontal direction within its bounding
rectangle. Choose between the Left, Right and Center alignments.
Vertical alignment
Select how the image should be aligned in the vertical direction within its bounding
rectangle. Choose between the Top, Bottom and Middle alignments. The Baseline
alignment is also available for presentations (this alignment corresponds to the baseline
alignment in HTML).
Hyperlink
This property is only available for presentations. Define this property if you want the
image element to represent a hyperlink. Clicking on the hyperlink in the Operation Mode
will invoke an action as specified in the properties of the hyperlink. To set the properties
of the hyperlink press the Details button next to the Hyperlink checkbox and set the
properties on the Hyperlink dialog – see Setting Hyperlink Properties.
Editing Conditional Element
Conditions
The conditions of the elements are specified using the Conditions table which has two
columns – “Condition” and “Element”. To set the conditions identifying when the element
is going to be printed specify the condition directly into the “Condition” column. To set
the properties of the element that will be printed when the condition holds click on the
“Set Report Element” button to bring up the “Report Element” dialog. In this dialog select
the type of the element to be printed and then specify its properties.
As an example let us assume that we are designing a presentation of an Account
business object and we want to show the account balance in green if it is greater than
100 and in red if it is less than 100. To do this we need to define a conditional element.
The condition table of this element will define two elements – both elements will be tag
elements containing the Account.Balance expression. We will set the foreground
color of the first tag element to be green and the second one – to be red. In the condition
cell of the first element we will specify the following expression: Account.Balance >=
100 and in the condition cell of the second element we will specify Account.Balance
< 100.
Collapse height
Tick this box if you want to collapse the element if nothing is printed. It is possible that
after evaluating conditions of a conditional element at run time no element is printed into
the document at all. In this case the area occupied by the conditional element can be left

Aware IM 8.8 User Guide
Copyright © 2002-2023 Awaresoft Pty Ltd Page 354 of 479
blank (if the checkbox is not ticked) or it can collapse and leave the space for other
elements.
See also the Attach Conditions command in the Miscellaneous Commands section.
Editing Sub-report/Sub-presentation Element
Subreport (sub-presentation) Settings
Click on this property to bring up the “Subreport Settings” dialog. Define the following
settings on this dialog:
Query
You must specify the query that will be used as a data source for the sub-report or sub-
presentation. Note that this query may use the current instance of the business object
being processed in the main report as a dynamic value (see Configuring Queries). For
example, if the main report shows instances of the Account object and the sub-report
shows instances of the Transaction object that belong to the account the query might
look something like this:
FIND Transaction WHERE Transaction IN Account.Transactions
To specify a query press the Query button on the dialog and enter the properties of the
query as described in Adding/Editing Queries.
Subreport(sub-presentation)
Select the name of the sub-report or sub-presentation from the list of other reports
available in the business space version or the list of other presentations of the business
object.
Report (presentation) parameters
If the report or presentation requires any parameters the names of these parameters will
be displayed in the Parameters table (see also Reports). You must provide the values of
these parameters by clicking on the Parameter expression cell in the table and typing in
the values directly into the cell.
Query
You must specify the query that will be used as a data source for the sub-report or sub-
presentation. Note that this query may use the current instance of the business object
being processed in the main report as a dynamic value (see Configuring Queries). For
example, if the main report shows instances of the Account object and the sub-report
shows instances of the Transaction object that belong to the account the query might
look something like this:
FIND Transaction WHERE Transaction IN Account.Transactions

Aware IM 8.8 User Guide
Copyright © 2002-2023 Awaresoft Pty Ltd Page 355 of 479
To specify a query press the Query button on the dialog and enter the properties of the
query as described in Adding/Editing Queries.
“When there is no data” options
These options refer to a situation when the sub-report or sub-presentation has no data
to show (for example, the Account object has no transactions yet). You can select the
following options:
- Print nothing – select this radio button if you do not want to print anything.
- Print all except detail section – select this option if you would still like to print the title
and/or summary of the sub-report or sub-presentation (the Detail band will not be
printed at all as there is no data).
Editing Table Element
Properties of this element are specified on the Table Element dialog.

Aware IM 8.8 User Guide
Copyright © 2002-2023 Awaresoft Pty Ltd Page 356 of 479
Data Source
You can select either “Use data of the report/presentation” or “Run sub-query” radio
buttons. Usually you will select the “Run sub-query” option to specify the query
extracting related records. For example, to embed a table of line items into a
report/presentation of an order you would define a query that looks something like this:
FIND LineItem WHERE LineItem IN PurchaseOrder.Items
The text of the query should be specified in the textbox next to the radio-button.
Table Columns
Here you define the columns of the table.
Tag Expression
Specify which attribute the column will show as a tag expression. If you defined a sub-
query as data source the expression should start with the name of the object retrieved
by the sub-query, for example, <<LineItem.Price>>
Column Name
Name of the column that will be shown in the table
Width
Width of the column in pixels
Alignment
Alignment of the column header and data in the column
Appearance
In this section you should specify how the table will look like.
Background Color
Specify background color of the cells in either the header of the table or the data section
of the table.
Height
Specify height in pixels of either the header of the table or the data section of the table.
Font
Specify font of the cells in either the header of the table or the data section of the table.
Border Color
Specify color of the table’s border
Border Style
Specify the style of the border by clicking the appropriate button.

Aware IM 8.8 User Guide
Copyright © 2002-2023 Awaresoft Pty Ltd Page 357 of 479
Using Toolbar to change Report/Presentation Elements
You can use the report/presentation toolbar to change certain properties of the selected
elements.
Make sure you select the elements that you want to change the properties of – see
Selecting Elements.
Font
To change the font of the selected elements select the required font in the font combo
box in the toolbar. This applies only to text elements, tag elements and conditional
elements that define text elements in their conditions. If no elements are selected
pressing this button will set the font to be used for new text and tag elements.
Font Size
To change the font size of the selected elements select the required size from the font
size combo box in the toolbar. You can also type the size directly into the size text box
and press Enter. This feature applies only to text elements, tag elements and conditional
elements that define text elements in their conditions. If no elements are selected
pressing this button will set the font size to be used for new text and tag elements.
Bold
To change the boldness of the font of the selected elements click on the icon in the
toolbar. This applies only to text elements, tag elements and conditional elements that
define text elements in their conditions. If no elements are selected pressing this button
will set the bold property to be used for new text and tag elements.
Italics
To change the italics property of the font of the selected elements click on the icon in
the toolbar. This applies only to text elements, tag elements and conditional elements
that define text elements in their conditions. If no elements are selected pressing this
button will set the italics property to be used for new text and tag elements.
Underline
To change the underline property of the font of the selected elements click on the
icon in the toolbar. This applies only to text elements, tag elements and conditional
elements that define text elements in their conditions. If no elements are selected
pressing this button will set the underline property to be used for new text and tag
elements.
Left alignment
To make the selected elements left aligned click on the icon in the toolbar. This
applies only to text elements, tag elements, images and conditional elements that define

Aware IM 8.8 User Guide
Copyright © 2002-2023 Awaresoft Pty Ltd Page 358 of 479
text elements or images in their conditions. If no elements are selected pressing this
button will make sure that any new text or tag element will be left aligned.
Center alignment
To make the selected elements center aligned click on the icon in the toolbar. This
applies only to text elements, tag elements, images and conditional elements that define
text elements or images in their conditions. If no elements are selected pressing this
button will make sure that any new text or tag element will be center aligned.
Right alignment
To make the selected elements right aligned click on the icon in the toolbar. This
applies only to text elements, tag elements, images and conditional elements that define
text elements or images in their conditions. If no elements are selected pressing this
button will make sure that any new text or tag element will be right aligned.
Setting Report/Presentation Properties
The properties of the report or presentation can be specified in the Element Properties
window. The following properties can be specified:
Report size
You can select the size of the page from a list of pre-defined sizes in the “Sizes” combo
box. When you select the pre-defined size its width and height will be displayed in the
“Width” and “Height” properties (you cannot edit width and height of the pre-defined
size). You can also select the “Custom” size in which case you will be able to specify the
width and height of the page in points
Report orientation
Choose either portrait or landscape orientation.
Margins
Specify margins between the edges of the page and the design from the top, bottom, left
and right in points. You will not see the margins in the Design Area but you will see them
in the resulting document.
Columns
Specify the number of vertical columns in the report or presentation as well as the width
of each column and spacing between columns in points.
Report layout
Specify whether the report or presentation layout will be vertical or horizontal. In the
vertical layout data elements iterated in the iterative bands (all bands except Summary
and Title) are laid out vertically – each next item is placed below the previous one (see
the Defining Presentation section for an example of such a layout). In the horizontal

Aware IM 8.8 User Guide
Copyright © 2002-2023 Awaresoft Pty Ltd Page 359 of 479
layout elements in the iterative bands are laid out horizontally – each next item is placed
next to the previous one unless there is no more horizontal space on the page.
Setting Band Properties
To set the properties of a report/presentation band (see Report/Presentation Bands),
click on the band’s bar in the Design Area. The properties of the selected band will be
displayed in the Selection Properties window.The following properties of the band can
be specified:
Name
Specify the name of the band. This name is shown in the band’s bar in the Design Area.
You can only define the names of the group bands that you add to the design yourself
(see Viewing Bands). You can’t change the names of the pre-defined bands.
Height
Specify the height of the band in points. Note that you can also drag the band’s bar in
the design area to change the height of the bands on both sides of the bar being
dragged.
Start new page
This option is only applicable to the Title, Summary and group bands. If this box is
checked the elements of the band will be printed on a new page in the resulting
document.
Visible
Selecting this option will toggle visibility of the band in the Design Area (see Viewing
Bands). It does not affect the presence of the band in the resulting document.
Start new column
This option is only applicable to group bands. If checked indicates that when a new
group is started a new column should be started as well.
Reprint header on each page
This option is only applicable to group bands. If checked indicates that the group header
should be printed not only at the start of the group but also on each new page.
Reset page number
This option is only applicable to group bands. If checked indicates that page number
should be reset when a new group is started.
Minimum height to start new page
This option is only applicable to group bands. It indicates minimum amount of vertical
space needed at the bottom of the column in order to place the group header on the
current column.

Aware IM 8.8 User Guide
Copyright © 2002-2023 Awaresoft Pty Ltd Page 360 of 479
Header height
Specify the height of the group header in points (only applicable to group bands).
Footer height
Specify the height of the group footer in points (only applicable to group bands).
Condition of group printing
This option is only applicable to group bands. It indicates the expression that will be
calculated by the report engine to check whether a new group should be started. The
new group will be started if the value of the expression changes. For example, if the
group condition is specified as Product.Category the new group will be started
whenever the category of the product changes (this works especially well if products are
sorted by category). Specify any valid report expression as group condition – see also
Reports). You can press F3 at any time while typing the expression to bring up the
Context Assistant.
Add/Delete Group Bands
You can add group bands to a report or presentation by selecting the “Create Group…”
command in the Actions menu of the Report Designer toolbar. Alternatively, you can
right click on the name of the report in the Outline window and select “Create Group…”.
In the the dialog that appears you can specify the name of the new group and the bands
representing the group (Group Header and Group Footer) will be added to the Design
Area of the report. You can click on any of these bands and set properties of the group
band in the Selection Properties window.
To delete a group select either the Group Header or Group Footer bands in the Outline
window, right click and select “Delete” from the popup menu.
Adding/Deleting Custom Font
Adding a custom font to a design is only relevant to reports. As explained in the Working
with Report/Presentation Designer section the PDF format that is used to produce the
report documents uses only a fixed number of default fonts. If you want to use a different
font you have to add it to your design as a custom font (this font will be embedded in the
PDF file).
To add a custom font, select the “Add Font” command from the Actions menu in the
Report Designer toolbar. The True type font selection dialog will be displayed. Select the
font you want and press the Open button. The selected font will appear in the list of fonts
in the toolbar and will be available when creating new text and tag elements.

Aware IM 8.8 User Guide
Copyright © 2002-2023 Awaresoft Pty Ltd Page 361 of 479
To delete a custom font select the “Delete Font” command from the Actions menu in the
Report Designer toolbar.
Finding Design Element
If your report or presentation design contains many elements it may be necessary to find
a particular element in the design. To find an element in the design select the Find
Design Element command in the Actions menu of the Report Designer toolbar. The Find
Element dialog will be displayed. Specify the following options on the dialog:
Criteria of search
By element name
Elements will be matched against their “name” property.
By element content
This option is applicable only to text and tag elements. Elements will be matched against
their text content.
By attributes used in the element
Elements will be matched against the names of business objects and attributes used in
the elements. Note that an element may refer to an attribute not only if it is a tag
element, but also if it represents a hyperlink (hyperlink properties may contain
expressions referring to attributes of business objects –see Setting Hyperlink
Properties). This option may be especially useful if the business space version has an
integrity problem in one of the elements of a report or presentation – see Checking
Integrity of Business Space Version. The integrity checker will display which report or
presentation has the problem and also the attribute that it could not resolve, but it will not
bring you straight to the problem. You can open the report or presentation with the
problem and look for the offending element using this option.
By name of the process used in the element
This option is analogous to the previous option.
By name of the query used in the element
This option is analogous to the “By attributes used in the element” option.
By name of the document/presentation used in the element
This option is analogous to the “By attributes used in the element” option.
Text to use
Specify a text to be used in the search. You can also specify whether the search is case
sensitive and whether the search should match the text exactly as specified or find
elements that contain the specified text.

Aware IM 8.8 User Guide
Copyright © 2002-2023 Awaresoft Pty Ltd Page 362 of 479
The elements found by the command will be selected.
Aligning Elements
To align several elements in the same band select the element you want to align against
first and then select all other elements holding down SHIFT or CTRL keys – see
Selecting Elements. Then click on the icon in the Report Designer toolbar to bring up a
popup menu.
- To align the selected elements with the left edge of the first element in the selection
choose the Left command in the popup menu.
- To align the selected elements with the right edge of the first element in the selection
choose the Right command in the popup menu.
- To align the selected elements with the top edge of the first element in the selection
choose the Top command in the popup menu.
- To align the horizontal axis of the selected elements with the horizontal axis of the
first element in the selection choose the Horizontal Axis command in the popup
menu.
- To align the vertical axis of the selected elements with the vertical axis of the first
element in the selection choose the Vertical Axis command in the popup menu.
Positioning Elements in Band
To move one or more elements in the same band to the left edge of the band select the
elements you want to move (see Selecting Elements) and choose the icon in the
Report Designer toolbar to bring up a popup menu and then select the edge you want
position against from the popup menu.
Changing Size of Elements
To change size of several elements in the same band select the element you want to
use as the prototype first and then select all other elements holding down SHIFT or
CTRL keys – see Selecting Elements. Then click on the icon in the Report Designer
toolbar to bring up the popup menu.
- To make the selected elements the same size as the first element in the selection,
choose the “Same Size” command in the popup menu.
- To make the selected elements the same width as the first element in the selection,
choose the “Same Width” command in the popup menu.
- To make the selected elements the same height as the first element in the selection,
choose the “Same Height” command in the popup menu.
- To space elements vertically select the “Space Vertically” command
- To space elements horizontally select the “Space Horizontally” command

Aware IM 8.8 User Guide
Copyright © 2002-2023 Awaresoft Pty Ltd Page 363 of 479
Working with Charts
To add a new chart to a report click on the icon in the Report Designer toolbar and
select “Chart”. Then drag a box around the area in one of report bands where the chart
will be located. The Report Designer will then start the Chart Wizard that will help you
define the properties of the new chart.
NOTE: a chart can only be added to the Title, Summary or one of Group Header or
Footer bands. You cannot add a chart to the Details, Column Header, Column Footer,
Page Header or Page Footer bands.
Defining a new chart consists of the following steps:
1. Define general properties of the chart, such as chart type and orientation.
2. Define data for the chart
3. Define other chart properties, such as chart title, axes labels, whether or not to
include a legend etc.
Defining general properties of the chart
First of all you need to define the type of chart. Some of the other properties of the chart
will depend on the type of the chart chosen. Four types of charts are currently available:
Bar chart
Line chart
Area chart
Pie chart
You also need to specify the background color of the chart and plot and chart
orientation. The preview window will show you the result of your selection and will make
it easier to understand what each of the properties mean.
Defining data for the chart
The second step is to define the data that the chart will display. The data is usually the
subset or all data that the report works with. For example, a report may show the details
of a company’s departments – staff members, sales, expenditure etc and a particular
chart may show a graph of expenditure per department.
You usually define the data for a chart by specifying expressions for X and Y axes of the
chart similar to the ones you define for a tag element. For example, if a report lists staff
members of a company represented by a business object StaffMember and you want
a chart that displays ages of staff members you can define data expressions like this:
For X axis:
StaffMember.Name
For Y axis:

Aware IM 8.8 User Guide
Copyright © 2002-2023 Awaresoft Pty Ltd Page 364 of 479
AGE (StaffMember.DateOfBirth)
You can also specify specific values for both X and Y axes.
A chart can display one graph or a series of graphs. Let’s look at some examples (the
configuration for these examples can be found in the SAMPLES directory of your Aware
IM installation – the file SampleCharts.bsv).
Example1. In this example a report will be showing expense records for some company.
Every expense record (ExpenseRecord object) will store a date of the expense, the
expense amount and the name of the department. The report will show expense records
for each department. The report will show separate charts of expense records for every
department. At the end of the report there will be a chart showing total expenses for
each department. This is how we can define a report for this example:
The report will have a group band with the following group condition:
ExpenseRecord.DepartmentName. Every time the value of the DepartmentName
attribute changes the new group will be started. We will include a chart into the Group
Footer section of the department group. This chart will show expense records for this
particular group. We will define the following expressions for the data of this chart:
For X axis:
ExpenseRecord.Date
For Y axis:
ExpenseRecord.Amount
We will also include another chart in the Summary band of the report. This report will
show total expenses for each group. We will define the data for this group like so:
For X axis:
ExpenseRecord.DepartmentName
For Y axis:
SUM ExpenseRecord.Amount
Note that we will set evaluation time for the SUM expression to be at the end of the
Department group.
The picture below shows the resulting charts for the Sales department and for all
departments:

Aware IM 8.8 User Guide
Copyright © 2002-2023 Awaresoft Pty Ltd Page 365 of 479
Example2. This example will also show expenses for a company’s departments as in
example 1, but instead of showing separate charts for each department we will be
showing expenses for each department as separate graphs on the same chart.
In this case we will also define the Department group as in the example 1 with the same
group condition. We will define a chart in the Summary band of the report. This chart will
show expenses of all departments. This is how we will define the data for this report:
For X axis:
ExpenseRecord.Date
For Y axis:
ExpenseRecord.Amount
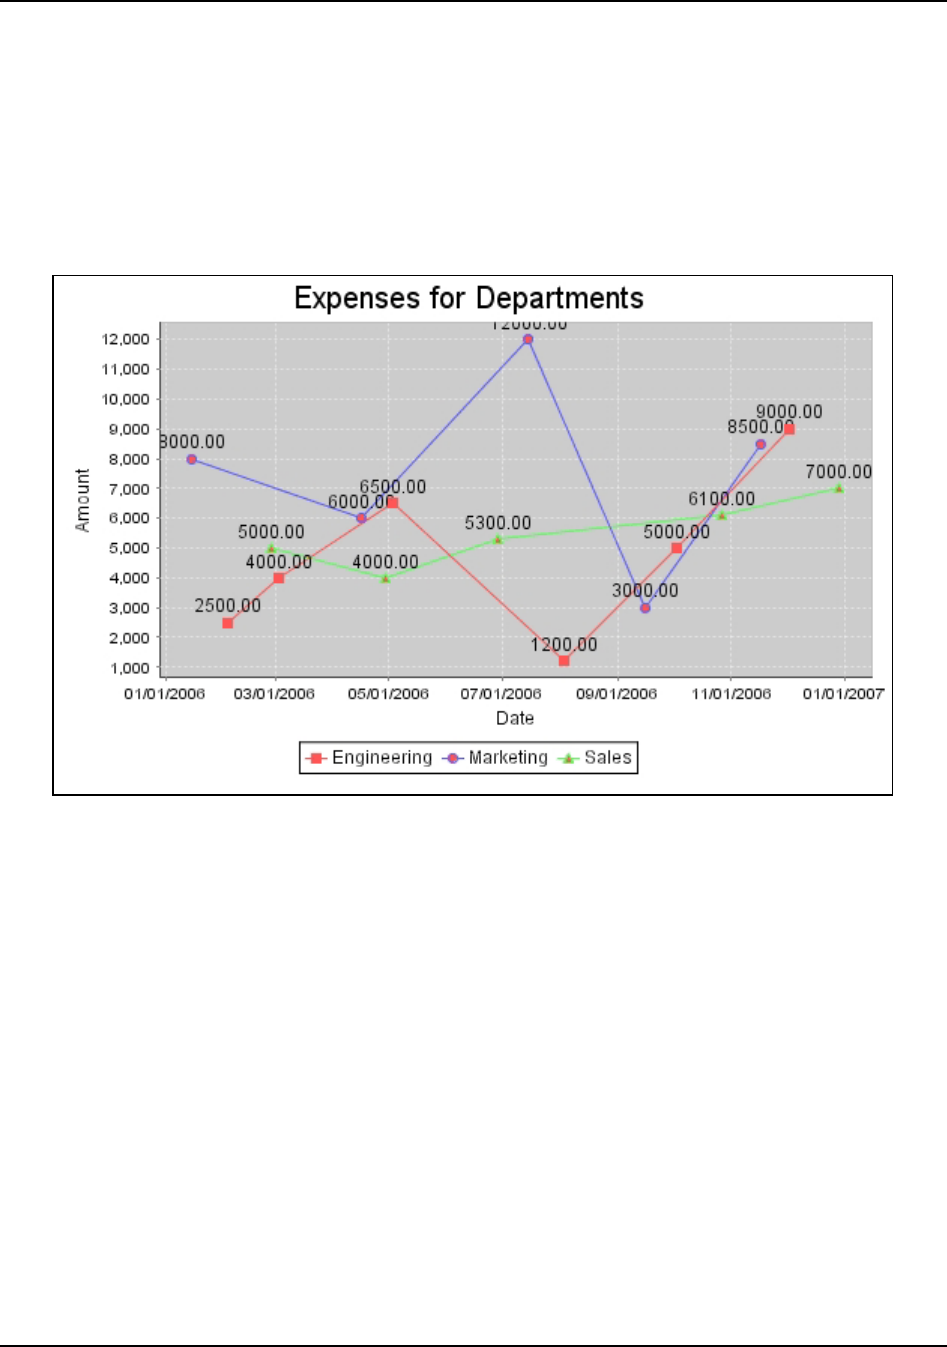
Aware IM 8.8 User Guide
Copyright © 2002-2023 Awaresoft Pty Ltd Page 366 of 479
We will also tick the “Support series” checkbox, click on the “Details” button, select the
“Series of data determined by group” radio button and select the Department group.
Then we will specify the following expression that will determine the name of each series
ExpenseRecord.DepartmentName. This is the crucial step – it will tell the Report
Designer that it should combine data for every group on the same chart.
The resulting chart is shown on the picture below:
Example 3. In this example we will be designing a chart that will be showing patient’s
records for a particular day in a hospital – heart rate and blood pressure measurements
taken at different times during the day.
We assume that the PatientRecord business object has been defined with the
following attributes:
PatientName
TimeTaken
HeartRate
BloodPressureLow
BloodPressureHigh
We want to define a chart that will show all these measurements at once. We want to
have one X-axis showing time of the day and we want to have separate Y-axis for heart
rate, low blood pressure and high blood pressure values. This is how we can define the
data for this chart:
For X axis:
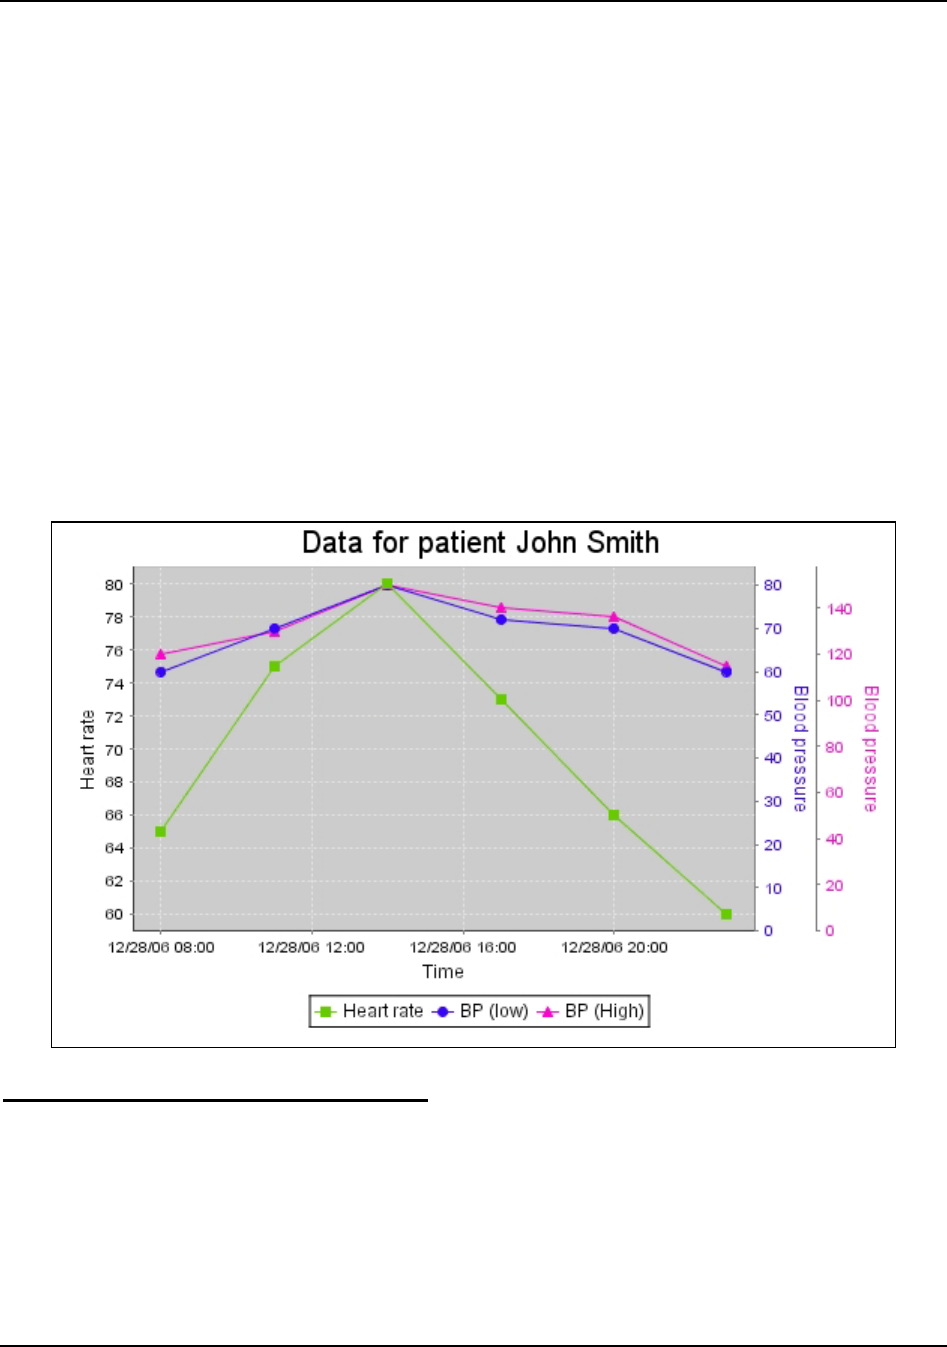
Aware IM 8.8 User Guide
Copyright © 2002-2023 Awaresoft Pty Ltd Page 367 of 479
PatientRecord.TimeTaken
For Y axis:
PatientRecord.HeartRate
Note that for Y-axis we can pick any of the attributes that we want to show –
HeartRate, BloodPressureLow or BloodPressureHigh. We will also tick the
“Support series” checkbox, click on the “Details” button, select the “Series of data
determined by expressions” radio button and define the following additional data
expression for Y-axis:
PatientRecord.BloodPressureLow
PatientRecord.BloodPressureHigh
We will also choose the name and color for each series. The resulting chart is shown on
the picture below:
Defining other properties of the chart
The final step is to define other properties of the chart. These include the following:
The title of the chart. You can define a static title, for example “Company
Expenses” or you can define an expression similar to those you define in tag
elements, for example “<<’Expenses for department ’ +
Company.DepartmentName>>. Expressions should be enclosed in tag symbols
“<<” and “>>”

Aware IM 8.8 User Guide
Copyright © 2002-2023 Awaresoft Pty Ltd Page 368 of 479
Up to two subtitles of the chart. You can define a static text for a subtitle or an
expression. If you do not want to define a subtitle leave it blank.
Whether or not to include a legend for the chart
Labels of the axes, font and colors of label marks
Whether or not to include labels for values on the chart
Whether or not to include gridlines
Whether or not to include effects, such as 3D effect, gradient effects and others
Other chart type specific properties
All different properties are grouped in tabs and you can switch between tabs to navigate
to a different group of properties. The preview window will show you the result of your
selection and will make it easier to understand what each of the properties mean.
Previewing the Report
To see how the report will look like to the user select the “Preview Report” item from the
Actions menu displayed on the Report Designer toolbar. A dialog will be displayed
where you can specify how many records Aware IM will generate fo the preview dataset.
This will be the number of test records displayed in the Details Band of the displayed
report.
Miscellaneous Commands
The following section has the description of some miscellaneous commands of the
Report/Presentation Designer.
Bring To Front and Send To Back
You can change the relative order of elements in the design by using the Bring to Front
or Send to Back commands. This may be useful when selecting one out of several
overlapping elements. Bring To Front command makes the selected element last in the
band so it will have preference over other overlapping elements. Send to Back
command makes the selected element first in the band. To invoke these commands
select them from the Actions menu of the Report Designer toolbar.
Attach Conditions
This command makes a conditional element out of the existing non-conditional element.
The command creates a conditional element with the original element being the sub-
element of the conditional element (initially without the conditions but you can add them
later) - see Editing Conditional Element. The command may be useful if you want to
attach conditions to the existing element, but you do not want to re-create the element
as part of a conditional element. To invoke the command right click on the element you
want to attach the conditions to and select the Attach Conditions from the pop-up menu.

Aware IM 8.8 User Guide
Copyright © 2002-2023 Awaresoft Pty Ltd Page 369 of 479
Show rulers
Rulers may be helpful when determining coordinates and dimensions of elements in the
design. It is possible to change measurements units of the rulers from points (each point
is equal to 1/72 of an inch) to centimetres by clicking on the corner point where vertical
and horizontal rulers meet. You can also turn visibility of the rulers on or off by selecting
the Rulers command in the Actions menu in the Report Designer toolbar.
Zoom
Zooming in and out may be very useful when working with the design. The following
options are available:
Zooming using toolbar
Specify the zoom scale in the toolbar or select from a number of the pre-defined scales
(scale of 100% corresponds to the actual size of the design).
Zooming in
Click on the . Icon in the Report Designer toolbar. The current zoom scale will be
increased by a factor of two.
Zooming out
Click on the . In the Report Designer toolbar. The current zoom scale will be reduced
by a factor of two.
Fit to page
Select “Fit to page” in the zoom box of the toolbar to fit the entire design into the screen.
Show grid
When the grid is displayed new elements created in the design will be snapped to the
grid. All movements of the elements will be snapped to the grid as well. To turn grid on
or off select the Show Grid command from the Actions menu of the Report Designer
toolbar.
Grid settings
To specify grid settings select the Grid Settings command from the Actions menu of the
Report Designer toolbar – the Grid Settings dialog will be displayed, where you will be
able to specify the resolution of the grid and its color.
Copy Style/Apply Style
You can quickly apply the entire presentation style of the one element to some other
element. To do this select the element the style of which you want to use and click on
the icon in the Report Designer toolbar to “copy” the style. Then select the element
you want to apply the style to and click on the icon in the toolbar to “paste” the style.

Aware IM 8.8 User Guide
Copyright © 2002-2023 Awaresoft Pty Ltd Page 370 of 479
Building Runtime Executable
NOTE: This feature is only available in the Aware IM Developer Edition.
If you want to sell applications configured with Aware IM you can use the “Build
Executable” feature to prepare the system for your end users with your own product
name and copyright.
To do this select the business space version containing the final configuration of your
application and select the “Build Executable” menu item from the “Version” menu.
Aware IM will display the “Build Executable” dialog. Enter the following information in the
dialog:
Name of the application
Specify the name of your application to be displayed by the Installation program and the
“About” menu item. This value is mandatory.
Version number
Specify the version number of your application to be displayed by the Installation
program and the “About” menu item. This value is mandatory.
Company name/Copyright
Specify your company name and copyright to be displayed by the “About” menu item.
This value is optional.
Target platform
Specify the target operating system platform where your application will be used. If your
application is to be used for multiple platforms, run “Build Executable” feature for each
target platform independently. This value is mandatory.
Target database
Specify the database that your application will use. This value is mandatory.
Do not allow end users to change business space version configuration
Tick this box if you do not want users to change the configuration of your application
using the Configuration Tool. In this case also specify the protection password to make
sure that only you can access the configuration.
Output directory
Specify the directory where the executable will be built. This value is mandatory.
License file location
Specify the location of your license file. This must be an ASCII text file. This value is
mandatory.

Aware IM 8.8 User Guide
Copyright © 2002-2023 Awaresoft Pty Ltd Page 371 of 479
Readme file location
Specify the location of the “README” file of your application. This must be an ASCII text
file. This value is mandatory.
Documents directory
If you include electronic documentation with your application specify the directory where
your documentation files are stored. This value is optional.
Web resources
If your application requires any resources (such as images and styles), which are used
in the custom HTML pages of your application, move these resources into a separate
directory and specify the name of this directory. Make sure that your HTML pages refer
to these resources using this directory as the parent directory. This value is optional.
Other resources
If your application requires any other resources (such as images used in the IMPORT
DOCUMENT action), move these resources into a separate directory and specify the
name of this directory. Make sure that these resources are referred to using
'../OtherResources', for example
IMPORT DOCUMENT Statement.StatementDocument FROM
'../OtherResources/myfile.doc'
This value is optional.
Custom JAR’s location
If your application requires any custom JAR files (for example if you write your own Java
extensions – see Extending Aware IM and Aware IM Programmer’s Reference), move
these JAR files into a separate directory and specify the name of this directory. This
value is optional.
JDK location
If you are building an application for the Linux platform and your current operating
system is not Linux, you need to download the Linux JDK1.4 or later
12
and specify the
directory where it is stored.
Once you provide the required values and press OK Aware IM will build the executable
(for Windows platform) or zip file (for Linux and Mac OS X platforms) in the output
directory that you specified. You can distribute this executable or zip file to your end
users
.
12
The license of Sun Microsystems does not allow distributing the complete JDK. However, Aware IM
only requires Java Runtime environment (JRE) and the file tools.jar (you can take it from the JDK and put
into the lib directory of the JRE – this file can be freely distributed together with the JRE).

Aware IM 8.8 User Guide
Copyright © 2002-2023 Awaresoft Pty Ltd Page 372 of 479
NOTE: When you install the runtime application you will not be able to run the
Configuration Tool. If you want users to be able ton run the Configuraton Tool install the
standalone Configuration Tool on the runtime machine or copy the AwareIM/ConfigTool
directory from your development machine to the runtime machine.
NOTE: If you are distributing an application for Mac OS X platform you can take the
resulting zip file to the Mac platform, unpack it and create an application bundle and/or
distributable package out of it (see Mac OS X manuals for details). You can then
distribute the application bundle or package to your customers. If you decide to distribute
the application as an original zip file, you will need to provide startup instructions in a
readme file. Customers will need to unpack the zip file, start the Mac OS X Terminal
application, change to the BIN directory and run the startAwareIM.sh script.
Configuring Applications for Mobile Devices
This is described in detail in the Aware IM For Mobile Devices document.
Creating Native Mobile Applications
This is described in detail in the Aware IM For Mobile Devices document.
Determining Current Location of the User
This is described in detail in the Aware IM For Mobile Devices document. Note,
however, that this functionality is available for all devices that support location detection
– all mobile devices do, but many desktop devices and laptops support this as well.
Rule Language Reference
This section provides the description of the Aware IM Rule Language. The rule language
is used to specify rules, queries, tags and other configuration elements. The rule
language is simple and intuitive and, unlike traditional programming languages does not
require special software development skills.
The description of the Rule Language provided in this section is intended to give readers
an informal and simple-to-understand introduction to the capabilities of the Rule
Language. For a more formal and comprehensive description please refer to a separate
document called the “Aware IM Rule Language Reference”.

Aware IM 8.8 User Guide
Copyright © 2002-2023 Awaresoft Pty Ltd Page 373 of 479
See:
Rule
Rule Condition
Calculations
Actions
Functions
Rule
The most basic construct in the Rule Language is the rule. The rule consists of a
condition followed by one or more actions. The condition part starts with the “IF”
keyword and the action part – with the “THEN” keyword. Therefore most rules look like
this:
If Condition Then Action
For example,
IF Policy.Driver.Age > 70 THEN Policy.Premium = 300
If Account.State='CLOSED' AND Account.Balance<>0 Then
REPORT ERROR 'Account with non-zero balance cannot be closed'
As seen from the examples above both the condition and action parts of a rule may refer
to a business object (or business object group or notification) and its attributes. Business
objects are referred to by name, for example Account. Attributes of a business object
are referred to by the attribute name where the name of the attribute is separated from
the name of the business object by a dot symbol, for example Account.State.
NOTE: The condition part of a rule may be omitted. A rule without a condition is
called an unconditional rule – it consists of one or more actions only, for example:
CreditAccount.AvailableFunds=CreditAccount.CreditLimit +
CreditAccount.Balance - CreditAccount.NonClearedFunds

Aware IM 8.8 User Guide
Copyright © 2002-2023 Awaresoft Pty Ltd Page 374 of 479
NOTE: A rule may also include the “ELSE” part which specifies what should happen if
a condition does not hold, for example:
IF Policy.Driver.Age > 70 THEN Policy.Premium = 300
ELSE Policy.Premium = 250
or
IF Policy.Driver.Age > 70 THEN Policy.Premium = 300
ELSE If Policy.Driver.Age > 80 Then Policy.Premium = 350
ELSE Policy.Premium = 250
Rule Condition
The following section describes the expressions that can be used in the conditional part
of a rule (see Rule). The conditional part of a rule consists of one or more expressions,
which are connected with the “AND” or “OR” keywords. For example,
1. IF Policy.Driver.Age > 70 THEN Policy.Premium = 300
The conditional part of this rule has one expression: Policy.Driver.Age > 70
2. If Account.State='CLOSED' AND Account.Balance<>0 Then
REPORT ERROR 'Account with non-zero balance cannot be closed'
The conditional part of this rule has two expressions:
- Account.State='CLOSED'
- Account.Balance<>0
3. If Policy.Driver.Age < 70 AND (Policy.Driver.PostCode BETWEEN
2010 AND 2040 OR Policy.Driver.PostCode BETWEEN 2060 AND 2070)
Then Policy.Premium = 250
The conditional part of this rule has three expressions:
- Policy.Driver.Age < 70
- Policy.Driver.PostCode BETWEEN 2010 AND 2040
- Policy.Driver.PostCode BETWEEN 2060 AND 2070
The rest of this section describes various types of expressions that can be used in the
conditional part of the rule. See:
Comparison
String Expression
EXISTS Expression

Aware IM 8.8 User Guide
Copyright © 2002-2023 Awaresoft Pty Ltd Page 375 of 479
IN Expression
Range Expression
WAS Changed Expression
IS UNDEFINED Expression
IS NEW Expression
Negation
Comparison
Comparison is used in the conditional part of a rule (see Rule Condition) to compare
values of two attributes using the following operators:
1. “=”
2. “<”,
3. “>”
4. “<=”
5. “>=”
6. “<>” (not equal)
For example:
- Account.State = 'CLOSED'
- Account.Balance < Account.Type.MinBalance
NOTE: All attribute types can be compared for equality or non-equality (even
attributes of the reference type – see Reference Attributes). If the types of the attributes
on both sides of the comparison are different, Aware IM automatically converts the
attribute types if it can. For example, if attributes of the Plain Text type are compared
with the attributes of the Number type, numbers are converted to strings as in the
example below:
Account.Name = 1000
this comparison will only be true if the value of Account.Name is ‘1000’
NOTE: Only attributes of the Number, Date, Timestamp and Duration may be
compared using other operators (‘<”, “>”, “<=”, “>=”)
NOTE: If a value of an attribute is undefined (blank) it is considered to be 0 for
comparison purposes.

Aware IM 8.8 User Guide
Copyright © 2002-2023 Awaresoft Pty Ltd Page 376 of 479
String Expression
The String Expression is used in the conditional part of a rule (see Rule Condition) to
check whether an attribute starts with (or ends with or contains) the specified text, for
example:
- Account.Name STARTSWITH 'John'
- Account.Name ENDSWITH 'Smith'
- Account.Name CONTAINS 'it'
NOTE: Typically the String Expression checks attributes of the Plain Text type.
However, it can also be used to check attributes of other types, for example:
Account.Balance STARTSWITH '10'
EXISTS Expression
The EXISTS Expression is used in the conditional part of a rule (see Rule Condition) to
check whether there are any instances of the specified business object (or business
object group) in the system, for example,
If EXISTS Account Then …
The expression may also check if only instances that match a particular condition exist
in the system. The condition may be indicated using the WHERE keyword and must be
enclosed in brackets, for example:
EXISTS Account WHERE (Account.State = 'OPEN')
The above expression checks whether there are open accounts in the system. The
condition that follows the WHERE keyword may have one or more expressions connected
with AND or OR keywords – just like the conditional part of a rule ((see Rule Condition),
for example:
EXISTS Account WHERE (Account.State = 'OPEN' AND Account.Balance
> 100)
NOTE: The expression checks all instances of the specified business object that
exist in the system’s database, not in the current Context – see Aggregate Operations.

Aware IM 8.8 User Guide
Copyright © 2002-2023 Awaresoft Pty Ltd Page 377 of 479
IN Expression
The IN Expression is used in the conditional part of a rule (see Rule Condition) to check
whether the value of a particular attribute of a business object , business object group or
notification is equal to one of the specified values in the provided list. For example,
- Account.State IN 'Open', 'Closed'
- Account.Balance IN 1000, 2000, 3000
As seen from the examples above, values in the list must be separated by a comma
symbol. There is no limit on a number of entries in the list.
The IN Expression may also check whether an instance of a business object is in the list
of references of another object. This form of the IN expression is typically used inside
the condition that follows the “WHERE” keyword (see EXISTS Expression). For
example,
EXISTS Account WHERE (Transaction IN Account.Transactions AND
Account.State = 'Open')
The above expression checks whether there is an open account in the system that
contains a particular transaction (the instance of a Transaction must be in the Context).
NOTE: It is possible to use a special expression LOGGED_IN_USERS instead of the
list of references. This will check if the specified user is logged in, for example:
FIND SystemUser WHERE SystemUser.LoginName=’john’
IF SystemUser IN LOGGED_IN_USERS Then
DISPLAY MESSAGE ‘John is logged in’
Range Expression
The Range Expression is used in the conditional part of a rule (see Rule Condition) to
check whether the value of a particular attribute of a business object, business object
group or notification is within the specified range. For example,
- Account.Balance BETWEEN 10000 AND 20000
- Transaction.Amount BETWEEN Account.Balance AND 5000
NOTE: A comma can be used instead of AND. For example,
Account.Balance BETWEEN 10000,20000
NOTE: Both lower and upper limits are included in the range.

Aware IM 8.8 User Guide
Copyright © 2002-2023 Awaresoft Pty Ltd Page 378 of 479
WAS CHANGED Expression
The WAS CHANGED Expression is used in the conditional part of a rule (see Rule
Condition) to check whether the value of a particular attribute of a business object or
business object group has been changed compared to the value stored in the system.
For example,
If Account.State WAS CHANGED Then …
The WAS CHANGED Expression can also be used to check if any attribute of the object
has changed, for example:
If Account WAS CHANGED
The WAS CHANGED Expression can also check whether an attribute has been
changed to a particular value, for example:
If Account.State WAS CHANGED TO 'Open' Then …
NOTE: When comparing new and old values of the attribute, the WAS CHANGED
expression only checks whether the value has been changed compared to the value of
the attribute in the last stable version of the business object – see the Evaluation of
Rules Containing WAS CHANGED Expressions section).
Expressions that track changes in a list
The WAS CHANGED expression can be used for reference lists as well as for ordinary
attributes. The WAS CHANGED expression for lists indicates whether there were any
references changed or removed from the list. For example,
If Account.Transactions WAS CHANGED Then…
It is possible to identify more precisely how a reference list has been changed and
perform actions based on the attribute values of objects that have been added or
removed from the list. The WAS ADDED TO expression can be used to check whether
any objects have been added to the list and the WAS REMOVED FROM expression can
be used to check whether objects have been removed from the list. To refer to the
objects that have been added or removed, the Added and Removed instance prefixes
can be used respectively (see Instance Prefixes). For example,
If Transaction WAS ADDED TO Account.Transactions Then INCREASE
Account.Balance BY AddedTransaction.Amount
If Transaction WAS REMOVED FROM Account.Transactions Then REDUCE
Account.Balance BY RemovedTransaction.Amount

Aware IM 8.8 User Guide
Copyright © 2002-2023 Awaresoft Pty Ltd Page 379 of 479
If the list itself hasn’t been changed, but an element belonging to a list has been, then
this situation can be checked using the combination of “FROM” and “WAS CHANGED”
keywords, for example:
If Transaction FROM Account.Transactions WAS CHANGED Then …
IS UNDEFINED Expression
The IS UNDEFINED Expression is used in the conditional part of a rule (see Rule
Condition) to check whether the value of a particular attribute of a business object,
business object group or notification is defined. Typically a value is undefined if it is
“blank” – for example, a user didn’t fill in the value in a form of the business object. For
attributes of the Reference Type (see Reference Attributes) “undefined” means that the
reference list is empty. For example,
- Account.State IS UNDEFINED
- Account.Transactions IS UNDEFINED
The variation of the IS UNDEFINED expression checks whether the value is defined, for
example:
Account.State IS DEFINED
IS NEW Expression
The IS NEW Expression is used in the conditional part of a rule (see Rule Condition) to
check whether a particular business object specified in the expression is being created
(does not exist in the system yet), for example
If NOT (Message IS NEW) Then PROTECT Message.Subject
In this example the Subject attribute of the Message object is protected if the object
already exists in the system.
Negation
All the expressions used in the conditional part of a rule (see Rule Condition) can be
negated by adding the NOT keyword in front of the expression (in this case the
expression must be enclosed in brackets), for example:
- NOT (EXISTS Account WHERE (Account.State = 'OPEN'))
- NOT (Account.Balance BETWEEN 100 AND 200)

Aware IM 8.8 User Guide
Copyright © 2002-2023 Awaresoft Pty Ltd Page 380 of 479
- NOT (Account.State IN 'OPEN', 'CLOSED' AND Account.Balance >
100)
Calculations
Expressions that can be used in the conditional part of a rule (see Rule Condition) may
work not only with attributes of business objects, business object groups or notifications
but also with calculations performed with these attributes. For example,
- If Account.ClosingDate < Account.OpeningDate + 5 Then …
- If Account.Balance < SUM Transaction.Amount WHERE (Transaction
IN Account.Transactions) Then …
Calculations can include the following constructs:
Constants
Arithmetic operations
Functions
Aggregate calculations
Constants
The following types of constants can be used in calculations:
1. Number (integer or floating point), for example, 3 or 5.6.
2. String (must be enclosed in apostrophe), for example ‘CLOSED’ or ‘Balance must
be positive’.
3. Date (in dd/mm/yy format), for example 05/12/98.
4. Date/Time (in dd/mm/yy HH:mm format), for example 05/12/98 17:05.
5. Duration (in #w#dHH:mm, where # stands for any digit, HH – for hours and mm -
for minutes), for example, 2w3d10:45.
6. UNDEFINED, for example Loan.Item = UNDEFINED
Arithmetic Operations
Basic arithmetic operations such as addition, subtraction, multiplication and division can
be used in calculations, for example:
- Account.Balance/2
- Account.InterestRate * Account.Balance – Account.Fee

Aware IM 8.8 User Guide
Copyright © 2002-2023 Awaresoft Pty Ltd Page 381 of 479
Functions
A function performs some calculation and returns a result. The result of a function is a
constant. There are a number of built-in functions that Aware IM supports. New
functions can be plugged in as well (see “Aware IM Programmer’s Referefence”). A
function may or may not have parameters. Parameters of a function must be either
attributes or calculationswith attributes. If a function does not have parameters then it
can be referred to by name only. If a function has parameters, they are listed after the
function name and enclosed in brackets. Parameters are separated by the comma
symbol. For example:
- CURRENT_DATE - function with no parameters.
- LENGTH (Customer.Name) – function with one parameter.
- MONTH_DIFFERENCE (Account.OpeningDate, Account.ClosingDate) –
function with two parameters.
The complete list of built-in functions supported by Aware IM is provided in the
Functions section.
Aggregate Calculation
The Aggregate Calculation performs calculations on a number of business objects or
business object groups and/or their attributes, for example, calculates the sum total of
an attribute:
SUM Account.Balance
The calculation above calculates the total balance of all available accounts.
The calculation may be applied not only to all available business objects of the specified
type, but also to objects that meet the specified condition. The condition can be specified
after the WHERE keyword and must be enclosed in brackets, for example:
SUM Account.Balance WHERE (Account.State='OPEN')
The calculation above calculates the total balance of all open accounts. The condition
that follows the WHERE keyword can have one or more expressions connected with the
AND or OR keywords – just like a conditional part of a rule ((see Rule Condition).
The following types of the Aggregate Calculation are supported:
1. SUM – calculate sum total of an attribute.
2. COUNT – calculate the number of available objects.
3. MIN – calculate minimum value of an attribute.
4. MAX – calculate maximum value of an attribute.

Aware IM 8.8 User Guide
Copyright © 2002-2023 Awaresoft Pty Ltd Page 382 of 479
5. AVG – calculate average value of an attribute.
NOTE: SUM, MIN, MAX, AVG calculations must not use attributes of the Reference
type, for example the following expression is not valid:
SUM Account.Transactions.Amount
If aggregate of the referred object is required as in the example above, the following
expression must be used:
SUM Transaction.Amount WHERE (Transaction IN Loan.Transactions)
NOTE: The COUNT calculation must only use the names of business objects or
business object groups – it is not allowed to use attributes, for example,
COUNT Account or COUNT Account WHERE (Account.State='Open').
Using references is also not allowed in the COUNT calculation, for example the following
expression is invalid:
COUNT Account.Transactions.
The valid expression that achieves the desired result is:
COUNT Transaction WHERE (Transaction IN Account.Transactions)
NOTE: The Aggregate Calculation uses instances of business objects that exist in
the system’s database, not in the current Context – see Aggregate Operations.
Actions
The action part of a rule consists of actions that are executed when the rule condition
holds true (see Rule). The following section describes different actions of the Rule
Language. See:
Modify Attribute Action
INCREASE BY and REDUCE BY Actions
INSERT and REMOVE Actions
REPLACE Action
CREATE Action
DELETE Action
SEND Action
REQUEST SERVICE Action
REPORT ERROR Action

Aware IM 8.8 User Guide
Copyright © 2002-2023 Awaresoft Pty Ltd Page 383 of 479
PROTECT Action
FIND Action
ENTER NEW Action
EDIT Action
VIEW Action
DISPLAY PERSPECTIVE Action
DISPLAY DOCUMENT Action
PRINT DOCUMENT Action
EXPORT DOCUMENT Action
IMPORT DOCUMENT Action
EXPORT Action
IMPORT Action
SET Action
UPDATE Action
IMPORT RELATIONSHIPS Action
DISPLAY MESSAGE Action
DISPLAY QUESTION Action
PICK FROM Action
DISPLAY Action
Process Call Action
Modify Attribute Action
The Modify Attribute action modifies the value of a particular attribute of a business
object, business object group or notification. The action assigns a new value to the
attribute. For example:
- Account.State = 'Open'
- Account.Balance = 1000 + Transaction.Amount
It is possible to assign values to attributes of the Reference type (see Reference
Attributes), for example:
Loan.Item = Item
It is also possible to clear the single references or references lists by assigning an
UNDEFINED constant as the value (see Constants), for example:
Member.Loans = UNDEFINED
INCREASE BY and REDUCE BY Actions
These actions increment or decrement the value of an attribute of a business object,
business object group or notification. For example:

Aware IM 8.8 User Guide
Copyright © 2002-2023 Awaresoft Pty Ltd Page 384 of 479
- INCREASE Account.Balance BY 1000
- REDUCE Account.Balance BY Transaction.Amount
The actions also allow specifying the amount to increase or reduce by in percents, for
example:
- INCREASE Account.Balance BY 10%
- REDUCE Account.Balance BY 5%
INSERT and REMOVE Actions
These actions insert or remove an instance of a business object or business object
group into a reference list of another object. For example,
- INSERT Transaction IN Account.Transactions
- REMOVE Transaction FROM Account.Transactions
REPLACE Action
The REPLACE Action replaces an instance of a business object or business object
group from a reference list of another object with some other instances. This action can
be especially useful when combined with the This and That prefixes (see Instance
Prefixes). For example,
REPLACE ThisTransaction IN Account.Transactions WITH
ThatTransaction
CREATE Action
The CREATE Action creates an instance of the specified business object. For example,
CREATE Account
CREATE action can optionally initialize one or more attributes of the business object that
it creates, for example:
CREATE Account WITH Account.State='Open', Account.Balance=0
The attributes to be initialized must follow the WITH keyword and must be separated by
the comma. An initialization expression may contain any constant or other calculation.

Aware IM 8.8 User Guide
Copyright © 2002-2023 Awaresoft Pty Ltd Page 385 of 479
Sometimes it may be necessary to create several instances of a business object with a
single CREATE action. For example,
1. CREATE Transaction FOR EACH Account
2. CREATE Transaction FOR EACH
DAY/WEEK/MONTH/QUARTER/YEAR/WEEK_DAY/WEEKEND_DAY BETWEEN
Account.OpeningDate AND Account.ClosingDate
3. CREATE Transaction FOR EACH NUMBER BETWEEN 1 AND 3
4. CREATE Attachment FOR EACH FILE IN 'c:/mydirectory'
The action in the first example will create as many instances of the Transaction object as
there are instances of the Account object in the Context.
The action in the second example will create as many instances of the Transaction
object as there are days in the specified date interval. The date interval includes both
starting and ending dates.
The action in the third example will create 3 instances of the Transaction. The interval
includes both starting and ending numbers.
The action in the fourth example will create as many instances of the Attachment object
as there are files in the specified directory.
NOTE: You can use LOOP_ITERATION expression to get values of the current file
name, current date or current iteration number, for example:
CREATE TRANSACTION FOR EACH FILE IN 'c:/mydirectory' WITH
Transaction.FileName=LOOP_ITERATION
See also the “Aware IM Rule Language Reference” for more details.
DUPLICATE Action
The DUPLICATE Action duplicates an instance of the specified business object. For
example,
DUPLICATE Account
The action will create a copy of the instance of the object with attribute values equal to
those of the original object. The action will not copy multiple references, document or
picture attributes. You have to copy them separately.
It is possible to exclude some attributes from the copied attributes, for example:
DUPLICATE Account EXCEPT Attribute1,Attribute2

Aware IM 8.8 User Guide
Copyright © 2002-2023 Awaresoft Pty Ltd Page 386 of 479
The above action will copy all attributes except Attribute1 and Attribute2.
Multiple references can be duplicated using the following syntax:
DUPLICATE ThisPerson.Accounts TO ThatPerson.Accounts
The above action will duplicate each instance of the Account object stored in the
ThisPerson.Accounts attribute and insert the duplicated instances into
ThatPerson.Accounts.
DELETE Action
The DELETE action deletes all instances of the specified business object or business
object group, which exist in the Context. For example,
DELETE Account
DELETE Account.Owner
CLEAN Action
The CLEAN action is similar to the DELETE action in that it deletes instances of the
specified business object. Unlike the DELETE action the CLEAN action does not invoke
execution of rules – records are deleted in the database directly. CLEAN action is much
more efficient than the DELETE action, however, you should use this action with care
because it does not check the integrity of the data – if there are instances of the
business objects left that refer to the deleted instances the data will be inconsistent. It is
your responsibility to make sure that the data remains consistent after deletion.
The syntax of the CLEAN action is similar to that of the FIND action. Examples:
CLEAN ALL Account
The above action deletes all records of the Account object in the database.
CLEAN Account WHERE Account.Name=’Smith’
The above action deletes all accounts with the name “Smith”
NOTE: The CLEAN action is not supported for business object groups. You cannot
use references in the condition of this action either.

Aware IM 8.8 User Guide
Copyright © 2002-2023 Awaresoft Pty Ltd Page 387 of 479
DELETE FILE Action
The DELETE FILE action deletes the specified file or directory (with all files in the
directory). For example,
DELETE FILE 'c:/temp/myfile.txt'
DELETE FILE Account.FileName
COPY FILE Action
The COPY FILE action copies the specified file to the specified location. For example,
COPY FILE 'c:/temp/myfile.txt' TO ‘c:/temp2/mynewfile.txt’
MAKE DIRECTORY Action
The MAKE DIRECTORY action creates the specified directory. For example,
MAKE DIRECTORY 'c:/temp/mydirectory'
MAKE DIRECTORY Account.DirectoryName
SEND Action
The SEND action allows sending a notification to a particular notification receiver. For
example,
SEND ReservationOfferEmail TO Reservation.Member
The receiver of the notification must be an intelligent business object with active
communication channels (see Intelligent Business Objects).
The VIA keyword can be used to indicate the specific channel through which a
notification will be sent, for example
SEND ReservationOfferNotification TO Reservation.Member VIA Email
If the VIA keyword is not specified, the default channel of the business object is used.
The USING keyword can be used to send emails using a particular email account, for
example:
SEND ReservationOfferNotification TO Reservation.Member USING
EmailAccount

Aware IM 8.8 User Guide
Copyright © 2002-2023 Awaresoft Pty Ltd Page 388 of 479
Here the instance of the EmailAccount object is taken from the Context and it should
contain email account values to use when sending an email (host server, port,
authentication details etc). Therefore, the object representing an account must have
certain attributes defined. The definition of such an object can be created in the
Configuration Tool using the “Add Outgoing Email Account” command.
REQUEST SERVICE Action
The REQUEST SERVICE action makes it possible to use a service of an intelligent
business object (see Communication Between Systems). For example,
REQUEST SERVICE RegisterProduct OF Awaresoft
The VIA keyword can be used to indicate specific channel through which the service is
requested, for example
REQUEST SERVICE RegisterProduct OF Awaresoft VIA Sockets
If the VIA keyword is not specified, the default channel of the service provider is used.
REPORT ERROR Action
The REPORT ERROR Action causes Aware IM to stop executing rules and issue the
specified error message to the original requestor (typically the error message is
displayed on the user’s screen). For example,
REPORT ERROR 'Value of the attribute is not defined'
This action is typically used to validate attribute values, for example:
If Account.Balance < 0 Then REPORT ERROR 'Account balance cannot
be negative'
NOTE: the action stops execution of any rules triggered by the initial request to the
system (unless there are process failure rules defined – see other notes). If the request
was issued by the user the specified error message is displayed on the user’s screen. If
the request did not originate from the user interface (for example, the request originated
from a scheduled process) the error message is written into the log and the current
process is terminated.

Aware IM 8.8 User Guide
Copyright © 2002-2023 Awaresoft Pty Ltd Page 389 of 479
NOTE: The request that eventually caused the REPORT ERROR action could have
changed a number of objects and attributes prior to the execution of the REPORT ERROR
action. All changes to the business objects and their attributes prior to the REPORT
ERROR action within the context of the request are discarded when the REPORT ERROR
action is triggered (unless there are process failure rules defined – see the next note).
See the Rules and Transactions section for more details.
NOTE: If evaluation of rules that caused execution of REPORT ERROR action was
initially triggered by a process and this process had failure rules attached to it, the
changes to the business objects and their attribute prior to the REPORT ERROR action
are not discarded. Instead process failure rules are evaluated and the execution of the
process continues – see Process Failure Rules.
PROTECT Action
The PROTECT action protects a business object or business object group or their
attributes from access by all or specified users. When a business object or its attribute is
protected it is not possible for the user to modify the object or attribute in any way - if an
attribute of a business object is protected it is read-only on the form of this business
object. If the entire object is protected all its attributes are read-only on the form (see
Conditional Access). The examples of the PROTECT action are shown below:
1. If Transaction.State='APPLIED' Then PROTECT Transaction FROM
ALL
2. If Transaction.State='APPLIED' Then PROTECT Transaction FROM
ALL EXCEPT Administrator
3. If Account.State='CLOSED' Then PROTECT Account.Name FROM User
AND Operator
The action in the first example protects the Transaction object from access by all users.
The action in the second example protects the Transaction object from access by all
users except those operating at the “Administrator” access level.
The action in the third example protects the Name attribute of the Account object from
users operating at the “User” and “Operator” access levels.

Aware IM 8.8 User Guide
Copyright © 2002-2023 Awaresoft Pty Ltd Page 390 of 479
NOTE: By default protection applies not only to changes done via the user interface,
but also to changes done by a process. It is possible to distinguish between these two
situations by specifying System as the access level, for example:
If Account.STATE <> 'NEW' THEN PROTECT Account.Balance FROM ALL
EXCEPT System
In this case users will not be able to change the account balance when the state of the
account is not new, however, it is possible to configure the process rules that change the
account balance.
NOTE: Protecting attributes of referred objects is not allowed, for example the action
PROTECT Transaction.Account.State FROM ALL is invalid.
NOTE: The PROTECT action can only be used in rules attached to a business object
to be protected. The action may not be used in processes.
NOTE: The action specified in the format described above protects against changes
to a business object or its attribute (“write protection”). If “read protection” is required,
READ prefix should be added in front of the action. When a business object is “read
protected” instances that match the protection condition will not be read from the
system. For example,
If Transaction.State='APPLIED' Then READ PROTECT Transaction FROM
ALL
If an attribute is “read protected” it is not visible on any form of the business object and
its value cannot be changed.
FIND Action
The FIND action finds particular instances of a business object or business object group
in the system. There are several variations of the action:
1. Find all instances of the specified business object or group. For example,
FIND ALL Account
2. Run the specified query that finds particular instances of the business object or
group. For example,
FIND 'Open accounts'

Aware IM 8.8 User Guide
Copyright © 2002-2023 Awaresoft Pty Ltd Page 391 of 479
The action above will run the query named ‘Open accounts’. Note that the apostrophe
must only be used if the query name contains space symbols otherwise the identifier of
the query name can be used without the apostrophe.
3. Find all instances of the business object or group that match the specified condition.
For example,
FIND Account WHERE Account.State = 'Open'
The condition must be specified after the “WHERE” keyword. The format of the condition
is exactly the same as the one used in the Rule Condition.
The following keywords can be optionally used after the FIND action (written in any of
the above formats):
1. ORDER BY
If this keyword is used after the FIND action, the instances found by the action will be
sorted by the specified attribute in the specified order. For example,
FIND ALL Account ORDER BY Account.Balance DESC
The above action finds all accounts sorted by their balances in the descending order.
The ASC keyword indicates the ascending order and the DESC keyword indicates the
descending order. If ASC and DESC keywords are omitted the ASC keyword is implied.
2. TAKE BEST
If this keyword is used after the FIND action, only the specified number of business
object instances which match the specified criteria, will be found by the action. Typically
this keyword is used together with the ORDER BY keyword. For example,
FIND ALL Account ORDER BY Account.Balance DESC TAKE BEST 5
The above action will find 5 accounts with the highest balance.
3. IN BATCHES OF
If the action is likely to find many instances of the business object (hundreds or even
thousands) their processing may take a while. In this case it is better to perform the
processing of instances in smaller chunks (batches). After processing of each batch is
finished the results will be immediately committed to the system and stored in the
database. If the batch size is not specified the system will only commit the results once
all the instances have been processed (see Batch Operations). For example:

Aware IM 8.8 User Guide
Copyright © 2002-2023 Awaresoft Pty Ltd Page 392 of 479
FIND Account WHERE Account.State = 'OPEN' AND Account.Balance >
1000 ORDER BY Account.Balance IN BATCHES OF 5
Perform some actions with found objects
(The actions will be performed in batches of 5 objects)
If IN BATCHES OF keyword is omitted the default batch size of 1000 is used.
ENTER NEW Action
The ENTER NEW action is similar to the CREATE action in that it creates a new instance
of a business object. Unlike the CREATE action it lets the user fill in the initial values of
the business object. The action displays a form of the specified business object and
waits for the user to provide the initial values of the attributes and submit them to the
system. For example,
ENTER NEW Account
NOTE: if the name of a business object group is specified in the action, Aware IM will
first display a list of all members of the group and when the user selects the name of the
required business object, Aware IM will display a form of this object.
NOTE: It is possible to indicate the initial values of the attributes using the WITH
keyword. The syntax is the same as for the CREATE action. The form will be pre-
populated with the supplied values (this initialization though is not available for groups –
see previous note). For example:
ENTER NEW Account WITH Account.Name='John Smith'
NOTE: It is possible to indicate the name of the specific form of the business object
that will be used when entering the object, for example:
ENTER NEW Account USING 'Form for administrators'
In this action ‘Form for administrators’ is the name of the form that must be
configured with the Account object (see Business Object Forms).
NOTE: By default the form of the object will be displayed in a pop-up window. If the
process finishes immediately after the user enters form values, you can designate the
form to be displayed in the current window or in a new tab. For example:
ENTER NEW Account AND VIEW
ENTER NEW Account AND VIEW IN TAB

Aware IM 8.8 User Guide
Copyright © 2002-2023 Awaresoft Pty Ltd Page 393 of 479
EDIT Action
The EDIT action displays a form of the existing instance of a business object to the user
and waits for the user to provide the new values of the attributes. For example,
- EDIT Account
- EDIT Account.Type
NOTE: It is possible to indicate the name of the specific form of the business object
that will be used when editing the object, for example:
EDIT Account USING 'Form for administrators'
In this action ‘Form for administrators’ is the name of the form that must be
configured with the Account object (see Business Object Forms).
VIEW Action
The VIEW action is very similar to the EDIT action. The difference is that the process in
which the action has been called does not wait for the user to change the values of the
object and continues execution immediately after displaying the form. Also the VIEW
action allows viewing the specific presentation (see Business Object Presentation) or
form of the business object. For example,
- VIEW Account
- VIEW Account.Type
- VIEW Account USING 'Some fancy presentation'.
In the last example ‘Some fancy presentation’ is the name of the presentation that
must be configured with the Account object.
NOTE: If NOEDIT keyword is specified at the end of the action the form viewed by the
action will have all its input controls disabled so that a user won’t be able to change any
attribute values. NOEDIT keyword is not applicable if a presentation is being viewed. For
example:
VIEW Account NOEDIT
DISPLAY PERSPECTIVE Action
The DISPLAY PERSPECTIVE action shows the specified visual perspective on the
screen, for example:

Aware IM 8.8 User Guide
Copyright © 2002-2023 Awaresoft Pty Ltd Page 394 of 479
DISPLAY PERSPECTIVE Orders
DISPLAY LAYOUT Action
The DISPLAY LAYOUT action shows the layout of the specified tab of the main frame of
the specified visual perspective on the screen, for example:
DISPLAY Layout Main FROM_VP Orders
The above action shows the content panels of the tab Main of the visual perspective
Orders. The benefit of this action is that it allows using layouts of content panels
defined in a visual perspective without using other elements of the perspective (menu,
tabs etc). Moreover, the action makes the context of the current process available to
commands invoked by the layout (such as processes, queries etc).
DISPLAY DOCUMENT Action
The DISPLAY DOCUMENT action displays the specified document on the screen. The
action has two variations:
1. Display the document contained in an attribute of the Document Type. Whatever
document is stored in the attribute will be displayed – no document processing is
performed (see Document Management). For example,
DISPLAY DOCUMENT Statement.StatementDocument
2. Generate the document from a document template and display the result on the
screen (see Document Generation). Consider the following rules as an example:
FIND Person WHERE Person.Name='John Smith'
DISPLAY DOCUMENT AccountOpeningLetter
In this example AccountOpeningLetter is the name of the document template. If this
template has the following line:
Dear <<Person.Name>>,
it will be replaced with the line
Dear John Smith
when the document is generated and displayed.

Aware IM 8.8 User Guide
Copyright © 2002-2023 Awaresoft Pty Ltd Page 395 of 479
Text and HTML documents can also be displayed inside a pop-up window if you use the
AS MESSAGE clause at the end of the action, for example:
DISPLAY DOCUMENT SplashScreen AS MESSAGE
Report documents can be displayed in the XLS format rather than the default PDF
format:
DISPLAY DOCUMENT AccountOpeningLetter AS XLS
You can also specify a query in this action to be used as the data source for the
document. Aware IM will produce as many documents as there are instances returned
by the query. If MERGE INTO ONE option is not used Aware IM will display all instances
on screen (the user will have to click on an icon next to each entry to see the document).
If MERGE INTO ONE clause is specified Aware IM will automatically merge all
documents into one document and show it to the user immediately. For example,
DISPLAY DOCUMENT AccountOpeningLetter USING ‘All accounts’ MERGE
INTO ONE
You can also merge the display document with any other document stored in some
attribute of the Document type (not necessarily used by a query). This is only supported
for PDF documents at the moment. For example:
DISPLAY DOCUMENT AccountOpeningLetter MERGE WITH
SystemSettings.TermsAndConditionsDoc
PRINT DOCUMENT Action
This action is very similar to the DISPLAY DOCUMENT action, but instead of displaying
the document on the screen, it sends the document to the default printer. It is also
possible to specify the name of the network printer to print to (if not specified the default
printer will be used) and the number of copies to print (if not specified 1 copy will be
printed). For example:
PRINT DOCUMENT StaffReport 2 COPIES
PRINT DOCUMENT StaffReport TO `Network Printer 1` 2 COPIES
EXPORT DOCUMENT Action
The EXPORT DOCUMENT action exports the specified document into a file on disk.
The action has two variations:

Aware IM 8.8 User Guide
Copyright © 2002-2023 Awaresoft Pty Ltd Page 396 of 479
1. Export the document or picture contained in an attribute of the Document or Picture
Type. Whatever document or picture is stored in the attribute will be exported – no
document processing is performed (see Document Management). For example,
EXPORT DOCUMENT Statement.StatementDocument TO FOLDER
'c:/mydocuments'
2. Generate the document from a document template and export the result (see
Document Generation). Consider the following rules as an example:
FIND Person WHERE Person.Name='John Smith'
EXPORT DOCUMENT AccountOpeningLetter TO FOLDER 'c:/mydocuments'
In this example AccountOpeningLetter is the name of the document template. If this
template has the following line:
Dear <<Person.Name>>,
it will be replaced with the line
Dear John Smith
when the document is exported.
The FOLDER keyword specified after the TO keyword identifies the directory in the file
system where the file will be written. If a directory doesn’t exist it will be created. The
name of the file that the document will be written to will be the name of the original file
that the document was created from. Note that if the file with this name already exists in
the specified folder, it will not be overwritten. Instead another file with the variation of the
original name (for example, originalName0) will be created.
The FILE keyword can be specified instead of the FOLDER keyword. In this case the
string after the FOLDER keyword must contain the full path of the file that the document
will be exported to. If a file with the specified name already exists it will be overwritten.
For example,
EXPORT DOCUMENT AccountOpeningLetter TO FILE
'c:/mydocuments/myfile.doc'
Report documents can be exported in the XLS format rather than the default PDF
format:
EXPORT DOCUMENT AccountOpeningLetter TO FOLDER 'c:/mydocuments'
AS XLS

Aware IM 8.8 User Guide
Copyright © 2002-2023 Awaresoft Pty Ltd Page 397 of 479
IMPORT DOCUMENT Action
The IMPORT DOCUMENT action imports the specified file into an attribute of the
specified business object (provided that the attribute is of the Document or Picture
type). For example,
IMPORT DOCUMENT Statement.StatementDocument FROM
'c:/mydocuments/myfile.doc'
EXPORT action
The EXPORT action exports existing instances of the specified business object or
results of running a query into a comma delimited text file (CSV file). For example:
EXPORT PersonalSavingAccount TO 'c:/mydocuments/psa.csv'
EXPORT ‘My Query’ TO 'c:/mydocuments/psa.csv'
If the name of the business object is used, the instances available in the current context
will be exported. If the name of the query is used Aware IM will run the query and export
the results. If the query has attributes to display defined, only those attributes will be
exported. Query names have to be enclosed in apostrophe.
There are several options that can be used with the action:
1. If the FOR UPDATE keyword is specified the ID attributes of the business objects will
be written into the export file. If such a file is later imported into the system, the
system will look for the objects with the specified ID’s and modify them rather than
insert the new ones. If the FOR UPDATE keyword is not specified the ID attributes of
the objects will not be written into the export file and if such a file is later imported
into the system, each record in the file will create the new instance of the business
object. For example:
EXPORT PersonalSavingAccount TO 'c:/mydocuments/psa.csv'FOR
UPDATE
2. If EXCLUDE RELATIONSHIPS keyword is specified any relationships that the
exported object has with other objects will not be written into the output file. By
default all relationships are exported. For example:
EXPORT PersonalSavingAccount TO 'c:/mydocuments/psa.csv' EXCLUDE
RELATIONSHIPS
3. If EXCLUDE BINARY keyword is specified any binary attributes that the exported
object has (such as Pictures and Documents) will not be written into the output
file. By default all binary attributes are exported. For example:

Aware IM 8.8 User Guide
Copyright © 2002-2023 Awaresoft Pty Ltd Page 398 of 479
EXPORT PersonalSavingAccount TO 'c:/mydocuments/psa.csv' EXCLUDE
BINARY
4. The USING expression allows you to use an existing export template. For example:
EXPORT PersonalSavingAccount TO 'c:/mydocuments/psa.csv' USING
`Account Template`
5. The APPEND clause allows you to append to an existing file rather than create a
new one. For example:
EXPORT PersonalSavingAccount TO 'c:/mydocuments/psa.csv' APPEND
See also the Export and Import section.
IMPORT Action
The IMPORT action imports the contents of the comma delimited text file (CSV) or the
XML file or XML string and creates or modifies instances of the specified business
object. For example:
IMPORT PersonalSavingAccount FROM 'c:/mydocuments/psa.csv'
IMPORT PersonalSavingAccount FROM XML XmlInput.XMLString
In the first example the object is imported from a file, in the second – from an XML string
contained in the XMLString attribute of the XMLInput object.
The format of the CSV and XML file is described in the file ExportImport.txt located
in the DOC directory of your Aware IM installation.
The following options can be used with the action:
1. IN BATCHES OF
If the action is likely to import many instances of the business object (hundreds or even
thousands) their processing may take a while. In this case it is better to import smaller
chunks (batches). After import of each batch finishes the results are immediately
committed to the system and stored in the database. If the batch size is not specified the
system will only commit the results once all instances have been imported (see Batch
Operations). For example:
IMPORT PersonalSavingAccount FROM 'c:/mydocuments/psa.csv'IN
BATCHES OF 100

Aware IM 8.8 User Guide
Copyright © 2002-2023 Awaresoft Pty Ltd Page 399 of 479
2. WITH VALIDATION
If this keyword is specified any rules associated with the business object being imported
will be executed. If any rule fails for some record in the import file, this record will be
ignored. If this option is omitted, the instances of the business object will be stored in the
system but any rules associated with the business object will not be executed. For
example:
IMPORT PersonalSavingAccount FROM 'c:/mydocuments/psa.cs v' WITH
VALIDATION
3. USING
If this keyword is specified an import is performed using one of the user-defined import
templates, for example:
IMPORT PersonalSavingAccount FROM 'c:/mydocuments/psa.csv' USING
'My import template'
NOTE: this option will slow down the import process considerably and is
recommended when the import files are not too large. On the other hand using this
option will guarantee that only valid instances of the business object are stored in the
system.
NOTE: The first line of the input file must contain the description of the imported
attributes. If this description contains the ID attribute, the system will look for the
specified instances and modify them with the supplied data, otherwise new instances will
be created.
See also the Export and Import section.
After the import has been finished a special predefined object called ImportResults is
placed into the Context. You can use this object to obtain import log and check whether
any errors have been detected. This object has the following attributes –
ErrorsDetected and Log.
SET Action
The SET action allows setting values of several attributes of a business object from a
string. The format of the import string must be one of the following:
1. attrName1#attrValue1#attrName2#attrValue2 etc
The string represented in this format has attribute names followed by the corresponding
values. The attribute names and values are separated by the “#” delimiter, for example

Aware IM 8.8 User Guide
Copyright © 2002-2023 Awaresoft Pty Ltd Page 400 of 479
#Name#John Smith#State#NEW#Balance#100.0
2. attrName1 attrValue1 attrName2 attrValue2 etc
The string represented in this format also has attribute names followed by the
corresponding values. The attribute names and values are separated by the space
character (space character is thus not allowed inside attribute values, for example
Name John Smith State NEW Balance 100.0 - invalid
Name John State NEW Balance 100.0 – valid
3. The string has multiple lines where each line has a single attribute name and the
corresponding value. The attribute name and value are separated either by the
space character or “#” delimiter, for example:
Name John
State NEW
Balance 100
The example of the action is shown below:
SET Account FROM IncomingEmail.Message
Instead of the space and “#” symbols you can use “USING” expression to specify the
delimiter explicitly, for example:
SET Account FROM Name: 'John' USING ':'
The delimiter used here is the “:” symbol.
This action can be useful in a variety of situations, for example when processing the
contents of the incoming e-mails (provided that they are formatted as described above)
– see Email Handling.
UPDATE Action
The UPDATE action invokes evaluation of rules attached to the specified business
object (provided that there are any). For example,
UPDATE Account
If there are any rules attached to the Account business object they will be evaluated.
Normally there is no need to use this action, as rules will be evaluated whenever the
object is modified. However, if an object contains a rule that performs scheduled

Aware IM 8.8 User Guide
Copyright © 2002-2023 Awaresoft Pty Ltd Page 401 of 479
operations (for example, IF DAY_DIFFERENCE(CURRENT_ DATE,
Client.DateOfBirth) <= 3 Then SEND GreetingEmail TO Client), the
UPDATE action may be used by a schedule process to invoke this rule (see Scheduling).
IMPORT RELATIONSHIPS Action
The IMPORT RELATIONSHIPS action imports the contents of the comma delimited text
file (CSV) that contains the relationships of the specified business object. For example,
IMPORT RELATIONSHIPS OF PersonalSavingAccount FROM
'c:/mydocuments/psa.csv'
The following option can be used with this action:
IN BATCHES OF
If the action is likely to import many instances of the business object (hundreds or even
thousands) their processing may take a while. In this case it is better to import smaller
chunks (batches). After import of each batch finishes the results are immediately
committed to the system and stored in the database. If the batch size is not specified the
system will only commit the results once all the instances have been processed (see
Batch Operations). For example:
IMPORT PersonalSavingAccount TO 'c:\mydocuments\psa.csv'IN
BATCHES OF 100
If IN BATCHES OF keyword is omitted the default batch size of 1000 is used.
See also the Export and Import Relationships section.
DISPLAY MESSAGE Action
The DISPLAY MESSAGE action displays the specified information message to the user.
For example,
DISPLAY MESSAGE 'Items have been created'
DISPLAY MESSAGE 'Items have been created' MTITLE ‘My title’
The message will be displayed as a pop-up dialog and the user will have to click OK to
continue. The ASYNCH option can be used to display the message in different corners of
the screen. The message will then automatically fade out in a few seconds and no user
intervention will be required. For example:
DISPLAY MESSAGE ASYNCH 'Items have been created'

Aware IM 8.8 User Guide
Copyright © 2002-2023 Awaresoft Pty Ltd Page 402 of 479
DISPLAY MESSAGE ASYNCH DELAY 15 'Items have been created'
(display message for 15 seconds)
DISPLAY MESSAGE ASYNCH CLOSABLE 'Items have been created'
(display closable window)
DISPLAY MESSAGE ASYNCH BOTTOM_LEFT 'Items have been created'
(display window in the bottom left corner of the screen, default is bottom right. TOP,
TOP_LEFT, TOP_RIGHT, BOTTOM, BOTTOM_LEFT and BOTTOM_RIGHT are
available.)
DISPLAY QUESTION Action
The DISPLAY QUESTION action displays a question to the user and waits for the user’s
reply. The string specified in the action identifying a question is displayed together with
the Yes, No and Cancel buttons. For example,
DISPLAY QUESTION 'Do you want to print out a receipt?'
DISPLAY QUESTION 'Do you want to print out a receipt?' MTITLE
‘Question’
The reply of the user can be checked using the Reply attribute of the predefined object
Question, for example:
If Question.Reply = 'Yes' Then …
DISPLAY URL Action
The DISPLAY URL action goes to the specified URL. For example,
DISPLAY URL ‘http://www.awareim.com’
or
DISPLAY URL Person.WebPage
By default the URL will be opened in a new window. You can also specify “IN MAIN
WINDOW”, “IN NEW WINDOW”, “IN CURRENT TAB”, “NEW TAB” or “FULL SCREEN”
to display URL in the main window, in the new window, in the current tab, in the new tab
or in the same window full screen respectively. For example,
DISPLAY URL ‘http://www.awareim.com’ IN MAIN WINDOW

Aware IM 8.8 User Guide
Copyright © 2002-2023 Awaresoft Pty Ltd Page 403 of 479
When the URL is displayed in a new tab there is an option to specify the name of the
tab, for example:
DISPLAY URL ‘http://www.awareim.com’ NEW TAB ‘My tab’
PICK FROM Action
This action is similar to the FIND action in that it finds particular instances of the
business object, but unlike the FIND action, it displays the found instances on the
screen and waits for the user to pick a particular instance. The syntax of the action is
almost exactly the same as that of the FIND action except that the PICK FROM keyword
is used instead of FIND. For example,
PICK FROM Account WHERE Account.State = 'OPEN' ORDER BY
Account.Balance
NOTE: IN BATCHES OF keyword that can be used in the FIND action is not
applicable to the PICK FROM action.
NOTE: By default the action will display a screen that allows selecting only one
object. If multiple selection is required use the PICK ONE OR MORE FROM keyword
instead of PICK FROM, for example
PICK ONE OR MORE FROM Account WHERE Account.State = 'OPEN' ORDER
BY Account.Balance
NOTE: By default if a query finds just one instance of an object this instance will be
displayed on the screen and the user will have to select it as usual. If you do not want
the action to prompt for the single found instance, but use this instance straight away
add NO CONFIRMATION FOR ONE keyword at the end of the action. For example,
PICK FROM Account WHERE Account.State = 'OPEN' ORDER BY
Account.Balance NO CONFIRMATION FOR ONE
DISPLAY Action
This action is very similar to the PICK FROM action in that it displays the instances of
the business object found by the action, however it does not expect the user to pick any
particular instance. The syntax of the action is exactly the same as that of the PICK
FROM action except that the DISPLAY keyword is used instead of PICK FROM. For
example,

Aware IM 8.8 User Guide
Copyright © 2002-2023 Awaresoft Pty Ltd Page 404 of 479
DISPLAY Account WHERE Account.State = 'OPEN' ORDER BY
Account.Balance
PRINT FORM Action
This action prints the specified form of the specified business object on the client’s
screen. Note that unlike the PRINT DOCUMENT action that prints the document on the
server, the PRINT FORM action prints the form on the clients’s machine inside a
browser. For example,
PRINT FORM Main OF Account
This action prints the form with the name “Main” of the Account object.
EXECUTE PROGRAM Action
This action runs an external program. For example:
EXECUTE PROGRAM ‘c:/TEMP/SomeProgram.exe’
By default Aware IM will wait for the external program to complete. However, if “NO
WAIT” clause is specified the system will not wait for the external program. For example,
EXECUTE PROGRAM ‘c:/TEMP/SomeProgram.exe’ NO WAIT
EXEC_SP Action
This action allows execution of a database stored procedure. You can initialize input
parameters of the stored procedure with rule expressions and you can also capture the
output parameters of the stored procedure in the attributes of business objects. If the
stored procedure returns a “result set” (the result of the SQL SELECT statement) you
can capture returned records as instances of business objects, which can then be
placed in the Context or returned by a query. The stored procedure can be in the native
Aware IM database or in the external database.
For detailed description of the syntax of this action refer to the Rule Language
Reference Guide. Here we just provide a few examples:
EXEC SP ‘procAlertGetAll’ RETURN Alert
This stored procedure does not require any parameters. It “selects” all alert records in
the native database, that Aware IM will automatically convert to instances of the Alert
object and put in the context or make available for a query

Aware IM 8.8 User Guide
Copyright © 2002-2023 Awaresoft Pty Ltd Page 405 of 479
EXEC SP ‘procAlertGet’ WITH ‘@alerID’=1 RETURN Alert
This stored procedure returns alert record with id=1
EXEC SP ‘procAlertGet’ WITH ‘@alerID’=SPParam.AlertId RETURN
Alert
This stored procedure returns alert record with id taken from the AlertId attribute of
the SPParam object
EXEC SP ‘procAlertGetOut’ WITH
‘@alerID’=SPParam.AlertId,’@alertName’=SPParam.AlertName OUT
This stored procedure returns alert record with id taken from the AlertId attribute of
the SPParam object. The name of the alert is then written into the AlertName attribute.
EXEC SP ‘proc1’ OF SQLServer WITH ‘@param1’=1,’@param2’=2 RETURN
SomeObject
This stored procedure returns the specified records from an external database identified
by the name SQLServer.
CONNECT TO EMAIL and DISCONNECT FROM EMAIL
Actions
These actions allow you to handle incoming e-mail dynamically from a process. For
more details please see the Rule Language Guide.
SAVE SCREEN Action
This action allows you to save image of a chart displayed on the current screen or the
entire displayed screen in an attribute of the Picture or Document types (in the latter
case the image is saved as PDF file). The syntax is::
SAVE SCREEN ‘my chart id’ TO Object.PictureAttribute
The action above saves the chart identified by id ‘my chart id’ in the picture attribute of
some object in the Context. The id of the chart can be specified when defining a chart
query.
SAVE SCREEN TO Object.PictureAttribute
The action above saves the current screen in the picture attribute of some object in the
Context.
SAVE SCREEN TO Object.DocumentAttribute AS PDF
The action above saves the current screen in the document attribute of some object in
the Context as PDF file.

Aware IM 8.8 User Guide
Copyright © 2002-2023 Awaresoft Pty Ltd Page 406 of 479
RENAME DOCUMENT Action
This action allows you to rename a document stored in an attribute of the Document
type, for example :
RENAME DOCUMENT Object.DocAttribute TO `abc.doc`
CLOSE TAB Action
This action forces closes all tabs with the specified id. Id’s can be assigned when
defining an operation or a menu item that directs its output to a new tab (settings of the
“New Tab” output).
CLOSE TAB ‘my tab’
EXEC_STRING Action
This action executes the specified string as if it was an action of the Rule Language.
This allows configurators to define rule actions dynamically, for example:
Object.Attribute = ‘FIND ALL Customer’
EXEC_STRING Object.Attribute
EXEC_SQL Action
This action executes the specified SQL string by invoking the database engine, for
example:
EXEC_SQL `UPDATE CRM_Customer SET Name=’John’`
If SQL to be executed performs a SELECT specify the object name that the SQL
returns, for example:
EXEC_SQL `SELECT CRM_Customer WHERE FirstName=’Jane’` RETURN
Customer
You have to be careful when using this acton as you can stuff up your database if you
do something wrong. This action is only recommended for advanced users who
understand how Aware IM manages the database.

Aware IM 8.8 User Guide
Copyright © 2002-2023 Awaresoft Pty Ltd Page 407 of 479
LOG2 Action
This action puts the specified string into the Execution Log, so that it becomes visible in
the Log Viewer. For example,
LOG2 ‘This is my log string’
LOG2 CONTEXT Action
This action dumps the contents of the current Context into the Execution Log, so that it
becomes visible in the Log Viewer. For example,
LOG2 CONTEXT
CLEAR CONTEXT Action
This action removes contents of the current Context. If no parameters are specified
clears the entire Context. You can also optionally specify the object to clear, for example
CLEAR CONTEXT (clears all Context)
CLEAR CONTEXT Custoner (only removes instances of the Customer object from the
Context)
COMMIT TRANSACTION Action
This action forcefully commits the current transaction. The next action in the process (if
any) starts a new transaction. For example,
COMMIT TRANSACTION
MOBILE CAMERA SNAP INTO Action
This action opens a camera on a mobile device that the user logged in from, allows the
user to take a photo and then writes the result into the specified Picture attribute of the
specified business object. Note that this action can only be used in native mobile
applications – it will not work in a browser.
For example:
MOBILE CAMERA SNAP INTO MyObject.MyPictureAttribute

Aware IM 8.8 User Guide
Copyright © 2002-2023 Awaresoft Pty Ltd Page 408 of 479
You can also optionally specify different properties defining how the camera will behave.
See the Rule Language Guide for more details. An example of the action using camera
properties:
MOBILE CAMERA SNAP INTO MyObject.MyPictureAttribute WITH
‘targetWidth’=’100’,’targetHeight’=’100’,’cameraDirection’=’1’,’a
llowEdit’=’false’
MOBILE CAMERA GET INTO Action
This action opens a photo library on a mobile device that the user logged in from, allows
the user to select a picture from the library and then writes the result into the specified
Picture attribute of the specified business object. Note that this action can only be used
in native mobile applications.
For example:
MOBILE CAMERA GET INTO MyObject.MyPictureAttribute
You can also optionally specify different properties defining how the camera will behave.
See the Rule Language Guide for more details.
MOBILE GET LOCATION INTO Action
This action reads the current location on a mobile device, that the user logged in from,
and writes the results into the attributes of the specified MGeoLocation object. For
example,
MOBILE GET LOCATION INTO MGeoLocation
The results will be written into the specified instance of the MGeoLocation object
(longitude, latitude, altitude etc).
MOBILE START LOCATION WATCH Action
This action starts tracking changes to the current location of the user on a mobile device
that he used to log in from. The changes are written into the specified instance of the
MGeoLocation object. For example:
MOBILE START LOCATION WATCH INTO MGeoLocation

Aware IM 8.8 User Guide
Copyright © 2002-2023 Awaresoft Pty Ltd Page 409 of 479
MOBILE STOP LOCATION WATCH Action
This action stops tracking changes to the current location of the user on a mobile device
that he used to log in from. For example:
MOBILE STOP LOCATION WATCH FROM MGeoLocation
MOBILE SUBSCRIBE Action
This action subscribes the mobile device of the user that he logged in from to receive
push notifications from the system. This action only works in native mobile applications –
it doesn’t work in the browser.Notifications are sent by using the MOBILE PUSH
command (see below). As the result of the successful subscription Aware IM
automatically creates an instance of the MobilePhone object and puts it into the
Context. The instance can then be used to send notifications to. For example:
MOBILE SUBSCRIBE
LoggedInRegularUser.Phone = MobilePhome
See the How To document for more details about push notifications.
MOBILE PUSH Action
This action sends the specified push notification to the mobile phones (MobilePhone
objects) that are currently in the Context of the process. This action only works in native
mobile applications – it doesn’t work in the browser. For example,
FIND ALL MobilePhone
CREATE MobilePushNotification WITH
MobilePushNotification.Title='Test',MobilePushNotification,Subjec
t='This is my test
notification',MobilePushNotification.Sound='default'
MOBILE PUSH MobilePushNotification TO MobilePhone
See the How To document for more details about push notifications.
EXEC_SCRIPT Action
This action runs the specified Javascript inside the browser of the current user that
started the process with this action.
For example:
EXEC_SCRIPT ‘AwareApp.closeComponent(parser.m_widgetInfo,false,false);’

Aware IM 8.8 User Guide
Copyright © 2002-2023 Awaresoft Pty Ltd Page 410 of 479
For more details please see the Rule Language Guide document.
END_PROCESS Action
This action ends the current process
For example:
IF Object.Value=’abc’ THEN
END PROCESS
Do Something
SET PROGRESS Action
This action sets progress of a process running in the background mode. For more details
about this mode please watch this video tutorial. The action has two parameters separated
by comma. The first parameter is an expression that calculates the progress in percent. This
parameter is mandatory. The second parameter is an expression that calculates a string to
be shown to the user
For example:
SET PROGRESS 30
SET PROGRESS 30, ‘Progress is 30%’
SET PROGRESS SessionObj.CurNmb/SessionObj.Total*100,’Handling record ‘ +
SessionObj.CurNo + ‘ of ‘ + SessionObj.Total
CLEAR OFFLINE DATA Action
This action clears data in the offline storage. Offline storage is used in the offline mode.
See this video tutorial for more details. If no business object is specified then the entire
offline storage is cleaned. Otheriwse, the system removes all instances of the specified
object from the offline storage. For example,
CLEAR OFFLINE DATA
Clears the entire offline storage
CLEAR OFFLINE DATA Customer
Removes instances of the Customer object from the offline storage

Aware IM 8.8 User Guide
Copyright © 2002-2023 Awaresoft Pty Ltd Page 411 of 479
ADD OFFLINE DATA Action
This action populates data in the offline storage with the results of the specified query.
Offline storage is used in the offline mode. See this video tutorial for more details. For
example,
ADD OFFLINE DATA ‘All Customers’
Runs query ‘All Customers’ and populates the offline storage with the results.
GO OFFLINE Action
This action prepares the system for the offline mode and then “goes offline” using the
specified visual perspective. See this video tutorial for more details. For example,
GO OFFLINE ‘Offline Perspective’
Goes offline using the ‘Offline Perspective” visual perspective.
CREATE BUCKET action
This action creates a bucket in Amazon S3 storage. Note that the Application ID and
Application Secret for Amazon S3 must be defined (they are defined when you define a
Document or Picture attribute stored in Amazon S3
The syntax is:
CREATE BUCKET ArithmeticExpression ()
The expression must produce a string that contains region name and bucket name
delimited by the dot symbol.
For example,
CREATE BUCKET ‘ap-southeast-2.MyBucket’
Process Call Action
This action makes it possible to run a process. The syntax of the action just includes the
name of the process to run. For example,
If Policy.State = 'Open' Then CalculatePremium
In this rule CalculatePremium is the name of the process to run (RUN PROCESS
keyword can be optionally specified as well, for example RUN PROCESS
CalculatePremium).

Aware IM 8.8 User Guide
Copyright © 2002-2023 Awaresoft Pty Ltd Page 412 of 479
If a process requires process input then instances of the business objects representing
the process input will be automatically taken from the current Context when the action is
executed (see the Context of Rule Execution section). It is also possible to explicitly
indicate this input, for example,
If Policy.State = 'Open' Then CalculatePremium USING Policy
The process input must be used explicitly in the action if it represents a reference
attribute. For example,
If Customer.CurrentPolicy.State = 'Open' Then CalculatePremium
USING Customer.CurrentPolicy
You can also run a process by using the START PROCESS action. The advantage of
using this action is that you can specify the name of the process to run dynamically – for
example:
START PROCESS SomeObject.ProcessName
The name of the process to run is stored in the ProcessName attribute of the
SomeObject object.
Functions
The following section provides the description of all functions supported in Aware IM
out-of-the-box. Note that new functions can be plugged in as well – see “Aware IM
Programmer’s Reference”
Date and Time Functions
Text Functions
Mathematical Functions
Financial Functions
Miscellaneous Functions
Date and Time Functions
See:
Date and Time Functions (A – C)
Date and Time Functions (D – E)
Date and Time Functions (F – K)
Date and Time Functions (L – R)
Date and Time Functions (S – Z)

Aware IM 8.8 User Guide
Copyright © 2002-2023 Awaresoft Pty Ltd Page 413 of 479
Function:
AGE
Description:
Returns the full year difference between the provided date and the
current date
Parameters:
Attribute of the Date type or date constant or calculation producing
date
Example:
IF Age (Account.Customer.DateOfBirth) > 70 Then …
Function:
BUSINESS_DAY_FORWARD
Description:
Calculates the date that corresponds to the first business day after
the provided date. Business days are usually those that do not
include weekends and public holidays. The list of public holidays may
be provided in the “PublicHolidays” property of the server property
file.
Parameters:
Attribute of the Date type or date constant or calculation producing a
date. The second parameter is optional – it indicates the number of
days to move forward. If omitted, one day is assumed.
Example:
IF CURRENT_DATE=BUSINESS_DAY_FORWARD
(Account.OpeningDate) Then …
Function:
BUSINESS_DAY_BACK
Description:
Calculates the date that corresponds to the first business day before
the provided date. Business days are usually those that do not
include weekends and public holidays. The list of public holidays may
be provided in the “PublicHolidays” property of the server property
file.
Parameters:
Attribute of the Date type or date constant or calculation producing a
date. The second parameter is optional – it indicates the number of
days to move back. If omitted, one day is assumed.
Example:
IF CURRENT_DATE=BUSINESS_DAY_BACK
(Account.OpeningDate) Then …
Function:
CURRENT_DATE
Description:
Returns current date as the date constant
Parameters:
None
Example:
Account.OpeningDate = CURRENT_DATE
Function:
CURRENT_TIMESTAMP
Description:
Returns current date and time as the timestamp
Parameters:
None
Example:
Transaction.Time = CURRENT_TIMESTAMP
Aware IM 8.8 User Guide
Copyright © 2002-2023 Awaresoft Pty Ltd Page 414 of 479
Function:
CURRENT_DAY_OF_YEAR
Description:
Returns current day of the year as an integer constant in the range 1-
366
Parameters:
None
Example:
IF CURRENT_DAY_OF_YEAR = 8 Then …
Function:
CURRENT_DAY_OF_MONTH
Description:
Returns current day of the month as an integer constant in the range
1-31
Parameters:
None
Example:
IF CURRENT_DAY_OF_MONTH = 8 Then …
Function:
CURRENT_DAY_OF_WEEK
Description:
Returns current day of the week as a string constant (‘Monday’,
‘Tuesday’, etc)
Parameters:
None
Example:
IF CURRENT_DAY_OF_WEEK = ‘Saturday’ Then …
Function:
CURRENT_MONTH
Description:
Returns current month as an integer constant in the range 1-12
Parameters:
None
Example:
IF CURRENT_ MONTH = 1 Then …
Function:
CURRENT_YEAR
Description:
Returns current year as an integer constant
Parameters:
None
Example:
IF CURRENT_YEAR = 2004 Then …
Function:
CURRENT_WEEK
Description:
Returns current week as an integer constant in the range 1-52
Parameters:
None
Example:
IF CURRENT_WEEK = 1 Then SEND GreetingEmail TO Customer
Function:
CURRENT_HOUR
Description:
Returns current hour as an integer constant in the range 0-23
Parameters:
None

Aware IM 8.8 User Guide
Copyright © 2002-2023 Awaresoft Pty Ltd Page 415 of 479
Example:
IF CURRENT_HOUR = 12 Then DISPLAY MESSAGE ‘Midday!’
Function:
CURRENT_MINUTE
Description:
Returns current minute as an integer constant in the range 0-59
Parameters:
None
Example:
IF CURRENT_MINUTE = 45 Then …
Function:
DATE
Description:
Returns the date constant built from the given numbers
Parameters:
An integer constant indicating day (1-31), an integer constant
indicating month (1-12), an integer constant indicating year
Example:
If DATE (DAY_OF_MONTH (Account.OpeningDate), 4, 2004) =
07/04/2004 Then …
Function:
DATE_ADD
Description:
Returns the date resulting from adding/subtracting the specified
number of days to the specified date
Parameters:
An expression producing date and an expression producing a
number to be added or subtracted (if the number is negative) to the
date
Example:
If DATE_ADD (Account.OpeningDate), 4) = 07/04/2004 Then …
Function:
DATE_PART
Description:
Returns the date part of the given timestamp
Parameters:
Timestamp
Example:
If DATE_PART (Account.OpeningDateTime) = 07/04/2004 Then …
Function:
DAY_DIFFERENCE
Description:
Calculates the day difference between the two dates as an integer
constant
Parameters:
Two attributes of the Date type or date constants or calculations
producing date
Example:
If DAY_DIFFERENCE (Account.OpeningDate, Account.ClosingDate)
= 3 Then …

Aware IM 8.8 User Guide
Copyright © 2002-2023 Awaresoft Pty Ltd Page 416 of 479
Function:
DAY_DIFFERENCE2
Description:
Calculates the day difference between the first date and the second
date ignoring years of the dates.
For example:
DAY_DIFFERENCE2 (15/06/1985, 17/06/1998) = 2
(the difference between 15 of June and 17 of June is 2)
DAY_DIFFERENCE2 (15/06/1985, 14/06/1973) = 364
(the difference between 15 of June and 14 of June is 364)
The function can be useful, for example, when determining next
anniversary of some event.
Parameters:
Two attributes of the Date type or date constants or calculations
producing a date
Example:
If DAY_DIFFERENCE2 (CURRENT_DATE, Client.DateOfBirth) = 2
Then SEND GreetingEmail TO Client
Function:
DAY_OF_WEEK
Description:
Returns day of week of the provided date as a string (‘Monday’,
‘Tuesday’ etc)
Parameters:
Attribute of the Date type or date constant or calculation producing a
date
Example:
IF DAY_OF_WEEK (Account.OpeningDate=’Wednesday’) Then …
Function:
DAY_NUMBER_IN_WEEK
Description:
Returns day of week of the provided date (1 for Sunday, 2 for
Monday etc)
Parameters:
Attribute of the Date type or date constant or calculation producing
date
Example:
IF DAY_NUMBER_IN_WEEK (Account.OpeningDate=1) Then …
Function:
DAY_OF_MONTH
Description:
Returns day of month of the provided date as an integer constant in
the range 1-31
Parameters:
Attribute of the Date type or date constant or calculation producing a
date
Example:
IF DAY_OF_MONTH (Account.OpeningDate=25) Then …
Function:
DAY_OF_YEAR
Description:
Returns day of year of the provided date as an integer constant in the
range 1-366
Parameters:
Attribute of the Date type or date constant or calculation producing a

Aware IM 8.8 User Guide
Copyright © 2002-2023 Awaresoft Pty Ltd Page 417 of 479
date
Example:
IF DAY_OF_YEAR (Account.OpeningDate=250) Then …
Function:
DAYS
Description:
Returns an integer constant indicating the number of days in the
provided duration
Parameters:
Attribute of the Duration type or duration constant or calculation
producing duration
Example:
If DAYS (Task.Duration) = 5 Then …
Function:
END_OF_WEEK
Description:
Returns a date being Sunday of the week that the parameter date
represents
Parameters:
Attribute of the Date type or duration constant or calculation
producing Date
Example:
Account.EndOfWeek = END_OF_WEEK(CURRENT_DATE)
Function:
FIRST_DAY_OF_MONTH
Description:
Calculates the date that corresponds to the first day of month of the
provided date
Parameters:
Attribute of the Date type or date constant or calculation producing a
date
Example:
IF FIRST_DAY_OF_MONTH (Account.OpeningDate=01/10/2004)
Then …
Function:
FIRST_DAY_OF_NEXT_MONTH
Description:
Calculates the date corresponding to the first day of the next month
of the provided date
Parameters:
Attribute of the Date type or date constant or calculation producing a
date
Example:
IF FIRST_DAY_OF_NEXT_MONTH
(Account.OpeningDate=01/11/2004) Then …
Function:
FIRST_DAY_OF_PREV_MONTH
Description:
Calculates the date corresponding to the first day of the previous
month of the provided date
Parameters:
Attribute of the Date type or date constant or calculation producing a
date

Aware IM 8.8 User Guide
Copyright © 2002-2023 Awaresoft Pty Ltd Page 418 of 479
Example:
IF FIRST_DAY_OF_PREV_MONTH
(Account.OpeningDate=01/09/2004) Then …
Function:
FULL_YEARS
Description:
Calculates the number of full years between the two dates as an
integer constant. Full year difference between 31/12/2004 and
01/01/2005 is 0
Parameters:
Two attributes of the Date type or date constants or calculations
producing date
Example:
If FULL_YEARS (Account.OpeningDate, Account.ClosingDate) = 5
Then …
Function:
HOUR
Description:
Returns hour of the provided date as an integer constant in the range
0-23
Parameters:
Attribute of the Date type or date constant or calculation producing
date
Example:
IF HOUR (Account.OpeningDate=12) Then …
Function:
HOURS
Description:
Returns an integer constant indicating the number of hours in the
provided duration
Parameters:
Attribute of the Duration type or duration constant or calculation
producing duration
Example:
If HOURS (Task.Duration) = 5 Then …
Function:
LAST_DAY_OF_MONTH
Description:
Calculates the date that corresponds to the last day of month of the
provided date
Parameters:
Attribute of the Date type or date constant or calculation producing a
date
Example:
IF LAST_DAY_OF_MONTH
(Account.OpeningDate)=31/10/2004Then …
Function:
LAST_DAY_OF_NEXT_MONTH
Description:
Calculates the date that corresponds to the last day of next month of

Aware IM 8.8 User Guide
Copyright © 2002-2023 Awaresoft Pty Ltd Page 419 of 479
the provided date
Parameters:
Attribute of the Date type or date constant or calculation producing a
date
Example:
IF LAST_DAY_OF_NEXT_MONTH (Account.OpeningDate)=11/2004
Then …
Function:
LAST_DAY_OF_PREV_MONTH
Description:
Calculates the date that corresponds to the last day of the previous
month of the provided date.
Parameters:
Attribute of the Date type or date constant or calculation producing a
date
Example:
IF LAST_DAY_OF_PREV_MONTH
(Account.OpeningDate)=30/09/2004 Then …
Function:
MINUTE
Description:
Returns the minute of the provided date as an integer constant in the
range 0-59
Parameters:
Attribute of the Date type or date constant or calculation producing a
date
Example:
IF MINUTE (Account.OpeningDate)=45 Then …
Function:
MINUTES
Description:
Returns an integer constant indicating the number of minutes in the
provided duration
Parameters:
Attribute of the Duration type or duration constant or calculation
producing duration
Example:
If MINUTES (Task.Duration) = 5 Then …
Function:
MONTH
Description:
Returns the month of the provided date as an integer constant in the
range 1-12
Parameters:
Attribute of the Date type or date constant or calculation producing a
date
Example:
IF MONTH (Account.OpeningDate)=12 Then …
Function:
MONTH_ADD
Description:
Returns the date resulting from adding/subtracting the specified
number of months to the specified date
Parameters:
An expression producing date and an expression producing a

Aware IM 8.8 User Guide
Copyright © 2002-2023 Awaresoft Pty Ltd Page 420 of 479
number to be added or subtracted (if the number is negative) to the
date
Example:
If MONTH_ADD (Account.OpeningDate), 4) = 07/04/2004 Then …
Function:
MONTH_DIFFERENCE
Description:
Calculates the month difference between the two dates as an integer
constant
Parameters:
Two attributes of the Date type or date constants or calculations
producing a date
Example:
If MONTH_DIFFERENCE (Account.OpeningDate,
Account.ClosingDate) = 5 Then …
Function:
MONTH_DIFFERENCE2
Description:
Calculates the month difference between the first date and the
second date ignoring years.
For example:
MONTH_DIFFERENCE2 (15/06/1985, 17/07/1998) = 1
(the difference between June and July is 1)
MONTH_DIFFERENCE2 (15/06/1985, 14/05/1973) = 11
(the difference between June and May is 11)
The function can be useful, for example, when determining next
anniversary of some event.
Parameters:
Two attributes of the Date type or date constants or calculations
producing a date
Example:
If MONTH_DIFFERENCE2 (CURRENT_DATE, Client.DateOfBirth) =
3 Then SEND ReminderEmail TO Client
Function:
NEXT_DAY_OF_WEEK
Description:
Returns the next day of the week closest to the specified date
Parameters:
An expression producing a date and a string identifying the day
Example:
Object.NextDay = NEXT_DAY_OF_WEEK (CURRENT_DATE,
‘Tuesday’) /** This returns next Tuesday from current date)
Function:
NEXT_SEQUENCE_TIME
Description:
Defines a time sequence that starts at a particular minute of a
particular hour and then occurs every few minutes. Returns “Yes” if
the current time coincides with the sequence occurrence.
Parameters:
identifier of the time sequence (any text that has to be unique across
all sequences), minutes of the hour when the sequence starts and
time interval of the sequence in minutes
Example:
IF NEXT_SEQUENCE_TIME(SEQ1’,0,15) = 'Yes' THEN

Aware IM 8.8 User Guide
Copyright © 2002-2023 Awaresoft Pty Ltd Page 421 of 479
DoSomething (this will return Yes at 00, 15, 30 and 45 minutes of
every hour)
Function:
PREV_DAY_OF_WEEK
Description:
Returns the previous day of the week closest to the specified date
Parameters:
An expression producing a date and a string identifying the day
Example:
Object.PrevDay = PREV_DAY_OF_WEEK (CURRENT_DATE,
‘Tuesday’) /** This returns previous Tuesday from current date)
Function:
SECONDS
Description:
Returns an integer constant indicating the number of seconds in the
provided duration
Parameters:
Attribute of the Duration type or duration constant or calculation
producing duration
Example:
If SECONDS (Task.Duration) = 5 Then …
Function:
START_OF_WEEK
Description:
Returns a date being Monday of the week that the parameter date
represents
Parameters:
Attribute of the Date type or duration constant or calculation
producing Date
Example:
Account.StartOfWeek = START_OF_WEEK(CURRENT_DATE)
Function:
TIME_ADD
Description:
Returns the timestamp resulting from adding/subtracting the specified
number of hours to the specified timestamp
Parameters:
An expression producing timestamp and an expression producing a
number to be added or subtracted (if the number is negative) to the
timestamp
Example:
If TIME_ADD (Account.OpeningTime), 4) = 07/04/2004 12:00 Then
…
Function:
TIMESTAMP
Description:
Returns the timestamp constant built from the given numbers
Parameters:
An integer constant indicating day (1-31), an integer constant
indicating month (1-12), an integer constant indicating year, an
integer constant indicating hours (0-23), an integer constant
indicating minutes (0-59).
Alternatively a timestamp can be created from 2 parameters – one
date and one timestamp. Only time values from the second

Aware IM 8.8 User Guide
Copyright © 2002-2023 Awaresoft Pty Ltd Page 422 of 479
parameter are used to create a timestamp.
Example:
If TIMESTAMP (DAY_OF_MONTH (Account.OpeningDate), 4, 2004,
11, 0) = 07/04/2004 11:00 Then …
Function:
TO_TIMEZONE
Description:
Converts specified timestamp into the specified timezone
Parameters:
An expression producing timestamp and an expression identifying the
timezone (string)
Example:
TO_TIMEZONE(Object.Timestamp, RegularUser.TimeZone)
Function:
WEEK
Description:
Returns the week of the provided date as an integer constant in the
range 1-52
Parameters:
Attribute of the Date type or date constant or calculation producing a
date
Example:
IF WEEK (Account.OpeningDate=50) Then …
Function:
WEEK_DIFFERENCE
Description:
Calculates the week difference between the two dates as an integer
constant
Parameters:
Two attributes of the Date type or date constants or calculations
producing date
Example:
If WEEK_DIFFERENCE (Account.OpeningDate,
Account.ClosingDate) = 2 Then …
Function:
WEEKS
Description:
Returns an integer constant indicating the number of weeks in the
provided duration
Parameters:
Attribute of the Duration type or duration constant or calculation
producing duration
Example:
If WEEKS (Task.Duration) = 5 Then …
Function:
YEAR
Description:
Returns the year of the provided date as an integer constant
Parameters:
Attribute of the Date type or date constant or calculation producing a
date
Example:
IF YEAR (Account.OpeningDate=2004) Then …

Aware IM 8.8 User Guide
Copyright © 2002-2023 Awaresoft Pty Ltd Page 423 of 479
Function:
YEAR_DIFFERENCE
Description:
Calculates the calendar year difference between the two dates as an
integer constant. Year difference between 31/12/2004 and
01/01/2005 is 1.
Parameters:
Two attributes of the Date type or date constants or calculations
producing a date
Example:
If YEAR_DIFFERENCE (Account.OpeningDate,
Account.ClosingDate) = 5 Then …
Text Functions
See:
Text Functions (A – M)
Text Functions (L – Z)
Function:
AS_DATE
Description:
Converts the given string into a date according to the specified
format.
Parameters:
Attribute of the Plain Text type or string constant or calculation
producing text and a format string
Example:
Object.DateAttr = AS_DATE (’02-25-2007’, ‘MM-dd-yyyy’)
Function:
AS_NUMBER
Description:
Converts the given string into a number. If a string cannot be
converted the original string is returned.
Parameters:
Attribute of the Plain Text type or string constant or calculation
producing text
Example:
If AS_NUMBER (Account.Text) = 5 Then …
Function:
AS_STRING
Description:
Converts the given attribute or expression of the Number, Date,
Timestamp, Yes/No or Plain Text types into a string.
Parameters:
Attribute or expression of the Number, Date, Timestamp, Yes/No or
Plain Text types
Example:
If AS_STRING (Account.Number) = ‘5’ Then …
Function:
AS_TIMESTAMP

Aware IM 8.8 User Guide
Copyright © 2002-2023 Awaresoft Pty Ltd Page 424 of 479
Description:
Converts the given string into a timestamp according to the specified
format.
Parameters:
Attribute of the Plain Text type or string constant or calculation
producing text and a format string
Example:
Object.TimeStampAttr = AS_TIMESTAMP (’02-25-2007 10:05’, ‘MM-
dd-yyyy HH:mm’)
Function:
CHARS_FROM_LEFT
Description:
Returns the text being the specified number of the leftmost
characters in the provided text
Parameters:
Attribute of the Plain Text type or string constant or calculation
producing text and an integer constant indicating the number of
characters to retrieve
Example:
If CHARS_FROM_LEFT (Account.Name, 2) = ‘Jo’ Then …
Function:
CHARS_FROM_RIGHT
Description:
Returns the text being the specified number of the rightmost
characters in the provided text
Parameters:
Attribute of the Plain Text type or string constant or calculation
producing text and an integer constant indicating the number of
characters to retrieve
Example:
If CHARS_FROM_RIGHT (Account.Name, 3) = ‘ith’ Then …
Function:
CR
Description:
Generates new line symbol
Parameters:
None
Example:
Company.Address = Company.Address1 + CR() +
Company.Address2
Function:
INDEX_OF
Description:
Returns an integer constant indicating the index of the first string
within the second string. For example, INDEX_OF(‘fox’, ‘red fox’)
returns 5. If the first string is not contained within the second one 0 is
returned.
Parameters:
Two attributes of the Plain Text type or two string constants or
calculations producing text. A third parameter can be optionally
specified – this parameter indicates occurrence number of the first
string in the second string.
Example:
If INDEX_OF (‘Smith’, Account.Name) = 0 Then …

Aware IM 8.8 User Guide
Copyright © 2002-2023 Awaresoft Pty Ltd Page 425 of 479
Function:
LAST_INDEX_OF
Description:
Returns an integer constant indicating the last index of the first string
within the second string. For example, LAST_INDEX_OF(‘r, ‘bright
red fox’) returns 8. If the first string is not contained within the second
one 0 is returned.
Parameters:
Two attributes of the Plain Text type or two string constants or
calculations producing text
Example:
If LAST_INDEX_OF (‘Smith’, Account.Name) = 0 Then …
Function:
LENGTH
Description:
Returns an integer constant indicating the number of characters in
the provided text
Parameters:
Attribute of the Plain Text type or string constant or calculation
producing text
Example:
If LENGTH (Account.Name) = 5 Then …
Function:
NFORMAT
Description:
Formats a number differently depending on its value – whether it is
positive, negative or zero. Returns formatted number
Parameters:
expression, such as SUM, format of the positive non-zero value;
format of the zero value; optional format of the negative value
Example:
<<NFORMAT(SUM Object.Attribute, '#.00', '')>>
Function:
MATCHES
Description:
Returns ‘Yes’ if the specified string matches the specified regular
expression
Parameters:
Attribute of the Plain Text type or string constant or calculation
producing text and a regular expression
Example:
If MATCHES (Customer.PhoneNo, ‘[0-9]’) = ‘No’ Then …
Function:
PAD_LEFT
Description:
Pads the given string on the left with the specified character
Parameters:
Attribute of the Plain Text type or string constant or calculation
producing text identifying the string to pad; the character to pad with;
the resulting length of the string
Example:
PAD_LEFT ('John', '0', 6) returns '00John'
Function:
PAD_RIGHT

Aware IM 8.8 User Guide
Copyright © 2002-2023 Awaresoft Pty Ltd Page 426 of 479
Description:
Pads the given string on the right with the specified character
Parameters:
Attribute of the Plain Text type or string constant or calculation
producing text identifying the string to pad; the character to pad with;
the resulting length of the string
Example:
PAD_RIGHT ('John', '0', 6) returns 'John00'
Function:
PARSE_JSON
Description:
Parses the specified string in JSON format and extracts a value
according to the specified path
Parameters:
Attribute of the Plain Text type or string constant or calculation
producing text identifying the string in JSON format to parse and the
path in JSONPath format (see https://github.com/json-
path/JsonPath#getting-started) identifying a value to be extracted
from JSON. Returns extracted value as a string
Function:
PARSE_XML
Description:
Parses the specified string in XML format and extracts a value
according to the specified path
Parameters:
Attribute of the Plain Text type or string constant or calculation
producing text identifying the string in XML format to parse and the
path in XPath format (see https://www.w3.org/TR/1999/REC-xpath-
19991116/) identifying a value to be extracted from XML. Returns
extracted value as a string
Function:
REPLACE_PATTERN
Description:
Returns the text being the replacement of all occurrences of the old
pattern in the provided text with the new pattern
Parameters:
Attribute of the Plain Text type or string constant or calculation
producing text; the text indicating the old pattern (supports format of
regular expressions) and the text indicating the new pattern
Example:
If REPLACE_PATTERN (Account.Name, ‘ohn’, ‘ack’) = ‘Jack Smith’
Then …
Function:
SUBSTRING
Description:
Extracts a string between two indexes of the given string (the second
index is not inclusive)
Parameters:
Attribute of the Plain Text type or string constant or calculation
producing text and two indexes
Example:
If SUBSTRING (Account.Name, 0, 4) = ‘John’ Then

Aware IM 8.8 User Guide
Copyright © 2002-2023 Awaresoft Pty Ltd Page 427 of 479
Function:
TO_LOWER_CASE
Description:
Returns the text being the lower case representation of the provided
text
Parameters:
Attribute of the Plain Text type or string constant or calculation
producing text
Example:
If TO_LOWER_CASE (Account.Name) = ‘john smith’ Then …
Function:
TO_UPPER_CASE
Description:
Returns the text being the upper case representation of the provided
text
Parameters:
Attribute of the Plain Text type or string constant or calculation
producing text
Example:
If TO_UPPER_CASE (Account.Name) = ‘JOHN SMITH’ Then …
Function:
TO_PROPER_CASE
Description:
Returns the text being the ‘proper’ case representation of the
provided text. “ ill sMith” becomes “Bill Smith”; “o’mailey” becomes
“O’Mailey”
Parameters:
Attribute of the Plain Text type or string constant or calculation
producing text
Example:
If TO_PROPER_CASE (Account.Name) = ‘JOHN SMITH’ Then …
Function:
URL_ENCODE, URL_DECODE
Description:
Convert the string into a representation that can be used in a URL
replacing spaces and other special symbols
Parameters:
Attribute of the Plain Text type or string constant or calculation
producing text
Example:
DISPLAY URL URL_ENCODE(Object.Url)
Function:
WORDS_FROM_LEFT
Description:
Returns the text being the specified number of the leftmost words in
the provided text
Parameters:
Attribute of the Plain Text type or string constant or calculation
producing text and an integer constant indicating the number of
words to retrieve
Example:
If WORDS_FROM_LEFT (Account.Name, 1) = ‘John’ Then …
Function:
WORDS_FROM_RIGHT
Description:
Returns the text being the specified number of the rightmost words in

Aware IM 8.8 User Guide
Copyright © 2002-2023 Awaresoft Pty Ltd Page 428 of 479
the provided text
Parameters:
Attribute of the Plain Text type or string constant or calculation
producing text and an integer constant indicating the number of
words to retrieve
Example:
If WORDS_FROM_RIGHT (Account.Name, 1) = ‘Smith’ Then …
Function:
WORD_NUMBER
Description:
Returns an integer constant indicating the number of words in the
provided text
Parameters:
Attribute of the Plain Text type or string constant or calculation
producing text
Example:
If WORD_NUMBER (Account.Name) > 2 Then …
Mathematical Functions
Function:
RANDOM
Description:
Calculates randomly generated number as a floating point constant in
the range of 0-1
Parameters:
None
Example:
Account.Key = RANDOM
Function:
ABS
Description:
Returns the number constant being an absolute value of the provided
number
Parameters:
Attribute of the Number type or number constant or calculation
producing number
Example:
If ABS (Transaction.Amount) = 10 Then …
Function:
SIGN
Description:
Returns the sign of the provided number (0, 1 or –1)
Parameters:
Attribute of the Number type or number constant or calculation
producing number
Example:
If SIGN (Transaction.Amount) = -1 Then …
Function:
FLOOR
Description:
Returns the largest integer number that is not greater than the
provided number: FLOOR (5.67) = 5; FLOOR (-5.57) = -6

Aware IM 8.8 User Guide
Copyright © 2002-2023 Awaresoft Pty Ltd Page 429 of 479
Parameters:
Attribute of the Number type or number constant or calculation
producing number
Example:
If FLOOR (Transaction.Amount) = 10 Then …
Function:
CEILING
Description:
Returns the smallest integer number that is not less than the provided
number: CEILING (5.67) = 6; CEILING (-5.57) = -5
Parameters:
Attribute of the Number type or number constant or calculation
producing number
Example:
If CEILING (Transaction.Amount) = 10 Then …
Function:
EXP
Description:
Returns the exponential number raised to the power of the provided
number
Parameters:
Attribute of the Number type or number constant or calculation
producing number
Example:
If EXP (Transaction.Amount) = 10 Then …
Function:
NEG
Description:
Returns the provided number negated
Parameters:
Attribute of the Number type or number constant or calculation
producing number
Example:
If NEG (Transaction.Amount) = -10 Then …
Function:
SQRT
Description:
Calculates the square root of the provided number
Parameters:
Attribute of the Number type or number constant or calculation
producing number
Example:
If SQRT (Transaction.Amount) = 10 Then …
Function:
POWER
Description:
Returns the value of the first number raised to the power of the
second number
Parameters:
Two attributes of the Number type or number constants or
calculations producing number
Example:
If POWER (Transaction.Amount, 2) = 100 Then …
Function:
ROUND
Description:
Returns the first number rounded to the precision of the second
Aware IM 8.8 User Guide
Copyright © 2002-2023 Awaresoft Pty Ltd Page 430 of 479
number. For example, ROUND (6.738, 1) = 6.7; ROUND (6.738, 2) =
6.74
Parameters:
Two attributes of the Number type or number constants or
calculations producing number
Example:
If ROUND (Transaction.Amount, 1) = 10.3 Then …
Function:
MIN2
Description:
Calculates the minimum of the two provided numbers
Parameters:
Two attributes of the Number type or number constants or
calculations producing number
Example:
If MIN2 (Transaction.Amount, Account.Balance) = 100 Then …
Function:
MAX2
Description:
Calculates the maximum of the two provided numbers
Parameters:
Two attributes of the Number type or number constants or
calculations producing number
Example:
If MAX2 (Transaction.Amount, Account.Balance) = 100 Then …
Function:
MOD
Description:
Calculates the remainder of the first number divided by the second
one
Parameters:
Two attributes of the Number type or number constants or
calculations producing number
Example:
If MOD (Account.Balance, Transaction.Amount) = 10 Then …
Function:
LOG
Description:
Calculates the base 10 logarithm of the provided value
Parameters:
An attribute of the Number type or number constant or a calculation
producing a number
Example:
If LOG (Transaction.Amount) = 1 Then …
Function:
LN
Description:
Calculates the natural (base e) logarithm of the provided value
Parameters:
An attribute of the Number type or number constant or a calculation
producing a number
Example:
If LN (Transaction.Amount) = 1 Then …

Aware IM 8.8 User Guide
Copyright © 2002-2023 Awaresoft Pty Ltd Page 431 of 479
Financial Functions
Function:
CURRENCY_SYMBOL
Description:
Returns the currency symbol for the given currency code
Parameters:
Currency code, for example USD
Example:
CURRENCY_SYMBOL(‘USD’)
Function:
PV
Description:
Calculates present value of an investment. The present value is the
total amount that a series of future payments is worth now
Parameters:
1) Rate – interest rate per period (in percents, 50% is 0.5).
2) Nper – total number of payment periods in an annuity
3) Payment – payment made each period
4) Future value (optional) – future value or the cash balance you want
to attain after the last payment is made. If omitted assumed to be 0
5) Type (optional) – indicates when payments are due. 0 or omitted –
at the end of the period; 1 – at the start of the period
Example:
PV (0.08, 12 * 20, 500, 0, 0)
Function:
FV
Description:
Calculates the future value of an investment based on periodic
constant payments and a constant interest rate
Parameters:
1) Rate – interest rate per period (in percents, 50% is 0.5).
2) Nper – total number of payment periods in an annuity
3) Payment – payment made each period
4) Present value (optional) – present value or the lump-sum amount
that a series of future payments is worth right now. If omitted
assumed to be 0
5) Type (optional) – indicates when payments are due. 0 or omitted –
at the end of the period; 1 – at the start of the period
Example:
FV (0.08, 12 * 20, 500, 0, 0)
Function:
NPER
Description:
Calculates total number of payment periods in an annuity
Parameters:
1) Rate – interest rate per period (in percents, 50% is 0.5).
2) Payment – payment made each period
3) Future value (optional) – future value or the cash balance that is
attained after the last payment is made. If omitted assumed to be 0
4) Present value (optional) – present value or the lump-sum amount
that a series of future payments is worth right now. If omitted
assumed to be 0

Aware IM 8.8 User Guide
Copyright © 2002-2023 Awaresoft Pty Ltd Page 432 of 479
5) Type (optional) – indicates when payments are due. 0 or omitted –
at the end of the period; 1 – at the start of the period
Example:
NPER (0.08, 500, 0, 0, 0)
Function:
PMT
Description:
Calculates payment to be made each period
Parameters:
1) Rate – interest rate per period (in percents, 50% is 0.5).
2) Nper – total number of payment periods in an annuity
3) Future value (optional) – future value or the cash balance that is
attained after the last payment is made. If omitted assumed to be 0
4) Present value (optional) – present value or the lump-sum amount
that a series of future payments is worth right now. If omitted
assumed to be 0
5) Type (optional) – indicates when payments are due. 0 or omitted –
at the end of the period; 1 – at the start of the period
Example:
PMT (0.08, 12 * 20, 500, 0, 0)
Miscellaneous Functions
Function:
APP_NAME APP_VERSION, APP_COPYRIGHT,
APP_PRODUCT_ID
Description:
Returns the name of the application, version number, copyright and
product id of the system respectively
Parameters:
None
Example:
DISPLAY MESSAGE APP_NAME()
Function:
BSV_VERSION
Description:
Returns the version number of the business space version as shown
in the Configuration Tool
Parameters:
None
Example:
DISPLAY MESSAGE BSV_VERSION()
Function:
CONTEXT_SIZE
Description:
Determines the number of instances of the specified business object
currently in Context. Can be useful if one needs to determine the
number of objects that user selected in the process that handles
multiple selection.
Parameters:
The name of the object

Aware IM 8.8 User Guide
Copyright © 2002-2023 Awaresoft Pty Ltd Page 433 of 479
Example:
SessionObj.Total = CONTEXT_SIZE (‘ObjName’)
Function:
DISTANCE
Description:
Returns the distance between two addresses or locations in metres
Parameters:
Two addresses or locations as Plain Text and a Google Maps key as
PlainText. A location can be specified as two geo coordinates
separated by comma
Example:
IF DISTANCE (ThisClient.Address, ThatClient.Address,
SystemSettings.GoogleMapsKey ) > 1000 THEN …
Function:
ELEMENT_COUNT
Description:
Returns number of elements in a report, page, column or group
(which is specified by pressing the Evaluation Details button in the
Report/Presentation Designer – see Editing Tag Element)
Parameters:
None
Example:
(to be used only inside tags in the Report Designer)
Function:
ELEMENT_COUNTER
Description:
Returns the number of an element in the report, page, column or
group (which is specified by pressing the Evaluation Details button in
the Report/Presentation Designer – see Editing Tag Element). For
example, if Details band contains 5 elements the value of the function
for the first element will be 1, the second – 2 etc.
Parameters:
None
Example:
(to be used only inside tags in the Report Designer)
Function:
ENCRYPT_B64, DECRYPT_B64
Description:
Provides BASE64 with XOR shift encryption (decryption) of the specified string.
Can be used to encrypt Aware IM links – see Login Parameters
Parameters:
An attribute of the Plain Text type or an expression producing a string
Example:
DISPLAY URL
‘logonOp.aw?e=ENCRYPT_B64(‘domain=Test&userName=john&password=123’)
Function:
ENCRYPT_BASE64, DECRYPT_BASE64
Description:
Provides BASE64 encryption (decryption) of the specified string.
Parameters:
An attribute of the Plain Text type or an expression producing a string
Example:
Object.Attr=ENCRYPT_BASE64(‘abc’)

Aware IM 8.8 User Guide
Copyright © 2002-2023 Awaresoft Pty Ltd Page 434 of 479
Function:
ENCRYPT_DOC_BASE64
Description:
Returns a string that represents BASE64 encryption of the bytes of the specified
document.
Parameters:
An attribute of the Document type or an expression producing a Document
Example:
Object.StrAttr = ENCRYPT_DOC_BASE64(Object.DocAttr)
Function:
EVAL_STRING
Description:
Evaluates the specified string as if it was a condition of the Rule
Language. Returns the result of evaluation, which can either be a
numeric value or “Yes/No” value
Parameters:
An expression providing a string. Two optional extra parameters
specify what should happen when condition evaluates to Yes or No
(see the last example)
Example:
Object.Attribute = ‘Customer.Nmb’
IF EVAL_STR (Object.Attribute ) = 5 THEN …
Object.Attribute = ‘Customer.Nmb >5’
IF EVAL_STR(Object.Attribute) = ‘Yes’ THEN …
Company.Address = Company.Address1 +
EVAL_STRING('Company.Address2 IS DEFINED', CR() +
Company.Address2, '')
Function:
EXEC_SPF
Description:
Executes the specified stored procedure and returns a value in the
OUT parameter of the stored procedure. The stored procedure must
have one and only one OUT parameter defined. All other parameters
(if any) should be IN parameters. The returned valus is of Plain Text
type. If you need to convert it to number use the AS_NUMBER
function on the result
Parameters:
The first parameter is the name of the stored procedure to execute.
The second parameter is the string identifying database environment
('MAIN' for the native one).All other parameters (if any) are IN
parameters of the stored procedure
Example:
IF EXEC_SPF ('ContactNotesCount', 'MAIN', Customer.ID) = 4
THEN…
Function:
EXACT
Description:
By default Aware IM automatically translates explicit strings used in
rules using the current locale. This function allows to bypass this
mechanism and use strings as they are specified in the function
Parameters:
A string to use

Aware IM 8.8 User Guide
Copyright © 2002-2023 Awaresoft Pty Ltd Page 435 of 479
Example:
IF Account.Status = EXACT(‘Final’) Then
PROTECT Account FROM ALL
Function:
FILE_EXISTS
Description:
Checks if the specified file or directory exists
Parameters:
An expression returning a string identifying a file or directory name
Example:
If FILE_EXISTS(‘c:/myfile.txt’) = ‘Yes’ Then
DISPLAY MESSAGE (‘File exists’)
Function:
FILE_NAME
Description:
Returns the name of the specified file or document without the
extension
Parameters:
An expression returning a string identifying a file or directory name or
an attribute of the Document type
Example:
DISPLAY MESSAGE (‘File name is ‘ + FILE_NAME(‘c:/myfile.txt’))
Function:
FILE_EXTENSION
Description:
Returns the extension of the specified file or document
Parameters:
An expression returning a string identifying a file or directory name or
an attribute of the Document type
Example:
DISPLAY MESSAGE (‘File extension is ‘ +
FILE_EXTENSION(‘c:/myfile.txt’))
Function:
FILE_SIZE
Description:
Returns the size of the specified file or document in bytes
Parameters:
An expression returning a string identifying a file or directory name or
an attribute of the Document type
Example:
DISPLAY MESSAGE (‘File size is ‘ + FILE_SIZE(‘c:/myfile.txt’))
Function:
FILE_LAST_MODIFIED
Description:
Returns the date when the specified file was last modified
Parameters:
An expression returning a string identifying a file or directory name
Example:
DISPLAY MESSAGE (‘File modified ‘ +
AS_STRING(FILE_LAST_MODIFIED(‘c:/myfile.txt’)))
Function:
GENERATE_PWD
Description:
Generates random string that can be used as string password
Parameters:
1) Min. number of characters in the password
2) Max. number of characters in the password

Aware IM 8.8 User Guide
Copyright © 2002-2023 Awaresoft Pty Ltd Page 436 of 479
3) Number of capital letters
4) Number of digits
5) Number of special characters
Example:
Object.Pwd = GENERATE_PWD(8,15,2,2,2)
Function:
GET_CHANGES
Description:
If an object was changed returns which attributes have been changed
as well as old and new values
Parameters:
Object name that has been changed
Example:
IF MyObject WAS CHANGED THEN
CREATE AuditRecord WITH
AuditRecord.Description=GET_CHANGES(MyObject)
Function:
GROUP_MEMBER
Description:
Returns ‘Yes’ if the specified business object belongs to the specified
business object group
Parameters:
6) String identifying the business object
7) String identifying the business object group
Example:
IF GROUP_MEMBER(‘SavingAccount’, ‘Account) = ‘Yes’ Then …
Function:
IN_CONTEXT
Description:
Determines if the specified business object is currently in Context
Parameters:
The name of the object
Example:
IF IN_CONTEXT(‘Customer’) = ‘Yes’ THEN …
Function:
IMAGE_WIDTH, IMAGE_HEIGHT
Description:
Determines widh(height) of the provided image
Parameters:
An attribute of the picture type
Example:
IF IMAGE_HEIGHT(Object.Picture) > 800 THEN …
Function:
LIST_SIZE
Description:
Returns number of elements in the list
Parameters:
A reference to the list
Example:
IF LIST_SIZE (Client.Children) > 2 THEN …
Function:
LIST
Description:
Prints out a list of business objects as a table where each row
represents a single list member. A list may be specified as an
attribute or as a query string. Only specified attributes of each list

Aware IM 8.8 User Guide
Copyright © 2002-2023 Awaresoft Pty Ltd Page 437 of 479
member are printed out. This function is useful when it is necessary
to print out a relatively small list inside a document or inside an e-mail
(usually used inside a tag). Returns a table as a text string.
Parameters:
1. Identifier of the list or a string identifying the query (either Rule
Language string or the name of the existing query).
2. Delimiter to be used between attributes of a member.
3. Attribute names to be printed out. The name of the attribute to
print out may be optionally followed by the print format (the name
of the attribute and the format must be separated by comma). If
format is not specified the default attribute format will be used.
Example:
<<LIST(Client.Children, ‘ ‘, ‘FirstName’, ‘LastName’, ‘Age,#’)>>
<<LIST(‘FIND Child WHERE Child IN Client.Children’, ‘ ‘,
‘FirstName’,’LastName’,’Age’)>>
Function:
LIST_TABLE
Description:
Prints out a list of business objects as a table where each row
represents a single list member. A list may be specified as an
attribute or as a query string. Only specified attributes of each list
member are printed out. The header of the table containing attribute
names is printed automatically
Parameters:
1. Identifier of the list or a string identifying the query (either Rule
Language string or the name of the existing query).
If the list identifier is used the second parameter may optionally
indicate ordering of the list
2. Attribute names to be printed out. The name of the attribute to
print out may be optionally followed by the print format (the name
of the attribute and the format must be separated by comma). If
format is not specified the default attribute format will be used.
Example:
<<LIST_TABLE(Client.Children, ‘FirstName’, ‘LastName’, ‘Age,#’)>>
Function:
LIST_TABLE_START, LIST_TABLE_END
Description:
Whereas the LIST_TABLE function prints the entire table including
the header, the combination of LIST_TABLE_START and
LIST_TABLE_END functions allows using an existing header of the
table. Just like the LIST_TABLE function it prints out members of a
list of query results. However, you create the table in the document
itself and only mark the start and end of the data. All tags in between
the markers represent attributes to be printed (see example). Aware
IM automatically inserts extra rows as required.
These functions can only be used inside tags in MS Word, Excel or
HTML documents!
Parameters:
LIST_TABLE_START function takes an identifier of the list or a string
identifying the query (either Rule Language string or the name of the

Aware IM 8.8 User Guide
Copyright © 2002-2023 Awaresoft Pty Ltd Page 438 of 479
existing query) – see LIST_TABLE function. If the list identifier is
used the second parameter may optionally indicate ordering of the
list. LIST_TABLE_END has no parameters.
Example:
Header1
Header 2
Header3
<<LIST_TABLE_START(C
lient.Children)>><<Child.Fi
rstName>>
<<Child.LastNa
me>>
<<Child.Age>><<LI
ST_TABLE_END()>
>
Function:
LIST_LINE
Description:
Prints out members of a list as a single line. Only specified attributes
of each list member are printed out. A list may be specified as an
attribute or as a query string. This function is useful when it is
necessary to print out a relatively small list inside a document or
inside an e-mail (usually used inside a tag). Returns a line as a text
string.
Parameters:
1. Identifier of the list or a string identifying the query (either Rule
Language string or the name of the existing query).
2. If the list identifier is used the second parameter may optionally
indicate ordering of the list
3. Delimiter to be used between attributes of a member.
4. Delimiter to be used between members.
5. Attribute names to be printed out. The name of the attribute to
print out may be optionally followed by the print format (the name
of the attribute and the format must be separated by comma). If
format is not specified the default attribute format will be used.
Example:
<<LIST_LINE(Client.Children,’ORDER BY Child.FirstName DESC‘,‘
‘,’,’,‘FirstName’, ‘LastName’, ‘Age,#’)>>
<<LIST_LINE(‘FIND ALL Child’,,‘ ‘,’,’,‘FirstName’, ‘LastName’,
‘Age,#’)>>
Function:
NATIVE_MOBILE_MODE
Description:
Return ‘Yes’ if the current user is running a native mobile application.
Can only be used in applicability conditions!
Parameters:
None
Example:
NATIVE_MOBILE_MODE()=’Yes’
Function:
NESTING_LEVEL
Description:
Returns the level of nesting of the currently executing subreport.
Master report has nesting level 0, the subreport of the master report
has nesting level 1, the subreport of the subreport has nesting level 2
etc.

Aware IM 8.8 User Guide
Copyright © 2002-2023 Awaresoft Pty Ltd Page 439 of 479
Parameters:
None
Example:
(to be used only inside tags in the Report Designer)
Function:
NEXT_SEQUENCE_NMB
Description:
Returns next value of the specified auto-incremented attrubute
Parameters:
1. Name of the business object that owns the auto-incremented
attribute
2. Name of the auto-incremented attribute
3. Optional expression that calculates the value identifying group of
instances as specified in the auto-incremented attribute
4. Optional expression that calculates the starting value of the
sequence as specified in the auto-incremented attribute
Example:
IF Object.AutoIncAttr IS UNDEFINED THEN
Object,AutoIncAttr = NEXT_SEQUENCE_NMB(‘Object’, ‘AutoIncAttr’,
Object.GroupValue)
Function:
NUMBER_OF_PAGES
Description:
Returns the number of pages in a report
Parameters:
None
Example:
(to be used only inside tags in the Report Designer)
Function:
NMB_OF_SESSIONS
Description:
Returns the number of time a particular user is logged in the system,
0 is returned if the user is not logged in
Parameters:
An instance of an object that belongs to the SystemUser group
Example:
IF NMB_OF_SESSIONS(RegularUser) > 1 THEN REPORT ERROR
‘User can only be logged in once’
Function:
NMB_OF_USERS
Description:
Returns the number of licensed users for the current Aware IM
license or –1 if evaluation version
Parameters:
None
Example:
IF Object.Count>NMB_OF_USERS() THEN REPORT ERROR
‘Error’
Function:
OLD_VALUE
Description:
Returns the old value of the attribute before it was changed
Parameters:
An attribute of a business object or group
Example:
If OLD_VALUE(Account.Balance) = 100 Then …

Aware IM 8.8 User Guide
Copyright © 2002-2023 Awaresoft Pty Ltd Page 440 of 479
Function:
PAGE_NUMBER
Description:
Returns the current page number in a report
Parameters:
None
Example:
(to be used only inside the tags in the Report Designer)
Function:
READ_TEXT_FILE
Description:
Returns the textual contents of the specified file
Parameters:
An expression returning a string identifying the full path of the textual
file
Example:
Object.Attribute = READ_TEXT_FILE(‘c:/temp/myFile.txt’)
Function:
SCALE_IMAGE
Description:
Scales the given image to the specified width and height
Parameters:
An attribute of the picture type and two numbers representing width
and height respectively
Example:
Object.ScaledImage = SCALE_IMAGE(Object.OrgImage, 30, 30)
Function:
SEARCH_COUNT
Description:
Returns the number of object instances found by the last query
Parameters:
None
Example:
FIND ALL Account
If SEARCH_COUNT = 1 Then
DISPLAY MESSAGE (‘One account was found’)
Function:
SUB_DOCUMENT
Description:
Includes a subdocument inside a master document. The source of
data for the sub-document is specified as the first parameter of the
function. The sub-document will be included for each instance of the
business object in the data source. This function can only be used
inside tags in MS Word documents!
Parameters:
1. Identifier of the list or a string identifying the query (either Rule
Language string or the name of the existing query). List members
of business objects found by a query serve as the data source for
the sub-document
2. Name of the document template identifying the sub-document.
Example:
<<SUB_DOCUMENT(Client.Children, ‘ClientList’)>>
Function:
TESTING_MODE
Aware IM 8.8 User Guide
Copyright © 2002-2023 Awaresoft Pty Ltd Page 441 of 479
Description:
Return ‘Yes’ if the current user is running in the testing mode
Parameters:
None
Example:
IF TESTING_MODE() = ‘Yes’ THEN …
Function:
TRANSLATE
Description:
Translates the specified string to the locale of the current user if it is
defined. Returns the translated string. If no locale is defined the
original string is returned.
Parameters:
Attribute of Plain Text type or expression producing Plain Text
representing a string.There is also an optional second parameter
indicating the name of the locale.
Example:
<<TRANSLATE(Student.Gender,’Arabic’)>>
Function:
TYPE
Description:
Returns the specific type of the member of the business object group
as a string constant
Parameters:
The name of the business object group
Example:
If TYPE (Account) = ‘PersonalSavingAccount’ Then … (this assumes
that the Account is a business object group having
PersonalSavingAccount as its member)
Function:
URL_CONTENTS
Description:
Calls the specified URL and returns its response as text.
Parameters:
1. URL to call
Example:
Object.URLContents = URL_CONTENTS(‘http://www.test.com’)

Aware IM 8.8 User Guide
Copyright © 2002-2023 Awaresoft Pty Ltd Page 442 of 479
Glossary
Access level
Action
Aggregate operation
Attribute
Attribute choice list
Attribute format
Attribute initial value
Attribute length
Attribute query
Attribute type
Attribute value range
Auto-generated form
Auto-generated rule
Aware IM
Aware IM server
Business object
Business object group
Business space
Business space documentation
Business space integrity
Business space version
Calculated attribute
Communication channel
Condition
Conditional element
Configuration mode
Configuration template
Configuration Tool
Configurator
Context
Context assistant
Control Panel
Custom form
Default business space
Default communication channel
Discovering services
Document template
Export
Expression
Form section
Form section navigation style

Aware IM 8.8 User Guide
Copyright © 2002-2023 Awaresoft Pty Ltd Page 443 of 479
Function
Hosting environment
Hyperlink element
ID attribute
Import
Indexed attribute
Initialization rule
Intelligent business object
Login
Logout
Matching attributes
Notification
Object form
Object operation
Object relation type
Object storage
Object type and object instance
Operation
Operation mode
Presentation
Process
Process Failure Rules
Process input
Publish
Query
Query rule form
Query simple form
Query SQL form
Reference attribute
Report
Required attribute
Rule
Rule collection
Rule evaluation
Rule execution log
Rule execution order
Rule language
Rule priority
Rule table
Run time
Scheduling
Service
Service implementation
Service input
Service reply
Shortcut attribute

Aware IM 8.8 User Guide
Copyright © 2002-2023 Awaresoft Pty Ltd Page 444 of 479
Sub-presentation
Sub-query
Sub-report
Tag
Testing mode
Validation rule
Visual perspective
While semantics
Access level
Access level determines what information users can see, how it is presented and what
operations are available to them when they login into their business space in the
operation mode. Each system user has an access level. The configurator may define as
many access levels as necessary to set restrictions and privileges for different
categories of users. When a new user is registered the user is assigned one of the
defined access levels.
Action
An action is a part of a rule that performs some operation. The rule language has a
number of pre-defined actions. Actions can perform validation, assign values to
attributes, create, find or display business objects, start processes, display or print
documents, import or export data, communicate with other software and perform other
operations.
Aggregate operation
An aggregate operation performs arithmetic calculations on several business objects
and/or their attributes. An example of an aggregate operation would be counting the
number of items in an order. Another example is calculating the order amount as a total
of the amounts of all items in the order. There are several aggregate operations in the
rule language.
Attribute
An attribute is a part of a business object that holds some fact about the business object.
It may be, for example, a customer name, an account balance or an order number. The
kind of information held by the attribute depends on its type.
Notifications, like business objects, also have attributes.

Aware IM 8.8 User Guide
Copyright © 2002-2023 Awaresoft Pty Ltd Page 445 of 479
Attribute choice list
Attributes of basic types that hold textual, numeric, date and time data can have a list of
possible values specified by a configurator. When entering data in the operation mode a
user can select one of these values rather than having to type it manually. This feature
offers convenience and saves data entry time.
In addition, the configurator can restrict the values allowed for the attribute to one of
those in the list. In this case Aware IM will validate the data against the list when the
attribute is updated whether manually or by a rule.
Attribute format
Attribute format determines how the attribute value will appear on the screen or in a
document. It applies to attributes of basic types that hold numeric, date and time data.
For example, a date may be presented in full, short or a custom-specified format.
Attribute initial value
For an attribute of a basic type a configurator may specify an initial value. This value will
be assigned to the attribute when the business object (or notification) to which it belongs
is created in the operation mode. For example, the configurator may specify that all
orders be created with the status 'New'.
Attribute length
Attribute length applies only to textual attributes. It specifies the maximum number of
letters allowed for the attribute value. For example, the length for a customer name may
be set to 100. When specifying the length the configurator should use some sufficient
but sensible number to avoid wasting space in the data storage.
Attribute query
A query may be nominated for reference attributes to limit available business objects
applicable to the attribute. For example, there may be a requirement that an account
holder cannot be younger than 18 years old. With the attribute query only persons of 18
years old and over will appear for selection of the account holder when a new account is
created.
Attribute type
An attribute type determines the nature of the information held by the attribute. An
attribute type can be either a basic type or a reference type. There are following basic
types:

Aware IM 8.8 User Guide
Copyright © 2002-2023 Awaresoft Pty Ltd Page 446 of 479
- Plain Text, used for non-formatted textual information such as a person's name or
address.
- Number, used for monetary, countable or other numerical data.
- Yes/No, used for information that can be described by one of two possible values,
such as yes/no, on/off, etc.
- Date, used to hold dates.
- Timestamp, used to hold a moment in time including the date and the time parts.
- Duration, used to hold a time interval.
- Picture, used specifically for images intended to be displayed on the object form.
- Document, used to hold document data such as text, report, scanned picture, web
page, digitised sound, etc.
- Shortcut, used to display data of a related business object.
Attribute value range
For numerical attributes the configurator may specify an interval of acceptable values.
For example, a person’s age can be expected to be within a certain range, a transaction
amount cannot exceed certain value, etc. When a range is specified, Aware IM will
validate the data against the range when the attribute is updated whether manually or by
a rule.
Auto-generated form
An auto-generated form is an object form that Aware IM generates automatically in the
operation mode. This way the configurator does not have to do any work related to
presentation of the object information in the operation mode. With auto-generated forms
the configurator can easily control which attributes appear on the form and in which
order.
To display information in an enhanced or special fashion the configurator can supply
custom forms or design presentations.
Auto-generated rule
Aware IM creates auto-generated rules to handle certain instructions that the
configurator may specify for an attribute, such as initial values, choice lists, value
ranges, and required values. Auto-generated rules are normally hidden, but can be
made visible when working with rules. Auto-generated rules cannot be edited.
Aware IM
Aware IM is a configurable information management software system designed for
businesses that cannot justify costs of custom-built software, or individuals with non-

Aware IM 8.8 User Guide
Copyright © 2002-2023 Awaresoft Pty Ltd Page 447 of 479
standard computing requirements. Aware IM allows non-technical people to configure
an information management system for their needs without engineering assistance.
Unlike traditional software applications with Aware IM the users can make frequent
adjustments to the system whenever their needs change.
Aware IM server
Aware IM server, or simply the server, is the central component of Aware IM. It
manages business space data in the operation mode, maintains the configuration
information of business spaces and provides the Configuration Tool with it, handles
communication between Aware IM and other software systems.
Business object
A business object, or simply an object, represents an element of the business for which
some information needs to be maintained. Examples of business objects: customers,
accounts, orders, payments, etc. A number of facts usually need to be registered for an
object. For example, an order may have the placement date, customer, line items,
shipment address, shipment date, shipment number, delivery instructions, order status,
etc. Each of such facts is represented by a separate attribute.
An advanced variant of a business object is called an intelligent business object.
Business object group
A business object group allows for uniform handling of business objects of different
types. It offers the convenience of establishing links to various business objects in one
place. For example, a Transaction group may be created to embrace all possible
transactions that can be applied to an account, where a separate object represents each
transaction type. An Account business object may have an attribute that is a multiple
reference to the Transaction group. In this way transactions of different types would be
registered with the account in a single list.
Business space
A business space is a container of all information and rules on processing the
information that a business organization, or an individual, may need to manage.
Aware IM manages a business space according to the instructions provided by a
configurator in the configuration mode. Regular users login into the business space in
the operation mode to work with operational information. A business space is therefore a
combination of both configuration instructions and operational data.
All configuration elements, such as business objects, processes, rules and others,
belong to a business space. They reflect the unique requirements of the organization, or

Aware IM 8.8 User Guide
Copyright © 2002-2023 Awaresoft Pty Ltd Page 448 of 479
individual, and can be adjusted as often as necessary to accommodate changes in the
requirements.
Business space documentation
On request of a configurator Aware IM will generate a complete self-containing
documentation of a business space. The documentation contains details of all business
objects, processes, rules and other configuration elements specified in the business
space. The generated document can be stored electronically and used by anyone
without access to Aware IM. It can be searched for information of interest, printed out,
filed away, used for audit purposes, etc.
The document is generated for a given business space version. It is recommended to
generate and keep documentation for each published version. This will allow keeping
track of the information and rules that were in effect at a given time in the past.
Business space integrity
A business space version may become inconsistent in the course of editing of its
configuration elements. To check for possible integrity problems, such as references to
non-existent business objects, invalid rules, etc., a configurator can use a command of
the Configuration Tool that verifies the integrity of the business space version. Aware IM
always checks the integrity of the version when the version is being published or made
available for testing. It will not allow publishing or testing an inconsistent version.
Business space version
To help manage changes made to a business space Aware IM has a built-in version
control mechanism. It allows making and testing changes to a business space without
affecting the normal operation of the system. To make changes to a business space the
configurator creates a new version of the business space and makes the changes in that
version. Then the modified version can be put under test to verify that the changes work
as expected. After that the new version can be published, i.e. made operational. The
state of a newly created version is ‘New’, state of a version being tested is ‘Under Test’,
the operational version, i.e. the one used in the operation mode has state ‘Current’, the
state of the former operational version is ‘Obsolete’.
All the configuration work for a business space is done in a version of that business
space. The configuration information of a business space version can be exported into
or imported from a file, which makes configuration information portable between different
Aware IM installations. In particular it allows people to prepare configuration templates
for others to use.

Aware IM 8.8 User Guide
Copyright © 2002-2023 Awaresoft Pty Ltd Page 449 of 479
Calculated attribute
A configurator may nominate an attribute as calculated, meaning that the attribute can
be updated in the operation mode only by a rule, but not by users. For more flexible
access control to attributes the configurator may use access levels and the PROTECT
action.
Communication channel
A communication channel is a software adaptor carrying communication between
Aware IM and an intelligent object. Aware IM provides several channels that allow
communicating with people via e-mail or software systems via a standard data exchange
protocol (SOAP). Custom communication channels can be developed and plugged into
Aware IM for situations where a software or device does not support the standard
communication protocol.
Condition
A condition is an expression in the rule language which result is either true or false.
Examples of conditions:
Order.State = 'Approved'
Account.Holder.Age < 18
Customer.Name IS UNDEFINED
LineItem WAS ADDED TO Order.Items
Conditions are an essential part of rules, where they determine when the rule actions
need to be executed, and of queries where they specify which business objects to find.
Conditions are also used for conditional elements in reports and presentations to specify
how a particular element should be displayed.
Conditional element
A conditional element is an element of a report or a presentation that can be displayed
differently depending on conditions attached to the element. A single condition can be
used to specify whether the element should be displayed. If the condition is not met the
element is not displayed. In particular, this may be used in letter templates to designate
conditional text.
Multiple conditions can be used to specify how the element should be displayed. For
example, an amount can be shown in black if it is non-negative, in red if it is negative, or
a little picture can be displayed if the value of the amount is unknown.

Aware IM 8.8 User Guide
Copyright © 2002-2023 Awaresoft Pty Ltd Page 450 of 479
Configuration mode
The configuration mode allows users to specify the elements of their business space, in
other words to define the contents and behaviour of their application. They use
Configuration Tool for this purpose. Aware IM uses the provided configuration
information to manage the business space in the operation mode.
Configuration template
Configuration template is a configuration of a business space prepared by a person with
an intention of distributing to other people so they can use it for their own purposes. This
is similar to templates of letters, forms or reports that may be found in an office
environment. Configuration Tool allows exporting business space configurations to files,
and importing from files, making it easy for people to share their configurations.
Configuration Tool
Configuration Tool is the editor of configuration information for a business space. It is a
component of Aware IM that allows a user to work with configuration of business
spaces, business space versions and the elements such as business objects,
processes, rules and others. Configuration Tool connects to Aware IM server to request
the necessary configuration information and submit the modified information back to the
server.
Configurator
The configurator is a person using Configuration Tool to edit configuration information of
a business space.
Context
The context is a working area containing relevant business objects and notifications that
Aware IM maintains in the operation mode for the purpose of rule evaluation and
displaying of information. The initial content of the context depends on the configuration
element. For example, for rules attached to a business object the context contains a
single instance of the object when the rules are evaluated. For processes the initial
context is determined by the process input. More objects can be added to the context
following execution of actions that create new business objects or retrieve them from the
storage.

Aware IM 8.8 User Guide
Copyright © 2002-2023 Awaresoft Pty Ltd Page 451 of 479
Note that rules do not distinguish between different instances of objects of the same
type. If there are multiple instances in the context the rule action will be executed on
each of the instances. For example, consider the following process:
FIND Loan WHERE Loan.DueDate < CURRENT_DATE
Loan.State = 'Late'
The first rule will find all overdue loans and place them in the context. The second rule
will change the state of each loan in the context.
Context assistant
The Context Assistant is a little pop-up window in the Configuration Tool that helps the
configurator enter and edit expressions of the rule language. Context Assistant comes
up when the configurator presses F3 while typing text of a rule or tag expression.
Control Panel
The window that starts up and shuts down the main Aware IM components and shows
their status. Aware IM system is started by starting the Control Panel.
Custom form
A custom form is an object form that the configurator can design to replace an auto-
generated form that Aware IM supplies by default for business objects. With custom
forms the configurator has the freedom of choosing the layout, background, fonts, colors
and other visual elements for displaying and editing of object attributes.
The configurator can also design presentations for custom display, but not editing, of
object attributes.
Default business space
The default business space is a business space that Aware IM creates during the
installation with the name supplied by the user. For many users the single default
business space will be sufficient to manage their information. Others may create
additional business spaces for testing purposes or to import, inspect and reuse
configuration templates. People creating configuration templates for others will probably
need to maintain multiple business spaces.
Default communication channel
For intelligent business objects that have more than one communication channel the
configurator may nominate one of these channels as a default channel. The default

Aware IM 8.8 User Guide
Copyright © 2002-2023 Awaresoft Pty Ltd Page 452 of 479
channel is the channel that all the communication with the business object will be sent
through if the channel is not explicitly specified in the rules that send a notification or
request a service.
Discovering services
Discovering services is a feature of Aware IM that automatically downloads into a
business space the definition of services provided by an intelligent business object. This
works only for business objects that communicate via the SOAP channel, a standard
web communication protocol. Discovering services is much easier than having to enter
the definitions by hand. Besides, it eliminates potential errors related to manual data
entry.
This feature is particularly useful when establishing communication between two
business spaces maintained by the same or different Aware IM installations. One of
these business spaces will include an intelligent business object that represents the
other business space and communicates via the SOAP channel. Discovering the
services of the intelligent object will automatically add the definitions of the services,
service input and service replies into the business space.
Document template
A document template is a fully prepared document, usually with some textual contents,
that is intended to include some information taken from business objects. The
configurator supplies document templates when editing a business space. In the
operation mode Aware IM creates an actual document from a template by inserting the
required information. Examples of document templates may be an account-opening
letter, a purchase receipt, etc. The business object-specific information is marked in the
template by special tags.
Aware IM supports several document template types including plain text, MS Word, MS
Excel, HTML and a special report type. The report is different from the other types in that
it allows insertion of information for multiple business objects and can also be used for
producing comprehensive reports. In addition the report type makes it possible to
include conditional text or other conditional elements that will be printed in the actual
document only when their conditions are met.
Export
Export is an action that writes values of attributes of a business object into a file in the
operation mode. It can be used to extract required information from the system on a
one-off or regular basis, for example to exchange data with software systems that do not
support direct communication. It is also possible to export data of multiple business
objects for editing in a specialised software application and import the modified data
back into Aware IM.

Aware IM 8.8 User Guide
Copyright © 2002-2023 Awaresoft Pty Ltd Page 453 of 479
Expression
An expression is a building block in the rule language used to construct various
elements of the rule language such as conditions, actions, tags, etc.
Form section
A form section is a separate page on the object form. For most business objects the
form contains a single section. However, if a business object is complex and contains
many attributes it is often beneficial to split them into logical groups, each displayed on a
separate form section with a specific name. A form section can be either auto-generated
or custom. In the operation mode users can switch between different sections according
the navigation style the configurator selects for the object form.
Form section navigation style
For object forms with multiple sections the navigation style determines how users
navigate between sections in the operation mode. There are two navigation styles:
random (direct) and wizard-like (sequential). With the random navigation style the user
can switch between sections at random by clicking on the section name to go directly to
the desired section. With the wizard-like navigation the order of form sections is strictly
defined. The user can only navigate to the next or previous form section by clicking a
corresponding button. The latter style is useful in situations where some attributes
depend on other attributes. During the transition between sections Aware IM
recalculates the value of dependent attributes as necessary.
Function
Functions can be used in rules to perform various manipulations with data. Aware IM
includes several groups of functions to work with text, dates and time, perform
mathematical calculations and others.
Aware IM also allows addition of new functions that can be developed using a
programming language.
Hosting environment
Aware IM allows users to access their business space in the operation mode from any
location via the Internet using a standard Web browser. This requires Aware IM Server
to be installed on a computer that has a permanent connection to the Internet with
sufficient speed and bandwidth. The users who do not have a suitable Internet

Aware IM 8.8 User Guide
Copyright © 2002-2023 Awaresoft Pty Ltd Page 454 of 479
connection can run Aware IM Server on a computer managed by an Internet hosting
service provider, which is called a hosting environment.
Working in configuration mode in a hosting environment in a little different. In particular,
the configurator saves business space configuration into a file and then uploads it to
Aware IM Server in the operation mode using a special command.
Users who only need to access their information system within a single location do not
need a hosting environment.
Hyperlink element
A visual element in presentations can have an operation assigned to it. When the user
clicks on the element in the operation mode the assigned operation is executed. The
operation types include starting a process, running a query, viewing a presentation and
others.
ID attribute
ID attributed is added automatically to a definition of any business object. When an
instance of a business object gets created the ID attribute is assigned a value that
uniquely identifies the instance within Aware IM
Import
Import is an action that reads values of attributes of a business object from a file in the
operation mode and inserts its contents into a business space creating or replacing
business objects as necessary. In addition to inserting separate object data it can also
preserve relations between objects allowing for importing complex data. For example, it
is possible to import customer details together with all his accounts and transactions on
those accounts.
It can be used to acquire data on a one-off or regular basis, for example to transfer data
from software systems that do not support direct communication. It is especially useful
for the initial migration of data from older software applications into a newly created
business space.
It is also possible to use the import action in combination with the export action to allow
for editing of multiple object data in specialised software applications.
Indexed attribute
If a configurator marks an attribute as indexed, Aware IM will instruct the underlying
database system to create an index for this attribute. Creating database index may

Aware IM 8.8 User Guide
Copyright © 2002-2023 Awaresoft Pty Ltd Page 455 of 479
significantly speed up queries involving the attribute. This is an advanced option to be
used by users familiar with the database management systems.
Initialization rule
Aware IM considers rules with a certain pattern to be initialization rules. Here is an
example of an initialization rule:
If Order.State IS UNDEFINED Then Order.State = 'New'
When a new business object is created in the operation mode the initialization rules are
executed before the object form is displayed. Therefore, when the user sees the form for
the new object its attributes are already initialized according to the rules.
Aware IM automatically generates initialization rules to handle initial values the
configurator specifies for object attributes.
Intelligent business object
In addition to a collection of attributes that ordinary business objects have, intelligent
business objects are capable of processing information and communicating in a
meaningful way. This includes human beings, software systems and electronic devices.
For example, a customer would be an intelligent object because an organization needs
to keep certain information about its customers, and may need to communicate with
them. Aware IM can communicate with intelligent objects via communication channels in
two ways: sending notifications or requesting services.
A business space in Aware IM is an intelligent business object because it can both
communicate and process information. The information is processed according to the
rules defined in the business space. As far as communication is concerned, a business
space can both provide services and handle incoming notifications.
Login
Login is a process of a user entering a business space that takes place in both
configuration mode and operation mode. In the configuration mode the configurator
enters a password and logs into a business space when Configuration Tool starts up. In
the operation mode there are two categories of users: registered users and guests. An
authorised person, usually the administrator of the system, can register users.
Alternatively users can self-register if the business space allows them to. Either way, on
registration all users are assigned a login name, a password and an access level. To
login the registered users must enter their login name and password.
The configurator may allow guest users to enter the business space without having to
login. Such users are assigned with special ‘Guest’ access level, which is usually

Aware IM 8.8 User Guide
Copyright © 2002-2023 Awaresoft Pty Ltd Page 456 of 479
configured to grant very limited access privileges. This is useful when the business
space should allow visitors to access some common information, such as the home
page of a web site.
Logout
Logout is a process of a user leaving a business space. In the configuration mode the
configurator logs out by closing Configuration Tool. In the operation mode users click on
the Logout link or Aware IM automatically logs them out after a certain period of
inactivity.
It is strongly recommended that users logout when finishing their work with the system,
especially if they use a computer that belongs to someone else. This will prevent
unauthorised access to the system.
Matching attributes
Matching attributes are reference attributes of two related business objects that describe
the same relation. Consider an example where Customer object has attribute Accounts
that keeps track of all accounts of the customer, and Account object has attribute Holder
that refers to the customer holding this account. These two attributes are declared as
matching. The user creates a new account and selects a customer as its holder. When
looking at the customer details the user will see the newly created account in the
customer’s account list.
Since objects in Configuration Tool are edited separately, the configurator needs to
specifically nominate attributes of related objects as matching to establish a two-way
connection. Otherwise they will be treated as two separate one-way connections
between the related objects.
Notification
A notification is a way of communicating where a party can send a message to another
party without having to identify itself and without expecting a reply back from the other
party. It is entirely up to the other party to decide how to react upon receiving the
notification. An e-mail is a good notification example.
Aware IM allows sending notifications from a business space to intelligent business
objects defined in the business space, for example sending e-mails to customers. It also
forwards incoming notifications into relevant business spaces, for example when an
incoming e-mail arrives or a user logs into the business space in the operation mode.
Notifications, like business objects, have attributes to hold communication information.

Aware IM 8.8 User Guide
Copyright © 2002-2023 Awaresoft Pty Ltd Page 457 of 479
Object form
An object form is one or more pages displayed for users in the operation mode to view
and edit a business object. The form shows attributes of the object according to their
type and the appearance settings specified by a configurator. Object forms can have
one or several sections, each section can be either auto-generated or custom.
Presentations offer an alternative way of displaying, but not editing, object information.
Object operation
An object operation is an operation that applies to a particular business object. For
example, a transaction object may have such operations as approve transaction, reject
transaction, etc. Object operations can be configured as processes taking as their input
the business object of interest. Object operations appear in the caption bar of the object
form making it easier for the users to start an operation while looking at the object
details. Also, object operations can be configured as hyperlink elements on a
presentation designed for the object, so the users can start an operation by clicking on
the hyperlink.
Object relation type
There are two relation types: peer and ownership. The peer relation type should be
used for objects that can exist independently of each other. For example a product can
exist without being linked to a product category. If a product category is deleted, all
products that were linked to the category lose the link but continue to exist on their own.
The ownership (or parent/child) relation type should be used if an object belongs to
some other object and does not make sense without its owner object. For example, a
line item always belongs to an order. If an order is deleted all line items of that order
should be deleted as well. If a configurator marks a reference attribute of an object as
owned by another object, Aware IM will automatically delete the object when its owner
object is deleted, or when the link with the owner object is broken.
Object storage
Business object storage, also called persistence, determines where the business object
data is kept. Usually the data is stored in a database. The configurator can nominate an
object as not persisted, in which case the object is used in the operation mode
temporarily and is not saved in the system.
Object type and object instance
While there is a single business object describing a business element in the
configuration mode, there may be many objects in the operation mode representing the

Aware IM 8.8 User Guide
Copyright © 2002-2023 Awaresoft Pty Ltd Page 458 of 479
same business element. For example, a customer object may be defined in the
configuration mode, and then many customer objects would be registered in the
operation mode, each representing a different customer.
A formal way of making the distinction between objects in the two modes is to refer to
the configuration-mode object as object type and to the operation-mode object as
object instance. When it is necessary to avoid confusion between the two modes this
formal notation is used. When it is clear which mode is being described, the term object
is used.
Operation
Operation is an action that a user can perform with the instance of a business object in
the Operation Mode. This action may start a process, run a query, create a document
etc. The action is usually specific to the instance of a business object for which the
operation is invoked. For example, a process started by an operation may take the
instance of a business object as its input. Operations can be configured on business
object forms, on reference attributes and on query result screen.
Operation mode
In the operation mode Aware IM manages the information system according to the
instructions in the business space provided by a configurator in the configuration mode.
Regular users login into the business space in the operation mode to use the system in
the course of conducting their day-to-day business activities.
Presentation
A presentation is a way of displaying information of one or multiple business objects for
users in the operation mode. Unlike object forms presentations are not used to edit
objects, instead they offer a variety of data presentation options for designing custom
layouts, including a conditional display of information. Presentations can include
hyperlink elements for performing various operations, in particular object operations,
with a mouse click. Presentations can also be used for displaying query results.
Presentations are designed using the same visual designer used for designing reports.
They share many features with reports including the ability to reuse designs.
Process
Process is a way of performing an operation in Aware IM. In the operation mode a
process can be started from a rule, manually by a user, or when a service is requested
by an external software system. Usually a configurator defines a process as a collection
of rules that are executed in a particular order. A process can also be configured to use

Aware IM 8.8 User Guide
Copyright © 2002-2023 Awaresoft Pty Ltd Page 459 of 479
a software component developed using a traditional programming language. This option
is useful when some special functionality, such as a complex mathematical algorithm,
needs to be implemented, which cannot be done using the rule language.
Process Failure Rules
Process failure rules may be attached to a particular process. They are evaluated if this
process fails as a result of execution of the REPORT ERROR action by one of its rules.
Failure rules perform corrective actions. If failure rules are defined for a process the
execution of the process continues after the failure.
Process input
If a process needs one or several business objects to work properly, a configurator
should declare such objects as the process input. When the process is executed in the
operation mode these objects will form the initial context for the process.
Aware IM uses the process input information for various purposes, for example when
looking for object operations for a particular business object, or when determining
service input for a service.
Publish
Publish is a command of the Configuration Tool that makes a business space version
operational. The version state becomes ‘Current’.
Query
A query is used in the operation mode to find business objects that meet specified
conditions. Query results can be displayed to the user or used for processing by rules,
for example within a process. Queries can also find objects that belong to a business
object group.
If query results are intended to be displayed to users, the configurator can select which
attributes of the found business objects should appear on a standard result page.
Alternatively a presentation can be designed for the query for customized display of the
results.
The configurator can specify queries in simple form, rule form or SQL form.

Aware IM 8.8 User Guide
Copyright © 2002-2023 Awaresoft Pty Ltd Page 460 of 479
Query rule form
The rule form is a section of the query editor in the Configuration Tool where a
configurator can specify a query using the rule language. It can be used for queries that
are too complex to be defined in the simple form. For example, a query in the rule form
that finds all members over 16 years old and lists them in the alphabetical order may
look like this:
FIND Member WHERE Member.Age > 16 ORDER BY Member.LastName
This particular example can also be specified using the simple form.
Query simple form
The simple form is a section of the query editor in the Configuration Tool where the
configurator can specify a query in a simple way using visual controls to select the
business objects to find and enter desired conditions. Some elaborate queries, which
cannot be constructed in the simple form, can be specified using the rule form.
Query SQL form
The SQL form is a section of the query editor in the Configuration Tool where the
configurator can specify a query using the SQL, a language that database management
systems understand. It can be used by SQL experts for queries that are too complex to
be defined in the simple form and, for some reasons, cannot be specified using the rule
form. For example, a query in the SQL form that finds all members over 16 years old
and lists them in the alphabetical order may look like this:
SELECT Member.* FROM Library_Member AS Member WHERE
(Member.Age > 16) ORDER BY Member.LastName
This particular example can also be specified using the simple form.
Reference attribute
Unlike attributes of the basic attribute types, a reference attribute, or simply reference,
describes a relation between the business object to which the attribute belongs and
some other business object or business object group. For example, to register a relation
between an account and its holder the configurator may define Holder attribute for
Account object as a reference to Person object.
A reference attribute can be single, as in the example above, or multiple. Multiple
references are useful for linking an object with several other objects, for example an
account and transactions applied to the account. It is usually beneficial to configure a
matching attribute on the related object. In the first example it could be an Accounts

Aware IM 8.8 User Guide
Copyright © 2002-2023 Awaresoft Pty Ltd Page 461 of 479
attribute on Person object listing all accounts held by the person, which, incidentally,
would be a multiple reference.
Report
Report is a special kind of document template that can be designed to present
information of multiple business objects. It is primarily intended to generate
comprehensive reports in the operation mode with multiple columns, groupings, element
count, subtotals, etc. Reports are designed in the report designer, which offers a variety
of data presentation options for designing custom layouts, including conditional elements
for presenting information differently depending on conditions.
Reports are similar to presentations. Both are designed using the same visual designer
and share many features including the ability to reuse designs. The main difference is
that presentations are displayed for users dynamically and can include interactive
elements whereas reports are generated as page-oriented documents that can be
printed, saved on disk, etc.
Required attribute
The configurator may specify that a value must be provided for an attribute, in other
words it cannot be empty. In this case Aware IM will check the value of the attribute
whenever the business object (or notification) is created or updated in operation mode
and disallow the operation if the attribute value is undefined.
Rule
A rule specifies one or more actions that should be executed when the rule conditions
are met. The conditions are optional and if none are specified the actions are executed
unconditionally. In other words a rule states what should happen and when. Aware IM
follows the rules defined by the configurator to manage the business space in the
operation mode. Rules can perform a variety of tasks. They can create business objects,
perform calculations, create or print documents, display information, exchange data with
other software, etc.
Rule collection
The configurator can attach rules to certain configuration elements such as business
objects, processes and notifications. Since there may be several rules attached to the
same configuration element such rules are organised into rule collections. Rule
collections can be ordered or unordered, which determines how rules are evaluated
and their actions executed.

Aware IM 8.8 User Guide
Copyright © 2002-2023 Awaresoft Pty Ltd Page 462 of 479
Rule evaluation
Rule evaluation is a process of Aware IM considering rules to determine whether their
actions need to be executed. Aware IM evaluates rules attached to a configuration
element when an event happens that affects that element. For example, when a
business object is modified or a process is started. When such an event takes place
Aware IM evaluates all rules in the relevant rule collection. How evaluation is performed
depends on the rule order in the rule collection.
Rule execution log
Rule execution log is a file containing history of rule evaluation and action execution in
the operation mode. It can be used to check that the business space works as expected.
The configurator can control the level of details that go into the log.
Rule execution order
Rule execution order determines how rules in a rule collection are evaluated and their
actions executed. Rule collections attached to business objects are unordered. When a
business object is modified Aware IM evaluates all rules in its rule collection to find
actions to be executed. It then executes one of the found actions. Since the action can
make further changes to the object, Aware IM re-evaluates all rules in the collection that
depend on the latest changes to see which actions still need to be executed. The cycle
is continued until no more changes are detected.
Rule collections for processes are usually ordered, although the configurator can specify
otherwise. With ordered rule collections the rules are evaluated once only, and their
actions executed if the conditions are satisfied, exactly in the order the rules appear in
the collection.
Rule language
The rule language used in Aware IM allows the configurator to define instructions on
managing information in a business space. It is used to specify rules, queries, tags, and
other configuration elements. The rule language is simple and intuitive and, unlike
traditional programming languages, it does not require special software development
skills.
Rule priority
When actions for rules in an unordered rule collection are executed their execution order
is undefined. Most rules are independent of other rules so the execution order is not
important. In those rare cases when an action should be executed before or after actions
of some other rules in the collection, this can be achieved by setting the rule priority

Aware IM 8.8 User Guide
Copyright © 2002-2023 Awaresoft Pty Ltd Page 463 of 479
higher or lower than that of the other rules. For example, a final discount may need to be
applied to an insurance policy after all other calculations on the policy have been
completed.
Aware IM automatically sets different rule priority to certain actions. For example, if the
action of an object rule generates a document from a template, the rule priority is lower
to allow all attributes to be calculated before the document is created.
Rule table
Rule table is a rule editor allowing for editing several rules at the same time. It hides
certain elements of the rule language and presents the rule contents in a simple and
easy to understand fashion. It is especially useful for editing rules of similar nature, for
example a set of rules that determine where to forward an incoming e-mail based on the
contents of its address or the subject line.
Run time
Run time is another way of referring to the operation mode. When some event is said to
happen at run time it means the event takes place in the operation mode.
Scheduling
Scheduling is a feature of Aware IM allowing executing operations at a specified time. It
is useful for periodic processes that should run with certain regularity at the specified
time of the day. For example, overnight printing of letters to clients that have been
generated during the day, or daily checking of outstanding invoices and sending
reminder e-mails to customers.
Service
A service is a more formal and comprehensive way of communicating than a notification.
A party requesting a service from another party must first identify itself to the other party,
and can expect a meaningful reply back. For example, requesting an order status for a
given order number from an order management system.
Aware IM allows defining services for intelligent business objects and using these
services in a business space. For example, sending payment details to a payment
processing system for completion of the payment. Service discovery is a feature that
helps the configurator in defining services for objects communicating via a standard
channel.

Aware IM 8.8 User Guide
Copyright © 2002-2023 Awaresoft Pty Ltd Page 464 of 479
Since a business space is an intelligent business object, the configurator can define
services that the business space provides to other software systems via standard or
custom channels.
Service implementation
A service provided by a business space is implemented by a process in the business
space. When an outside service request is received into the business space the
implementing process is started.
Service input
Service input is one or more business objects containing information that the service
expects from the service requestor. If the service is defined in a business space the
service input objects are passed to the implementing process as the process input when
the service is requested in the operation mode.
Service reply
Service reply is a notification containing information that the service passes back to the
service requestor as the service result.
Shortcut attribute
Shortcut attribute allows displaying an attribute that belongs to a related business object
on a form for the object to which the shortcut attribute belongs. For example, an order
item form could display a name of the product for the item with a shortcut attribute that
uses an expression OrderItem.Product.Name, which is called shortcut path.
Sub-presentation
Sub-presentation is a presentation embedded into another presentation. It is used when
a presentation needs to show business objects other than those shown by the
presentation. For example, if a presentation showing details of one or several customers
should include orders and outstanding invoices for each customer, the orders and
invoices would be shown by separate sub-presentations embedded into the main
presentation for customers.
Sub-query
Sub-query is a part of a query that performs search on business objects other than those
of the main query. For example, in a query that searches for customers who placed

Aware IM 8.8 User Guide
Copyright © 2002-2023 Awaresoft Pty Ltd Page 465 of 479
more than one order within last month, the part checking the orders would be a sub-
query since the main query searches for customers.
Note that not all databases support sub-queries.
Sub-report
Sub-report is a report embedded into another report. It is used when a report needs to
show business objects other than those shown by the report. For example, if a report on
customers should also include orders and outstanding invoices for each customer, the
orders and invoices would be shown by separate sub-reports embedded into the main
report for customers.
Tag
A tag is placeholder used to indicate business object-specific information inside
document templates, presentations, reports and other elements containing text. When a
document is generated from a template in the operation mode, or a presentation is
displayed, the tag is replaced with actual data taken from business objects. For example
a template for a customer letter may start with a line that includes a tag:
Dear <<Customer.Name>>,
When a letter is generated for a customer in the operation mode the tag will be replaced
with the actual customer name.
Testing mode
Testing mode allows the configurator to try out a new version of a business space in the
operation mode without disrupting the normal operation of the application. When the
configurator moves a business space version under test, Aware IM creates a separate
test business space in the operation mode according to the configuration of the new
version. Nominated users can login into the testing mode of the business space to
perform necessary testing.
User Defined Processes (workflows)
User defined processes (or workflows) are processes that end users define for
themselves using the special module available in the Operation Mode. For more details
please watch this video tutorial.

Aware IM 8.8 User Guide
Copyright © 2002-2023 Awaresoft Pty Ltd Page 466 of 479
Validation rule
Aware IM considers rules with a certain pattern to be validation rules. Here is an
example of a validation rule:
If Customer.Name IS UNDEFINED Then REPORT ERROR 'Customer name
is empty'
Aware IM applies such rules when a user edits a business object on the object form and
does not accept changes if the entered data is invalid. Also, Aware IM automatically
generates validation rules to handle conditions the configurator may specify for object
attributes such as required attributes or range of values.
Visual perspective
Visual perspective determines what appears on screen when users access their
business space in the operation mode. It includes such layout elements as menu,
header and footer panels, font type and size, colors and other visual settings. A
configurator can define several visual perspectives within a business space for different
parts of the business space or to create a different interface for users with different
access levels.
While semantics
‘While semantics’ is an option for rules in unordered collections the configurator may use
in some rare circumstances to tell Aware IM that it should keep executing rule actions
while the rule conditions are satisfied. Normally Aware IM executes rule actions once,
and only executes them again if attributes mentioned in the rule change.
This is an advanced rule option and should be used with care since it may cause an
endless execution loop.
Appendix A. Aware IM Property Files
The following section explains the settings used in the Aware IM property files to
initialize various software components.
Aware IM uses the following property files (all are located in the BIN directory of the
Aware IM Installation):
1. BASServer.props – this property file is used by the Aware IM server
2. UIConfig.props – this property file is used by the Configuration Tool
3. webapp.props – this property file determines the properties of the Aware IM web
application

Aware IM 8.8 User Guide
Copyright © 2002-2023 Awaresoft Pty Ltd Page 467 of 479
Setting Properties of the Aware IM server
The following table lists and explains the property settings of the BASServer.props file
that are used to initialize the Aware IM Server:
Property
Comments
Database Settings
DatabaseComponent
Fully classified name of the component implementing the database
specific functionality:
1. com.bas.basserver.persistence.dbplugins.MySQLInterface – for
MySQL database
2. com.bas.basserver.persistence.dbplugins.CloudscapeInterface – for
IBM Cloudscape/Derby database
3. com.bas.basserver.persistence.dbplugins.MSSQLServerInterface –
for MS SQL Server / SQL Server Express databases
4. com.bas.basserver.persistence.dbplugins.OracleInterface – for Oracle
database
5. com.bas.basserver.persistence.dbplugins.MariaDBInterface – for
Maria DB
6. com.bas.basserver.persistence.dbplugins.PostgreSQLInterface – for
PostgreSQL
DatabaseName
Name of the database used in the regular (non-testing) mode
DatabaseNameTest
Name of the database used in the testing mode (see Testing Mode)
DriverClassName
Fully qualified name of the JBDC driver. Only relevant if data source is not
supported (see “Aware IM Installation Guide”)
DriverURL
URL used by the JDBC driver in the regular (non-testing mode). Only
relevant if data source is not supported (see “Aware IM Installation
Guide”)
DriverTestURL
URL used by the JDBC driver in the testing mode. Only relevant if data
source is not supported (see “Aware IM Installation Guide”)
DataSource
Name of the data source to be used when connecting to the database in
the regular (non testing) mode.
This property (and DataSourceTest) is mutually exclusive with
DriverClassName, DriverURL and DriverTestURL properties. Only one or
the others should be used
DataSourceTest
Name of the data source to be used when connecting to the database in
the testing mode.
This property (and DataSource) is mutually exclusive with
DriverClassName, DriverURL and DriverTestURL properties. Only one or
the others should be used
Java Settings
RequestQueue, ReplyTopic,
LocalQueue, LocalTopic,
NotificationInQueue,
NotificationOutTopic
Names of mandatory Java Messaging System (JMS) topics and queues
that the Aware IM Server requires. Three queues and three topics must
be defined (see also “Aware IM Installation Guide”)
JMSFactory
Name of mandatory JMS Factory
DirectoryService
Fully qualified name of the class that implements Java directory service
(JNDI). This property is mandatory
DirectoryServiceProvider
Optional URL of the directory service provide
Aware IM Plug-In’s

Aware IM 8.8 User Guide
Copyright © 2002-2023 Awaresoft Pty Ltd Page 468 of 479
DocumentEngines
A list of comma separated fully qualified names of the classes
implementing document types (see “Aware IM Programmer’s Reference”)
ChannelTypexxx
Properties starting with the ChannelType prefix identify the
communication channels (see Communication with Other Systems and
“Aware IM Programmer’s Reference”)
Clustering Settings
StartRange, EndRange, Hub
Reserved for future use
Other Settings
SystemPort
The port number that the Aware IM Server requires.
SessionTimeout
The value in milliseconds that determines the timeout of the idle session.
If no requests are made on behalf of the session to the Aware IM Server
within the specified time interval Aware IM logs out the session
UIProcessTimeout
The value in milliseconds that determines how long Aware IM will wait for
the User Interface operation to provide a reply before suspending the
current request (see “Rules and Transactions”).
MaxNmbOfRepeats
Determines how many iterations the Rule Engine allows before deciding
that the actions of the rules went into an infinite loop (assuming that the
action pattern repeating over and over again performs changes to the
system while it is executing). See also Evaluation of Unordered Rule
Collections.
MaxNmbOfRepeatsWithoutCh
ange
Determines how many iterations the Rule Engine allows before deciding
that the actions of the rules went into an infinite loop (assuming that the
action pattern repeating over and over again does not perform any
changes to the system while it is executing). See also Evaluation of
Unordered Rule Collections.
AwaresoftHost
DNS name of the server hosting Awaresoft Web Site. Relevant only for
online product registration – see Registering Software.
AwaresoftPort
Port number of the server hosting Awaresoft Web Site. Relevant only for
online product registration – see Registering Software.
PublicHolidays
A collection of days identifying public holidays in the country or state of
operation. This information is used by BUSINESS_DAY_FORWARD and
BUSINESS_DAY_BACK functions of the Rule Language (see “Aware IM
Rule Language Reference”). The days must be in the format
“dd/MM/yyyy” and must be separated by comma, for example:
25/12/2004,26/12/2004,… If this propery is not specified
BUSINESS_DAY_FORWARD and BUSINESS_DAY_BACK functions will only
consider weekends as non-working days.
Setting Properties of the Configuration Tool
The following table lists and explains the property settings of the UIConfig.props file that
are used to initialize the Configuration Tool:
Property
Comments
ModelFactories,
Commands
These are settings used by the system. Not to be changed.
HostServer
DNS name of the computer hosting the Aware IM Server
HostServerPort
Port number used by the Aware IM Server (see also
SystemPort setting in the BASServer.props file).

Aware IM 8.8 User Guide
Copyright © 2002-2023 Awaresoft Pty Ltd Page 469 of 479
WebServer
DNS name of the computer hosting the Web Server such
as Tomcat
WebServerPort
Port number used by the Web Server such as Tomcat.
OperationMode
The URL that will be used by the Configuration Tool to
login into the Operation mode – see Logging into the
Operation Mode.
Setting Properties of the Aware IM Web Application
The following table lists and explains the property settings of the webapp.props file that
are used to initialize Aware IM web application. These properties are mostly relevant if
the Aware IM Server and web server are running on the separate computers (see
“Aware IM Installation Guide”).
Property
Comments
ServerName
DNS name of the computer hosting the Aware IM
Server
ServerPort
Port number used by the Aware IM Server (see
also SystemPort setting in the BASServer.props
file).
SessionTimeout
The value in milliseconds that determines the
timeout of the idle session of the web server (such
as Tomcat). If no requests are made on behalf of
the session to the web server within the specified
time interval web server logs out the session
Appendix B. Known Bugs and Limitations
The following table lists all known problems and limitations of the Aware IM software and
suggests workarounds where possible:
Problem/Limitation Description
Workaround
1. Arithmetic operations with dates are not
supported in FIND action, for example
using the following will not work:
FIND Account WHERE
Account.Date=CURRENT_DATE-1
Use functions with dates (such as
DATE_ADD) instead of arithmetic
operations, for example:
FIND Account WHERE
Account.Date=
DATE_ADD(CURRENT_DATE,-1)
2. The following functions and expressions
are not supported if used in queries:
- WAS CHANGED
- WAS CHANGED TO
None

Aware IM 8.8 User Guide
Copyright © 2002-2023 Awaresoft Pty Ltd Page 470 of 479
- TYPE
- OLD_VALUE
3. The following functions are supported only
in Cloudscape/Derby database:
- WORD_NUMBER
- WORDS_FROM_LEFT
- WORDS_FROM_RIGHT
None
4. Printing of documents of HTML type from
rules is not supported
None
5. Printing of documents of MS Excel type
from rules is not supported under Linux and
Mac OS X operating systems
None
6. Documents of MS Word type are not
supported under Linux and Mac OS X
operating systems (MS Word XML format
can be used instead if browsers are
running on the Windows platform)
None
7. If the Aware IM Server is started when
either LAN or Internet connection is up and
then either LAN goes down or Internet is
disconnected, the server goes down too
Start the Aware IM Server within
the configuration that you intend to
work with. For example, if you only
use dial-up Internet connection
occasionally make sure that you
start the Aware IM Server first and
then connect to the Internet. This
way when you disconnect from the
Internet Aware IM will continue to
work properly.
8. If two business objects are related through
a parent/child relationship (see Reference
Attributes) and the reference attribute to a
child is defined as “Value must be
provided” it is impossible to add a new child
instance from a form of the parent instance
using Add New button (see Working with
References in the Operation Mode)
Do not force “Value must be
provided” flag for reference
attributes or create child instance
first and then add it to a parent
using Add button.
9. If you drag the bottom line of the Summary
pane in the Report/Presentation Designer
the height of the Summary band is not
changed even though it appears visually
that it is.
Change height of the Summary
band using Band Properties – see
Setting Band Properties
10. Sorting on reference attributes in a query
will not work if query searches business
object group. For example, sorting in the
following query will not work if Account is
Define a shortcut attribute and sort
by it, for example:
FIND Account ORDER BY
Account.OwnerName

Aware IM 8.8 User Guide
Copyright © 2002-2023 Awaresoft Pty Ltd Page 471 of 479
business object group:
FIND Account ORDER BY
Account.Owner.Name
Where OwnerName is the shortcut
to Account.Owner.Name
11. Checking for UNDEFINED value of a
multiple reference attribute (see Reference
Attributes) in queries does not work
correctly. For example, the following will
not work:
FIND Account WHERE
Account.Transactions IS UNDEFINED
Use EXISTS or COUNT
expressions, for example
FIND Account WHERE COUNT
Transaction WHERE
(Transaction IN
Account.Transactions) = 0
12. MIN, MAX and AVG expressions are not
supported if used in subqueries on groups.
For example the following query is not
supported if Transaction is a group:
FIND Account WHERE (COUNT Transaction
WHERE (MAX.Transaction.Amount = 1000))
Avoid using these expressions in
subqueries
13. Negated IN expression is not supported in
queries. For example, the following
expression is not supported:
FIND Event WHERE NOT(LoggedInMember
IN Event.Participants)
In many cases the negated IN
expression can be replaced by
using the equivalent COUNT or
EXISTS expression, for example:
FIND Event WHERE COUNT
Member WHERE(Member IN
Event.Participants AND
Member=LoggedInMember) = 0
14. IN expressions using complex identifier of
the reference list are not supported if used
in subqueries. For example, the following
query is not supported:
FIND Client WHERE (COUNT Account
WHERE (Account IN Client.Carrier.Accounts)
> 3)
Note that the following query is supported:
FIND Client WHERE (COUNT Account
WHERE (Account IN Client.Accounts) > 3)
Avoid using such constructs in
queries
15. Dragging bands in Report Designer to
change their height is not supported on
Mac OS X
Hold down Apple key and click on
the band’s header to bring up the
bands property dialog. Specify the
height of the band in the dialog

Aware IM 8.8 User Guide
Copyright © 2002-2023 Awaresoft Pty Ltd Page 472 of 479
Appendix C. Number Format in Java Programming
Language
The following section describes the format of the number used in the Java Programming
Language. This format can be used for attributes of Number type – see Setting
Properties of Number Attributes.
The string representing the number format has the following form:
positive-pattern[;negative-pattern]
If the negative pattern is omitted, negative numbers are formatted using the positive
pattern with a “-“ character prepended to the result. Each pattern has the following form:
[prefix]integer[.fraction][suffix]
The following symbols are significant in the pattern string.
Symbol
Description
0
A digit
#
A digit where 0 is not shown
.
A placeholder for a decimal separator
,
A placeholder for a grouping separator
;
The format separator
-
The default negative prefix
%
Multiplies value by 100 and shows as a percentage
Any characters other than these special characters can appear in the prefix or the suffix.
A single quote can be used to escape a special character, if you need to use one of
these symbols in a prefix or a suffix.
For example, the pattern string for U.S. currency values is:
$#,##0.00;($#,##0.00)
This indicates that a $ character is prepended to all formatted values. The grouping
separator character , is inserted every three digits. Exactly two digits after the decimal
place are always shown. Negative values are shown in parentheses. Thus, the value -
1234.56 produces output like:
($1,234.56)

Aware IM 8.8 User Guide
Copyright © 2002-2023 Awaresoft Pty Ltd Page 473 of 479
Appendix D. Links to Aware IM operations
The following section lists the links to Aware IM operations that can be invoked from the
hyperlinks of HTML pages included either in a visual perspective, custom menu or
custom forms. All links have to call a particular JavaScript function supported by Aware
IM in a special object called AwareApp, so the general format of a link is as follows:
<a href=”#” onclick=”AwareApp.functionName(parameters)” >Name of
the link</a>
Many of these functions use “renderOption” parameter. This parameter indicates
where the output of the function will be directed. Possible values are:
‘main’
Output will be displayed in the main page replacing the current contents
‘new_tab’
Output will be displayed in a new closable tab
‘popup’
Output will be displayed in a popup window
Javascript object that defines properties of a modeless
window
Output will be displayed in a modeless window. The object describing properties of a
modeless window can have the following properties:
o ‘modeless’ (Boolean - must be defined and set to true)
o ‘centered’ (Boolean - if defined the window will be centered on the
screen)
o ‘position’ – an object with two properties (‘left’ and ‘top’) that
define where the window will appear (if centered=false)
Example: { modeless: true, position: { top: 100, left: 50 }}
AwareApp.getPanelId(frameType, tabName, panelName)
Use this function to send the output of the operation to the specified panel of the
specified tab in the specified frame, for example:
AwareApp.getPanelId (‘main’, ‘MyTab’, ‘MyPanel’)
#HTMLElementId
If renderOption is a string that starts with the “#” symbol, the string after this symbol
indicates a unique id of an HTML element where the output will be directed. The
element can be anywhere on the screen. For example, if you have this placeholder
element somewhere <div id=”my_id”></div> and you specfy renderOption as #my_id,
the output of the operation will be displayed inside the placeholder element.
All supported JavaScript functions are presented in the table below:
Function
Example
Comments
startProcess
(processName,
AwareApp.startProcess
(‘MyProcess’, ‘main’)
Start the process with
the specified name

Aware IM 8.8 User Guide
Copyright © 2002-2023 Awaresoft Pty Ltd Page 474 of 479
renderOption)
startProcess2(proces
sName,
ctxObjectName,
ctxObjectId,
renderOption)
AwareApp.startProcess2
(‘MyProcess’,’MyObject
’,256,’main’)
Start the process with
the specified name and
provide the specified
object as a context
startProcessWithInit
(processName,renderO
ption,initObjName,
initObjParams,proces
sContext)
AwareApp.startProcessW
ithInit(‘MyProcess’,’m
ain’,’MyObject’,’Attr1
=Value1@Attr2=Value2@…
”
Create an object with the
specified initialisation
values and start a
process that uses the
created object as input.
Initialisation values
must be either a string
in the form
Attr1=Value1@Attr2=Value2
@” etc where Attr1,Attr2
are attribute names in
the object or it should
be a JSON object with
attribute values hashed
by attribute names. If
this function is used as
firstCommand (see
firstCommand)
initialisation values
will be appended
automatically from the
remaining URL parameters,
for example:
http://localhost:8080/Awa
reIM/logonOp.aw?domain=BS
&firstCommand=startProces
sWithInit,MyProcess,main,
MyObject&Attr1=Value1&Att
r2=Value2…
startProcessFromForm
(processName,
renderOption,
htmlElem, saveFlag)
AwareApp.startProcessF
romForm (‘MyProcess’,
‘main’, this, true)
Usually used from a
custom HTML element on an
object form (button or
hyperlink). HtmlElem
parameter indicates this
element. If saveFlag is
true will save the form
before starting a
process. The saved object
will be used as a
parameter to the process
runQuery(queryName,
renderOption)
AwareApp.runQuery (‘My
query’, ‘main’)
Run the query with the
specified name
runQueryWithParams
(queryName, params,
renderOption)
AwareApp.runQueryWithP
arams (‘My query’,
params, ‘main’)
Run the query that
requires user input.
Provide the input values

Aware IM 8.8 User Guide
Copyright © 2002-2023 Awaresoft Pty Ltd Page 475 of 479
entered by the user in
the params hashtable
hashed by query parameter
name
newObject
(objectName,
renderOption)
AwareApp.newObject(‘My
Object’, ‘main’)
Display a form to create
a new object with the
specified name
getObjectData(object
Name, objectId,
callbackFunction)
AwareApp.getObjectData
(context[0].objectName
,context[0].objectId,
function (objData) {
alert(objData["Code"]}
);
Asks the server to
provide attribute values
for the specified
instance of the
object(objectName and
objectId). The callback
function receives objData
parameter that contains
returned attribute
values).
createOrUpdateObject
(objectName,
objectId,
objectData,callbackF
unction
AwareApp.createOrUpdat
eObject (
"A",
null,
{ Txt: "abc", Nmb: 3
},
function (objectId,
objectVersion) {
alert ('Created' +
objectId + " " +
objectVersion);
});
Calls the server to
create or update the
instance of the object
with the specified data.
The data is a JSON object
with attribute names and
values. The callback will
receive the id and
version of the object. If
objectId is null a new
instance will be created,
otherwise an existing one
will be updated.
saveForm (htmlElem)
AwareApp.saveForm
(this)
Saves the current form.
This can be used by
custom buttons to perform
save operation instead of
the standard buttons.
htmlElem defines an
element on the form that
performs the operation
(button or hyperlink)
recalculateObject
(htmlElem)
AwareApp.recalculateOb
ject(this)
Similar to saveForm.
However, if the form was
displayed by a process,
the process will continue
displaying the form after
the form has been saved.
recalculateObject2(h
tmlElem) – shortcut
key on forms is F8
AwareApp.recalculateOb
ject2(this)
Causes execution of rules
of the object being
edited or created using
the values currently
entered on the form.

Aware IM 8.8 User Guide
Copyright © 2002-2023 Awaresoft Pty Ltd Page 476 of 479
Displays recalculated
values on the form
runDocument(docName)
AwareApp.runDocument
(‘My document
template’)
Run the document template
with the specified name.
The result is displayed
in a new window
userDetails
(renderOption)
AwareApp.userDetails (
‘main’)
Display a form with the
details of the currently
logged in user
newUser(objectName,
renderOption)
AwareApp.newUser
(‘MyUser’, ‘main’)
Display a new user
registration form for the
user object with the
specified name
showPerspective
(perspective)
AwareApp.showPerspecti
ve (‘MyPerspective’)
Display the specified
perspective
systemSettings
(renderOption)
AwareApp.systemSetting
s (‘main’)
Display the form of the
SystemSettings object
logout(logoutPage)
AwareApp.logout (null)
Logout from Aware IM.
Optionally provide the
URL of the logout page
Appendix E. Regular Expressions.
Summary of regular-expression constructs
Construct
Matches
Characters
X
The character x
\\
The backslash character
\0n
The character with octal value 0n (0 <= n <= 7)
\0nn
The character with octal value 0nn (0 <= n <= 7)
\0mnn
The character with octal value 0mnn (0 <= m <= 3, 0 <= n <= 7)
\xhh
The character with hexadecimal value 0xhh
\uhhhh
The character with hexadecimal value 0xhhhh
\t
The tab character ('\u0009')
\n
The newline (line feed) character ('\u000A')
\r
The carriage-return character ('\u000D')
\f
The form-feed character ('\u000C')
\a
The alert (bell) character ('\u0007')
\e
The escape character ('\u001B')
\cx
The control character corresponding to x

Aware IM 8.8 User Guide
Copyright © 2002-2023 Awaresoft Pty Ltd Page 477 of 479
Character classes
[abc]
a, b, or c (simple class)
[^abc]
Any character except a, b, or c (negation)
[a-zA-Z]
a through z or A through Z, inclusive (range)
[a-d[m-p]]
a through d, or m through p: [a-dm-p] (union)
[a-z&&[def]]
d, e, or f (intersection)
[a-z&&[^bc]]
a through z, except for b and c: [ad-z] (subtraction)
[a-z&&[^m-p]]
a through z, and not m through p: [a-lq-z](subtraction)
Predefined character classes
.
Any character (may or may not match line terminators)
\d
A digit: [0-9]
\D
A non-digit: [^0-9]
\s
A whitespace character: [ \t\n\x0B\f\r]
\S
A non-whitespace character: [^\s]
\w
A word character: [a-zA-Z_0-9]
\W
A non-word character: [^\w]
POSIX character classes (US-ASCII only)
\p{Lower}
A lower-case alphabetic character: [a-z]
\p{Upper}
An upper-case alphabetic character:[A-Z]
\p{ASCII}
All ASCII:[\x00-\x7F]
\p{Alpha}
An alphabetic character:[\p{Lower}\p{Upper}]
\p{Digit}
A decimal digit: [0-9]
\p{Alnum}
An alphanumeric character:[\p{Alpha}\p{Digit}]
\p{Punct}
Punctuation: One of !"#$%&'()*+,-./:;<=>?@[\]^_`{|}~
\p{Graph}
A visible character: [\p{Alnum}\p{Punct}]
\p{Print}
A printable character: [\p{Graph}]
\p{Blank}
A space or a tab: [ \t]
\p{Cntrl}
A control character: [\x00-\x1F\x7F]
\p{XDigit}
A hexadecimal digit: [0-9a-fA-F]
\p{Space}
A whitespace character: [ \t\n\x0B\f\r]
Classes for Unicode blocks and categories
\p{InGreek}
A character in the Greek block (simple block)
\p{Lu}
An uppercase letter (simple category)
\p{Sc}
A currency symbol
\P{InGreek}
Any character except one in the Greek block (negation)

Aware IM 8.8 User Guide
Copyright © 2002-2023 Awaresoft Pty Ltd Page 478 of 479
[\p{L}&&[^\p{Lu}]]
Any letter except an uppercase letter (subtraction)
Boundary matchers
^
The beginning of a line
$
The end of a line
\b
A word boundary
\B
A non-word boundary
\A
The beginning of the input
\G
The end of the previous match
\Z
The end of the input but for the final terminator, if any
\z
The end of the input
Greedy quantifiers
X?
X, once or not at all
X*
X, zero or more times
X+
X, one or more times
X{n}
X, exactly n times
X{n,}
X, at least n times
X{n,m}
X, at least n but not more than m times
Reluctant quantifiers
X??
X, once or not at all
X*?
X, zero or more times
X+?
X, one or more times
X{n}?
X, exactly n times
X{n,}?
X, at least n times
X{n,m}?
X, at least n but not more than m times
Possessive quantifiers
X?+
X, once or not at all
X*+
X, zero or more times
X++
X, one or more times
X{n}+
X, exactly n times
X{n,}+
X, at least n times
X{n,m}+
X, at least n but not more than m times
Logical operators
XY
X followed by Y
X|Y
Either X or Y

Aware IM 8.8 User Guide
Copyright © 2002-2023 Awaresoft Pty Ltd Page 479 of 479
(X)
X, as a capturing group
Back references
\n
Whatever the n
th
capturing group matched
Quotation
\
Nothing, but quotes the following character
\Q
Nothing, but quotes all characters until \E
\E
Nothing, but ends quoting started by \Q
Special constructs (non-capturing)
(?:X)
X, as a non-capturing group
(?idmsux-idmsux)
Nothing, but turns match flags on - off
(?idmsux-idmsux:X)
X, as a non-capturing group with the given flags on - off
(?=X)
X, via zero-width positive lookahead
(?!X)
X, via zero-width negative lookahead
(?<=X)
X, via zero-width positive lookbehind
(?<!X)
X, via zero-width negative lookbehind
(?>X)
X, as an independent, non-capturing group
