
TrueCommerce, Inc.
(724) 940-5520
210 West Kensinger Drive, Suite 100, Cranberry Township, PA 16066 USA
www.TrueCommerce.com
© Copyright 2012-2020 TrueCommerce, Inc. All Rights Reserved. Reproduction and distribution under license only.
This document and the software it describes are confidential and proprietary information of TrueCommerce and its
affiliated entities and are copyrighted properties of TrueCommerce with all rights reserved. Information contained
herein is subject to change at any time at the sole discretion of TrueCommerce. Neither this information nor the
software may be copied in whole or in part without the prior written consent of TrueCommerce.
This documentation and the related software programs are “commercial computer software” and “commercial
computer software documentation” pursuant to DFAR Section 227.7202 and FAR Section 12.212 (and any successor
sections). Use of this documentation or the related software programs, including reproduction and display of them, by
the United States of America and/or any of its instrumentalities, regardless of form, (collectively, the “Government”), is
allowed only as governed by terms of a valid license agreement with TrueCommerce or one of its affiliated
companies. Under no circumstances shall TrueCommerce be obligated to comply with any Government requirements
regarding cost or pricing data or cost accounting requirements. If any Government requirement might apply, you must
notify TrueCommerce of the Government requirement and obtain a waiver or exemption for the benefit of
TrueCommerce before you may use this documentation or the related software programs.
TrueCommerce® is a trademark of TrueCommerce Software Inc. All other marks are the property of their respective owners.

TrueCommerce Pulse User Guide iii
Contents
Introduction .............................................................................................................................. 5
About this User Guide ............................................................................................................................... 5
Additional Documentation ......................................................................................................................... 6
Navigating this PDF .................................................................................................................................. 6
Before you Begin ..................................................................................................................... 7
Responsive Design ................................................................................................................................... 7
Logging In / Logging Out .......................................................................................................................... 8
About the User Interface ........................................................................................................................... 9
Common Functionality .......................................................................................................................... 9
Working with Grid Data ....................................................................................................................... 10
Search Panel ...................................................................................................................................... 12
Spaces Menu ...................................................................................................................................... 14
Translation Options ................................................................................................................................. 14
Online Help ............................................................................................................................................. 15
Pulse Overview ...................................................................................................................... 16
Navigating Pulse ................................................................................................................................. 16
KPIs .................................................................................................................................................... 16
What are Dashboards? ........................................................................................................................... 16
What are Pivots? .................................................................................................................................... 17
What are Spreadsheets? ........................................................................................................................ 17
Dashboards ............................................................................................................................ 18
Dashboards Start Page .......................................................................................................................... 18
View Mode .......................................................................................................................................... 19
Edit Mode............................................................................................................................................ 19
Open a Dashboard ................................................................................................................................. 20
Create a Dashboard ............................................................................................................................... 20
Dashboard Action Bar ............................................................................................................................. 21
View Mode .......................................................................................................................................... 21
Edit Mode............................................................................................................................................ 22
Add KPIs to the Dashboard .................................................................................................................... 22
KPI Settings ........................................................................................................................................ 22
Customizing Dashboards........................................................................................................................ 28
KPI Panel Properties .......................................................................................................................... 29
Display Options .................................................................................................................................. 30
Marquee.............................................................................................................................................. 36
Print/Export Options ................................................................................................................................ 40
Print .................................................................................................................................................... 40
Export as an Image ............................................................................................................................ 40
Export to Excel ................................................................................................................................... 41
Pivots ...................................................................................................................................... 43

Contents
TrueCommerce Pulse User Guide iv
Pivots Start Page .................................................................................................................................... 43
View Mode .......................................................................................................................................... 44
Edit Mode............................................................................................................................................ 44
Open a Pivot ........................................................................................................................................... 45
Create a Pivot ......................................................................................................................................... 45
Pivot Settings ...................................................................................................................................... 45
Pivot Action Bar ...................................................................................................................................... 47
Pivot Grid ................................................................................................................................................ 47
Pivot Fields ......................................................................................................................................... 48
Field Hierarchy ................................................................................................................................... 48
Pivot Chart .............................................................................................................................................. 49
Pivot Data ............................................................................................................................................... 50
Calculated Fields .................................................................................................................................... 50
Creating a Calculated Field ................................................................................................................ 50
Changing or Deleting a Calculated Field ............................................................................................ 52
Field Chooser ......................................................................................................................................... 52
Filter .................................................................................................................................................... 53
Rows ................................................................................................................................................... 53
Columns.............................................................................................................................................. 53
Data .................................................................................................................................................... 54
Export Options ........................................................................................................................................ 55
Spreadsheets ......................................................................................................................... 56
Spreadsheets Start Page........................................................................................................................ 56
View Mode .......................................................................................................................................... 57
Edit Mode............................................................................................................................................ 57
Open a Spreadsheet ............................................................................................................................... 58
Create a Spreadsheet ............................................................................................................................. 58
Spreadsheet Settings ......................................................................................................................... 58
Spreadsheet Action Bar .......................................................................................................................... 59
Worksheets ............................................................................................................................................. 60
Implementation Notes ......................................................................................................................... 60
Worksheet Tools ................................................................................................................................. 61
Columns and Rows ............................................................................................................................ 66
Formatting........................................................................................................................................... 67
Sorting and Filtering ........................................................................................................................... 70
Data Validation ................................................................................................................................... 74
Formulas and Functions ..................................................................................................................... 79
File Management .................................................................................................................................... 86
Import from Excel ............................................................................................................................... 87
Export to Excel ................................................................................................................................... 87
Export to PDF ..................................................................................................................................... 88

TrueCommerce Pulse User Guide 5
Introduction
TrueCommerce Pulse is a supply chain intelligence solution that integrates data from different sources to
produce consolidated enterprise-level portraits of your business operations.
It leverages graphical dashboard technology along with interactive pivots and spreadsheets to help you
visualize, aggregate, and analyze Key Performance Indicators (KPIs) from incoming and historical data.
KPIs enable you to monitor and zero-in on more sensitive business metrics that may require your
immediate attention. To get started using Pulse refer to the Pulse Overview on page 16.
About this User Guide
The Pulse User Guide provides visibility into Key Performance Indicators (KPIs) using interactive
dashboard, pivots and spreadsheets. It is primarily intended for end users who need to learn about and
apply these built-in tools to manipulate and organize KPI data into useful, graphical, ad hoc reports.
Implementation Consultants (ICs), installers, and system administrators should also go over this material
to become familiar with basic concepts and functionality of Pulse prior to referencing the ‘Pulse
Administrator Guide.’
The content provided in this guide does not cover full details for the integration of Pulse with another
application. Consult that product’s user documentation for instructions specific to your implementation. In
addition, depending on your role as user, you may not have access to all of the functionality described.
Contact your system administrator to ensure you have the permission settings to perform your work.
NOTE
Applications that run in TrueCommerce Foundry are optimized for use on multiple devices. For
example, in this documentation ‘click’ may refer to the same action as ‘tap’ or ‘touch’ whether your
device is equipped with a track pad, touch screen, or mouse-operated user interface

Introduction
TrueCommerce Pulse User Guide 6
Additional Documentation
TrueCommerce Foundry is a responsive workspace environment that serves as principal login and user
interface for the deployment of multiple integrated applications. For information about the features that are
common to all the TrueCommerce applications, click the button to access Online Help.
The Key Performance Indicators (KPIs) used in Pulse come from outside sources. If required, you may
need to consult the documentation associated with the applications or databases from which those
metrics are derived.
Administrative users should refer to the ‘TrueCommerce Pulse Administrator Guide’ for documentation on
managing user accounts, designing custom KPIs, creating filters for contextual dashboards, and building
new interactive pivots.
Navigating this PDF
This PDF is designed for onscreen viewing with built-in search and navigation capabilities. Use Adobe
Acrobat® Reader to take full advantage of the following interactive features:
Bookmarks
The bookmarks panel is a clickable table of contents that is available to you anywhere in the document.
Click the button on the left side of the page to activate the bookmarks panel.
Cross-References / Hyperlinks
Blue hyperlinks appear in the text wherever one topic references another. They also appear in generated
lists, such as in the table of contents. Use the Alt + Left Arrow shortcut in Acrobat Reader to jump back
to previous hyperlinks.
.

TrueCommerce Pulse User Guide 7
Before you Begin
Pulse runs in TrueCommerce Foundry. This section explains features of the Foundry platform and user
interface that are common to all TrueCommerce applications.
Responsive Design
Applications that run in Foundry are optimized for multiple screen sizes via mobile phone, tablet, or desktop.
The layout may be adjusted, where practical, based on the size and capabilities of the device. For
example, on a phone, you may see content in a single column view; a tablet might show the same
content in two columns. This also changes when devices are rotated to landscape mode.
NOTE
In this documentation, ‘click’ refers to the same action as ‘tap’ or ‘touch’ whether your device is
equipped with trackpad, touch screen, or mouse-operated user interface.

Before you Begin
TrueCommerce Pulse User Guide 8
Logging In / Logging Out
In order to access Pulse, you must first launch TrueCommerce Foundry in your browser via the common
Sign In prompt. You need to be an authorized user to log into Foundry. Consult your system
administrator to obtain the necessary domain information and user credentials.
Your user profile should already be set up with
authorizations for application and data access, as well as
any Translation Options that may be available for your role.
Most users only need to enter their User Name and
Password via the basic Sign In prompt, as depicted on the
left. If other credentials are required for your tenant, click
Advanced View for an expanded list of login options.
Once you have entered all your login details, click the
Login button to launch Foundry.
When Foundry displays, it will contain all the applications to
which you have access. If application components are
missing from the menu, contact your system administrator
to ensure the correct authorizations are in place.
Save all changes to your work before attempting to close a
Foundry session. You should also check for unfinished
work the application pages that remain open in the Spaces
Menu, explained on page 14.
To log out of Foundry, click on your user name in the
header bar and select Logout from the drop-down
menu.
You are prompted to confirm that you intend to close all
application pages that are currently open in Foundry.

Before you Begin
TrueCommerce Pulse User Guide 9
About the User Interface
After successful logon, TrueCommerce Foundry displays in your browser. This is the common platform
and user interface for all your TrueCommerce applications and task pages.
Common Functionality
The layout and controls you see on each task page are dependent on the application; however, the
overall navigation and display functionality will be the same no matter which application is running in the
platform. Key features of the user interface include:
The Foundry navigation control opens the main Menu for access to your applications.
Each menu link opens to a different task page under the selected application.
A symbol to the right of a menu link indicates a drop-down menu to more links.
You can only work on one task page at a time in the Foundry workspace, but active pages may be
saved to the background while you work on other pages.
Click the button next to the menu link to save a page to the background. Use the Spaces Menu to
retrieve previously opened pages.
You can also set up Favorites and quick links in the navigation panel for quick access to the
pages you work with the most.
The action bar contains all your application-specific buttons and controls.
The and symbols on the action bar indicate a drop-down menu to more controls.
If you need more room to work in a task page, use the toggle to hide the navigation panel and
page header from the Foundry workspace.
To search, filter and organize what you see on a task page, click the button. This invokes the
Search Panel, described on page 12.
Depending on the application, you may be Working with Grid Data to find the information you need.
Event-trigged notifications are signaled by the on-screen control. Application-specific notifications
may appear as ‘toast messages’ at the bottom of your screen.
To read more about Foundry, click the button to invoke the Online Help menu.
Navigation Panel
Action Bar
Workspace
Task Page
Online Help
Navigation Controls
Search Panel

Before you Begin
TrueCommerce Pulse User Guide 10
Working with Grid Data
Some applications use the grid format for displaying, creating and editing data on the page. Foundry’s
interactive grids include several useful controls to help you find and organize your data quickly so that
your most important information is always visible and easily accessible.
Basic Navigation
The grid offers full navigational mobility to scroll through records vertically and view data horizontally
using the standard mechanisms available to your user interface or device. Use the following controls on
the pagination bar at the bottom of the grid to select pages and change page size.
You can customize the grid to show more records (which requires horizontal scrolling to view) or break them
up into smaller pages (which requires pagination controls to view). Page size can be set to any number of
records; however, reducing the number of records per page might be faster for reloading records when
refreshing the grid. You can decide which page size is right for the best system performance.
Filtering provides another powerful way for you to organize the number of records displayed. For more
information, see Search Panel on page 12.
Customizing Columns
Following are some quick methods for customizing the display of columns and the data elements within a
selected column to suit your preferences.
Rearrange Columns
To rearrange, simply click and hold a column heading and
then drag and drop the entire column to a different place
horizontally on the grid.
Sort Records by Column
Tiny up/down arrows to the right of a column heading indicate that a sort can be applied to the column
selected. Click once on the column heading to sort all records in the grid based on the contents of that
column. Click again to toggle between ascending and descending sort order.
Pagination controls
Set number of records displayed on the page
Total records
Refresh
Both tiny arrows indicate column can be sorted
No arrows indicate column cannot be sorted
Tiny up arrow indicates ascending order

Before you Begin
TrueCommerce Pulse User Guide 11
Show / Hide Columns
There is a simple way to hide (or show) columns on the grid. Click any symbol between the column
headings and then click Columns from the dropdown options. This opens the master columns list for
displaying columns on the grid. Only the columns selected on the master list will be displayed on the grid.
Column Filter
If hundreds (possibly thousands) of records are loaded into your grid, it might be difficult (and slow) to
scroll through all the data. Setting a column filter, allows you to focus only on the record(s) you need by
hiding everything else on the grid. Click any symbol between the column headings and then click
Filter from the dropdown options. This invokes the menu for applying a quick filter based on that column.
There are several different rules available for defining how values are interpreted and used in the filter
statement “Show items with value that”.
To set a column filter, complete the statement by selecting the rules and search criteria in the menu:
The filter is based on two sets of rules and column values (data elements) which together complete
the filtering statement. You can complete the statement using just one or a combination of both.
There will be different rules available from the drop-down field depending on if the column contains
alphanumeric, numeric or date values. These rules are generally self-explanatory.
Column values can be from any records on the grid, not just what is currently displayed on the page.
Once your criteria is in place, click the Filter button to apply the filter.
To reset the column filter, click the Clear button.
Column filtering can be applied on its own or in addition to the Search Panel.
Click to show / hide a column
Dropdown options
Master columns list
Complete the statement …
Filter Rule
Column Value

Before you Begin
TrueCommerce Pulse User Guide 12
Saving Grid Settings
Lock in your grid settings by clicking Save Configuration via menu dropdown on the grid control bar.
Use Reset Configuration to restore the grid to default settings.
Selecting Records
Simply double-click on a record to make it editable. To select a range of records, highlight the first record,
hold down the Shift key, and then click on the last record. To select multiple (but not consecutive)
records, hold down the Ctrl key while clicking on the individual records you want to include. Note that
these selection and editing options could be disabled for certain grids.
Export
Grids may include functionality that allows you to export and download their contents to an XLSX file. You
can choose to export all available data, or filter the grid via the Search Panel.
To export grid data, select the Export menu option. Depending on your browser settings, the exported
file may be downloaded immediately or you may be presented with other save options.
Search Panel
To help manage large amounts of data, some applications may be equipped with a collapsible search
panel that allows you to customize which data you want displayed on the task page based on specified
values and rules.
This feature (also known as filtering) is an effective way to find something quickly, reduce the number of
records displayed, and to organize your data into logical groupings and workflow. After you set up your
search criteria, you have the option to save those settings for reuse whenever you need them.
If your page includes this feature, use the control on the workspace action bar to expand/collapse the
search panel on the right side of the workspace.
Saved Search Sets dropdown
Search options: Search, New Search, Save, and Delete
Rules list dropdown
Value entry box
Field name and current rule

Before you Begin
TrueCommerce Pulse User Guide 13
The panel comprises a menu of search fields that match searchable information in the application’s
workspace. The types of values that can be entered in a search field depend on the values defined in the
application; either alphanumeric, numeric or date values.
Performing a Search
Following are the steps for defining search criteria using one or more search fields:
1. Determine which data you wish to search, and then locate the matching fields
in the search panel.
2. Use the value entry box below the field name to enter your search criteria
based on field type. Some fields have preset values where you must select
from dropdown options instead.
3. If needed, click the button next to the search field to apply rules (as shown
on the right). The options available in the rules drop-down list depend on if
the data elements are alpha-numeric, numeric or date values.
4. Click the option inside the search panel to start the search using the
current settings.
For most searches, it is enough to enter your search criteria in a single field. However, you have the
option to use multiple fields to refine your search settings; for example, depending on the data, you might
enter a combination of names with dates or locations.
Starting a New Search
For best results, remember to use the option to clear all settings before you start a new search. If you do not
reset your data using this option, any new search criteria will be applied in addition to the previous search.
Using Saved Search Settings
To record the current settings for future use, click the option. When the Select a Name dialog appears,
enter a name for your saved search and click OK.
To reuse settings, select a named search from your list of Saved Search Sets. This populates search fields
with previously recorded values so that you can locate or filter your data the same way every time.

Before you Begin
TrueCommerce Pulse User Guide 14
Spaces Menu
Use the Spaces menu for quick access to previously-opened
dashboards, pivots and spreadsheets.
Pulse adds new spaces (active pages) for every task page you
open via the Menu and maintains them in a ‘ready state’
throughout your Foundry session. This includes the start pages
for Dashboards, Pivots, and Spreadsheets.
When you select a Pulse-related link from the menu, the
associated page resumes work at the same place where you left
off. For example, a dashboard that was set to Marquee mode
before it was added to the Spaces menu will resume the
marquee rotation as soon as it opens in the workspace.
To remove any extra or unwanted pages from the Spaces
menu, click the button to the right of the selected link.
See favorites and quick links in Foundry’s Online Help for other
handy navigation tricks.
Translation Options
If your system supports translation options, you will be able to switch
Foundry to a different language via the dropdown field on the Sign In
prompt (Logging In / Logging Out, page 8).
In addition, application components may allow you to assign
translations to user-defined names, titles, or labels. Click the Show
Translation button next to input boxes in settings.
Translation options display below the input box, as illustrated below.
Enter your default text, select the default language, and then click the Translate button for any of the
languages where translations are required. Translations (for default text and language) display next to
each language selected. Note that your translated text can be edited manually as well.
Once you are satisfied with the translations in each language, click Hide Translation to collapse
translation options. The translations entered here will display for that name, title or label for that
application component whenever the corresponding language is chosen at the Foundry Sign In prompt.
Default Text
Default Language
Translated Text

Before you Begin
TrueCommerce Pulse User Guide 15
Online Help
For help online within your Foundry session, click the button on the header bar and then select
Documentation > Foundry User Interface in the drop-down menu.
A variety of documentation and training options are available depending on your implementation and the
TrueCommerce applications licensed under your tenant ID, including:
Guided Tutorials - walk you through the actual steps, showing
where to click or type, as you perform live tasks in Foundry and
within your applications.
University - opens the official TrueCommerce training site in a
new browser tab.
Support Center - displays recent support notifications and
instructions on how to contact TrueCommerce Support.
Documentation - invokes a drop-down menu with links to
Foundry Help and any other documentation that was provided with
your applications.
About - launches the About dialog showing version
information about the applications running under your tenant in
Foundry.

TrueCommerce Pulse User Guide 16
Pulse Overview
Pulse comprises a variety of display tools for visualizing, monitoring, analyzing and evaluating your
historical and real time KPI data. Each of these tools may be used to render your data in a variety of
informative layouts, as outlined in the sections that follow.
Navigating Pulse
Dashboard, Pivot and Spreadsheet start pages (thumbnail pages) are launched via the Pulse menu on
the menu bar. When you select a specific thumbnail from a start page, the resulting dashboard, pivot,
or spreadsheet will be the only page open in the Foundry workspace.
You can only work on one page at a time. However, the pages you open in Pulse automatically create links
in the Spaces Menu. Therefore, when you switch to working in a new page, you can always navigate back to
previous pages using the links in this menu. Pulse-related links remain active until you select Close to
remove them.
TIP
Use links in the Spaces Menu to keep multiple pages open (in a ready state) for quick access to the
dashboards, pivots, or spreadsheets you work with the most.
KPIs
The contents of a Pulse dashboard, pivot view, or spreadsheet is derived from Key Performance
Indicators (KPIs), pieces of query logic that tap into your data for measuring operational performance
over a period of time. Contact your system administrator to learn more about the KPIs that may be
applicable to your company and your business objectives.
What are Dashboards?
Pulse Dashboards contain one or many active KPIs rendered in chart, gauge, grid, or map formats. This
functionality allows you to design how each KPI will convey the data retrieved. The dashboard below
contains information from different KPI sources using a variety of graphics.
For complete details, see Dashboards on page 18.

Pulse Overview
TrueCommerce Pulse User Guide 17
What are Pivots?
Pulse Pivots provide KPI renderings similar to dashboards, but each pivot comes with a set of controls
that allow users to manipulate data elements and change the display ‘on the fly’. Following are renditions
of KPI source data that has been changed into different formats and redisplayed instantly using controls
within the same active pivot.
For complete details, see Pivots on page 43.
What are Spreadsheets?
Pulse Spreadsheets provide the means for you to access KPI data in a fully functional Excel style
spreadsheet. This feature provides all the tools you need for preparing spreadsheet-style reports from
your query results before you share them in other file formats outside of Pulse.
For complete details, see Spreadsheets on page 56.

TrueCommerce Pulse User Guide 18
Dashboards
A dashboard displays a collection of one or more KPIs. You can retrieve prebuilt dashboards via the
Dashboards Start Page; as well, you can make copies or build new dashboards comprising any number
of KPIs. Depending on the source, each KPI in a dashboard may be set up to render data in the form of a
chart, gauge, graph, grid, or map.
The following sections describe how to view, create, modify, print and export the contents of a dashboard:
Dashboards Start Page, below
Open a Dashboard, page 20
Create a Dashboard, page 20
Add KPIs to the Dashboard, page 22
Customizing Dashboards, page 28
Print/Export Options, page 33
For documentation specific to the other application components in Pulse, see Pivots on page 43, and
Spreadsheets on page 56.
Dashboards Start Page
Pulse Dashboards start with a page listing all the private or shared
dashboards to which you have access under your tenant.
To launch the start page, click Pulse > Dashboards via the Foundry
Menu. If you visited the start page previously at any time during
your current Foundry session, you can also find the Dashboards link
in the Spaces menu.
The start page opens in the Foundry workspace under the
Dashboards page header. Dashboards can be organized as
Favorites, Private, and Shared, as illustrated in the example below.

Dashboards
TrueCommerce Pulse User Guide 19
The Dashboards start page opens to a page of thumbnail cards, each of which can be used to Open a
Dashboard for display and editing. From the start page, you can also create, edit, remove, and share
selected dashboards. Different start page functionality is available depending on if you are in View or
Edit mode. (For dashboard specific options refer to the Dashboard Action Bar, page 21.)
View Mode
If the Mode control on the start page is switched to View, you can Open a Dashboard, as well as set
the Marquee control on the workspace action bar to activate a multi-dashboard Marquee slide show.
Edit Mode
Start Page Edit Mode. If the Mode control on the start page is switched to Edit, this gives you access
to Add Dashboard to Create a Dashboard or Dashboard Settings when you select a dashboard.
The following drop-down options are available under
Dashboard Settings:
Edit
Opens the Dashboard Settings dialog to change the title,
thumbnail image, or filter associated with a selected dashboard.
Mark as Favorite
Unmark as Favorite
Marks/unmarks selected dashboards as Favorites
on the Pivots start page.
Set Preview
Sets dashboard thumbnail image based on a local file.
Use the Panel Menu to set preview automatically.
Copy/Convert
Changes Menu to display copy and convert options
based on the current status of the selected dashboard:
If Shared: Copy to Private places a copy of the
dashboard under Private and Convert to Private
changes its status from Shared to Private.
If Private: Copy to Shared places a copy of the
dashboard under Shared and Convert to Shared
changes its status from Private to Shared.
Click Menu to change back to Dashboard Settings.
Delete
Removes the selected dashboard from the start page.
Dashboard Thumbnail Cards

Dashboards
TrueCommerce Pulse User Guide 20
Open a Dashboard
If the Mode control is switched to View, you can open a dashboard by double-clicking one of the
thumbnail cards on the Dashboards Start Page. The workspace will then display all of the KPIs contained
within the selected dashboard, and switch to dashboard specific controls on the Dashboard Action Bar.
`
From here, you will be able to update, customize, and add KPIs to the dashboard, as described in the
sections that follow. If a KPI appears empty, then you may need to retrieve data via Search.
TIP
Each dashboard you open adds a new link to the Spaces Menu. Use this menu to keep multiple pages
open (in a ready state) for quick access to the dashboards you need the most.
Create a Dashboard
If the Mode control on the start page is switched to Edit, you can create a new dashboard via the
Add Dashboard control. Depending on your permission level, you can also create new dashboard based
on a Copy, as documented under Dashboard Settings (Edit Mode) on page 19.18
Following are the steps for creating a new (empty) dashboard from the Dashboards Start Page.
1. Ensure the Mode control on the action bar is switched to View.
2. Click Add Dashboard to access Dashboard Settings.
3. Enter a unique Title for the dashboard.
4. If the option is available, you may
translate the Title to another language.
Click Show Translation to select from
available Translation Options.
5. If the option is available, you may select
Shared Dashboard to list the dashboard
as Shared.
6. Click the Save button.
Panels
Panels
Panels
KPIs

Dashboards
TrueCommerce Pulse User Guide 21
The newly-created dashboard is added to the start page as illustrated below.
At this point, if you click on the new dashboard it will be empty of KPIs. The final step is to Add KPIs
to the Dashboard, as described in the sections that follow.
Dashboard Action Bar
When you Open a Dashboard, the functionality available to you for adding, editing, deleting, and
rearranging KPIs within the dashboard will depend on your permission level and on which way the
Mode control is set. (For start page specific options refer to the Dashboards Start Page, page 18.)
View Mode
When the Mode control is switched to View mode, you will be able to rearrange KPIs, select a KPI for
editing, and access the following set of controls on the dashboard action bar:
Start Marquee
Invokes the Marquee feature, which activates a ‘slide show’ style rotation of KPIs
for display within the current dashboard.
Print
Saves a PDF version of the dashboard for download and printing.
Mark as Favorite
Unmark as Favorite
Marks/unmarks the dashboard to be included under Favorites on the
Dashboards start page.
Mode
Switches dashboard functionality between View and Edit modes
Filters
Drop-down menu of controls for setting filters on the selected dashboard:
Save Filters saves Search/Filtering changes
Reset Filters Resets unsaved Search/Filtering changes
Sync Filters removes saved Search/Filtering changes to the dashboard and reloads
original Filters from the KPI Settings.
Close
Closes the dashboard, removes its link from the Foundry Spaces menu, and returns
to display the Dashboards Start Page.
Procedures for adding, changing, and removing KPIs in dashboards are further documented under
Customizing Dashboards on page 28.

Dashboards
TrueCommerce Pulse User Guide 22
Edit Mode
When the Mode control is switched to Edit mode, you will be able to rearrange KPIs, add new panels
and access the following set of controls on the dashboard action bar:
Mark as Favorite
Unmark as Favorite
Marks/unmarks the dashboard to be included under Favorites on the
Dashboards start page.
Mode
Switches dashboard functionality between View and Edit modes
Tools
Drop-down menu of controls for dashboard maintenance and customization:
Save saves changes to KPI panel size/layout Display Options
Add KPI launches the KPI Selection editor to Add KPIs to the Dashboard, as
documented in the sections that follow
Rename Dashboard launches a dialog for renaming the dashboard
Change Dashboard Color Scheme launches a dialog for overriding the dashboard
Color Scheme
Copy/Convert options to copy/convert the dashboard depending on if it is private or
shared, as described under the start page Edit Mode.
Procedures for adding, changing, and removing KPIs in dashboards are further documented under
Customizing Dashboards on page 28.
Add KPIs to the Dashboard
When you first Create a Dashboard, it is empty until you start adding KPIs via the KPI Settings editor. To
access the editor, select the Add KPI option on the Tools drop-down menu of the Dashboard Action
Bar, as documented in the section below.
Each panel represents a KPI instance rendered for display based on a set of user-defined properties, such as
date ranges, graphical format (chart, grid, gauge) and filter settings. The same KPI source can be displayed on
a dashboard multiple times, showing different filtered data, and rendered in different formats.
NOTE
Pulse is metadata-based, so all source references and parameters are stored with the KPI. If
entities or connections are changed at the source you will need to rebuild the panel to see the
new data. To modify existing KPIs, see Customizing Dashboards, page 28
KPI Settings
KPIs are added and defined via the KPI Panel Settings editor:
1. Select a dashboard from the Dashboards Start Page.
2. When the dashboard opens, ensure the Mode control is switched to Edit mode.

Dashboards
TrueCommerce Pulse User Guide 23
3. Click Tools on the Dashboard
Action Bar.
4. Select the Add KPI control
from the drop-down options.
This launches the KPI Panel
Settings editor for selecting the
KPI source, configuration, and
filtering.
KPI Selection
5. Under the KPI Selection tab, do one of the following:
6.
Fill in each field …
Select from preset …
Select from dropdowns for Company, Product,
Category, and KPI fields.
Field options are cascading, which means that the
option you select in one field changes the list of
options available in subsequent fields. If the results
contain only one option for a field, there is no
dropdown and the field is filled in automatically.
Scroll through available KPI presets as
illustrated in the example above. Clicking the
associated image automatically fills in any of
the fields defined for that preset.
Presets are created from existing KPI
settings via the Copy Settings control on
the Panel Menu, page 29.
6. Click Next to advance to the General tab.
General
7. Type in a unique Panel Title, which is the title that will appear on the KPI’s menu bar. This defaults to
the source KPI name but you can override it with something more descriptive based on your settings.
Each image represents a preset

Dashboards
TrueCommerce Pulse User Guide 24
8. If the option is available, you may translate the Panel Title to another language. Click Show
Translation to select from available Translation Options.
9. Use the dropdowns for the Display Type field to select from available options. An additional
configuration tab is added to the KPI Panel Settings editor when the Chart, Gauge, or Map display
type is selected, as illustrated below. The different display types are discussed at the end of this section.
10. Set the Refresh Interval between refreshes of the KPI. The time limit can be in seconds, minutes
(default), hours, and days, as best suits the quantity of data being presented. Note that a value of 0
makes the KPI static. For manual refresh, refer to the Panel Menu, page 29.
11. Click Next to advance (or click Finish if no other tabs are required).
Filters
12. If a Filters tab is present, fill in the required fields to determine which data is to be displayed on the
panel based on KPI results.
Your system administrator establishes which filtering options are available for the KPI (if any) which
could also be dependent on the Display Type selected. For example, some KPIs may allow you to set
date ranges (Today, This Week, Month to Date, Year to Date, and so on) or to choose a Custom
Date Range to filter incoming data.

Dashboards
TrueCommerce Pulse User Guide 25
If you choose not to define filters in the Filters tab, it is possible that no data will appear in the grid or
chart when it displays on the dashboard. In this case, the data must be retrieved via Search/Filtering
at the dashboard level, as indicated by the Using Shared Filter designation.
Cascading Filters. Some KPIs may be set up with cascading filters, where the options you select for
one filter will automatically change the options available in subsequent filters. For example, selecting a
specific country in the first filter provides a list of states in the next filter; then, selecting the state will
change the list of available suppliers within that state, and so on.
Like other forms of filtering, if your KPI includes cascading filters, those options will be available via
Search/Filtering at the dashboard level. See Cascading Filters, page 35.
13. Click Next to advance.
14. Complete any of the fields required for the remaining Chart, Gauge, or Map tab, whichever was
selected for the Display Type. These tabs are discussed at the end of this section.
15. Click Finish to save the new KPI panel and return to the dashboard.
Note that you can also make changes to the KPI within the dashboard itself. See Customizing
Dashboards on page 28.
Filter is not preset
Filter is set to specific criteria
Click to expand/collapse filter details

Dashboards
TrueCommerce Pulse User Guide 26
Chart
If the Chart tab is enabled, fill in the necessary
fields as per the descriptions in the table below.
Set the goal line either by query as coded in the
KPI source or as a fixed value.
Select the chart type that best suits the data to be
displayed. There are several to choose from.
Once you select a chart, you have the option to
select a color scheme to override the default, as
documented under Color Scheme, page 32.
Click Finish to save the chart settings you
selected for displaying the KPI in the new panel
and return to the dashboard.
Note that you can also make changes to the KPI
within the dashboard itself. See Customizing
Dashboards on page 28.
Field Descriptions
Field
Description
Use Goal Line Query
Check box to indicate Goal Line Value field will list dropdown options.
Goal Line Value
Sets goal line for certain types of charts (not Pie, Doughnut and Area).
The goal shows as a solid line across the Y-axis to visually compare
against actual results. If Use Goal Line Query check box is set, you can
select from generated dropdown options; otherwise, enter a fixed value.
Chart Type
Default chart type from the drop-down list that best applies to your KPI.
You can at any time change between multiple chart types, such as:
Column, Bar, Pie, Line, Area, Doughnut, Stacked Column, Stacked Bar,
Stacked Area, Bubble and Point.
Color Scheme Override
Changes the default Color Scheme at the panel level.
Goal Line

Dashboards
TrueCommerce Pulse User Guide 27
Gauge
If the Gauge tab is enabled, fill in the necessary
fields as per the descriptions in the table below.
The gauge color will be set to the default unless
start/end values for green, yellow, and red are
included.
You can enter a fixed value to determine the goal
marker/line or use values determined by goal line
query from the KPI.
Click Finish to save the gauge settings you
selected for displaying the KPI in the new panel
and return to the dashboard.
Note that you can also make changes to the panel
within the dashboard itself. See Customizing
Dashboards on page 28.
Field Descriptions
Field
Description
Range Settings
Values to determine start and stop points for Green, Yellow and Red ranges.
Use Goal Line Query
Check box to indicate Goal Line Value field will list dropdown options.
Goal Line Value
Sets goal marker. If Use Goal Line Query check box is set, you can select
from generated dropdown options; otherwise, enter a fixed value.
Gauge Type
Gauge type from the drop-down list that best applies to your KPI. You can at
any time change between Linear, Numeric, Radial, and Semicircle formats.
CAUTION
Numbers defined in this tab are literal. Therefore, if the source data is not suited to ranges in
your settings, the resulting gauge may appear skewed beyond normal readings. Ensure that
you set ranges that can accommodate the values expected.
Goal Marker

Dashboards
TrueCommerce Pulse User Guide 28
Map
If the Map tab is enabled, you will be able to make
changes to the default Color Scheme at the panel
level.
This is the only setting that is not completely
under the control of the KPI itself.
Click Finish to save the map settings you
selected for displaying the KPI in the new panel
and return to the dashboard.
Note that you can also make changes to the KPI
within the dashboard itself. See Customizing
Dashboards on page 28.
Customizing Dashboards
After you Add KPIs to the Dashboard you will be able to customize the dashboard layout as well as the
KPIs within each dashboard. The options available to you will depend on your permission level and on
which way the Mode control is set.
Access KPI Panel Properties to adjust settings, print and export selected KPIs
Apply different Display Options to control how charts, maps, and data are displayed in the workspace
Use the Marquee feature to invoke ‘slide show’ effects on dashboards and KPIs
To switch modes
To access Panel Properties

Dashboards
TrueCommerce Pulse User Guide 29
KPI Panel Properties
Depending on the source, each KPI can be viewed as a data grid or rendered in chart, gauge, graph, or
map format. There are controls for modifying the appearance, viewing underlying data, changing KPI
settings, exporting and printing. The following options are available for customizing the panels in which
KPIs are contained:
Access the Panel Menu for panel-specific options, described below
Zoom in to panel contents or start Marquee mode, as described under Display Options
Click elements in a chart, graph, gauge, or map to access Source Data.
Panel Menu
Panel-specific controls are available when the dashboard Mode control is switched to View mode.
Click the button on the top right corner of a KPI’s panel to access the dropdown menu.
Refresh
Immediately refreshes display of the current KPI. To refresh all KPIs at the
same time, use the control on the workspace action bar. To set auto refresh,
refer to the Refresh Interval field under the KPI Panel Settings > General tab.
Expand
Collapse
Toggles the KPI between expanding to fill the entire workspace and
collapsing to its original size. See Display Options on page 30.
Info Panel
Opens a popup dialog providing brief details about the KPI
Set KPI Preview
Adds the settings of the current KPI to the list of the preset options under KPI
Settings
Set Dashboard Preview
Sets the dashboard thumbnail (on the Dashboards Start Page) to the
current KPI’s chart, map or gauge
Grid View
Chart View
Toggles the KPI between the graphic rendering (chart, gauge, etc.) and
displaying the data in grid format (if that option is set up in the source). See
Switching between Chart View and Grid View on page 34.
Print/Export
Changes the Menu to display Print/Export Options, described on page 40.
Click Menu to change back to the original controls.
Panel Settings
Opens a dialog for making changes to the KPI’s panel, including the title,
display type, filters, and colors. See KPI Settings, page 22.

Dashboards
TrueCommerce Pulse User Guide 30
Display Options
Customize dashboard display by resizing, altering the layout, changing colors, switching between charts
and data grid, and/or rendering dashboards in the form of a slide show. The following sections document
the dashboard display options in Pulse:
Zoom, below
Rearrange, page 31
Resize, page 31
Expand/Collapse, page 32
Color Scheme, page 32
Source Data, page 33
Search/Filtering, page 35
Zoom
When the dashboard Mode control is switched to View mode, you can easily zoom in and out of
charts or maps. The zoom feature is particularly useful when you need to focus on a slice or range of data
within a very large, or more detailed, chart.
For charts, place your pointer in the KPI’s panel, and then use your mouse scroll wheel to zoom in and out.
A focus bar will appear above (or on the side) as the chart is being resized. Drag the focus bar to move to
segments of the chart that are not visible in the zoomed area.
To zoom in on maps, you have the option to use your scroll wheel or use the slider bar. To move around
to different areas, click on the ‘direction circle’ or simply grab/drag the map with your mouse.
Place pointer and
use scroll wheel
to zoom chart
Focus Bar
Zoom Slider Bar
Direction Circle
Grab/Drag Pointer

Dashboards
TrueCommerce Pulse User Guide 31
Rearrange
When the Mode control is switched to Edit mode, you can change the placement of each KPI. Click
and hold the panel you want to move, and then slowly drag the mouse pointer over to the new location.
When you release the moved KPI, the dashboard will reset the other panels automatically to the new
formation. If there is a blank spot, you may need to scroll down in case some KPIs were pushed out of view.
Resize
When the Mode control is switched to Edit mode, you can resize a specific KPI to be larger/smaller
than the others. Click on a corner of the KPI’s panel, and slowly drag until it reaches the size you want.
When you release the resized KPI, the dashboard will reset the others automatically to the new formation.
If there is a blank spot, you may need to scroll down in case some KPIs were pushed out of view.
Click, hold, and then drag to a new location
To resize, drag corners of the panel

Dashboards
TrueCommerce Pulse User Guide 32
Expand/Collapse
When the dashboard Mode control is switched to View mode, you can resize KPIs so they take up
the entire workspace. To maximize, click the button on the top right corner of the KPI’s panel, and then
select the Expand option from the Panel Menu.
To minimize the full size KPI, click the button, and then select the Collapse option. This collapses the
KPI to its original size and returns the dashboard to display multiple panels in the workspace.
Color Scheme
Pulse includes a library of preset color schemes for quickly selecting a new look for your KPI colors.
There are three methods for changing KPI colors in Pulse:
All Dashboards, below
Selected Dashboard, page 33
Selected KPIs, page 33
Note that color changes made to a shared dashboard will affect all who use that dashboard.
All Dashboards
To change the default color scheme for all dashboards:
1. Select Pulse > Settings > Default Color Scheme via
the Foundry Menu.
The Dashboard Color Scheme dialog opens with a
sample dashboard in the workspace.
2. Click on the drop-down field at the top of the workspace
to select from the available color schemes. Each
selection changes the color scheme of the KPIs in the
sample dashboard below.
3. You can also browse the colors directly by dragging the
samples to the left or right.
4. When you decide on a color scheme, click Save on the workspace menu bar.
The new color scheme will be applied to all your dashboards; that is, unless the color scheme is
overridden at the dashboard or KPI level (described next).

Dashboards
TrueCommerce Pulse User Guide 33
Selected Dashboard
To change the color scheme of the currently open dashboard:
1. Switch the Mode control to Edit mode.
2. Select the Change Dashboard Color Scheme option from the Tools dropdown menu on the
Dashboard Action Bar.
The Dashboard Color Scheme Override dialog opens with a sample dashboard in the workspace.
Select from the drop-down options or drag the sample dashboard left or right to browse through the
available color schemes.
3. When you decide on a color scheme, click Save on the workspace menu bar. This changes the
default color for all the KPIs in the current dashboard (unless overridden at the KPI level).
Selected KPIs
To change the default color scheme for charts or
maps at the KPI level:
1. Switch the Mode control to View mode
and click the button on the selected KPI.
2. Click Panel Settings from the Panel Menu.
3. For charts, select the Chart tab in the KPI
Panel Settings dialog. For maps, select the
Map tab in the KPI Panel Settings dialog.
Select from the Color Scheme Override drop-
down options or drag the sample dashboard to
browse through the available color schemes.
4. When you decide on new colors, click Save.
Source Data
There are several ways to set up KPIs to allow quick access to the data they are based on:
As described under KPI Settings you have the option to display KPIs in the form of a data grid when
you create or modify the panel.
You may be able to click on selected elements in a chart, gauge, or map to view underlying details in
popup form or jump directly into the source application.
KPIs coded in the form of Actionable Analytics allow you to pass parameters via chart, gauge, or map
in Pulse to invoke actions in the source applications.
You can Switching between Chart View and Grid using controls in the panel menu.
Quick View
Depending on the KPI, some panels may include
functionality where you can quickly view the data
behind a chart, gauge or map.
Hovering the mouse pointer over data elements
(points, bars, slices, etc.) invokes a small popup
that displays specified content.
Double-clicking on the chart element may launch
a sub-page that shows the data associated with
the chart or jump directly into the source
application where the data originates.

Dashboards
TrueCommerce Pulse User Guide 34
Actionable Analytics
It is possible for some KPIs to be configured in a way that allows you to control other integrated
applications directly from your chart, gauge, or map in Pulse. With KPI enhancements, you can build
interactive dashboards that provide both a graphical view of your data, and the ability to invoke changes in
the source application or database. For example, clicking on a data element in an ‘orders’ chart may be
configured to pass that value as a parameter to the corresponding ‘orders’ page in another application,
which triggers a process in that application to update data.
It is entirely up to your organization to assess the need and to create the KPIs for this purpose. If
required, contact your TrueCommerce Sales representative to discuss custom KPI development options.
For more information, refer to the ‘TrueCommerce Pulse Administrator Guide’.
Switching between Chart View and Grid View
Depending on your KPI settings, you may have the option to toggle the panel display between chart and
grid format. Click the button and then select the Grid View option from the Panel Menu.
The KPI panel changes automatically to grid format, displaying the data only, including when rendered in
Marquee mode. Grids include several useful controls to help you find and organize your data. For more
information, see Working with Grid Data on page 10. If necessary, use the Expand option on the Panel
Menu to maximize the size of the grid. When displayed as a grid, the panel also includes the option to
Export to Excel, as described on page 41.
To return to chart format, click the button, and then select the Chart View option.

Dashboards
TrueCommerce Pulse User Guide 35
Search/Filtering
Some dashboards are configured so that you can choose which source data you want to display in KPI
panels. If this is the case, the search control will be present on the dashboard action bar. Clicking the
control opens (and also closes) the search panel. For a general discussion on filtering, refer to Search
Panel on page 12. This section discusses filtering as it pertains to the dashboard display and KPI panel
functionality:
Search functionality may be required to populate charts and grids that have not been configured with
predefined Filters in their KPI settings. Such panels start out empty when you open the dashboard.
The values that can be entered in a field depend on the data in the associated panel (alphanumeric,
numeric or dates). The search can also be set up to use Cascading Filters, described below.
To save changes to the search panel, click Save Filters on the dashboard’s action bar. Reset
Filters can be used to reset unsaved changes to the search panel. Note that the Save Filters option
is only available to the owner of a dashboard that is shared.
To change back to default search/filtering click Sync Filters on the dashboard’s action bar.
Cascading Filters
When KPIs are designed using cascading filters, the
options you select in one field will automatically change
the list of options in the fields that follow.
Refer to the example on the right.
Selecting one or more options in the Country field
changes the list of regions (states) in the Region field;
then, selecting regions changes the list of companies in
the SupplierId field, and so on.
You can also select/deselect all the options in a field by
clicking the first check box listed; for example,
CompanyName in the SupplierId field.
When you are finished selecting the options you need,
click the control, as described for Performing a
Search at the beginning of this user guide. This
automatically changes the display of charts and grids
on the dashboard to reflect the changed filters.
Note that if you edited the filters within specific panels
(via the Panel Menu) those panels will not be
changed.
As mentioned earlier, click Sync Filters on the
dashboard’s action bar to reset panels to their default
filters.
For documentation on KPI design, refer to the
‘TrueCommerce Pulse Administrator Guide’.
Dashboards
TrueCommerce Pulse User Guide 36
Marquee
Pulse marquee feature renders KPI panels in an automated ‘slide show’ format. It provides a quick and
easy mechanism for you to present dashboards in continuous rotation; for example, as a ‘display board’
in your corporate lobby, lunchroom, or conference booth. In addition, with Display Board Feeds you will
be able to provide external access to marquees as well.
There are two methods for running a marquee in Pulse:
Current Dashboard, which cycles through panels in the currently-open dashboard, one at a time
based on intervals set by the user
Multi-Dashboard, which cycles through panels in one or more selected dashboards, one at a time or
all on the same page, at intervals set by the user.
Current Dashboard
To run a slide show of panels from the currently-open
dashboard:
1. Select a dashboard on the Dashboards Start Page.
2. Ensure the Mode control is switched to View
mode and then click Start Marquee on the
action bar. You will be prompted to define the
parameters for your slide show.
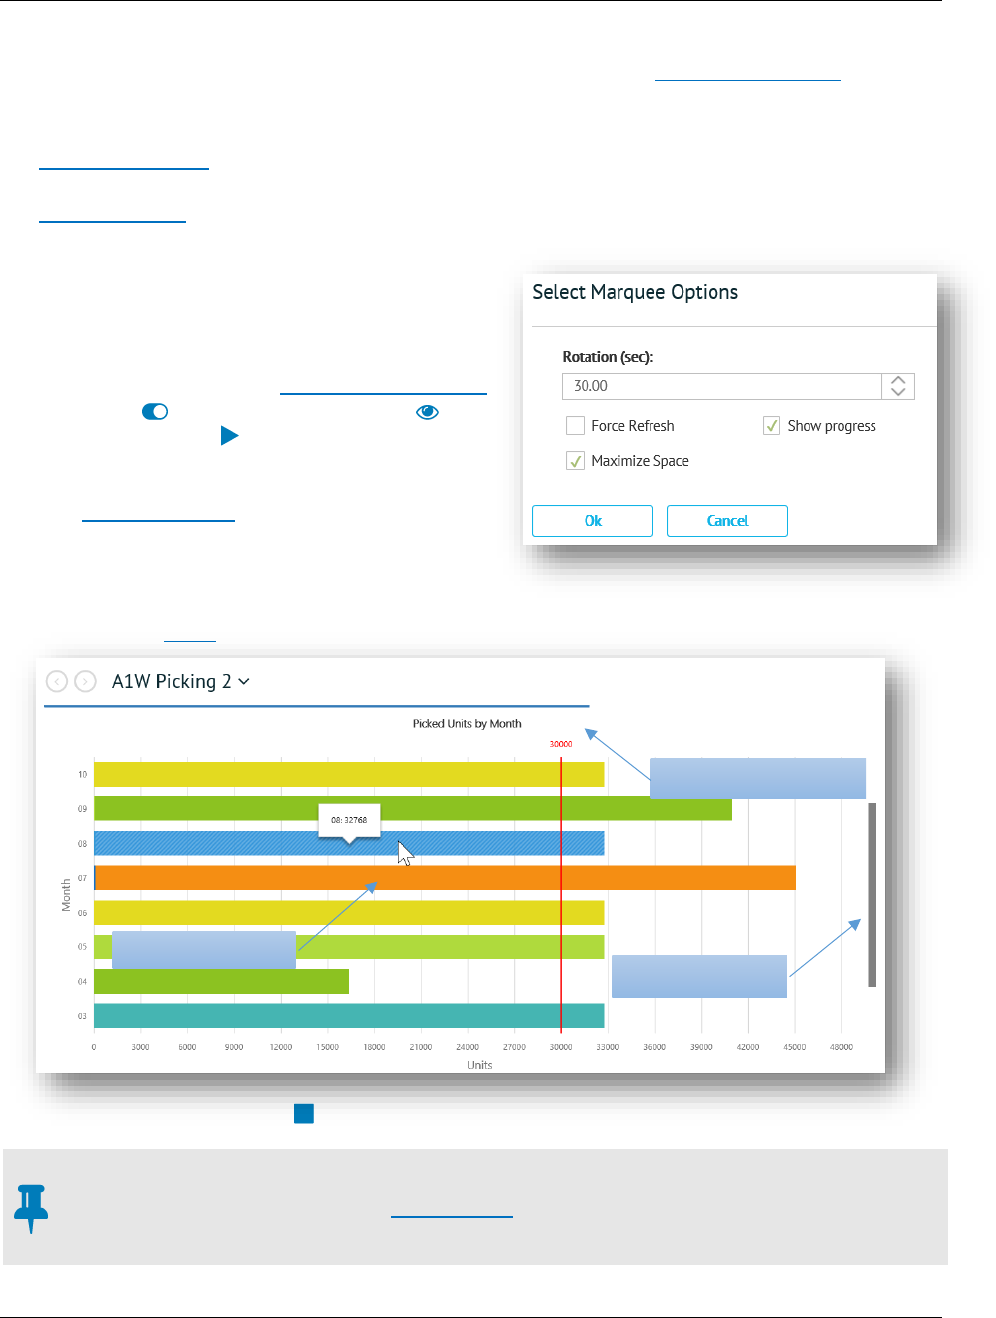
See Marquee Options for field descriptions.
3. Click OK in the Marquee Options dialog to start the marquee using the parameters defined above.
In marquee mode, the slide show format cycles through each panel in expanded view. Note that you
can still apply Zoom or click on data elements in each panel that comes up in rotation.
4. To exit marquee mode, click Stop Marquee on the action bar.
NOTE
If you retrieve a dashboard from the Spaces Menu that was previously set to marquee mode, it
will resume with the panel rotation when it opens in the workspace.
Marquee Progress Bar
Zoom Focus Bar
View Data Element

Dashboards
TrueCommerce Pulse User Guide 37
Multi-Dashboard
To run a slide show of one or more dashboards:
1. Open the Dashboards Start Page.
2. Ensure the Mode control is switched to View mode and then click Marquee on the action bar.
3. Click on the dashboards you want to use in the marquee rotation. Each dashboard you select will be
highlighted with a blue border and checkbox.
4. When you finish selecting dashboards for rotation,
click Start on the workspace action bar.
You will be prompted to define parameters,
including the rotation object, for your slide show.
See Marquee Options for field descriptions.
5. Click OK in the Marquee Options dialog to start
the marquee using the parameters defined.
Note that you can still apply Zoom or click on data
elements in the panels within each dashboard that
comes up in marquee rotation.
The following marquee example is displaying all the panels in the dashboard using tile formation.
6. Click Pause on the action bar to pause the rotation at the currently-displayed dashboard. To keep
going, click Resume.
Marquee Progress Bar
Zoom Slider Bar
View Data Element

Dashboards
TrueCommerce Pulse User Guide 38
7. If you want to add or remove the dashboards selected for rotation, click Stop. To return to
marquee mode, click Start again.
8. To exit completely, click Exit Marquee Mode on the action bar. When you return to the
Dashboards page, your dashboards will no longer be selected for rotation.
Display Board Feeds
Direct Link is a separately licensed option that allows you to share the marquees you create for use as
external display board feeds. It works by generating a URL link to a configured marquee that can be
copied directly into their browser window for display (without the need for user credentials). To acquire
this add on feature for use with Pulse contact your TrueCommerce representative.
To generate a URL link of a marquee configuration:
1. Set up the dashboards and parameters for your marquee, and then click the Get Link button in the
Marquee Options dialog.
2. In the Direct Link dialog, enter a name for your link, and then click Create.
3. When the link to your marquee is generated, select the text box and copy it to the clipboard.

Dashboards
TrueCommerce Pulse User Guide 39
4. Paste the copied link into a browser address bar to launch the marquee. Linked marquees run within
a limited version of Pulse that allows read-access only, with no other functionality except basic
refresh, resize and pause/resume controls.
5. To exit the linked marquee, simply close the browser tab.
The Direct Links feature also records all of the links you generate. For access to previously-generated
links, select Pulse > Settings > Dashboard Direct Link via the Pulse folder under the main
applications menu. The Direct Links list opens in the workspace.
To use saved links, simply copy and paste them from this list.
Marquee Options
Field
Description
Rotation (sec)
Duration each slide will be displayed on the screen.
Rotation Object
Multi-Dashboard Only. Selects the format in which panels are displayed
for each dashboard in a Multi-Dashboard rotation:
Panels — cycles through each panel in expanded view before advancing
to the next dashboard
Dashboards — displays all panels at once (in tile formation) before
advancing to the next dashboard
Force Refresh
Check box to indicate that data will be refreshed when it comes in rotation.
This is recommended when Rotation setting is longer than 60 seconds.
Show Progress
Check box to show the progress bar, which indicates how long before the
next panel in the slide show
Maximize Space
Check box to indicate that panels are to fill the browser window, which is
the same as selecting the button on the action bar.
Pasted Link
Link Names
URL Links

Dashboards
TrueCommerce Pulse User Guide 40
Print/Export Options
You can select a KPI to send to print, or export as an image file or PDF, described below. When
Switching between Chart View and Grid, you can also Export to Excel.
Print
To print a selected chart, gauge, or map:
1. Click on the top right corner of the KPI’s panel, and then select Print/Export from the Panel Menu.
2. Select Print from the Print/Export menu.
This invokes your browser’s Print dialog, which allows you to select a printer location (or print file)
and set preferences before printing.
Click the Print button to send the KPI to the selected printer.
To exit the Print/Export menu, click on the top right corner of the KPI’s panel, and then select Menu.
Export as an Image
To export the selected chart, graph, gauge, or map to a PDF or image file:
1. Click on the top right corner of the KPI’s panel, and then select Print/Export from the Panel Menu.

Dashboards
TrueCommerce Pulse User Guide 41
2. Select one of the Export options from the Print/Export menu.
This invokes the export dialog, which provides options to Open and/or Save the generated file to a
location of your choosing.
Select the appropriate option to save the KPI as an image file.
To exit the Print/Export menu, click on the top right corner of the KPI’s panel and then select Menu.
Export to Excel
To export a KPI that is currently set to Grid
View:
1. Click on the top right corner of the KPI’s
panel and then select Print/Export.
2. Select Export to Excel from the
Print/Export menu.
This invokes the Select Columns dialog,
which includes check boxes for you to
choose which columns from the grid you
want to export to the Excel file. The default is
Select All.

Dashboards
TrueCommerce Pulse User Guide 42
Click the Export button to save the contents of the selected
columns to an .xlsx file.
This invokes the export dialog for saving the generated file to
a location of your choosing.
Select the appropriate option to save the KPI as an Excel file.
To exit the Print/Export menu, click on the top right corner of a KPI’s panel, and then select Menu.

TrueCommerce Pulse User Guide 43
Pivots
Pulse offers the ability to deliver KPIs in the form of interactive pivot grids. Pivots, which are conceptually
similar to Excel pivot tables, give users direct control to change the appearance of data elements while
they are still in use. They enable ad hoc reporting with the capacity to instantly switch (pivot) between
columns and rows, or to add, remove, sort and filter the data they are based on.
The following sections describe how to view, create, modify, and export pivots:
Pivots Start Page, below
Open a Pivot, page 45
Create a Pivot, page 45
Pivot Action Bar, page 47
Pivot Grid and Pivot Chart, page 47
Calculated Fields, page 50
Field Chooser, page 52
Export Options, page 55
For documentation specific to the other application components in Pulse, see Dashboards on page 18,
and Spreadsheets on page 56.
Pivots Start Page
Pulse Pivots starts with a start listing all the private or shared
pivots to which you have access under your tenant.
To launch the start page, click Pulse > Pivots via the Foundry
Menu. If you visited the start page previously at any time during
your current Foundry session, you can also find a Pivots link in
the Spaces menu.
The start page opens the Foundry workspace under the Pivots
page header. Pivots can be organized as Favorites, Private,
and Shared, as illustrated in the example below.

Pivots
TrueCommerce Pulse User Guide 44
The Pivots start page opens to a page of thumbnail cards, each of which can be used to Open a Pivot
for display and editing. From the start page, you can also create, edit, remove, and share selected pivots.
Different start page functionality is available depending on if you are in View or Edit mode.
View Mode
If the Mode control on the start page is switched to View, you will be able to double click on a
thumbnail card to select and Open a Pivot.
Edit Mode
If the Mode control on the start page is switched to Edit, this gives you access to the Add Pivot
control to Create a Pivot or Pivot Settings when you select a pivot.
The following dropdown options are available under
Pivot Settings:
Edit
Opens the Pivot Settings dialog to change the title, thumbnail
image, or filter associated with a selected pivot.
Mark as Favorite
Unmark as Favorite
Marks/unmarks selected pivots under Favorites on
the Pivots start page.
Set Preview
Sets pivot thumbnail image based on a local file.
Copy/Convert
Changes Menu to display copy and convert options
based on the current status of the selected pivot:
If Shared: Copy to Private places a copy of the pivot
under Private and Convert to Private changes its
status from Shared to Private.
If Private: Copy to Shared places a copy of the pivot
under Shared and Convert to Shared changes its
status from Private to Shared.
Click Menu to return to the initial Pivot Settings.
Delete
Removes the selected pivot from the start page.
Pivot Thumbnail Cards

Pivots
TrueCommerce Pulse User Guide 45
Open a Pivot
If the Mode control is switched to View mode, you will be able to open a pivot by double-clicking
one of the thumbnails in the Pivots Start Page. The selected pivot opens to display KPI data in grid format
according to the fields defined and on previously saved settings.
From here, you can easily switch between Pivot Grid and Pivot Chart, select which fields to display, set as
a favorite, and adjust various other settings via controls on the Pivot Action Bar, page 47.
TIP
Each pivot you open adds a link to the Spaces Menu. Use this menu to keep multiple pages open (in a
ready state) for quick access to the pivots you need the most.
Create a Pivot
When the start page is in Edit Mode, you can create a new pivot based on any of the KPI criteria set up
by your administrator, as described below. Depending on your permission level, you can also create new
pivot based on a Copy, as documented under Pivot Settings (Edit Mode) on page 44.
Pivot Settings
Pivots are added and defined in the Pivot Settings editor:
1. Ensure the Mode control on the Pivots Start Page
is switched to View.
2. Click Add Pivot on the action bar. This launches
the editor to set KPI Selection, Chart, and Filters for
the new pivot.
KPI Selection
3. Type in a unique Pivot Name. The name entered
here appears with the thumbnail image on the Pivots
Start Page.
4. If the option is available, you may translate the Pivot
Name to another language. Click Show Translation
to select from available Translation Options.
5. If the option is available, you may select Shared
View to list the pivot under Shared.
6. Select from the dropdowns for Company, Product, Category, and KPI fields.

Pivots
TrueCommerce Pulse User Guide 46
Field options are cascading, which means that the option you select in one field changes the list of
options available in subsequent fields. If the KPI provides only one option for a field, then there is no
dropdown and the field is filled in automatically.
7. Click Next to advance to the Chart tab.
Chart
8. Select a Chart Type from the dropdown
options that best suits the data to be
displayed. This will be the default chart that
displays when you select the Pivot Chart
control on the Pivot Action Bar.
Note that your choices for chart types in a
pivot are different from the ones listed for
dashboard KPIs.
9. Enter a unique Chart Title for the chart
selected.
10. Optionally, you can click the check box to
Show Grid Lines in the chart selected.
11. Optionally, you can select a Color Scheme
to override the default, as documented under
Color Scheme, page 32.
12. Click Next to advance to the Filters tab or
click Finish to exit the editor and add the
newly created pivot to the Pivots Start Page.
Filters
13. If a Filters tab is present, fill in the required fields to determine which data is to be displayed in the
pivot based on KPI results.
Your system administrator establishes what can be filtered. For example, the KPI may allow you to set
date ranges (Today, This Week, Month to Date, Year to Date, and so on) or choose a Custom Date
Range to filter incoming data. Other options may include a checklist for adding/removing criteria.
14. Click Finish to add the newly created pivot to the Pivots Start Page.

Pivots
TrueCommerce Pulse User Guide 47
Pivot Action Bar
Once you Open a Pivot in the workspace, you have the ability to transform how your data is being
presented by dragging and dropping data elements from the KPI source. The pivot action bar includes a
set of controls for changing the open pivot’s appearance instantly, on-the-fly:
Pivot Grid
Displays data in Pivot Grid format based on Field Chooser settings. Drag and drop
functionality allows you to make adjustments to Pivot Fields directly within the grid.
Pivot Chart
Displays data in Pivot Chart format based on Field Chooser settings.
Pivot Data
Displays all Pivot Data as it is defined in the KPI source.
Mark as Favorite
Unmark as Favorite
Marks/unmarks the currently selected pivot under Favorites on the Pivots
Start Page.
Export
Dropdown menu of controls for exporting the selected pivot. See Export Options, page 55.
Tools
Dropdown menu of controls for pivot maintenance and customization:
Save saves changes to the pivot grid and chart layout
Field Chooser launches an editor for adjusting Field Chooser settings
Calculated Fields launches an editor for adjusting Calculated Fields
Rename Pivot launches a dialog for renaming the pivot
Setup accesses the KPI Selection for modifying the pivot’s name, chart style, and use
of any filters that many be available
Copy/Convert options to copy/convert the pivot depending on if it is private or shared,
as described under the start page Edit Mode.
Close
Closes the pivot, removes its link from the Foundry Spaces menu, and returns to the
Pivots Start Page.
Pivot Grid
The Pivot Grid control on the Pivot Action Bar displays the KPI data as a grid. The initial layout is based
on fields selected from your KPI data source and placed in the Field Chooser dialog. However, you can
make a variety of quick changes simply by dragging and dropping Pivot Fields within the grid itself.
Grid functionality is documented in the sections that follow. To view ‘raw’ data with no Fields Chooser
parameters applied, use the Pivot Data control.
Moveable fields

Pivots
TrueCommerce Pulse User Guide 48
Pivot Fields
Before using a pivot grid, you must first select which fields you plan to use via the Fields Chooser
control on the action bar. Data displayed in the pivot is based on fields selected for each of the Filter,
Rows, Columns, and Data parameters in the dialog box. When you move fields to a different location on
the pivot grid, the changes you make are reflected in the Field Chooser dialog and vice versa.
The example below illustrates how fields are placed on the grid based on parameters in the dialog box.
NOTE
Fields can only be added to, or removed from, the pivot using the All checklist in the Field
Chooser dialog. If no fields are assigned to parameters, the grid will be empty.
Following are the options available to you for changing fields within the grid:
Simply drag and drop selected fields from any grid location to another
Toggle the or icon next to the selected field to sort results in ascending/descending order
To set a filter within a selected field, click the drop-down control
Upon refresh, these changes will have an immediate effect on the contents of the grid, the Field Chooser
dialog, and the Pivot Chart.
Field Hierarchy
If practical, multiple fields may be assigned to columns or rows in the grid. When this is the case, the
placement of the field in the row or column parameter will determine the order in which the data is to be
displayed. Also, for each level in the hierarchy, the button next to a data element indicates the existence
of a subordinate (child) field.
Refer to the next example. In the Rows parameter, the Ship City field ranks above Order Num for the
display of row data. Clicking the button next to ‘Markham’ under the Ship City field expands all the
Order Num data for ‘Markham’. When you expand each level of data in this manner, the button toggles
to to indicate the expanded view. To hide the data in the subordinate field, click the button again.
Parameters in dialog box
Fields placed on grid
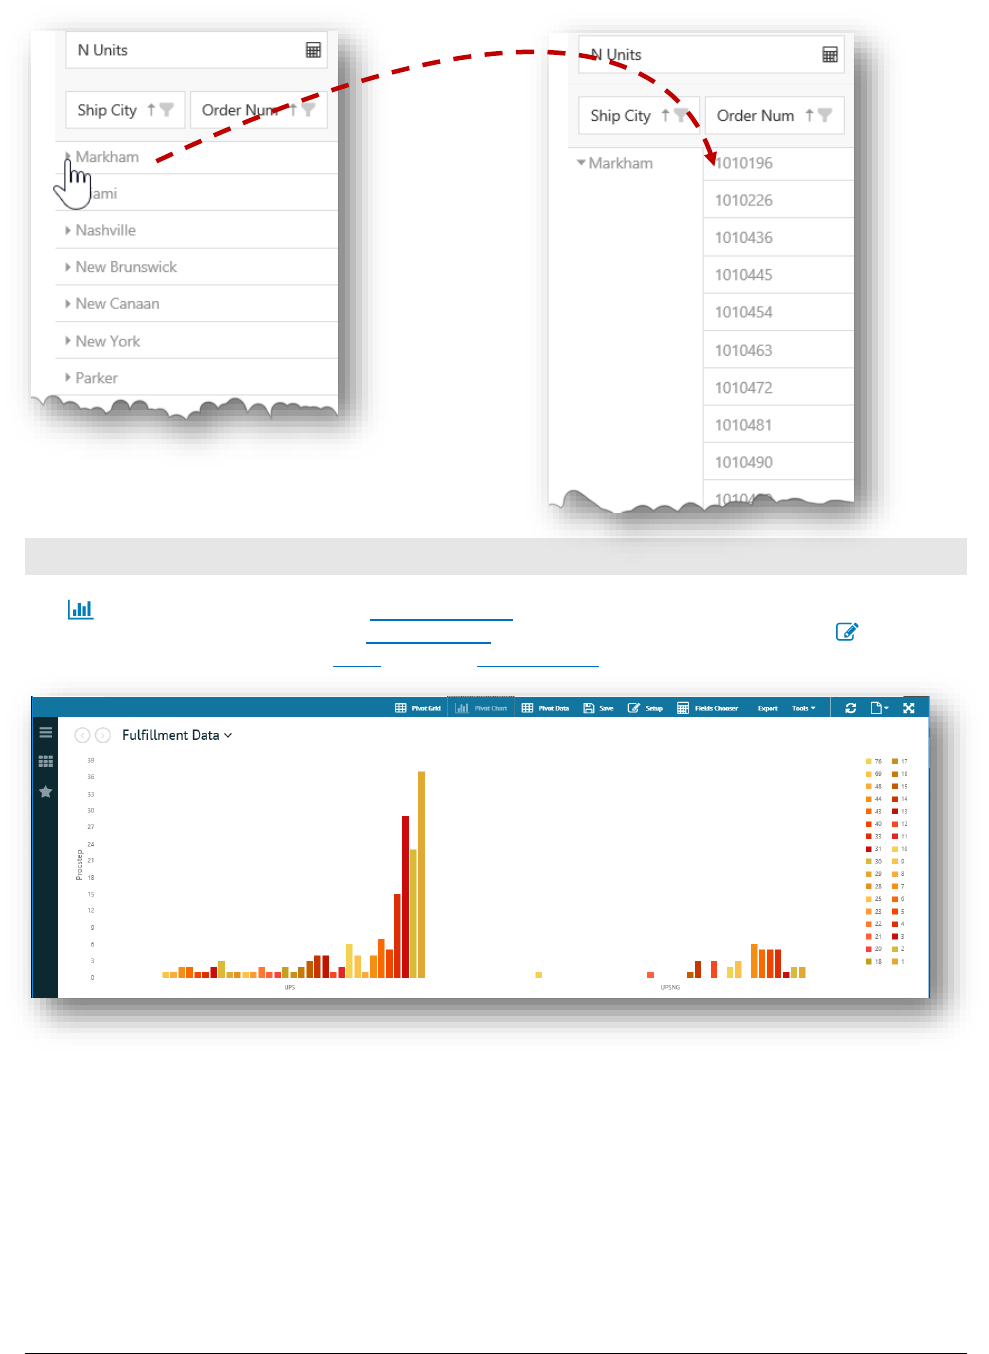
Pivots
TrueCommerce Pulse User Guide 49
Pivot Chart
The Pivot Chart control on the the Pivot Action Bard displays the pivot’s KPI data as a chart, defined
by the fields and filters selected in the Field Chooser dialog. To change the chart type, click Setup on
the pivot action bar and select the Chart tab under Pivot Settings.
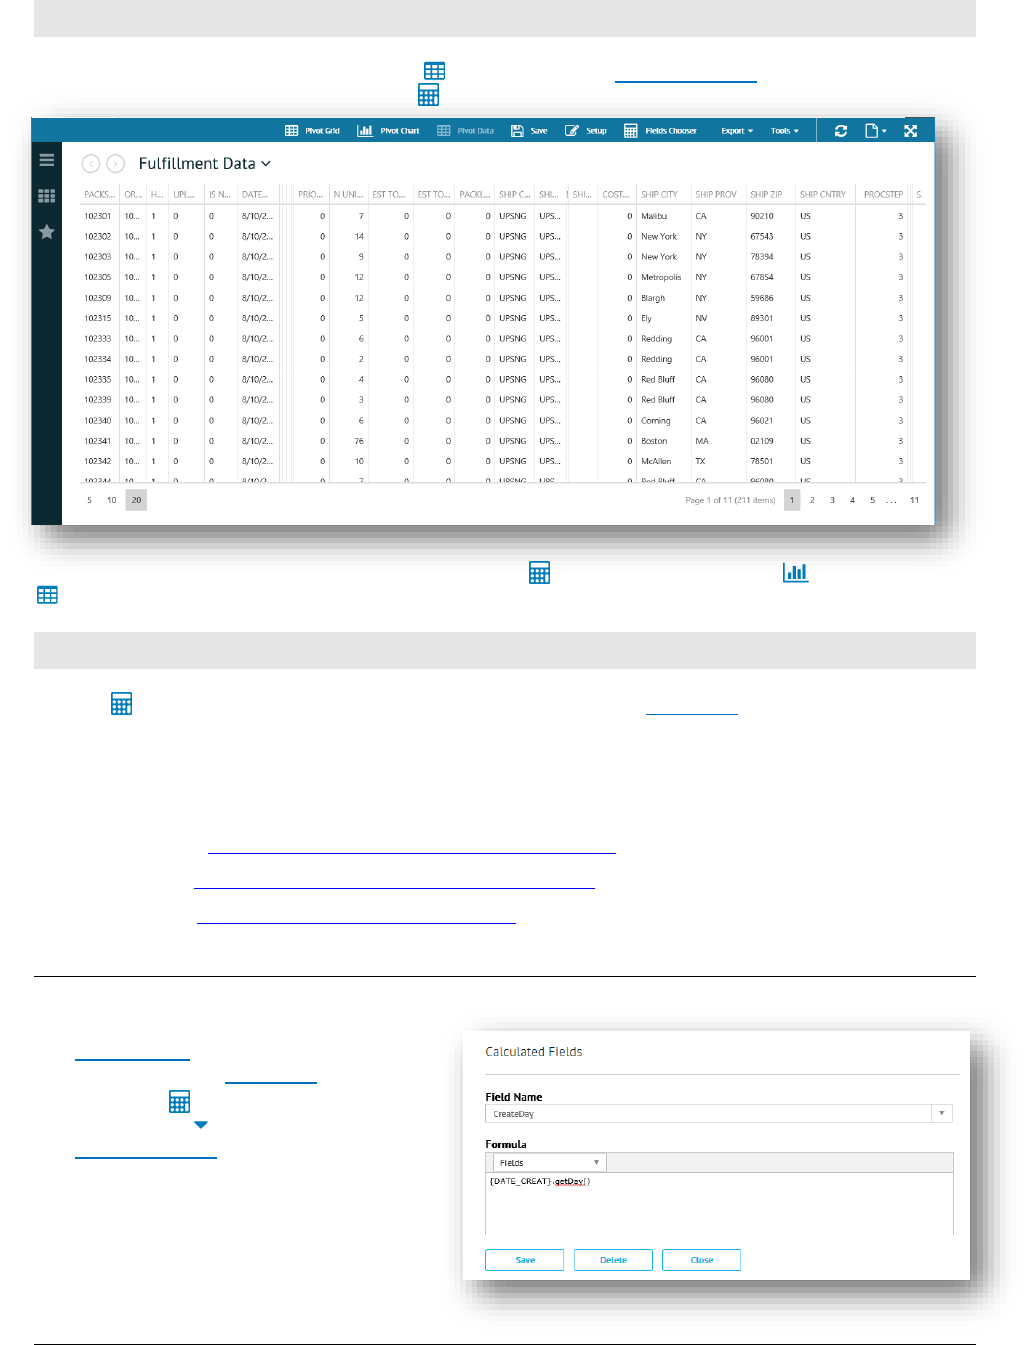
Pivots
TrueCommerce Pulse User Guide 50
Pivot Data
To view all the data behind the pivot, select Pivot Data on the Pivot Action Bar. This displays every
field (column) produced by the KPI with no Fields Chooser parameters applied.
To view pivot data based on parameters defined by the Fields Chooser, use the Pivot Chart and
Pivot Grid controls.
Calculated Fields
Use the Calculated Fields control to add new fields (columns) to Pivot Data by combining values from
existing fields. The new field provides a means for you to run user-defined calculations after your KPI
data has been retrieved, avoiding the need to create a new field in the source.
While this feature offers similar functionality to Excel, Pulse uses simple JavaScript functions to create
the formulas for calculated fields. For syntax details, refer to the w3schools developer site:
String Functions: www.w3schools.com/jsref/jsref_obj_string.asp
Date Functions: www.w3schools.com/js/js_date_methods.asp
Math Functions: www.w3schools.com/js/js_math.asp
Creating a Calculated Field
New calculated fields are named and defined for pivots via the Calculated Fields editor.
1. Open a Pivot to view all available fields
(columns) under Pivot Data.
2. Select the Calculated Fields control
on the Tools dropdown menu of the
Pivot Action Bar.
This launches the Calculated Fields
editor for creating the new field.
3. Enter a unique Field Name that best
describes calculation result.

Pivots
TrueCommerce Pulse User Guide 51
4. Enter a Formula using Fields selected from the dropdown list (illustrated
on the right) along with any JavaScript functions and operators needed to
create calculations for the new field.
5. When you are finished entering the formula, click Save. Pulse validates
the syntax and then issues a popup message to indicate if the calculation
is successful or if problems need to be corrected.
6. If the calculation is successful, click Close. The calculated field is added to the pivot to become the
last column on the (Pivot Data) grid.
Following is a simple example where the formula calculates a new PricePerDozen field based on the
existing UnitPrice field.
C
When the editor is closed, the calculated field is added to the pivot at the end of the (Pivot Data) grid.

Pivots
TrueCommerce Pulse User Guide 52
Changing or Deleting a Calculated Field
The Calculated Fields editor is also used to change or delete an existing calculated field.
1. Click the Calculated Fields control on the Pivot Action Bar to launch the Calculated Fields editor.
2. Use the dropdown control on the Field Name to select a previously created field, and then do one of
the following:
3.
Edit the field …
Delete the field …
Make any changes to the Field Name and/or
Formula that may be required and click Save to
validate the new syntax for the selected field.
Click Delete to remove the selected field from
the pivot.
4. Click Close to exit the Calculated Fields editor.
Your changes will be reflected in the (Pivot Data) grid.
Field Chooser
Selecting the Field Chooser control on the Tools dropdown menu of the Pivot Action Bar launches
a dialog box for you to pick fields from your data source and set Parameter Options that will affect the
contents and layout of results.
Double-click field names from the All checklist to assign them to the Filter, Rows, Columns, and Data
parameters (described below). The changes you make in the Field Chooser dialog box will appear
automatically in the Pivot Grid and Pivot Chart.
Field Name Checklist
Base Filtering
Fields used for Rows
Fields used for Columns
Functions / Calculations

Pivots
TrueCommerce Pulse User Guide 53
Parameter Options
A check mark to the left of each field name in
the All checklist indicates which fields are
currently in use for pivot results.
Double-clicking a field name from the checklist
adds it to the Columns parameter by default.
Simply drag and drop any field from any
parameter box into another.
Toggle the or icon next to the selected field
to sort results in ascending/descending order.
To set a filter within a selected field, click the
dropdown control to include/exclude specific
data items from the pivot display.
To remove a field from the Fields Chooser,
double-click to de-select the field name from the
All checklist or drag the selected field name
out of its current parameter box.
If no field names have been selected for any of these parameters, the Pivot Chart and Pivot Grid
controls will display no data when you click on them.
Filter
The Filter parameter is used to apply overall pivot filtering based on the field(s) selected. Click the
dropdown control next to the field name to include/exclude specific data items to set the filter.
For example, if you assign a City field to the Filter
parameter and then select specific cities, no matter what Rows
and Columns are applied, the results displayed must fall within
those cities.
If the Filter parameter is left empty, filtering will be
determined entirely by individual filters in the Rows and/or
Columns parameters.
Rows
The Rows parameter determines the fields being used for the rows of the Pivot Grid. These fields are
also used to populate the Y-axis in the Pivot Chart. After dropping a field into the parameter box, you can
apply sorting, filtering and other Parameter Options.
If practical, multiple fields may be added to this parameter (in top-down priority); however, the more fields
referenced, the more fractional your data may be. See Field Hierarchy, page 48.
Columns
The Columns parameter determines the fields being used for column headers of the grid. These are
also used to populate the X-axis in the Pivot Chart. After dropping a field into the parameter box, you can
apply sorting, filtering and other Parameter Options.
If practical, multiple fields may be added to this parameter (in top-down priority); however, the more fields
referenced, the more fractional your data may be. See Field Hierarchy, page 48.
Sort Arrows
Sort Arrows
Filtering Dropdown

Pivots
TrueCommerce Pulse User Guide 54
Data
The Σ Data parameter determines which numeric values are reported (defined within column/row cells)
and allows aggregate options to be defined for summarizing the values specified. Only numeric fields can
be used for this purpose. Once the field name is placed in the Data parameter box, you can click the
drop-down to access different summary functions and calculations.
Summarize Functions
The functions located on the top half of the menu are used to summarize the data represented by the
selected field. Each applies a different type of calculation to the Grand Total of columns and rows in the
Pivot Grid. Note that the prefix to the field name indicates which function is currently in use, as illustrated
by N Units (Count) above.
Click More Aggregate Options to display the expanded list of functions used to summarize the data,
which includes Sum, Count, and Average. The aggregate options are described in the table below.
Aggregate Options
Function
Description
Sum
Calculates the sum of all the values. This is the default setting for fields with numeric fields.
Count
Counts the number of entries that include numeric values.
Average
Calculates the average of the values.
Max
Shows the largest value.
Min
Shows the smallest value.
Product
Shows the product of the values.
StDev
Estimates the standard deviation of a population, where the sample is a subset of the
entire data population.
StDevp
Calculates the standard deviation of a population, where the population is all of the data
to be summarized.
Var
Estimates the variance of a population, where the sample is a subset of the entire
population.
Varp
Calculates the variance of a population, where the population is all of the data to be
summarized.

Pivots
TrueCommerce Pulse User Guide 55
Calculation Options
In addition to the Aggregate Options, further analytical calculations can
be applied to the pivot. These calculation options typically perform
mathematical operations that use the currently-applied function
(described above) to summarize the data using values in other cells
defined by fields in the Data parameter.
Index calculates values as an index where each index number
represents its value’s “importance” compared to other values. Each
ranking uses the calculation: (value × grand total) / (row total × column
total)
% of Grand Total displays values as a percentage of the grand total of
all values in the report.
Clear Calculations displays the value that is entered in the field with no
calculations.
Number Format
Click the Number Format option to format cells for the selected field name. You have the option to select
the format to be used for general computations such as sum, average, min, max, and others.
Export Options
The following sections discuss options for exporting KPI data as an image, PDF or Excel file. Pivots can
be exported from any display format ( Pivot Grid, Pivot Chart, or Pivot Data) to any of the file
types selected.
NOTE
Currently, there is no ‘print’ control for printing pivots directly from Pulse. If needed, you can print
exported pivots locally once they are in an image, PDF or Excel file format.
To export the contents of an opened pivot to a local file:
1. Click Export on the Pivot Action Bar.
2. Select one of the options from the dropdown menu.
Your browser may launch a dialog with options to Open and/or
Save the generated file to a location of your choosing.
A message from your browser will indicate when the download has completed.

TrueCommerce Pulse User Guide 56
Spreadsheets
While Dashboards and Pivots offer functionality for exporting KPI results that can be edited in Excel, the
Spreadsheets feature allows you to manipulate and format within Pulse itself. Data elements derived from
your KPIs are loaded directly into a fully functional spreadsheet, which can then be manipulated using
standard spreadsheet functions and formulas — if you know how to use Excel, you will have no trouble
sorting, calculating, and formatting numbers and strings in a Pulse spreadsheet.
The following sections describe how to use this feature in Pulse.
Spreadsheets Start Page, below
Open a Spreadsheet, page 45
Create a Spreadsheet, page 58
Spreadsheet Action Bar, page 59
Worksheets, page 60
File Management, page 86
For documentation specific to the other application components in Pulse, see Dashboards on page 18,
and Pivots on page 43.
Spreadsheets Start Page
Pulse Spreadsheets start with a page listing all the private or shared
spreadsheets to which you have access under your tenant.
To launch the start page, click Pulse > Spreadsheets via the
Foundry Menu. If you visited the start page previously during your
current Foundry session, you can also find a Spreadsheets link in
the Spaces menu.
The start page opens in the Foundry workspace under the
Spreadsheets page header. Spreadsheets can be organized as
Favorites, Private, and Shared, as illustrated in the example below.

Spreadsheets
TrueCommerce Pulse User Guide 57
The Spreadsheets start page opens to a page of thumbnail cards, each of which can be used to Open
a Spreadsheet. From the start page, you can also create, edit, remove, and share selected spreadsheets.
Different start page functionality is available depending on if you are in View or Edit mode.
View Mode
If the Mode control on the start page is switched to View, you will be able to double click on a
thumbnail card to select and Open a Spreadsheet.
Edit Mode
If the Mode control on the start page is switched to Edit, this gives you access to the Add
Spreadsheet control to Create a Spreadsheet, or Spreadsheet Settings when you select a spreadsheet.
(For documentation on editing the contents of a spreadsheet, see Worksheets, page 60.)
The following dropdown options are available under
Spreadsheet Settings:
Edit
Opens the Spreadsheet Settings dialog to change the title,
thumbnail image, or filter associated with a selected spreadsheet.
Mark as Favorite
Unmark as Favorite
Marks/unmarks selected spreadsheets as
Favorites on the Spreadsheets start page.
Set Preview
Sets spreadsheet thumbnail image based on a local
file.
Copy/Convert
Changes Menu to display copy and convert options
based on the current status of the selected spreadsheet:
If Shared: Copy to Private places a copy of the
spreadsheet under Private and Convert to Private
changes its status from Shared to Private.
If Private: Copy to Shared places a copy of the
spreadsheet under Shared and Convert to Shared
changes its status from Private to Shared.
Click Menu to return to Spreadsheet Settings.
Delete
Removes the selected spreadsheet from the start page.
Spreadsheet Thumbnail Cards

Spreadsheets
TrueCommerce Pulse User Guide 58
Open a Spreadsheet
To open a spreadsheet, click on one of the thumbnails displayed on the Spreadsheets Start Page. The
selected spreadsheet opens to display KPI results in one or more tabbed worksheets, with the data
contained in ‘cells’ defined by lettered columns and numbered rows.
Pulse includes a menu of tools for you to design how each of the worksheets in a spreadsheet is to
convey the information presented. Within each worksheet, you will be able to add, edit, or format text,
numbers or formulas, as discussed under Worksheets, page 60 .
TIP
Each spreadsheet you open adds a link to the Spaces Menu. Use this menu to keep multiple pages
open (in a ready state) for quick access to the spreadsheets you need the most.
Create a Spreadsheet
The Add Spreadsheet control on the start page is used to create a new spreadsheet based on KPI
criteria set up by your administrator, as described below. Depending on your permission level, you can
also create new spreadsheet based on a Copy, as documented under Spreadsheet Settings (Edit
Mode) on page 57.
Spreadsheet Settings
New spreadsheets are added and defined in the Spreadsheets Settings editor:
1. Ensure the Mode control on the Spreadsheets Start
Page is switched to View.
2. Click Add Spreadsheet on the action bar. This launches
the Spreadsheet Settings editor to set KPI Selection and
filter options.
KPI Selection
3. Type in a unique Spreadsheet Name. The name entered
here appears with the thumbnail image on the start page.
4. If the option is available, you may translate the
Spreadsheet Name to another language. Click Show
Translation to select from available Translation Options.
Spreadsheet Name
Worksheet Tabs
Open Worksheet

Spreadsheets
TrueCommerce Pulse User Guide 59
5. If the option is available, you can select Shared View to list the spreadsheet under Shared.
6. Select from the dropdowns for Company, Product, Category, and KPI fields.
Field options are cascading, which means that the option you select in one field changes the list of
options available in subsequent fields. If the KPI provides only one option for a field, then there is no
dropdown and the field is filled in automatically.
7. Click Next to advance to the Filters tab.
Filters
8. If a Filters tab is present, fill in the required fields to determine which data is to be displayed in the
pivot based on KPI results.
Your system administrator establishes what can be filtered. For example, the KPI may allow you to set
date ranges (Today, This Week, Month to Date, Year to Date, and so on) or choose a Custom Date
Range to filter incoming data. Other options may include a checklist for adding/removing criteria.
9. Click Finish to add the newly created spreadsheet to the Pivots Start Page.
Spreadsheet Action Bar
When you Open a Spreadsheet, the action bar contains the following file management controls:
Mark as Favorite
Unmark as Favorite
Marks/unmarks the currently selected spreadsheet under Favorites on the
Pivots Start Page.
Export
Dropdown menu of controls to Export to Excel and Export to PDF.
Tools
Dropdown menu of controls for spreadsheet maintenance and customization:
Save saves changes to the pivot grid and chart layout
Set Preview sets the current worksheet as the start page thumbnail.
Setup accesses KPI Selection for modifying some spreadsheet settings.
Copy/Convert options to copy/convert the spreadsheet depending on if it is private or
shared, as described under the start page Edit Mode.
Close
Closes the current spreadsheet, removes its link from the Foundry Spaces menu, and
returns you to the Spreadsheets Start Page.
Controls for editing and formatting the contents of a spreadsheet are outlined under Worksheets, next.

Spreadsheets
TrueCommerce Pulse User Guide 60
Worksheets
Spreadsheets comprise one or more worksheets either generated via the source KPI or added later by a
user. Each worksheet is equipped with the standard functionality to edit and visualize your data as found
in Microsoft Excel.
https:// docs.telerik.com/kendo-ui/controls/data-management/spreadsheet/end-user/user-guide
To add a new (blank) worksheet, click the control on the bottom left corner of the grid. Click on a
worksheet tab to open, double click to rename, and click the control to delete specific worksheets.
This section provides a quick reference of worksheet functionality and describes the various tasks that
you can perform with data contained when you Open a Spreadsheet in Pulse:
Implementation Notes, below
Worksheet Tools, page 61
Columns and Rows, page 66
Formatting, page 66
Sorting and Filtering, page 70
Data Validation, page 74
Formulas and Functions, page 79
Pulse controls to save, copy, rename and export an opened spreadsheet are discussed previously under
Spreadsheet Action Bar on page 59.
Implementation Notes
Most Excel-style functionality in Pulse Spreadsheets is intuitive by design. Some options are familiar and
others may be handled differently in a browser based environment. Be aware that some Excel functionality
will not be practical or fully supported due to the size of the incoming data. Refer to the notes below:
Pulse supports universal spreadsheet functionality, matching the most commonly-used Excel
functions, formulas and keyboard shortcuts.
Equivalent Excel controls are invoked via the Tool Bar, Dropdown Menus, and Shortcut Keys, as
described throughout this section.
Some browsers may not support the Copy, Cut and Paste commands if selected from the tool bar or
via the right-mouse click menu. If an error message occurs as a result, use Shortcut Keys instead.
Depending on the browser, formulas that are too deeply nested may result in an error. Use a different
method to avoid nesting values more than 100 levels deep.
Tool Bar Tabs
Tool Bar
Formula Bar
Undo/Redo
r
Add New Worksheet
Worksheet Tabs
Select All

Spreadsheets
TrueCommerce Pulse User Guide 61
Worksheet Tools
When you need to work with the contents of a worksheet, most of the functionality for adding, formatting
and manipulating your data is accessible via the Tool Bar, Dropdown Menus, and Shortcut Keys.
Other familiar controls include:
Undo (Ctrl+Z) – Reverses the last action or deletes the last typed entry.
Redo (Ctrl+Y) – Repeats the last action if possible.
Select All – Top left of grid, selects every cell on the worksheet.
Add Worksheet – Bottom left of grid, adds a new blank worksheet to the spreadsheet.
Tool Bar
Tool bar controls are listed in the sections that follow. Most of the functionality described below will be
familiar to anyone who uses Excel but for quick reference, simply hover over a control to see its
description.
The Home, Insert or Data tabs are used to switch the list of tool bar controls according to functionality.
Home
Select Home to access general controls, primarily for use in Formatting.
Open – Launches a dialog for selecting an xlsx file to open in the spreadsheet from a local folder.
Export – Launches a dialog to export spreadsheet contents as an xlsx file to a local folder.
Cut (Ctrl+X) – Cuts selected cells from the spreadsheet and adds them to the clipboard.
Copy (Ctrl+C) – Copies selected cells from the spreadsheet and adds them to the clipboard.
Paste (Ctrl+V) – Pastes contents of the clipboard at your cursor location.
Bold – Bolds text within cells selected.
Italics – Italicizes text within cells selected.
Underline – Underlines text within cells selected.
Link – Launches a dialog to embed external xlsx content via hyperlink at the cursor location.
Background – Lists options to change background color of cells selected.
Text Color – Lists options to change text color of cells selected.
Borders – Lists options to change border lines (and color) of cells selected.
Font Size – Lists options to change font size for text within cells selected.
Font – Lists options to change font type for text within cells selected.

Spreadsheets
TrueCommerce Pulse User Guide 62
Alignment – Lists options to change the text alignment within cells selected.
Wrap Text – Toggles between wrapping and truncating text within cells selected.
Increase Decimal – Increases decimal places of numbers within cells selected.
Decrease Decimal – Decreases decimal places of numbers within cells selected.
Custom Format – Lists options to change format of data elements within cells selected.
Merge Cells – Lists options to merge cells selected.
Freeze – Lists options to keep selected columns, rows, or cells in one place when scrolling.
Filter – Invokes filtering options for the column selected.
Toggle Gridlines – Toggles between showing/hiding spreadsheet gridlines.
Insert
Select Insert to access controls for adding/removing Columns and Rows.
Add Column Left – Inserts a new blank column to the left of the cell or column selected.
Add Column Right – Inserts a new blank column to the right of the cell or column selected.
Add Row Below – Inserts a new blank row immediately below the cell or column selected.
Add Row Above – Inserts a new blank row immediately above the cell or row selected.
Delete Column – Removes one or more columns at location where cells or columns are selected.
Delete Row – Removes one or more rows at location where cells or rows are selected.
Data
Select Data to access controls for organizing your data via Sorting and Filtering and controlling content
via Data Validation:
Quick Sort – Lists options to sort the selected data based on the first column only.
Filter – Launches a dialog to set more advanced sorting and filtering criteria.
Launches a dialog to validation criteria on selected cells or columns.

Spreadsheets
TrueCommerce Pulse User Guide 63
Dropdown Menus
Depending on where you place your mouse pointer, you can right click for quick access to certain controls
based on the location in the worksheet and the data selected.
Columns or Rows
Right click on column or row header to dropdown view options, described below.
Cut – Cuts entire column or row and adds them to the clipboard.
Copy – Copies entire column or row and adds them to the clipboard.
Paste – Pastes contents of the clipboard at your cursor location.
Delete – Deletes entire column or row from the worksheet.
Hide – Hides selected column or row.
Unhide – Restores hidden columns and rows. Click Select All (top left corner of the
worksheet) prior to right-clicking column or row headers.
Cell Contents
Right click on cells to view dropdown options, described below:
Cut – Cuts the contents of one or more selected cells and adds
them to the clipboard.
Copy – Copies the contents of one or more selected cells and adds
them to the clipboard.
Paste – Pastes contents of the clipboard at your cursor location.
Merge – Launches the Merge Cells dialog to apply merge options.
Add Conditional Format – Launches the Conditional Format dialog to apply automatic font and
background color formatting to the selected cell range based on a set of conditions.
Select Save to activate the condition
setting.
A pop up message will be displayed to
indicate when the condition has been
activated.

Spreadsheets
TrueCommerce Pulse User Guide 64
Edit Conditional Format – Launches the Conditional Format dialog to change or remove automatic
conditional formatting on a selected cell ranges.
Select Save to activate changed or deleted
condition settings
A toast message will be displayed to
indicate when the condition has been
changed or deleted.
Expand Formula –Copies the formula in the selected cell to all other cells in the same column,
automatically adjusting the input references of adjacent cells.
Auto Aggregate – Invokes a dropdown list of function
options that, when selected, will calculate numeric
values in the current column.
1. Select any cell below a list of numeric values in a column
2. Right click and select Auto Aggregate from the menu options.
3. Click on a function from the dropdown list.
The selected function (Sum, Average, Count, Max, or Min) automatically
performs a calculation based on the values in that column. The formula and
result is placed in the first empty cell below the list of values.

Spreadsheets
TrueCommerce Pulse User Guide 65
Shortcut Keys
Many of the actions you perform with a mouse may also be handled using your keyboard. Pulse
spreadsheets support the following standard keyboard shortcuts:
Ctrl + A
Selects whole worksheet
Ctrl + C
Copies selected cells
Ctrl + S
Saves the active spreadsheet file
Ctrl + V
Inserts copied or cut cells to a selected location within the worksheet
Ctrl + X
Cuts selected cells
Ctrl + Y
Invokes Redo control, if possible, to repeat the previous action
Ctrl + Z
Invokes Undo control, if possible, to reverse the previous action
Ctrl + selected cell
Selects an adjacent or non adjacent cell
Shift + selected cells
Selects a range of adjacent cells.
Ctrl + selected rows or columns
Selects an adjacent or nonadjacent row or column.
Esc
Cancels an entry in a cell or in the formula bar.
Arrows
Move a cell up, down, left, or right in a worksheet.
Down Arrow
Up Arrow
Selects the next or previous command when a menu or submenu is open.
In a dialog box, the arrow keys move between options in a dropdown list, or between
options in a group of options.
Ctrl + Arrow
Moves to the edge of the current data region of the worksheet.
Shift + Arrow
Selects (a range of) adjacent cells, rows, or columns, by extending the selection by one
cell, row, or column.
Backspace
Removes all contents of a selected cell.
When editing cell contents, it deletes characters to the left of the cursor.
In the formula bar, it deletes characters to the left of the cursor.
Delete
Removes the contents of selected cells without affecting cell format.
When editing cell contents, it deletes characters to the right of the cursor.
End
Moves to the last cell on the right of the currently selected row.
In a menu or submenu, it selects the last command.
In the formula bar, it moves the cursor to the end of the text.
Ctrl + End
Selects the last cell on a worksheet.
Ctrl + Shift + Home
Extends the selection of cells to the last cell on a worksheet.
Enter
Completes a cell entry from the cell or formula bar, and selects the cell below.
In a dialog box, it performs the action for the default command button.
Esc
Cancels an entry in the cell or formula.
Cancels and then closes an open menu, submenu, or dialog box.
Home
Moves to the first cell on the left of the currently selected row.
In a menu or submenu, it selects the first command.
In the formula bar, it moves the cursor to the beginning of the text.
Ctrl + Home
Selects the first cell on a worksheet.

Spreadsheets
TrueCommerce Pulse User Guide 66
Ctrl + Shift + Home
Extends the selection of cells to the first cell on a worksheet.
Page Down
Moves one screen down in a worksheet.
Page Up
Moves one screen up in a worksheet.
Spacebar
Inserts space at cursor location when editing contents of a cell or formula bar.
Tab
Moves one cell to the right.
In a dialog box, it moves to the next option or option group.
On the tool bar, it moves to the next control on the right.
Within a selected range (cells, rows, or columns) it moves to the next cell.
Shift + Tab
Moves one cell to the left.
In a dialog box, it moves to the previous option or option group.
On the tool bar, it moves to the previous control on the left.
Within a selected range (cells, rows, or columns) it moves to the previous cell.
Columns and Rows
Following are the basic methods to resize, insert or delete, and hide or unhide whole columns and rows in
a worksheet.
Selecting Columns or Rows
In the column/row header, click on the letter of the column or number of the row you want selected. This
will highlight the entire row or column to indicate that it is now selected.
To select multiple adjacent columns or rows, drag the mouse pointer along the column/row header. To
select nonadjacent columns or rows, press the Ctrl key and click on the letter of the columns or number of
the rows you want selected. To select all columns and rows in a worksheet, click the Select All control.
Resizing a Column or Row
In the column/row header, hover your cursor at the line denoting the edge of the column or row until it
changes to appear as illustrated below:
Columns
Rows
Drag the cursor left or right to change the width of the selected column. Drag the cursor up or down to
change the height of the selected row.
Adding Columns or Rows
After Selecting Columns or Rows, select the column or row next to where want the new column or row,
and then select the Insert tab on the Tool Bar. Click one of the following:
Columns
Rows
To insert on the left
To insert below
To insert on the right
To insert above

Spreadsheets
TrueCommerce Pulse User Guide 67
Deleting Columns or Rows
Select the column or row and then select the Insert tab on the Tool Bar. Click one of the following:
To delete a column
To delete a row
Another option for deleting is to right click on the column letter or row number and then select Delete from
the menu options.
Hiding/Unhiding Columns or Rows
To hide, right click on the column letter or row number and then select the Hide menu option. To restore
hidden columns or rows, click Select All (top left corner of the worksheet) prior to selecting the Unhide
menu option. For further details, see Dropdown Menus on page 63.
Freezing a Column or Row
Select the column or row and then select the Home tab on the Tool Bar. Click and select from the
dropdown options.
Freezing options allow you to keep selected data in the same place as you
scroll through the rest of your worksheet.
For example, if your first row is used for column headings, freezing will keep
the headings visible no matter how much data lies below. This is particularly
useful when you have a long list of data in your worksheet and you need to
differentiate columns near the bottom of the table.
Formatting
Formatting controls are available under the Home tab on the Tool Bar. Some of this functionality will be
familiar to those with experience formatting data in Excel but for quick reference, simply hover over a
control to see what it does.
Selecting Cells
Click to select a cell. For a range or block of cells, extend the selection by dragging the mouse pointer
over adjacent cells. Press the Ctrl key to select multiple nonadjacent cells. To select all cells in a
worksheet, click the Select All control.
This highlights the cells to indicate that they are now selected.
Selecting a Cell for Editing
Double click to edit cell contents. This places the cursor inside the selected cell to allow editing.
NOTE
When a cell is selected for editing, Copy (Ctrl+C), Cut (Ctrl+X) and Paste (Ctrl+P) commands
affect the contents of the cell and not the cell itself.
Text Styling
Cell Color
Text Color
Cell Borders
Font Settings
Data Alignment
Number Formats
Merge Cells
Freeze Cells

Spreadsheets
TrueCommerce Pulse User Guide 68
Adding Cell Borders
Select the cells, columns, or rows you want to modify, and then select the
Home tab on the Tool Bar. Click and select a border style and color
from the dropdown options. Click anywhere on the worksheet to exit the
dropdown menu.
The Reset Color control changes the border color to black by default.
To remove a border, reapply the border style using the method described
above, and then change the color to white.
Adding Cell Background
Select the cells, columns, or rows you want to modify, and then select the
Home tab on the Tool Bar. Click and select a color from the dropdown
options. Click anywhere on the worksheet to exit the dropdown menu.
The Reset Color control changes the color to white by default.
Merging Cells
Select adjacent cells that you want to merge, and then select the Home
tab on the Tool Bar. Click and select from the dropdown options.
Alternately, you can right click on cells and select Merge from the
dropdown options. Click anywhere on the worksheet to exit the dropdown
menu.
When merging cells that contain data, only the data in the first set of
cells will be retained in the resulting merge.
Aligning Cell Data
Select the cells, columns, or rows that have data you want to modify, and then select the Home tab on the
Tool Bar. Click one of the following controls:
Wrap Text – Toggles between wrapping and truncating text within the cells selected. See also,
Resizing a Column or Row, page 66.
Alignment – Lists options for horizontal and vertical alignment of text within the cells selected.
Set a horizontal style (left, center, right, or justified) as
well as a vertical style (top, middle, or bottom). Click
anywhere on the worksheet to exit the dropdown menu.

Spreadsheets
TrueCommerce Pulse User Guide 69
Formatting Text
Select the cells, columns, or rows that have data you want to modify, and then select the Home tab on the
Tool Bar. Click one of the following controls:
Bold – Bolds text within the cells selected.
Italics – Italicizes text within the cells selected.
Underline – Underlines text within the cells selected.
Text Color – Lists options to change text color within the cells selected.
Font Size – Lists options to change font size for text within the cells selected.
Font – Lists options to change font type for text within the cells selected.
Formatting Numeric Data
Select the cells, columns, or rows that have data you want to modify, and then select the Home tab on the
Tool Bar. Click one of the following controls:
Increase Decimal – Increases decimal places of numbers within the cells selected.
Decrease Decimal – Decreases decimal places of numbers within the cells selected.
Custom Format – Lists options to change the format of numeric data within the cells selected
Selecting one of the options from the dropdown list quickly switches
data to the numeric, currency or date format selected. Note the hints
on the right. To further customize, select More formats …

Spreadsheets
TrueCommerce Pulse User Guide 70
Sorting and Filtering
Following are the basic methods for reorganizing data in a worksheet. Click Undo (Ctrl+Z) if you need
to reverse any Sorting or Filtering results.
Sorting
Sorting can be performed on an entire worksheet, a single column, or a range of cells. With Pulse
spreadsheets, there are different methods to reorganize data depending on the type of sort you require.
On First Column
Use this type of sort to quickly reorganize selected data based on the order of cells in the first column. It
can also be used to sort data in a single column.
To sort based on the first column:
1. Select a range of cells as described under Selecting Cells, or select a column as described under
Selecting Columns or Rows.
2. Select the Data tab on the Tool Bar.
3. Click and then select from the dropdown options:
Sort range A to Z sorts the contents of selected cells in
ascending order.
Sort range Z to A sorts the contents of selected cells in
descending order.
If a range of cells is selected, this method reorganizes all selected data based on whatever is in the first
column. If a column is selected, the data will be reorganized independent of any other data in the
worksheet.
Note that this type of sort does not assume that the top row is a ‘title’ and therefore, the data in that row
will be included in the reorganization.
On Any Column
This type of sort is applied using Filter control options, which allow you to reorganize selected data
based on the order of cells in any column you choose.
To sort based on any column:
1. Select a range of cells as described under Selecting Cells, or select multiple columns as described
under Selecting Columns or Rows.
2. Select the Data tab on the Tool Bar.
3. Click the control. The top row of the highlighted cells will be marked with symbols to indicate
that those columns can be used for sorting or filtering.
Note that this type of sort considers the top row of the data selected to be a ‘title’ and it is not
included in the reorganization. Sorting only affects the cells starting below the rows that contain
symbols, whether those cells are actual titles or not.

Spreadsheets
TrueCommerce Pulse User Guide 71
4. Click the symbol on the column you want to sort by. Column ‘ G ‘ is selected in the following
example. This launches the filter/sort dropdown menu.
5. Select a sorting option from the top of the dropdown menu, where:
Sort range A to Z sorts the contents of selected cells in ascending order.
Sort range Z to A sorts the contents of selected cells in descending order.
In the following example, the table from step 4 has been reorganized in ascending order based on
the contents of Column G, Customer Name:
6. When you no longer require sorting options, click the control to remove symbols from the
highlighted cells.
Sort Options
Filter Options

Spreadsheets
TrueCommerce Pulse User Guide 72
Filtering
Applying a filter in a worksheet narrows down the data within a range of cells to display only the
information you need. This feature is useful for displaying a subset of data, particularly if your
spreadsheet is very large, or designed to be repopulated on a regular basis via KPI mechanisms.
To filter a block of cells:
1. Select a range of cells as described under Selecting Cells, or select multiple columns as described
under Selecting Columns or Rows.
2. Select the Data tab on the Tool Bar.
3. Click the control. The top row of the highlighted cells will be marked with symbols to indicate
that those columns can be used for sorting or filtering.
4. Click the symbol on the column you want to filter by. Column ‘ I ‘ is selected in the following
example. This launches the filter/sort dropdown menu.
5. Select one of the following options to filter your selected data:
Filter by Condition. Filters data elements based on one of several preset conditions.
Filter by Value. Filters data elements based on a checklist of available values.
The two methods of filtering are discussed in more detail at the end of this section.
6. Click Apply at the bottom of the dropdown menu to activate the filter. Once your filter is in place,
only the rows that match the filter criteria will be displayed in the block of cells selected.
7. When filtering is complete, click the control to remove symbols from the highlighted cells.
To restore filtered rows, click Select All followed by the control.
Sort Options
Filter Options

Spreadsheets
TrueCommerce Pulse User Guide 73
Filter by Condition
You can define filtering criteria based on conditions selected from a
drop-down list of options that can be applied to either text, date,
or numeric fields.
Text Fields. Choose any of the text based conditions from the drodown
list and then fill in the text box to complete the filter criteria.
You can alphabetically sort the filter results by clicking
Sort range A to Z or Sort range Z to A once the filter is in place.
Date Fields. Choose any of the date based conditions from the dropdown
list and then fill in the text box to complete the filter criteria. Note that the
date format may differ depending on the order of date components. Make
sure you check the current format before applying this filter.
Numeric Fields. Choose any of the (Is…) numeric conditions from the
dropdown list and then fill in the text box to complete the filter criteria.
Example: For the ‘Segment’ column, Text contains is the chosen
condition with criteria in the text box set to ‘Corporate’.
After clicking Apply, the resulting data displays only those rows with
cells that contain ‘Corporate’:
Filter by Value
You can define filtering criteria by selecting/deselecting from a checklist
of column data elements.
Each checkbox represents a value that exists one or more times in
the column selected.
Only the checkboxes selected will display rows in the filter results.
Deselecting All clears all checkboxes and removes all rows from the
filter results.
Selecting All selects all checkboxes and displays all rows as a result.

Spreadsheets
TrueCommerce Pulse User Guide 74
Example: For the ‘State’ column, only the ‘New York’ and ‘Pennsylvania’ checkboxes are selected.
After clicking Apply, the resulting data displays only those rows with cells that contain those two states:
Data Validation
Data validation allows you to regulate which data is to be permitted for entry in selected cells, columns, or
rows. Depending on your requirements, you can:
Restrict entries to a certain set of values
Configure data validation so users can choose values from a dropdown list of preset options
Create custom validation rules using spreadsheet formulas
Provide hints to notify users upon the entry of invalid data
Copy and paste data validation from any cell into another.
Setting Validation
To set data validation in Pulse spreadsheets:
1. Select one or more cells as described under
Selecting Cells, or select entire columns as
described under Selecting Columns or Rows.
2. Select the Data tab on the Tool Bar.
3. Click to launch the Data
Validation editor.
4. Choose one of the options from the Criteria
dropdown, as explained under Validation Criteria
on page 75.
5. Select Ignore Blank if you want to evaluate cells
that only contain data.
6. Select one of the two On invalid data options.
7. Select Show Hint and complete the hint fields if
you want to write your own error message.
8. Click Apply to activate validation on the cells or
column selected.
Validation Criteria and Changing/Removing Validation are documented in the sections that follow.

Spreadsheets
TrueCommerce Pulse User Guide 75
Validation Criteria
When Setting Validation, initial criteria defaults to Any Value, which means that no validation will be
applied to the selected cells unless you select an option in the Criteria field.
Data validation can be based on Number, Text,
Date, Custom Formula, or List criteria.
When you select one of these options, the
following fields and check boxes in the Data
Validation editor will change to accommodate
rules associated with the criteria selected, as
explained below.
Field Descriptions
Field
Description
Criteria
Dropdown options to determine the validation criteria applied, and subsequent fields
to be displayed in the Data Validation editor:
Any Value – No validation criteria applied (default)
Number – Numeric value criteria
Text – Alphanumeric value criteria
Date – Date value criteria
Custom Formula – Criteria based on customized spreadsheet formula
List – Criteria selected from a list, either cell reference or built in array.
Comparer
Number, Text, or Date only – Dropdown options of relational operators used to build
a compare statement against the contents of cell(s) selected.
Min / Max
Number only – Numeric values used in the compare statement. Max field is only
required for ‘between/not between’ Comparer options.
Value
Text only – Alphanumeric value (in double quotes).
Custom Formula only – Statement built using formula syntax (no equal sign)
List only – Value(s) selected from cell reference or built in array.
Start / End
Date only – Date values used in the compare statement, format ‘mm/dd/yyyy’ or
‘DATEVALUE("mm/dd/yyyy")’. End field is only required for ‘between/not between’
Comparer options.
Ignore Blank
Checkbox to indicate that validation will not apply to empty cells.
On Invalid Data
Radio buttons to determine how invalid data is to be handled, where
Reject Input does not allow entry of invalid data
Show Warning allows entry of invalid data but ‘red flags’ the cells
Show Hint
Checkbox to display user-defined hint message upon entry of invalid data, using the
contents of Hint Title and Hint Message fields.
Hint Title
Title of popup message.
Hint Message
Contents of popup message.
TIP
Data Validation can be copied (like a formula) by copying the cell to the new location. Cell
references in the validation criteria for Custom Formula and List criteria adjust automatically to
the location of new cells unless you change them to absolute references.

Spreadsheets
TrueCommerce Pulse User Guide 76
Number
If Number is chosen in the Criteria
field, the validation statement can
be set up to compare against a
single numeric value, or between
two numeric values.
In this example, Data Validation
automatically checks against a
value greater than 200 on data
selected in column J.
Because Show Warning has been
selected for handling invalid data,
this results in a ‘red flag’ on all the
values in the column that are under
200.
Text
If Text is chosen in the Criteria field the validation statement
compares against an alphanumeric value, which must be defined in
double quotes.
In this example, Data Validation automatically checks against a text
value equal to “Standard Class” on data selected in column C.
Because Reject Input has been selected for handling invalid data, this results in a popup message,
preventing any attempt to enter a text value other than “Standard Class”. Also, because the Show Hint
option has been selected, the associated hint message “Validation reject” displays in place of the generic
error message

Spreadsheets
TrueCommerce Pulse User Guide 77
Date
If Date is chosen in the Criteria field, the validation statement can
be set up to compare against date values , which must be defined
using the format ‘mm/dd/yyyy’ or ‘DATEVALUE("mm/dd/yyyy")’.
In this example, Data Validation automatically checks against a
date value between two dates on data selected in column B.
Because the Display button to show calendar option was set in the validation criteria, dates can be
selected using the built in popup calendar (shown above). Also, because Reject Input has been selected
for handling invalid data, the calendar will not display months that are outside of the validation date
range.
Custom Formula
If Custom Formula is chosen in the Criteria field, the validation
statement can be customized using spreadsheet Formulas and
Functions, as described on page 78. Note that data validation
syntax does not use the equal sign for custom formulas.
In this example, Data Validation uses the custom formula
‘AND(ISNUMBER(D4), LEN(D4)<14)’ to automatically check
that the value in cell D4 is a numeric less than 14 digits.
Because Show Warning has been selected for handling invalid data, this results in a ‘red flag’ on the
selected cell. Also, because the Show Hint option has been selected, the associated hint message
displays when you hover your mouse over the flagged cell.

Spreadsheets
TrueCommerce Pulse User Guide 78
List
If List is chosen in the Criteria field, the validation statement will
compare cell contents against a list of values.
Smaller lists can be entered directly in the value field using the
array format: {“Value1”, “Value2”, “Value3”}.
For longer lists, you can reference a range of cells anywhere in
the spreadsheet using the format: SheetName!A1:A20.
In the first example, Data Validation automatically checks
against a list in the value field on data selected in column E.
Because Display button to show list was set in the validation criteria, the options ‘true’ or ‘false’ can be
selected from a dropdown list.
In the second example, Data Validation automatically checks against values defined in a range of cells
on data selected in column F.
Because Display button to show list was set in the validation criteria, six options (contents of the cell
range in the ‘Segment’ worksheet) can be selected from a dropdown list.
Changing/Removing Validation
To make changes to existing validation on selected cells, follow the same steps described under Setting
Validation, edit the criteria, and then click Apply. To remove existing validation from selected cells, follow
the steps described under Setting Validation, and then click Remove.

Spreadsheets
TrueCommerce Pulse User Guide 79
Formulas and Functions
You can simplify your work by entering formulas in cells to handle a wide variety of calculations. Typical of
any spreadsheet application, formulas in Pulse start with an equal sign, which can then be followed by
numbers, math operators, and any functions that may be required to calculate and transform your data.
To apply a formula:
1. Select a cell.
2. Type an equal sign [ = ] in the Formula Bar.
3. Complete your formula using any combination of values, operators, or functions.
There may be more than one way to achieve the result you want. When you
start typing, autocomplete prompts you with options and syntax.
For a list of supported functions, see Function Reference on page 79.
4. Press Enter to see the result of your formula in the selected cell. Refer to the
example below.
Note that you can modify a formula by double-clicking on the cell, which
displays the existing formula in the Formula Bar.
Example: A formula is entered in cell B5 to calculate the sum of values contained in the range of cells
B2 to B4. This can be achieved either by using ‘+’ math operators or the SUM function in the formula.
=B2+B3+B4
=SUM(B2:B4)
Function Reference
Each formula can contain a function or multiple functions, predefined rules used to quickly transform the
contents of cells. If you are new to spreadsheets, syntax requirements and examples of functions are
available from multiple sources on the internet, including the Excel help center.
Following is a quick reference of the functions that can be applied to formulas in Pulse spreadsheets:
ABS
Returns absolute (nonnegative) value of a number
ACOS
Returns principal value of the arccosine of a number. The angle is returned in radians.
ACOSH
Returns principal value of the inverse hyperbolic cosine of a number
ACOT
Returns principal value of the arccotangent of a number. The angle is returned in radians.
ACOTH
Returns hyperbolic arccotangent of a number
ADDRESS
Returns cell address (reference) as a text
AGGREGATE
Returns aggregate of a list or database
ARABIC
Converts Roman numbers to Arabic as numbers

Spreadsheets
TrueCommerce Pulse User Guide 80
AREAS
Returns number of areas in a reference
ASIN
Returns principal value of the arcsine of a number. The angle is returned in radians.
ASINH
Returns principal value of the inverse hyperbolic sine of a number
ATAN
Returns principal value of the arctangent of a number. The angle is returned in radians.
ATAN2
Returns principal value of the arctangent from x- and y- coordinates in radians
ATANH
Returns principal value of the inverse hyperbolic tangent of a number
AVEDEV
Calculates average of the absolute deviations of listed values
AVERAGE
Returns average of a set of numbers
AVERAGEA
Returns average of values, including numbers, text, and logical values
AVERAGEIF
Returns average of all cells in a range based on a given criteria
AVERAGEIFS
Returns average of all cells in a range based on multiple criteria
BASE
Converts number into a text representation with the given base
BETA.DIST
Returns beta cumulative distribution function
BETA.INV
Returns inverse of the cumulative distribution function for a specified beta distribution
BETADIST
Returns value of probability density function or cumulative distribution function for beta distribution
BINOM.DIST
Returns individual term binomial distribution probability
BINOM.DIST.RANGE
Returns probability of a trial result using a binomial distribution
BINOM.INV
Returns smallest value for which cumulative binomial distribution is less than or equal to criterion value
BINOMDIST
Returns binomial distribution probability
CEILING
Rounds number to the nearest integer or to the nearest multiple of significance
CEILING.MATH
Rounds number up, to the nearest integer or to the nearest multiple of significance
CEILING.PRECISE
Rounds number to nearest integer or to nearest multiple of significance. Regardless of sign of the
number, the number is rounded up.
CHAR
Return character represented by given number
CHISQ.DIST
Returns cumulative beta probability density function
CHISQ.DIST.RT
Returns one-tailed probability of the chi-squared distribution
CHISQ.INV
Returns cumulative beta probability density function
CHISQ.INV.RT
Returns inverse of the one-tailed probability of the chi-squared distribution
CHISQ.TEST
Returns test for independence
CHOOSE
Uses index to return a value from a list of values
CLEAN
Removes all nonprintable characters from a text
CODE
Returns numeric value corresponding to the first character in a text string
COLUMN
Returns column number(s) of a reference
COLUMNS
Returns number of columns in a given range
COMBIN
Returns number of combinations for a given number of objects
COMBINA
Returns number of combinations with repetitions for a given number of objects
CONCATENATE
Joins number of text strings into one text string
CONFIDENCE.NORM
Returns confidence interval for a population mean
CONFIDENCE.T
Returns confidence interval for a population mean, using a Student's t distribution
COS
Returns cosine of a number. The angle is returned in radians.

Spreadsheets
TrueCommerce Pulse User Guide 81
COSH
Returns hyperbolic cosine of a number
COT
Returns cotangent of an angle, specified in radians
COTH
Returns hyperbolic cotangent of a number
COUNT
Counts number of numbers in a list of arguments
COUNTA
Counts number of values in a list of arguments
COUNTBLANK
Counts number of blank cells in a range
COUNTIF
Counts the number of cells in a range that meet a criteria
COUNTIFS
Counts the number of cells in a range that meet multiple criteria
COVAR
Calculates the covariance between two cell ranges
COVARIANCE.P
Returns covariance, the average of the products of paired deviations
COVARIANCE.S
Returns sample covariance, average of products deviations for each data point pair in two data sets
CRITBINOM
Returns smallest value for which cumulative binomial distribution is less than or equal to a criterion value
CSC
Returns cosecant of an angle, specified in radians
CSCH
Returns hyperbolic cosecant of an angle, specified in radians
DATE
Returns date value constructed from a year, month, and day values
DATEVALUE
Returns date converting it in the form of text to a serial number
DAY
Returns day by converting it from a serial number
DAYS
Returns number of days between two dates
DAYS360
Returns number of days between two dates using the 360-day year
DECIMAL
Converts text representation of a number in a given base into a decimal number
DEGREES
Converts radians to degrees
DOLLAR
Converts number to text, using the $ currency format
EDATE
Returns serial number of date that is the indicated number of months before or after the start date
EOMONTH
Returns serial number of the last day of the month before or after a specified number of months
ERF
Returns error function
ERFC
Returns complementary error function
EVEN
Rounds number up to the nearest even integer
EXACT
Reports if two text values are equal using a case-sensitive comparison
EXP
Returns e raised to the power of a given number
EXPON.DIST
Returns exponential distribution
F.DIST
Returns F probability distribution
F.DIST.RT
Returns F probability distribution
F.INV
Returns inverse of F probability distribution
F.INV.RT
Returns inverse of F probability distribution
F.TEST
Returns result of F -test
FACT
Return factorial of a number

Spreadsheets
TrueCommerce Pulse User Guide 82
FACTDOUBLE
Returns double factorial of a number
FALSE
Returns logical value False
FIND
Returns starting position of a given text
FISHER
Returns Fisher transformation
FISHERINV
Returns inverse of the Fisher transformation
FIXED
Rounds number to a specified number of decimals and formats the result as a text
FLOOR
Rounds number down to the nearest multiple of the second parameter
FLOOR.MATH
Rounds number down, to the nearest integer or to the nearest multiple of significance
FLOOR.PRECISE
Rounds number down to the nearest integer or to the nearest multiple of significance. Regardless of
the sign of the number, the number is rounded down.
FORECAST
Assumes future value based on existing x- and y- values
FORMULATEXT
Returns formula at the given reference as text
FREQUENCY
Returns frequency distribution as a vertical array
GAMMA
Return Gamma function value
GAMMA.DIST
Returns Gamma distribution
GAMMA.INV
Returns inverse of the Gamma cumulative distribution
GAMMALN
Returns natural logarithm of the Gamma function
GAUSS
Returns 0.5 less than the standard normal cumulative distribution
GCD
Returns greatest common divisor (GCD)
GEOMEAN
Returns geometric mean of a sequence
HARMEAN
Returns harmonic mean of a sequence
HLOOKUP
Looks for matching value in the first row of a given table, and returns the value of the indicated row
HOUR
Converts serial number to an hour
HYPERLINK
Creates hyperlink involving an evaluated expression
IF
Returns one of two values, depending on a condition
IFERROR
Returns specified value if a formula evaluates to an error; otherwise, returns the result of the formula
INDEX
Returns value or a reference to a value from within a table or range
INDIRECT
Returns reference indicated by a text value
INT
Rounds number down to the nearest integer
INTERCEPT
Returns intercept of the linear regression line for the given data
ISBLANK
Returns True if the referenced cell is blank; else returns False
ISERR
Returns True if the value is any error except #N/A; else returns False
ISERROR
Returns True if the value is any error; else returns False
ISEVEN
Returns True if the value is even; else returns False
ISLOGICAL
Returns True if the value is logical; else returns False
ISNA
Returns True if the value is the #N/A error; else returns False
ISNONTEXT
Returns True if the value is not text; else returns False

Spreadsheets
TrueCommerce Pulse User Guide 83
ISNUMBER
Returns True if the value is a number; else returns False
ISO.CEILING
Returns number that is rounded up to the nearest integer or to the nearest multiple of significance
ISODD
Returns True if the value is odd; else returns False
ISOWEEKNUM
Returns ISO week number of the year for a given date
ISREF
Returns True if the value is a reference; else returns False
ISTEXT
Returns True if the value is text; else returns False
KURT
Returns kurtosis (“peakedness”) of a data set
LARGE
Finds nth largest value in a list
LCM
Returns least common multiple
LEFT
Returns selected number of text characters from the left
LEN
Returns number of characters from a given text
LINEST
Returns parameters of a (simple or multiple) linear regression equation for the given data and, optionally,
statistics on this regression
LN
Returns natural logarithm of a number
LOG
Returns logarithm of a number to a specified base
LOG10
Returns base-10 logarithm of a number
LOGEST
Returns parameters of an exponential regression equation for the given data obtained by linearizing this
intrinsically linear response function and returns, optionally, statistics on this regression
LOGNORM.DIST
Returns cumulative lognormal distribution
LOGNORM.INV
Returns inverse of lognormal cumulative distribution
LOWER
Converts text to lowercase
MATCH
Finds item in a range of cells, and returns its relative position (starting from 1)
MAX
Returns maximum value in a set of numbers
MDETERM
Returns determinant of a matrix
MEDIAN
Returns median (middle) value in a list of numbers
MID
Returns specific number of characters from a text string, starting at a specified position
MIN
Returns minimum value in a set of numbers
MINUTE
Converts serial number into a minute
MINVERSE
Returns inverse of a matrix
MMULT
Returns matrix output of two arrays
MOD
Returns remainder when one number is divided by another number
MODE.MULT
Returns vertical array of most frequently occurring, or repetitive values in an array or range of data
MODE.SNGL
Returns most common value in a data set
MONTH
Converts serial number to a month
MROUND
Rounds number to the desired multiple
MULTINOMIAL
Returns multinomial for a given set of values
MUNIT
Creates unit matrix of a specified dimension
N
Returns number of a value

Spreadsheets
TrueCommerce Pulse User Guide 84
NA
Returns error value #N/A
NEGBINOM.DIST
Returns negative binomial distribution
NEGBINOMDIST
Returns negative binomial distribution
NETWORKDAYS
Returns number of whole workdays between two dates
NORM.DIST
Returns normal cumulative distribution
NORM.INV
Returns inverse of the normal cumulative distribution
NORM.S.DIST
Returns standard normal cumulative distribution
NORM.S.INV
Returns inverse of the standard normal cumulative distribution
NOT
Reverses logic of its argument
NOW
Returns serial number of the current date and time
ODD
Rounds number up to the nearest odd integer, where "up" means "away from 0"
OFFSET
Modifies position and dimension of a reference
PEARSON
Returns Pearson correlation coefficient of two data sets
PERCENTILE
Calculates x-th sample percentile of values in a range
PERCENTILE.EXC
Returns k-th percentile of values in a range, where k is in the range 0..1, exclusive
PERCENTILE.INC
Returns k-th percentile of values in a range
PERCENTRANK
Returns percentage rank of a value in a sample
PERCENTRANK.EXC
Returns rank of a value in a data set as a percentage (0..1, exclusive) of the data set
PERCENTRANK.INC
Returns percentage rank of a value in a data set
PHI
Returns value of the density function for a standard normal distribution
PI
Returns approximate value of pi
POISSON.DIST
Returns Poisson distribution
POWER
Returns result of a number raised to the power of another number
PROB
Returns probability that values in a range are between two limits
PRODUCT
Multiplies set of numbers, including all numbers inside ranges
PROPER
Capitalizes first letter in each word of a text value
QUARTILE
Returns quartile of a data set
QUARTILE.EXC
Returns quartile of the data set, based on percentile values from 0..1, exclusive
QUARTILE.INC
Returns quartile of a data set
QUOTIENT
Returns integer portion of a division
RADIANS
Converts degrees to radians
RAND
Returns random number between 0 (inclusive) and 1 (exclusive)
RANDBETWEEN
Returns random number between specified values
RANK
Returns rank of a number in a list of numbers
RANK.AVG
Returns rank of a number in a list of numbers
RANK.EQ
Returns rank of a number in a list of numbers

Spreadsheets
TrueCommerce Pulse User Guide 85
REPLACE
Replaces characters within text
REPT
Repeats text a specified number of times
RIGHT
Returns rightmost characters from a text value
ROMAN
Converts Arabic numbers to Roman as text
ROUNDDOWN
Rounds number down, towards zero, to the number of digits specified by digits
ROUNDUP
Rounds number up, away from 0 (zero), to the number of digits specified by digits
ROW
Returns row number(s) of a reference
ROWS
Returns number of rows in a reference
RSQ
Returns square of the Pearson product moment correlation coefficient
SEARCH
Finds text value within another text value (not case-sensitive)
SEC
Returns secant of an angle specified in radians
SECH
Returns hyperbolic secant of a given angle specified in radians
SECOND
Converts serial number to a second. This function presumes that leap seconds never exist.
SERIESSUM
Returns sum of a power series based on the formula
SIGN
Returns sign of a number
SIN
Returns sine of an angle specified in radians
SINH
Returns hyperbolic sine of a number
SLOPE
Calculates slope of the linear regression line
SMALL
Finds the n-th smallest value in a data set
SQRT
Returns positive square root of a number
SQRTPI
Returns square root of a number multiplied by pi
STDEV.P
Calculates standard deviation based on the entire population
STDEV.S
Estimates standard deviation based on a sample
STEYX
Returns standard error of the predicted y-value for each x in the regression
SUBSTITUTE
Substitutes text for old text string
SUBTOTAL
Evaluates function on a range
SUM
Sums (adds) the set of numbers, including all numbers in a range
SUMIF
Sums values of cells in a range that meet a criteria
SUMIFS
Sums values of cells in a range that meet multiple criteria
SUMPRODUCT
Returns sum of products of corresponding array elements
SUMSQ
Sums (adds) set of squares of numbers, including all numbers in a range
SUMX2MY2
Returns sum of the difference between the squares of corresponding values in two arrays
SUMX2PY2
Returns sum of squares of corresponding values in two arrays
SUMXMY2
Returns sum of squares of corresponding values in two arrays
T
Converts its arguments to text; else returns a 0-length text value
T.DIST
Returns Percentage Points (probability) for the Student t-distribution
T.DIST.2T
Returns Percentage Points (probability) for the Student t-distribution
T.DIST.RT
Returns Student's t-distribution

Spreadsheets
TrueCommerce Pulse User Guide 86
T.INV
Returns t-value of Student's t-distribution as a function of the probability and the degrees of freedom
T.INV.2T
Returns inverse of the Student's t-distribution
T.TEST
Returns probability associated with a Student's t-test
TAN
Returns tangent of a number in radians
TANH
Returns hyperbolic tangent of a number
TEXT
Formats number and converts it to text
TIME
Constructs time value from hours, minutes, and seconds
TIMEVALUE
Returns serial number of a particular time
TODAY
Returns serial number of today's date
TRANSPOSE
Returns transpose of an array
TRIM
Removes spaces from text; replaces all internal multiple spaces with a single space
TRIMMEAN
Returns mean of the interior of a data set, ignoring a proportion of high and low values
TRUE
Returns logical value True
UNICHAR
Returns character represented by the given numeric value according to the Unicode Standard
UNICODE
Returns Unicode code point that corresponds to the first character of a text value
UPPER
Converts text to uppercase
VALUE
Converts text argument to a number
VAR.P
Calculates variance based on the entire population
VAR.S
Estimates variance based on a sample
VLOOKUP
Looks for matching value in a table or a range by row
WEEKDAY
Converts serial number to a day of the week
WEEKNUM
Determines week number of the year for a given date
WORKDAY
Returns date serial number which is a specified number of work days before or after an input date
YEAR
Converts serial number to a year
YEARFRAC
Extracts number of years (including fractional part) between two dates
File Management
The Spreadsheet Action Bar provides a Save control to save changes to a spreadsheet. The following
sections discuss various other options to import and export spreadsheets.
Import from Excel, below
Export to Excel, page 87
Export to PDF, page 88
NOTE
Currently, there is no ‘print’ control for printing spreadsheets directly from Pulse. If needed, you
can print exported spreadsheets locally either as a PDF or Excel file.

Spreadsheets
TrueCommerce Pulse User Guide 87
Import from Excel
You can upload the contents of Excel files into Pulse Spreadsheets.
CAUTION
Importing from a local file will overwrite all worksheets in the currently opened spreadsheet.
Before importing, ensure that your destination spreadsheet is suitable for this purpose.
To import a local Excel file:
1. Click from the Home tab on the worksheet toolbar.
This launches your browser’s Open dialog for locating an Excel file to upload into your spreadsheet.
2. Select an xlsx file and click Open.
When the upload is complete, the destination spreadsheet displays all the data and worksheets that
are contained in the imported file.
Export to Excel
Pulse allows you to export spreadsheets or single worksheets into Excel.
Export Spreadsheet
To save an opened spreadsheet as a local Excel file:
1. Click Export on the Spreadsheet Action Bar.
2. Click Excel from the dropdown menu.
Depending on your browser, the file may download automatically to your default folder or invoke
options to Save or Save As to a location of your choosing.
The file downloads to the location selected as per your browser set up.
Export Worksheet
To save the currently displayed worksheet as a local Excel file:
1. Click from the Home tab on the worksheet toolbar.
This invokes the Export.. dialog for selecting a file type.

Spreadsheets
TrueCommerce Pulse User Guide 88
2. Enter a unique file name and select the Excel Workbook file type from the dropdown menu.
3. Click Save. Depending on your browser, the file may download automatically to your default folder or
invoke options to Save or Save As to a location of your choosing.
The file downloads to the selected (or default) location in your browser set up.
Export to PDF
Pulse allows you to export spreadsheets or single worksheets to PDF.
Export Spreadsheet
To save an opened spreadsheet as a local PDF file:
1. Click Export on the Spreadsheet Action Bar.
2. Click PDF from the dropdown menu.
Depending on your browser, the file may download automatically to your default folder or invoke
options to Save or Save As to a location of your choosing.
The file downloads to the selected (or default) location in your browser set up.
Export Worksheet
To save the currently displayed worksheet as a local PDF file:
1. Click from the Home tab on the worksheet toolbar.
This invokes the Export.. dialog for selecting a file type.
2. Enter a unique file name and select the Portable
Document Format file type from the dropdown menu.
This invokes a dialog for defining the layout options
for exporting to PDF.

Spreadsheets
TrueCommerce Pulse User Guide 89
3. Select the worksheet(s) you want to export and then
complete the layout details from the options provided in
the dialog.
Note that some options are better suited for printing the
PDF after the file is exported.
4. When you are finished with the layout options, click
Save at the bottom of the dialog.
Depending on your browser, the file may download
automatically to your default folder or invoke options to
Save or Save As to a location of your choosing.
The file downloads to the location selected as per your
browser set up.
