
022714.1
Configuration and Utilities
User Guide
8.6

Configuration and Utilities
© 2003-2020 Qlik Analytics (ISR) Ltd..
Copyright
© 2012-2020 Qlik Analytics (ISR) Ltd. All rights reserved.
No part of this document may be reproduced or transmitted in any form or for any
purpose without the express permission of Qlik Analytics (ISR) Ltd.
Qlik Analytics (ISR) Ltd. makes no warranties or representations with respect to the
content hereof, and assumes no responsibility for errors in this document. Qlik
Analytics (ISR) Ltd. shall not be liable for special, indirect, incidental, or
consequential damages, including without limitation, lost revenues or lost profits
which may result from the use of these materials. The information contained in this
document is subject to change without notice.
Trademarks
Gold Client and the Gold Client logo are registered trademarks of Qlik Analytics (ISR)
Ltd., Inc.
SAP, SAP NetWeaver, ABAP and other SAP products and services mentioned herein
as well as their respective logos are trademarks or registered trademarks of SAP AG
in Germany and in several other countries all over the world.
All other product and company names herein may be trademarks of their respective
owners.

Configuration and Utilities
© 2003-2020 Qlik Analytics (ISR) Ltd..
Table of Contents
Introduction
Configuration
• Installation Setup
o Installation Setup
o Custom Table Discovery
o Setup Confirmation
• Data Wave
• Framework
o Client Construct
o Data Echo
o Data Type Hierarchy Report
o Tables Missing Field Relations
o Set Data Snap Record Limits
o Maintain Data Type Tags
o S4 Exclude Fields
o Config Download/Upload (JSON)
• Intelligent Slice
• Parallel Processing
• Global Scenario Variables
• Structure Differences
• Select Optimization
• Memory Optimization
• Transform Order
• Application Settings (mconfig)
• Configure Auto Import RFC
• Simulate Export Setup
• Maintain User Exits
Utilities
• Logical System Configuration
• Logical System Mapping
• Activity Log
• Configuration Change Log
• Configuration Download
Advance Utilities
• Passport File Utility
• Activity Log Cleanup
• Stranded Files Cleanup
• Export ID Manager
• Scenario Manager
• Change Gold Client File Path
• Export Table Data (CC)
• Resend Subset Sync Job
Configuration and Utilities
© 2003-2020 Qlik Analytics (ISR) Ltd..
System
• Cross-Client File Names/Paths
• Number Range Buffer
• Datatype Change Pointers
New Utilities
• Restart Failed Jobs
• Table Cleanup Utility
• Global Parameter Maintenance
• SQL Trace Comparison
• Memory optimization upgrade
• Compression Exception by Table
• Export progress report
• Maintain Timestamp types
• Export Dashboard
• Tablename Mapping
A select number of utilities have been moved out of the Configuration area and
relocated to the main Gold Client screen under the function named Post Process
(within the Data Echo area). All of these utilities have a common purpose and that is
to perform conversion of client values that are stored as part of the data value.
Conversion
• Maintain Change Doc Userexit Config
• Update Change Document Client
• Utility to Update Client Value
• Update Person Where-Used Addr Client
Support Information

Configuration and Utilities
© 2003-2020 Qlik Analytics (ISR) Ltd..
Introduction
This user guide provides detailed insight into accessing and executing the various
configuration functions and utilities available in Gold Client.
The Gold Client configuration and utilities are easily accessible from the main Gold
Client page (transaction ZGOLD) by selecting the ‘Configuration’ button located in the
lower right-hand corner. The result is that the Gold Client Setup Utility page is
displayed (Fig 1.0). Within the Gold Client Setup Utility screen, the various functions
are organized into six primary folders: Configuration, Utilities, Advance Utilities,
System, New Utilities, and SCM. A select number of functions are further organized
into sub-folders.
Figure 1.0
Figures 1.1 – 1.6 show all the executables within each of the primary folders.

Configuration and Utilities
© 2003-2020 Qlik Analytics (ISR) Ltd..
Figure 1.1
Figure 1.2

Configuration and Utilities
© 2003-2020 Qlik Analytics (ISR) Ltd..
Figure 1.3
Figure 1.4
Figure 1.5
Figure 1.6

Configuration and Utilities
© 2003-2020 Qlik Analytics (ISR) Ltd..
Configuration
Installation Setup
This is an entry point into the Auto Config utility which is primarily intended for when
Gold Client is being initially deployed; however, some programs may provide value
beyond the initial deployment which is why they are segregated into two sections,
one being for 1-time execution and the other being for periodic execution.
The suite of utilities included here consists of: Configure COPA, Deactivate Linkages,
Removing Non-Existent Tables, Initialize /HTG/number ranges, Configure Master
Data Tables, and Configure Custom Table. The programs can be executed
individually or collectively as required, but from a practicality standpoint, most users
would likely favor individual execution.
The content that follows describes each of these programs in greater detail (Fig.
2.0).
Figure 2.0

Configuration and Utilities
© 2003-2020 Qlik Analytics (ISR) Ltd..
Configure COPA
Since CO-PA (Profitability Analysis) tables are always unique for each customer it is
necessary to create the data types within the Data Echo framework so that the data
stored in these tables can be successfully copied. If you do not use CO-PA, then this
utility is not relevant.
To run this utility, just check the ‘Configure COPA’ box, input the correct Operating
Concern(s), and select ‘Execute’ (Fig. 2.1).
Figure 2.1
The tables being updated by this utility all reside within the Gold Client namespace
(/HTG/*). Here is what the output looks like after having executed the Configure
COPA utility (Fig. 2.2).
Figure 2.2
Here is a sample result of executing this utility where the Data Echo data types have
been created, including the associated tables and linkages (Fig. 2.3).
Figure 2.3

Configuration and Utilities
© 2003-2020 Qlik Analytics (ISR) Ltd..
Deactivate Linkages
This utility will set Recipient Data Types which are not relevant to the customer’s
system as inactive. The benefit here is that it helps optimize the data export process.
Alternatively, any Recipient Data Type links can be deactivated manually.
Let’s take a hypothetical example that your system is not using the New GL
functionality and thus there is no data to copy in those relevant tables. Executing
this utility would then set the Recipient Data Type FI – GL ITEMS (FAGLFLEX) to be
inactive (Fig. 2.4).
Figure 2.4
To run this utility, just check the ‘Deactivate Linkages’ box and select ‘Execute’. It is
not even necessary to specify which data types to analyze for deactivation; instead,
all Recipient Data Types are automatically analyzed.
Here is what the output looks like after having executed the Deactivate Linkages
utility (Fig. 2.5).
Figure 2.5

Configuration and Utilities
© 2003-2020 Qlik Analytics (ISR) Ltd..
Remove Non-Existent Tables
Gold Client is delivered with many tables already pre-configured, so this utility is
used to remove tables from both the Client Construct and Data Echo frameworks
that do not exist within a customer’s system. The tables being updated by this utility
all reside within the Gold Client namespace (/HTG/*).
To run this utility, just check the ‘Remove Non-Existent Tables’ box and select
‘Execute’.
Here is an example of what the output looks like after having executed the Remove
Non-Existent Tables utility (Fig. 2.6).
Figure 2.6

Configuration and Utilities
© 2003-2020 Qlik Analytics (ISR) Ltd..
Initialize /HTG/ number ranges
To use Gold Client, it requires that a few different number ranges exist. The number
range object themselves are delivered as part of the Gold Client code, but the ranges
themselves must then be defined in each client where Gold Client will be used.
To run this utility, check the ‘Initialize /HTG/ number ranges’ box and select
‘Execute’ to reach the subsequent screen.
When displaying the selection screen, the default entry is ‘Report Only’ which is the
same as running the program in test or simulation mode. Select the ‘Update
Database’ option to define the actual number ranges (Fig. 2.7).
Figure 2.7
The following outputs will appear based on the various circumstances: if the number
ranges have already been defined (Fig. 2.8); if they have not yet been defined (Fig.
2.9); or they are defined when executing the program (Fig. 2.10).
If the ranges already exist and the user selects ‘Update Database’ no changes will
occur since they only need to be defined once.
Figure 2.8
Figure 2.9

Configuration and Utilities
© 2003-2020 Qlik Analytics (ISR) Ltd..
Figure 2.10

Configuration and Utilities
© 2003-2020 Qlik Analytics (ISR) Ltd..
Configure Master Data Tables
This utility is used to add various Condition tables (pricing, output, KOT*), HR
infotypes, and custom tables to the Client Construct framework so that the master
data stored in these tables can be successfully copied. Alternatively, tables can be
added to the framework manually.
To run this utility, just check the ‘Configure Master Data Tables’ box and select
‘Execute’.
The tables being updated by this utility all reside within the Gold Client namespace
(/HTG/*). Here is an example of what the output looks like after having executed the
Configure Master Data Tables utility (Fig. 2.11).
Figure 2.11
Here is a sample result of executing this utility where the tables have been added to
the Client Construct data types (Fig. 2.12).
Figure 2.12

Configuration and Utilities
© 2003-2020 Qlik Analytics (ISR) Ltd..
Configure Custom Table
This utility enables customers to easily incorporate custom tables into the Data Echo
framework. The end result is typically a joining or mapping between standard SAP
tables and custom tables. Once the join is complete, subsets of data stored in these
tables can be successfully copied using the Data Echo functionality.
The tables being updated by this utility all reside within the Gold Client namespace
(/HTG/*). Alternatively, custom tables can be added into the Data Echo framework
manually.
To run this utility, check the ‘Configure Custom Table’ box.
Upon doing so, a Namespace field will appear with values ‘Z’ and ‘Y’ defaulted. The
user can input additional table namespaces if required; for example, an organization
may have their own custom namespace that could be added.
Here is an example of what the output looks like after having executed the utility
(Fig. 2.13).
Figure 2.13
Using the output, it’s possible to review which custom table could be potentially
joined to which SAP standard table based on the utility’s comparison of matching
data elements. An example of this is highlighted (Fig. 2.14) where the link between
custom table ZDS400_POS and standard table EKKO using common fields EBELN to
EBELN is proposed.

Configuration and Utilities
© 2003-2020 Qlik Analytics (ISR) Ltd..
Figure 2.14
To create the join between the proposed tables, select the relevant entries and then
click the ‘Accept’ button (Fig. 2.15).
Figure 2.15
Caution: It’s important to review each proposed table link critically as linking in
custom tables incorrectly or inefficiently can impact the performance of data exports.
If unsure whether to proceed with one or more table links, consider seeking advice
from either your team’s internal ABAP resources and/or the Qlik support team.
Upon accepting one or more links between custom and standard tables, an output is
provided displaying the outcome (Fig. 2.16).
Figure 2.16
The actual result of executing this utility is reflected in this example where custom
table YIT_O1ASS was linked to table ANLA using the proposed common fields within
Data Echo data type CA – ASSET MASTER (Fig. 2.17).

Configuration and Utilities
© 2003-2020 Qlik Analytics (ISR) Ltd..
Figure 2.17
There may be table joins that you want to exclude from future executions of the
Configure Custom Table utility (for whatever reason). These proposed joins can be
eliminated by selecting the appropriate entries and selecting the ‘Exclude’ button
(Fig. 2.18).
Figure 2.18
Some proposed joins may use only a single data element, and these are typically
hierarchical objects; Company Code, Plant, and Sales Organization are just a few
examples. The Qlik team would never recommend creating a join using just one of
these lone fields as it is far too generic and would likely cause Gold Client to export
substantial amounts of data from the relevant custom table.
To define a list of lone data elements that the program should exclude, select the
‘Field Exceptions’ button (Fig. 2.19). In the table that appears on the subsequent

Configuration and Utilities
© 2003-2020 Qlik Analytics (ISR) Ltd..
screen, add data elements as required; save changes and exit the table (Fig. 2.20).
The report must be executed again for these new entries to be considered.
To be clear, the program does not ignore these data elements entirely, just when
they are the only common data element shared between the two tables.
Figure 2.19
Figure 2.20

Configuration and Utilities
© 2003-2020 Qlik Analytics (ISR) Ltd..
Custom Table Discovery
This program can be used to try and identify custom tables within a given system
that might need to be incorporated into the Gold Client configuration. The primary
purpose is to arm users with information about which tables are in a given system
that may be relevant for incorporation.
The default inputs are for those tables named Z* and Y* and have a delivery class of
‘A’ (Application Data). The user can add/edit the Table Name and Delivery Class
inputs as required (Fig. 3.0).
The ‘Hide if in Data Echo’ and ‘Hide if in Client Construct’ options can be used to
exclude those custom tables which have already been incorporated into one or both
of the Gold Client configurations.
Figure 3.0
The screen also has an option to maintain a list of tables that should be excluded
from the report each time it is executed. Selecting the ‘Maintain Excluded Tables’
button will launch a new screen where tables can be excluded from the /HTG/ZEE
report (Fig. 3.1).
Figure 3.1

Configuration and Utilities
© 2003-2020 Qlik Analytics (ISR) Ltd..
The report output lists the custom Table Name, Delivery Class, Short Description,
Table Position, Field Name, Data Element, and Long Field Label (Fig. 3.2). This
information may be very useful in identifying where to place the custom tables into
the Gold Client configuration.
The output only shows the key fields for each custom table, and skips the displaying
of the first key field, MANDT, or the Client field.
Figure 3.2

Configuration and Utilities
© 2003-2020 Qlik Analytics (ISR) Ltd..
Setup Confirmation
This utility is primarily used by the Qlik team prior to deploying Gold Client in a
customer’s system to help ensure that the system and related items are ready;
however, it may also be useful for customers who want to deploy Gold Client to other
systems where it did not exist previously and confirm that everything is setup
accordingly.
This program does not require any user inputs. Selecting this program triggers its
execution immediately. The total runtime should be less than a minute.
Perhaps the most useful part of the report’s output is listed at the top (Fig. 3.3). If
there were any issues found with the various configuration items, the status would
be red. Freely contact Qlik support if assistance is required with any items displaying
a red / error status.
Figure 3.3
The remaining part of the output is more informational and is useful for the Attunity
team prior to deploying Gold Client on the customer’s system (Fig. 3.4).

Configuration and Utilities
© 2003-2020 Qlik Analytics (ISR) Ltd..
Figure 3.4

Configuration and Utilities
© 2003-2020 Qlik Analytics (ISR) Ltd..
Data Wave
The Data Wave folder organizes all of the configuration programs specific to Data
Wave functionality in one location. Most of these programs can be accessed via the
Gold Client configuration menu or via the Data Wave configuration menu. The
programs in this folder are documented independently; reference the user guide
named Data Wave Setup and Configuration which can be located on Qlik’s customer
support website.

Configuration and Utilities
© 2003-2020 Qlik Analytics (ISR) Ltd..
Client Construct Framework
This utility serves as the entrance point to where all configuration maintenance can
be performed in relation to the Client Construct functionality within Gold Client (Fig
4.0).
Due to the importance of this configuration and the significant purpose it serves, a
separate user guide exists. For more information and support, see the Client
Construct 8.6 User Guide which can be located on Qlik’s customer support site.
Figure 4.0

Configuration and Utilities
© 2003-2020 Qlik Analytics (ISR) Ltd..
Data Echo Framework
This utility serves as the entrance point to where all configuration maintenance can
be performed in relation to the Data Echo functionality within Gold Client (Fig. 4.1).
Due to the importance and complexity of this configuration, and the significant
purpose it serves, a separate user guide exists. For more information and support,
see the Data Echo Advanced Config 8.6 User Guide which can be located on Qlik’s
customer support site.
Figure 4.1

Configuration and Utilities
© 2003-2020 Qlik Analytics (ISR) Ltd..
Data Type Hierarchy Report
With many different Data Types and the various linkages that can exist among them,
it can be very complicated to identify what data is being exported when using a
particular Data Type. The Data Type Hierarchy Report can easily identify all of the
different Data Types analyzed during the export process.
For example, to identify all recipient Data Types used by Sales Documents, execute
the Data Type Hierarchy Report for data type SD - SALES DOCUMENTS (Fig. 5.0).
Figure 5.0
The report output displays all recipient data types in a hierarchical (top-down) format
for the given data type. The default option is to display only those data types which
are set as ‘active’ within the Data Echo Framework. To see all links within the
hierarchy (both active and inactive), select the ‘Inactive Linkages Displayed’ radio
button; the output will automatically refresh upon its selection. Freely select the
‘Active Linkages Only’ radio button and the output will refresh accordingly (Fig. 5.1).
Within the output, related data types can be expanded individually by selecting the
relevant folder, or all related data types can be expanded by selecting the ‘Expand
subtree’ icon. Likewise, the data types can be collapsed individually by selecting the
relevant folder, or all related data types can be collapsed by selecting the ‘Collapse
subtree’ icon (Fig. 5.1).
Data types that have a document icon next to them represent those data types
which have no recipient data types related to them; see data type CA – CHANGE
DOCUMENTS as an example. Data types that have a folder icon next to them
represent those data types which have one or more recipient data types related to
them; see data type FI - REVENUE RECOGNITION as an example (Fig. 5.1).
The ‘Dupl_Flag’ (Duplicate Flag) column indicates those Data Types which are linked
more than once. The ‘Inactive’ column indicates whether or not the Recipient data
type is set as an inactive link from the Provider Datatype within the Data Echo
Framework (Fig. 5.1).
Note that the Date Type can be changed directly from the output screen. If this
action is taken, select the ‘Refresh’ button in order to update the report’s output.

Configuration and Utilities
© 2003-2020 Qlik Analytics (ISR) Ltd..
Figure 5.1

Configuration and Utilities
© 2003-2020 Qlik Analytics (ISR) Ltd..
Users can also reach the Data Type Manager function from this report, either from
the input screen (Fig. 5.2) or the output screen (Fig. 5.3). Selecting it from either
location will direct the user to another screen where the configuration relevant to the
given Data Type can be displayed. If the user has the proper authorizations, they
would be able to deploy changes to this config, but if not, then the config would be
display only. For more information, reference the Gold Client Data Echo Advanced
Configuration Guide.
Figure 5.2
Figure 5.3

Configuration and Utilities
© 2003-2020 Qlik Analytics (ISR) Ltd..
Tables Missing Field Relations
This utility provides a quick way to check if any table relationships within the Data
Echo configuration are missing their related common field entries. This program does
not provide a way to fix the issue; instead, the user needs to add the missing fields
within the Data Echo framework itself.
There is no input screen so selecting this executable immediately initiates the check.
If issues are found, the output will look like this (Fig. 5.4), and if no issues are
found, the output will look like this (Fig. 5.5).
Figure 5.4
Figure 5.5

Configuration and Utilities
© 2003-2020 Qlik Analytics (ISR) Ltd..
Set Data Snap Record Limits
This utility provides an easy way to update the maximum number of records that is
allowed when executing Data Snap exports.
Input the respective Data Type and then ‘Execute’ (Fig. 5.6).
Figure 5.6
Update the value stored in the ‘Data Snap Rec. Limit’ field as required (Fig. 5.7).
Save changes and exit when done.
Figure 5.7

Configuration and Utilities
© 2003-2020 Qlik Analytics (ISR) Ltd..
Maintain Data Type Tags
This utility provides the ability to define tags and then assign them to one or more
Data Types. The value of this activity is that it provides Gold Client users another
way of searching for various Data Types and do so with values that are custom and
relevant to the team. Some possible examples of tags can be seen below (Fig. 5.8).
Figure 5.8
Select the ‘New Entries’ button and then input one or more Tag IDs and descriptions
as required (Fig. 5.9).
Figure 5.9
Select the row for a given Tag and then choose the ‘Tag by Data type’ folder from
the Dialog Structure (Fig. 5.10).
Figure 5.10
Select the ‘New Entries’ button and then input one or more Data Types as required
(Fig. 5.11).

Configuration and Utilities
© 2003-2020 Qlik Analytics (ISR) Ltd..
Figure 5.11
An example of results once Data Types have been entered (Fig. 5.12).
Figure 5.12
Once a tag has been defined, it is possible to display and maintain tag assignments
within the Data Echo framework (Fig. 5.13 and 5.14). It is not possible to define tags
from this perspective, only to assign them.
Figure 5.13

Configuration and Utilities
© 2003-2020 Qlik Analytics (ISR) Ltd..
Figure 5.14
Once a tag has been assigned to at least one Data Type, it is possible to search for
them. From the main Gold Client screen, select Data Snap. For the field named
‘Select Data Type’ use the search help function (Fig. 5.15) and select the search help
named ‘Data Type by Tags’ (Fig. 5.16); an example of search help results (Fig.
5.17).
Figure 5.15
Figure 5.16

Configuration and Utilities
© 2003-2020 Qlik Analytics (ISR) Ltd..
Figure 5.17

Configuration and Utilities
© 2003-2020 Qlik Analytics (ISR) Ltd..
S4 Exclude Fields
This functionality has been specifically developed for use in HANA S4 systems. The
reason is due to how S4 calculates values for some tables and fields on the fly -- one
example is for various material stock quantities. Another way to think about this
difference is that the values in these fields are no longer just attributes stored within
a given table as they were in previous SAP versions.
The Qlik team has determined that exporting these calculated fields may cause
performance/stability issues because of the calculations that are performed by the
S4 application, and also that there is no value in copying them from the source to
the target anyhow since the application will derive the calculated value. Therefore, it
is necessary to exclude some fields from being included in the export and import
processes. This is entirely different to how Gold Client has historically worked in that
all columns on a table were always included in the export and import, and the user
had no control to manipulate this outcome.
This executable takes the user to a customizing (SM30) type of table where relevant
tables and fields that need to be excluded during copy processing can be added (Fig.
5.18). The Qlik team should be able to suggest some entries that belong in this table
so freely submit a support case to the Qlik team for discussions as required.
Figure 5.18
Maintaining entries in this table requires the user to have a role assigned which
contains Gold Client authorization activity ‘85’. This is the same activity required in
order to perform maintenance to the Data Echo framework. Please reference the
Gold Client 8.6 Security document for more details.

Configuration and Utilities
© 2003-2020 Qlik Analytics (ISR) Ltd..
Config Download/Upload (JSON)
As the name suggests, this program is used to download and upload the Gold Client
configuration. The intended use case for this program is to streamline support for
customers who may need Qlik team assistance with updating their configuration;
however, it can also be used to simply backup the configuration to file in case the
need arises for restoration. Please see the primary use case “flow” below in case
useful.
• Customer’s User/Admin downloads their Gold Client config to file
• User/Admin sends config file to Qlik Support team via support case
• Qlik Support team uploads this config to internal systems
• Qlik Support team performs updates as required
• Qlik Support team downloads this updated config to file
• Qlik Support team provides file to the User/Admin via support case
• User/Admin uploads config into their respective system(s)
To understand the true benefit of this solution, this same process has previously
required the need to generate transports and to pass them back and forth between
the customer’s team and the Qlik team which, because transports were involved,
typically required the involvement of the customer’s Basis team since access to the
operating system was required. This solution removes some of those potential
bottlenecks thus helping streamline the process.
On the following pages, the introduction section shares useful and important
information regarding all of the various settings and options available within this
program; there are subsequent sections for initiating the download and upload
processes.
Important Notes:
This program requires Gold Client security activity ‘85’ which is the same one that
users must have in order to perform maintenance to the Client Construct and Data
Echo frameworks. It is therefore suggested that this download / upload program be
accessed only by the team’s administrators.
This program can be executed in Production systems; however, it contains important
logic that restricts the content which can be downloaded and uploaded to only those
tables that reside within the /HTG/ (Gold Client) namespace. This safeguard
is in place so that users cannot accidentally or intentionally import or overwrite data
in their Production system.
The Qlik team recommends using this program with some caution because if it were
used incorrectly or maliciously, it could significantly impact a team’s “golden” version
of their Gold Client config; however, be mindful that this program can also be very
useful in order to backup and restore a team’s configuration.

Configuration and Utilities
© 2003-2020 Qlik Analytics (ISR) Ltd..
Introduction to Functionality
The initial Config Download/Upload (JSON) screen appears like this (Fig. 5.19).
• The ‘Download’ action is set by default
• The local path and filename default to
C:\GoldClient\GoldClientConfig_SID###.txt where the System ID and Client
values are based on the system-client in which the user is signed in. In this
example (Fig. 5.19), the system is EST and the client is 800.
• The text box shares some content around the logic that is used in order to
determine which Gold Client tables are downloaded and/or uploaded
Figure 5.19
If the ‘Upload’ action is set by the user, the screen updates accordingly and
introduces to the user two additional options (Fig. 5.20).
• “Table Update Instructions”
o Delete all recs, then Insert
▪ This option should be selected if a complete synchronization is
the desired outcome as the program will purge all records from
the relevant Gold Client config tables and then insert the
records stored within the file
▪ This is the default setting
o Insert new, Modify existing
▪ This option should be selected if only new config should be
added and only changed config should be updated. All other
config should remain as-is.
▪ Selecting this setting may be useful if during the time that the
Qlik team was enhancing the customer’s config, that the
customer was also deploying config changes within their system
that would be lost when using the “Delete all recs, then Insert”
option.
• “Post-Processing Options”
o Remove Non-Existent Tables: This setting will execute a Gold Client
program that is used to purge tables from the Gold Client configuration
that does not exist in the respective system’s data dictionary (DDIC).
o Using a hypothetical example, the Qlik team adds 100 new tables to a
customer’s Gold Client configuration through the update process. This

Configuration and Utilities
© 2003-2020 Qlik Analytics (ISR) Ltd..
config is subsequently uploaded into the customer’s system; however,
of these 100 tables, 20 do not exist within the customer’s system and
so should be purged from their Gold Client config. Running this
program will check and remove those tables accordingly. This would
most likely occur when a customer is running an older version of SAP,
but there may be other reasons for this outcome to occur.
o Note: it is not possible to run only this purging program from the
Config Download/Upload (JSON) screen; however, it can be executed
standalone from elsewhere within the Configuration menu when
necessary. Go to the section named Installation Setup within this
document for details.
Figure 5.20

Configuration and Utilities
© 2003-2020 Qlik Analytics (ISR) Ltd..
Download process
1. In order to execute a download, the user simply needs to confirm or update
the file path and/or name and then click the ‘Execute’ button
2. Since the program is attempting to write a file to the user’s local directory,
this window may appear (Fig. 5.21). The user will need to select ‘Allow’ for
the program to continue or otherwise select ‘Deny’.
• Selecting the latter option will cancel the process and the config will
not be written to file
• This window may not appear if the user has previously selected the
‘Remember My Decision’ checkbox
3. Once the program completes processing, an output appears on the screen; a
sample of that output is displayed here (Fig. 5.22)
• The output shows the tablename, the number of records written to file,
and a status
• The statuses are limited to ‘SUCCESS’ and ‘NO DATA’; the latter status
simply indicates that the table contained no data and so none was
written to file; this is not an unusual result
• If for some reason you anticipated a different outcome, it is
recommended that you contact the Qlik team for support
4. Go to the respective file directory and open the file in case you wish to display
its contents. If needed, send the file to the Qlik support team if the config is
to be updated by them.
Figure 5.21

Configuration and Utilities
© 2003-2020 Qlik Analytics (ISR) Ltd..
Figure 5.22

Configuration and Utilities
© 2003-2020 Qlik Analytics (ISR) Ltd..
Upload process
Tip: Prior to performing an upload it is recommended that you perform a new
download to save off the configuration or at least have one from a recent download
just in case it is necessary to use that file for restoration purposes.
1. In order to execute an upload, the user must first select the Upload radio
button
• With this action, the screen will update accordingly
2. With regards to the Table Update Instructions, use the default setting of
‘Delete all recs, then Insert’ or update it to use ‘Insert new, Modify existing’
3. With regards to the Post-Processing Option ‘Remove Non-Existent Tables’,
select it as required
4. Click the ‘Execute’ button to initiate the upload process
5. A confirmation message will appear (Fig. 5.23); select ‘Upd. Tables’ to
continue or ‘Cancel’ to abort the process
Figure 5.23
6. Since the program is attempting to access the respective file on the user’s
local directory, this window may appear (Fig. 5.24). The user will need to
select ‘Allow’ for the program to continue or otherwise select ‘Deny’.
• Selecting the latter option will cancel the process and the config will
not be uploaded
• This window may not appear if the user has previously selected the
‘Remember My Decision’ checkbox
Figure 5.24
7. Once the program completes processing, one of two output versions will
appear on the screen; the version that appears is based on whether the user
selected the ‘Remove Non-Existent Tables’ option since it has its own output

Configuration and Utilities
© 2003-2020 Qlik Analytics (ISR) Ltd..
• Both versions of the output show the tablename, the number of
records read from the file, and a status (Fig. 5.25 and 5.26)
• If the ‘Remove Non-Existent Tables’ option was selected, a Post-
Processing column will be visible, and content with respect to this
program will appear at the end of the output (Fig. 5.26)
• The only status expected to appear in these outputs is ‘SUCCESS’; if
for some reason a different outcome is encountered, it is
recommended that you contact the Qlik team for support
Figure 5.25
Figure 5.26

Configuration and Utilities
© 2003-2020 Qlik Analytics (ISR) Ltd..
Intelligent Slice
This utility provides an easy solution for maintaining the Intelligent Slice screen.
From here, fields can be added, deleted, activated or deactivated, and even the
sequence in which they appear on the screen. Even further, a user description can be
defined which would then be displayed on the Intelligent Slice screen instead of
SAP’s long field label. An entry must be set as ‘Active’ to become visible on the
Intelligent Slice screen (Fig 6.0).
Be sure to select the button to save any changes which have been made.
Figure 6.0

Configuration and Utilities
© 2003-2020 Qlik Analytics (ISR) Ltd..
The screen definition in Figure 6.0 controls the appearance of the Intelligent Slice
screen (Fig. 6.1).
Figure 6.1

Configuration and Utilities
© 2003-2020 Qlik Analytics (ISR) Ltd..
Parallel Processing
This utility establishes important constraints for Gold Client exports and imports
which utilize background processing. These settings define the maximum number of
processes used and on which servers.
The value entered in the ‘Max jobs per server at 1 time’ field defines the maximum
number of processes per server that Gold Client can use at anyone time. The ‘Select
Servers’ section provides the flexibility to choose which servers can be used by Gold
Client processing. Using this example (Fig. 7.0), Gold Client would be allowed to use
up to 12 background processes since the ‘Max’ has been defined as 4 and all three
servers have been selected.
Figure 7.0
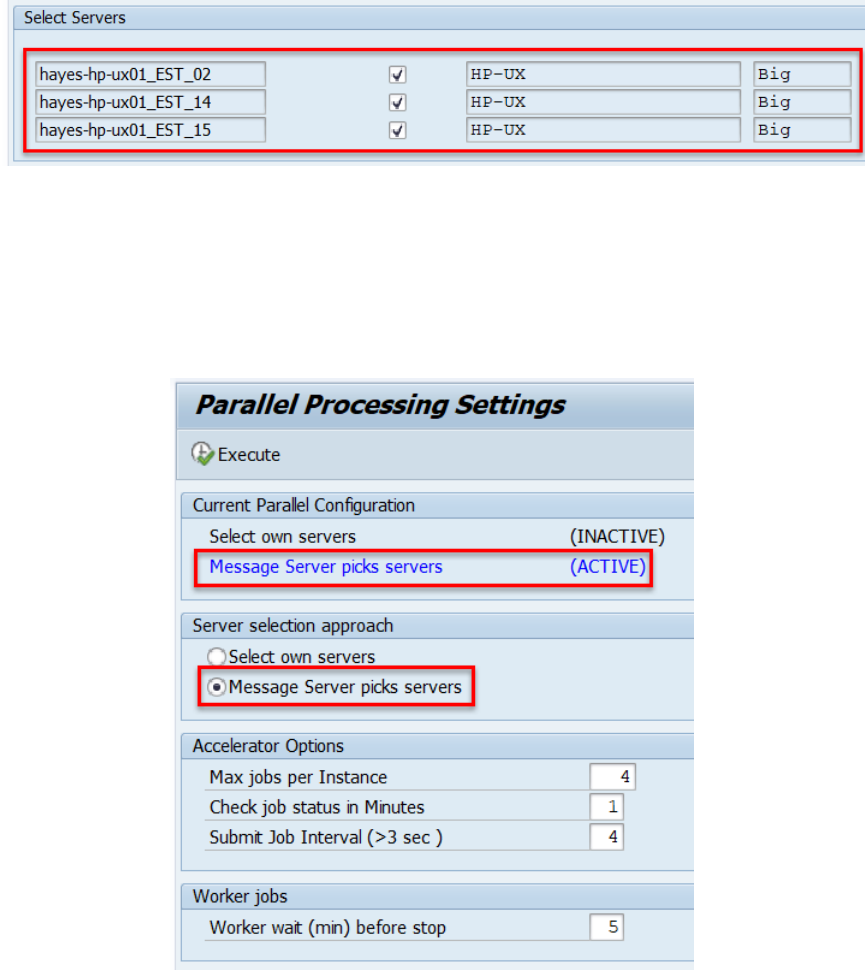
The ‘Select Servers’ section also provides informational content regarding each
server’s operating system and Endianess. This may be critical information as Gold
Client exports and imports must use the same Endianess. If, for example, an
organization uses a mix of Unix and Linux servers, only one type should be used in
both the source and target systems to ensure that data copies will work successfully
(Fig. 7.1).
Configuration and Utilities
© 2003-2020 Qlik Analytics (ISR) Ltd..
Figure 7.1
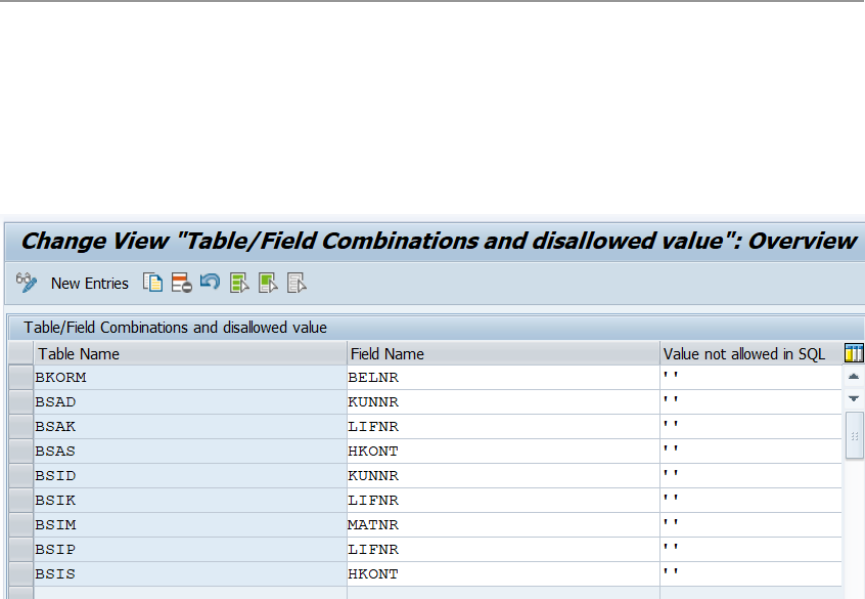
Alternatively, it is possible to allow the Message Server to choose the servers instead
of selecting them manually. This can be achieved by selecting the ‘Message Server
picks servers’ radio button. The screen will update accordingly with this config
setting showing as (ACTIVE) and the ‘Select Servers’ section being hidden since it is
no longer relevant (Fig. 7.2).
Figure 7.2

Configuration and Utilities
© 2003-2020 Qlik Analytics (ISR) Ltd..
Global Scenario Variables
This config area is used for creating static variables that can be used either as part of
the Scenario creation or within the Data Echo framework itself.
The primary use case for creating variables is to limit the amount of historical data
that is exported. For example, an organization is using the HR module and generates
payroll data. A user may want to copy one or more Personnel Records but not copy
multiple years of payroll data because it just adds overhead to the copy process and
does not provide any meaningful value; instead, it makes more sense to truncate the
collection process to be that of only the last 1-2 years (depending on the user’s
requirements). In order to fulfill this use case, there are two steps that need to be
executed: (1) defining the variable and (2) applying the variable within the
respective areas of the Data Echo config.
When in change mode, the New Entries selection enables the creation of a new
variable definition in three steps:
• Enter the variable name
• Input the Data Element to use (must be an existing Data Element)
• Enter the desired value
Once saved, the As Stored in DB column will show the value as it is stored in the
database. Data elements of the same type (i.e. CHAR, DATS, and NUMC) can be used
interchangeably, for example, ERDAT can be used for all date fields.
The ‘Date Format’ column is relevant when a date value is being entered in the ‘As
Entered’ column. This format should default from the user’s settings but can be
changed here in case the user wants to input date value with a different format.
This image illustrates several examples of variables (Fig. 8.0).

Configuration and Utilities
© 2003-2020 Qlik Analytics (ISR) Ltd..
Figure 8.0
This image illustrates an example of a variable being applied within the Data Echo
framework when linking from one Data Type to another Data Type (Fig. 8.1). It is
only possible to apply variables when linking two Data Types.
In this example, an export that uses Data Type HR - EMP MAST WITH PAY POSTING
will perform a join to table HRPY_RGDIR but the restriction of FPBEG >= 20140101
will be applied which will help limit the data that is exported (because this is the
value assigned to the variable).
Figure 8.1

Configuration and Utilities
© 2003-2020 Qlik Analytics (ISR) Ltd..
Structure Differences
Ideally, table structures should be identical when copying data between source and
target clients. Gold Client export and import programs have progressively improved
to handle these exceptions; however, imports may still fail on an occasional basis
because of a structural delta. The import failure should generate a shortdump which
can be analyzed to determine the problem table. This utility provides a technical
solution for those instances when a failure occurs for a given table.
To make use of this solution, convert the screen to change mode and select the ‘New
Entries’ button. Add the table in the Table Name field and click the Active checkbox
to activate the configuration (Fig. 9.0).
It is necessary to define the entry in both the source and target clients.
Figure 9.0
Note: If an import failed because of this issue and the Structural Changes table has
been updated in the respective clients, a new data export must be generated to
make use of this solution.
Configuration and Utilities
© 2003-2020 Qlik Analytics (ISR) Ltd..
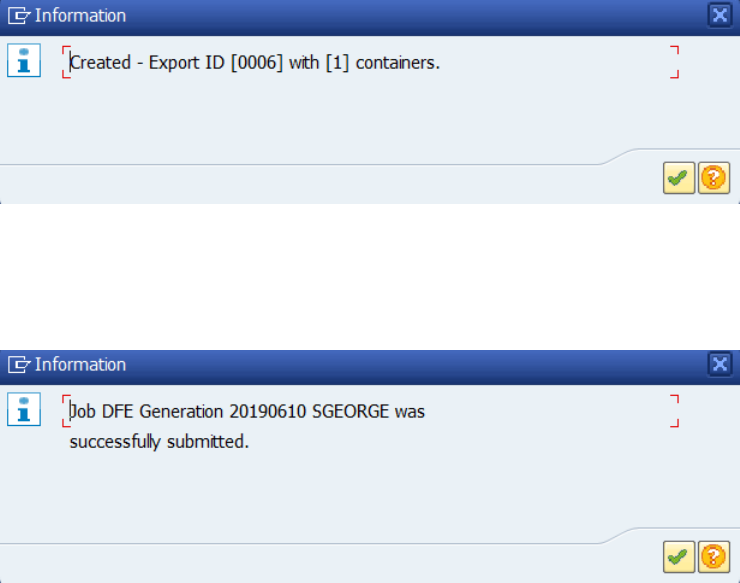
Select Optimization
This table contains table name and field name values and the disallowed values for
each combination (Fig. 10.0). This can be useful when a SQL statement would cause
slow performance when there are no values to return. An example of this would be
for FI documents by vendor. If the vendor field is not always populated, all FI
documents would still be part of the search even though they will never be returned
by that query. Disallowing a blank value for the vendor field would stop the
performance hit.
Figure 10.0

Configuration and Utilities
© 2003-2020 Qlik Analytics (ISR) Ltd..
Memory Optimization
This configuration screen controls how the Gold Client export program collects data
into memory and writes it out to the file system (Fig. 11.0).
Figure 11.0
• Collections per Unit of Work: A performance control to help limit the
amount of memory used by the export process. This parameter controls how
many collections are processed before being written to file.
• Header Table Package Size: It may be beneficial to process those exports
that target large volumes of data in smaller packages. Like other technical
settings, this is designed to reduce the memory consumption on an export.
This parameter should only be changed in the event of an export failure due
to a large volume export. There may be times to either increase or decrease
this value. It is possible that setting this value too low may result in export
failure. Please contact Qlik for support issues or questions.

Configuration and Utilities
© 2003-2020 Qlik Analytics (ISR) Ltd..
Transform Order
This table is used to control in which order the data within the listed tables is
transformed. The use of this particular utility is exceptional and is typically related to
HR data due to the need to both transform it and yet keep it in sync across any
number of various data tables.
The input screen requires the entry of a data type; once done, select ‘Execute’ (Fig.
12.0).
Figure 12.0
This table only requires the input of multiple tables and the order in which the data is
to be transformed (Fig. 12.1).
Figure 12.1

Configuration and Utilities
© 2003-2020 Qlik Analytics (ISR) Ltd..
Application Settings (mconfig)
This table controls a number of miscellaneous configuration settings that are
available within Gold Client (Fig 13.0). Those functionality items marked as ‘Active’
are in use. It’s suggested that you contact Qlik for support prior to making any
changes to these settings.
Figure 13.0

Configuration and Utilities
© 2003-2020 Qlik Analytics (ISR) Ltd..
In the Miscellaneous Configuration there’s an entry named DISABLE_NEWS_WIDGET.
If this setting is not marked as ‘Active’ then Qlik, Inc. is able to deliver information
such as new releases, updates, and announcements which are delivered in widget
form visible on the main Gold Client page (Fig. 13.1). If this setting is marked as
‘Active’, then the widget is disabled, and support-related details are provided instead
(Fig. 13.2).
Figure 13.1
Figure 13.2

Configuration and Utilities
© 2003-2020 Qlik Analytics (ISR) Ltd..
Configure Auto Import RFC
This table is used to administer control over which target clients are available for
selection by end-users when using the Import Options feature that is available within
the Data Snap and Export Control functions.
Adding an entry to this table means that an end-user can select from this list of
destinations so that the import is automatically initiated (via the respective RFC).
The entry must be set as ‘Active’ for it to appear in the selection list; if inactive, it
cannot be selected by the end-user (Fig. 14.0).
If the auto-import option is not selected by the user at the time of initiating the
export, then the import must be performed manually.
Figure 14.0
In this sequence, the user selects the Import Options function and must then input
or select from the lookup function a valid RFC for the ‘Target Destination’ field (Fig.
14.1). The list of valid values displayed to the end-user is controlled from the entries
stored in this configuration table (Fig. 14.0).
Figure 14.1

Configuration and Utilities
© 2003-2020 Qlik Analytics (ISR) Ltd..
Important Note: the RFC that is used for Import Options functionality must be
setup (in t-code SM59) as a named user. The import options functionality will not
work if the RFC is set with ‘Current User’. An example of this can be seen where the
RFC has an actual user assigned and the ‘Current User’ checkbox is not set (Fig.
14.2).
Figure 14.2

Configuration and Utilities
© 2003-2020 Qlik Analytics (ISR) Ltd..
Simulate Export Setup
This utility is used in conjunction with the Simulate Export option that is available
within Export Control. Its sole purpose is to create estimates for dependent data
objects. The only way to create these estimates is to initiate a data export.
Here’s a hypothetical example: if a simulated export of 1000 sales orders is executed
and it locates 2000 related billing documents and 3500 related material documents,
then the ratio of sales orders to billing docs is 1:2 and for sales orders to material
docs is 1:3.5. Now, when the user is in Export Control and has a Scenario for
exporting 5000 sales orders it will estimate that your export will include 10,000
billing docs (based on the 1:2 ratio) and 17,500 material docs (based on the 1:3.5
ratio).
In the utility you enter a sample of how much data to review (a range between 1,000
and 10,000 is typical), a date range, and which data types you would like to include
in the estimate (Fig. 15.0).
You can execute for all data types or selectively choose date types. Understand that
if running for all data types that the export job may run for quite some time, so it is
suggested that specific data types be used when possible.
Figure 15.0
Once initiated, a message will appear (Fig. 15.1). This just informs the user that the
record count process has been initiated. The job can be monitored via t-code SM37.
Figure 15.1
Configuration and Utilities
© 2003-2020 Qlik Analytics (ISR) Ltd..
The next message informs the user which Export ID has been generated by the
execution of this simulated export (Fig. 15.2). The results can be viewed by using
the Export Control function located on the main Gold Client screen.
Figure 15.2
The final message informs the users that the simulated export job has been initiated
(Fig. 15.3). The job can be monitored via t-code SM37.
Figure 15.3

Configuration and Utilities
© 2003-2020 Qlik Analytics (ISR) Ltd..
Maintain User Exits
This table is used to add programs that need to be applied during various times of
the copy process. This typically involves some additional processing that is beyond
just the copying of data from Source to Target or even data transformation.
It is generally recommended that users work with the Qlik support team when
needing to make changes to existing user exits or when new user exits are required.
This is to help ensure that this config is defined correctly and to help ensure that the
user’s requirements are successfully achieved.
The table is comprised of the following elements (Fig. 16.0):
• Table Name: input the relevant table
• Utility Type: when the user exit is to be applied
o Available options are After Import, Before Import, During
Export, and During Import
• Data Type: input if the user exit needs to apply to a specific Data Type
o If left blank, the user exit will be applied to each Data Type that
contains the relevant table (what is in the ‘Table Name’ field)
• Report Name: input the program name
• Active: check if the user exit is active or not
o If an entry is set in the table as ‘Active’, and the given table is
part of the export then the user exit will be executed
automatically
Figure 16.0

Configuration and Utilities
© 2003-2020 Qlik Analytics (ISR) Ltd..
Utilities
Logical System Configuration
During the import of data, Gold Client will change the Logical System name from the
Logical System name assigned in the Source to the Logical System name assigned in
the Target; an example is visible via t-code SCC4 where the client is defined (Fig.
19.0). Performing this conversion during import replaces the need to run BDLS to
convert the Logical System name.
The Qlik team provides this configuration by default but users may freely maintain
this table as required to include any tables and fields that need to be converted
during import for the various AWSYS or LOGSYS type of fields.
Figure 19.0
Enter the tables to be converted in the Table Name column and in the Field Name
column, input the respective field. If the box in the Active column is checked, then
the respective table/field will have its Logical System name converted during import;
if not checked as Active, then the Logical System name will not be converted (Fig.
19.1).
The Use BDLS Map column can be selected when additional logic is required due to
data being replicated to connected systems (CRM, for example). See the next section
titled Logical System Mapping for more details.
Figure 19.1

Configuration and Utilities
© 2003-2020 Qlik Analytics (ISR) Ltd..

Configuration and Utilities
© 2003-2020 Qlik Analytics (ISR) Ltd..
Logical System Mapping
Logical System Mapping allows for the conversion of Logical System values in those
environments where multiple SAP solutions are utilized and are connected to each
other. In the preceding section titled Logical System Configuration, content is shared
that describes how the Logical System value stored in the source will be converted to
match the value stored in the target; however, in connected systems like CRM, SRM,
GTS, EWM, etc. this simple conversion logic will not necessarily lead to positive
results. This is because the Logical System value points to the system from which
the data was sourced.
For example, there may be data in CRM such as a Business Partner that was initially
created in ECC and then replicated to CRM; the Logical System field in the CRM
table(s) will therefore contain the ECC Logical System value even though the data is
in CRM.
A simple Logical System conversion would not lead to ideal results because it would
convert the value to the CRM target Logical System and not the connected ECC
target Logical System. Thus, the import program will interrogate the entries in this
table (as required according to the settings defined in the Logical System
Configuration table) and use these “mappings” to determine how to convert the
Logical System values.
Add new entries to this table according to the organization’s requirements and
specific Logical System values. The value in the first Logical System column
represents the Source value and the second Logical System column represents the
target value (what it needs be converted to). The BDLS App column is just
informational but helps provide visibility on where each conversion/mapping is used.
In this example, the config is defined in a CRM system where the ECC Logical System
values need to be converted from ERPCLNT800 to ERPCLNT200 (Fig. 19.2).
Figure 19.2

Configuration and Utilities
© 2003-2020 Qlik Analytics (ISR) Ltd..
Activity Log
All exports, imports, and deletions are logged for reference and monitoring purposes,
and so this utility can be used to view those details.
The input screen provides the user the flexibility to query this history in numerous
ways (Fig. 20.0):
• Export only, import only, or deletion only, or all of them collectively
o Additionally, the user can choose to query exports just by the Header
data type - which is the default setting (Fig. 20.1) - or by all data
types. See output examples for each to understand the difference;
with default setting (Fig. 20.2) and with this setting off (Fig. 20.3).
The Header data type is highlighted just for visibility, and it is possible
in this case to see the other five data types that were included in the
export.
• User Name, Created on, Data Type, Export ID, and Run time ID
Figure 20.0
Figure 20.1
Figure 20.2
Figure 20.3

Configuration and Utilities
© 2003-2020 Qlik Analytics (ISR) Ltd..
The report’s output displays the following information:
• Exp/Imp: Identifies the relevant process with ‘E’ for export, ‘I’ for import, or
‘D’ for deletion
• Run Time ID: Unique value assigned to each process execution
• Container: Container number used in the process
o Displayed only for exports
• Data Type: Data Type used in the process
• Exp ID: The Export ID used in the process
• Sc.Num: Scenario used in the process
o Displayed only for exports
• User Name: Who executed the process
• Start Dt: Date on which the process was executed
• St. Time: Time on which the process was executed
• Col. Ct: The record count from the Header table in the Data Type that was
processed
• Seconds: Number of seconds for the process to be executed
• Background Job Name: Name of background job used during processing
Here is a sample output (Fig 20.4).
Figure 20.4

Configuration and Utilities
© 2003-2020 Qlik Analytics (ISR) Ltd..
Configuration Change Log
This report can be executed to display all changes made to the Client Construct and
Data Echo frameworks. The report can be executed using optional filters: User
Name, Change Date, and/or Data Type (Fig 21.0).
Figure 21.0
The execution of this utility’s output (Fig. 21.1). Any comments entered by the user
at the time of change are displayed in the ‘Reason for change’ column.
Figure 21.1
There are various config events that can be displayed:
• CONNECTOR - Subset Sync config has been maintained
• COPIED DT - A new Data Type has been created via the copy function
• DATASNAP - Data Snap config has been maintained
• DELETE DT - A Data Type has been deleted
• ECCONFIG - Memory parameters have been maintained
• LINKAGES - A link from this Data Type has been maintained; this event also
occurs with respect to maintaining the linkage details
• NEW DT - A new Data Type has been created
• TABLES - A table relation within this Data Type has been maintained; this
event also occurs with respect to maintaining the common fields

Configuration and Utilities
© 2003-2020 Qlik Analytics (ISR) Ltd..
Configuration Download
This utility allows a user to download the Gold Client configuration to several
different formats. The most common use case is for copying the config from a
higher-level system like Prod down to lower-level system. This can only be achieved
using the ‘Flat File’ format. Freely download to Excel or XML when useful.
Select the radio button of the desired format, select which parameters should be
included, and then select the Execute button to run the utility (Fig 22.0).
Figure 22.0
The Flat File format will generate export files for each option selected in the
additional parameters section (Fig. 22.1). These export files can then be used to
import this configuration into another client via the Import Control function.
Configuration and Utilities
© 2003-2020 Qlik Analytics (ISR) Ltd..
Figure 22.1
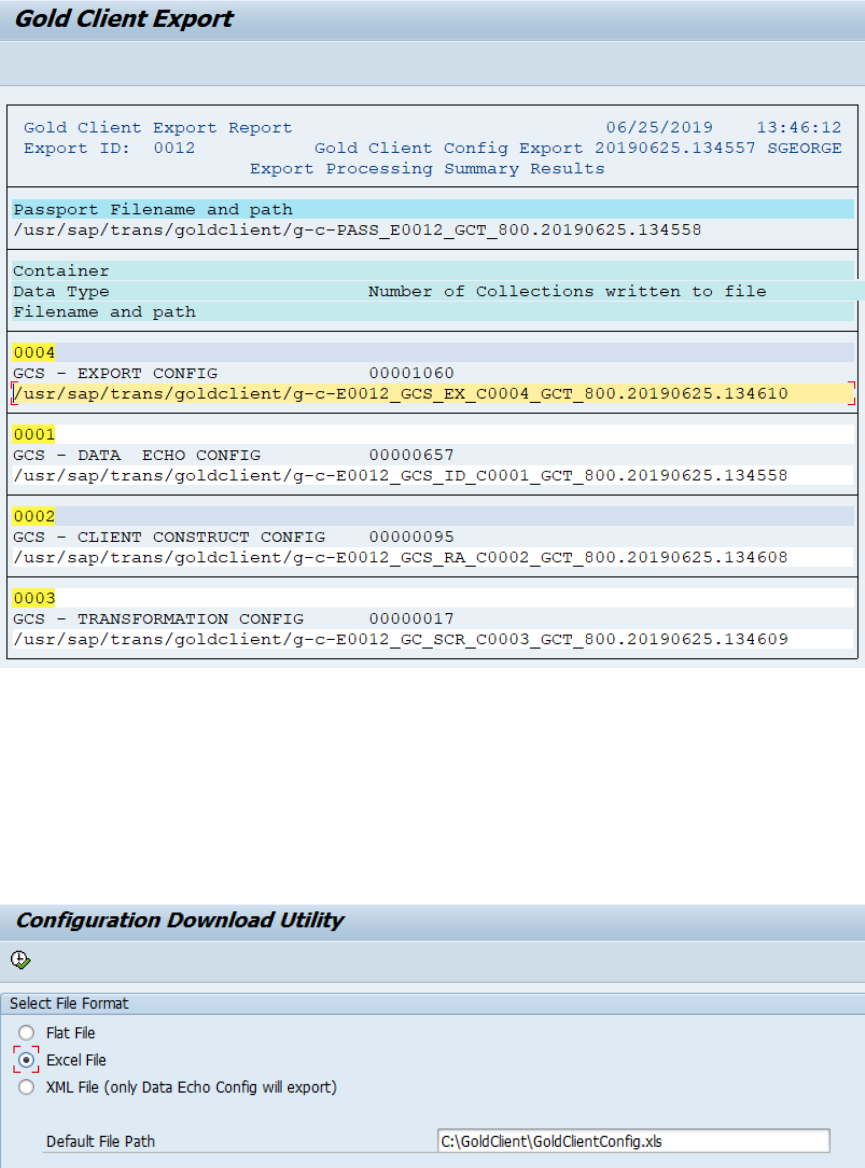
The Excel File format (Fig. 22.2) will dump the contents of the Gold Client
configuration tables to a series of Excel Spreadsheets (Fig. 22.3); each spreadsheet
will be for a different Gold Client configuration table. When this format is selected,
the default file path will be displayed; however, this path can be changed by the user
as needed.
Figure 22.2

Configuration and Utilities
© 2003-2020 Qlik Analytics (ISR) Ltd..
Figure 22.3
The XML File format (Fig. 22.4) will only copy the Data Echo configuration to an XML
format (Fig. 22.5).
Figure 22.4
Figure 22.5

Configuration and Utilities
© 2003-2020 Qlik Analytics (ISR) Ltd..
Advance Utilities
Passport File Utility
This utility is used in conjunction with the Parallel Processing feature. If one or more
of the Parallel Processing jobs fails, then some or all of the data files associated with
that part of the export would be missing from the passport file. This utility is useful
in those instances when it’s decided that the data which was exported successfully
can be imported into the Target client even though not all of the data was exported
successfully and thus some data will be absent in the Target. A passport file can be
generated to bundle together all of the data files so that the import process can be
initiated.
Note: this program is relevant to the legacy export engine which existed in Gold
Client versions preceding 8.5. With the 8.5 version, the export engine was rewritten
for optimization purposes and the typical response to a canceled job would be to use
the ‘Restart Failed Jobs’ utility instead.
In this example, jobs 001-005 and 007 finished successfully; however, job 006
canceled (Fig. 23.0). If the decision is made that the data that would have been
collected via export job 006 is not needed in the target client, then this utility can be
used to generate the necessary Passport file and so that the import can proceed.
Figure 23.0
The alternative solution to this problem would be to resolve the root cause of the
failed job and repeat its execution.
The only data that is required to execute this utility is the Parallel Processing ID (Fig.
23.1) which can be found within any of the successful export job logs. The files
associated with this Parallel Processing ID will be retrieved and can be selected for
inclusion into the passport file.

Configuration and Utilities
© 2003-2020 Qlik Analytics (ISR) Ltd..
Figure 23.1

Configuration and Utilities
© 2003-2020 Qlik Analytics (ISR) Ltd..
Activity Log Cleanup
This utility will remove logs older than the number of days specified. This is helpful
because it will purge logs that are no longer needed and thus clears space within the
file system.
By default, 60 days is populated and the report only mode is selected. You can also
choose to cleanup log files by adding specific Data Type(s) to the selection screen
(Fig. 24.0).
Figure 24.0
Here is the output when executed with the ‘Report only’ option (Fig. 24.1). It lists
the relevant data type as well as the date and time the log was created.
Figure 24.1
To run the log deletion, remove the checkmark from the ‘Report only’ option and
execute. Here is the output when executed without the ‘Report only’ option (Fig.
24.2).

Configuration and Utilities
© 2003-2020 Qlik Analytics (ISR) Ltd..
Figure 24.2

Configuration and Utilities
© 2003-2020 Qlik Analytics (ISR) Ltd..
Stranded Files Cleanup
This function can be used to report on those Gold Client files that were created from
failed exports; additionally, this program can purge those files. This can be useful
since the files consume space in the directory; however, files from more recent failed
exports could still be restarted and so the Qlik team suggests targeting only those
files that are at least 30-days old. Of course, each organization can use their own
discretion to determine how old files should be prior to purging them.
The selection screen allows the user the ability to input dates or a date range, and/or
a Runtime ID. The ‘Show Report’ option is set by default so that the program will
only display the records without purging. This may be useful in case the files
displayed in the output need to be reviewed before purging (Fig. 25.0).
If the ‘Show Report’ option is deselected on the selection screen and the program is
executed, the file purging will occur immediately without the opportunity to cancel
the process.
Figure 25.0
Upon execution, this message should appear (Fig. 25.1). This is to help the user
recognize that exports could be in-flight and that this could disrupt those activities.
It is best to purge files when export and import processing is minimized or
altogether inactive.
Figure 25.1
Here is an example of the utility’s output (Fig. 25.2).

Configuration and Utilities
© 2003-2020 Qlik Analytics (ISR) Ltd..
Figure 25.2
From the output, it is possible for the user to select entries and use the Delete
Selected Files button to delete files.
Figure 25.3

Configuration and Utilities
© 2003-2020 Qlik Analytics (ISR) Ltd..
Export ID Manager
The primary purpose of the Export ID Manager utility is to locate and, as needed,
delete those Export ID records which are no longer required.
The Export IDs can be found using various inputs: Export ID, Export Type, Data
Type, and even the last time the Export ID had been executed. Additionally, the user
has the options to choose My Export IDs or All Export IDs in lieu of using any
inputs (Fig. 26.0).
Figure 26.0
Executing this utility generates the output displayed on the Export ID Manager
screen. This information consists of Export ID, Export ID description, Activity Type,
Owner, Created On, and Changed On (Fig 26.1).

Configuration and Utilities
© 2003-2020 Qlik Analytics (ISR) Ltd..
Figure 26.1
The checkboxes in the Delete column can be used to select those Export IDs that are
no longer needed. After selecting, choose the ‘Delete Flagged Export IDs’ button
located on the toolbar (Fig. 26.2).
The delete action deletes the Export ID(s) but does not delete the Scenarios which
are assigned to the Export ID(s). This deletion activity cannot be undone.
Figure 26.2

Configuration and Utilities
© 2003-2020 Qlik Analytics (ISR) Ltd..
Scenario Manager
The primary purpose of the Scenario Manager utility is to locate and, as needed,
delete those Scenario Segment records which are no longer required. This data can
be found using a wide-range of user inputs such as Data Type, Scenario Number,
Export ID, or Not used in an Export ID, and even the last time the Scenario Segment
had been executed in an export (Fig 27.0).
Perhaps the most important input is the one named ‘Show My Scenarios Only’.
Deselecting this setting allows the user to report – and possibly delete – Scenario
Segments created/owned by other users; however, there is a security activity set
specifically for this option. If the user has the authorization, this option can be
deselected; however, if the user is not authorized, then this option is suppressed,
and it cannot be deselected, and the result is that the user can only see their own
data.
Figure 27.0

Configuration and Utilities
© 2003-2020 Qlik Analytics (ISR) Ltd..
Executing this utility generates the output displayed on the Scenario Report screen.
This information consists of Data Type, Scenario Number and Description, Export ID
and Description, Container, Scenario Owner, and Date (Fig 27.1). It may be
necessary to scroll in order to view the various columns.
Figure 27.1
The checkboxes in the Delete column can be used to select those Scenarios that are
no longer needed. After selecting, choose the ‘Delete Flagged Scenarios’ button
located on the toolbar (Fig. 27.2). This action deletes the Scenario itself and it also
deletes it from the associated Export ID, if this relation exists. This deletion activity
cannot be undone.
Figure 27.2

Configuration and Utilities
© 2003-2020 Qlik Analytics (ISR) Ltd..
Change Gold Client File Path
The purpose of the Change Gold Client File Path utility is to change the file directory
for existing data files in order to match the value in the Target client in those
exceptional cases when the file directory is different from between the Source and
Target clients.
Let’s hypothesize that the file directory in the Source client is named:
/usr/sap/trans/goldclient/<FILENAME> and therefore the generated files are named
like this:
/usr/sap/trans/goldclient/g-c-E913_CAADDR_C0001_EI4_800.20121113.132825
However, the file directory for the Target client is
/usr/sap/trans/goldclient/EI4/<FILENAME> where “EI4” is part of the directory, and
so to be able to import this file, it must be renamed like this:
/usr/sap/trans/goldclient/EI4/g-c-E913_CAADDR_C0001_EI4_800.20121113.132825
Upon selecting this utility, this confirmation message appears (Fig. 28.0). There are
no user inputs required as all existing files in the Target will be updated.
Figure 28.0

Configuration and Utilities
© 2003-2020 Qlik Analytics (ISR) Ltd..
Export Table Data (CC)
The Export Table Data utility provides the user another method for exporting data;
however, this program is limited to copying data from only a single table, and the
data can only be segmented on the first key field (not including the MANDT / Client
field), and only single values (no ranges) can be used within the selection criteria.
An R3Trans process is used in this program to export data just like the R3Trans
method that exists within Client Exporter; however, when using Client Exporter all
data within the table is exported, whereas this program allows the user the
additional flexibility to export only a segment of the table data.
This program is most useful when there is a need to export a significant volume of
data from a single table and where the selection can be segmented by the primary
key field.
Enter a table name and then select the ‘Selection Criteria’ button; in this example,
table ZMATERIAL_IDES is entered (Fig 29.0).
Figure 29.0
On the following screen the first field on whichever table was entered will appear.
Enter the data selection criteria as needed and then save the changes (Fig 29.1).
Figure 29.1
Once the data selections have been entered, return to the main screen and select
the ‘Export’ button (Fig 29.2).

Configuration and Utilities
© 2003-2020 Qlik Analytics (ISR) Ltd..
Figure 29.2
Enter a job name and then the ‘Accept’ button (Fig 29.3). A message will appear that
the job has been submitted. The background job is used only to report when the
R3Trans data collection has started and ended. The background job can be
monitored via t-code SM37.
Figure 29.3
Once the export is complete, the import process can only be executed using the
Client Importer function and the R3Trans Method. Refer to the Client Construct User
Guide for instructions.

Configuration and Utilities
© 2003-2020 Qlik Analytics (ISR) Ltd..
Resend Subset Sync Job
If a Subset Sync export cancels in the connected system, it is possible to restart it
using Gold Client’s Resend Subset Sync Job utility.
Input the following required and optional fields (Fig 30.0):
• Top GUID
• Run GUID
• Ensure that the ‘Resend’ button is selected
o There is also an option to perform the ‘resend’ in foreground
Note: The Top GUID and Run GUID values can be found towards the end of the
respective export job log (Fig 30.1); copy and paste these values from the log into
their respective fields
Click the ‘Execute’ button to initiate the process. The results of the initiated process
can be checked via t-code SM37 in the connected Source system.
Figure 30.0
Figure 30.1
Configuration and Utilities
© 2003-2020 Qlik Analytics (ISR) Ltd..
System
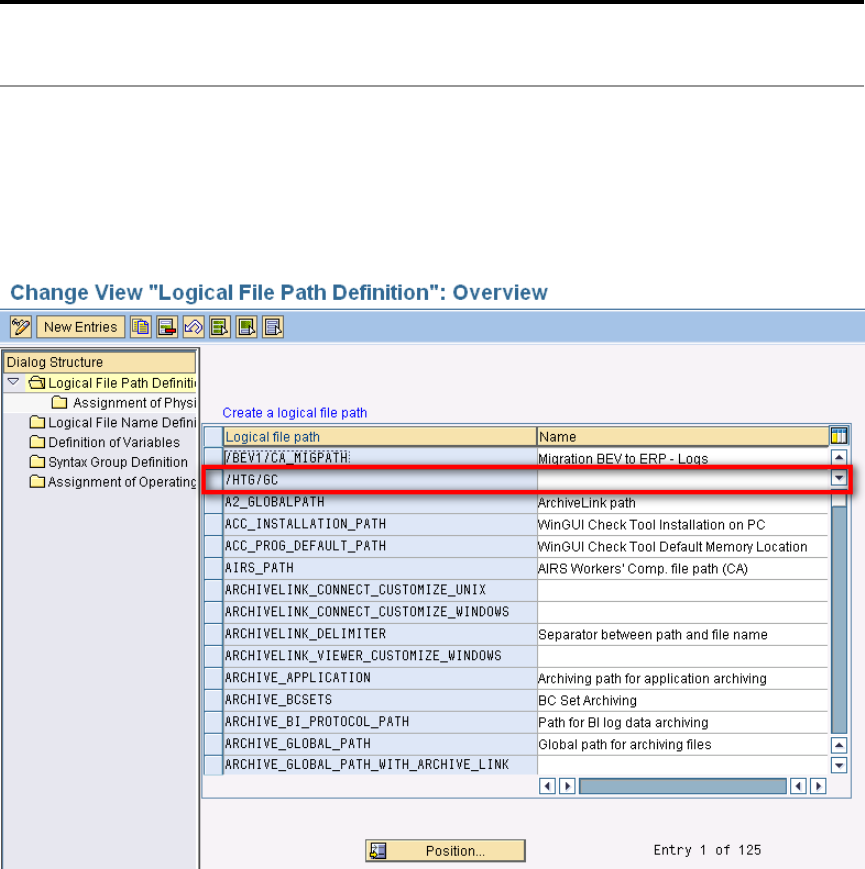
Cross-Client File Names/Paths
Export files are created and stored in a very similar fashion to the archiving process.
This makes use of logical paths and file names controlled through SAP standard
transaction code FILE.
The Logical file path required for the Gold Client application is /HTG/GC as highlighted
in Figure 31.0.
Figure 31.0

Configuration and Utilities
© 2003-2020 Qlik Analytics (ISR) Ltd..
Here is an example of the Logical to Physical path assignment (Fig. 31.1).
Figure 31.1
This is the extent of what must be configured manually. The actual logical file names
are produced with the creation of Data Types which is an automated process within
the Gold Client software (Fig. 31.2).
Figure 31.2

Configuration and Utilities
© 2003-2020 Qlik Analytics (ISR) Ltd..
Number Range Buffer
This utility is basically a shortcut for SAP standard t-code SM56. It displays number
range buffer information including status and value (Fig. 32.0).
After number ranges have been copied between the source and target clients, it is
necessary to execute this transaction to refresh the buffers. For more information on
how this transaction is used with respect to Gold Client, see the document titled Gold
Client 8.6 Number Range User Guide.
Figure 32.0

Configuration and Utilities
© 2003-2020 Qlik Analytics (ISR) Ltd..
Data Type Change Pointers
Gold Client now has the capability to generate Change Pointers for Data Imports in a
Gold Client target system. The following section will walk you through the steps that
need to be completed in order to make sure Change Pointers are created in the
target client during the data import process for Data Echo and Client Construct within
Gold Client.
1. In the target system, ensure the following application setting is active
(ZGOLD → Configuration → Application Settings (mconfig)):
GENERATE_CHANGE_POINTERS
YOU MAY WANT TO ADD THIS APPLICATION SETTING (MCONFIG) ENTRY TO YOUR
SOURCE SYSTEM AS WELL, SO THAT IF THE GOLD CLIENT CONFIGURATION IS
PULLED OVER TO A TARGET SYSTEM, THIS ENTRY WILL REMAIN ACTIVE IN YOUR
TARGET. ACTIVATING THIS SETTING IN YOUR SOURCE SYSTEM WILL UTILIZE THE
SAME STEPS AS ABOVE
2. Gold Client utilizes table TBD62 in your SAP system to generate Change
Pointers in the target system. We will need to utilize this table to find/target
tables and message types from our Gold Client Configuration (FELDNAME =
KEY) that need to be generated in the target system. Additionally, Change
Pointers need to be active within transaction BD50 to generate Change Pointers
– if these are not active in this transaction, then no Change Pointers will be
generated
THESE ARE THE ONLY TYPES OF CHANGE POINTERS THE TOOL WILL GENERATE FOR, WHERE
FLDNAME = KEY IN TABLE TBD62.

Configuration and Utilities
© 2003-2020 Qlik Analytics (ISR) Ltd..
3. Open this table and scroll through the list to find the TABLES + MESSAGE
TYPES you are wanting to generate Change Pointers for – we need to capture
the MESTYP field for the entries in TBD62 to add to the Gold Client
Configuration
4. Once the tables + message type have been targeted, we need to maintain the
Gold Client Data Type + Message Type in Datatype Change Pointers within
the Configuration Menu of Gold Client (ZGOLD
→
Configuration
→
System
(folder)
→
Datatype Change Pointers); this needs to be completed in the
target system; (table for these entries are /HTG/GC_MSGTYP)
NOTE, WE ARE ABLE TO GENERATE CHANGE POINTERS FOR BOTH THE DATA ECHO AND
CLIENT CONSTRUCT SIDE OF THE TOOL

Configuration and Utilities
© 2003-2020 Qlik Analytics (ISR) Ltd..
5. Within the Data Type Change Pointers screen, you will need to enter the Data
Type you wish to use, as well as the Message Type (note, you can use the
same Data Type for multiple Message Types). You can use Data Types from
both the Data Echo side of the tool as well as Client Construct You will then
need to mark these lines as Active, if you wish to generate Change Pointers
for the combination that has been entered (as seen below)
6. Once the Application Setting has been set as active and the Data Type
Change Pointers screen has been maintained, when you import data with Gold
Client in to a target system, and the tables within the Data Type contain the
tables from the Message Type, Change Pointers will be generated in BDCP2
7. In BDCP2, the following information will be entered while the Change Pointers
are generating:
a. MESTYPE – comes from what is configured in the Gold Client Configuration
Area
b. CPIDENT – Next available Change Pointer Number
c. PROCESS – left as blank, so the change pointers can be sent to the connected
system
d. TABNAME – Table that was imported from the corresponding data type
e. TABKEY – Key fields of the table to generate the Change Pointers
f. FLDNAME – will always be KEY, as this is the only type of Change Pointers, we
are current targeting
g. CRETIME and ACTTIME – time which the data was imported into the SAP
system with Gold Client
h. USRNAME – Name of the user who is doing the importing with Gold Client
i. CDCHGID – Type of change to the data; in this case, it only works during the
import side of things, so we would only expect an I in this field

Configuration and Utilities
© 2003-2020 Qlik Analytics (ISR) Ltd..
New Utilities
Restart Failed Jobs
Execute this utility when an export or import job has canceled for some reason and
needs to be completed. The program does not start the process completely over but
instead it attempts to complete whatever work remains.
To restart a process, input the following (Fig. 33.0):
• a Run Time ID value
o this value can be found within the export or import job located near
the top of the log (Fig. 33.1)
• select the appropriate processing option: Export or Import
o If the Export option is chosen, select the appropriate type: Client
Construct or Data Echo
o If the Import option is chosen, the screen will change accordingly,
including making visible the option of running the import using Parallel
Processing (Fig. 33.2)
• additional processing options
Figure 33.0
Figure 33.1

Configuration and Utilities
© 2003-2020 Qlik Analytics (ISR) Ltd..
Figure 33.2
The program will likely respond with a sequence of messages that will vary based
upon the user’s inputs. The first is just informational and provides the user some
understanding as to the root cause (Fig. 33.3).
Figure 33.3
The next message provides the user the name of the background job that was
submitted (Fig. 33.4). The job can be monitored using transaction code SM37.
Figure 33.4

Configuration and Utilities
© 2003-2020 Qlik Analytics (ISR) Ltd..
Table Cleanup Utility
This utility is used to purge entries from the Gold Client tables listed below.
When an export is executed, these tables will be populated while processing but if
the export completes successfully, then the records in these tables (for the given
export) are automatically deleted; however, for exports which are not successful, the
records are left within the tables. As such, executing this program will remove these
records.
/HTG/GCSWRKRTABL
/HTG/GCSEXPFILES
/HTG/GCS_GETWORK
/HTG/GCSFILETODO
/HTG/GCSFILEPROG
/HTG/GCSFLOWTODO
/HTG/GCSFLOWPROG
/HTG/GCS_DERIVET
/HTG/GCS_DERIVEX
/HTG/GLC_TRA_H
/HTG/GLC_SYNCDET
/HTG/GLC_SYNCHD
This program contains no input screen so selecting it prompts the user with the
question about proceeding or not (Fig. 34.0). If ‘Yes’ is selected, the program will
immediately initiate the purging process in the background. While the process is
running, a message should appear at the bottom of the screen (Fig. 34.1).
Figure 34.0
Figure 34.1

Configuration and Utilities
© 2003-2020 Qlik Analytics (ISR) Ltd..
When the process is completed the screen will show how many records were deleted
per table. (Fig. 34.2).
Figure 34.2

Configuration and Utilities
© 2003-2020 Qlik Analytics (ISR) Ltd..
Global Parameter Maintenance
This utility can be used to maintain Gold Client’s global level parameters. These
settings are provided to the customer with recommended defaults in place and
changes to the settings would ideally be provided by the Qlik support team on an as-
needed basis (Fig. 35.0).
Figure 35.0

Configuration and Utilities
© 2003-2020 Qlik Analytics (ISR) Ltd..
SQL Trace Comparison
The typical use case for this program would be when a user has copied data from the
source to the target and has found data to be missing. The next natural step is to
adjust the Data Echo framework so that the missing data is included in future copies
but, perhaps the user is unsure of what changes to deploy because they do not know
where the missing data is stored. Perhaps the best way to locate this information is
to run a SQL trace in the source client (where the data is good) and then compare
the trace results to the target client to identify the deltas. The user can input the
respective trace details in this utility to perform a comparison between the source
and target clients (Fig. 36.0).
Please note that to perform the comparison an RFC is required that allows the source
client to communicate with the target client. If a relevant RFC does not exist, your
Basis team will need to first create one.
The user can also limit the number of trace records to compare by adjusting the ‘Max
Records’ field; in most cases 5,000 should be more than sufficient for most trace
comparisons.
Figure 36.0
SQL traces can be executed and collected via standard SAP t-code ST05. To collect a
trace, it is recommended that you open two SAPGUI sessions. In one session, first
activate the SQL trace, and then in the other session run the relevant t-code that
displays the relevant data; when finished, return to the ST05 session and deactivate
the trace, and finally display the trace (Fig. 36.1). Note: the default setting should
be trace type ‘SQL Trace’ but ensure that it is selected; no other trace types are
required.

Configuration and Utilities
© 2003-2020 Qlik Analytics (ISR) Ltd..
Figure 36.1
After the trace has been generated, display the filter conditions for it (by selecting
‘Display Trace’ on the ST05 screen) and make note of the date and time details (Fig.
36.2).
Figure 36.2
Copy/paste these date and time details into the SQL Trace Comparison screen. Input
an RFC destination, and then execute the program (Fig. 36.3).

Configuration and Utilities
© 2003-2020 Qlik Analytics (ISR) Ltd..
Figure 36.3
Here is an output example from the execution of this program (Fig. 36.4). The area
highlighted in yellow shows the delta that was found where table CE1IDEA finds four
records in the source client but zero records in the target client. The area highlighted
in orange shows the details that can be used to query the table that is causing the
delta. In this example, table CE1IDEA can be queried using the logic where VRGAR =
‘F’ and RBELN = ‘0090005220’ and COPA_AWTYP = ‘VBRK’. Having this information
in hand, the user can hopefully adjust the Gold Client config accordingly in order for
this data to be included in subsequent exports.
Figure 36.4
Freely reach out to the Qlik support team if assistance with missing data is required.
Sharing any trace comparison outputs with Qlik would provide useful insight in order
for the team to help resolve the issue.

Configuration and Utilities
© 2003-2020 Qlik Analytics (ISR) Ltd..
Memory optimization upgrade
This utility can be used to quickly update Gold Client’s memory parameters. These
parameters are typically maintained individually via the Memory Optimization utility,
but this utility streamlines the maintenance process when changes need to be
applied to all data types. This program’s primary use case is for Gold Client
customers who are upgrading from a pre-8.5 version to 8.5 or later, but it can also
be used at other times when relevant. The key here is understanding that this
program’s execution will affect all data types.
The user must select either the ‘Fixed value’ or ‘Multiply value’ processing option
where the fixed option is set by default. Qlik’s best practice recommendation is to
use fixed values and set ‘Collections’ as 1,000 and ‘Package Size’ as 20,000 (Fig.
37.0); however, these values are not set by default and so rely on user input.
If the multiply option is chosen, the screen will refresh accordingly (Fig. 37.1).
Figure 37.0
Figure 37.1
Based on the chosen processing option, input the relevant parameters and execute
the program. The message below should appear.

Configuration and Utilities
© 2003-2020 Qlik Analytics (ISR) Ltd..
To check if the memory parameters were updated, go to the Configuration menu and
select the Memory Optimization utility (Fig. 37.2). The values in this table should be
displayed according to the user’s inputs (Fig. 37.3).
Figure 37.2
Figure 37.3

Configuration and Utilities
© 2003-2020 Qlik Analytics (ISR) Ltd..
Compression Exception by Table
This utility can be used to maintain compression settings. The Gold Client export
program contains default compression logic but on occasion tables are found that
require the use of a different compression types and so this table can be used to
manage those exceptions.
Typically, Gold Client users will not know when this table needs to be populated and
instead would be directed here by the Qlik support team.
Populating the table is straight forward in that the table requiring the exceptional
compression is entered in the ‘Table Name’ column and the compression type is
selected from the available list in the ‘ComprMd’ column (Fig. 38.0).
Figure 38.0

Configuration and Utilities
© 2003-2020 Qlik Analytics (ISR) Ltd..
Export progress report
This report provides insight to the user to help them understand the progress of an
in-flight export. Although the Export Progress Report can be used as a monitoring
tool, be advised that the best overall monitoring tools are t-code SM37 or the Export
Dashboard located within Export Control.
The user can display the data still to be exported (‘In Progress’ tab) as well as the
data already exported (‘Complete’ tab). This report also provides the job log for the
given export. This is a collective log so that even if the export was initiated as a
parallel export, the logging details from all jobs will be displayed here (Fig. 39.0). If
the export is complete, the details on the ‘In Progress’ and ‘Complete’ tabs will be
empty; however, the ‘Job Log’ details will be present as long as the jobs have not
been purged from the system.
Figure 39.0
The only input required by the user is the Runtime ID; this detail is most easily
located in the following places: at the very start of the parent’s job log (Fig. 39.1), or
within the name of the WORKER jobs (Fig. 39.2).
Figure 39.1
Figure 39.2

Configuration and Utilities
© 2003-2020 Qlik Analytics (ISR) Ltd..
Once a Runtime ID has been entered, select the various tabs to see the relevant
content (Fig. 39.3).
A user typically wants insight to try and understand how much longer the export will
run and so the ‘In Progress’ tab is the most useful, but having this information is not
all that meaningful without understanding how the export process works. When an
export runs, it first interrogates the Data Echo configuration to identify all of the
relevant data type links, and then once it has obtained this information, it then
exports all of the data relevant to these data types. This is the reason the ‘In
Progress’ tab includes in the ‘WSID’ column the value of either LINK or FILE. A LINK
value indicates that the linkages for the given data type are being discovered, and a
FILE value indicates that the data for that data type is being collected and written to
file. Ultimately, all data types will complete both processes (except those data types
which do not have links so they will only perform the FILE step) and the total Record
Count will reach zero indicating that the export is complete. The larger the record
counts and the more LINK entries there are, the longer the export is going to take to
complete. Select the refresh button to update the report details.
Figure 39.3

Configuration and Utilities
© 2003-2020 Qlik Analytics (ISR) Ltd..
If useful, select the ‘Complete’ tab to see what data types have finished writing to
file (Fig. 39.4). Practically speaking, this is probably useful only if the user is
interested in seeing how much data has been exported so far.
Figure 39.4
If useful, select the ‘Job Log’ tab to see the collective logging details (Fig. 39.5). The
first log displayed will be the parent job, but it is possible to scroll down through the
log to eventually locate the logging for the various WORKER jobs.

Configuration and Utilities
© 2003-2020 Qlik Analytics (ISR) Ltd..
Figure 39.5

Configuration and Utilities
© 2003-2020 Qlik Analytics (ISR) Ltd..
Maintain Timestamp types
This utility can be used to maintain date and timestamp conversion settings when
necessary. It is most relevant with respect to the Intelligent Slice function where
users typically input a date range and then those date values are saved as selection
criteria within Gold Client Scenarios. If the conversion is not completed successfully
then the values stored in the selection criteria may be incorrect or invalid and cause
less than ideal results when running the export for this Scenario.
Be aware that this issue is not common when using date-related fields which are
assigned a DATS data type such as these examples (Fig. 40.0).
Figure 40.0
Typically, Gold Client users will not know when this table should be populated and
instead would be directed here by the Qlik support team.
Populating the table is reasonably simple in that the relevant domain, data type
element, or conversion exit is entered in the first column and the conversion type is
selected from the available list in the second column. It is also possible to activate or
inactivate these entries as needed (Fig. 40.1).

Configuration and Utilities
© 2003-2020 Qlik Analytics (ISR) Ltd..
Figure 40.1

Configuration and Utilities
© 2003-2020 Qlik Analytics (ISR) Ltd..
Export Dashboard
This program is appropriately named as it is a user’s dashboard for managing
exports. This dashboard is primarily designed for an advanced user, perhaps
someone on the team who is tasked with performing data refreshes and/or copying
large data volumes and thus requires advanced monitoring and administration
functions because of these responsibilities. The idea is that this dashboard replaces
and centralizes various SAP t-codes that could be used for monitoring purposes,
primarily SM37 (Background Job monitor), SM50 (Work Process monitor for single
instance), and SM66 (Work Process monitor for all instances).
The dashboard provides monitoring capabilities by displaying the following important
elements: Job Name, Status, Start Date and Time, Duration, and other useful details
like whether the export included data transformation and/or Subset Sync
functionality. It is possible to display other more advanced details as well when
useful.
The dashboard defaults the Start Date (‘today’ minus 30-days) and User Name;
however, the user may change them as required (Fig. 41.0); if changed, select the
Refresh button to update the output. The user may also wish to input one or more
specific job names in order to filter the contents in the dashboard.
Figure 41.0
Here is an example of the default content provided in the dashboard (Fig. 41.1).
Most of the columns displayed are self-explanatory; however, here are a few details
for those that may not be.
• Status: red = canceled export, yellow = active export, green = completed
export
• Job Log: to display the log for a specific job, click ‘Job Log’
o This screen capture provides an example of the ALV-style job log that
should be displayed (Fig. 41.2)
o Tip: when placing a cursor on it, Job Log should become underlined
indicating that it can be selected
• Tform: if a light bulb is displayed, data transformation was active for one or
more Data Types for the export
• Subset: if a light bulb is displayed, Subset Sync was active for one or more
Data Types for the export

Configuration and Utilities
© 2003-2020 Qlik Analytics (ISR) Ltd..
Figure 41.1
Figure 41.2
The dashboard also consists of these functions: Advanced Details, Job Variant
Details, Export Progress, and Restart Failed Jobs (Fig. 41.3); see below for more
details on each. Note: Advanced Details can be selected without selecting a specific
job; however, the other functions require that a job be selected first. If not, the
system will respond with the message of “Select one Job Name”.
Figure 41.3
• Advanced Details provides additional details for an export (Fig. 41.4)
o Current Table: from which table an export is actively working
o Server: the server being used by an active export
o Export GUID: the unique ID assigned to each export
o Data Type: the last data type that was exported
o LINK/FILE: in what stage an active export is working (LINK is
displayed when the export is identifying the various dependent data

Configuration and Utilities
© 2003-2020 Qlik Analytics (ISR) Ltd..
relations, and FILE is displayed when the export is collecting data and
writing it to file)
• Job Variant Details displays the same content as if the user was in t-code
SM37, selected an export job, and displayed the variant details (Fig. 41.5)
• Export Progress can be used to display details for an in-flight export;
reference the section in this user guide named Export progress report for
more details on utilizing this function
• Restart Failed Jobs can be used to restart an export that resulted in a
canceled status; reference the section in this user guide named Restart Failed
Jobs for more details on utilizing this function
Figure 41.4
Figure 41.5
In addition to the Configuration menu, this function can also be accessed via the
Export Control screen by selecting the Export Dashboard button (Fig. 41.6).
Figure 41.6

Configuration and Utilities
© 2003-2020 Qlik Analytics (ISR) Ltd..
Tablename Mapping
This utility can be used to maintain Gold Client parameters in those unique instances
when the table name between the source system and target system are not identical
(Fig. 42.0). This solution originated with the need to copy data in EWM (Extended
Warehouse Management) systems where some tables have a client value
incorporated into their names. An example of this is table /1DF/FDR### where ###
represents the respective client number.
The utility might be a solution outside of EWM systems, but it is advised that
customers to do so with the Qlik support team’s guidance so as to achieve the
desired result.
Figure 42.0
To deploy a solution specifically for EWM systems, input into the ‘Source Table Name’
column the full table name or it is also acceptable to input a table name prefix. It is
not necessary to input a value in the ‘Target Table Name’ column. Tick both the
‘EWM Active’ and ‘Active’ checkboxes. It is necessary to maintain these settings in
the Target client.
These settings will force the import to substitute the client number for the last three
characters for those table prefixes entered in this table. It will perform the
conversion only if the last three characters are numeric.
A sample table entry that would convert the clients for EWM doc flow tables (Fig.
42.1).
Figure 42.1

Configuration and Utilities
© 2003-2020 Qlik Analytics (ISR) Ltd..
Conversion
Some data objects are stored in the database with a client value attached. If the
client value in the source and targets are different, this data may not display
successfully even though the data has been successfully copied to the target. To
resolve these various issues, Gold Client has conversion-related utilities that can be
used to target each of the areas where these issues reside. The conversion programs
that exist currently involve data stored in theses tables: CDHDR and CDPOS (Change
docs), STXH and STXL (Text), and ADRV (Address where-used).
This suite of conversion utilities has been moved out of the Configuration menu and
is located on the main Gold Client screen under the function named Post Process
(Fig. 43.0 and 43.1).
Figure 43.0
Figure 43.1

Configuration and Utilities
© 2003-2020 Qlik Analytics (ISR) Ltd..
Update Change Document Client
After data has been imported, the client number in the change document tables
(CDHDR and CDPOS) may need to be updated from the old client number (source)
to the new client number (target). Executing this program will perform that
conversion.
The user is required to input the old client number and one or more Change Doc
objects (the value stored in CDHDR.OBJECTID).
If useful, the program can be executed first in report mode (the default setting) to
identify the number of relevant records found. Select the ‘Update table entries’ radio
button to perform the actual conversion. Freely increase the default ‘Max records to
process’ parameter when required (Fig. 43.2).
Figure 43.2
A sample output that displays after having executed the program (Fig. 43.3).
Figure 43.3
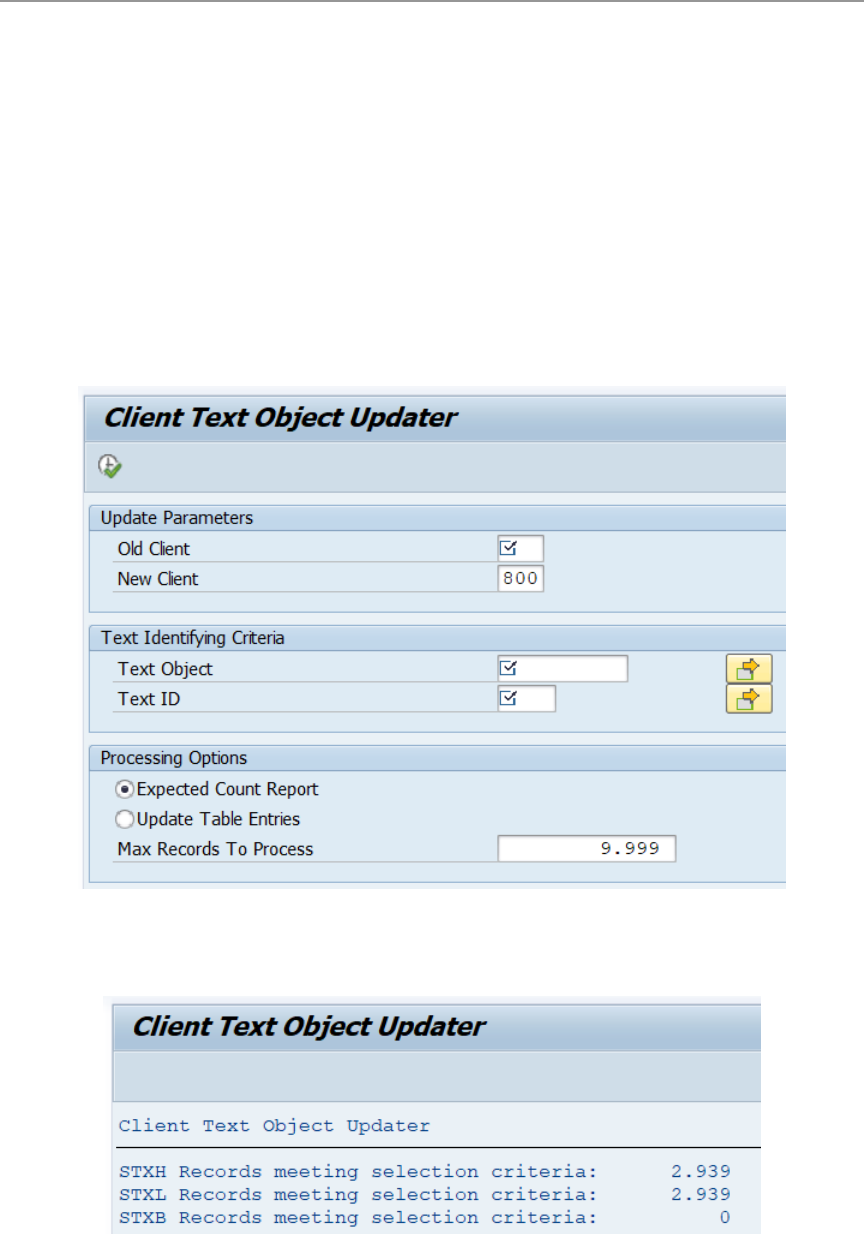
Configuration and Utilities
© 2003-2020 Qlik Analytics (ISR) Ltd..
Utility to Update Client Value
After data has been imported, the client number in the text tables (STXH, STXL,
and STXB) may need to be updated from the old client number (source) to the new
client number (target). Executing this program will perform that conversion.
The user is required to input the old client number, one or more Text objects (the
value stored in STXH.TDOBJECT), and one or more Text IDs (the value stored in
STXH.TDID). Note: inputting an asterisk (*) is an acceptable value in the Object and
ID fields.
If useful, the program can be executed first in report mode (the default setting) to
identify the number of relevant records found. Select the ‘Update Table Entries’ radio
button to perform the actual conversion. Freely increase the default ‘Max records to
process’ parameter when required (Fig. 43.4).
Figure 43.4
A sample output that displays after having executed the program (Fig. 43.5).
Figure 43.5

Configuration and Utilities
© 2003-2020 Qlik Analytics (ISR) Ltd..
Update Person Where-Used Addr Client
After data has been imported, the client number in address table ADRV may need to
be updated from the old client number (source) to the new client number (target).
Executing this program will perform that conversion.
The user is required to input the old client number, one or more Application table
names (the value stored in ADRV.APPL_TABLE), and one or more Application field
names (the value stored in ADRV.APPL_FIELD). Note: inputting an asterisk (*) is an
acceptable value in the Application table name and Application field name fields.
If useful, the program can be executed first in report mode (the default setting) to
identify the number of relevant records found. Select the ‘Update Table Entries’ radio
button to perform the actual conversion. Freely increase the default ‘Max records to
process’ parameter when required (Fig. 43.6).
Figure 43.6
A sample output that displays after having executed the program (Fig. 43.7).
Figure 43.7

Configuration and Utilities
© 2003-2020 Qlik Analytics (ISR) Ltd..
Maintain Change Doc Userexit Config
This program is another way of converting client values that are stored in the
Change Document (CDHDR and CDPOS) tables but can be thought of as a 2
nd
-
generation and more mature solution. It leverages Gold Client’s “user exit”
functionality so that the client conversion is performed automatically during the data
import process.
The scope of the conversion is determined by the values stored within this
configuration table which resides in the Post Process menu (Fig. 43.8).
Figure 43.8
The user can freely maintain in this table whatever Change Doc objects require client
conversion with respect to the data in their system (Fig. 43.9).
• The ‘Change doc. object’ column represents the values stored in
CDHDR.OBJECTID / CDPOS.OBJECTID
• Selecting the checkbox in the ‘OBJECTID field Active’ column informs Gold
Client to perform the client conversion for values stored in
CDHDR.OBJECTID and CDPOS.OBJECTID
• Selecting the checkbox in the ‘TABKEY field Active’ column informs Gold Client
to perform the client conversion for values stored in CDPOS.TABKEY

Configuration and Utilities
© 2003-2020 Qlik Analytics (ISR) Ltd..
Figure 43.9
For the values in this table to be effective, the Change Doc user exits must be active.
This config area can be reached by going to the main Gold Client screen and then
selecting the Configuration menu, and then on the following screen by selecting
Maintain User Exits.
These respective user exits need to exist in this table and be set as ‘Active’ for this
solution to work. Note that there is entry for CDHDR and another for CDPOS so they
can be used indepedently when required (Fig. 43.9).
Figure 43.9
Once the Change Doc configuration table has been populated accordingly, and the
user exits configured, this client-conversion activity will occur automatically during
the import process.

Configuration and Utilities
© 2003-2020 Qlik Analytics (ISR) Ltd..
Support Information
Qlik Analytics (ISR) Ltd. can be contacted either by telephone or via email. Any
support related issue regarding problems with or use of the Gold Client software and
process can be reported for resolution.
If our offices are closed, or staff is unable to directly respond to a support request,
we will respond within 24 hours of the initial call. Problems related to the export or
import processing may require code enhancements. If a code enhancement or fix is
required, resolution time may vary.
As per the maintenance agreement, any repairs or enhancements to the Gold Client
software will immediately be deployed to all customers up-to-date with their
maintenance contract. It is the choice of the customer as to if and when such
enhancements are implemented. In addition, customers may request a planning
session with Qlik to review changes in the software and how the changes might
impact their environment.
We can also be contacted to discuss application or feasibility of using the Gold Client
process to resolve a current challenge the project team faces. When this is required,
a planning session can be scheduled in advance to ensure proper participation by
both Qlik and the client.
Corporate Offices:
QLIK TECHNOLOGIES INC.
211 South Gulph Road
Suite 500
King of Prussia, PA 19406
United States
Website:
https://www.qlik.com/us/products/qlik-gold-client
Contact:
goldclient.supp[email protected]
1-877-484-8982 (Toll Free in the USA)
