
Adobe Acrobat XI Pro
Introduction
U.S. Bankruptcy Court, FLSB
July 2016

2 | P a g e
Objectives
In the course of your work, you may receive PDF documents or need to convert
documents to PDF. For information to be useful you need to access or convert it based
on the situation and what you need to accomplish. We’ll take a look at various features
in Adobe Acrobat that make using PDF a useful tool.
At the end of this lesson you will be able to:
• Use the Adobe Acrobat interface
• Create PDF documents

3 | P a g e
Getting to Know Adobe Acrobat
Acrobat is an authoring application. Rather than starting from scratch and creating a new
document in Acrobat, your workflow usually involves converting a document, created in
another program (like Word or WordPerfect), to a Portable Document Format (PDF) file.
So what’s the big deal? In our CMECF world, having documents that are secure and remain
the same years from now is the key. Document viewing is secondary to document integrity.
The preservation of the contents of a page is what makes PDF so extraordinary.
Features
Acrobat provides you with features such as menu commands, toolbars, and palettes to
accomplish work for whatever task you hope to complete with PDF documents. Take a
look at the information below to understand the names used to describe the various
areas of the Acrobat interface:
Title Bar
By default, the name of the file you open appears
in the title bar.
Menu Bar
Contains all the top-level menu commands.
Tool Bar
Contains a set of buttons grouped based on their
functionality.
Document Pane
Displays the content of the PDF document. When
no file is open, the Document Pane is empty.
Navigation Pane
Contains the navigation icons for Pages,
Bookmarks, Signatures, Comments and
Attachments. Each icon displays a list of elements
in its associated panel, which is then used to
navigate to a specific location in the PDF document.
The Navigation Pane can be expanded or collapsed
as needed.
Menu Br

4 | P a g e
Customize Tool Set
Enable Tool Set
1. From Tool Bar, select Edit Current Tool Set
2. Choose the tools you want to display
Remove Tool Set
1. From Tool Bar, select Edit Current Tool Set
2. Highlight the tool> select Delete
Tool Bars
Menu Bar
Title Bar
Document Pane
Navigation Pane

5 | P a g e
Viewing and Navigating PDF Files
You can navigate and view pages in Acrobat via several means covered in this section.
Opening PDFs
As with most computer programs you already use in Windows, you know that files are
generally opened via the File> Open command. Acrobat uses the same menu and
keyboard shortcuts to access the Open dialog box where you browse your drives, open
folders, and ultimately select a file to open.
1. Select File> Open
2. Select from the navigation panel on the left
3. Browse through the folders or documents
4. Select the document> click Open
Opening recently viewed files
Acrobat keeps track of the most recently opened files. By default, it keeps track of the
last five files you opened.
1. Select File
2. Choose from PDFs listed.
Note: To increase the amount of documents recently view, click Edit> Preferences>
Categories: Documents> increase the number for Documents in recently used list

6 | P a g e
Navigation
Various page navigation tools are available. The some features of the toolbar are not
visible by default. You can place the toolbar in view and dock it for easy access.
Thumbnails
View:
Click on the Pages icon> click on the
Thumbnail to view the page
Enlarge View:
Right click on Thumbnail> Enlarge Page
Thumbnails
Enable Page Navigation Toolbar
1. Right click on Toolbar> Page
Navigation
2. Check off what you need
Or
1. View> Page Navigation

7 | P a g e
Viewing
PDF pages can be viewed in several different ways. Acrobat contains six tools used for
zooming views.
Page Display
1. Right click on Toolbar> Page
Display OR
2. Right click on Toolbar> Rotate View
3. Check off what you need
Or
View> Page Display or Rotate View
• Single Page View: displays
one page at a time
regardless of magnification
size
• Enable Scrolling: displays
more than one page stacked
vertically
• Two Page View: displays
pages next to each other
like a book
• Two Page Scrolling:
displays more than one pair
of pages at a time stacked
vertically

8 | P a g e
Zoom
1. Right click on Toolbar> Select &
Zoom
2. Check off what you need
Or
3. View> Zoom
4. Check off what you need
Searching
Features
Acrobat XI continues with the search options you had available in the previous versions.
You’ll notice the Find tool and the Search pane are both available.
Right click> Edit> Find
OR
Edit> Find
OR CTRL + F
Find information contained in the
PDF document.
Right click> Edit> Advanced Search
OR
Edit> Advanced Search
Search PDFs scattered around your
hard drive.

9 | P a g e
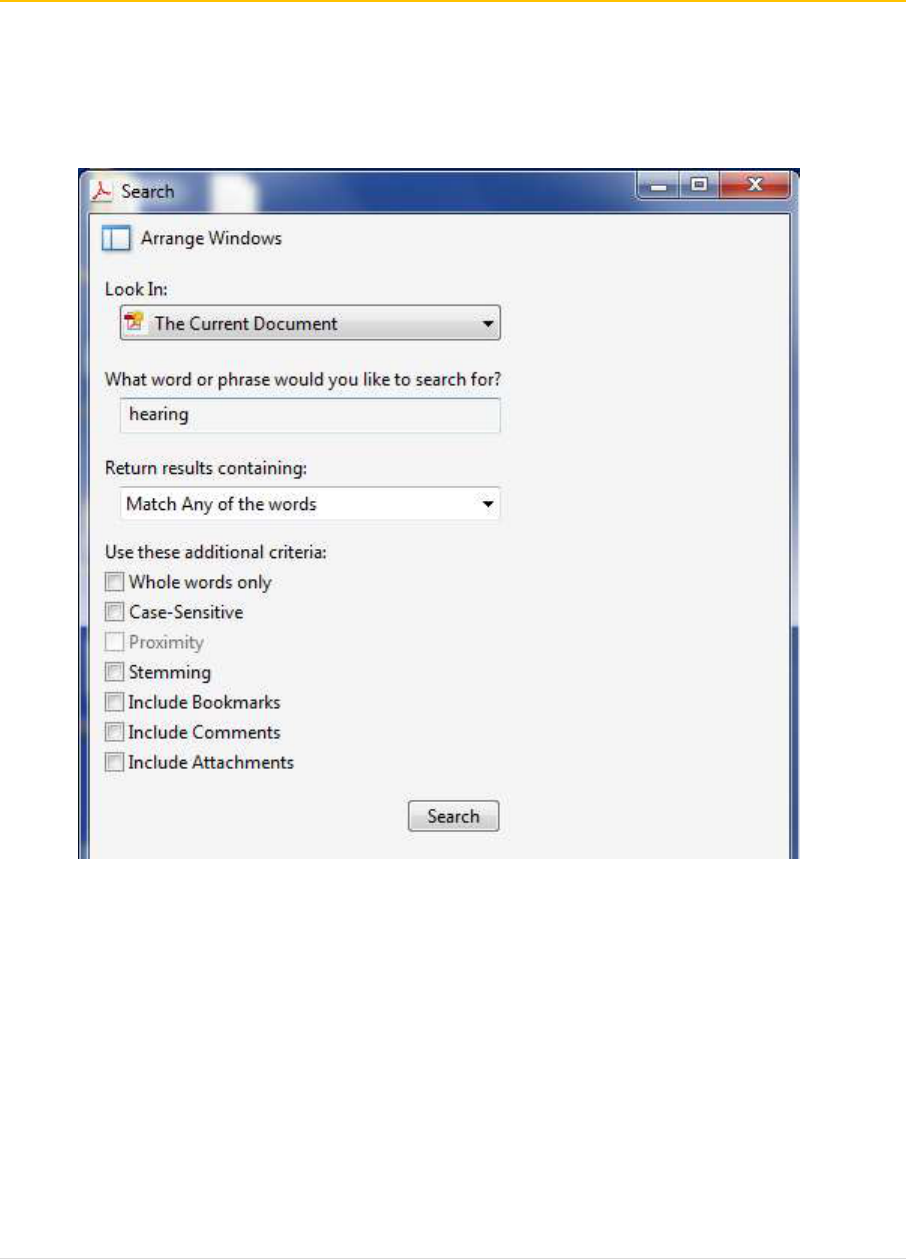
Find tool
In order to use the Advanced Search, you must have a document open in the Document
pane. If you have more than one open it will search in the active document.
1. Select Edit> Find
2. Type the word(s) you are looking for in the document and open the drop down
menu for more options> press Enter
3. Use the Previous and Next buttons to view the occurrences of the word in the
document.
Search Pane
The Organizer is a tool that helps you manage and access frequently used documents in
a centralized place within Acrobat.
1. Click the Search icon from your Tool Bars.
2. Select your search criteria> click Search

10 | P a g e
Note: In the basic search you are limited to actual word(s) you want to find. You
cannot us Boolean (AND, OR, and NOT) operators or any kind of search
expressions. For more than one word the results are for the exact phrase.
3. Review and select the needed search results or start a New Search
11 | P a g e
Advanced Search
To take advantage of searching with advanced options follow the steps below.
1. Click the Show More Options link at the bottom of the Search Pane
2. Select the additional criteria as needed
Note: depending on your selection criteria the options available will change. For
example, if I choose one of the drives instead of the current document and
select Refine Search Results link additional options appear:

12 | P a g e
Note: Boolean queries can be used by selecting it under the Return results
containing: drop down option.
3. Select your search criteria> click Refine Search Results
4. Review and select the needed search results or start a New Search

13 | P a g e
Converting Documents to PDF
Acrobat was never designed to support creating new files and editing pages to add content.
Where Acrobat begins is with the file conversion to the PDF format. Any program file can be
converted to PDF through a number of different methods offered by Acrobat, operating
systems, and authoring applications. The method you use to convert a document to PDF and
the purpose for which the PDF is intended require you to become familiar with a number of
different options at your disposal for PDF file creation. This section covers some of those
options.
Main Conversion Options
You can save the file to PDF. You can also print a file to the Adobe PDF printer and it is
converted to PDF. It all sounds simple, but two very important distinctions exist between
these methods of conversion for certain file types that you need to understand before
you start converting the files to PDF.
Save As: PDF
Saves the document directly to PDF.
Print to
Adobe PDF
Print your file to a disk. During this process, the file is
temporarily saved as a PostScript file and it is distilled in
Acrobat Distiller. The settings in the Distiller control the
attributes of the resulting PDF file.

14 | P a g e
Convert a PDF or Active (Fillable) PDF to PDF/A or Inactive PDF
To enhance security within CMECF it is important that PDFs are inactive so they cannot
be edited.
1. Select File> Print
2. Change the Printer name to Adobe PDF> click Properties
3. In the Adobe PDF Settings tab, select PDF/A-1b: 2005> click OK> click Print
Note: to optimize file size click Edit (next to Default Settings)> change
Resolution> click OK

15 | P a g e
4. Navigate to the location you want to save the file> click Save
5. Review the converted file to make sure it is no longer interactive.

16 | P a g e
Create PDF from a Single File
Acrobat offers various options to convert application documents to PDF. For PDF creation
supported by Acrobat, you don’t need to leave the program to produce PDF files. Older
WordPerfect file formats are not supported in Adobe.
1. Select File> Open
2. Change type of file to All files (*.*)> navigate to the location where the
document is located> select the document you want to convert> click Open
3. Select File> Save As> Save as type: Adobe PDF Files (*.pdf) should be selected
4. Navigate to the location to save> click Save
or
1. Select Create> PDF from file> All Supported Formats
2. Navigate to the location where the document is located > select the document
you want to convert> click Open
3. Repeat steps 3 and 4

17 | P a g e
Scanning
Scanning Work Environment (Configure Presets)
For scanning tasks, you can preset preferences for scanning. This helps you save time by
setting up some general options that apply for scanning a range of original document
types.
1. Select Create> PDF from Scanner> Configure Presets
2. Select the necessary preferences> click OK.

18 | P a g e
*Sides
Supports two-sided scanning (front or both sides).
Resolution
At a minimum you should use 300 dpi for scan
resolution for file optimization.
Paper Size
You can leave it at Automatic or change as needed for
the task such as legal size.
*Prompt for
scanning more
pages
Will prompt you to confirm if you are done scanning.
Optimization
Adjusts the quality of the scanned image. Click the
Options button for additional quality customization:
• Deskew – automatically straightens crooked
scans.
• Background removal – removes background
data when text has drop shadows or original
copy shows dust and dirt.
• Edge shadow removal – removes shadow
around type when scanned in grayscale or color
mode.
• Despeckle/Descreen – helpful when scanning
printed documents or documents with dust and
dirt.
• Halo removal – clean up halo effect around type.
*Make PDF/A
compliant
This makes the PDF available for Archiving and
maintains the integrity of the document.
19 | P a g e
Scanning a text document (basic scan)
The following instructions are for use with the Fujitsu fi-6130 scanner.
1. Select Create> PDF from Scanner> Black and White Document
2. Click OK if you get the prompt confirming the scan is complete
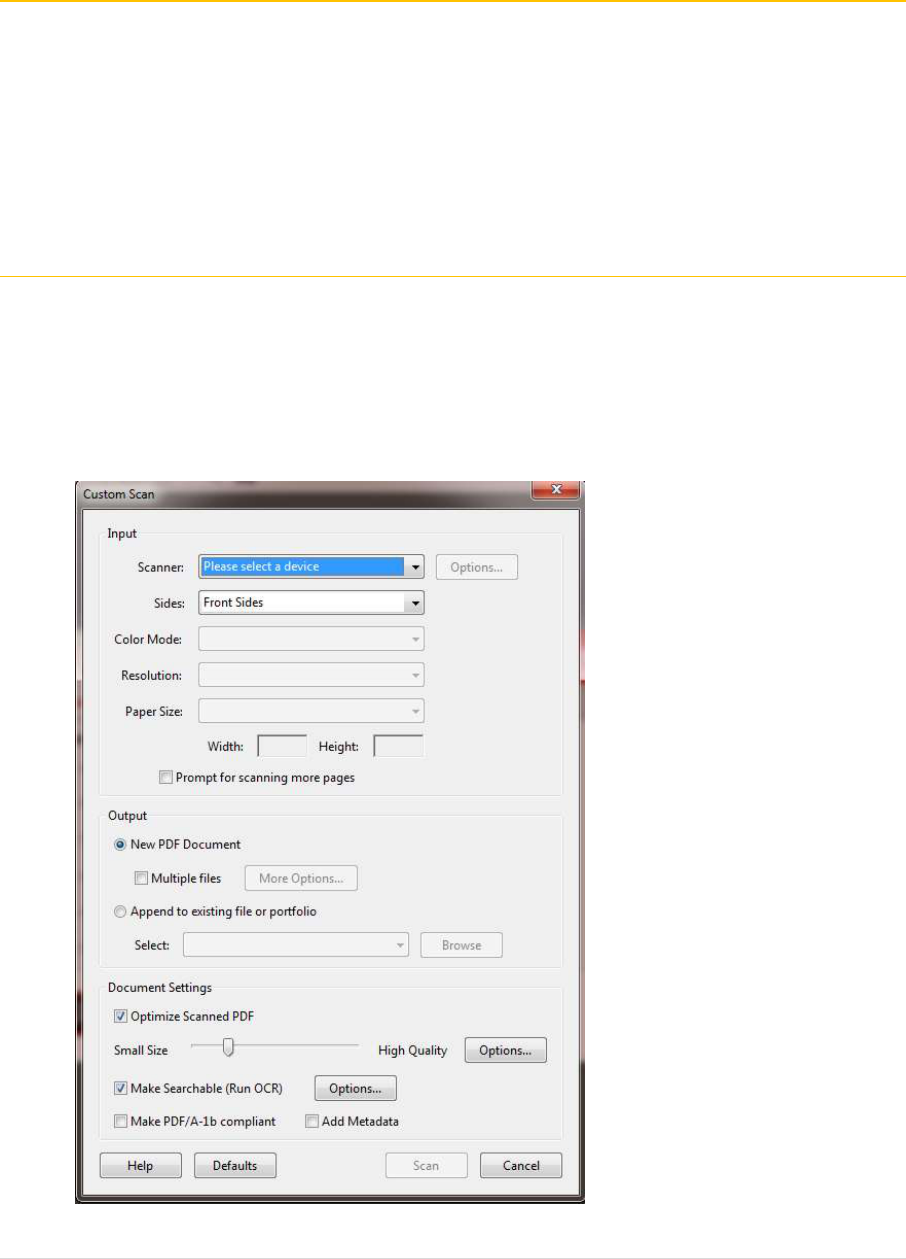
Scanning a text document (custom scan)
There are times where you want choose your options prior to a scan – more like a one-
time use – for special tasks.
1. Select Create> PDF from Scanner> Custom Scan
2. Select the necessary preferences> click Scan.

20 | P a g e
Adding scanned documents to an existing file (custom scan)
You can append scans to document(s) already open or one already filed depending
where you are in your workflow.
1. Select Create> PDF from Scanner> Custom Scan
2. In Output select Append to existing file or portfolio
3. Browse for the file you need> select it> click Choose
4. Click Scan
Scanning a legal size document (custom scan)
In the course of scanning various documents you may get a different paper size than the
default choice selected in your configure presets. If this is the case, you’ll want to
change the size to suit your own personal scanning needs without having to go to the
copier to shrink the paper to then scan it.
1. Click Create> PDF from Scanner> Custom Scan
2. In Paper Size select Legal> click OK
3. File> Print> change Printer to Adobe PDF> verify Page Sizing & Handling is
Shrink oversized pages> click Print

21 | P a g e
Note: your printable area should be letter size (configure presets to Letter if
needed)
4. Navigate to the location you want to save the file in> rename the file> click Save
Scanning documents as separate PDFs (custom scan)
You scan a group of documents in one sitting and save them as separate PDFs in one of
two ways depending on your needs.
A. Create a scan that opens a new PDF file
1. From an open Document pane (active PDF document just scanned) click Create>
PDF from Scanner> Custom Scan
2. In Output select New PDF document> click Scan

22 | P a g e
3. Navigate to the location you want to save the file in> name the file> click Save
B. Scan multiple pages and create separate new pages for each scan
1. From an open Document pane (active PDF document just scanned) click Create>
PDF from Scanner> Custom Scan
2. In Output select New PDF document> check Multiple files
3. Browse for a folder to save the file in> click OK
4. File> Open> navigate to the folder you saved it in> review the PDFs> rename as
needed

23 | P a g e
File Optimization
You may be working with PDFs already created and may need to reduce file sizes or strip
unnecessary content in order for it to comply with CMECF or District requirements. Rather
than going back to the original authoring program, you can use tools in Acrobat to optimize
the file.
Identifying File Size
In order for you to determine the best way to optimize the file verify the size of the file.
1. Select File> Properties
2. Click the Description tab if not active> in the Advanced section review File Size.

24 | P a g e
Reducing File Size
Acrobat enables you to reduce file sizes. It is as good idea to save it as a new file in case
the file reduction fails and you need to return to the original file to try another method
of file reduction. Note: Reducing the files size of a digitally signed document removes the
signature.
1. Select File> Save as Other> Reduced Size PDF
2. Select version compatibility> click OK
3. Provide a filename> click Save
Using PDF Optimizer
Reducing file size and examining documents might get you only a slight file reduction. A
more aggressive tool is the PDF Optimizer.
1. Select File> Save As Other> Optimize PDF
2. Optimize the settings> click OK

25 | P a g e
Note: by default, only elements that do not affect functionality are selected.
3. Select File> Save As> provide a filename> click Save
Note: When you want to get the most out of reducing file sizes, use the PDF Optimizer. The
PDF Optimizer gives you the same results as the PDF Examiner and Reduce size combined.

26 | P a g e
Save As
As you edit PDF documents, they tend to become bulky and contain unnecessary
information. By using the Save As command you can create a smaller more optimized
file.
1. Select File> Save As
2. Navigate to the location to be saved> rename file> Save
Zip Files
When you need to send multiple files it may be easier to group them in a smaller zip file.
You gain about 20% efficiency by compressing the files.
1. Select the files you want to save together
2. Right click> select Send To> Compressed (zipped) folder
3. Name the zip folder
4. Open your zip folder to verify all the documents you selected were zipped

27 | P a g e
Editing Pages
Rather than recreate the entire PDF file, Acrobat enables you to selectively append, replace,
delete, and extract pages in a PDF document.
Document Menu Options
The Document Menu provides you various options to edit your PDF document. Knowing
what you need to accomplish helps identify which menu option will work best for you.
A. Working within a Single
Document
1. Reorder Pages
2. Remove/Delete Pages
3. Rotate Pages
B. Create separate PDF files from
a Multipage PDF(s)
1. Extract Pages
2. Split Document
C. Create ONE PDF from
separate pages or files
1. Insert Pages
2. Copy/Paste Pages
3. Replace Pages
4. Merge Files

28 | P a g e
Reordering Pages
Thumbnails are mini-views of PDF pages. The Pages panel offers opportunities for
sorting pages and reorganizing them.
1. Open the Page Thumbnails and drag the right side of the pane to the far right of
the Document pane
2. Enlarge the thumbnail as needed (right click for Options)
3. Click on the thumbnail page and drag the page to a spot between the pages
(vertical highlight bar appears) where you want to relocate the selected page>
release the mouse button to complete the move

29 | P a g e
Note: the Shift and Ctrl key functionality apply here to move multiple pages at a
time.

30 | P a g e
Removing/Deleting Pages
Pages can be removed from within a PDF and across PDFs after a copy/paste sequence.
A. Within the Same Document
1. Click on the thumbnails you want to delete> Click Delete on your keyboard
2. Click OK at the prompt to confirm your deletion
B. From one PDF to another (from a copy/paste sequence)
1. Hold down the CTRL key as you drag the page you want to copy to a new
location in the same PDF file
2. Release the mouse when you see the vertical highlight bar appear at the desired
location
3. Click Delete on your keyboard> Click OK at the prompt to confirm your deletion
Note: The page is deleted from the original file and copied to the second file.
Rotate Pages
Depending on the authoring program of the original document and the way the PDF
was created, you may experience problems with pages appearing rotated or inverted.
1. Select Tools> Pages> Rotate Pages

31 | P a g e
2. Select the direction and page range to be affected> click OK
3. File> Save As> Navigate to where you want to save the file> rename the file>
Save
Extract a Page
Extracting a page is like pulling out a single or multiple pages and creating a new PDF file
with them. Extracting pages has no effect on bookmarks or links for the destination
pages in the original document unless you delete pages when extracting them. If you
have a bookmark to a page not part of the extraction, the link is broken.
1. Select Tools> Pages> Extract Pages
2. In Extract Pages dialog box select the range of pages you need to extract> click
OK

32 | P a g e
Note: you can select the two additional options provided individually or
together when extracting pages.
3. Select File> Save As> provide a filename> click Save
Splitting Documents
This option allows you to save multiple pages in a document and save them as separate
PDF files.
1. Select Tools> Pages> Split Document
2. Select how to split the document based on the choices provided
Number of
Pages
Split the document according to the number of pages
you want for the maximum page count for each file.
File Size
Type a value for the maximum file size for each of the
split files.

33 | P a g e
Top-level
bookmarks
This option enables you to split a file according to the
parent bookmarks in a PDF. Nested bookmarks are not
recognized for splitting a document.
3. Select Output Options> select needed options to save your documents > click
OK
Target Folder
Saves the document in the same folder as the originals
or in a new folder you designate. Make sure you
remember where it is going to save to.
File Labeling
Can distinguish between the new split files by adding a
label to the original file name (Part I, Part II, Part II, etc.)
Do not
overwrite
existing files
Mark this if you choose to save files to the same folder
as the original files and you want to prevent overwriting
of the existing files.
4. To spilt multiple folders (instead of a document) click Apply to Multiple

34 | P a g e
5. Add additional files or documents> click OK
6. Click OK in the Split Document dialogue box to apply your parameters for
splitting the document
7. Click OK to confirm the document split
8. View your new PDF files in the Target Folder you designated in Output Options

35 | P a g e
Insert a Page
This helps you select the file to insert and to choose the location for the insertion
regardless of the current page viewed. All the pages shift left or right, depending on
whether you selected the Before or After option.
1. Select Tools> Insert Pages> Insert from File
2. Select the file you want to insert> click Open
3. Choose the location for insertion from the options provided> click OK

36 | P a g e
Copying Pages
You can copy and paste pages within a PDF document or from one open PDF document
to another. Observe page number before and after to confirm page has been copied.
A. Within the Same Document
1. Hold down the CTRL key as you drag the page you want to copy to a new
location in the same PDF file
2. Release the mouse when you see the vertical highlight bar appear at the desired
location
B. From one PDF to another
1. Open both PDF files and view them tiled (Page Thumbnails open)
2. Click and drag the thumbnail from one file to another
3. Release the mouse when you see the vertical highlight bar appear at the desired
location
4. Select File> Save As> provide a filename> click Save
Replace a Page
This option only affects the contents of a PDF page. You can click a single page
thumbnail or select multiple pages in a continuous order.
1. Highlight the page(s) you want to replace in the Page Thumbnails
2. Right click> select Replace Pages
3. Navigate to the file containing the pages that are to replace page(s) in the open
file> select file > click Open
4. Enter the page number for the first page in the target file> click OK

37 | P a g e
• In the Original area, select the page range for the target pages to be replaced
• In the Replacement area, select the first page in the range of pages that will be
used to replace the pages in the Original area
5. Click Yes to confirm the replacement of the pages
6. Select File> Save As> provide a filename> click Save
Tip: You can replace pages through drag-and-drop operations when viewing two
documents in tiled views and when the Pages panel is opened for both documents.
Make sure the cursor is on top of the thumbnail of the first page to be replaced
(thumbnail highlights in black).
Merge Files
You can convert multiple supported file types to PDF or combine multiple PDF
documents together into a single document. Before you use the command, be mindful
of a few exceptions to combining multiple files:

38 | P a g e
PDFs with security
Cannot be combined.
Adobe LifeCycle
Designer XML Forms
Cannot be added.
Digital signatures
Signatures are removed when you combine the
files.
Form fields
Forms with identical field names inherit data
from the first form in a list of files you merge.
1. Select Create> Combine files into a Single PDF
2. Click Add Files button> navigate to the location where the document is located
(only the supported formats will display)> select file> Open

39 | P a g e
3. Select the files you want to add to the list and click Add Files (continue this step
until all documents are included)
Note: If you have a folder containing all the files you want to combine, you can
choose Add Files> Add Folders> navigate to and select folder> click OK
Tip: You can select multiple files to add to your list at one time. Click a file, press
the Shift key, and click the last file to select a group of file in continuous order.
Click a file, press the Ctrl key, and select files not in order.
4. Change the File Size to the smallest> click a file in the list and arrange the files in
the order you want them to appear in the merged PDF document
5. Remove any files that are not supported> click Combine Files
6. Rename the file (from default Binder#), navigate to the folder where it will be
saved in> click Save
Note: From the desktop you can select files and right click> Combine supported files in
Acrobat
