
Page 1 of 14
Index
Create the PDF File for Long Plot (Scroll) Printing
Select Pen Table Dialog
Print Dialog
Select a Scroll Plot Printer Driver Configuration File
Set the Print Units (inches, feet, etc.)
Select Plot Driver
Edit the Printer Driver Configuration
Select Paper Size option
Select the Print Scale
Adjust (Change) the Paper Size
Center the Plot on the Paper
Print Attributes
Update Print Settings from View
File > Print
Print the PDF File to a “Roll Paper” Scroll Plotter
Open Adobe Acrobat (or other PDF Software)
Select the Print Queue
Set Print Properties
Print Orientation (Portrait or Landscape)
Custom Paper Size
Rotate 90 Degrees
Color or Grayscale
Paper Size matches Document Size
Print
PDF Scroll: Creating and
Plotting
21C-33
Design Manual
Chapter 21
Automation Tools
Instructions
Originally issued: 10-30-09
Revised: 03-31-16
Office of Design

Chapter 21Automation Tools Instructions Section 21C-33PDF Scroll: Creating and Plotting
Page 2 of 14
Create the PDF File for Long Plot (Scroll) Printing
1) To create a MicroStation “PDF print scroll file”:
1. Place a fence around the print area, then
2. Select File > Print from the MicroStation pull-down menu.
2) The first dialog to display may be the Select
Pen Table File dialog. We do not use
MicroStation Pen Tables, so click the Cancel
button, as shown by the red arrow at the right,
and move on to the next dialog.
Note: When using Interplot plotting rather than
MicroStation plotting, we use IPLOT “Script
Files”, which are often mistakenly referred to
as Pen Tables.
3) After clicking the Cancel button,
shown above, the Print dialog
should appear, similar to as
shown at the right.
If a message displays that says something similar to
“cannot locate file W:\Highway\Design\CADD\MicroStation\Plotting\...”,
then exit MicroStation, delete your “upf” file, and restart MicroStation.
The “upf” file is located at follows: C:\Users\your login ID\your login IDPWV8i.upf

Chapter 21Automation Tools Instructions Section 21C-33PDF Scroll: Creating and Plotting
Page 3 of 14
4) If the Print dialog title bar does not display one of the “…pdf.plt”
options, (as shown above), it must be changed. Select a
“…pdf.plt” “print driver” file from the File > Select Bentley Driver
option list, as shown at the right.
5) For a colored PDF scroll
, select Scroll_clr_pdf.plt from the “Select Printer Driver
Configuration File” dialog, as shown below.
Click the Open button and the blue title bar should then display: “Print (Scroll_clr_pdf.plt)”, as
shown on the next page.
The print drivers are located at the following location:
pw:\Documents\Standards\RoadDesign\Microstation\Plotting

Chapter 21Automation Tools Instructions Section 21C-33PDF Scroll: Creating and Plotting
Page 4 of 14
6) From the Print dialog (partially shown at the right), set the units to
inches from Settings > Units > Inches.
7) For a color plot, the General Settings area of the
Print dialog should appear as shown at the right.
8) The Plot Driver is selected from the Printer
and Paper Size section of the Print dialog.
The Bentley driver should be selected by
clicking the drop-down arrow to produce the list
of available Print Driver files, as shown at the
right.
Note: If it will be necessary to turn levels on/off within the created PDF file, then a copy of the
selected “…plt” file must be edited. To do this, the “…plt” file must be copied from the hyperlink
location shown below to your project directory.
pw:\Documents\Standards\RoadDesign\Microstation\Plotting\
To make the minor changes to the copied “…plt” file, use a common text editor, (such as
Notepad, PFE32, etc.). The lines to be changed are listed below. The actual changes to be
made are listed at the “bullet” (●), immediately following the lines of code shown below.

Chapter 21Automation Tools Instructions Section 21C-33PDF Scroll: Creating and Plotting
Page 5 of 14
;===============================================================
;Turn the Level/File optional content on and off
;CmdName /appname="pdf" /command="FileOptionalContent" /qualifier="On"
CmdName /appname="pdf" /command="FileOptionalContent" /qualifier="Off"
;off by default
;===============================================================
● Changes to be made, to the above lines of code, are as follows:
Remove the semi-colon (;) from the left end of the line that ends with qualifier="On",
and add a semi-colon (;) to the left end of the line that ends with qualifier="Off".
A newer version of plot driver with the file extension “.pltcfg” can only be edited from within
MicroStation.
To edit a “.pltcfg” plot driver file, access the file
through File > Edit Printer Driver Configuration, as
shown at the right
9) Paper Size
Presently, the two scroll plotters in Design are set
for 24 inch and 36 inch paper, which plot at a
maximum width of 23.5 inches and 35.5 inches
respectively. Preset paper size selections, at one
foot length increments, are available through the
drop-down option listing, as shown at the right.
The size options include from
23.5x12 through 23.5x199 and
35.5x12 through 35.5x199

Chapter 21Automation Tools Instructions Section 21C-33PDF Scroll: Creating and Plotting
Page 6 of 14
After a fence has been placed around the area to
be printed and a Paper size has been selected,
(such as 23.5x36 in the example to the right), the
Print program will automatically calculate the
scale and size of the plot, as shown at the right.
Example:
Based on the Paper Size choice of
23.5x199, the program maximized the print
to the largest possible dimension of 23.5” x
195.315”, at a scale of 6.6825.
Note: If it is unknown what paper size to use, select one of the preset maximum sizes
(23.5x199, or 35.5x199) and click the Maximize button (as located by the blue arrow). The
program will then display the largest possible Print Scale (and Print Size) within the selected
paper size. After the program determines the maximum print size and scale combination for
the specific fenced area, the print size can then be reduced by increasing the scale
appropriately, as shown below.
Next, change the Scale value to the desired scale
for the plot (20 in this example). The Print Size
dimensions will automatically change and display
the minimum possible size for the given scale
(58.584 x 9.995 in the example) shown at the
bottom of the double ended red arrows.
The Printer Paper size dimensions should then
be changed to match or exceed the Print Scale
Size values. If a small white border is required on
the print, the size values should be rounded up
slightly, as shown at the top of the double ended
red arrows, (59 and 10.)
To center the plot on the paper, click the Auto-
center check-box (), as shown by the blue
arrow at the right.

Chapter 21Automation Tools Instructions Section 21C-33PDF Scroll: Creating and Plotting
Page 7 of 14
10) Print Attributes
The Print Attributes dialog is accessed through
Settings > Print Attributes, as shown at the right.
Verify the settings to be as listed below, and as
shown at the right.
For all plots,
uncheck, (), Clip Volume and Print
Border
If plotting a scroll,
check, (), Line Weights
If plotting an 11x17 or 8.5x11,
uncheck, (), Line Weights

Chapter 21Automation Tools Instructions Section 21C-33PDF Scroll: Creating and Plotting
Page 8 of 14
11) Update from View
Before printing, verify that all print settings are still as
intended and as shown in the current view. Click
“Settings > Update from View”, as shown at the
right.
12) File > Print
When ready to print, click “File > Print” from the
drop-down menu, as shown at the right. This will
produce the “Save Print As” dialog, as shown on
the next page.

Chapter 21Automation Tools Instructions Section 21C-33PDF Scroll: Creating and Plotting
Page 9 of 14
Select the appropriate
project directory to save
your PDF to by Clicking
on the “Select” button.
Browse to the folder
where the file is to be
saved and Click “OK”,
as shown below.
Provide a name for the
file, as shown at the
right. Checking the box
next to the padlock
symbol will make the
file name and
ProjectWise document
name the same (the file
name extension will
default to “.pdf”).
Chapter 21Automation Tools Instructions Section 21C-33PDF Scroll: Creating and Plotting
Page 10 of 14
Print the PDF File to a “Rolled Paper” Scroll Plotter
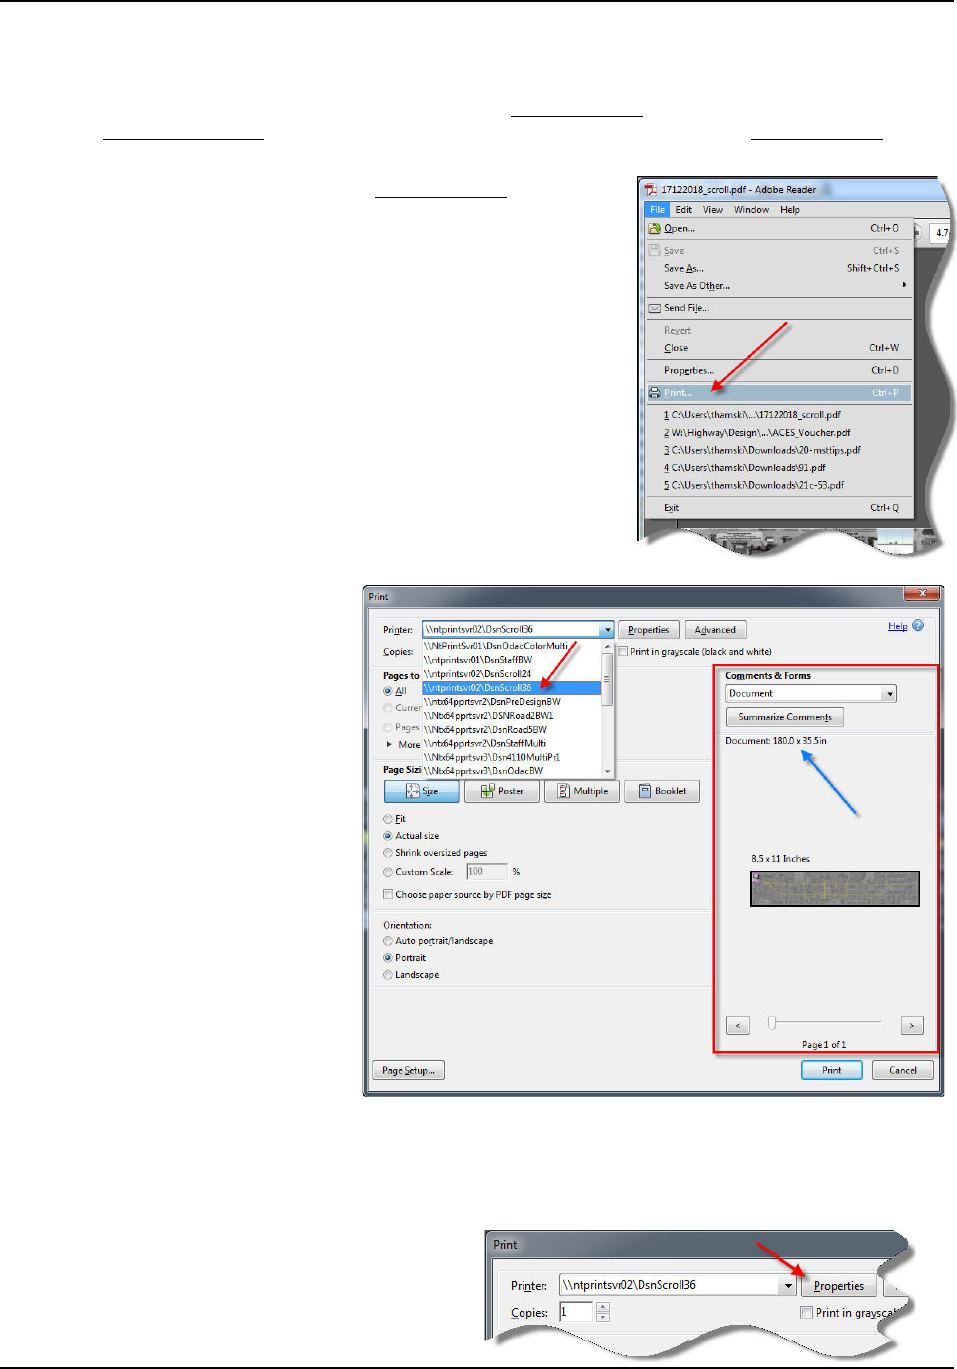
1) Open the PDF file with a PDF software, such as Adobe Acrobat, by double-clicking the file name
in Windows Explorer. For this instruction document, it will be assumed that Adobe Acrobat is
used to open the PDF file.
2) Access the Print dialog from the Adobe Acrobat File > Print
pull-down menu, as shown at the right.
The Print dialog should resemble the one shown below.
3) From the Print dialog drop-
down selection list (located
by the red arrow), select the
Plotter that is to be used.
The Design scroll plotters
that are currently available
for PDF printing are:
\\ntprintsvr02\DsnScroll24
and
\\ntprintsvr02\DsnScroll36
No matter what printer/plotter is selected, the PDF Print dialog usually defaults to a print size of
8.5 x 11, as shown in the red box above. Since the size of this example print document is shown
to be 180 x 35.5 (blue arrow above), the print size must be changed from the default setting to the
correct setting for this print, as shown in the Properties dialog, below.
4) After making the printer/plotter selection
from the drop-down selection list (above),
click the Print > Properties button, as
located by the arrow at the right.

Chapter 21Automation Tools Instructions Section 21C-33PDF Scroll: Creating and Plotting
Page 11 of 14
5) To change the plot size, it will
be necessary to create a
Custom Document Size to fit
the situation.
On the Paper/Quality tab, click
the “Custom” button.
6) On the Custom Paper Size dialog, change the Width
and Length to match or exceed the size needs of the
plot, which are 35.5 x 180 in this example, and shown by
the blue arrows.
Note: It is very important that the newly created Paper
Size (35.5 x 180 in this example) either matches or is
larger than the area to be plotted (35.5 x 180 in this
example, which was displayed in the initial Print dialog)
Provide a Name for the new Custom Paper Size, as
shown by the red arrow.
When complete, click the “Save” and “OK” buttons, as
shown by the green arrows.
7) The new Document size should now display on the Paper/Quality tab, as shown below by the
red arrow.
When complete, select the Layout/Output tab, as located by the green arrow below.

Chapter 21Automation Tools Instructions Section 21C-33PDF Scroll: Creating and Plotting
Page 12 of 14
8) If the print is to be longer than the
paper width, the print Orientation
must be changed to Landscape,
as shown at the right on the
Properties dialog Layout/Output
tab. For most scroll plots, it will be
necessary to select the
Landscape print Orientation.

Chapter 21Automation Tools Instructions Section 21C-33PDF Scroll: Creating and Plotting
Page 13 of 14
9) Layout/Output tab: For some
scroll plots, it may be necessary
to select the Rotate by 90
degrees in the Rotation combo
box.
The saved Document Size
should also be selected, as
shown.
Click the Color tab, located by
the green arrow.
10) Color tab: select either Color or
Grayscale, as appropriate for the
plot (as shown at the right.)
Many more settings and options
are available which allow the
print properties to be set exactly
to the needs of any specific print
situation, but the above listed
settings will generally be the
minimum to produce a scroll plot.
Adjust additional settings as
desired.
When complete, click the “OK”
button, which will then display the
updated Print dialog, as shown
below.

Chapter 21Automation Tools Instructions Section 21C-33PDF Scroll: Creating and Plotting
Page 14 of 14
11) The Paper Size and the plot
dimensions (shown by the double-
ended arrow) should now match.
These dimensions will also match
the new Document size created
earlier.
Note: It is very important that the
newly created Document size
(180 x 35.5 in this example) either
matches or is larger than the area
to be plotted (180 x 35.5 in this
example, and shown by the blue
arrow). If this is not the case, it
may cause the plot file size to be
extremely large (possibly up to
several hundred or thousand Mb)
and it will take a very long time to
plot (possibly up to several hours.)
12) When all of the above steps are complete, click the “Print” button and the plot will be sent to the
selected scroll plotter.
If the scroll is very large and takes a long amount
of time to print on the plotters reducing the file
size may speed up the process. This can only be
done with PDF editing software like Adobe
Acrobat.
To reduce the file size of a scroll using Adobe
Acrobat, open the Document menu and select
Reduce File Size…
The dialog in the bottom right will appear, select
Retain Existing from the Make compatible with
combobox.
Using this tool in Adobe Acrobat can greatly
reduce the file size and time in which the pdf
buffers at the scroll plotters. On average PDF
files with raster images can be reduced to about
one third the original file size. Buffering times are
approximately reduced to one third the time as
well. The reduction has not been found to reduce
the quality of the image.
Chronology of Changes to Design Manual Section:
021C-033
PDF Scroll: Creating and Plotting
3/31/2016 Revised
Updated imagery to reflect newer software versions. Updated the software settings for physical plot to reflect
current equipment. Added Section for reducing PDF file size of very large PDFs
1/15/2014 Revised
Update graphics due to move to Projectwise.
2/26/2010 NEW
