
AT&T Internet Air
TM
for Business 5G Gateway
User Guide
ATT.144.UG-R0RRD

2
Getting started .........................................................5
Introduction ...........................................................6
About the user guide .....................................................6
Setting up your gateway ................................................7
Features and functions ...................................................7
LED Status Lights .........................................................9
Installing a SIM Card .....................................................10
Connecting Your Devices ................................................11
Powering up ............................................................12
Connecting your devices ................................................13
Connect using Wi-Fi .....................................................13
Connect using Ethernet ..................................................13
Basic operations .......................................................15
Web User Interface ......................................................16
Web UI login ............................................................16
Dashboard ..........................................................17
Accessing your dashboard ...............................................17
Dashboard main menu icons .............................................18
Dashboard quick link icons ...............................................19
Network . . . . . . . . . . . . . . . . . . . . . . . . . . . . . . . . . . . . . . . . . . . . . . . . . . . . . . . . . . . . . 20
Network Map ...........................................................21
Status .................................................................22
Mobile-WAN ............................................................24
Contents
3
LAN ...................................................................27
Wi-Fi ...................................................................31
Security .............................................................37
Firewall ................................................................38
Blocked Devices ........................................................40
Diagnostic ..........................................................41
Diagnostic Tools ........................................................41
System Settings ......................................................42
Admin (Password) .......................................................43
Backup/Restore .........................................................44
Firmware Update ........................................................46
NAT Forwarding ......................................................48
DMZ ...................................................................48
UPnP ..................................................................48
ALG ...................................................................49
Virtual Servers ..........................................................50
FAQs, Technical Specifications, Troubleshooting ............................52
Common Issues ......................................................53
Troubleshooting ........................................................53
Specifications .......................................................54
Gateway specifications ..................................................54
Licenses .............................................................55
Copyright information .................................................55
Regulatory and Warranty ................................................56
Disposal and Recycling ................................................57
Regulatory agency identification ........................................58
4
FCC Regulations ........................................................58
FCC Caution ...........................................................58
RF Exposure Information ..................................................59
FCC responsible Party ...................................................59
Warranty ............................................................60

5
Getting started
The topics in this section will introduce you to your gateway, help you get
set up, provide an overview of the gateway, and get you started with basic
operations.
6
I
ntroduction
Thank you for purchasing your new AT&T Internet Air™ for Business 5G
Gateway.
About the user guide
The following topics explain how best to use this guide to get the most out of
your gateway.
Before using your gateway
Read the Safety Information Guide that came with your device thoroughly
for proper usage.
Descriptions in the user guide
Note that most descriptions in this guide are based on your gateway’s setup
at the time of purchase.
Screenshots and key labels
Screenshots and other illustrations in this user guide may appear differently
on your gateway. Labels are simplified for illustrative purposes.
Other notations
Throughout the user guide, the term “gateway” may be used to reference
your AT&T 5G Gateway.
7
Setting up your gateway
The following instructions give you all the information you need to set up your
AT&T 5G Gateway for the first time.
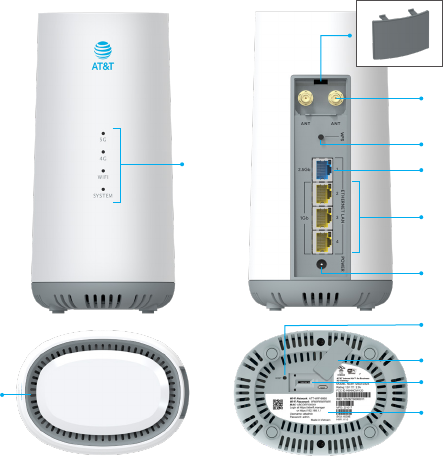
Features and functions
These topics illustrate your gateway’s features and key functions.
SMA Connector
External
Antenna
Cover
WPS
2.5 GbE LAN
1 GbE LAN
DC Power Port
Vent
Factory Reset
Button
SIM Card Cover
SIM Card Slot
Device Label
LED
Status
Lights

8
Feature Description
LED Status Lights
Illuminated components indicating the status of the
gateway’s functionality, see “LED Status Lights” on
page 9.
External Antenna
Cover
Fully removable protective cover.
SMA Connector RF Coaxial connection point.
WPS
Press the Wi-Fi Protected Setup (WPS) button to
connect WPS capable devices.
2.5 GbE LAN 2.5 Gigabit ethernet port.
1 GbE LAN 1 Gigabit ethernet ports.
DC Power Port Electrical connection power port.
Factory Reset
Button
Press to reset your gateway to its factory default
settings.
SIM Card Cover Protective cover.
SIM Card Slot Insert SIM Card into your gateway.
Device Label
Label containing the gateway information as well as
the Web UI default username and password.
CAUTION! Inserting an accessory into the incorrect jack may damage the
gateway.

9
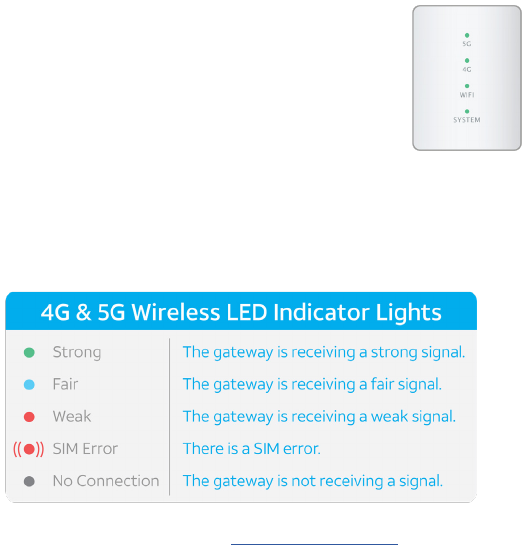
L
ED Status Lights
The status lights located on the front of the gateway indicate the status of
the 5G Gateway’s functions.
• The 4G & 5G LED Status Lights indicate the cellular network signal strength and
status.
• The Wi-Fi LED Status Lights indicate the Wi-Fi connection and WPS status.
• The System LED Status Lights indicate the status of the system functionality and
firmware status.

10
Installing a SIM Card
Insert a SIM card
1. Rotate the SIM Card Cover to open.
2. Insert the SIM card into the SIM Card Slot and press down until the SIM card
clicks into the SIM Card Slot.
3. Replace the SIM Card Cover.
Remove a SIM card
1. Rotate the SIM Card Cover to open.
2. Press down on the SIM card until the SIM card ejects out of the SIM Card
Slot.
3. Remove the SIM card and replace the SIM Card Cover.
SIM Card SlotSIM Card Cover

11
Connecting Your Devices
The instructions below explain how to connect and set up your gateway.
Plug in the gateway
Using the power adapter (included), plug in the gateway by inserting the
connector at the end of the power cable into the DC Power Port on the
gateway. Then, plug the power adapter into your electrical outlet.
DC Power
Port
Power
Adapter
(included)
12
Powering up
Wait for the gateway to power up. Once the gateway is powered up, the LED
Status Lights will turn solid. This will take approx. 2-3 minutes.
Cellular network signal status
Verify the gatew
ay is receiving a cellular network signal.
The 5G or 4G LED Status Lights will be solid green when the
gateway is receiving a strong cellular network signal.
5G and 4G LED Status Lights
• W
hen the LED Status Lights are solid blue, the cellular network signal is fair.
• When the LED Status Lights are solid red, the cellular network signal is weak.
• When the LED Status Lights are blinking red, there is a SIM error detected.
• When the LED Status Lights are solid gray, There is no cellular network signal
detected.
Note: For additional help, please visit att.com/5G-Gateway.

13
Connecting your devices
You can connect your device to the gateway’s Wi-Fi or Ethernet.
Connect using Wi-Fi
1. Use a web browser to visit http://attwifi.manager or http://192.168.1.1.
2. Enter your username and password, then click Login.
Note: The default network name and password can be found on the label
located at the bottom of your gateway.
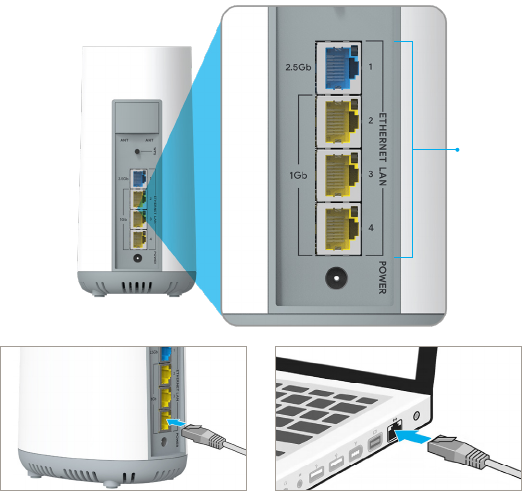
Connect using Ethernet
1. Connect the Ethernet cable (sold separately) to your gateway’s 2.5 GbE or
1 GbE LAN port located on the back of your device.
2. Connect the other end of the second Ethernet cable to your computer or
laptop’s Ethernet port.
Default
Username
& Password
14
Note: For best results, it is recommended that you use a Cat-6 Ethernet cable
or higher.
Connect
to your
computer
or laptop’s
Ethernet
port

15
Basic operations
The following topics outline basic features and operations of your gateway.

16
Web User Interface
The Web UI (Web User Interface) allows you to configure the 5G Gateway
settings, and see status from the user-friendly dashboard.
Web UI login
1. With your connected device, use your preferred web browser to access the
Web UI.
2. Using the address bar, navigate to http://attwifi.manager or
http://192.168.1.1 to access the login page.
3. Enter your username and password, then click Login.
a. The default username (attadmin) cannot be changed.
b. The default password (admin) can be changed by accessing the
Admin, see “Admin
Da
shboard and clicking System Settings >
(Password)” on page 43.


18
Dashboard main menu icons
Icon Name Description
Dashboard
The dashboard is a user-friendly single stop
to view your 5G Gateway’s status, or change
configurations.
Network
View and modify your network
configurations including your network map,
network status, mobile WAN, LAN, and Wi-Fi.
Security
Vi
ew and configure your security settings
including your firewall and blocked devices.
Diagnostics
Test your gateway to ensure it is functioning at
its optimal performance level.
System Settings
View and configure your system settings
including your device name, password,
backup/restore, system backup, reboot and
reset, and firmware updates.
NAT Forwarding
Create rules for communication to specific
devices on your LAN, and edit pass-through
options for protocols.

19
Dashboard quick link icons
Icon Name Description
Internet Status Verify internet connection
Mobile-WAN Cellular status
Wi-Fi Wi-Fi settings
Wi-Fi Protected Setup WPS quick connect shortcut
Firewall Firewall security settings
LAN View and customize LAN settings
Connected Devices
Connected device status and
information
System Information Device information
System Settings Device administration settings
Firmware Update System software information/updates
Antenna Toggle on optional external antenna

20
Network
View and configure your network settings.
1. From the Dashboard , click Network to access your network settings.
Note: When the network status is connected, it will show “OK” in green under
the Internet Status icon on the dashboard.

21
Network Map
The Network Map gives you a high level visual representation of your
network, and connected devices.
1. From the Dashboard , click Network then click Network Map to view
your network map.

22
Mobile-WAN
1. From the Dashboard , click Network then click Network Map.
2. Click to view your WAN (Wide Area Network) IP address.
LAN
1. From the Dashboard , click Network then click Network Map.
2. Click to view your LAN (Local Area Network) IP address, Subnet
mask, and DHCP (Dynamic Host Configuration Protocol) status.
3. From here you can also access your LAN Settings.
Wi-Fi
1. From the Dashboard , click Network then click Network Map.
2. Click to view your Wi-Fi SSID and Password.
3. From here you can also access your Wi-Fi Settings.
Status
View the status of your network components.
1. From the Dashboard , click Network then click Status to access the
status of the following;
• Overview: Provides a high-level view of your current network status.
• Internet (v4): Provides an overview of your current IPv4 status.
• Internet (v6): Provides an overview of your current IPv6 status.
• Mobile: Provides an overview of your current mobile status.

23
• LAN: Provides an overview of your current LAN status.
• Wireless 2.4G: Provides an overview of the current status of your 2.4 GHz
Wi-Fi network.
• Wireless 5G: Provides an overview of your the current status of your 5 GHz
Wi-Fi network.
• System Information: Provides an overview of your current system status.
• Month to date usage: Provides an overview of your data usage for the
current month to date.
• Current usage: Provides an overview of your current data usage since
the gateway was last rebooted.

24
Mobile-WAN
Access your 4G/5G Mobile-WAN Status, APN Settings, and Antenna settings.
1. From the Dashboard , click Network then click Mobile-WAN, or click
the Mobile-WAN icon on the dashboard.
Mobile-WAN Status
1. From the Dashboard , click Network > Network Map > 4G/5G.
2. From here, you can view the status of your Internet Connection, and
SIM card. Additionally, you can disconnect from the Mobile network, or
change APN settings.

25
APN Settings
1. From the Dashboard , click Network > Network Map > 4G/5G > APN
Settings.
2. Auto APN is active by default.
3. You can manually configure the APN Settings by disabling Auto APN.
Note: Consult with AT&T before changing APN settings which can impact
data performance and your ability to access the Internet.

26
Antenna
1. From the Dashboard , click Network > Network Map > Antenna.
2. From here you can toggle between the internal and external antenna if
equipped (sold separately).
Note: Your antenna status will appear as “Internal” or “External” (according
to your settings) in green under the Antenna icon on the dashboard.

27
LAN
Access and configure your LAN settings.
1. From the Dashboard , click Network then click LAN, or click the LAN
icon on the dashboard.

28
IPv4 & DHCPv4
1. From the Dashboard , click Network > LAN > IPv4 & DHCPv4.
2. From here you can configure the following;
• Setting:
Setting Description
MAC Address View the MAC address for your gateway.
IP Address
View and configure the IP Address for your
gateway.
Subnet Mask View and configure your subnet mask.
Enable DHCP Server
Enable or disable DHCP Server by selecting Yes
or No .
Lease Time View and configure your DHCP lease time.
Default Gateway View your default gateway IP address.
• DNS Server: View and configure your DNS server IP address and
Secondary DNS.
• Static IP Assignment within DHCP IP Pool:
1. Select Yes or No to enable/disable static IP assignment.
2. You can view the current list of assigned static IP addresses.

29
3. To assign a new static IP address, click Add Rule.
4. Select a device from the drop-down list of currently connected devices,
confirm the current IP address or edit it.
5. For devices not yet connected, fill in the details manually.
IPv6 Settings
1. From the Dashboard , click Network > LAN > IPv6 Settings.
2. From here you can configure your IPv6 LAN Settings.
3. Enable LAN by selecting Enable or disable LAN by selecting Disable .

30
Client List
1. From the Dashboard , click Network > LAN > Client List, or click the
Connected Devices icon on the dashboard.
2. From here you can view the details of devices connected to your network.
DHCP Lease
1. From the Dashboard , click Network > LAN > DHCP Lease.
2. From here you can view the MAC Address, temporary IP addresses and the
Hostname assigned to the devices on your network.

31
Wi-Fi
View and configure your gateway’s Wi-Fi settings.
Note: When Wi-Fi is turned on, it will show “Enabled” in green under the Wi-Fi
i
con on the dashboard.
Basic
1. From the Dashboard , click Network > Wi-Fi > Basic, or click the
Wi-Fi icon on the dashboard.
2. From here you can view and configure your basic Wi-Fi settings.

32
• Band Steering: Turn Band Steering On or Off .
Note: Enabling Band Steering will create one combined Wi-Fi network.
Please verify the new Wi-Fi Network Name and Password below prior to
saving.
• Setting:
Setting Description
Wi-Fi Network
Enable or disable your Wi-Fi network by sliding
the switch to the On or Off position.
Wi-Fi Network Name
(SSID)
View and configure your Wi-Fi network name.
Broadcast SSID
Enable or disable the broadcasting of the Wi-Fi
Network Name (SSID) by sliding the switch to
the On
or Off position.
Security Setting View and configure your security setting.
WPA Encryption View your WPA encryption type.
Wi-Fi Password View or change your Wi-Fi password.
33
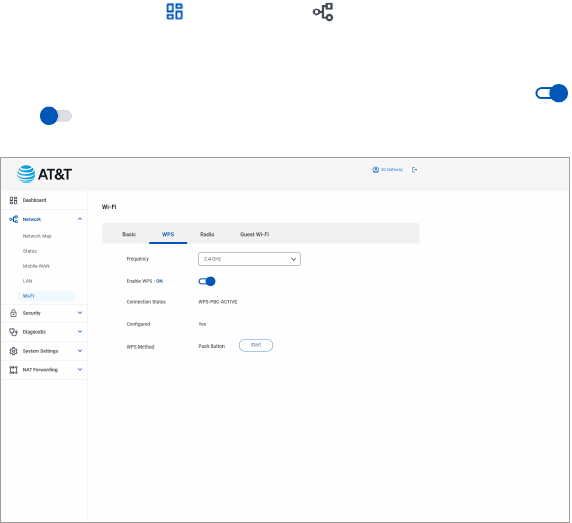
WPS (Wi-Fi Protected Setup)
1. From the Dashboard , click Network > Wi-Fi > WPS.
2. From here you can view and configure your WPS settings.
• Frequency: View and configure your WPS frequency.
• Enable WPS: Enable or disable WPS by sliding the switch to the On or
Off position.

34
Radio
1. From the Dashboard , click Network > Wi-Fi > Radio.
2. From here you can view and configure your radio settings.
• Frequency: View and configure radio settings by selecting a frequency
band from the drop-down list.
• Setting:
Setting Description
Wireless Mode View and configure your wireless mode.

35
Channel Bandwidth View and configure your channel bandwidth.
Control Channel View and configure your control channel.
Tx Power Adjustment View and configure your Tx power percentage.
Guest Wi-Fi
1. From the Dashboard , click Network > Wi-Fi > Guest Wi-Fi.
2. From here you can view and configure your guest Wi-Fi settings.
• Frequency: View and configure guest Wi-Fi network settings by selecting
a frequency band from the drop-down list.frequency band from the drop-down list.

36
• Setting:
Setting Description
Guest Wi-Fi
Enable or disable guest Wi-Fi by sliding the
switch to the On or Off position.
Guest Wi-Fi Name
(SSID)
View and configure your guest Wi-Fi name.
Broadcast SSID
Enable or disable the broadcasting of the Wi-Fi
Network Name (SSID) by sliding the switch to
the On
or Off position.
Security Setting View and configure your security setting.
WPA Encryption View your WPA encryption type.
Wi-Fi Password View or change your Wi-Fi password.

37
Security
Configure and view your security settings.
1. From the Dashboard , click Security to access your security settings.
38
Firewall
The Firewall provides an additional layer of protection to restrict outside
access to devices on your network from would-be cyber attackers. Your AT&T
5G Gateway has been preconfigured with this setting turned on for both
Firewall IPv4 and Firewall IPv6 by default.
Note: When the firewall is enabled, it will show “ON” in green under the
Firewall icon on the dashboard.
Best Practice: Consider installing antivirus software from a reputable source
for additional protection against malicious software or other security threats.
To enable Firewall
1. From the Dashboard , click Security > Firewall IPv4 or Firewall IPv6,
or click the Firewall icon on the dashboard.
2. Under the Common tab select Yes next to Enable Firewall.
3. Click Save .
Note: Disabling the firewall is not recommended without careful
consideration and additional protective measures in place.
Ping Request from WAN
Turning on Ping Request from WAN allows outside clients to ping the public IP
address from your 5G Gateway which may be needed to diagnose network
connectivity issues.
To enable/disable Ping Request from WAN
1. From the Dashboard , click Security > Firewall IPv4 or Firewall IPv6,
or click the Firewall icon on the dashboard.
2. Under the Common tab select Yes or No next to Ping Request from
WAN.

39
3. Click Save .
Note: Avoid leaving this feature enabled for longer periods of time than
necessary. Doing so could leave your device open to security threats.
Net Service Filter
The Network Services filter blocks or allows the LAN to WAN communication
for specified devices, for specified network services.
To configure Net Service Filter
1. From the Dashboard , click Security > Firewall IPv4, or click the
Firewall icon on the dashboard.
2. Under the Net Service Filter tab select Yes next to Enable Net Service
Filter.
3. Select a mode from the Filter Table List drop-down.
Mode Description
White List
Clients on the list can access the specified
network services.
Black List
Clients on the list cannot access the specified
network services.
4. Click Add .
5. Fill in the necessary fields and click Add .
6. Click Save .

40
Blocked Devices
1. From the Dashboard , click Security > Blocked Devices.
2. Under the Settings tab select Yes to Enable Blocked Devices.
3. Click Add .
4. Select a device from the client drop-down list if it’s currently connected to
your network.
5. For devices not currently connected, enter the device’s MAC address
6. Click Add and then Save .

41
Diagnostic
R
un diagnostics on your gateway to identify information needed to ensure
efficiency and peak performance.
1. From the Dashboard , click Diagnostic to access your diagnostic
tools.
Diagnostic Tools
1. From the Dashboard , click Diagnostic > Diagnostic Tools.
2. Select your Method and Target from the drop down selections provided.
Method Description
Ping
Tests if the specified host is reachable, and what
the latency is.
Traceroute
Shows the path data takes to reach a specific
target destination.
3. Click Diagnose to generate a response.

42
System Settings
View and configure your gateway’s system settings.
1. From the Dashboard , click System Settings to access your system
settings.

43
Admin (Password)
1. From the Dashboard , click System Settings then click Admin
(Password), or click the System Settings icon on the dashboard.
2. From here you can change your system password and device name.
System Password
Change your system password
1. From the Dashboard , click System Settings then click Admin
(Password), or click the System Settings icon on the dashboard.
2. Enter your old password.
3. Enter your new password.
4. Confirm your password by entering it again.
5. Click Save .
Device Name
Change your device name
1. From the Dashboard , click System Settings then click Admin
(Password), or click the System Settings icon on the dashboard.
2. Enter your new device name.
3. Click Save .

44
Backup / Restore
1. From the Dashboard , click System Settings then click Backup/
Restore.
2. From here you can modify your system configuration or reset yo
ur
system.
Configuration
Save to File
Save your current system configuration to a file.
1. From the Dashboard , click System Settings then click Backup/
Restore.
2. Click Save next to Save to File.
Restore from File
Restore your system configuration to a previously saved version/file.
1. From the Dashboard , click System Settings then click Backup/
Restore.
2. Click Select file and select the file you would like to restore.
3. Click Upload to install the chosen file.
Reset
System reboot
Reboot your system.
1. From the Dashboard , click System Settings then click Backup/
Restore.

45
2. Click Reboot .
3. An alert box will appear, click Confirm to continue, or Cancel to cancel
the re
boot.
Reset to Default
Reset your gateway to original factory settings.
Warning: Performing a factory reset will restore the gateway to original
factory settings and defaults shown on the gateway’s label.
, click System Settings then click Backup/
1
. From the Dashboard
Restore.
2. Click Factory reset
.
3. An alert box will appear, click Confirm to continue, or Cancel to cancel
the factory reset.

46
Alternative Reset
1. Leave the gateway plugged in and lay it on its side.
2. Use a paperclip to press and hold the factory reset button on the bottom
of the gateway for at least 5 seconds until the System LED starts to flash
green.
3. The LED will turn solid green once complete.
Firmware Update
Keep your gateway’s firmware up to date.
1. From the Dashboard , click System Settings then click Firmware
Update, or click the Firmware Update icon on the dashboard.
Note: When your firmware is up to date, it will display “Up to date” in green
under the Firmware Update icon on the dashboard.

47
Firmware Information
Information Description
Product ID View your product ID.
Hardware Version View your hardware version.
SVN View your IMEI software version.
Firmware version
installed
View the firmware version that is currently installed
on your gateway.
Check for firmware updates
1. From the Dashboard , click System Settings then click Firmware
Update.
2. Click Check for update to generate a result status.
a. When the firmware is up to date the status will read, “The current
firmware is the latest version.”
b. When the firmware needs to be updated the status will read, “New
version is found”.
3. Select “Download and Update” A progress bar will appear and the System
LED Light will flash blue during the installation process.
4. Your gateway will power cycle upon successful completion.

48
NAT Forwarding
View and configure advanced network configurations.
1. From the Dashboard , click NAT Forwarding to access your NAT
forwarding settings.
DMZ
Enable DMZ to pass all WAN traffic to a specific device.
1. From the Dashboard , click NAT Forwarding then click DMZ.
2. Select Yes to Enable IPv4 DMZ.
3. Enter the IP address of the device you want exposed.
4. Click Save .
Note: To avoid the possibility of the IP address changing, making it
unreachable, it’s recommended to assign a static IP address to the
intended device.
UPnP
UPnP (Universal Plug and Play) allows devices to auto discover each other
without having to create networking configurations.
Some common uses include:
• Smart speakers with digital assistants
• Home automation devices
• Security cameras and other sensors
UPnP should be enabled only when necessary and only trusted devices
should be allowed to connect to the network.

49
1. From the Dashboard , click NAT Forwarding then click UPnP.
2. Select Yes to Enable UPnP.
Note: Additional protective measures such as anti-virus software are
recommended as applicable.
Setting Description
Advertisement Period
Defines the number of minutes the 5G
Gateway broadcasts UPnP information.
Advertisement Time to Live
Defines the maximum number of hops
each packet can travel before timing out.
ALG
ALG (Application Layer Gateway) allows dynamic TCP/UDP ports to
communicate with known ports used to support underlying protocols such
as VPN, FTP and VoIP services.
If you are using applications that require these protocols, you may need to
enable the below for an optimal experience.
1. From the Dashboard , click NAT Forwarding then click ALG.
2. Enable or disable the following by sliding the switch to the On or Off
position:
• PPTP Passthrough
• L2TP Passthrough
• IPSec Passthrough
• SSL Passthrough

50
• RTSP Passthrough
• H.323 Passthrough
• SIP Passthrough
Virtual Servers
Virtual servers allow incoming network traffic on a specific port to be
forwarded to a designated device on your network. This is commonly used
for security cameras, home automation, and other IoT devices.
Note: Port forwarding is not recommended without careful consideration
and additional protective measures in place.
1. From the Dashboard , click NAT Forwarding then click Virtual
Servers to access your Port Forwarding List.
Note: To avoid the possibility of the IP address changing, making it
unreachable, it’s recommended to assign the device a static IP address.

51
Add port forwarding rules
1. From the Dashboard , click NAT Forwarding > Virtual Servers > Add
Rule .
2. Use the drop down option provided to update your port forwarding
settings.
3. Click Add to save your settings.

52
FAQs, Technical Specifications,
Troubleshooting
The topics in this section will cover troubleshooting tips and gateway
specifications.
53
Common Issues
Troubleshooting
Check be
low for solutions to common problems you may experience.
Problem: My device is unable to connect to the 5G Gateway Wi-Fi network.
Solution: Check that the Wi-Fi LED is solid green on the 5G Gateway. If the
LED is red, your gateway may require a software update or may need to be
powered off and back on. You may also check to see if the device is on the
Blocked Devices List.
Problem: A web page is loading slowly or won’t load at all.
Solution: Check the signal strength using the 4G and 5G LED indicators.
When the device is not receiving a cellular signal, no LED lights will display.
Connecting an external antenna or repositioning your gateway to an area
with better cellular coverage may improve your experience.
Problem: I forgot my Wi-Fi password.
Solution: You can retrieve the Wi-Fi password by logging into the Web UI
and navigating to the Wi-Fi settings from a connected device. You can also
connect using Ethernet without a password.
Problem: I forgot my Web UI admin password.
Solution: If you haven’t changed the password from the default, it can be
found on the label at the bottom of the gateway. You can also complete a
factory reset to reconfigure the password back to the default.

54
Specifications
The following tables list your gateway’s specifications.
Gateway specifications
Specification Description
Model N C M112 0D2- D323
Cellular LTE Cat 19, 5G NSA Sub 6 GHz
Frequency Bands
LTE B2/B5/B12/B14/B29/B30/B66
5G n2/n5/n14/n30/n66/n77
Wi-Fi
2.4GHz/5GHz 802.11 a/b/g/n/ac/ax (Wi-Fi 6)
2x2 MIMO
Certifications FCC, UL, Wi-Fi Alliance, Easy Mesh
Dimensions 200mm x 96mm x 133mm
Weight ~2 lbs or 900g
Operating Temperature 0°C to 45°C (32°F to 113°F)
Storage Temperature -20°C to 70°C (-4°F to 158°F)
Humidity
10%-90%
2.5GbE Ethernet Ports 1
1GbE Ethernet Ports 3
Power Input 100-240V, 50/60Hz, 0.8A
Power Output DC 12.0V/2.5A
55
L
icenses
The Wi-Fi Logo is a certification mark of the Wi-Fi Alliance.
Copyright information
©2024 AT&T INTELLECTUAL PROPERTY. ALL RIGHTS RESERVED. AT&T, the
Globe and other marks are trademarks of AT&T Intellectual Property.
All other product or service names are the property of their respective
owners.

56
Regulatory and Warranty
The topics in this section will detail important regulatory and warranty
information.

58
Regulatory agency identifications
FCC Regulations
This device complies with Part 15 of the FCC Rules.
Operation is subject to the following two conditions: (1) This device may
not cause harmful interference, and (2) this device must accept any
interference received, including interference that may cause undesired
operation.
This equipment has been tested and found to comply with the limits for a
Class B digital device, pursuant to Part 15 of the FCC Rules. These limits are
designed to provide reasonable protection against harmful interference in
a residential installation. This equipment generates, uses and can radiate
radio frequency energy and, if not installed and used in accordance with
the instructions, may cause harmful interference to radio communications.
However, there is no guarantee that interference will not occur in a particular
installation. If this equipment does cause harmful interference to radio or
television reception, which can be determined by turning the equipment off
and on, the user is encouraged to try to correct the interference by one of
the following measures:
• Reorient or relocate the receiving antenna.
• Increase the separation between the equipment and receiver.
• Connect the equipment into an outlet on a circuit different from that to
which the receiver is connected.
• Consult the dealer or an experienced radio/TV technician for help.
FCC Caution
Any changes or modifications not expressly approved by the party
responsible for compliance could void the user’s authority to operate this
equipment.
Operations in the 5.15-5.25GHz band are restricted to indoor usage only.
59
RF Exposure Information
This equipment must be installed and operated with a minimum distance of
25 centimeters between the radiator and any nearby person.
FCC Responsible Party:
ASKEY COMPUTER CORP.
10F, No.119, Jiankang Rd.
Zhonghe District
New Taipei City 23585, Taiwan, R.O.C.
+886-2-2228-7588
FCCID: H8NNCM1120

60
Warranty
Warranty duration:
The product may consist of several parts, which may have separate warranty
periods, to the extent permitted by local laws. The “Warranty Period” (as
defined in the table below) takes effect on the date of purchase of the
product (as indicated on the proof of purchase) or date of product delivery
and activation (if required), whichever is later.
1. Warranty period (see below)
AT&T Warranty 12 Months / 1 Year
2. Warranty period for repaired or replaced parts:
Subject to special provisions of local laws in force, the repair or replacement
of a product does not, under any circumstances whatsoever, extend the
original warranty period of the product concerned. However, the repaired or
replaced parts are guaranteed in the same manner and for the same defect
for a period of ninety days after delivery of the repaired product, even if their
initial warranty period has expired. Proof of purchase required.
Implementation of the Warranty
If your product is faulty under normal conditions of use and maintenance, in
order to benefit from the present warranty, please contact the Returns Center
at 1(800) 801-1101 for assistance. The customer support center will then
provide you with instructions on how to return the product for support under
warranty. For more information, please visit att.com/warranty.
Warranty exclusions
Manufacturer guarantees its products against material, design and
61
manufacturing defects. The Warranty does not apply in the following cases:
1. Normal wear and tear of the product requiring periodic repair and
replacement.
2. Defects and damages due to negligence, to the product being used other
than in a normal and customary manner, to the non-compliance with the
recommendations of this User Manual, to an accident, regardless of the
cause. Instructions for use and maintenance of the product can be found
in your product’s User Manual.
3. The opening, unauthorized disassembly, modification being carried out or
repair of the product by the end user or by persons or by service providers
not approved by Manufacturer and/or with spare parts not approved by
Manufacturer.
4. Use of the product with accessories, peripherals and other products whose
type, condition and/or standards do not meet Manufacturer’s standards
5. Defects associated with the use or connection of the product to
equipment or software not approved by Manufacturer. Some defects
may be caused by viruses due to unauthorized access by yourself or by
a third party service, computer systems, other accounts or networks. This
unauthorized access may take place through hacking, misappropriation
of passwords or various other means.
6. Defects and damage due to the exposure of the product to humidity,
extreme temperatures, corrosion, oxidation, or to any spillage of food or
liquids, chemicals and generally any substance likely to alter the product.
7. Any failure of embedded services and applications that have not been
developed by Manufacturer and whose functioning is the exclusive
responsibility of their designers.
62
8. Installation and use of the product in a manner that does not comply with
the technical or security standards of regulations in force in the country
where it’s installed or used.
9. Modification, alteration, degradation or illegibility of the serial number of
the product.
10. Absence of proof of purchase.
Upon expiration of the warranty period or upon an exclusion of warranty,
Manufacturer may, at its discretion, provide a quote for the repair and
offer to provide support for the product, at your cost.
The Manufacturer contact and after-sales service details are subject to
change. These Warranty terms may vary substantially according to your
country of residence.
