
Microsoft Word 2010 - Level 2
© Watsonia Publishing Page 63 Table Features
CHAPTER 7 TABLE FEATURES
Tables in Word contain many features that you can apply to
improve the format and layout of your documents. As such, you can
use tables for a wide range of documents, such as invoices and
forms.
In this session you will:
learn how to create a table from text
learn how to change cell alignments
learn how to insert formulas into a table
learn how to update formulas in a table
learn how to sort table data
learn how to merge cells in a table
learn how to split table cells
learn how to display and hide table guidelines
gain an understanding of table properties
learn how to align tables on the page
learn how to change the direction of text in a table
learn how to create repeating heading rows in tables
learn how to convert a table to text.
INFOCUS
WPL_W820

Microsoft Word 2010 - Level 2
© Watsonia Publishing Page 64 Table Features
CREATING A TABLE FROM TEXT
Try This Yourself:
Open
File
Before starting this exercise you
MUST open the file W820 Table
Features_1.docx...
Select all data below the Paris
Telephone Listing heading
Click on the Insert tab, then click
on Table in the Tables group
to open the Insert Table grid and
drop-down menu
Select Convert Text to Table to
open the Convert Text to Table
dialog box
Word has recognised that six
columns are required based on the
number of tabs set in the text...
Click on AutoFit to window under
AutoFit behaviour
We will leave the default setting as
Tabs for Separate text as, as this is
how the text is currently
separated…
Click on [OK] to convert the text
into a table with borders applied
You will now adjust the column
width for Telephone…
Deselect the text and then double-
click the border between the
Telephone and Salary columns
twice to auto-adjust the column
width
Save the document
For Your Reference…
To create a table from text:
1. Select the text to convert
2. Click on Table in the Tables group on
the Insert tab
3. Select Convert Text to Table
4. Select the desired options and click on [OK]
Handy to Know…
It is important to check that the Number of
columns is correct in the Convert Text to
Table dialog box. If the number in this field
isn’t as expected, you may have forgotten to
insert a separator character in one or more
lines of text.
3
6
You can convert a list into a table. This is useful if
you have rows and columns of text that you
would like to place into a table to make it easier
to manage the list. When you convert text into a
table, Word will by default use the paragraph marks
to determine the number of rows and will use the
tab marks to determine where text should be split
into cells.

Microsoft Word 2010 - Level 2
© Watsonia Publishing Page 65 Table Features
ALIGNING DATA IN CELLS
Try This Yourself:
Same
File
Continue using the previous
file with this exercise, or open
the file W820 Table
Features_2.docx...
Select the top row of the table,
then click on the Layout tab
Click on Align Top Centre
in the Alignment group to
change the cell alignment for
the heading row to centre-
aligned
Click to the left of the first
salary 52,500, hold down
and click to the right of the
bottom salary to select all
salaries
Click on Align Top Right
in the Alignment group to
change the cell alignment for
the salaries to right-aligned
Click in the heading to
deselect the text
Save and close the document
For Your Reference…
To change cell alignment:
1. Select the cells to be changed
2. Click on the Layout tab
3. Click on the desired alignment option in the
Alignment group
Handy to Know…
If a table has rows that are significantly
higher than the text – perhaps you have
manually increased the Table Row Height –
the content will appear neater if you use the
three tools that centre the text vertically
within the cell: Align Centre Left, Align
Centre and Align Centre Right.
2
4
When you enter data into a table, the data will be
left-aligned in each cell by default. While this
alignment usually works well, there will be times
when the table design will be improved if the cell
alignment is changed. For example, if you have
cells containing numbers of different lengths, they
will appear neater if they are right-aligned to the
cell.

Microsoft Word 2010 - Level 2
© Watsonia Publishing Page 66 Table Features
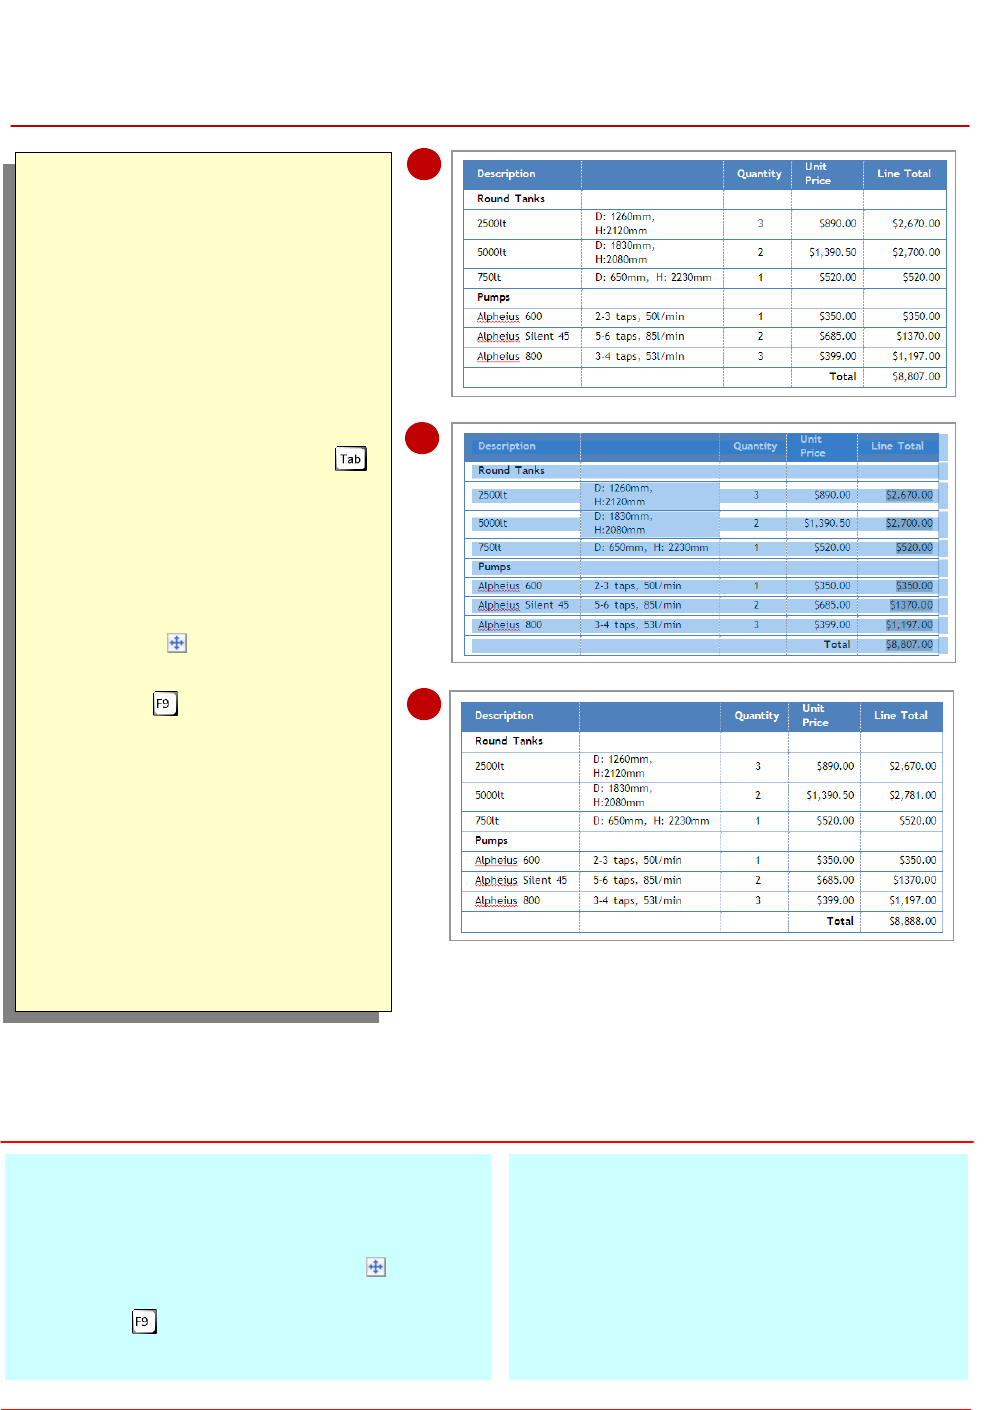
INSERTING FORMULAS INTO A TABLE
Try This Yourself:
Open
File
Before starting this exercise you
MUST open the file W820 Table
Features_3.docx...
Click in the Line Total cell for the
2500lt tank
Click on the Layout tab, then click on
Formula in the Data group to
open the Formula dialog box
Word proposes a formula but you will
need to multiply the values, not add
them...
Triple-click in Formula and type
=C3*D3
This tells Word to multiply cell C3 (3)
by cell D3 ($890.00)…
Click on the drop arrow for
Number format and select
$#,##0.00;($#,##0.00)
This will format the result as
Currency…
Click on [OK]
Repeat steps 1 – 5 to enter the
following formulas:
5000lt tank =C4*D4
750lt tank =C5*D5
600 pump =C7*D7
45 pump =C8*D8
800 pump =C9*D9
Click in the empty Total cell, click on
Formula , type =SUM(E3:E9) in
Formula, then click on [OK]
For Your Reference…
To insert a formula into a table:
1. Click in the cell, then click on the Layout tab
2. Click on Formula in the Data group
3. Type the formula including the relevant cell
addresses
4. Select a Number format, then click on [OK]
Handy to Know…
The Formula dialog box has a list of built-in
functions − such as Average, Maximum
and If − that you can paste into the Formula
field. Using this feature will help to ensure
that you type the formula correctly.
2
7
Word can calculate table data, such as
subtracting or multiplying table data, using
formulas. A formula is an instruction that you
insert that tells Word what data to calculate and
how to calculate that data. Word uses a function
name to identify the calculation (such as SUM for
addition), and uses the cells as references (such as
cell C4) to determine what data will be calculated.
5
Microsoft Word 2010 - Level 2
© Watsonia Publishing Page 67 Table Features
UPDATING FORMULAS IN A TABLE
Try This Yourself:
Same
File
Continue using the previous
file with this exercise, or open
the file W820 Table
Features_4.docx...
Triple-click on $1350.00 in
Unit Price for the 5000lt tank
We mistyped the Unit Price for
this tank...
Type $1,390.50 and press
Notice that the Line Total has
not updated – it is still
$2,700.00. For the correct
value to appear, the formulas
need to be recalculated...
Click on the table move
handle to select the entire
table
Press to perform a
recalculation – every formula
in the table will recalculate –
then click outside the table to
deselect the table
Notice how the line total for the
5000lt tank has increased to
$2,781.00 and the Total at the
bottom of the table has
increased to $8,888.00…
Save the document
For Your Reference…
To update formulas:
1. Make the desired changes to the cell values
2. Click on the table move handle to select
the table
3. Press
Handy to Know…
To update a formula once you’ve made
changes to its dependent data, right-click on
the formula and select Update Field. This
will recalculate the cells and update the
formula value.
2
3
A significant drawback when using formulas in
Word is that the formula does not update
automatically if the data in one of the dependent
cells changes. For example, if you change the
quantity of an item, the line total for that item will
not update automatically. You can, however,
instruct Word to refresh all formulas in a table after
changing any data.
4

Microsoft Word 2010 - Level 2
© Watsonia Publishing Page 68 Table Features
SORTING TABLE DATA
Try This Yourself:
Same
File
Continue using the previous
file with this exercise, or open
the file W820 Table
Features_5.docx...
Select the three rows below
the Round Tank row
Click on the Layout tab, then
click on Sort in the Data
group to open the Sort dialog
box
Ensure that Column 1 is
selected in Sort by, click on
the drop arrow for Type and
select Number and ensure
that Ascending is selected
Click on [OK] to sort the three
tank rows in ascending order
of volume
Let’s sort the Pump rows but
this time the entries in the first
column are textual...
Select the three Pump rows,
repeat the above steps to sort
the rows using the default
settings in the dialog box, and
then click outside the table to
deselect the table
Save the document
For Your Reference…
To sort table data:
1. Select the cells containing the data to be
sorted
2. Click on Sort in the Data group on the
Layout tab
3. Select the desired sort criteria, then click on
[OK]
Handy to Know…
To sort data in descending order,
alphabetically, numerically or by date, select
Descending in Sort by in the Sort dialog
box.
2
4
The Sort function lets you sort data in a table.
Data can be sorted alphabetically, numerically or
by date, in either ascending or descending order.
So whether you want to organise an address
book or know at a glance which product is selling
best, you can present the data in a table and then
sort it.
5

Microsoft Word 2010 - Level 2
© Watsonia Publishing Page 69 Table Features
MERGING TABLE CELLS
Try This Yourself:
Same
File
Continue using the previous
file with this exercise, or open
the file W820 Table
Features_6.docx...
Click in the Description cell,
hold down the left mouse
button and click in the next cell
to select both cells
Click on the Layout tab, then
click on Merge Cells in the
Merge group
You can see that the cells are
merged as the dotted line has
disappeared between the two
cells…
Repeat step 1 to select the
four cells as shown
Repeat step 2 to merge the
four cells into one, then click
outside the table to deselect
the cell
Because the word Total is
right-aligned, it remains in the
same position. If the word had
been left-aligned, it would have
moved to the left of the
merged cell…
Save the document
For Your Reference…
To merge cells:
1. Select the cells to be merged
2. Click on Merge Cells in the Merge
group on the Layout tab
Handy to Know…
To merge several cells into two or more cells
(such as merging 8 cells into 4 cells), select
the cells, click on Split Cells in the
Merge group to open the Split Cells dialog
box, ensure that Merge cells before split is
ticked, then enter the desired number of
columns or rows.
1
2
You can merge two or more cells in a table.
When you merge cells, all selected cells will
become a single cell. This is useful for headings
that span across several columns, for example.
To merge two or more cells, select the cells to
merge and then apply the Merge Cells command
to the selection.
3
4

Microsoft Word 2010 - Level 2
© Watsonia Publishing Page 70 Table Features
SPLITTING TABLE CELLS
Try This Yourself:
Same
File
Continue using the previous
file with this exercise, or open
the file W820 Table
Features_7.docx...
Click in the Description cell,
then click on the Layout tab
You will add a new heading
between Description and
Quantity – Description will
need to be split into two cells...
Click on Split Cells in the
Merge group to open the Split
Cells dialog box
Ensure that 2 appears in
Number of columns, then
click on [OK] to create two
equal-sized cells –
You will now make the new
heading cell the same width as
the other cells in the column…
Hover over the gridline
between the two heading cells
until the pointer changes to a
pair of parallel lines with
arrows , hold down and
drag to the left until the gridline
lines up with the column
gridline
Click in the new heading cell,
press + for bold, and
then type Details
Save the document
For Your Reference…
To split cells in a table:
1. Select the cell/s to split
2. Click on Split Cells in the Merge group
on the Layout tab
3. Specify the number of columns and/or rows
that you want to split the cell/s into, then click
on [OK]
Handy to Know…
If you have multiple cells selected (for
example, 8 cells in one column), you can
split them into numerous columns (say 4)
and merge them into a reduced number of
rows (say, 2) simultaneously using the Split
Cells dialog box.
2
3
The Splitting Cells tool lets you select one or
more cells and split them into several cells. This
feature is particularly useful where you need
more cells in a particular row. For example, if you
have created a form, you might split two cells into
six cells so that you can include several fields of
data on the same row.
4
5

Microsoft Word 2010 - Level 2
© Watsonia Publishing Page 71 Table Features
DISPLAYING TABLE GRIDLINES
Try This Yourself:
Same
File
Continue using the previous
file with this exercise, or open
the file W820 Table
Features_8.docx...
Click on the Layout tab and
then click anywhere in the
table
The gridlines show the
columns, but as borders are
applied to the rows you will not
see the row gridlines...
Click on View Gridlines in
the Table group to hide the
gridlines
Notice that the horizontal and
outside borders still appear,
but the gridlines have
disappeared. This is how the
table would print...
Click on View Gridlines in the
Table group
The gridlines will reappear…
Save and close the document
For Your Reference…
To display or hide gridlines:
1. Click in the table
2. Open the Layout tab
3. Click on View Gridlines in the Table
group
Handy to Know…
Gridlines will not appear if you view the
document in Print Preview or in a web
browser.
2
3
Table gridlines are turned on by default in Word.
Gridlines help you to identify the borders of each
cell when entering and formatting data. Gridlines
appear as dotted lines and do not print. If you
have applied borders to your table you won’t see
the gridlines, but they remain hidden behind the
borders.

Microsoft Word 2010 - Level 2
© Watsonia Publishing Page 72 Table Features
UNDERSTANDING TABLE PROPERTIES
1
Tables offer much more flexibility than simply
allowing you to create a grid of columns and
rows. Many of the extra features that you may
require for your table can be found in the Table
Properties dialog box. You can access this dialog
box via the Layout tab on the ribbon.
Table
Use the settings in the Table tab to specify how wide the table should be (Preferred width), its
alignment on the page, how text should be wrapped around the table, how far the table should be
indented from the left margin, borders and shading options for the table, and via [Options] to set
default cell margins and cell spacing.
Row
Use the settings in the Row tab to specify how high a row, several rows or all rows should be,
whether a row should act as a header row, and whether the row can break across pages.
Column
Use the settings in the Column tab to specify how wide a column, several columns or all columns
should be.
Cell
Use the settings in the Cell tab to specify how wide an individual cell should be and how the text
within the cell should be vertically aligned (top, centre or bottom of the cell). The [Options] allow
you to specify the default internal margins for an individual cell.
Alt Text
In the event that the table will be uploaded onto the web and visitors to the web page are waiting
for the table to load or cannot see the table, you can insert alternative text that will be displayed in
place of the table. Here you might enter the name or description of the table.
2
3
4
5
5
4
3
2
1

Microsoft Word 2010 - Level 2
© Watsonia Publishing Page 73 Table Features
ALIGNING TABLES
Try This Yourself:
Open
File
Before starting this exercise
you MUST open the file W820
Table Features_9.docx...
Click anywhere in the table to
activate the table
Click on the Layout tab, then
click on Properties in the
Table group to open the Table
Properties dialog box
Click on the Table tab, click on
Centre under Alignment, then
click on [OK] to centre-align
the table
Save and close the document
For Your Reference…
To align tables on the page:
1. Select the table
2. Click on the Layout tab
3. Click on Properties in the Table group
4. Select the desired Alignment option
5. Click on [OK]
Handy to Know…
You can open the Table Properties dialog
box by right-clicking on a table and selecting
Table Properties or by clicking on the
dialog box launcher for the Cell Size
group.
2
3
You can align tables on the page, such as left-,
centre- or right-aligning a table on the page. This
is useful if the width of the table doesn’t extend
across the page, or to improve the layout of your
document. Word has several table alignment
options in the Table Properties dialog box.

Microsoft Word 2010 - Level 2
© Watsonia Publishing Page 74 Table Features
CHANGING THE DIRECTION OF TEXT
Try This Yourself:
Open
File
Before starting this exercise
you MUST open the file W820
Table Features_10.docx...
Click in the top empty cell in
the first column
Type Round Tanks, press
and type Pumps in the second
empty cell
Click on the Layout tab, then
click on Text Direction in
the Alignment group
The text will become vertical.
We will keep clicking on Text
Direction to cycle through
some of the available styles
until we find the style we
want…
Click on Text Direction
again to apply the next
available style
Repeat steps 3 and 4 for
Round Tanks
Select both cells, click on the
Layout tab and then click on
Align Centre Left in the
Alignment group to centre-
align the text along the left of
the cell
Deselect the text, then save
and close the document
For Your Reference…
To change text direction in a table:
1. Select the text to be rotated
2. Click on the Layout tab, then click on Text
Direction in the Alignment group, or
4. Click on an alignment option in the
Alignment group
Handy to Know…
When you click repeatedly on Text
Direction , Word will cycle through three
of the alignment settings. To select a specific
alignment setting, click on an alignment
option in the Alignment group.
2
3
You can change the direction of text in tables so
that it appears vertically rather than horizontally.
Changing text direction is a useful feature for
specialised tables such as price lists, reports,
invoices, and the like. Click repeatedly on Text
Direction on the Layout tab to cycle through some
of the available styles and select the style you
want.
5
6
4

Microsoft Word 2010 - Level 2
© Watsonia Publishing Page 75 Table Features
REPEATING HEADING ROWS
Try This Yourself:
Open
File
Before starting this exercise
you MUST open the file W820
Table Features_11.docx...
Click on the Next Page button
and the Previous Page
button to scroll through the
document – notice that the
heading for each column
appears only once at the start
of the table
Return to the top of the
document and click in the blue
heading row
This row contains the column
headings that we want to
repeat on every page…
Click on the Layout tab and
then click on Repeat Header
Rows in the Data group to
mark this row as the repeating
row
Click on the Next Page button
You will notice that the table
on page 2 now contains a
header row…
Click on the Next Page button
and the Previous Page
button to scroll through the
document, then save and
close the document
For Your Reference…
To insert a repeating header row:
1. Click in the row that contains the headings
2. Open the Layout tab
3. Click on Repeat Header Rows in the
Data group
Handy to Know…
Note that the repeating header row feature
will not work on a table that has been split
over two pages with a manual page break.
When inserting a page break between a
table, Word recognises the tables as two
separate tables.
4
When large tables spill over to one or more
pages, it is generally best to have the heading
row appear at the top of each page that the table
appears on to help the reader navigate the table.
You can apply a repeating header row in Word to
a table so that the heading row appears as the first
row of each additional page on which the table
appears.

Microsoft Word 2010 - Level 2
© Watsonia Publishing Page 76 Table Features
CONVERTING A TABLE TO TEXT
Try This Yourself:
Open
File
Before starting this exercise
you MUST open the file W820
Table Features_12.docx...
Click anywhere in the table
You will convert all data in the
table to text…
Click on the Layout tab and
then click on Convert to Text
in the Data group to open
the Convert Table to Text
dialog box
Ensure that Tabs is selected,
click on [OK], then click in the
heading to deselect the text
The table will be converted to
text, where each cell in a row
is separated by a tab mark and
each row has become a new
paragraph…
Click on the Home tab and
then click on Show/Hide
to display the tab and
paragraph marks that have
been inserted to separate the
text
Save and close the document
For Your Reference…
To convert a table to text:
1. Click in the table, then click on the Layout tab
2. Click on Convert to Text in the Data
group
3. Choose the appropriate separator
4. Click on [OK]
Handy to Know…
Although separating the text using tab marks
produces a pleasing effect when converting a
table to text, you can choose other separator
characters. For example, if you want each
cell entry to be converted to a new
paragraph, click on Paragraph marks in the
Convert Table to Text dialog box.
2
4
Word lets you convert tables to paragraphs of
text. You can choose to convert the whole table
or a range of contiguous rows anywhere within
the table. You cannot convert selected cells. As
part of the conversion, you can specify the
separator character that will be used in place of the
column boundaries, such as tabs or spaces, while
each row will be separated with paragraph marks.
